A clean dryer vent is essential for both home safety and appliance efficiency. Over time, lint and debris can build up in your dryer vent, increasing the risk of fire and causing your dryer to work harder, which leads to higher energy bills and potential breakdowns.
Regularly cleaning your dryer vent not only speeds up drying times but also extends the life of your appliance and helps prevent dangerous house fires. In this guide, you’ll learn why dryer vent cleaning is important, how to spot signs of a clogged vent, and step-by-step instructions on how to clean your dryer vent from both the inside and outside.
Why Dryer Ducts Need to Be Cleaned
Cleaning your dryer vent has additional advantages beyond saving your life, including as boosting the longevity and efficiency of your dryer and increasing your general health. I want to go into each of them in more detail.
1. To Maintain a Healthy Life
A clogged dryer vent poses a risk not just to your house but also to your life. Neglected dryers can lead to major issues, such as hazardous gas emissions and fire hazards. Homeowners must thus take precautions to keep themselves safe from potentially fatal scenarios and clean their vents regularly.
2. To Keep the Efficiency of Your Dryer
Your dryer vent will function at its peak efficiency if you remove any debris and dust. Your garments remain in top condition and dry more quickly. It’s time to contact a professional if you notice that your laundry requires many cycles to dry.
3. To Increase the Dryer’s Lifespan
Cleaning your dryer vents regularly greatly increases their longevity. A blocked vent reduces the machine’s efficiency by making it work harder. Maintaining an unobstructed dryer vent ensures optimal operation and minimizes the need for repair.
4. Save Money
Maintaining the cleanliness of your equipment will make it last longer and need fewer repairs. Vents function at maximum efficiency and reduce component wear and tear when they are clean. This lowers the cost of repairs in addition to saving you money on a new machine. A clean dryer uses less energy than a clogged one, so there’s an extra benefit of decreased power expenses.
Signs of Blocked Dryer Vents
A blocked dryer vent can lead to several issues that affect your dryer’s performance. The main symptoms and indicators of a clogged dryer vent are as follows:
1. Longer Time to Dry Clothes
You should be concerned if your dryer is suddenly taking longer to dry your garments. Over time, even the greatest dryers may lose some of their efficiency; however, a clog in the dryer vent can hasten this process. After calling in a dryer professional, a few people found out that the dryer’s incapacity to release moisture and air out the vent was the primary cause of the efficiency decline.
2. Burning Smell Around the Dryer
It’s a worrying indication if you smell burning next to your dryer. You must switch off the dryer immediately if you believe that it is the source. Dryer vent lint and debris are very combustible; thus, leaving them uncleaned may constitute a fire danger. Furthermore, it’s never a good idea to combine heat with combustible materials. One should never let anything as easy as a burned scent be a red flag for when it’s time to clean your dryer vent and get your dryer serviced.
3. Dryer or Clothes Are Hot to the Touch
Poor ventilation is indicated if your dryer feels very hot to the touch or if your garments are overheated after the cycle is over. For the dryer to keep up the right temperature and remove moisture from the garments, there has to be efficient air circulation. The dryer may overheat if there is insufficient air exchange, which might result in malfunctions, a shorter lifetime, or, in the worst case, a fire.
4. Issues with the Flap on the Duct Hood
Your dryer may be having issues if the flap on the duct hood isn’t opening as it usually does. Look around for any lint or debris. The accumulation of lint around the dryer hose or vent aperture may sometimes obstruct airflow. Don’t let the problem persist. To have your dryer cleaned and returned to normal, get expert help. While cleaning the plastic wire mesh may fix the issue, seeking outside assistance helps prevent unneeded difficulties.
How Much to Clean Dryer Vent
You can clean out the dryer vent using the following methods every three to six months, depending on how often you use your dryer. Furthermore, remember to remove the lint filter after every usage.
If the vent is longer, clean it more often. In contemporary houses, dryers are often situated close to living areas after formerly being mostly found in basements or outside laundry rooms. This implies that to go outside, they could need a longer vent. In residential spaces, clogged vents from gas dryers may cause harmful carbon monoxide to back up into the house.
Choose a straight vent channel; the fewer curves, the slower the lint accumulates and the fewer cleanings required.
Tinier or older dryers are often less effective and might accumulate a little bit more lint.
Safety Considerations
Dryer vents are very combustible, often used as campfire kindling, and may quickly spread fire throughout your house if they catch fire due to lint accumulation.
Here is a checklist to help you make sure your dryer is secure and reduce your risk of fire:
1. Inspect the Dryer Vent Outside
Feel the exterior dryer exhaust vent while your dryer is operating to be sure hot air is leaving. In the event that there is no air movement, cleaning the dryer vent ductwork is advised since this might be a sign of a lint accumulation.
2. Dust the Lint Trap
A frequent source of dryer fires is lint. To lower the danger, clean the lint screen both before and after each wash cycle. To eliminate extra lint that the screen may have missed, also clean the dryer’s inside. The lint trap protects against lint buildup in more hazardous regions, so never use the dryer without it.
3. Examine the Area Around the Dryer
Under and beneath the dryer, lint may gather. Make sure there is no lint or debris in the vicinity of your dryer.
4. Learn Fire Safety Regulations
When upgrading or installing your dryer, be sure to follow all local fire safety regulations. The exhaust duct should be no longer than 25 feet, the dryer vent shall have a minimum diameter of 4 inches, and it should exhaust outside. To stop exhaust from seeping into your house, make sure the fittings are tight.
5. Maintain a functional fire extinguisher close by
For the protection of your dryer vent, have a fire extinguisher in your laundry room. It could be very important to put out a fire before it becomes bigger.
6. Never Leave the Dryer Running While Leaving the House
To avoid house fires caused by appliances, always be present while the dryer is operating.
7. Use Ductwork for Metal Dryers
To preserve appropriate airflow and lower the possibility of lint accumulation, replace accordion-style dryer ducts with flexible or stiff metal ducts.
8. Keep Items That Can Catch Fire Away
Make sure that nothing combustible, such as paint, lint, dust, clothes baskets, or cleaning supplies, is near your dryer.
9. Keep Combustible Materials Out of the Dryer
Avoid using the dryer to dry clothing that has come into touch with gasoline or that contains flammable materials. Avoid plastic and rubber products as well, since they may get damaged or even catch fire in extreme heat.
Other Guidelines
- Make sure that the diameter of the dryer vent and the dryer duct match.
- If the duct is concealed, use a semi-rigid, non-flammable metal material. Don’t use foil or accordion plastic.
- Outside is the best place to vent the dryer—not into an attic, crawl space, chimney, or other vent.
- Avoid using screws or non-metal tape to secure the dryer duct; instead, use metal tape.
- Prior to drying every new load of laundry, make sure the lint filter is clean.
How To Clean Dryer Vent From Outside
It’s better to utilize a dryer vent cleaning kit together with a shop vacuum for a complete clean. These kits are inexpensive and come with firm bristles to help remove lint and dust. The lengthy, curved tubing makes it easier to thread the brush through the whole system of ducts. Although they work best when used in conjunction with a drill for a deeper clean, you may get good results even without one.
To clean your dryer vent from the outside, you’ll need the following:
Essentials
- Screwdriver
- Wipes and rags for cleaning
- Dryer vent cleaning kit (comes with a long, flexible stick with a stiff brush inside)
- Cleaner vacuum
Extra tools:
- Shop-Vac
- Drill
Take these easy steps to clean the exterior of your dryer vent!
Step 1: Find the External Vent
Turn on your dryer and explore the outside of your house to locate the vent that needs cleaning. You should be able to hear the machine, feel the heated air, and perhaps even smell your detergent.
Step 2: Unplug the Dryer
Please disconnect your machine to ensure safety. While working, shut off the gas valve on your gas dryer if you have one.
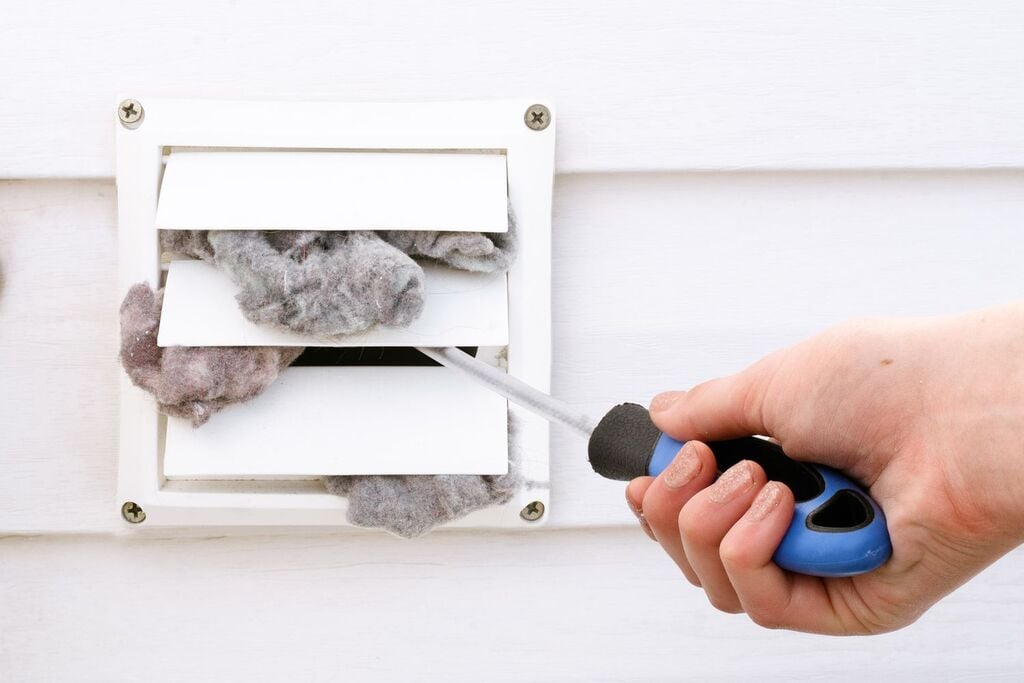
Step 3: Remove the Lid and Outside Vent Grille
To get access to the vent’s interior, remove the grille with a screwdriver.
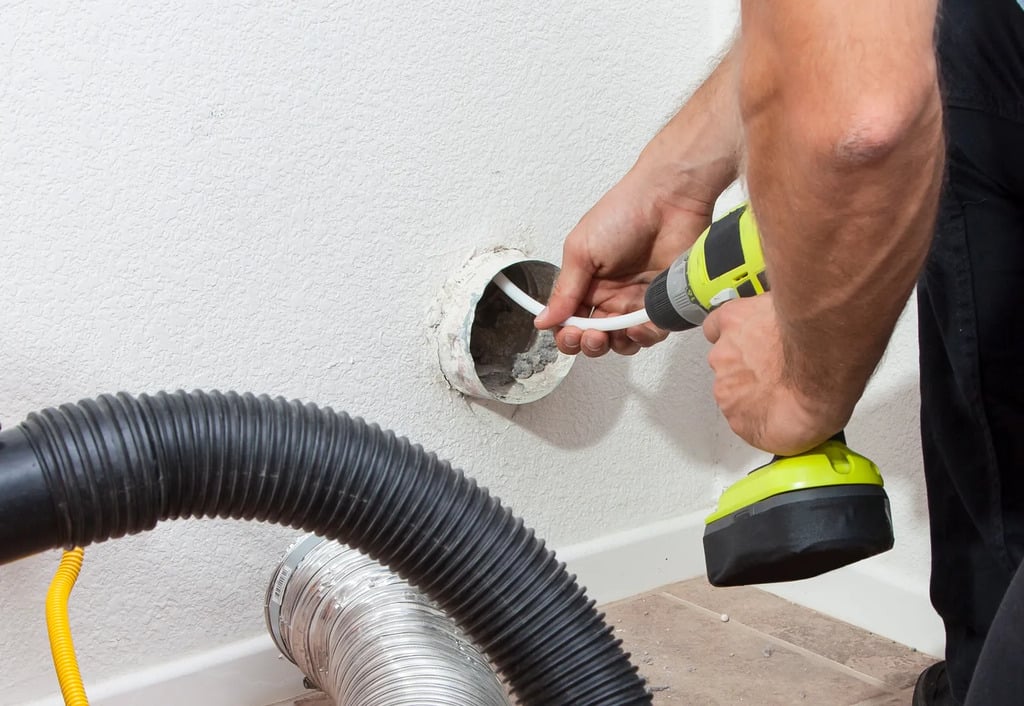
Step 4: Clean the Inside with the Brush
To remove dust and lint, feed the brush into the vent. For a cleaner and easier approach, connect the kit to the vent’s mouth if you’re using a shop vac and drill.
Step 5: Gather the Lint with the Vacuum
Remove the brush and use a vacuum to gather the lint. When compared to cleaning inside, this reduces cleanup.
Step 6: Clean the Vent Cover
Wipes or soap and water are good options for removing stubborn dirt from the vent cover. Remove any obstructions inside the grille.
Step 7: Replace the Vent Cap with a Screw
You’re almost finished! Reinstall the vent cover and fasten it firmly with screws.
Learn to Clean Your Dryer Vent from the Outside
Here you have it: A simple how-to for cleaning the exterior of your dryer vent. It’s not too difficult, and in the long term, it will have a big effect on the efficiency and safety of your dryer. Cleaning your dryer vent from the outside is an important home maintenance task that’s often disregarded, but it may significantly reduce your house’s danger of fire.
How To Clean a Dryer Vent From the Inside
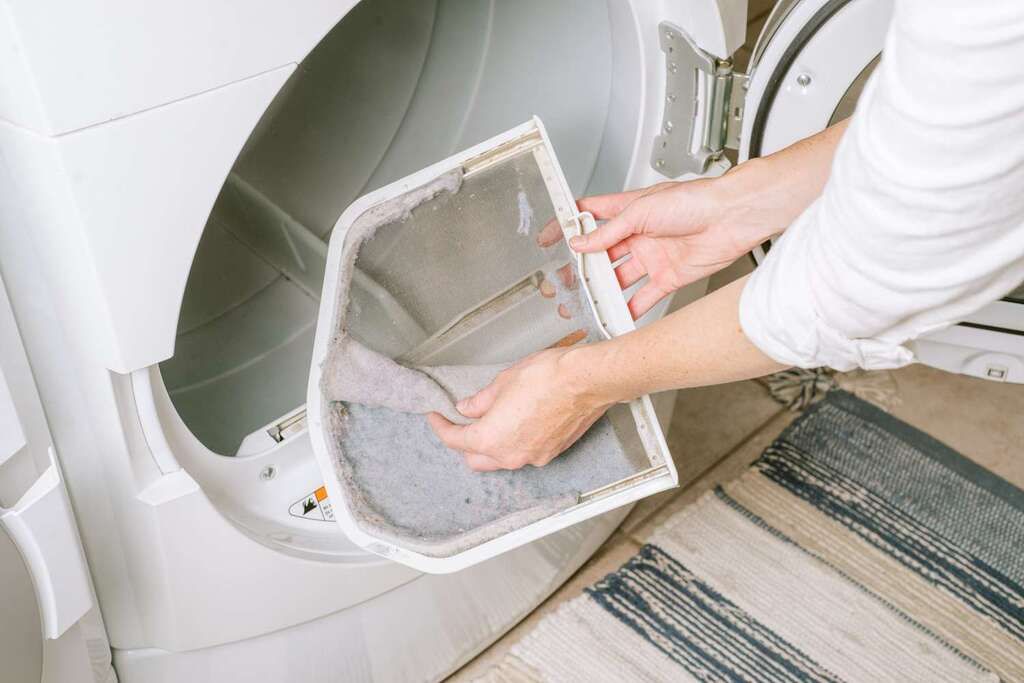
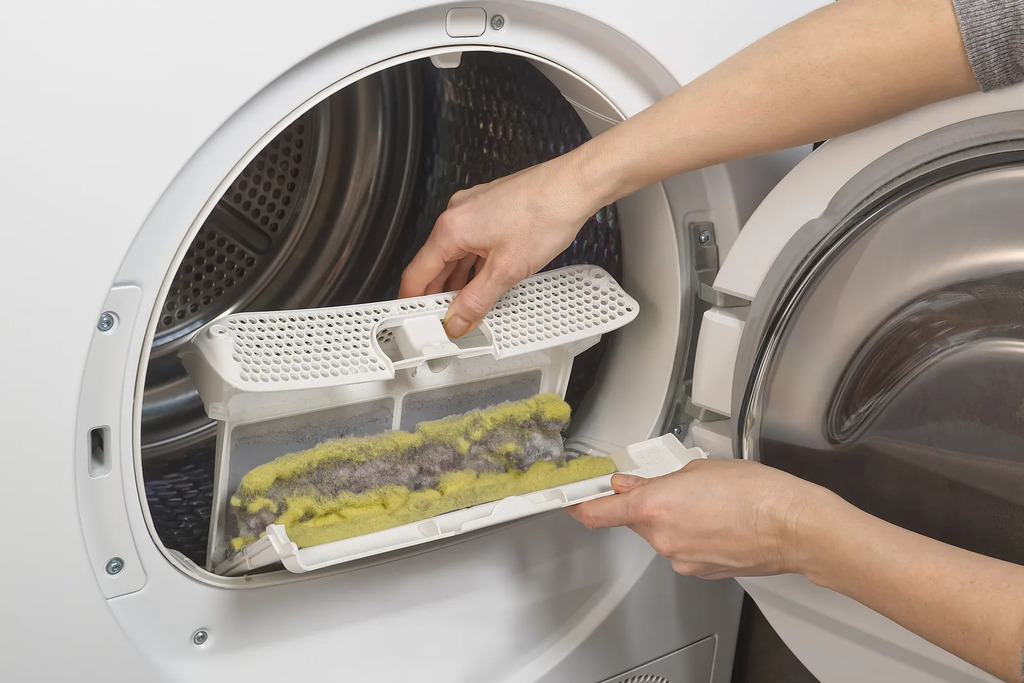
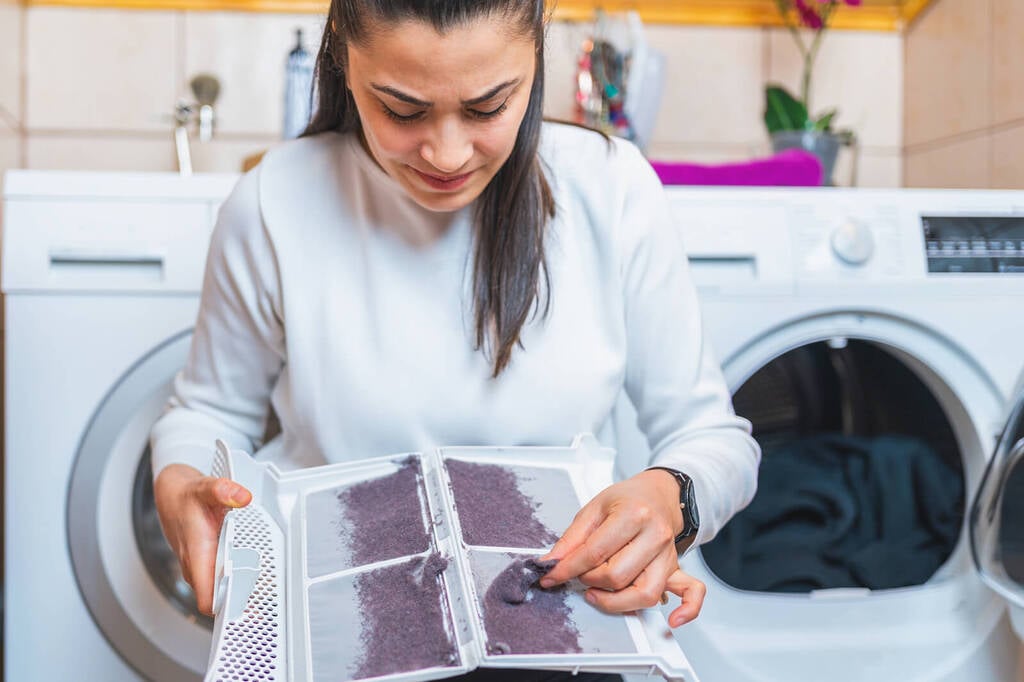
Step 1: Remove and Cleanse the Lint Trap
Locate the lint trap on your dryer, which is often located at the bottom or on top of the door. For particular areas, see the manufacturer’s information or the handbook. Take out the lint trap, clear away any big lint particles, then clean the interior of the lint trap housing with a shop vacuum. To access the bottom of the housing, use a tiny hose attachment.
Alternately, thoroughly clean the interior of the lint trap housing using the brush included in a dryer duct cleaning kit.
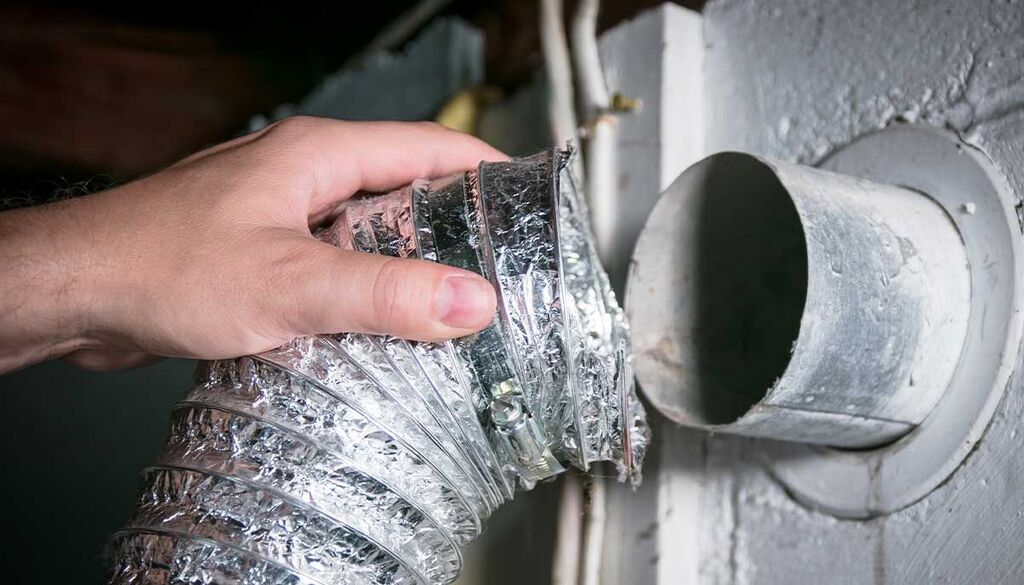
Step 2: Find the Dryer Vent
Determine the dryer vent’s two ends. The outdoor vent end is often located on the outside of the house, next to the laundry room, while the internal vent end is generally located behind or above the dryer.
Step 3: Unplug the Dryer
If applicable, disconnect the dryer and close the gas supply valve. To reach the indoor vent end, slide the dryer away from the wall by one or two feet. Ask for help if it’s too heavy. Unplug the dryer from the vent; some hoses fit in easily, while others need screws to tighten.
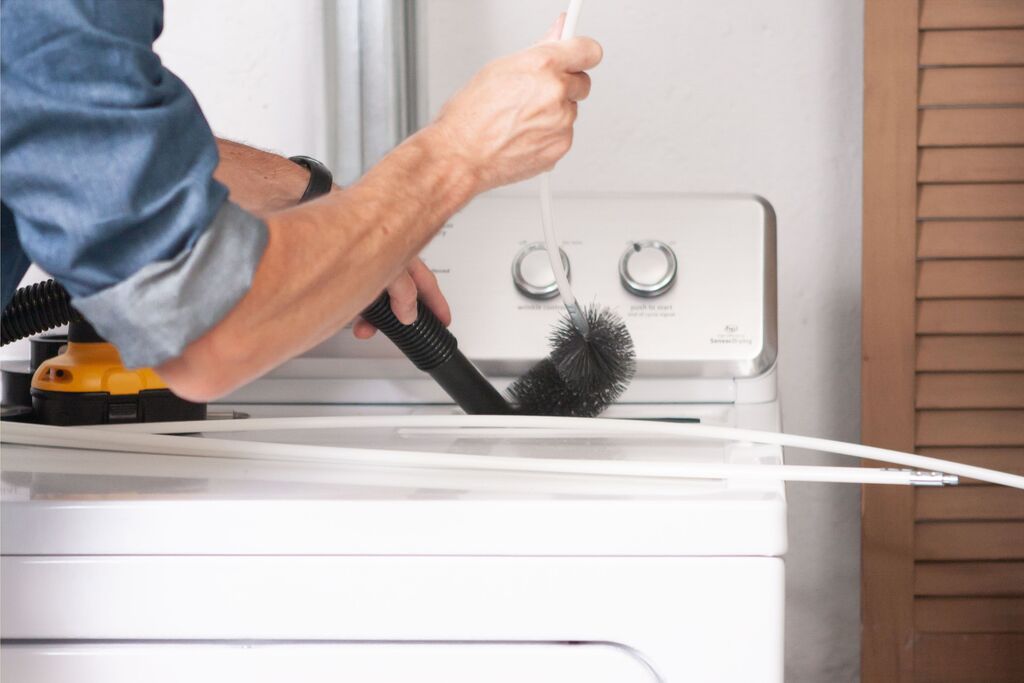
Step 4: Vent for a Vacuum Dryer
Attach the lengthy hose to a shop vacuum and use it to reach into the dryer vent. To gather trash, place the hose into the dry exhaust vent after turning on the vacuum and sucking up any loose lint around the vent hole.
Step 5: Clean the Dryer Vent
Use a dryer duct cleaning kit with extensions and a flexible brush if necessary. To get to the end of the vent, feed the brush into it and add extensions. For powered cleaning, you may also use a drill bit attached to the brush.
To clean, carefully remove the brush from the vent and rotate it. To dryer clean vent without using a drill, move the brush back and forth.
Step 6: Take a Vacuum to the Outside Dryer Vent
Go outside and see whether there is any free movement in the vent aperture. Spray lubricant on the slats if they get stuck. To clean the area surrounding the vent entry, connect and turn on the vacuum. To gather loose debris, place a thin hose connection into the vent.
Step 7: Clean the External Dryer Vent
Set up a vent cleaning brush. Feed the brush into the vent, making any required extensions. For effective cleaning, either manually rotate the brush or use a drill attachment. When you remove the brush, expect some debris to fall out.
Step 8: Clean Up Any Garbage
Use warm, soapy water and a microfiber cloth to clean the outside vent cover. Clear the dryer vent of any loose dirt by vacuuming or sweeping.
Step 9: Reconnect the Dryer
Reattach the dryer to the vent, plug it in, and, if necessary, activate the gas valve. Verify the connections once again and reposition the dryer, making sure the ducting is not bent.
Step 10: Check the Dryer
Reinstall the lint screen, switch on the dryer, and make sure hot air is properly vented outside.
How to Stop Dryer Vent Buildups and Clogs from Happening Again
Cleaning your dryer vent can save not only costs but also lives. It safeguards not only your clothing but also your health. Thus, pay attention to these cleanups. These days, folks may even clean things up by following an easy do-it-yourself method.
- First, take the dryer out and unplug it.
- When you get to the vent duct, remove the clamp holding the vent pipe in place.
- Examine the clamp for any damage, and replace it right away once you find any cracks. If not, look for obstructions throughout the remainder of the vent.
- To remove all of the lint and dirt that has accumulated within the dryer, use a vacuum. It’s a good idea to look around for anything that could be obstructing the passageway.
- Reinstall all the screws and switch on the machine after cleaning.
If you do this once a year, your dryers will last longer.
FAQs
Experts suggest cleaning your dryer ducts twice a year.
Not only is a clogged dryer vent irritating, but it poses a danger to safety. Your dryer vent’s accumulated lint is very combustible. It retains heat and may cause a fire when it builds up. Your clothing is protected, and the chance of a home fire is decreased when you clean your dryer vent.
Typically, lint accumulates in vents over time and obstructs airflow. Nests and other detritus may sometimes cause a blockage as well.
Steam may revert to water if a vent blockage occurs. The stench coming from your dryer vent is like a dead creature because of the combination of heat, water, and lint.
Conclusion
According to the U.S. Fire Administration, each year, clothes dryers cause close to 3,000 fires, resulting in five fatalities and more than $35 million worth of property damage. A quick but essential way to improve your family’s and your home’s safety is to make sure your dryer vent is clear.
In addition to raising the danger of fire, blocked vents reduce the efficiency of your dryer and raise the cost of power and malfunctions. Your dryer may have a lint blockage in its vent if it is taking longer to dry a load.
Explore Further: