Home Blog Page 27

A Real Talk Guide For Backyard Remodeling

0
Backyard Remodel Ideas

Dreaming of professional backyard remodeling? Let us help! Whether you’re looking for a complete pool and backyard renovation or just some tweaks, this guide, made by our professional builders, will help you make your backyard the ultimate hangout spot.

The First (And Most Important) Step: What’s Your Backyard Dream?

First up, let’s dream big (or small)! What’s your vibe for your pool replastering? How would you envision your backyard with the upgraded pool? What experience would you like to have every time you step outside to enjoy your new pool? Do you want to enhance the current settings of your backyard with a pool renovation or completely remodel it to a new design? Are there any other changes happening in your home right now that can complement your pool replastering project?

Once you get all the answers, you’ll gain a clear picture of your complete backyard renovation project in terms of time, budget, and complexity. We suggest you write those answers down and let them be your northern star in all of your following decisions so your project will stay in line and won’t cause you to waste time and money.

The Right Help: Finding Contractors Someone Local

Backyard Remodeling

Assuming you’re looking for a bit more than gardening, especially with a focus on swimming pool renovation, you’d probably need some help bringing those dreams to life. A quick search for “backyard renovation near me” can hook you up with local pros who specialize in swimming pool renovations and can make it a reality. We strongly recommend hiring local contractors familiar with swimming pool projects in your area, as they can suggest the best materials and designs that align with your surroundings and are experienced in yard renovations involving swimming pools.

Pool Talk: Making a Splash

Thinking about adding a pool? Great idea! But a pool is more than just a place to take a quick swim. it’s about creating the ultimate hangout spot for all seasons: sitting by the pool and doing some reading, maybe even working, or hosting some friends for a birthday party. To do so, we’d suggest decking it out with some comfy loungers, adding some mood lighting, and maybe even a slide for a bit of fun, both for adults and kids.

Green Thumb Fun: Jazzing Up Your Garden

Everyone loves plants! Mixing flowers and greens can turn your backyard into a little slice of nature. Throw in a veggie patch or some magical garden paths to step up your garden game. It doesn’t have to be extravagant, by the way. You can use the plants to complete the outdoor experience, not to steal the show.

Outdoor Chill Zone: Living It Up Outside

Your backyard can also be a place for social gatherings! From hosting yoga classes to throwing outdoor movie nights or sleepovers, your outdoor space can become an entertainment hotspot. Additionally, you can create the perfect spot for after-work hangouts with your family. Anything is possible when you have a tailor-made backyard plan and experienced contractors around you. And don’t forget to include some umbrellas and fans to ensure you stay cool and comfortable during the hotter days of the year.

Revamp Your Pool and Transform Your Backyard with Stunning Replastering

As you step out into your backyard, you will be greeted by a sparkling pool that has been beautifully replastered and sparkling in the sunlight. Pool replastering is not just about aesthetics. it also ensures the longevity of your pool and can enhance the overall value of your property. With a fresh layer of plaster, your pool will feel like new again, inviting you to create lasting memories with family and friends.

Pairing pool replastering with a backyard remodel can completely transform your outdoor space into a luxurious oasis. Consider adding new landscaping elements or updating the surrounding patio to complement the freshly plastered pool.

By incorporating elements such as seating areas, water features, or outdoor kitchens, you can create a seamless blend of relaxation and entertainment in your backyard retreat. Make your outdoor living space an extension of your home’s interior comfort and style by revamping it.

Creating a Backyard Blend of Hardscape and Landscape

Hardscape and landscape design are essential elements of creating a beautiful backyard. Hardscaping involves non-living components like pathways, patios, decks, and walls that add structure to the outdoor space. It provides functionality and defines different areas within the landscape. In contrast, landscaping includes living elements such as plants, trees, shrubs, and flowers that soften hardscape elements and add color and texture. Working with contractors can help bring these designs to life effectively.

Combining hardscaping and landscaping in a backyard can create a balanced and inviting outdoor oasis. The aesthetic appeal and functionality of outdoor living areas can be enhanced by incorporating features such as water fountains, fire pits, pergolas, and more to enhance their aesthetic appeal and functionality.

By blending your hardscape design with your landscape design you will be able to create a seamless transition between indoor and outdoor living areas in your backyard, allowing you to personalize the area to suit your style preferences.

It’s Time To Make It Happen

Ready to make your backyard dream come true? Our experienced builders at Tumi Builders will be happy to help you make your backyard dream come true and execute the best backyard renovation possible. We will listen to your vision, break it into a tailor-made plan, and implement it with maximum efficiency and low costs.

Got any questions? At Tumi Builders, our professional builders would be happy to assist you with a 30-minute free consultation call in which we will discuss your specific needs and how we can make your pool and backyard renovations easy, fast, and cost-efficient. Our experienced contractors are here to help.

In Case You Missed It!

20+ Driveway Edging Ideas That Elevates Your Space 

0
Driveway Edging Ideas

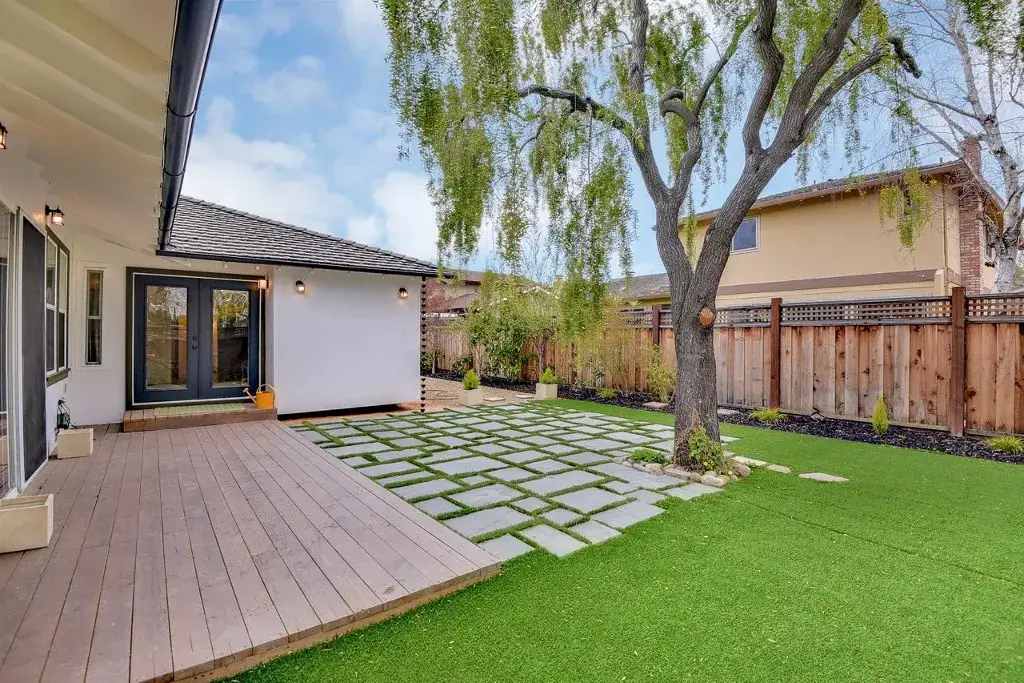
It’s time now to ditch your dull and old fashioned driveway. Your home’s entrance deserves more than just a plain slab of concrete. It’s the first impression you make on visitors, and the right edging can elevate it from forgettable to fabulous. But who says you have to break the bank? In this blog, you can explore 20+ inexpensive driveway edging ideas that transform your space from bland to beautiful in no time. So, without causing further delays, let us explore them all. 

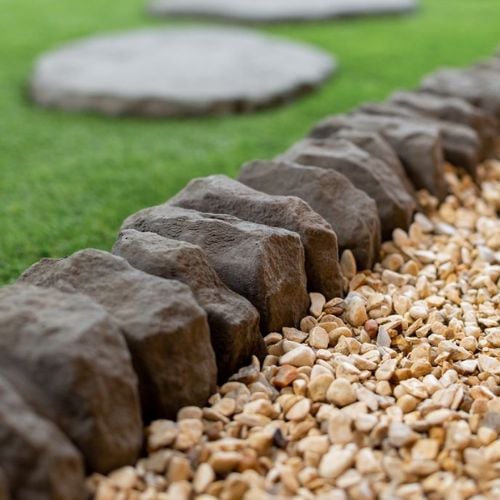
1) Rustic Stone Border

Rustic Stone Border

Do you want to add touch of natural charm to your driveway? Consider installing a rustic stone border. This simple yet effective driveway edging ideas can brings a timeless appeal to any outdoor space. Using natural stones of various shapes and sizes, you can create a border that blends seamlessly with your surroundings. 

Whether you prefer a neat and uniform look or a more eclectic arrangement, rustic stone borders offer versatility and durability. Plus, they require minimal maintenance, making them a practical choice for busy homeowners. So why settle for a plain driveway when you can elevate it with the rustic charm of stone?

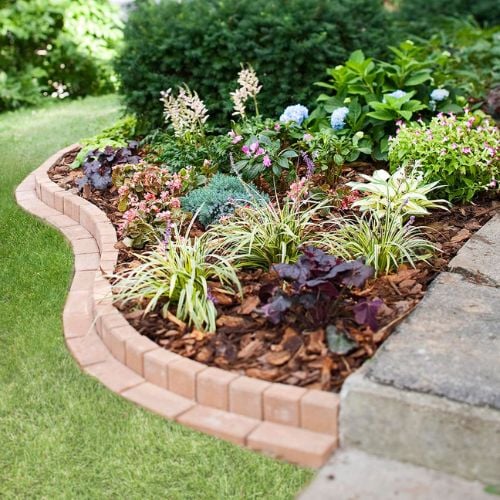
2) Classy Brick Beauty

Classic Brick Beauty

How about incorporating classic brick edging to elevate your driveway’s aesthetic appeal? This timeless choice adds a touch of sophistication and charm to your outdoor space. Not only does it enhance the overall look of your driveway, but it also provides durability and low maintenance which save your time and effort in the long run. 

With a classy brick border, you can create defined edges that beautifully frame your driveway, giving it a polished and upscale appearance. Plus, brick edging seamlessly complements various architectural styles, which adds value to your property and leaves a lasting impression on guests.
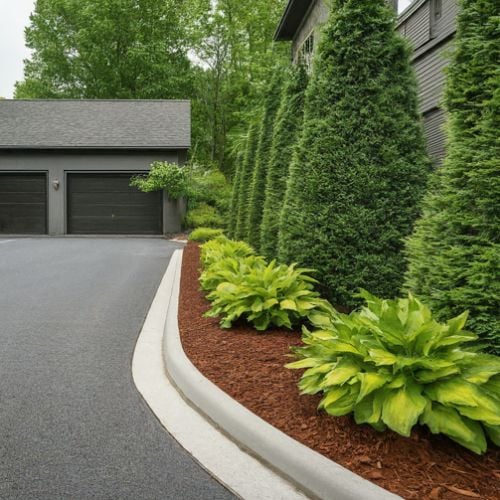
3) Fieldstone Flair

Feildstone Flair

For a natural and rustic touch, fieldstone edging is an excellent choice. The natural touch adds character and warmth to your outdoor space, which creates a welcoming ambiance that beckons guests to your home.

Fieldstone edging comes in a variety of sizes and colors, which adds visual interest and texture to your driveway. Its irregular shapes and earthy tones blend seamlessly with various landscaping styles, effortlessly elevating the overall aesthetic of your property. Additionally, fieldstone edging requires minimal maintenance, which allows you to enjoy your driveway without the hassle of constant upkeep. 
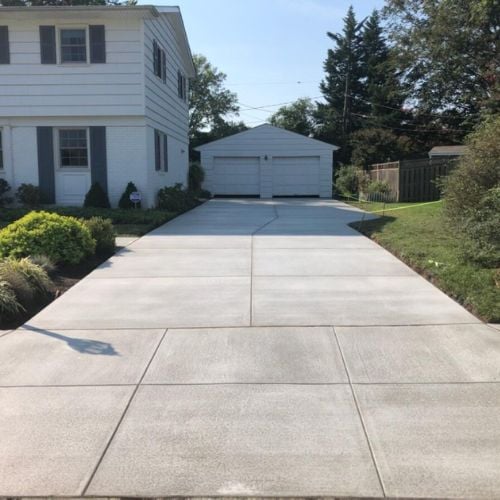
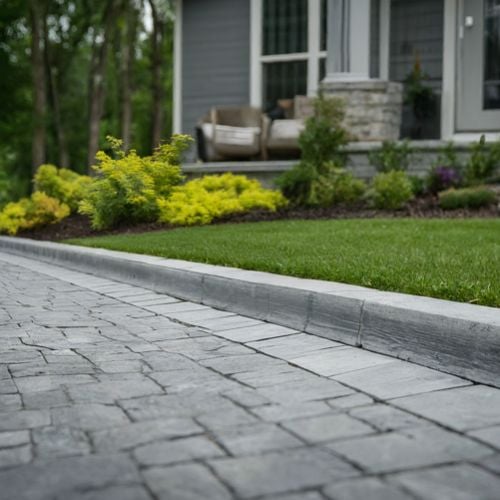
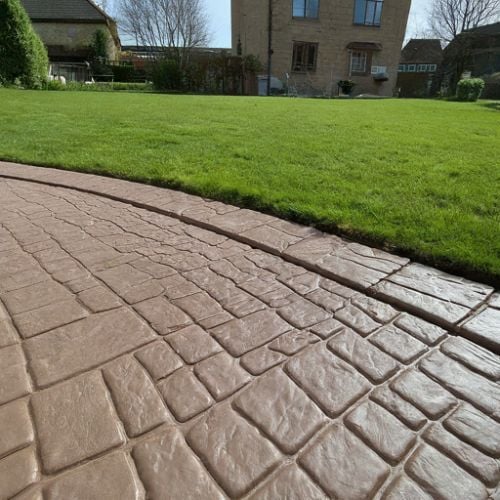
4) Poured Concrete

Poured Concrete

Craving a clean, modern look that requires minimal upkeep? Poured concrete edging is your answer. The poured concrete creates a seamless, polished border that defines your driveway and adds a touch of contemporary style. More importantly, it provides a seamless and cohesive edge that adds structural integrity to your outdoor space.

With its versatility, you can customize the shape and design of the concrete edging to suit your preferences and complement your home’s architecture. Additionally, poured concrete requires minimal maintenance, saving you time and effort in the long run. 
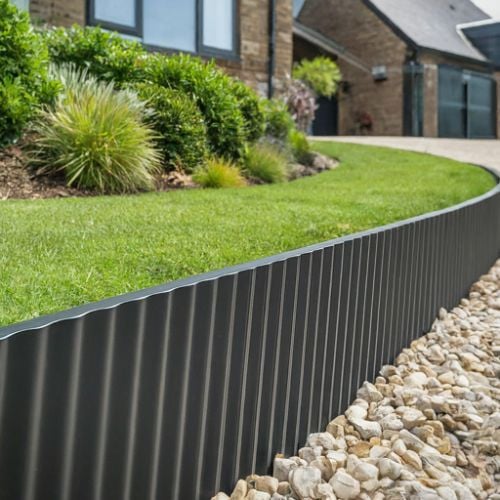
5) Steel Edging

Steel edging

Elevate your driveway’s appearance with the sleek sophistication of steel edging. It not only adds a touch of modern elegance but also offers exceptional durability and longevity. Available in various colors like black, galvanized silver, or even corten steel this steel edging adds a modern look to your driveway.

Convincingly, steel is incredibly strong and weather-resistant, which makes it a great choice for all climates. It creates a clear separation between your driveway and landscaping, preventing erosion and keeping edges crisp.

6) Low-Maintenance Mulch

Low Maintenance Mulch

For a budget-friendly and natural-looking solution, mulch edging can’t be beat. Mulch adds a pop of color and texture to your driveway, creating a soft border that blends seamlessly with your landscaping. 

Mulch also helps retain moisture in the soil, promoting healthy plant growth and reducing the need for watering. Additionally, it acts as a natural weed barrier, minimizing the growth of unwanted vegetation along the driveway edges. With its aesthetic appeal and practical advantages, low-maintenance mulch is an excellent choice for homeowners looking to enhance their driveway effortlessly.
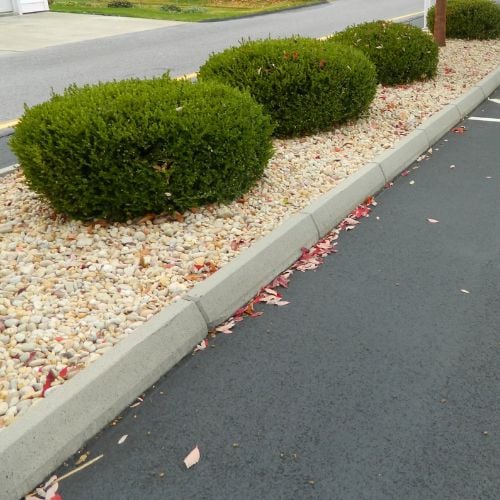
7) Decorative Curbs

Decorative Curb

For a touch of personality and flair, consider decorative concrete curbs. These precast units come in a variety of colors, shapes, and even textures, which allows you to add a unique touch to your driveway edging.

Additionally, decorative curbs help prevent erosion and maintain the integrity of your driveway, prolonging its lifespan. With their durable construction and timeless appeal, decorative curbs are sure to elevate the beauty and value of your property.
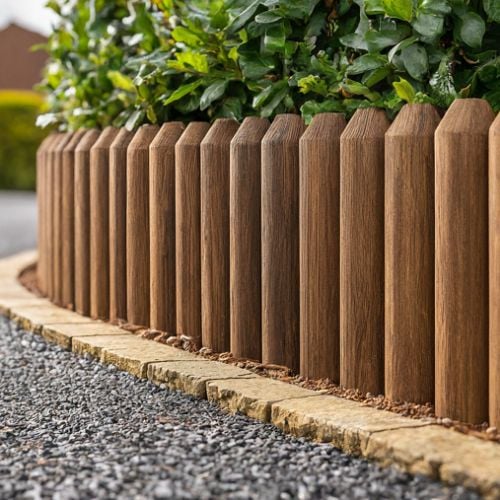
8) Timber Ties

Timber Ties

For a touch of warmth and natural charm, consider timber tie edging. These natural borders not only add visual appeal but also offer practical benefits. Timber ties provide a warm and inviting aesthetic that blends seamlessly with various landscaping styles. 

The natural wood tones of timber ties complement a variety of architectural styles, from traditional to modern. They’re also surprisingly durable, withstanding harsh weather conditions when properly treated. What makes this driveway border ideas the best is relatively straightforward DIY-friendly option for handy homeowners.
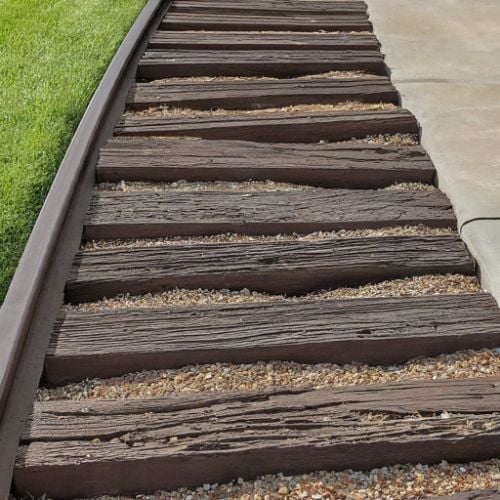
9) Railroad Ties

Railroad ties

Looking for a unique and characterful edging option? Railroad ties offer a bold statement with a rustic, industrial vibe. These hefty, weathered timbers create a strong and long-lasting border that defines your driveway and adds a touch of history.

The beauty of railroad ties lies in their natural imperfections – cracks, knots, and uneven textures all add to their charm. They’re incredibly durable and can withstand heavy traffic and harsh weather conditions. However, due to their weight and size, professional installation is highly recommended.

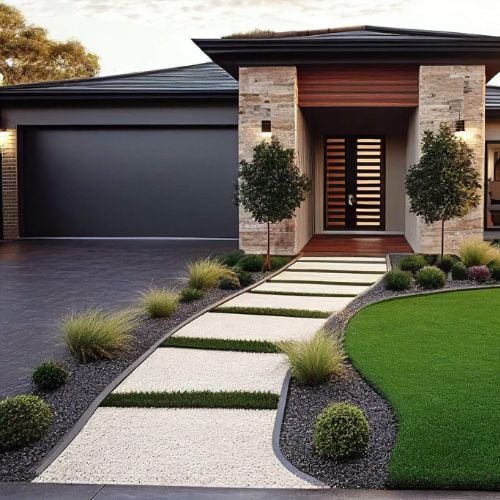
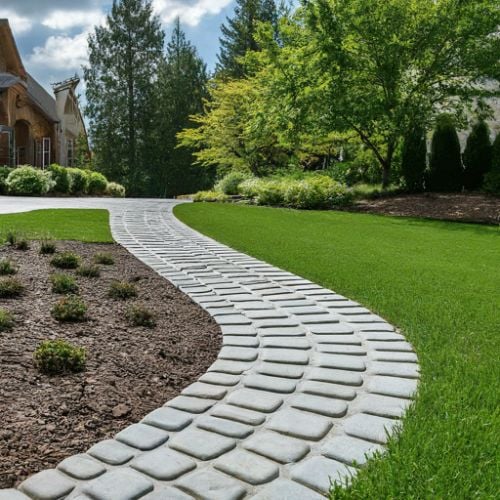
10) Curb Appeal with Pavers

curb appeal with pavers

For a touch of eternal elegance that’s surprisingly easy to achieve, consider paver edging. Pavers are interlocking stones available in various materials like concrete, brick, or even natural stone. They create a clean, finished border that adds a touch of sophistication to your driveway.

The beauty of pavers lies in their versatility. You can choose from a wide range of colors, textures, and patterns to complement your existing landscaping and home style. Pavers are also relatively durable and require minimal maintenance. 

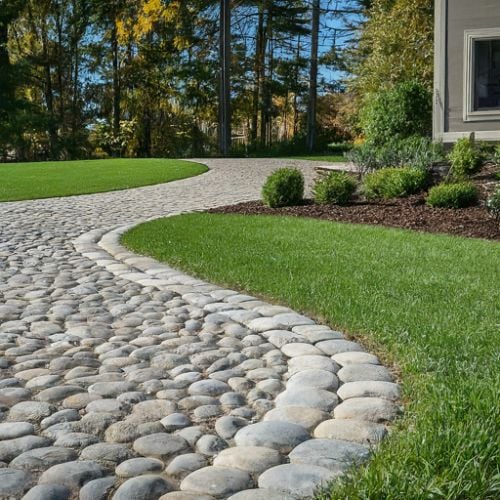
11) Cobblestone Charm

Cobblestone charm

For a touch of elegance and European charm, cobblestone edging is a captivating choice. These small, rounded stones come in various colors and textures, creating a visually interesting and durable border for your driveway.

Cobblestones add a sense of history and sophistication to your property. They’re incredibly strong and weather-resistant, lasting for generations with minimal upkeep. While installation requires skilled craftsmanship, the result is a truly unique and eye-catching driveway edge.

12) Steel Chic

Steel Chic

For a modern and bold statement, steel edging is a unique option. Corrugated or galvanized steel creates a clean, defined border with an industrial chic vibe. It’s a perfect choice for contemporary or minimalist homes that crave a touch of edge.

Steel edging is incredibly durable and requires minimal maintenance. It can withstand harsh weather conditions and won’t crack or rot like some other materials. You can typically install it yourself with minimal tools since the process is relatively straightforward. Plus, the clean lines of steel create a sharp contrast with landscaping materials, adding a touch of modern flair.

13) Recycled Plastic Edging

Plastic Edging

Looking for an eco-friendly and budget-conscious edging solution? Recycled plastic edging might be the perfect pick for you. Made from recycled materials, this option offers a sustainable choice without compromising on functionality.

Recycled plastic edging comes in various styles, often mimicking the look of natural stone or brick. It’s a great way to achieve a polished look without the high cost of real stone. Installation is a breeze – the lightweight plastic edging easily slots together or pins into the ground. Plus, minimal maintenance is required, making it a time-saving choice.
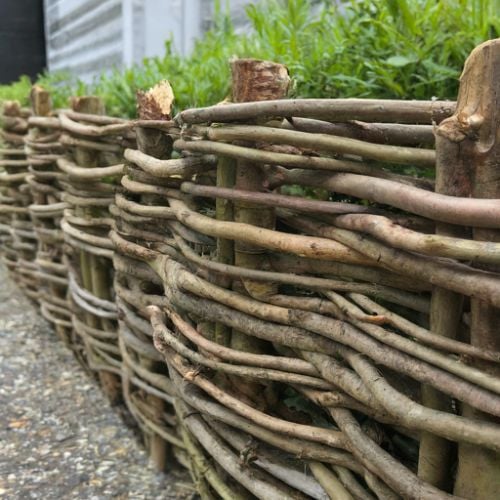
14) Wattle Wonder

Fencing Driveway

Embrace an eco-friendly and natural look with wattle fencing as your driveway edging. Made from woven branches and twigs, wattle adds a rustic charm and blends seamlessly with natural landscapes. It’s a sustainable option, often utilizing branches cleared from your own property.

Wattle fencing is surprisingly durable, lasting for several years with proper maintenance. The natural materials provide excellent drainage and prevent soil erosion. While installation requires some effort, the process is relatively simple and allows for a customized design.

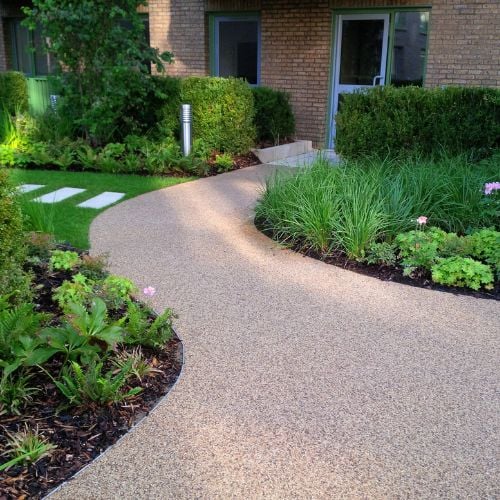
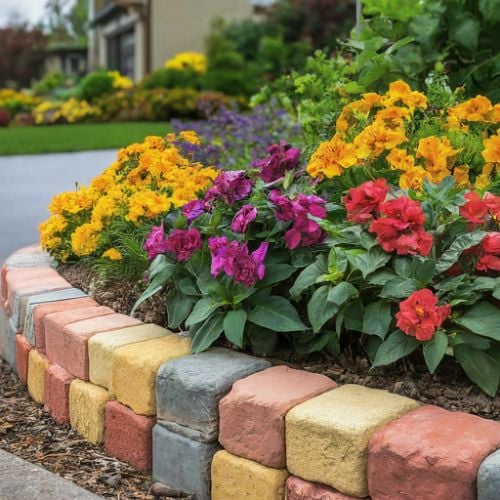
15) Flower Bed Edging

Flower Bed Edging

For a touch of life and color, consider flower bed edging. This option combines the functionality of edging with the beauty of flowers, creating a vibrant and welcoming entrance to your home.

Here, you can use various materials for the edging itself, like bricks, stones, or even low-profile metal borders. The key is to choose something that complements your landscaping and allows for easy planting and maintenance.

Within the edging, you can plant a variety of low-growing flowers, herbs, or even ornamental grasses. This adds a pop of color and texture, softening the hard lines of the driveway and creating a more inviting atmosphere.

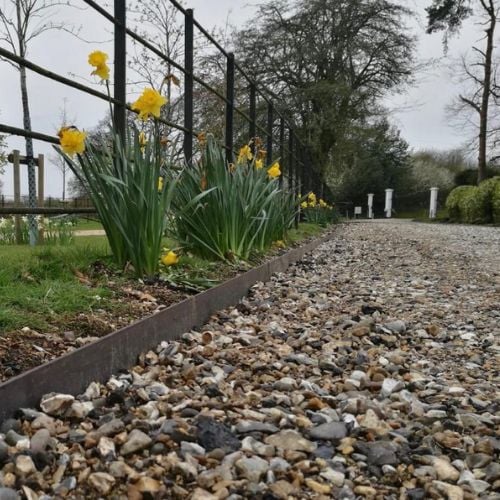
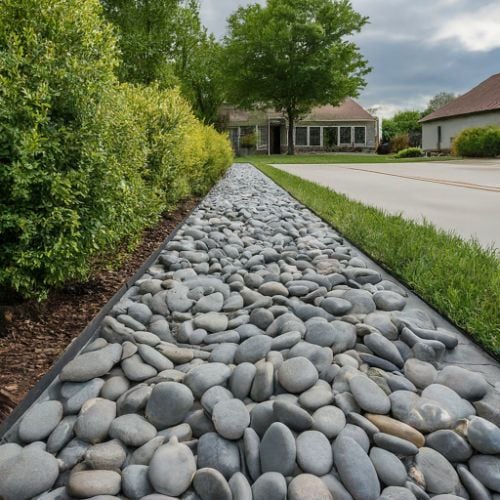
16) The Gravel Guardian

Gravel Guardian

For a low-maintenance and natural-looking solution, consider gravel driveway edging ideas. This simple option uses loose gravel to create a defined border between your driveway and landscaping. It’s a perfect choice for those who want a hassle-free edging solution that blends seamlessly with the surrounding environment.

Gravel edging is incredibly easy to install. You simply dig a shallow trench along the edge of your driveway and fill it with compacted gravel. Plus, it’s readily available and affordable, making it a budget-friendly option. While the look might not be as polished as some other options, gravel driveway edging ideas offers a natural aesthetic and requires minimal upkeep.

17) Cobblestone Character

Cobblestone Character

For a touch of timeless charm and rustic elegance, cobblestone edging is a fantastic choice. These smooth, rounded stones create a unique and visually appealing border that complements various architectural styles.

Cobblestones are incredibly durable and weather-resistant, lasting for decades with minimal maintenance. They offer a natural look that blends seamlessly with landscaping elements, creating a warm and inviting entrance. Installation can be a bit more labor-intensive compared to some options, but the end result is a truly unique and eye-catching addition to your driveway.

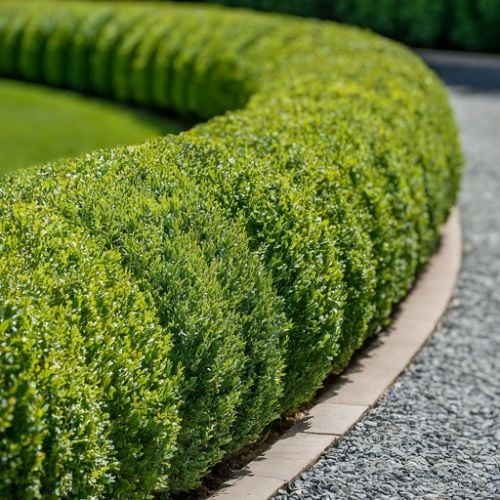
18) Creative Curve: Bending the Rules with Live Edging

Live Edging

For a truly unique and low-maintenance approach, consider live edging. This option utilizes low-growing shrubs or plants to create a natural and curving border for your driveway. It adds a touch of softness and greenery, creating a more organic and inviting entrance.

Popular choices for live edging include boxwood, creeping phlox, or ornamental grasses. These plants require minimal maintenance once established, but regular trimming might be needed to maintain their shape. The best part? Live edging can be easily curved or shaped to follow the contours of your driveway, adding a touch of personalized flair.

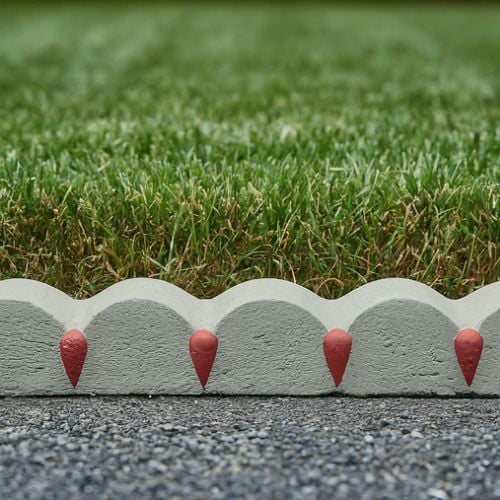
19) Precast Concrete Edging

Precast concrete edging

For a modern twist on a classic material, consider precast concrete edging. These pre-formed slabs come in various styles, from sleek and modern to geometric and textured. They offer a clean and polished look that elevates the aesthetics of your driveway.

Precast concrete edging is incredibly durable and requires minimal maintenance. They’re resistant to harsh weather and won’t crack or rot like some other materials. Installation is also relatively straightforward, often requiring just a shallow trench and some gravel for a secure base. You can typically install it yourself with minimal tools since the process is relatively straightforward

20) Living Large: Lush Lawns with Curbing

Lush Lawn

Craving a clean separation with a touch of green? Curbing with a lush lawn edging might be the perfect choice for you. This option combines a low concrete curb with a vibrant strip of lawn, creating a defined border and adding a touch of life to your driveway.

The curb itself provides a clean and stable edge, preventing grass and mulch from encroaching on your driveway. The beauty lies in the adjoining lawn, which you can maintain as a crisp, manicured edge or allow to grow into a more relaxed, natural border.

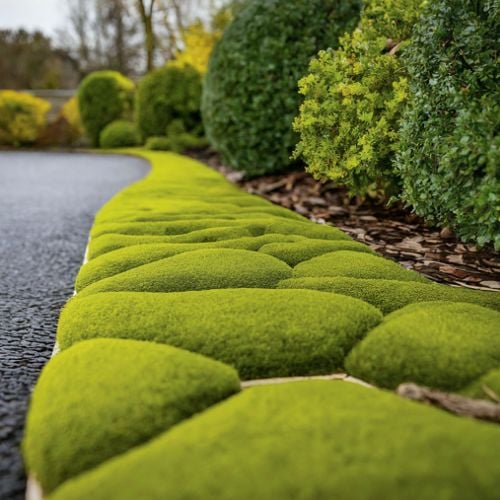
21) Going Green: Moss Magic 

Moss Edging

For a truly unique and eco-friendly approach, consider a moss driveway edging ideas. This option creates a lush, natural border that blends seamlessly with your landscaping and offers several benefits.

Moss thrives in shady, damp areas, making it a perfect choice for driveways with limited sun exposure. It requires minimal maintenance – no watering or weeding needed! Plus, moss acts as a natural filter, helping to improve air quality and reduce dust around your home.

Here’s the trick: Establishing moss edging can be a bit more challenging than some other options. You’ll need to create a suitable environment by adding moisture-retaining material like peat moss and keeping the area damp. However, once established, moss edging provides a stunning and low-maintenance solution that sets your driveway apart.

Which Driveway Edging Ideas You Like the Most? 

In this article you are provided with 20+ unique and inexpensive driveway Edging ideas. With so many options to choose from, consider the idea that aligns with your space, needs, and budget. So get creative, explore your options, and don’t be afraid to experiment! With a little planning and the right choice, you can transform your driveway from ordinary to extraordinary.

In Case You Missed It!

Don’t Make These Bathroom Renovation Mistakes

0
Avoid common bathroom renovation mistakes by learning from experts. Discover key pitfalls to steer clear of for a successful remodel.

Remodeling your bathroom can be a fun project that makes your home nicer and your everyday life better. But it’s important to be careful and avoid Bathroom Renovation Mistakes that could cause problems, delays, or extra costs. In this guide, we’ll talk about some common mistakes people make when they renovate their bathrooms and give you tips on how to steer clear of them.

Ignoring Proper Planning and Design

When you’re redoing your bathroom, it’s really important to have a clear plan first. If you just start without knowing what you want, you might end up with a messy layout, things that don’t match, and spending more money fixing mistakes later on. So, before you start, take some time to make a detailed plan. Figure out how you want everything arranged, what fixtures you want to use, and how much you’re willing to spend.

Tip: Talk to a designer or architect who knows about design to help you make a good plan for your space. They can help you use the space well and make sure everything works how you want it to, all while keeping costs in mind.

Bathroom Renovation Cost

Remodeling a bathroom can cost more than people think. You’ve got to pay for plumbing, electricity, fixtures, and finishing touches, and it all adds up fast. One mistake lots of homeowners make is not planning enough money for the project and forgetting about extra costs that might pop up along the way.

Tip: Make a budget that’s realistic and includes extra money for unexpected expenses. Look up how much materials and workers usually cost in your area to make sure your budget covers everything.

Choosing the Wrong Fixtures and Materials

Choosing the best fixtures and materials for your bathroom makeover is really important to make sure it looks good and works well. But sometimes people just pick things that look nice without thinking about how long they’ll last, how much upkeep they need, or if they’re right for the bathroom.

Tip: When picking stuff for your bathroom, focus on good quality and how well they work. Think about things like if they can handle water well, if they’re easy to clean, and if they match how you want your bathroom to look.

Overlooking Proper Ventilation

It’s important to have good airflow in your bathroom to stop moisture from building up. If moisture sticks around, it can cause mold and mildew to grow and damage your bathroom stuff. Sometimes people forget or don’t pay attention to getting good airflow when they redo their bathrooms, and that can cause problems later on.

Tip: Put a good exhaust fan in your bathroom to make sure air moves well. Also, think about putting in windows or skylights that can open to let fresh air in.

Neglecting Waterproofing

It’s really important to make sure your bathroom is waterproofed well. This stops water from ruining the structure underneath and helps your renovations last a long time. But lots of people forget to do it properly. They think regular building materials will be enough to keep everything safe from water damage.

Tip: Make sure your bathroom stays safe from water damage by either hiring pros to waterproof it or using waterproofing products. Focus on places like showers, floors, and walls.

DIY Plumbing and Electrical Work

Doing your own projects at home can feel good, but trying plumbing or electrical work without knowing how can cause big problems and be dangerous. If plumbing or electrical stuff isn’t put in right, it might leak, give you an electric shock, or break the rules.

Tip: Leave plumbing and electrical work to experts who are trained and experienced to do it safely and properly. It might be more expensive to hire a professional at first, but investing in plumbing maintenance contracts it can save you time, money, and stress in the future.

Failing to Consider Storage Needs

People sometimes forget about storage when they’re redoing their bathrooms. This can make the countertops messy and the bathroom less useful. If you don’t think about how much storage you need, your bathroom might end up disorganized and not very convenient.

Tip: Add plenty of places to keep things in your bathroom design, like cabinets built into the walls, shelves, and vanities with drawers. Think about using tall storage options to save room in smaller bathrooms.

Ignoring Lighting Design

Good lighting is really important in a bathroom for things like getting ready and putting on makeup. It also helps set the mood. But lots of people forget about planning the lighting when they redo their bathrooms. This can make the space dark and not very nice to use.

Tip: Make sure you think about how you want your lights set up. Use different types of lights, like ones on the ceiling, ones for specific tasks, and ones to highlight certain areas. You might want to add dimmer switches or lights you can move to make the lighting just right for what you’re doing.

Skipping Permits and Regulations

In some places, when you want to do certain home improvements like fixing pipes or wiring, you need permission and have to follow rules. If you don’t get permission or follow the rules, you could get fined, face delays, or even make your home unsafe.

Tip: Before you start fixing up your home, check what permits and rules you need to follow where you live. Make sure to get the right permits and follow all the rules to avoid getting in trouble and to keep your home safe.

Rushing the Project

Many homeowners rush when renovating their bathrooms, but this is a big mistake. When you rush, you might do a bad job, miss important details, and end up spending more money fixing mistakes.

Tip: it’s important to take your time and do things step by step. Focus on doing a good job instead of rushing through it quickly. Plan out how long each part of the project will take, and be ready to change your schedule if you need to, to make sure everything turns out well.

In conclusion

Remodeling your bathroom can make your home look nicer and work better. But it’s important to avoid Bathroom Renovation Mistakes that can mess up your project and make you unhappy. Plan carefully, focus on quality and what you need, and get help from experts if you need it. That way, your project will turn out well and you’ll be happy with it for a long time.

In case you missed it

Difference Between Glulam Vs LVL Wood

0
Glulam Vs LVL Wood

Most, if not all modern wood-framed buildings use engineered wood products. And the two most popular options among builders are glulam timbers and Laminated Veneer Lumber vs glulam. Let’s compare Glulam Vs lvl and find out which is a better option for your woodworking project.

Glulam Construction

Glulam Construction

Made with multiple layers of wood critic lumber held together with high-strength adhesive, glulam is an innovative and versatile laminated beam used in residential and commercial construction.

A glulam unit looks like a well-bonded stack of large lumber glued together. It doesn’t only come in a variety of sizes but can also be custom-fabricated to meet a wide range of design specifications. Due to the strength and stiffness glulam construction offers, it’s often an essential component used for building vaulted roofs, domes, and bridges.

When it comes to glulam connections, they typically feature steel bolts, dowels, and plates.

Common Uses

Common uses for glulam include:

  • Straight beams
  • Curved beams
  • Arched bridges
  • Trusses
  • Columns from round and square to complex ones
  • Tied rafters and arches

Strength Profile

Glulam Timbers Strength Profile

The classification of glue-laminated timber members is base on their unique strength properties and their rating on a stress classification system. The first part of the rating refers to their reference bending design value while the second part is their modulus of elasticity value.

Benefits of Using Glulam

For starters, glulam timbers are very strong, highly customizable, and cost-effective. Since they make with smaller pieces of lumber, and glulam timbers are very strong and are also resource-efficient. Builders and designers enjoy a number of benefits by using glulam in their construction projects, including:

  • Glulam can use in a myriad of ways – from the roof and floor beams, and columns to decking and bracing
  • Have a unique capability of creating up to 500 feet of unsupported spans
  • Contain low levels of formaldehyde and thus, are environment-friendly
  • Cut down the handling and transportation costs
  • Can easily be customized to meet special design requirements
  • Are readily available in standard lengths and widths
  • Are easy to install and repair
  • Have amazing fire-resistant properties, better than steel beams
  • Are make to precise dimensions
  • Are manufacture in well-managed forests and are PEFC-certified

Precautions and Tips

Glulam Timbers Precautions and Tips

Glulam requires careful handling and safe storage for damage prevention. It is crucial that you follow strict precautionary measures to ensure their maximum structural capacity.

Surface scratches are very common when handling glulam and so, make sure that you always use 1 when lifting it. When it comes to storage, the ideal position is vertical. You can also consider covering them with a plastic sheet to protect them from the weather. Moreover, glulam timber isn’t expose to outdoor conditions until they’re ready for installation unless of course, it specially makes for outdoor areas.

Laminated Veneer Lumber (LVL)

Laminated Veneer Lumber (LVL)

LVL is another common timber wall cladding option for modern buildings. Also known as microlam, LVL makes from peeled or sliced thin veneers laid in a parallel arrangement and bonded together under heat and pressure. Let’s see microlam vs glulam.

The standard sizes of LVL include widths of 3 ½, 5 ¼, and 7 inches, and depths from 9 ½ to 24 inches deep. Columns are available in sizes from 4×4 and 8×8.

The biggest reason why builders so commonly use LVL is that it’s cheap. A unique advantage of this beam type is that you can fabricate it to match narrower beam widths. Not only this, you can also get a larger beam made by simply nail-laminating several plies together. This especially proves helpful in retrofit projects where lifting a big, heavy beam is difficult or impossible.

Common Uses

The strong engineered wood beam typically uses for structural applications. Below are a few common uses of it:

  • Beams
  • Pitched rafters
  • Truss chords
  • Floor bearers
  • Formwork
  • Lintels
  • Purlins

Strength Profile

Glulam Timbers

The strength of LVL can compare with that of steel, concrete, and solid timber.

Benefits of Using LVL

The following are some of the amazing benefits offered by LVL.

  • High sustainability and durability
  • Is a cost-effective option
  • Delivers maximum structural reliability and considerable strength
  • Has fire-resistant properties similar to solid timber, burns at a slow and predictable rate
  • Is easily available in long lengths
  • Small wood pieces can easily make into large LVL beams
  • Can easily be cut and machined with regular woodworking tools

Precautions And Tips

LVL is a popular timber wall cladding option that demands careful handling and storage. Ideally, it should be handled the same way as solid timber. If proper care does not take, damage to the edges and exposed corners is inevitable. Let’s see glulam vs lvl price.

When on-site, LVL beam prices should be laid flat off the ground. It’s important to note that they should be dry before they install. As far as weather damage is concerned, short-term exposure doesn’t affect its performance but long-term exposure can. Therefore, you should consider preservative treatment and coat the material with a protective sheet.

Summing It Up

Glulam Timbers

Both LVL vs glulam have their own set of advantages in the construction industry. Glulam beams typically manufacture for a specific design. When they bring on-site, they’re usually already custom sanded, stained, and finished. Needless to say, they look stunning and can be expensive. Although they’re much lighter than concrete and steel, they’re extremely strong. Glulam is most commonly uses in the construction of large buildings, including universities, airports, hotels, and museums.

On the other hand, you’ll only find LVL buried in the walls, usually over windows and doors. Even when used for decks or other exterior structures, they tend to get covered up with different finishing products.

Both glulam and LVL are strong materials in their own roles. Your choice between the two will depend on the type of construction project you’re working on and the kind of results you want.

Explore further:

Shower Dimensions: Standard Sizes for All Types of Showers

0
walk-in shower dimension

Planning a bathroom remodel? One of the most important decisions you’ll face is choosing the right shower dimensions. The size and layout of your shower have a big impact on both comfort and functionality. Whether you’re going for a sleek walk-in shower or a classic tub-shower combo, getting the dimensions right is key to avoiding a cramped or awkward layout.

Many people focus on tiles, fixtures, and color schemes, but proper shower sizing is what truly defines a practical and well-designed bathroom. From minimum dimensions to popular layout options, understanding standard shower sizes will help you make smart choices during your remodel.

In this guide, you’ll find everything you need to know about shower dimensions, from common measurements to ideal layouts for different types of bathrooms. We’ve also included walk-in shower ideas and trending bathroom designs to inspire your next renovation.

Standard Shower Dimensions & Sizes

A standard shower is actually a traditional set-up made by enclosed panels and a shower door. These types of showers have a shower pan and either a framed or frameless glass panel enclosure. You can create the interior as you like by placing various tiles on the floor and walls. 

An ideal standard shower size is about 3 feet by 5 feet. These days prefabricated shower units or kits are also available in the market. So you can go for the small bathroom layout dimensions of about 32 inches wide x 32 inches deep. The latter size is the absolute minimum size for a shower. These shower kits are available in many incremental sizes up to 36 inches x 60 inches. You can get the one according to your preference. 

These days most common widths for showers are 36, 32, and 60 (inches). Here’s the list of the most typical average shower size:

  • 32 inches x 32 inches
  • 34 inches x 34 inches
  • 36 inches x 36 inches
  • 42 inches x 36 inches
  • 48 inches x 36 inches 
  • 48 inches x 48 inches
  • 60 inches x 36 inches 

Before installing a shower unit, first, you need to decide whether you want a standard enclosure, a freestanding walk-in shower, a steamy sauna, or a shower/bath. Below, we’ve explained all three types of bathroom enclosures in detail, along with their dimensions and measurements.

1. Standard Enclosure Showers

The size also depends on the shape of the shower. Yes, every shape has different shower dimensions. 

Square-Shaped Shower

Shower dimensions: Square-Shaped Shower

Square-shaped showers are usually installed in the corners of the bathrooms. If your master bathroom dimensions or space is small, you can go with this shape as it can also be installed along one wall. 

The tiniest and compact square-shaped shower unit measures 32 x 32 inches and can go up to 34 x 34 inches and 36 x 36 inches.

Shower and Tub Combo

shower dimensions

The most common size for a shower-bathtub combo are:

  • 60 inches x 30 inches x 72 inches 
  • 60 inches x 36 inches x 72 inches. 

This includes the measurements of the porcelain tub and the space around the tub’s basin. Measuring this space is crucial because it is required when installing a tub and shower combo.  

To get a clean and modern look, a shower and tub combo is installed with a glass shower enclosure. The height of the glass shower enclosure or bathtub height code typically varies from 79 inches, 81 inches, and 87 inches.

Stand-Alone Shower Stall

For this type of shower, the shower stall sizes usually depend on the space to be allotted in the bathroom for the shower area dimensions. Without a tub, the standard size is 48 x 36 inches. Here you’ll get a compact or low shower space, but you’ll get more room to move around. 

2. Walk-In Shower Sizes

If you want to add a sophisticated and elegant factor to your bathrooms, go with walk-in showers. They are generally smaller than shower and bathtub combos. These showers come in various sizes. The only thing that you have to keep in mind is that the shower should not overpower the bath space. Also, consider the available space in your bathroom and your showering needs. 

Walk-in shower dimension is 32 inches in length x 32 inches in width for minimum size. Here are some of the common walk-in shower sizes:

  • 34 inches x 34 inches
  • 36 inches x 36 inches
  • 42 inches x 36 inches
  • 48 inches x 36 inches 
  • 48 inches x 48 inches

If you have ample space, you can go with the larger sizes, such as 60 inches x 36 inches, and can also add a shower bench. 

The height of the walk-in shower mostly depends on the ceiling height of your home, but in general, the highest shower height should be 8 feet. 

Other walk-in shower dimensions are as follows:

  • 60 inches x 48 inches x 96 inches (height)
  • 66 inches x 66 inches x 90 inches (height)
  • 54 inches x 35 inches x 89 inches (height)
  • 71 inches x 47 inches x 88 inches (height)
  • 42 inches x 42 inches x 82 inches (height)

3. Steam Shower Dimensions

Shower dimensions: Steam Shower Dimensions

Similar to the walk-in shower, the ceiling height of a steam shower should not exceed 8 feet. Below are some of the common steam shower measurements (L x W x H): 

  • 42 inches x 42 inches x 82 inches
  • 54 inches x 35 inches x 89 inches
  • 60 inches x 48 inches x 96 inches
  • 66 inches x 66 inches x 90 inches
  • 71 inches x 47 inches x 88 inches

Types of Showers

Another thing that you should keep in mind while installing a shower unit is the type of shower. Yes, there are various types of showers available in the market. They can be categorized into four major categories. Also, consider the age and configuration of your home’s plumbing system as these factors are also quite important.  

Here are four types of showers:    

Mixer Showers 

shower dimensions
Mixer Showers: walk-in shower dimensions

This type of shower is usually connected directly to your pipes. This means that they’re entirely reliant on the water pressure and heat system of your home. 

Electric Showers 

Electric Showers
Electric Showers: walk-in shower dimensions

Electric showers are the most budget-friendly option among all the other shower types. They can easily be installed in any home. Electric showers have a built-in element for heating water. That’s why they’re also pretty energy efficient.

Power Showers 

Power Showers
Power Showers: walk-in shower dimensions

Power showers are also known as pumped showers and have a built-in pump that can make up for a low-pressure system. This shower has an excellent heating and pressure system, but they’re low energy efficient and a bit expensive compared to others. 

Digital Showers

Digital Showers
shower sizes: Digital Showers

If you want to bring the latest shower technology to your bathroom, go with digital showers. They’re eco-friendly and also have a digital panel for controlling pressure and heat. However, the latest technology comes with a high price tag. 

After selecting the comfortable standard shower size and type, there are also plenty of different shower styles to consider. Materials are also important while installing a shower unit. The most common ones used in prefabricated shower units are fiberglass and acrylic. They’re easy to install and maintain, and anyone can easily install them. 

These days the most popular shower enclosure is the walk-in showers. They’re highly practical, attractive, and a great choice for both large and small bathroom dimensions. So if you’re looking for some gorgeous and functional bathroom space within a budget, go for the walk-in showers! 

To create a comfortable and classy walk-in shower, you can include tile treatments, lighting, layout, storage, and more. Below are some inspiring bathroom designs that all feature an enviable walk-in shower. These walk-in shower ideas will work in all types of spaces.  

1. Rain Showers

shower sizes: Rain Showers

2. Subway Tile

shower sizes: Subway Tile
walk-in shower ideas: Subway Tile

3. Traditional Black & White Combo 

walk-in shower ideas: Traditional Black & White Combo 

4. Classic Marble Walk-in Shower 

walk-in shower ideas: Classic Marble Walk-in Shower 

5. Pattern Tiles 

master bathroom dimensions: Pattern Tiles 

6. Pale Gray Colors & Wood Cabinetry 

master bathroom dimensions: Pale Gray Colors & Wood Cabinetry 

7. Traditional Style Walk-in Shower

Traditional Style Walk-in Shower
bathroom layout dimensions: Traditional Style Walk-in Shower

8. Minimalist Bathroom Design

bathroom layout dimensions: Minimalist Bathroom Design

9. Spa Like Walk-in Shower

bathroom layout dimensions: Spa Like Walk-in Shower

10. Small Bathroom Design

small bathroom dimensions
Small Bathroom Design

Conclusion

When it comes to choosing a shower, Shower size and shape should always be your starting factor. After this, think about the location, fixtures, and accessories. These things can improve your personal comfort and the overall look of your bathroom.

You’ll have some flexibility if you’re designing a custom shower or getting a prefab shower unit. Other major factors that you should keep in mind as you make your decision include price, eco-friendliness, style, and durability.

So, this is all about shower dimensions. I hope you found this in-depth guide on shower sizes helpful and useful. Please share this blog with your friends and family who also want to renovate or remodel their bathrooms.

Explore further:

15+ Best Metal Lathe Projects For Beginners

0
Metal Lathe Projects For Beginners

Do you have a lathe machine setup at home, or you’re planning to get one soon? If yes, you’ll surely love to make different things for metal lathe projects. Lathe machines are super powerful as there are so many things that you can make with the help of them. So, what can you make with a metal lathe machine?

There are so many cool things to make on a metal lathe, from flower pots, glasses, metal bullets, and weapons.

Whether you’re a newbie to wood crafting or looking for some new ideas for something unique to make, you’ve landed on the right page. Today in this blog, we’ve compiled a list of the best metal lathe projects for beginners. From puzzles, hammers to wooden bowls and chess boxes, you can literally make so many things with the help of a lathe machine. 

So if you’re interested to know and want to learn about mini lathe projects in detail, keep on reading! Let’s start with what a lathe machine is and how it works.

What is a Lathe Machine?

A lathe machine is a versatile tool used for shaping both metal and wood. It offers a wide range of functions and operations, including cutting, sanding, knurling, drilling, turning, and more. The workpiece is securely held and rotated on a chuck, while a tool post allows for precise manipulation and control. With its ability to handle various materials and perform multiple tasks, a lathe machine is an essential tool for craftsmen and manufacturers.

A wooden or metal piece is fixed on a rotating tool at a right angle to the axis of rotation. After this, all the excess and unwanted parts of the material are removed, and finally, get a nicely shaped workpiece. 

Many different kinds of lathe machines are available, and each has different parts. Based on this, they’re used in woodturning, metalworking, metal spinning, thermal spraying, parts reclamation, and glass-working.  

15+ Easy & Creative Beginner Metal Lathe Projects 

A man working on a piece of wood in a workshop

If you’ve doubts that lathe machine projects are challenging to create, take a look at the below list of mini lathe projects metal and wood. We’ve rounded up every type of project idea, including wood and metal. So whether this is your first time or you’ve been doing it for the hundredth time, you’ll surely find an interesting project to make in the below list. Lets’s see beginner lathe projects metal.

And while making a project, if you mess up or break your working piece, you can always fix them by welding the pieces together with a tig welder. Learn more about tig welders here.

Let’s move on to the things to make on a metal lathe:

1. The Captive Nut

Captive Nut

Known by many names such as children’s puzzle, bolt in a screw and rod with a captive ring, and many more, this is one of the interesting and easy-to-make lathe projects. If you have children, this will be a fun puzzle game for them. So how does the ring get into the rod?

Here’s the trick: the nut or ring is trapped on a threaded core, and the two ends of the rod are designed in such a way that they’re bigger as compared to the ring. You have to try removing the nut while turning the nut in different directions. Here is a detailed tutorial on how to make a captive nut.

2. Steel Jewelry Box

Steel Jewelry Box

Are you looking for a unique gift idea to give to your mother, or sister, or girlfriend? The jewelry box idea will be the best option to give to any woman. Instead of buying the set from the shop, this time make it yourself! 

Though this metal/steel box will take some time, the finished product will be worth all your time! And most importantly, it’s not nearly impossible to create. You can make it from steel or any other easily available material. Even as a beginner, you can try this project as it has some room for error.   

3. Paulding Hammer

Paulding Hammer

Paulding hammer, also known as a mallet, is another easy-to-make project for students and beginners. The process is pretty much straightforward and easy. With the help of a lathe machine, you can easily give any shape to the metal but make sure that its shape is symmetric. 

You have to create two parts to make this hammer: a cylinder bottom part and a top horizontal part. The handle will allow you to show your excellent woodworking skills, and for that, you’ll have to use a knurling tool. You can also add a spin design at the handle for a personal touch.     

Don’t forget to put your own spin on the design of the handle to make the project your own. You can also create a set of hammers of different sizes and styles.  

4. Letter Seal

Make your letter more personalized with a cute seal. This is an old tradition that was popularly used by nobles, merchants, and guild masters. They use stamped wax to seal the letters and confidential documents. 

So if you’re making a metal lathe machine project for the first time, try this simple metal lathe projects. It’s quite simple but looks really attractive. You can also give as gifts to your family and friends.    

5. Writing Pen

Writing Pen

Another great metal lathe machine project for beginners is a pen. Though it’s a simple concept, it takes a lot to create this. You have to make all the pieces so that they fit correctly. For a different look, you can also combine metal with wood and also engraved names or details if you’re planning to gift this to someone.  

6. Threading Die Holder

Threading Die Holder

After looking at the picture of a threading die holder, you may have surely believed that it is one of the hardest metal projects to make. We won’t lie to you, yes it’s a bit complicated to understand its design at first, but once you know everything correctly, the entire process will be so easy. You can build this die holder from a round bar stock and later attach it to a mini lathe tailstock. 

7. Metal Bullets

Metal Bullets

One of the most popular metal lathe project ideas is the bullets! Many people choose their first lathe project because of its ease of operation. Plus, you can make many similar bullets, and the entire process is almost similar for all of them. 

See, the basic shape of the bullet is a cone, but if you want, you change its shape according to your liking. Start with the core or small metal block and work while spinning it.   

Once you get familiar with the entire process, replicating the bullets will be difficult for you. You can try different shapes and sizes, from small bullets to large ones, to make the procedure more fun and interesting. 

8. Machinist’s Scribe/Pen

Machinist’s Scribe/Pen

Here is another great metal lathe idea for you: make a machinist scribe. Here’s a full tutorial to make a metal scribe and if you want to make a metal pen, here’s the step by step guide.

9. Wedding Rings

Here you can see how easy and smooth it is to make rings. Whether you want to make a copper ring or wedding ring, you can easily create one with the help of a lathe machine. 

10. Ice Cream Scoop 

Ice Cream Scoop 

Want to make something small but meaningful? Try an ice cream scoop spoon. This is one of the popular small metal lathe projects.

Other than this, there are many more project ideas such as baby cup, metal bowls and other art pieces which you can try.

Wood Lathe Projects For Beginners

Wood Lathe Projects For Beginners

Now let’s move to the wood lathe project ideas. Yes, you can create so many creative and wonderful pieces just from a piece of wood. Here are some of the cool wood lathe machine project ideas.

11. Wooden Bangles

Wooden Bangles
close up of wooden bangles

Let’s start with the wooden bangles! One of the most liked jewelry pieces of the women and girls, bangles will be the best gift. Though rubber and chain bracelets are most in trend these days, they still can’t beat the elegance of a bangle, especially when someone crafts it.

Bangles are durable, and they’ll last for many years. You can also try different shapes and designs to create more unique pieces. You can also include your kids in the project building process, as it will be a fun thing to watch for them. Make sure that they don’t stand too close to the machine.

12. Wooden Spoons

Wooden Spoons

Your grandma will tell you how important the wooden spoons are in her kitchen. From making pasta sauces and other delicious foods, wooden spoons have been used because wood doesn’t cause any reaction, which can alter the taste. Metal utensils can also ruin foods like dough and foods that include yeasts or bacteria. 

So if wooden spoons mean so much to her, you can make one for her with the help of a lathe machine. Even beginners can try this woodturning to create simple and ornate spoons. So try this method and make some beautiful wooden spoons.

13. Candle Stools/Doll Furniture

Candle Stools/Doll Furniture

Do you love miniature things? If yes, you’ll surely love this cute tiny piece. This is a functional piece that can be used for many things such as candle stools or doll furniture or to elevate plant pots. Simple and easy project, this stool will be a fun lathe machine project for you and your children. You can even use this stool to create a romantic evening or seating for dolls.

You can also change the size according to your liking. Don’t worry if you think that this stool looks tiny; that’s why it’s hard to make, but that’s not true! It’s one of the quickest lathe projects with versatile designs that you can make. 

14. Wooden Bowl

Wooden Bowl

You may have seen videos of people creating fantastic bowls and vessels with the help of the lathe machine. If you are fascinated by them, why not try for yourself! Due to the ease of operation and design, even as a beginner, you can try this.

From fruits, fancy dinner sets to a storage container; you can literally use this bowl in many ways. With the help of a lathe machine and other tools, you can either opt for a standard, plain-looking bowl or add various patterns and designs.

15. Chess Box

Chess Box

Here is a fun lathe machine project for you: A chessboard! Made from excellent quality wood materials, this chessboard is something that is super exciting to build. You can build the small, medium or as per your liking.

To make its handling easy, you can also add handles and closure for opening and closing. You can easily do this with a wood lathe machine; watch the video 1.

16. A Wooden Shot Glass 

Wooden Shot Glass

Yes, shot glasses are usually made from crystal, but there is no rule that it has to be made from glass only! Check out this extraordinary wooden glass that can be used for household purposes. 

You can make one with wood and use it either for drinking or display. Achieve and create the set of these beautiful glasses by using a wood lathe machine. So include this unique and elegant wooden piece in your home decor.    

17. Bottle Stoppers

Bottle Stoppers
wooden Bottle Stoppers

Another great project for both students and beginners is bottle stoppers. Here’s a full blog with a tutorial on how to make wooden bottle stoppers by lathe machine.

18. Bottle Coasters

Bottle Coasters


19. Candy Box

Candy Box


Here are some more wood and metal lathe machine projects for you to get some inspiration:

Metal Bullets
Metal wrench
wooden cup
Metal Machine
Wooden Bowls
wWooden vase
wooden box
wedding band
pair of metal dices
A couple of metal objects sitting on top of a wooden table
Mirror with wooden stand
Three Flower vases
wooden pig toy
bunch of bullet
workbench

The Bottom Line

All the wood and metal lathe projects plans that we’ve mentioned in the above list are easy to make, and mostly you can build them in under a day or two. Start with the easy projects, and when you get mastered in handling the metal lathe machine, you can try more complicated ones. 

Whether this is your first time using a lathe machine or you’ve already done so many projects, you can try these mini metal lathe projects. At first, there are chances to mess up but keep trying until you get the desired result. Another wonderful thing about them is that you can sell metal lathe projects to make money. Yes, there are many metal lathe projects that sell at a good price. So, this time doesn’t be afraid to try and create some unique projects in metal and wood and enjoy the entire process with your kids.

So this is all about the wood and metal lathe machine projects. I hope this blog gives you some inspiration for your next weekend lathe project.

Discover more:

18+ Trendy Ceiling Textures Types For Your Home

0
Ceiling Texture Types

The smell of fresh paint on the walls or the rooftop of your house is very intoxicating. Right? In our childhood, we all wanted to paint the walls, and some of you had done it! Here we are providing 20 ceiling texture types, so read each type that is classified by their textures.

So whether you recently shifted to your dream apartment or simply want to renovate your house, this ultimate guide will surely help you to decorate your place. It may sound pretty easy to decorate, but it is one of the toughest tasks in the whole world. And in addition to it, the hardest part is to find the perfect ceiling.

Yes, ceilings!! You decorate every part of your house, so why leave the uppermost important part of your home. We all paint and embellish our walls and always ignore the fifth wall of our house. The fifth wall means the vault!! Yes, don’t forget them, they are as important as the other sections of your home. Read this blog to find out how you can wisely decorate it with super cool various types of ceiling textures.

What is the Ceiling Texture?

Ceiling texture refers to the decorative finish or treatment applied to the surface of a ceiling. It adds visual interest and can help conceal imperfections. Common ceiling texture types include popcorn, knockdown, and stucco. Ceiling texture is applied using various techniques, such as spraying, rolling, or troweling. It is popular in both residential and commercial settings, offering a unique aesthetic appeal to ceilings.

Ceiling Texture

Kinds of Textured Paint

There are a few kinds of paint textures from that you can select one for you.

  • Smooth Textured Paint
  • Premixed Textured Paint
  • Self-Mixing Paint
  • Alternative Finishes

Types of Ceiling Texture

There are numerous ceiling texture types available in the market, here we’re giving every kind so that you can select the one that you find most suitable for your place. They are basically categorized according to the type and application process or texture.

Below is a list of all the types, you can possibly find in the market:

Spray Texture

1. Popcorn Ceiling

Popcorn Ceiling

Sometimes Popcorn Ceiling is known as “Acoustic” ceiling texture or “Cottage cheese.” This type of ceiling is always in demand. It is called a “Popcorn ceiling” because its surface looks like popcorn.

To create this famous ceiling, first, you have to clean your roof and then coat it with a stain-blocking primer. This helps the texture to stick smoothly on the ceiling. After that, just directly spray the popcorn ceiling spray on the ceiling.

This spray consists of a mixture of mud and Styrofoam. This is kind of liquidy but still lumpy, but by this, only you’ll get a puffy effect. Sometimes it’s challenging to do this kind of ceiling, so it is better to hire professionals as they know the best and fast methods to do this.

2. Spray Sand Ceiling Texture

Spray Sand Ceiling Texture

Yes, this texture is quite similar to the orange peel Ceiling Texture. It is not artistic like tree bark or Sheetrock, but it was popular back in time & still, people are choosing this. This technique is less expensive, and in addition, you can do this in 2 simple steps:

  • Mix sand with cold water the night before you’re going to apply it.
  • Just apply it with a brush or spray gun.

The result? Obviously awesome!!

3. Knockdown Ceiling Texture

Knockdown Ceiling Texture

To get this kind of ceiling effect, you need to reduce the consistency of the joint compound by adding some water. You’ll also need a knockdown tool to apply this mixture, but if you don’t have this, you can also use a trowel.

Drywall Texture Types

4. Mud and Tape Ceiling

Mud and Tape Ceiling

This type of ceiling texturing is pretty common these days. In this, you have to use tape to cover joints and sides of the roof, and after that, mud is applied. This is slightly more costly than the other methods, but it is worth it.

So, what are your thoughts about this one? This will absolutely look amazing on your bedroom walls.

5. Skip Trowel Ceiling Texture Ideas

Skip Trowel Ceiling Texture Ideas

Just like other ceiling types such as Sheetrock Ceiling Texture, you can do this by hand by using a trowel. For this, simply dip your tool in the joint compound, then gently drag it all across your ceilings. Easy and fast, right? You’ll see a pattern, as it doesn’t cover all the surfaces of the roof, some remaining spaces create this unusual pattern.

6. Sheetrock Ceiling Texture

Sheetrock Ceiling Texture

These ceiling textures have a history as they had started back in 1917. This is not one of the super clean and smooth surfaces, but it is rough but has an artistic feel to it! So unlike other ceiling types, it is entirely done by hand. That’s why it is time-consuming, and the results are very pleasing and satisfying.

Another great thing about Sheetrock Ceiling Texture is that whether your room has a modern or farmhouse style, this will go with everything. Isn’t this amazing?

If you love farmhouse vibes or rustic style, this one is for you!!

Pattern & Designs

7. Lace Ceiling Texture

Lace Ceiling Texture

If you want your ceilings to look delicate and beautiful, try this type of roof. Yes, the Lace ceiling texture is the most attractive ceiling texture in the whole world. But beauty comes with a lot of effort. Right? So, this ceiling will also demand super skills. You’ll also need many tools such as a spatter gun, pin nailer gun, drywall knife, knife sharpener, and many others.

There are many types of lace patterns or types like Spanish lace and French lace textures. You’ll also need to choose a base color that’ll from the spaces in the lace designs. So, first, you’ve to color the ceiling then add the desired pattern on it. Though it seems impossible to do this, after all this hard work, the final result will blow your mind.

8. Swirl Ceiling Texture

Swirl Ceiling Texture

You’ve already seen this type of ceiling around your neighborhood. This is super easy to do but requires patience. You can get the swirl pattern by using a roller, trowel, or sprayer. The swirls can be smooth or rough, depending upon the tool you’re using.

The main thing about this ceiling texture is that you’ve to make the swirls before the mud dries. As it is impossible to change it later on. So, whenever you’re doing your ceiling, it is good to take help from another person rather than to do it alone and end up creating a mess. Right?

9. Fish Scale Ceiling Texture

Fish Scale Ceiling Texture

Fish Scale Ceiling Texture, sometimes known as half-circle or half-swirl Ceiling texture. We know it looks pretty tricky to create this type of texture on your vault, but you can always hire people to do the task. Right? Just tell them that you want this type of ceiling texture design, and they will install it.

This is one of those types of ceilings that immediately catch people’s attention after they come to your house. The common types of swirls that people are going for are perlite and sand swirl.

Just paint the walls in simple plain colors, so that the Fish Scale Ceiling Texture will pop out beautifully.

Brushstrokes

10. Slap Brush Ceiling Texture

Slap Brush Ceiling Texture

This ceiling texture is not easy to apply as compared to the other textures. You’ll need a brush with soft bristles and thin mud. Follow these steps for the application:

  • Apply the thin mixture of mud all over the roof using a textured roller.
  • Make ceiling patterns by slapping the brush from one side to the other, until you’re satisfied with the design.

And Voila… your Slap Brush Ceiling Texture is ready!!

11. Stipple Brush Ceiling Texture

Stipple Brush Ceiling Texture

To achieve this texture at your vault, you’ll need a stipple brush that’s it! This will be perfect if your rooftop has dents, holes, or uneven surfaces as it beautifully covers all the imperfections. The drywall ceiling mixture is quite thick, so you’ve to do it carefully to avoid any mistakes.

12. Rosebud Ceiling Texture

Rosebud Ceiling Texture

If you love flower print or texture, this ceiling texture types is for you. It looks absolutely gorgeous and also easy to apply. Just make sure the layer is thin enough to create rosebud ceiling patterns and draw them with an airless paint sprayer or brush. You can also choose various colors according to the theme of your room.

13. Crows Foot Ceiling Texture

Crows Foot Ceiling Texture

Do you want something creative? Install Crows Foot texture on your roof. This task requires two people as one is creating the pattern, and the other one applies the mud. Use a stipple brush to create this pattern, and it is good to cover your floor before you start the application as it is a messy procedure.

14. Stamped Texture Ceiling

Stamped Texture Ceiling

This is one of those kinds of ceiling textures types that can be achieved in many ways. You can use different types of objects like broom bristles, tiles, brick, or sponges to get the desired texture.

But do remember one thing whatever you stamped on the ceiling, it will come out as backward (especially consider it with words).

Clean Textures

15. Smooth Ceiling Texture

Smooth Ceiling Texture

Textures and patterns look pretty attractive up there, but still, many people prefer Smooth Ceiling Texture as it is minimal looking but give a constant & finished look. But there are more reasons that this is people’s first choice.

It doesn’t require any special skills to do this, and it is cheaper as compared to other ceiling textures. Others are hard to remove and need professionals to do it. Whereas a smooth ceiling is super easy to apply, and it fits perfectly with any style or size of the room. So if these are your requirements, go for this white wall texture!

Doesn’t this texture look super easy to install? So try this out!

16. Skim Coat Ceiling Texture

Skim Coat Ceiling Texture

If you face difficulty in applying any of the textured ceiling types, don’t worry, go for this one. Yes, Skim Coat Ceiling Texture is easy and fast to install. Actually, the skim coating is a process of applying a thin covering by mud. Which is also sometimes used to hide minor imperfections of the wall or ceiling. You can apply as many coatings as you want to smooth out your rooftop.

So are you going to try out this idea?

Magic of Tools

17. Santa Fe Ceiling Texture

Santa Fe Ceiling Texture

Santa Fe Ceiling Texture is really a variation of skip trowel. You are deemed to get confused at a single glance towards it. Even though the installation of both types is the same, the Santa Fe covers 60% more surface area than the skip trowel.

So what do you prefer skip trowel or Santa Fe Ceiling Texture?

18. Stomp Ceiling Texture

Stomp Ceiling Texture

Stomp Ceiling Texture is applied by using textured Ceiling paint rollers and stomp brush, just like the knockdown texture. Consistency is vital while applying this mixture. So it should be at the right paintable consistency with water to get the desired texture on the roof.

Mild Textures

19. Orange Peel Ceiling Texture

Orange Peel Ceiling Texture

You already got an idea about this ceiling texture as the name it resembles the skin of an orange. This is mostly used in washrooms and cooking areas because it has good strength and also looks clean, that’s why sometimes it is called an eggshell ceiling texture.

It started back in the 1970s and got so popular in the early 1990s. You can also see this orange peel texture on the walls. To make this special mixture, you need to apply a thin layer of mud texture with the help of a gun (set on high pressure).

20. Tree Bark Ceiling Texture

Tree Bark Ceiling Texture

Its name describes it all, which means it looks like tree bark. This look can be achieved with the help of a heavy roller. There is no doubt that a ceiling with a tree bark stark catches more attention from other types of ceiling. It is also good if you’re going for a farmhouse style. So what do you think about this Ceiling texture?

Advantages and Disadvantages of Ceiling Texture

Here are all the benefits and drawbacks of having a ceiling texture in your home:

PROS:

  1. As time passes, you may notice that the drywalls get some cracks and spaces between the joints. So, the repair cost is more expensive than if you apply ceiling texture. You can easily cover up all the imperfections of the ceilings with this.
  2. If you’re living in a rental apartment, you face this kind of roof problem. To resolve this concern, you can go for a ceiling texture that will inevitably cost you less and also saves a lot of your time.
  3. If your wall texture has bumps and holes, you can easily cover them with these ceiling textures, and after the applications, they look flawless.
  4. After proper application, they will stay in the place for a very long time.
  5. Unlike the old ceiling types, here you can find varieties in textures & patterns to choose from.

CONS:

Everything has some drawbacks, and it also has some!

  1. Some of the ceiling patterns are time-consuming, and some are very hard to apply. So you have to hire a professional to do this, which may hurt your pocket.
  2. The tools and equipment are also a problem as many of us don’t have these kinds of specialized tools in our house.
  3. Some ceiling textures like popcorn and lace are harsh to scraping off and then installing another one.
ceiling texture types idea

Tips and Precautions For Ceiling Texture

  • Always cover your floor with plastic before you start this process, as some of the joint compound or drywall mixture drops on the floor, and it is pretty hard to clean.
  • Use tape to mark the roof to get them clean and finished lines.
  • Cover your mouth with a mask and wear hand gloves to protect yourself from dust and dirt.

So did you select the one for your bedroom? We’re pretty sure that your heart is stuck at more than one. After all, they all have beautiful ceiling textures, and it’s pretty hard to select one. Right? But always pick the one which is really suitable for your house and also do check the prices before purchasing the materials.

Some of them really required hard work, but after this, the result will blow people’s minds, and they will not get off their eyes from your extra-ordinary-looking ceilings. And you can always add a bit green to your lovely place.

So, this is all about the ceiling textures types.

A person using a paint roller to paint a wall
A person using a paint roller to paint a ceiling
A man is painting a ceiling with a paint roller
A person with a brush on a ceiling
A person is painting a ceiling with a paint roller
A person using a paint roller to paint a ceiling
A person using a paint roller to paint a wall
A man is painting a wall with white paint
A man is painting the ceiling of a room

FAQs:

1. What Is the Primary Objective of Setting a Ceiling Texture?

It has been found that texturing can hide defects in the best possible way. It even aids in getting rid of echo in a room. Have you ever spoken in a room before and after carpeting? If yes, you will comprehend the difference in echoes made after carpeting.

2. Is There a Definite Way to Texture a Ceiling?

We advise using a sand compound and spreading it in a specific pattern to curate a lumpy, rocky finish.

3. How Long Does It Take to Perform Ceiling Texture?

It takes less than an hour to texture and costs less than $20 in materials.

4. What Results in Falling Off a Ceiling Texture?

When you apply latex on top of a popcorn ceiling, the water in the colorant can destroy the tacky bond between the texture and substrate. This results in falling off a ceiling texture. To avoid this problem, it is suggested to smear an alkyd primer before covering with a new coat of color with latex.

5. How Long Should You Keep Ceiling Texture Dry Up?

The ceiling texture dries to the touch in five to ten minutes and to handle in ten to fifteen minutes. Please enable the paint to dry for at least a day before painting. It might take even longer to dry if there is an even heavier texture.

To get more information:

A Millennial’s Guide to Home Loan Interest Rates

0
Home Loan Interest Rates Guide

Introduction:

For many millennials, owning a home in Singapore represents more than just a significant milestone; it’s a dream that embodies stability, success, and personal fulfillment. However, the path to homeownership is fraught with complexities, especially when it comes to navigating the labyrinth of home loan interest rates. At My Millennial Guide, we understand the importance of making informed financial decisions that align with your aspirations and lifestyle goals. This guide is designed to demystify home loan interest rates, providing you with the knowledge and tools to select the best home loan, enabling you to embark confidently on your homeownership journey.

The Basics Unveiled

Before diving into the specifics, let’s clarify some key terms that are crucial in understanding home loan interest rates:

  • Fixed Rate: The interest rate remains constant throughout a specified portion of your loan tenure, offering predictability in your repayments.
  • Floating Rate: This interest rate fluctuates based on a benchmark rate, adjusting your repayments according to market conditions.
  • SORA (Singapore Overnight Rate Average): The new standard for floating rates in Singapore, known for its transparency and reliability.
  • SIBOR (Singapore Interbank Offered Rate): The former benchmark which is being phased out in favor of SORA.

Transitioning from SIBOR to SORA: What It Means for You

The shift from SIBOR to SORA is not just a regulatory change; it’s about moving towards a more stable and transparent system that benefits borrowers like you. This transition reflects a global trend towards financial benchmarks that better represent current market conditions, ultimately offering you more stable loan options.

Home Loan Interest Rate

Singapore’s economic landscape directly influences 1. Currently, we’re seeing a trend towards SORA-pegged floating rate loans, driven by their greater stability and predictability. Understanding these trends is crucial for making a loan choice that suits your financial and personal life goals.

Whether you’re leaning towards a fixed or floating rate loan, it’s essential to consider how these choices align with your financial stability and future plans. Are you looking for predictability in your monthly repayments, or are you willing to bet on market fluctuations for potentially lower rates?

Factors Influencing Home Loan Rates: A Closer Look

Several factors can affect the interest rates of home loans in Singapore, including:

  • Economic Conditions: Global and local economic health can influence interest rates across the board.
  • Policy Changes: Regulatory adjustments, like the SIBOR to SORA transition, can impact loan pricing.
  • Bank-Specific Factors: Each bank’s funding costs and lending policies might affect the rates they offer.

Comparison of Home Loan Providers: Finding Your Best Match

When comparing home loan packages from Singapore’s leading banks, consider:

  • Fixed-Rate Loans: Ideal for those seeking repayment stability.
  • Floating-Rate Loans (SORA-Pegged): Suitable for those who are okay with some risk for potentially lower rates.
  • Home Loans for Buildings Under Construction (BUC): Special loans for properties not yet completed.

Choosing the Right Home Loan: Tailoring to Your Millennial Lifestyle

choosing right home loan

The right home loan for you balances between your financial situation and your aspirations. Whether you’re a first-time homebuyer or an investor, your choice between fixed and floating rates should reflect your lifestyle goals and financial resilience.

Important Considerations Before Applying: The Fine Print

Pay attention to the lock-in period, early repayment penalties, and the importance of securing an Approval-in-Principle (AIP). These factors can significantly impact your financial flexibility and your ability to adapt to life’s changes.

Conclusion: Charting Your Path to Smart Homeownership

At My Millennial Guide, we believe in empowering you to make financial decisions that not only lead to wealth accumulation but also enrich your life with satisfaction and personal achievements. Understanding home loan interest rates is a step towards realizing your dream of homeownership in Singapore, aligned with your aspirations and lifestyle. Stay informed, choose wisely, and embrace the journey to a fulfilling and financially stable future.

Resources and Tools: Empowering Your Decision-Making

Leverage our online tools for calculating monthly repayments, understanding Buyer’s Stamp Duty (BSD), and ensuring you meet the Total Debt Servicing Ratio (TDSR) requirements. These resources are designed to simplify your homeownership journey, allowing you to make decisions with confidence and clarity.

In Case You Missed It!

8 Effective Ways to Increase Your Home Value in 2025

0
increase home value

Enhancing the value of your home is a multifaceted endeavor that can significantly impact both your living experience and potential resale value. Whether you’re contemplating a sale shortly or simply aiming to improve your living space, there exist numerous avenues through which to augment your home’s value. Herein lies a comprehensive exploration of eight key strategies to increase your home value:

1. Kitchen Renovation:

Kitchen Renovation
  • Upgrade appliances, countertops, and cabinets for a modern look and improved functionality.
  • Consider incorporating features that balance aesthetics and practicality, appealing to both potential buyers and enhancing daily living experiences. Elements like a spacious island or energy-efficient appliances can add significant value to your kitchen space.

2. Bathroom Remodel:

Bathroom Remodel
  • Refresh fixtures, introduce a new vanity, or install a walk-in shower to create a luxurious spa-like atmosphere.
  • Prioritize cleanliness and functionality in your design choices, recognizing bathrooms as pivotal areas that can significantly influence a buyer’s decision. Incorporating high-quality materials and fixtures can elevate the overall appeal and value of your home.

3. Exterior Improvements:

Exterior Improvements of home
  • Boosting curb appeal is essential when it comes to increasing your home’s value. Invest in exterior improvements such as landscaping, painting, or upgrading your front door to make a positive first impression.
  • Maintain the exterior meticulously to ensure a welcoming ambiance that entices potential buyers. Elements like a well-manicured lawn, vibrant flowers, and a freshly painted front door can make a substantial difference in the perceived value of your home.

4. Energy-Efficient Upgrades:

Energy Efficient Updates
  • Install solar panels, energy-efficient windows, or a smart thermostat to reduce utility costs and appeal to environmentally conscious buyers.
  • Embrace sustainable living practices while simultaneously increasing the value of your home. Highlighting these energy-efficient features can set your property apart in a competitive market and attract discerning buyers who prioritize eco-friendly living.
  • One last benefit often overlooked are the tax incentives. A lot of energy-efficiency upgrades qualify for tax credits or deductions. These incentives change often so make sure you familiarize yourself with the latest tax implications.

5. Home Additions:

  • Consider expanding your living space by adding a bedroom, home office, or multipurpose room to accommodate modern lifestyle needs.
  • Evaluate your home’s layout and architectural design to seamlessly integrate functional spaces that enhance both usability and aesthetic appeal. Flexible living areas that can adapt to various purposes can significantly increase the desirability and value of your home.

6. Flooring Updates:

Flooring Options for home
  • Upgrade your flooring with durable and visually appealing materials such as hardwood, laminate, or tile.
  • Select flooring options that are not only aesthetically pleasing but also practical and easy to maintain. Investing in high-quality flooring throughout your home can enhance its overall value and appeal to potential buyers seeking a cohesive and well-maintained living space.

7. Fresh Paint:

Fresh Paint for home
  • A fresh coat of paint can do wonders for your home’s appearance. Opt for neutral colors that appeal to a broad audience and make your space feel clean and inviting.
  • Pay attention to detail by touching up trim, doors, and ceilings to achieve a polished finish that showcases the craftsmanship and attention to maintenance. A well-maintained and visually appealing paint job can significantly enhance the perceived value of your home.

8. Smart Home Technology:

Smart home Technology
  • Incorporating smart home technology can make your home more attractive to tech-savvy buyers. Consider installing smart thermostats, security cameras, or lighting systems to enhance convenience and security.
  • These features not only add modern convenience but also increase the perceived value of your home. Smart home technology is becoming increasingly popular among homeowners, so integrating it into your home can give you a competitive edge in the real estate market.

Conclusion

Navigating the process of increasing your home value requires careful consideration and strategic planning. By implementing these comprehensive upgrades and improvements, you can elevate the appeal and marketability of your home while maximizing its potential value

In Case You Missed It!

29 Best Kitchen Pantry Ideas to Try in 2025

0
Kitchen Pantry Ideas

Your pantry can be one of those forgotten spots in your home, where style isn’t a top priority like it is in your bedroom or living room. It’s easy to neglect it, whether it’s a large room or just a few shelves on a wall. After all, it’s not where you entertain guests. Plus, it’s hard to imagine how to make it look nice even if you had the time. But your pantry doesn’t have to be left out. With some smart design choices, it can be more than just a place to stash food – it can be a space you actually enjoy being in.

If you’re wondering what else you can do besides putting dry goods in matching containers and tossing out old food, don’t worry. We’ve got some ideas to help you spruce up your pantry and make it a place you’ll love.

Kitchen Pantry Ideas for an Impeccable Kitchen

Kitchen Pantry Ideas for an Impeccable Kitchen

1. Cabinet Pantry Storage

Cabinet Pantry Storage

Consider using cabinet storage in place of a traditional pantry if you don’t have one. Place cabinets with high doors to conceal deep drawers containing everything you need for your pantry. Cabinet pantries benefit greatly from pullout drawers since they maximize available space without allowing items to vanish at the rear.

2. Small Walk-In Pantry

Small Walk-In Kitchen Pantry

A freestanding bookshelf can easily add storage to a small kitchen pantry ideas. Installing a storage system or shelves is not necessary. It’s also a quick way to add some color to a wardrobe that could otherwise be gloomy.

3. Spacious Butler’s Pantry

Butler's Kitchen Pantry

With a sizable butler’s pantry attached to your kitchen, you can add more room and maintain organization. For additional work space and storage, it has a long, shallow counter. Pantry goods are kept in open drawers under the counter, while cookbooks and less-used serving dishes are kept on the higher shelves, which are reachable with a movable library ladder.

4. Hidden Pantry Storage

Hidden Pantry Storage

If you want to conceal a walk-in pantry, paint it the same color as your kitchen cabinets and panel it with the same style. Nestled neatly behind a bi-fold door, the little pantry in this kitchen has matching hardware to complement the rest of the area.

5. Kitchen Pantry Shelving Ideas

Kitchen Pantry Shelving Ideas

Thanks to its matching design and architectural characteristics from the adjacent kitchen, this pantry seems more like an additional room than merely a storage closet. A soapstone countertop and wainscoting on the walls provide some fashionable details. Additionally, there’s plenty of room for necessities and dishes on the wall-mounted shelves, so you may not need as many cabinets above the kitchen countertops.

6. Modern Butler’s Pantry

Modern Butler's Pantry

Add a butler’s pantry to free up space for large appliances, additional storage, and food preparation. Usually, you would store your food in a different location, but if your walk-in room is large, you might merge the two.

7. Farmhouse Pantry Style

Farmhouse Pantry Style

Expand the farmhouse kitchen concept to include the pantry. Put up plain white shiplap panels behind the racks to maintain natural light and facilitate quick item retrieval. To keep little snacks tidy and to fit in with the décor, use neutral-colored storage baskets.

8. Canning Storage

Canning Storage Kitchen Pantry

Decanting dry goods or preserving foods are excellent uses for a cold, dark pantry. Keep everything accessible and visible by using open shelves with glass containers that are simple to reach when needed. To make sure nothing is forgotten or put to the back, use shallow floating shelves.

9. Pantry Door Shelves

Pantry Door Shelves

Installing thin shelves on the rear of the door can help you make the most of a tiny pantry. Single-serve goods, single drink bottles, and snack packs are ideal for keeping on these shelves for easy access.

10. Small Pantry Storage

Small Pantry Storage

This clever compact kitchen pantry design combines several storage techniques to maximize available space. Spice and dish storage is conveniently accessible with specially designed higher shelves. Mounted racks with wine glasses are located under the lowest level. Stored behind the double doors are slender shelves holding wine bottles, vinegars, and oils. There’s plenty of space for drinks and other pantry staples under an espresso machine-topped countertop surface, complete with spacious drawers and open cubbies.

11. Closed Door Pantry Ideas

Closed Door Pantry Ideas

Raised cabinet doors conceal food storage and preserve a tidy, well-organized appearance in the kitchen. These panel-style doors open to deep shelves that are ideal for preserving dry goods as well as canned and jarred goods. Furthermore, these doors cover the refrigerator as well as the pantry, keeping all of your food in one easy-to-reach location.

12. Reach In Pantry Ideas

Reach-In Pantry Ideas

Keeping your kitchen pantry neat can help you keep your food fresh and conveniently accessible. Reach-in pantries with clever designs make it easy to store and retrieve dinnerware, small appliances, and canned and dry products. In the pantry, shallow, angled shelves make it simple to see what you have and keep little products organized so they don’t get mixed up with bigger ones. In addition, there’s a whiteboard on the inside of the door where you can write shopping lists and meal ideas.

13. Vertical Pantry Storage

Vertical Pantry Storage

Add a touch of beautiful furniture design and increase the amount of storage space in your home by adding a tall pantry with open shelves and cabinets. It’s ideal for storing dry items and makes inventory management simple with its 14-inch cabinet depth. Use shelf dividers or baskets to keep your storage things tidy if your shelves are deeper.

14. Food Storage Central

Food Storage Central Kitchen Pantry

Store all of your food in one handy location for fast and simple access. Your kitchen’s tall pullout pantry unites cold food and dry goods storage with an extension from the refrigerator. With its long shelves that swing out, this slim cabinet provides lots of storage in a little area.

15. Neat Pantry Organization

Neat Pantry Organization

The pantry door is often open, so it’s critical to maintain cleanliness and organization. A wooden wine rack gives the impression of affluence and neatness. These walk in kitchen pantry ideas maintains its neat appearance by purposefully placing food, cookware, and appliances on pristine white shelves.

16. Kitchen Pantry Organization Ideas

Kitchen Pantry Organization Ideas

Having the appropriate tools can make a big difference in pantry organization. For example, an over-the-door closet can free up room within the pantry by converting an unused area into a practical storage area. On the other hand, corner kitchen pantry ideas can also help save space. Choose a wire organizing rack; it has movable storage baskets, so you can customize it to your specifications.

17. Organized Pantry Zones

Organized Pantry Zones

Creating zones inside a simple walk-in pantry will increase its usefulness. Set aside certain shelves or sections for pantry staples, such as additional paper goods, supper components, snacks, and drinks. To ensure that everyone in the home understands where to locate items and where to put them back, label each zone.

18. Hidden Pantry Items

Hidden Pantry Items

Keep your kitchen looking neat and organized by hiding food, appliances, and other supplies in a concealed pantry. When the pantry door is closed, built-in porcelain cabinets on each side of the space combine to provide a smooth, unified design. The pantry, while hidden, yet complements the kitchen’s serene color palette and simple style.

19. Kitchen Pantry Cabinet Ideas

Kitchen Pantry Cabinet Ideas

There is plenty of room in floor-to-ceiling cabinets to store your essential kitchen items. While you’re cooking, you can easily reach various items with a tall cabinet that has shelves at varying heights. This handy pantry complements the bottom cabinets’ dark stain, keeping the kitchen’s design cohesive.

20. Small Pantry Storage

Small Pantry Storage Idea

Space-saving techniques and clever storage are essential when managing a tiny pantry. To make snacks easier to reach, divide them into storage containers or bags. To make it easy to see what’s inside, transfer dry foods like pasta, cereal, and other items into transparent plastic containers. To add more storage without packing the shelves to capacity, think about purchasing an over-door wire rack.

21. Small Kitchen Small Pantry Ideas

Small Kitchen Small Pantry Ideas

You will be able to cook with more space if you place a kitchen pantry cabinet in a convenient location just outside the kitchen. To maximize the storage space in your pantry cabinet, consider adding shelves to the backs of the doors as convenient pantry ideas for small kitchens. Pullout shelves also allow you to make the most of every available area for storing small appliances, supplies, and food.

22. Recessed Kitchen Pantry Design Ideas

Recessed Kitchen Pantry Design

Modern kitchen cabinets with recessed panels provide a modern, built-in look and neatly conceal pantry storage. This design maintains the kitchen’s uniform appearance by blending in well with the surrounding cabinets. Door storage and shelves are ideal for arranging small kitchen appliances, dry items, and spices inside.

23. Built-In Ideas for Kitchen Pantry

Built-In Ideas for Kitchen Pantry

To make it simpler to access your kitchen necessities, replace standard shelves with sliding drawers. Pullout drawers below and spacious shelves above provide plenty of storage in a compact form. You can also quickly and easily examine what you have with this configuration. In addition, the white double doors conceal your assortment of dry goods while coordinating with the design of the kitchen.

24. Pantry Ideas for Fine China

Pantry Ideas for Fine China

Food storage is not the only function of pantries. To arrange and showcase your china and dinnerware in a tidy and appealing manner, use the pantry shelves. So that every dinner guest can enjoy your beautifully arranged tableware, stack bowls and plates neatly and place glasses with care.

25. Cubby Style Pantry

Cubby Style Pantry Kitchen

It’s easier to keep your kitchen pantry organized and maintained if your food goods have clear labels. Cubby-style pantry designs created by combining cabinets provide room for both bulk and regular products in one handy location. Little bins and shallow boxes are simple to take into the kitchen, cutting down on the number of journeys back and forth.

26. Compact Pantry Ideas

Compact Pantry Ideas

Conveniently located near the kitchen island is a compact pantry with an extra deep shelf. Items that are often difficult to reach are easily accessible thanks to deep rolling drawers. The pantry’s small size allows it to fit in with the kitchen while concealing food and equipment from view.

27. At-The-Ready Pantry Storage

At-the-Ready Pantry Storage

The goal of this pantry is to make items easily accessible. You can now easily reach deep drawers with the redesigned pullout storage, which is ideal for organizing a large number of products. Additionally, the door has a corkboard along one side, which gives you a convenient place to put notes, keys, and any cute family photos you’d want to show off.

28. DIY Pantry Ideas

DIY Pantry Ideas

This kitchen’s DIY pantry was created out of a closet. You can easily reach the internal storage area thanks to the smooth sliding doors. Concealed behind cloudy glass doors, rows of spacious shelves await you inside, providing enough space for groceries and kitchen necessities like a microwave and trash can. Chalkboard-style custom cabinets with bright kitchen colors on the panels flank the pantry.

29. Locker Style Pantry

Locker Style Pantry

Make a unique pantry out of metal lockers to liven up your kitchen. These lockers, when paired with wooden shelving, provide an abundance of storage space and style to any eccentric kitchen. Added bonus: magnetic spice canisters work well with the metal locker doors.

Kitchen Pantry Décor Ideas

Kitchen Pantry Décor Ideas
  • Combine brightly colored wallpaper with your kitchen pantry to create a standout piece. 
  • Pantries can be located in places without windows, so use paint or light-colored tiles to make the space seem more airy. 
  • For the countertop and backsplash, combine materials like marble and wood to create a chic look. 
  • Apply a glossy coat to the pantry ceiling to give additional luster, and for a really stunning effect, think about tiling the pantry floor with patterned tiles.

How Important Is a Pantry?

kitchen pantry importance

Perhaps you’re asking yourself, “How truly essential is a pantry?”

A pantry can really brighten up a kitchen, but ultimately, it comes down to personal taste. It serves mostly as a place to store things, with the purpose of keeping food fresh by keeping it cold and dark. A pantry is a staple in every kitchen since it’s so useful and manageable. Everything is conveniently accessible and kept in one location.

Not all food goes in a pantry, however. Additionally, it can accommodate kitchen gadgets and equipment, freeing up important countertop space. An integrated compact pantry, housing necessities such as the coffee maker, kettle, and toaster, can also double as a breakfast alcove.

More sentimentally, pantries can include cookbooks that contain treasured family recipes or treasures like antique crockery or silver teapots that are too valuable to use every day. Pantries evoke memories of bygone eras in which we prized belongings from the family and home, preserving them in one location.

How to Choose a Kitchen Pantry

How to Choose a Kitchen Pantry

To make sure your pantry counter or cabinet matches your requirements, take into account the following important elements before choosing or building one:

Space

Take measurements and set aside adequate room to accommodate your needs.

Style

Match the pantry’s color scheme, material selection, and finish to the kitchen’s overall design and style.

Features

Use pendant or ceiling lights to give brightness to the area. For added convenience, think about installing motion-activated puck lights. To keep smaller objects tidy, use shelf inserts with tiers and lazy susans.

Cost

Buying a prefabricated pantry or building one yourself depends on your demands and the layout of your kitchen. Online retailers offer freestanding glass pantry units between $150 and $500, while customized pantry units usually start around $1,000 for a simple 15-by-80-inch unit.

Explore More :