A small bathroom is easy to keep clean, but finding the perfect vanity can be tricky. If it’s too big, it can crowd the space. Luckily, there are small bathroom vanity ideas that fit perfectly. They’re designed to save space and often come with built-in storage like drawers or shelves. With the right vanity, you can keep your bathroom neat and tidy.
To help you out, we’ve put together an index of small bathroom vanity ideas. You’ll find lots of options to make your bathroom both practical and stylish. From floating shelves to wall-mounted vanities, these ideas will help you make the most of your space and give your bathroom a fresh look.
1. Single Vanity with a Shelf
Setting up a vanity on the lowermost shelf will increase your storage capacity. In addendum to drawers, the shelf offers you a place for storage baskets or bath towels to keep everything you need for the bathroom tidy.
2. Small Vanity with an Ornamental Door
Change the standard cabinet door on a tiny single vanity to something interesting, such as chicken wire, a glass front, or a curtain-laced door, to add some flair.
For example, you can add some texture to the vanity’s simple white appearance by utilizing an internal curtain and a lattice door design. This makes the bathroom more intriguing and fashionable by adding additional patterns, colors, and materials in addition to providing you with concealed storage space.
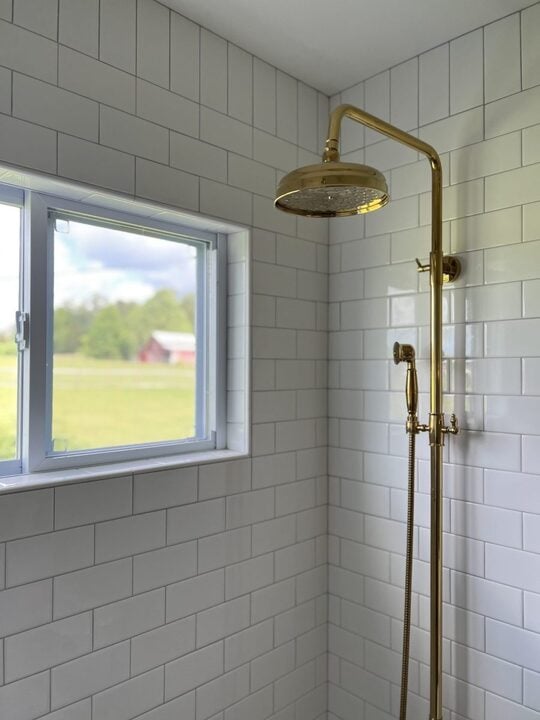
3. Brass Console Vanity
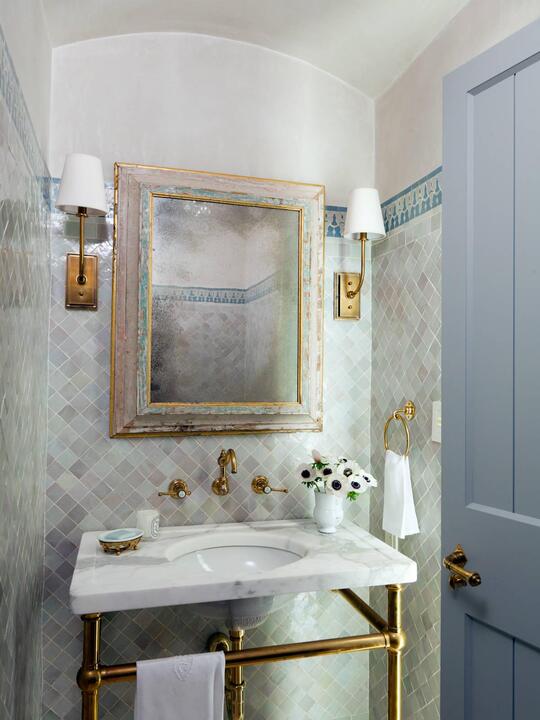
Installing a brass console vanity can give your bathroom a classic appearance. It’s a timeless choice that looks great in any bathroom, regardless of the style, and it fits in both traditional and contemporary settings. It also functions as a towel or napkin holder, which is convenient if you don’t have enough room for additional towel rings or bars.
4. Vanity with Internal Organizers
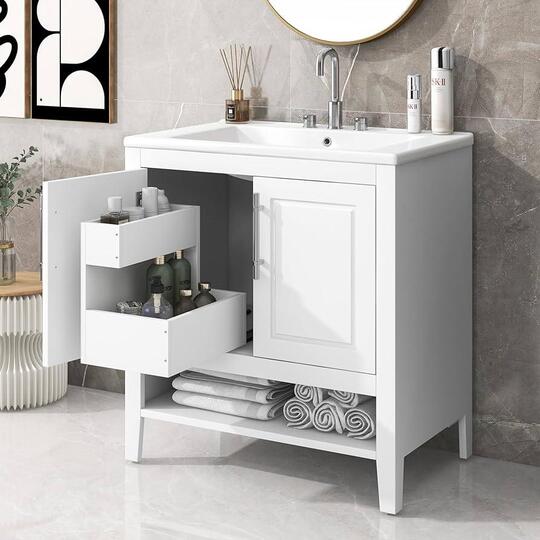
Installing practical organizers like these two-floored sliding drawers can help you make the most of your little vanity. Rather than letting vertical space go unutilized in a vanity without drawers or shelves, make use of clever solutions that will increase the surface area while keeping your bathroom necessities accessible and organized.
5. Pink Vanity Under a Marble Top
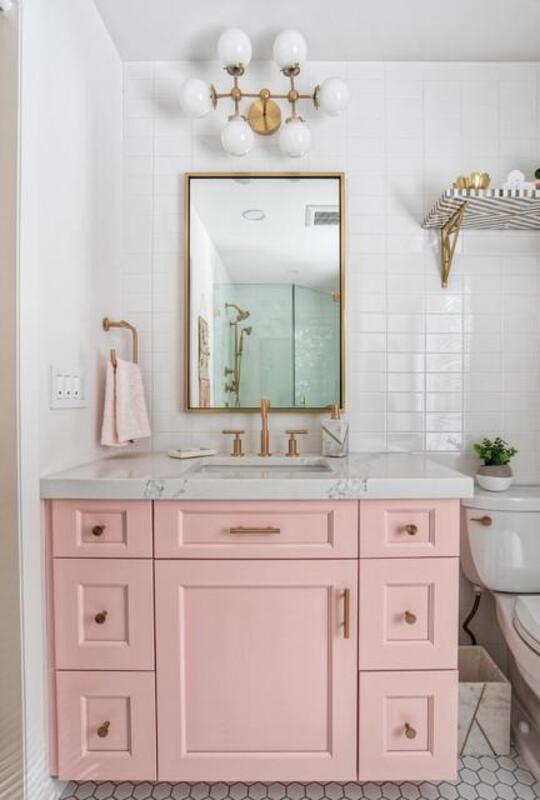
A blush pink vanity sprinkles some softness to this little bathroom, and its several drawers provide plenty of storage space. A simple way to personalize a traditional vanity is to paint it a vivid color and swap away the hardware with unique pulls or knobs. It’s a spartan, low-cost design tip that can drastically change the appearance of your bathroom.
6. Wall to Wall Floating Vanity
Having a space between your wall and the vanity squanders useful space, invites trouble when objects fall through the opening, and makes dusting difficult.
Install a wall-to-wall floating vanity that is specially made to prevent these problems. Its neat and organized look not only effectively utilizes the whole area but also adds a modern touch.
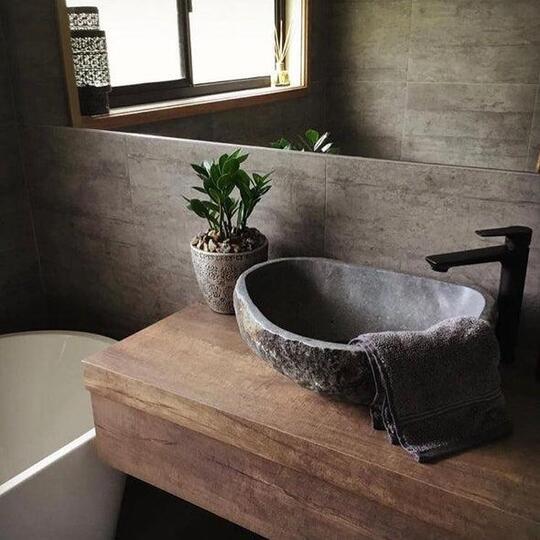
7. Industrial Type Vanity

A pipe-base vanity, a dense rock sink, and muted black hardware give this gloomy and dark bathroom a touch of industrial style. The vanity, with its clean lines ideally combined with a circular mirror, ornate floor tile, and sleek lighting, makes a powerful style statement despite its tiny size.
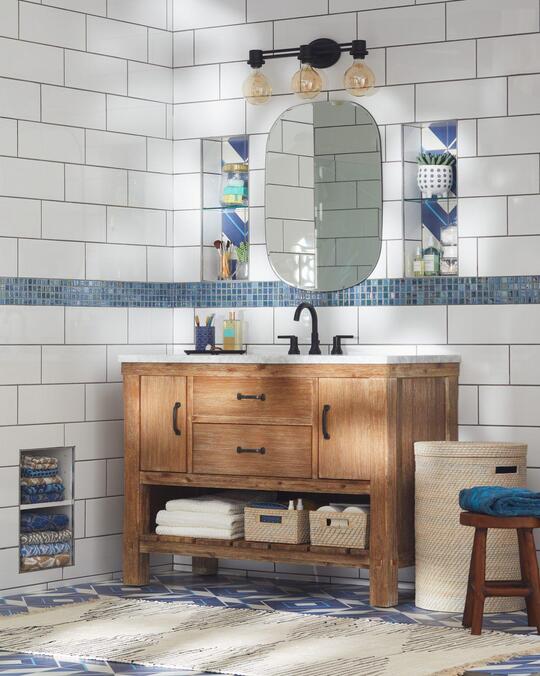
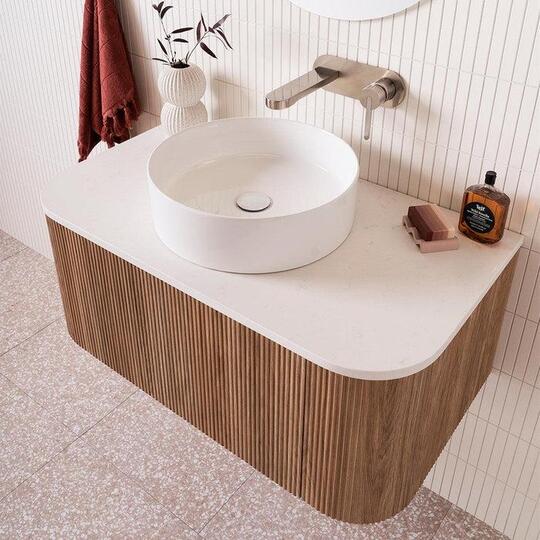
8. Contemporary Console Sink
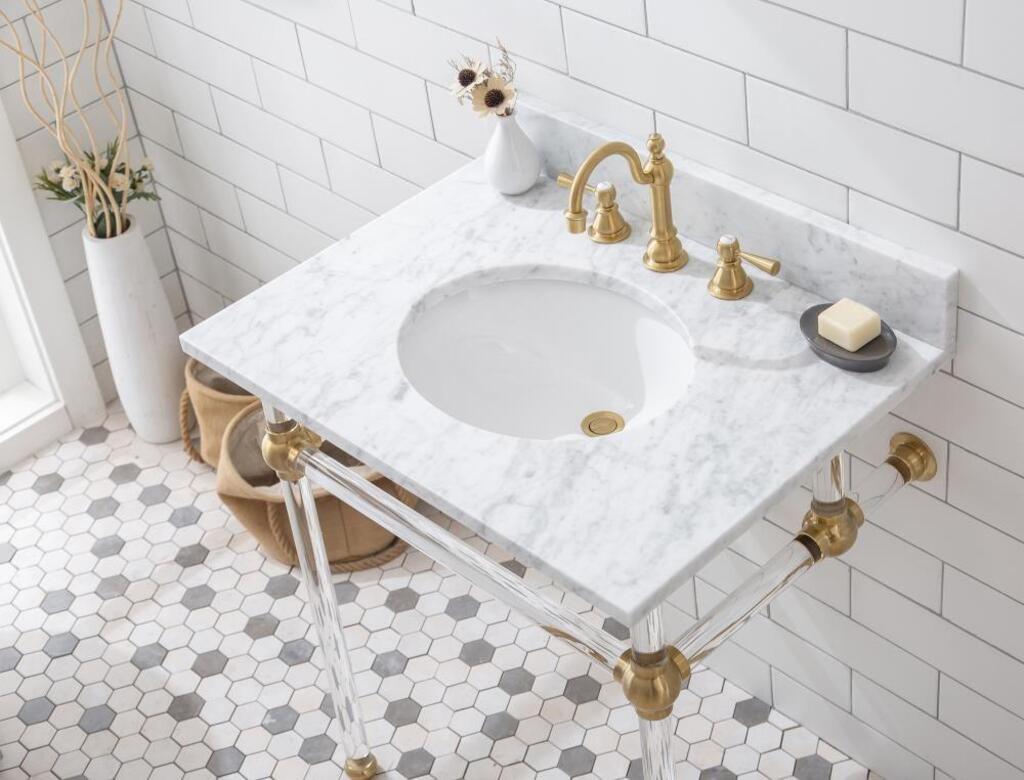
A small bathroom vanity with a sink having clean lines can give a classic design a contemporary touch and give it a sleek appearance. This little bathroom radiates luxury and style thanks to its thick marble countertop and gleaming brass legs. Utilize the space beneath the sink; it’s big enough to fit a garbage can, short stool, or basket.
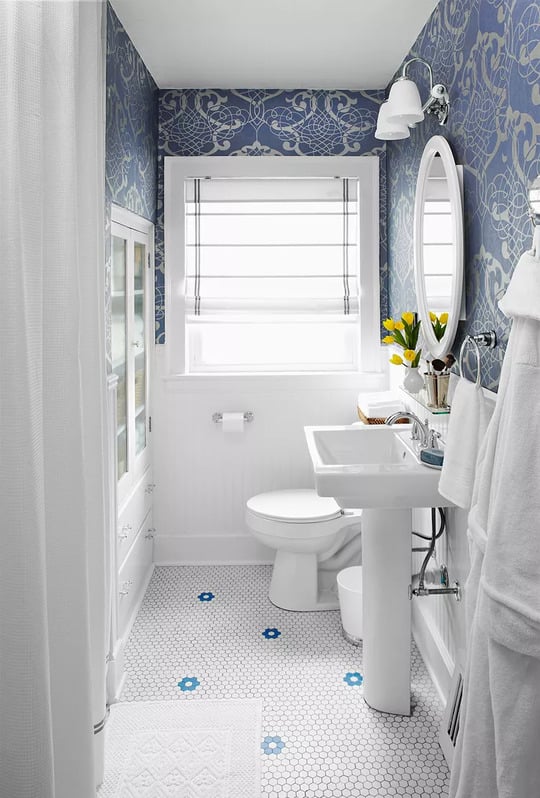
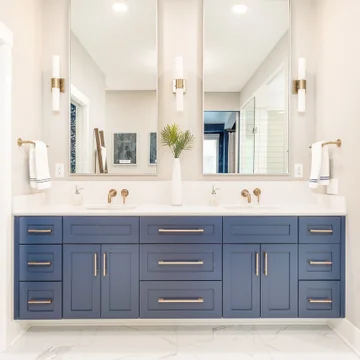
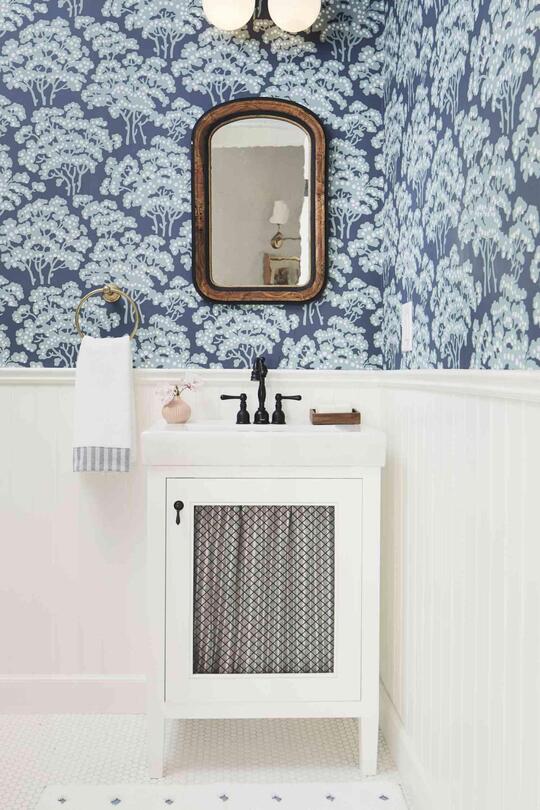
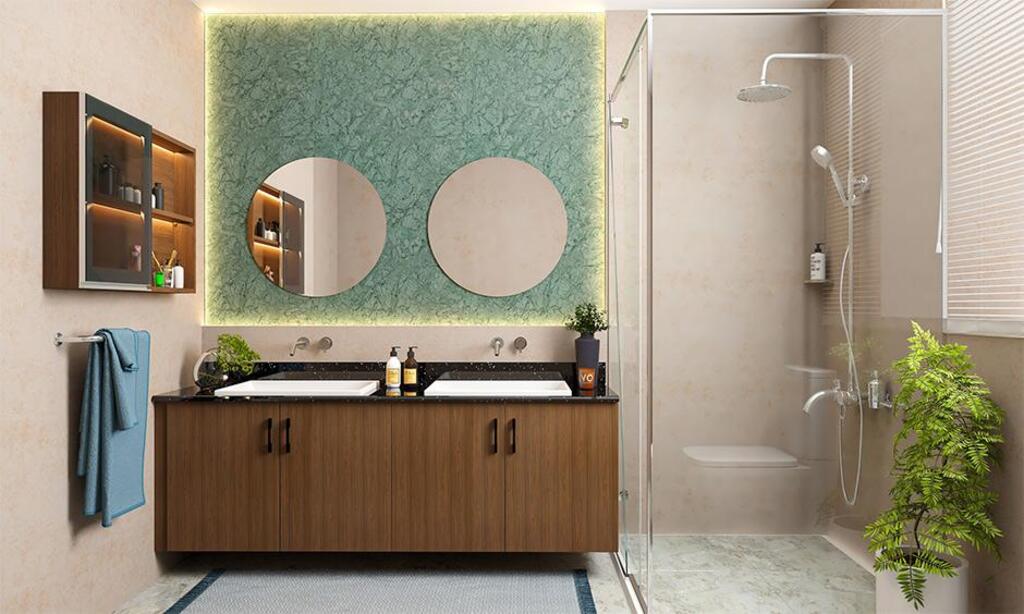
9. Blue Vanity with Scalloped Attributes
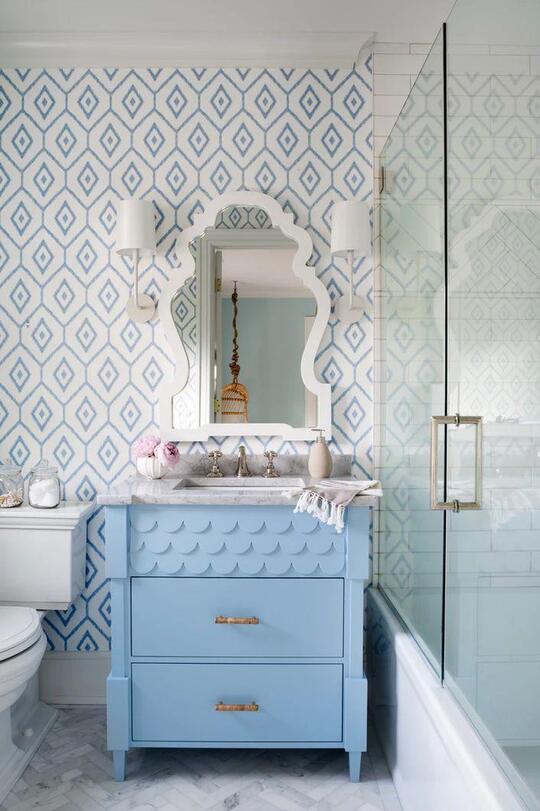
A small vanity unit can be unique, even if it is small. Consider the exquisite marble top and the eye-catching scalloped feature of this gorgeous powder blue vanity. The wallpaper has a geometric pattern in white and blue that complements the color of the vanity. A playful accent mirror has an interesting design that echoes the scalloped edge of the vanity.
10. Marble Vanity with a Rack
A wall-touch floating vanity is the ideal solution for a little bathroom. Marble is a traditional option that adds refinement to the space. A shelf beneath the vanity may offer more storage while maintaining a basic design. This will make the vanity more useful.
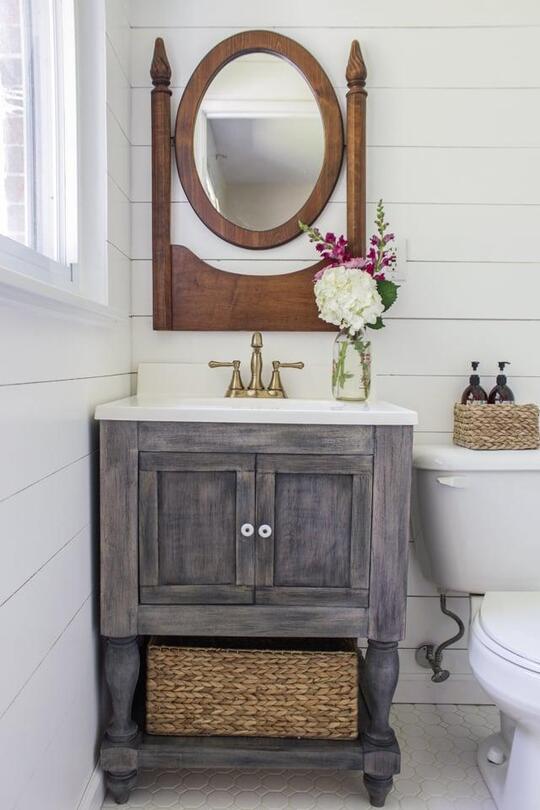
11. Antique Bathroom Vanity
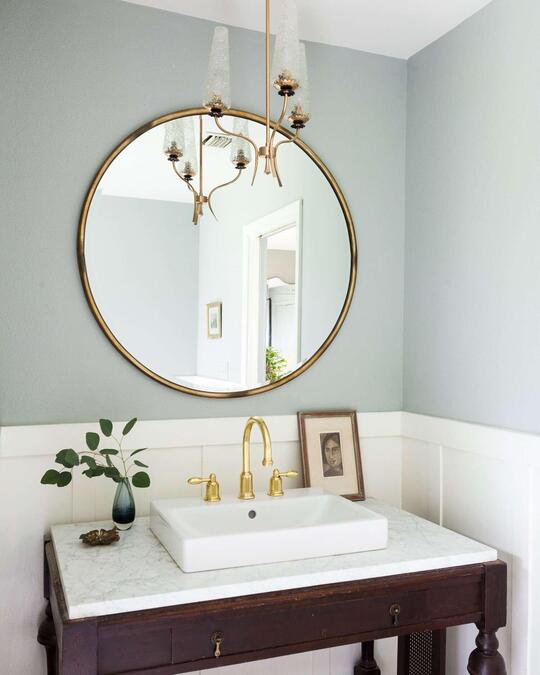
Convert an antique-type console table into a quaint, unique, tiny vanity. The square sink and marble top preserve and update the wooden component, while the little drawers offer just the proper amount of space for your bathroom essentials. Add a faucet, brass mirror, and pendant lamp that match the vanity to complete the room’s antique feel.
12. Single Vanity with a Toilet Paper Holder
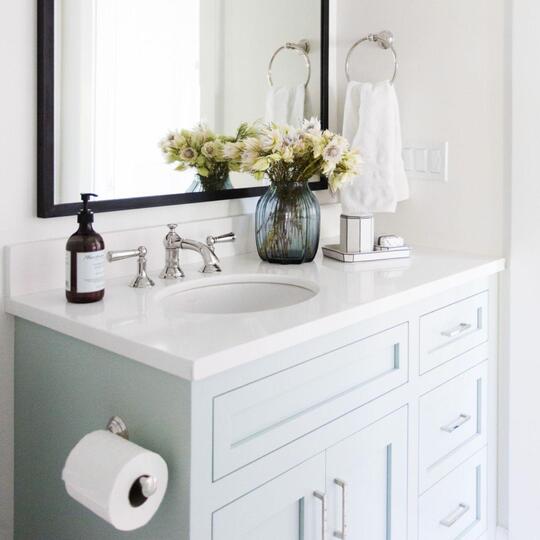
Put a toilet paper bracket on the flank of your tiny vanity if it is near to the toilet. Use up to 3 distinct metals in one area to create a layered, fashionable design. Just make sure the finish complements the other materials in the bathroom.
13. Wall Mounted Vanity with In-Built Shelves
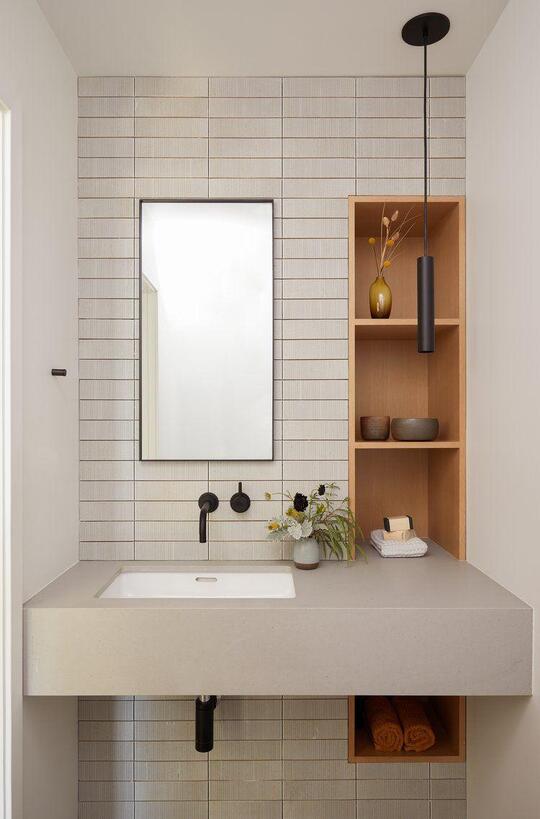
If your compact vanity has vertical space above it, you could choose to add in-built shelves. These classy shelves complement the wall-mounted vanity’s simple design. Combining cool and warm textures and colors contributes to a well-balanced appearance.
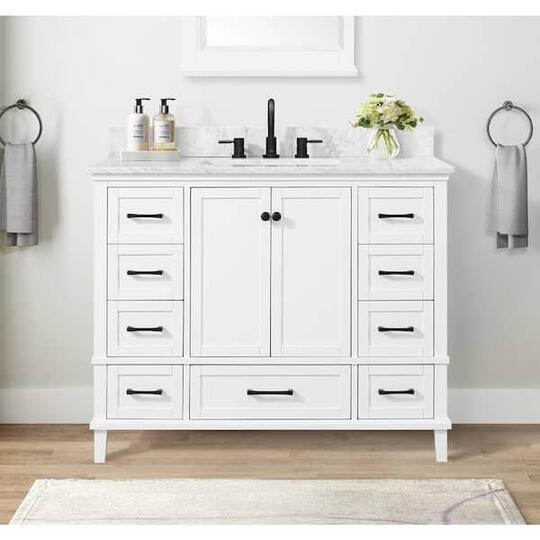
14. Vanity with Several Storage Alternatives
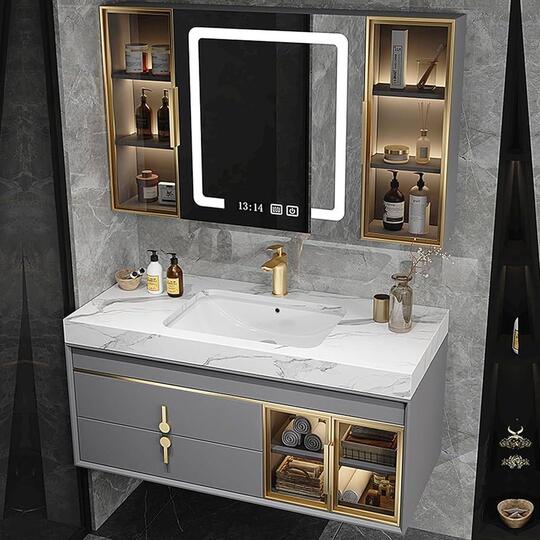
To maximize your available space, choose a vanity that has many storage alternatives, including cabinets, shelves, drawers, and a toilet paper holder. You may keep an assortment of goods in this manner, including additional towels, hair styling equipment, toilet paper, and dental supplies.
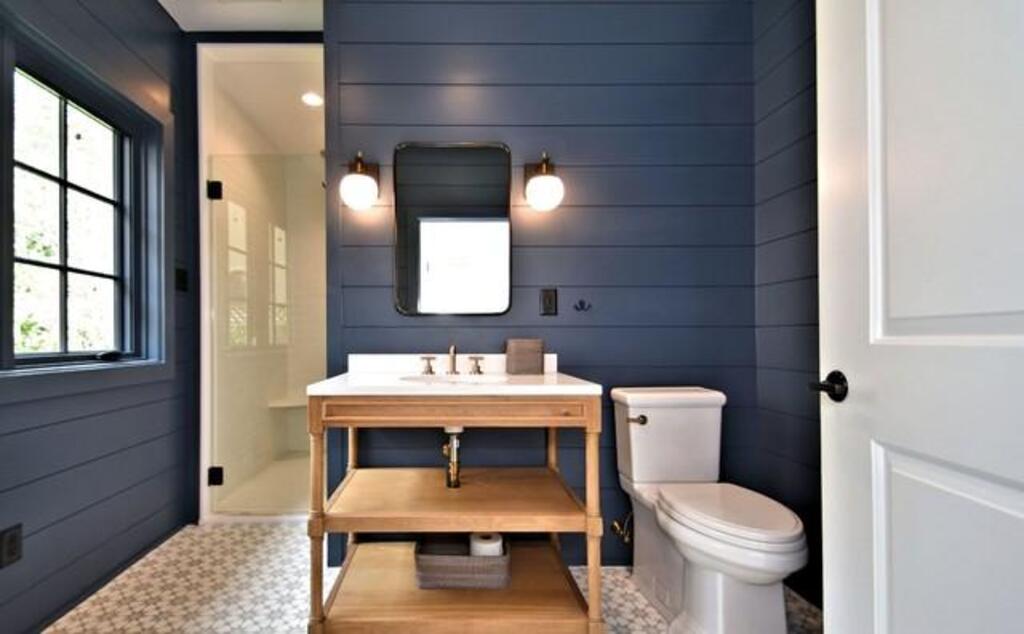
15. Floating Marble Sink with a Pull-Out Drawer
It’s simple to put a mounted drawer below a floating marble sink if you like the design but need storage. The warm-toned wooden drawer in your bathroom accentuates the rock’s natural veining and rustic brass finishes, creating a cohesive and well-thought-out design.
16. Curved Bathroom Vanity
A marble top with decorative edging gives a freestanding, curving vanity a sense of classic elegance. Due to its softer edges, curved furnishings are a great option for compact rooms since it doesn’t seem as bulky.
17. Small Vanity with Curved Legs
Turned legs can make an otherwise boring white vanity more distinctive. With this easy and inexpensive adjustment, it may go from a builder-grade look to a bespoke design. Most hardware shops have natural wood-turned legs. To make them fit in smoothly and seem to have always been a part of the vanity, just connect them to the footing of the vanity and daub them the identical color.
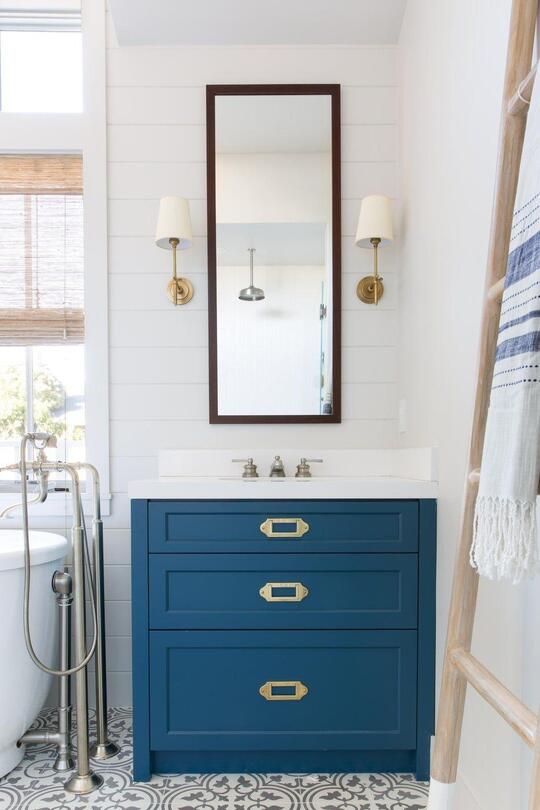
18. Navy Blue Vanity with Leather Pulls
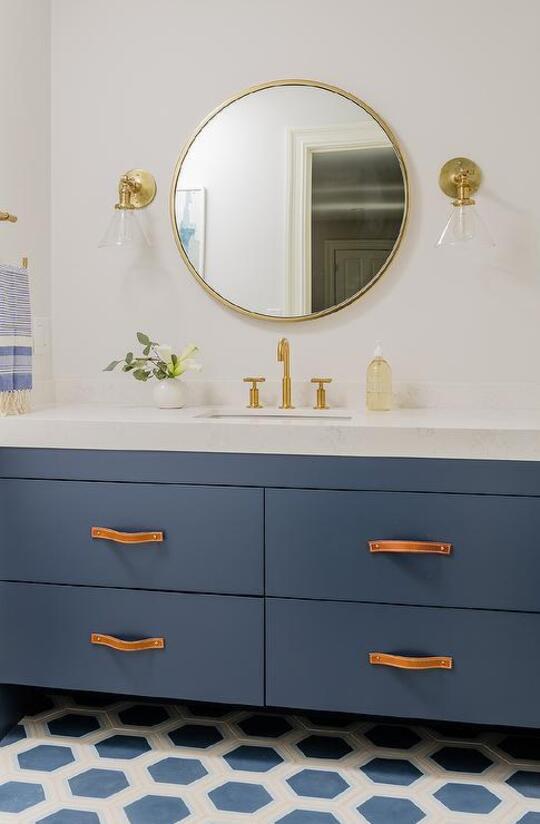
Replace the boring knobs on a tiny single vanity with drawers with something spectacular, like these leather tugs, to instantly spruce it up. They provide a unique design element that really pops by contrasting with the navy blue vanity and bringing in a novel and surprising material.
19. Open Shelf Vanity
Choose a tiny vanity with loads of storage to get the most out of it. It’s simple to quickly get what you need off the open shelves. Use baskets to arrange your goods on the shelf so that everything is neat and free of clutter.
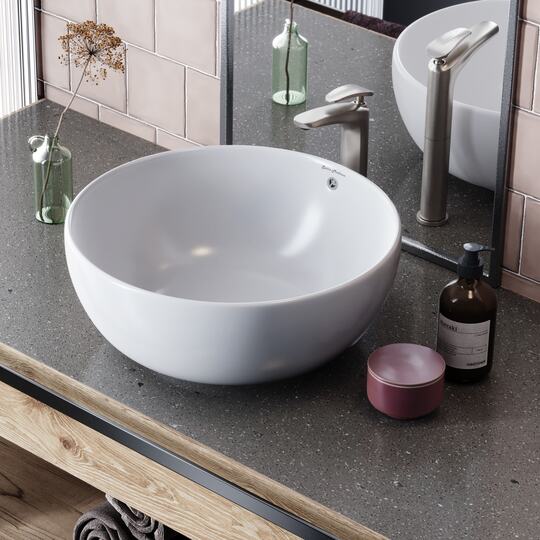
20. Stone Bowl Vanity
A little vanity table with a rock bowl sink will give your bathroom a unique touch. Whether it’s a massive marble bowl like this one or a colorful ornamental item you bought on your trips, you can adapt any robust bowl-style object into a sink. Underneath, insert a colorful basket to provide extra area for toiletries.
21. DIY Wood Vanity
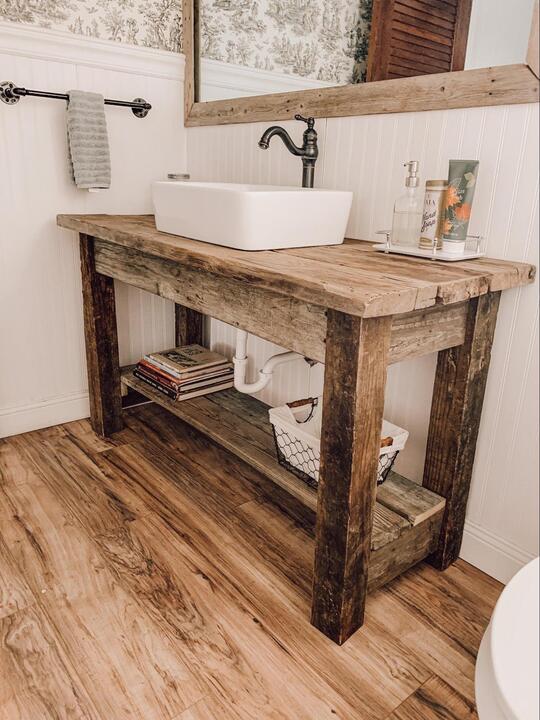
You can create your own little vanity out of a fragment of furniture rather than purchasing a vanity for your bathroom. A sink will go on top, so be sure to take into account the console table’s width, depth, and height when using a tall nightstand, cabinet, or other piece of furniture.
22. White Bathroom Vanity
A single white vanity will keep your bathroom bright and spacious and is ideal for fostering a tranquil mood. Maintain the air of brightness by opting for a marble countertop or white quartz. To complement the clean color scheme, add a touch of sophistication with cool, lustrous chrome spigot hardware.
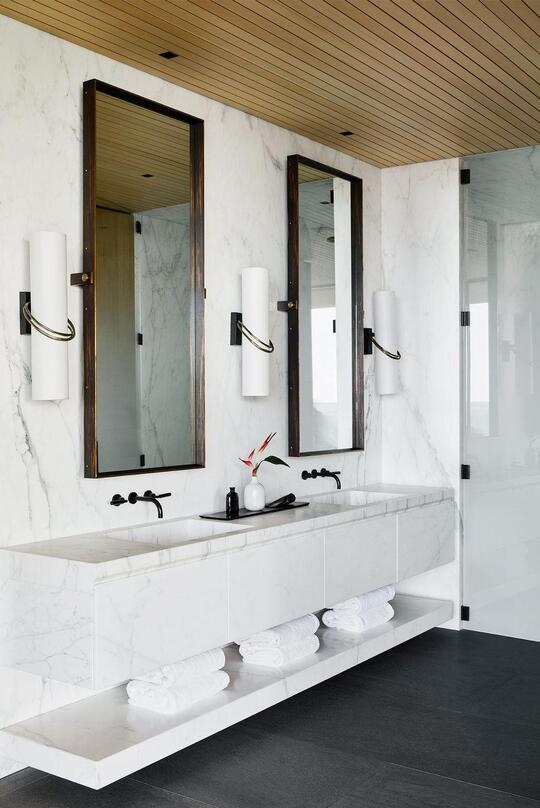
23. Eclectic Materials Floating Vanity
The combination of a hardwood shelf, a porcelain white sink, and muted black fittings creates a classy look for this corner-mounted vanity. Making the most of the limited area, the straightforward shelf offers a place to store soap bars or toothbrushes rather than simply having the sink float there. A towel ring, a decorative mirror, and a retro lamp in the shape of a bulb complete the corner. Additionally, a white shiplap accent wall adds a delicate finishing touch.
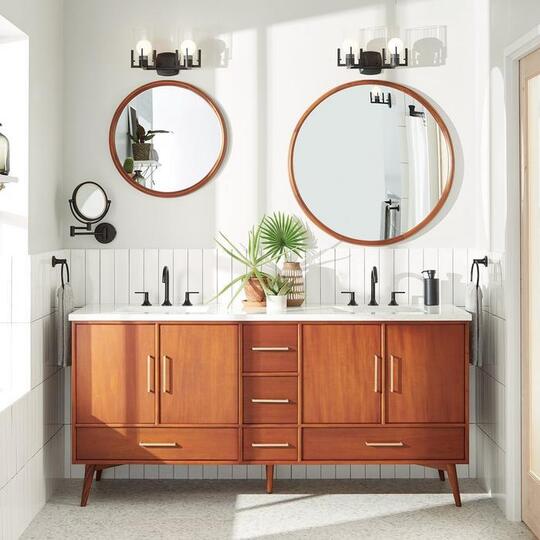
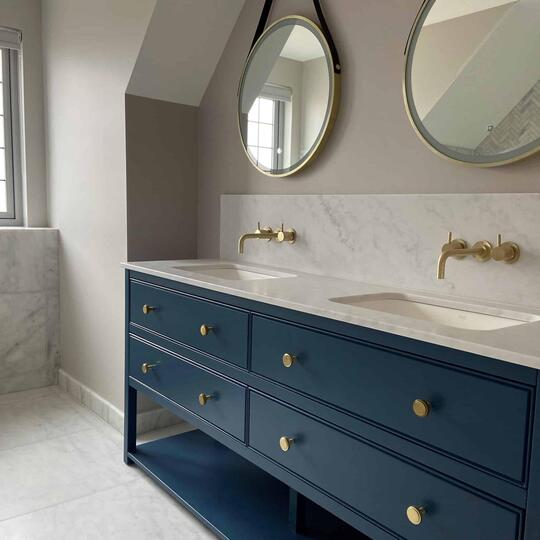
24. Double Vanity
You can still fit a double vanity in a tiny bathroom if you have creative thinking. Additionally, you have twice as much storage room with a small double vanity!
25. Green Painted Bathroom Vanity
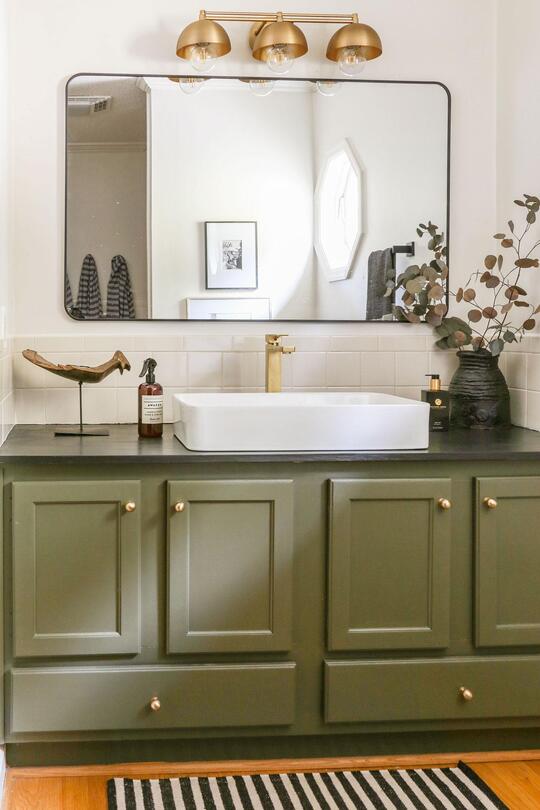
Painting a tiny vanity with a dark, rich hue can give it charm. Its somber green hue lends it a classic vibe, particularly when combined with brass cabinet door locks and matching wooden drawer knobs. Vanity top with ornamental edges in charcoal gray to accentuate the traditional design. Crown molding, cream-tone beadboard, and vintage-style candle sconces all add to the classic look.
26. Double Sink Vanity
A small double sink vanity might be a terrific alternative if you share a bathroom with your kids, roommates, or significant other since it contains two sinks. These vanities are available in floating forms and include storage cabinets as well. Similar to standard stand-up vanities, they come in a range of materials, hardware choices, and fittings.
27. Small Vanity with Decorative Trim
If your little vanity is unadorned, consider lining the cabinet doors or adding ornamental trim to the knobs. To draw attention to the features and give the item a distinctive look, paint it a vivid color and use unusual hardware.
How to Choose the Best Small Bathroom Vanity
Bathroom vanities may be expensive, so think about the following before making that purchase:
Take a measurement of the area to ensure the vanity fits
Make sure the vanity you choose fits snugly in your bathroom without sacrificing design if it’s on the smaller side. Make sure it fits snugly in your area by double-checking all the dimensions, including those with completely opened drawers and doors.
Think about the storage
Though visual appeal is vital, don’t overlook practicality. Look for descriptions that specify the actual storage space available since many bathroom vanities feature cutouts for pipes. Be wary of phony ornamental drawers or drawers that have been chopped into a U shape to accommodate plumbing.
Consider additional expenses
Even if there may be inexpensive vanities available, keep in mind that there are other costs. It is probable that you will need an appropriate faucet, a p-trap to prevent blockages in your plumbing system, and, depending on what comes with your vanity, a mounting bracket and backsplash. You’ll also need to budget for installation charges unless you’re a do-it-yourself plumbing guru, which we don’t advocate for plumbing projects. Think about the original expenditure as well as any further charges since the quality of the wood treatments, hardware, and countertop materials will significantly impact the cost.
Revamp Your Vanity Your Way
There are several alternatives available to you, depending on whether you want to remodel your bathroom completely or simply give it a fast makeover. The majority of bathroom vanities with tops are available in a variety of designs, from contemporary to rustic., So you’re sure to find one that goes with the decor of your house. However, if you want something more distinctive, you may get a vanity without a top and then choose from a variety of toppers that suit your requirements.
Recall that if you choose any of these alternatives, you will need to buy bathroom sink faucets individually.
There are many bathroom vanity ideas available to match the design of your house. In the event that none of them completely fit the bill, you may always create your own personalized vanity. Then, let us handle the task of renovating your bathroom with our skilled bathroom installation services.
Explore More: