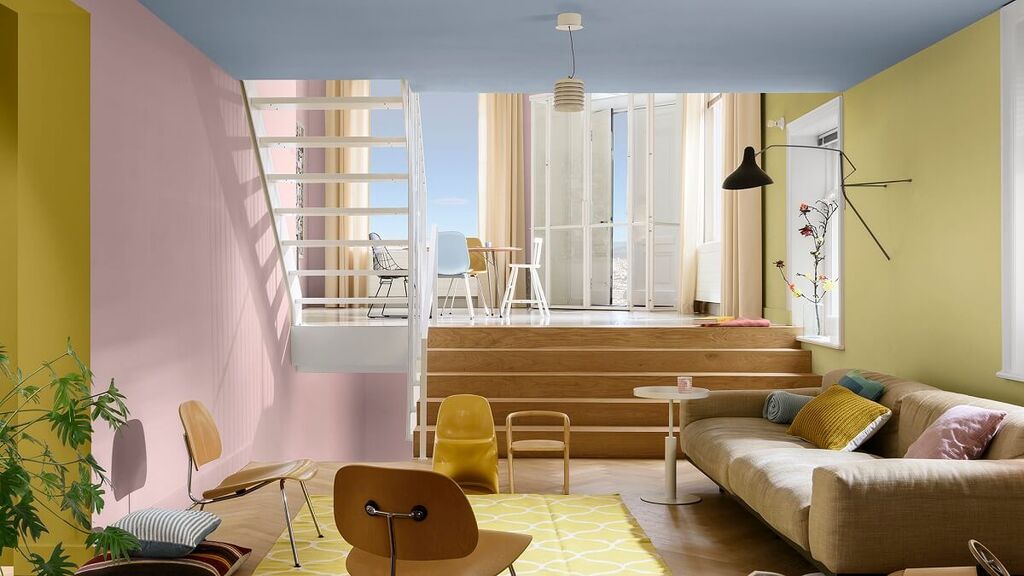
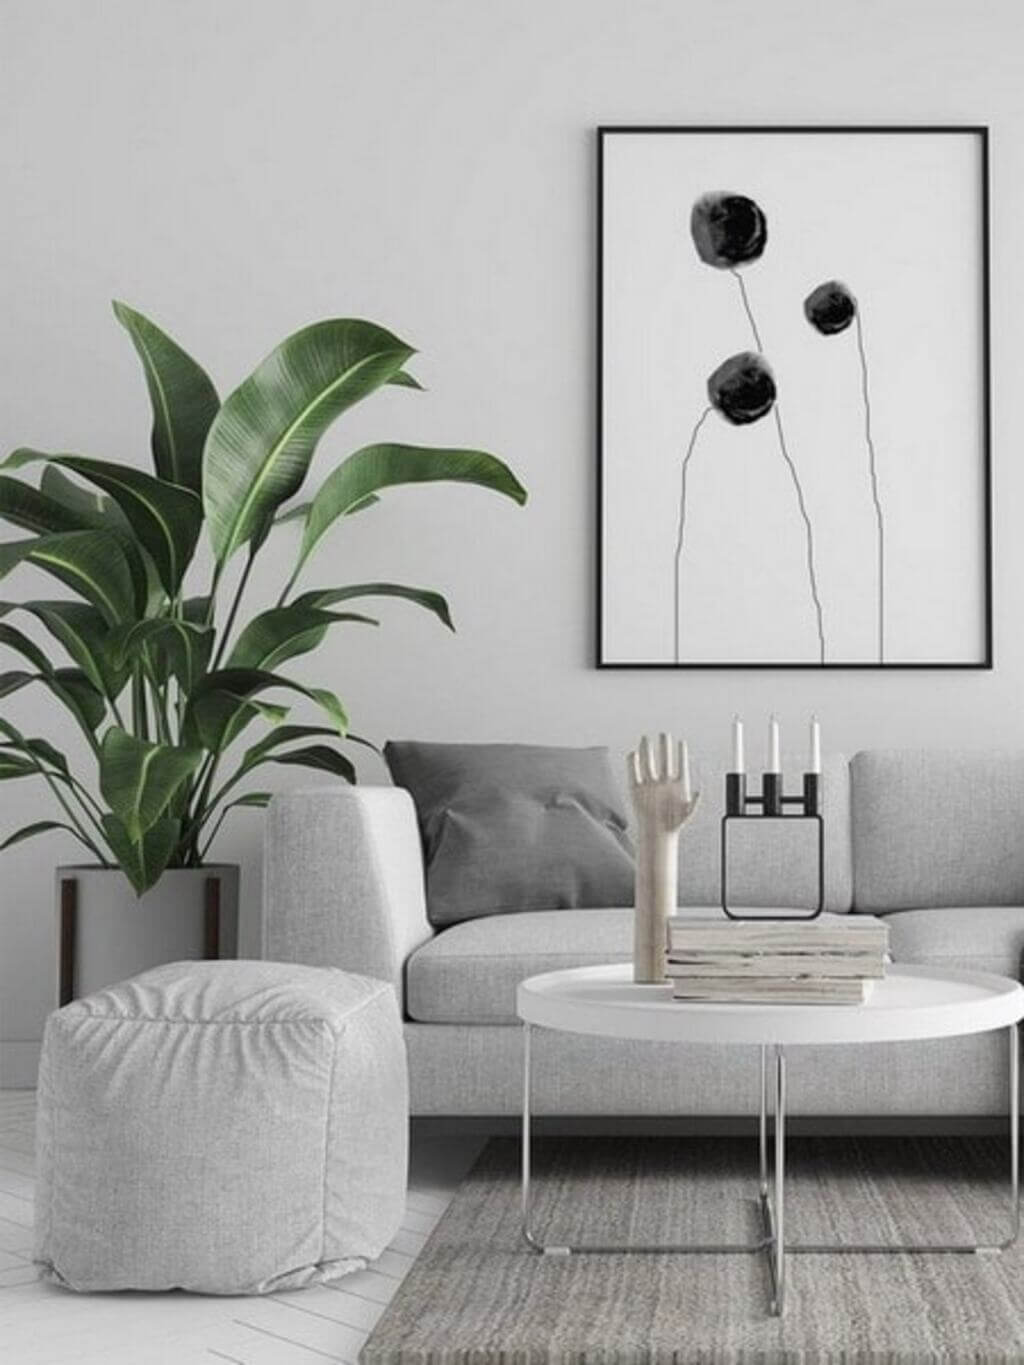
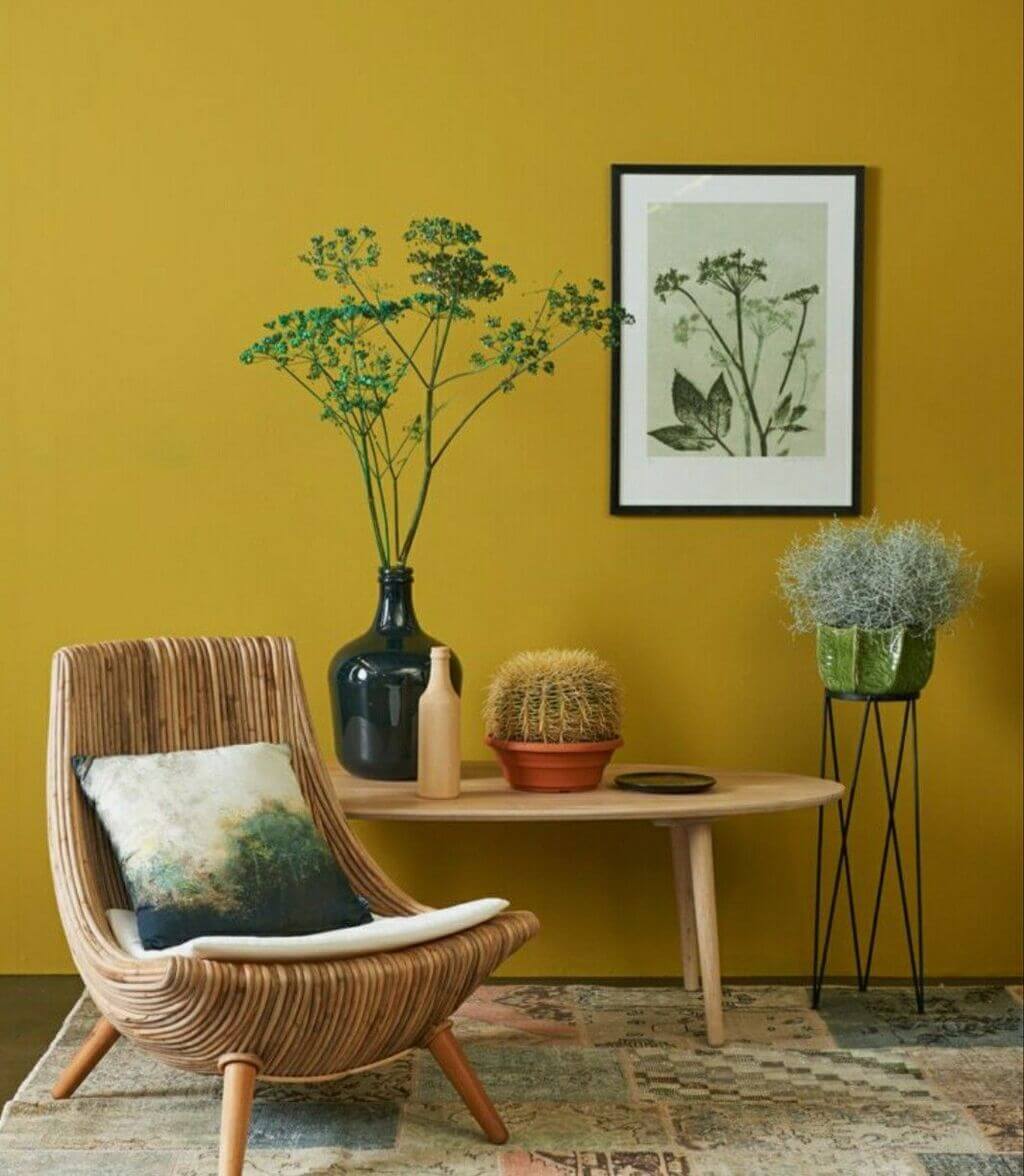
Want to refresh your space without breaking the bank? Your home decor doesn’t have to be expensive to make a big impact. With a few creative, budget-friendly home decor ideas, you can transform your living space into a cozy, stylish retreat that reflects your personality. In this guide, you’ll find ten affordable ways to update your home, proving that great style is possible on any budget.
1. Create a Design Board
Your home decor should reflect your style, and creating a design board is the most convenient way of deciding the theme, color palette, and style that fits your personality. Look for various interior design styles online and pick the one that screams to you, or take online quizzes to find out your interior decorating style.
For example, you conclude that your home decor style is shabby chic, a combination of soft hues and vintage furnishings. Now you can start browsing for shabby chic home decor items and calculate the expenses.
2. Set a Budget
After estimating the expenses, you can set a budget for yourself and save money to buy decor items and raw materials for DIY projects. Engaging in online trading is a substantial option to multiply your funds for a home makeover.
Note that trading can be risky, and using a portfolio tracker can help you minimize the risk; as it will help you determine which investments are growing and which are losing money. Additionally, downloading a budget app will also help you keep track of your earnings and spending, so you have full control over your expenses.
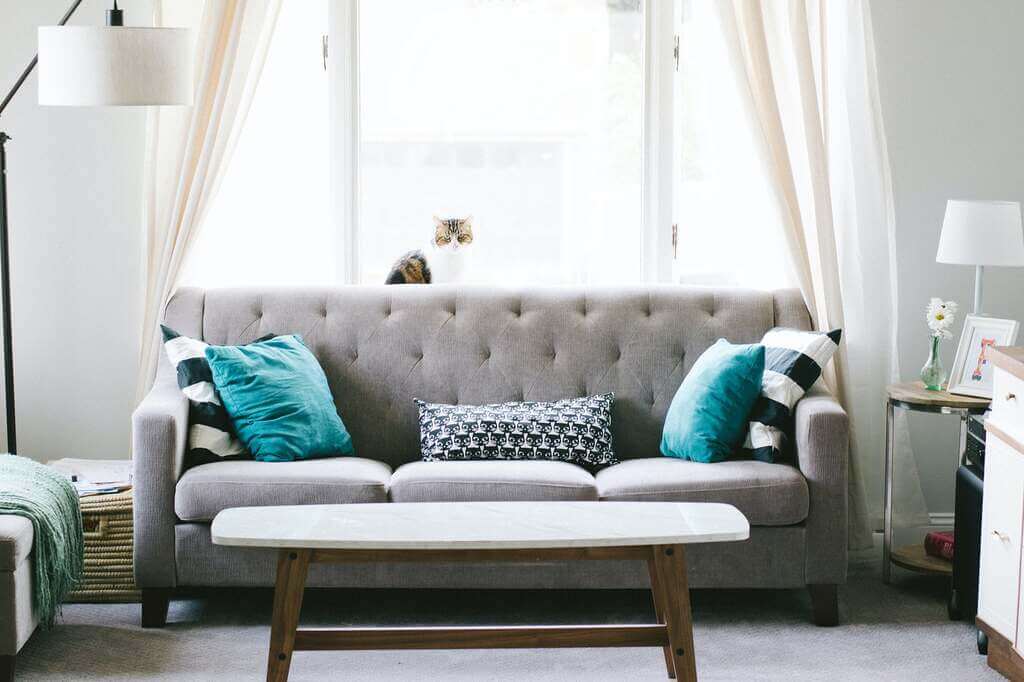
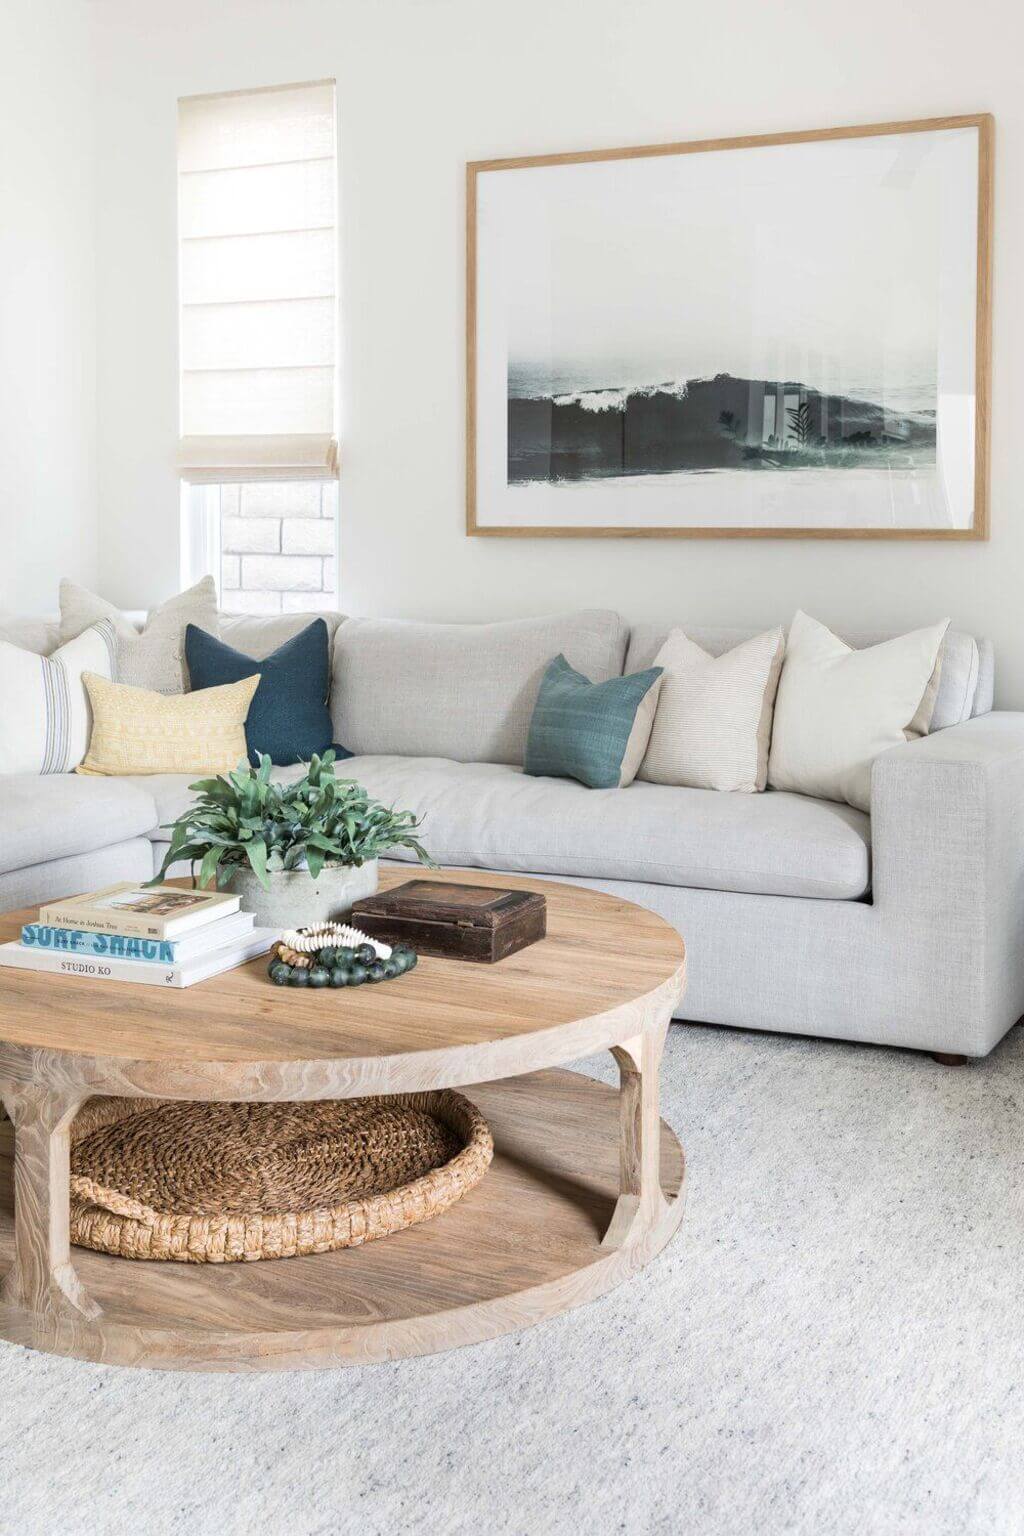
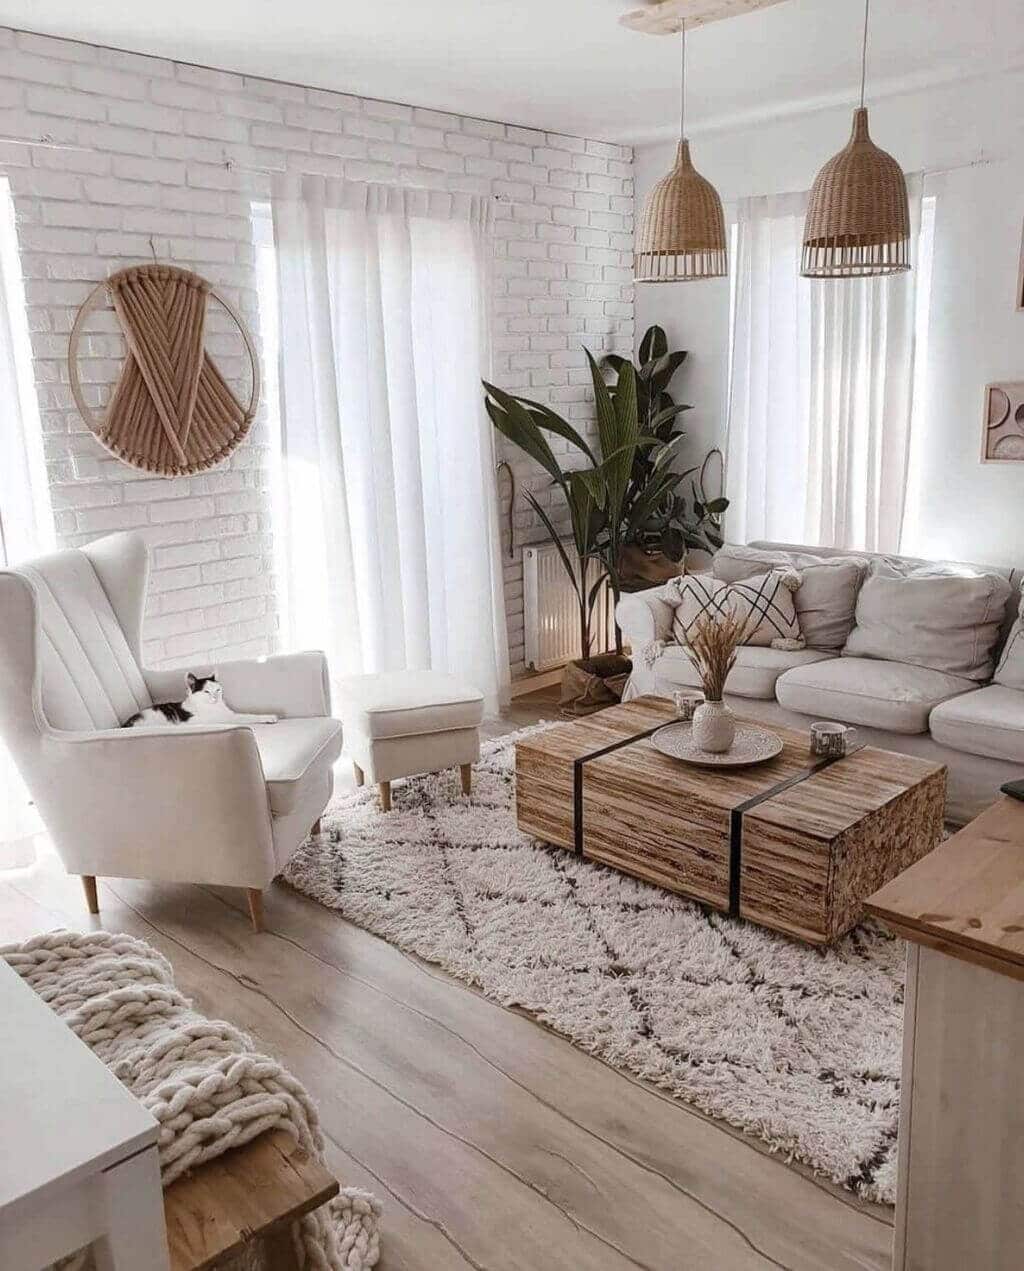
3. Switch Out Throw Pillows, Rugs, and Curtains
Replacing your throw pillows, rugs, and curtains will completely transform the look of your home. Making your throw pillows and curtains is a cost-friendly way to decorate your home. Rugs can be expensive, and a great alternative to buying new ones is to hit up the thrift store and test your luck. Choose your favorite-colored throw pillows and rugs to add a pop of color and brighten a room.
You can also switch out your pillows, rugs, and curtains to match the seasons. For example, replace your comfy fur pillows with lighter textures like cotton for your spring home decor. Make sure to change the filters of your air conditioner too, to avoid recirculating dust and bacteria onto your fabrics and furniture.
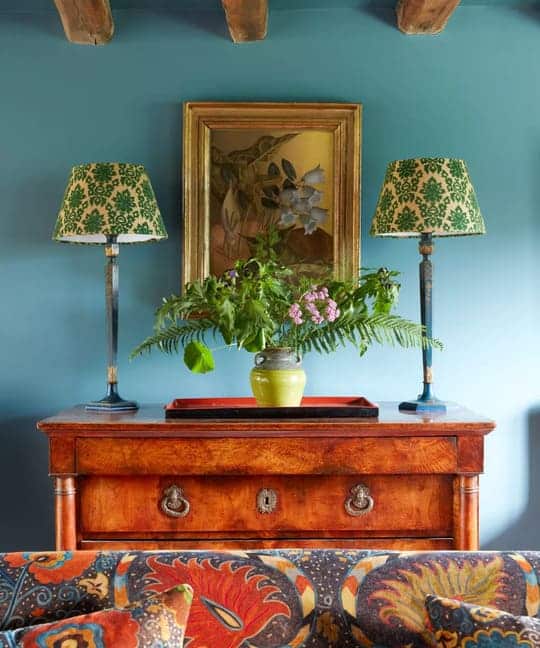
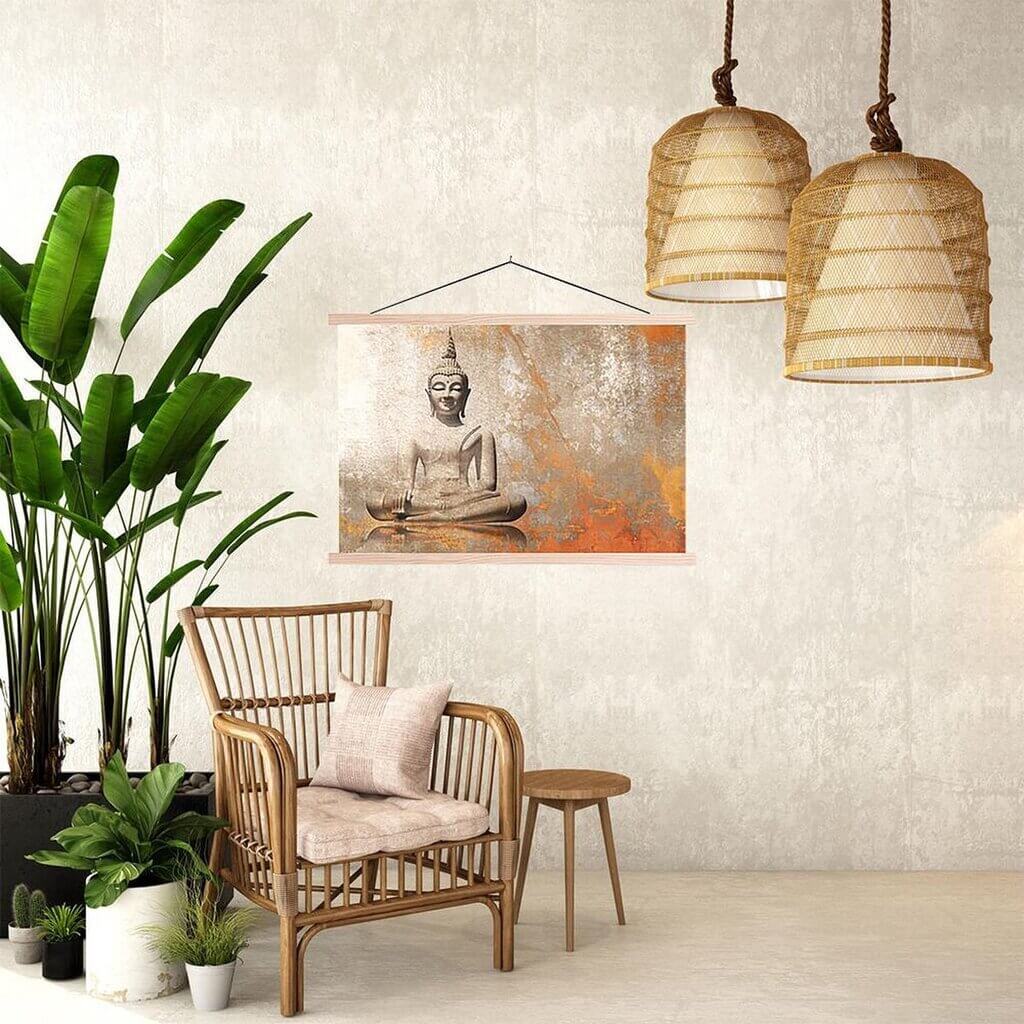
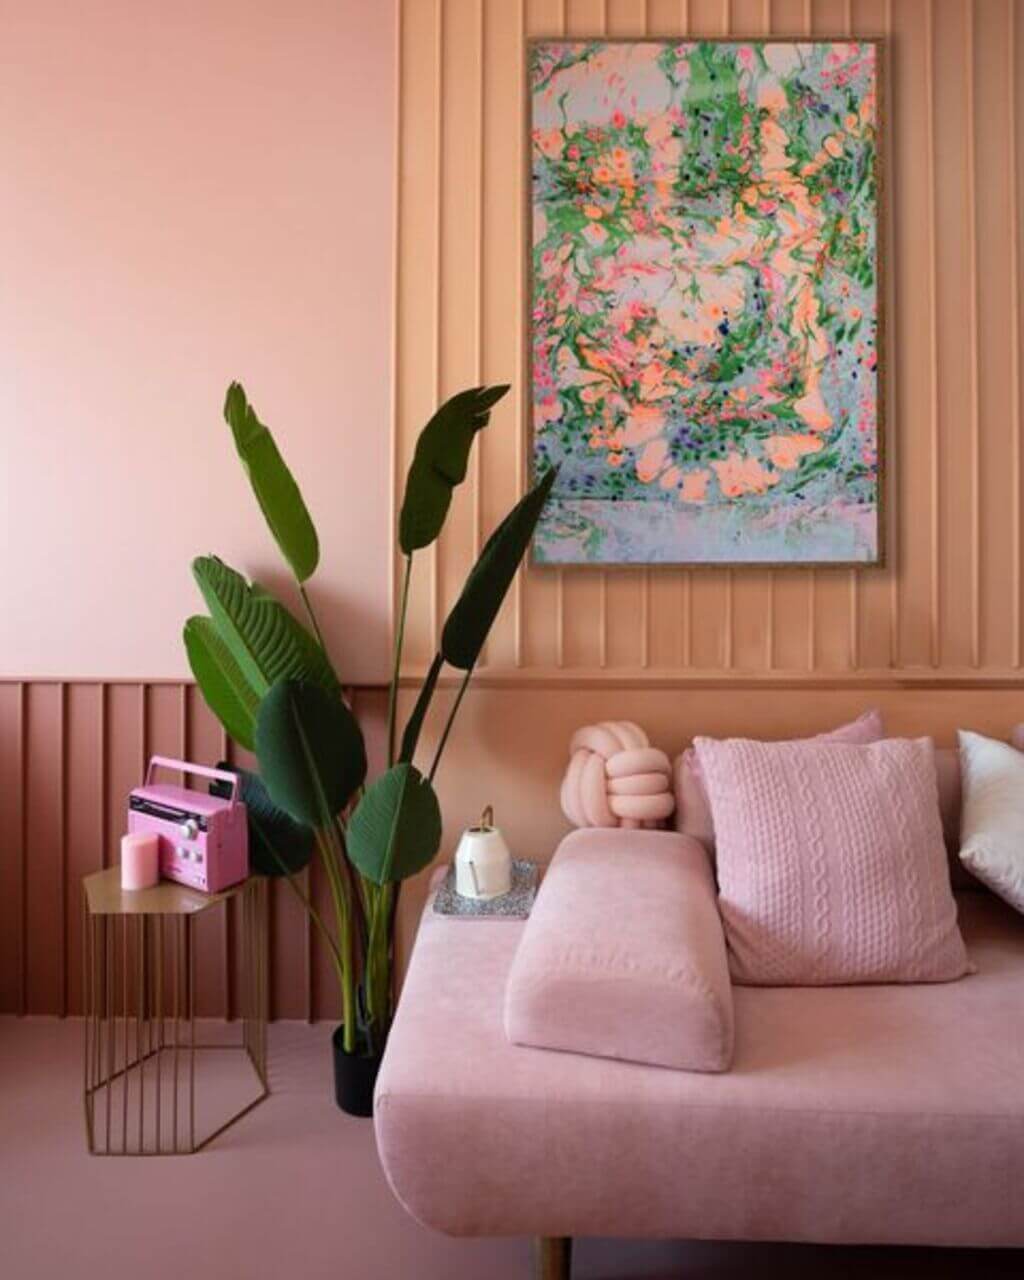
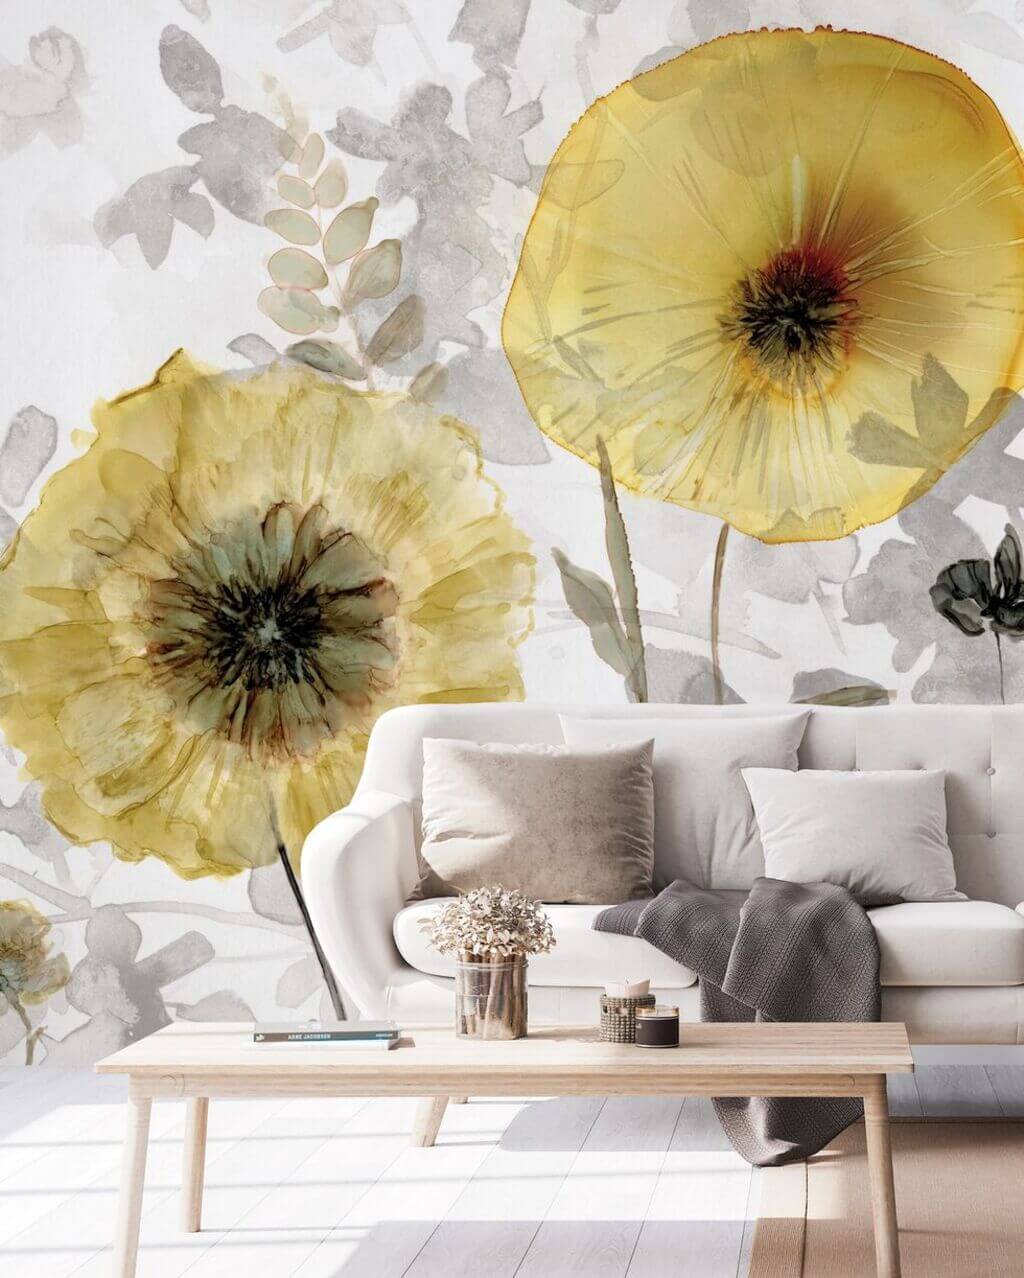
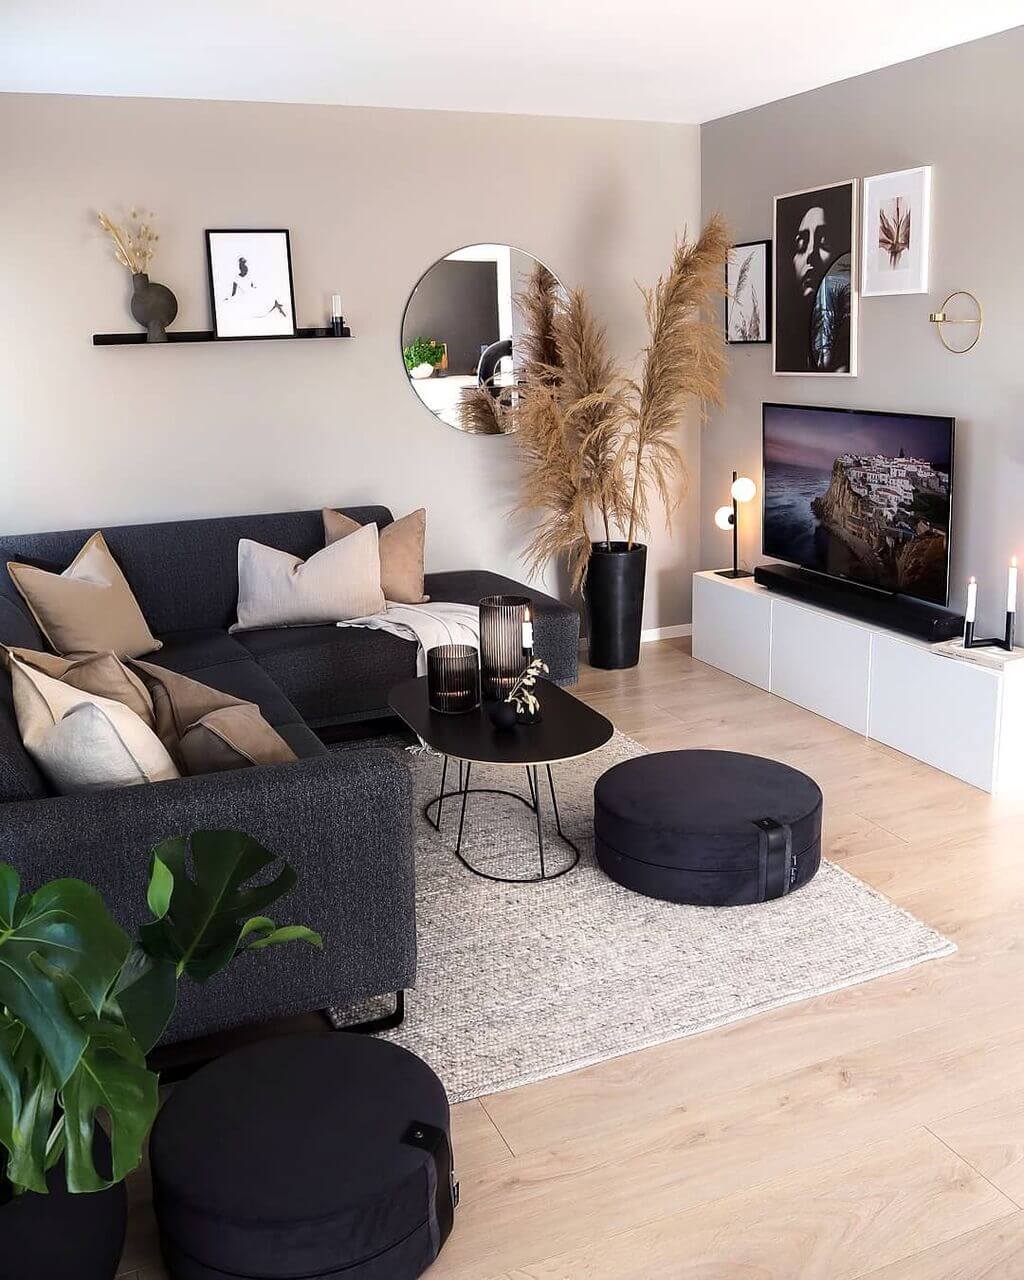
4. Don’t Leave Your Walls Empty
Hanging eye-catching art on the walls is another easy and economical home decor tip to spruce up the look of your living space. From family photos to DIY art, framing works of art can make a place feel like a home. Creating your artwork is a terrific approach to get inexpensive artwork.
If you’re feeling creative, look for canvases, paint, and other art materials in your local craft store and splash some paint on a canvas to create abstract art.
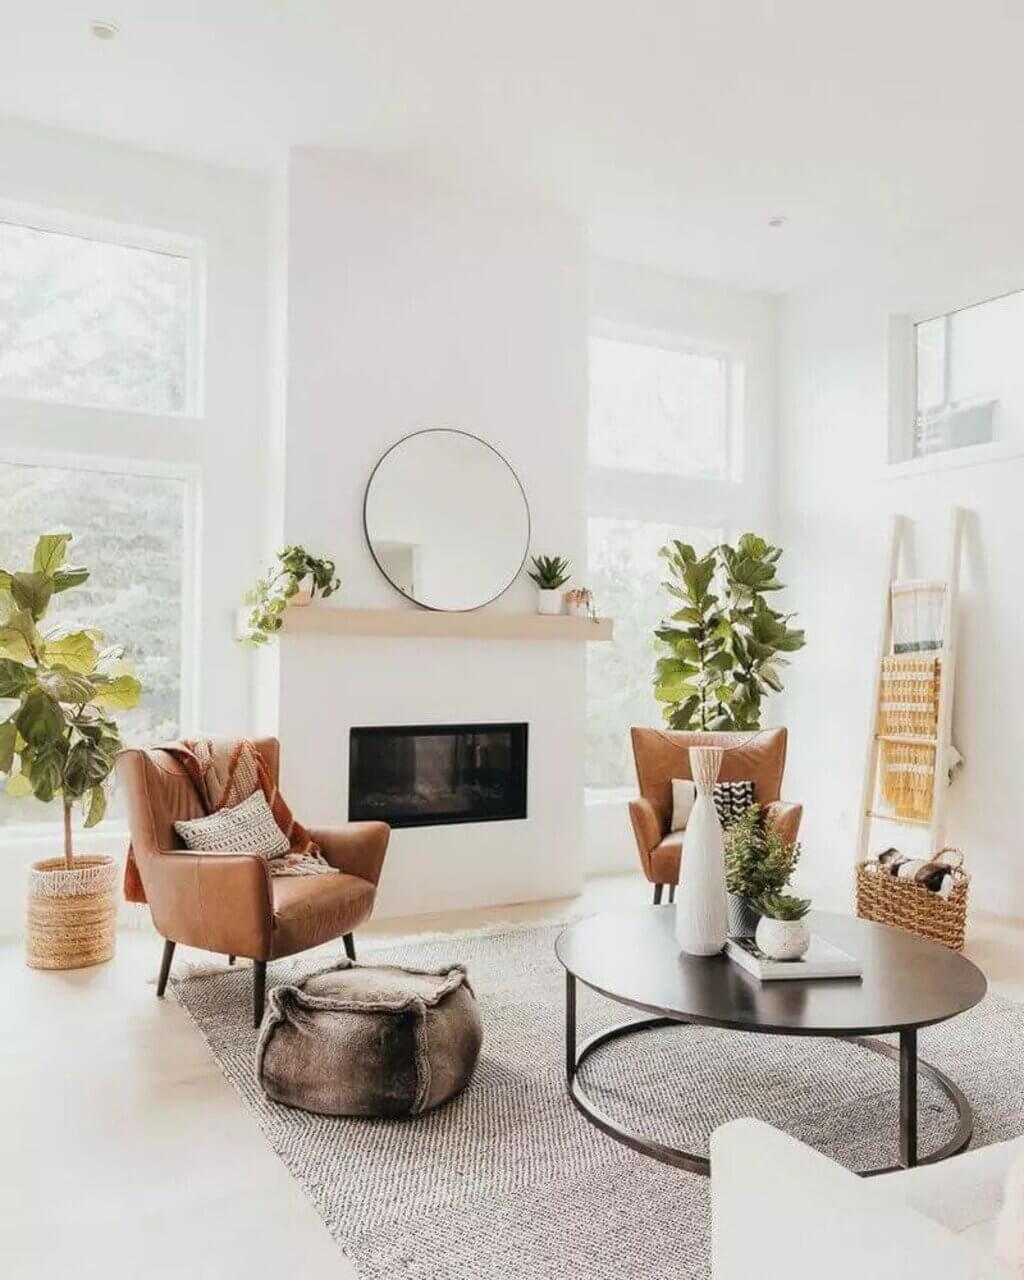
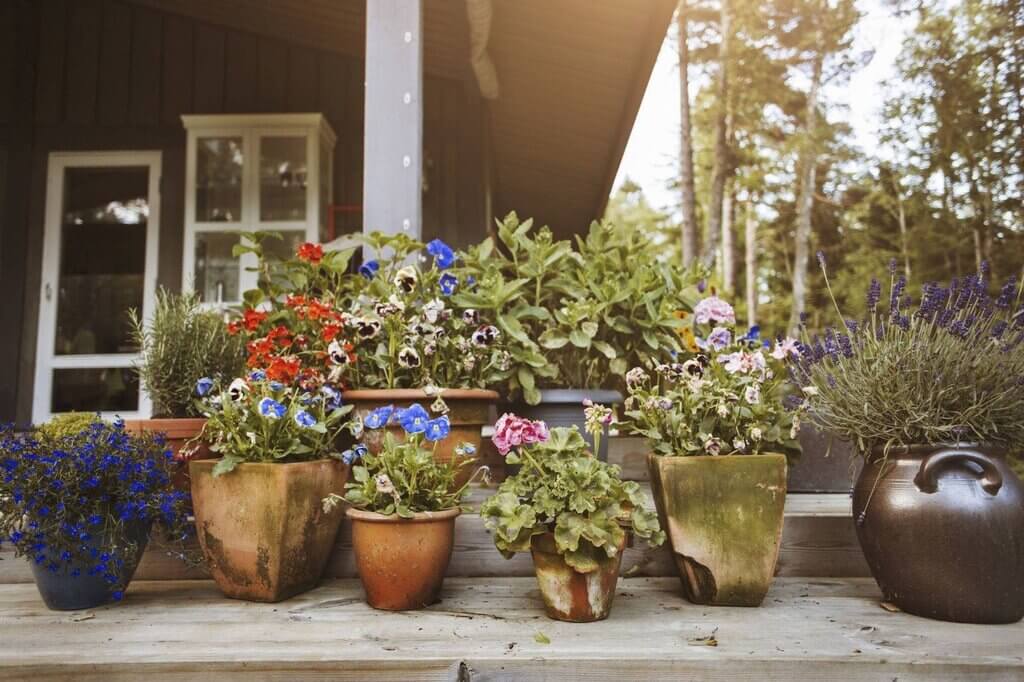
5. Add Accents
Magazines are a fantastic source of home design inspiration and ideas for how to embellish a place. To buy inexpensive decor items, head to your local thrift store and look for coffee table books, resin coasters, planters, mirrors, vases, etc. Additionally, search how to make DIY accent pieces with resin and air-dry clay to create expensive-looking decor on a budget.
6. Create DIY Shelves
To make any piece, such as shelves or kitchen cabinets, look personalized and store-bought, make sure it fits precisely in your home. The most appropriate method to get this appearance is to have them extend from the floor to the ceiling.
A wall-mounted bookshelf always appears more expensive than one that stands alone. With the right tools and a little research, you can complete this project in one or two weekends.
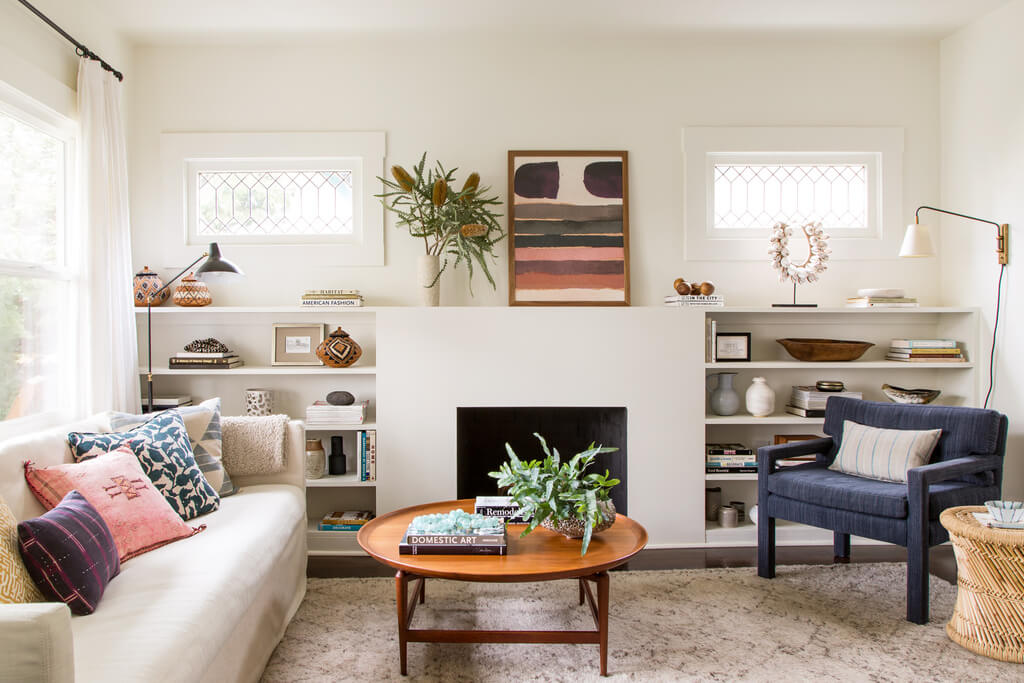
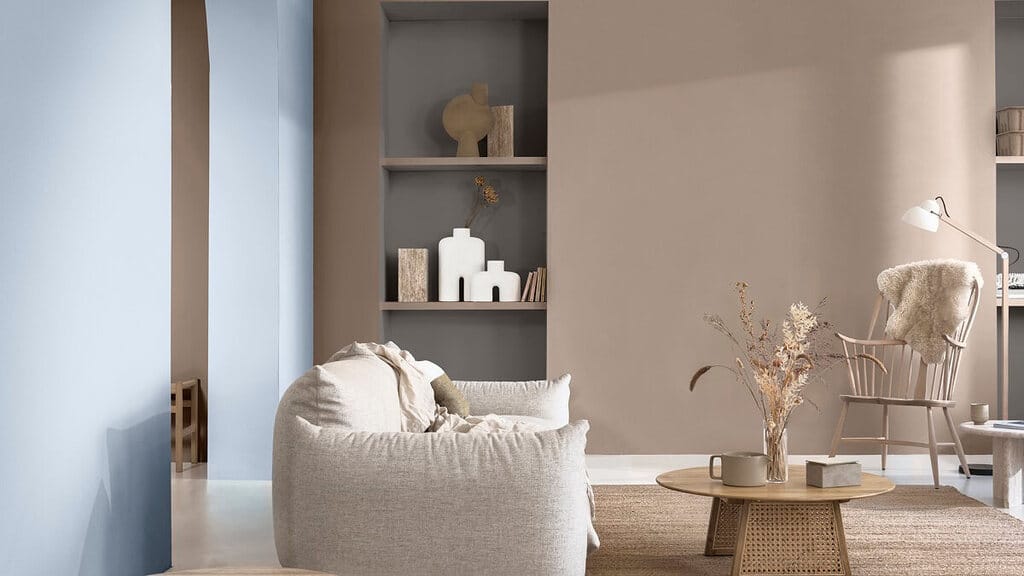
7. Use Bookshelves to Showcase Art Pieces
Bookshelves don’t have to resemble a stuffy library. By adding books, framed images, and unique bookends, you can create an aesthetically pleasing bookshelf. Vintage shelves are ideal for some interior design ideas since they have adequate space for books and souvenirs. Thrift stores are a great place to find woodwork materials for a fraction of their actual price.
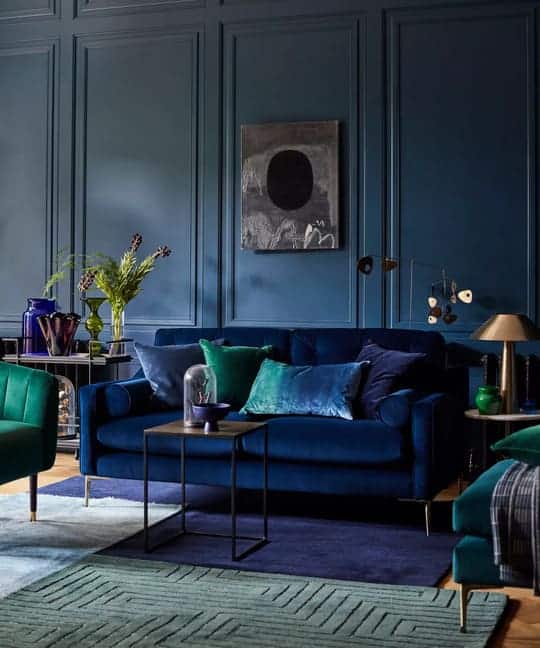
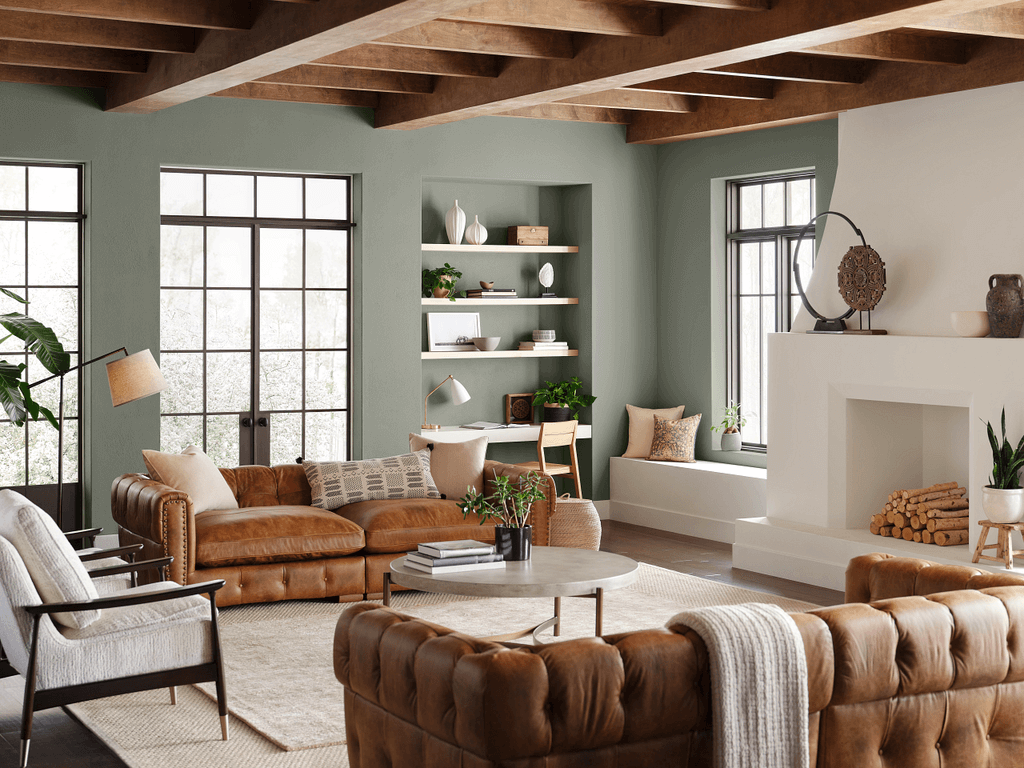
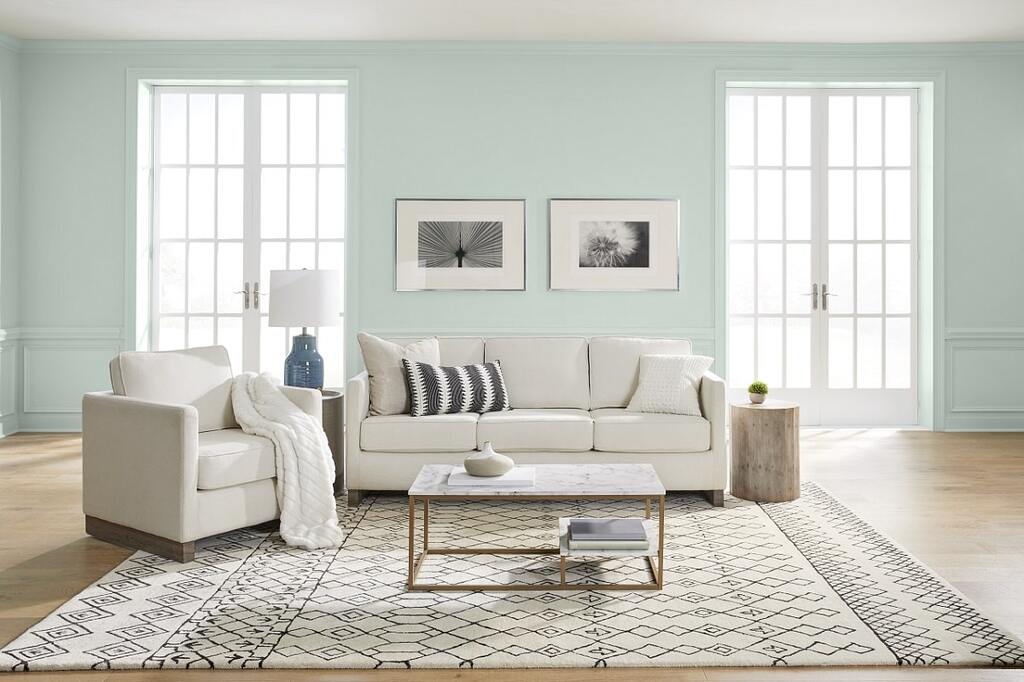
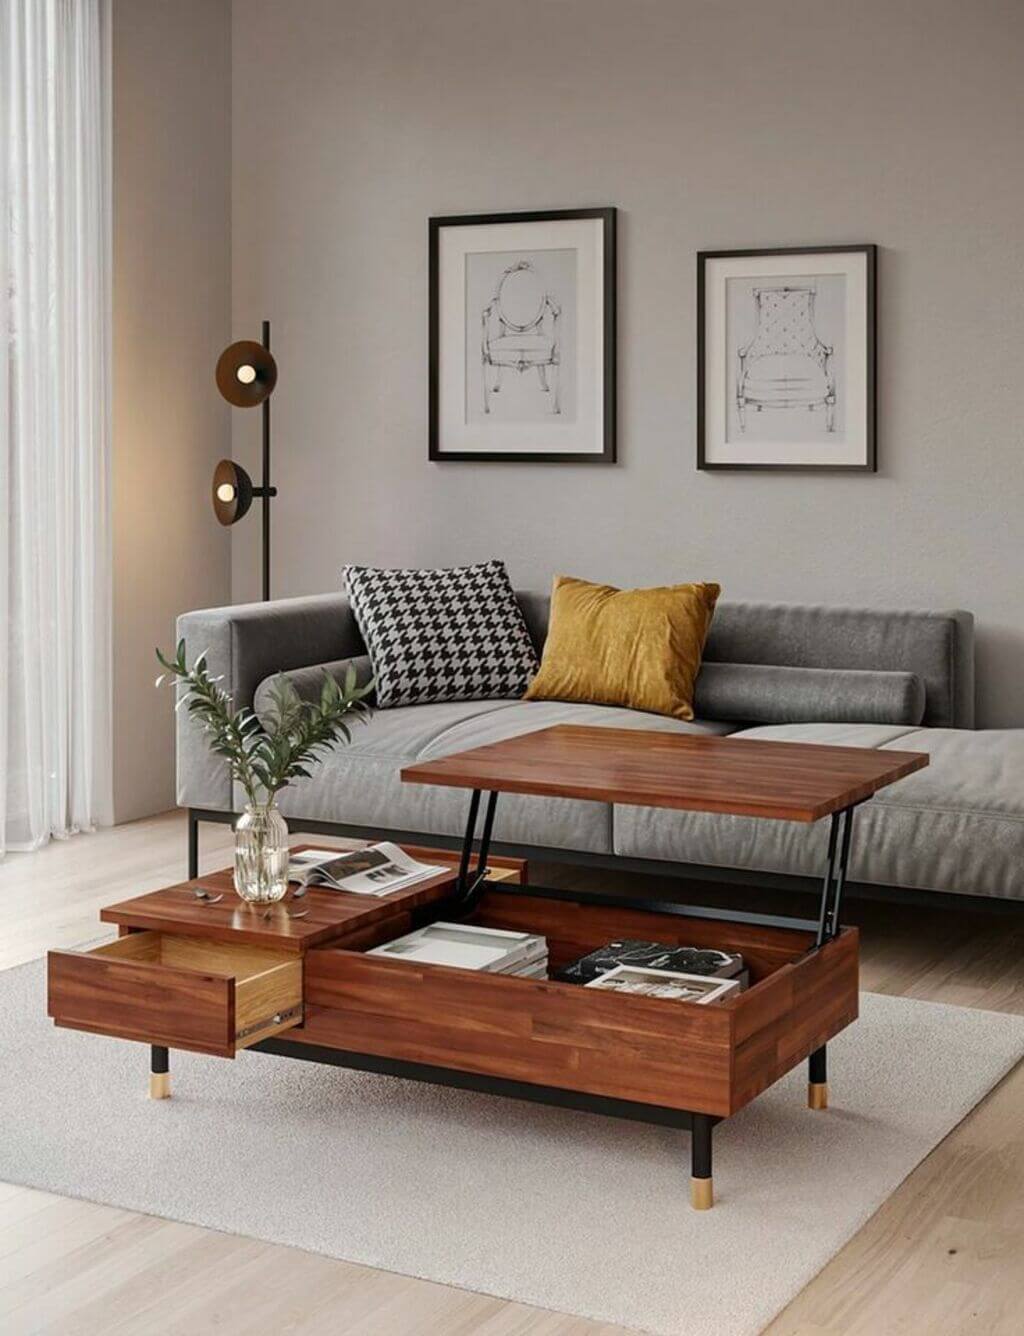
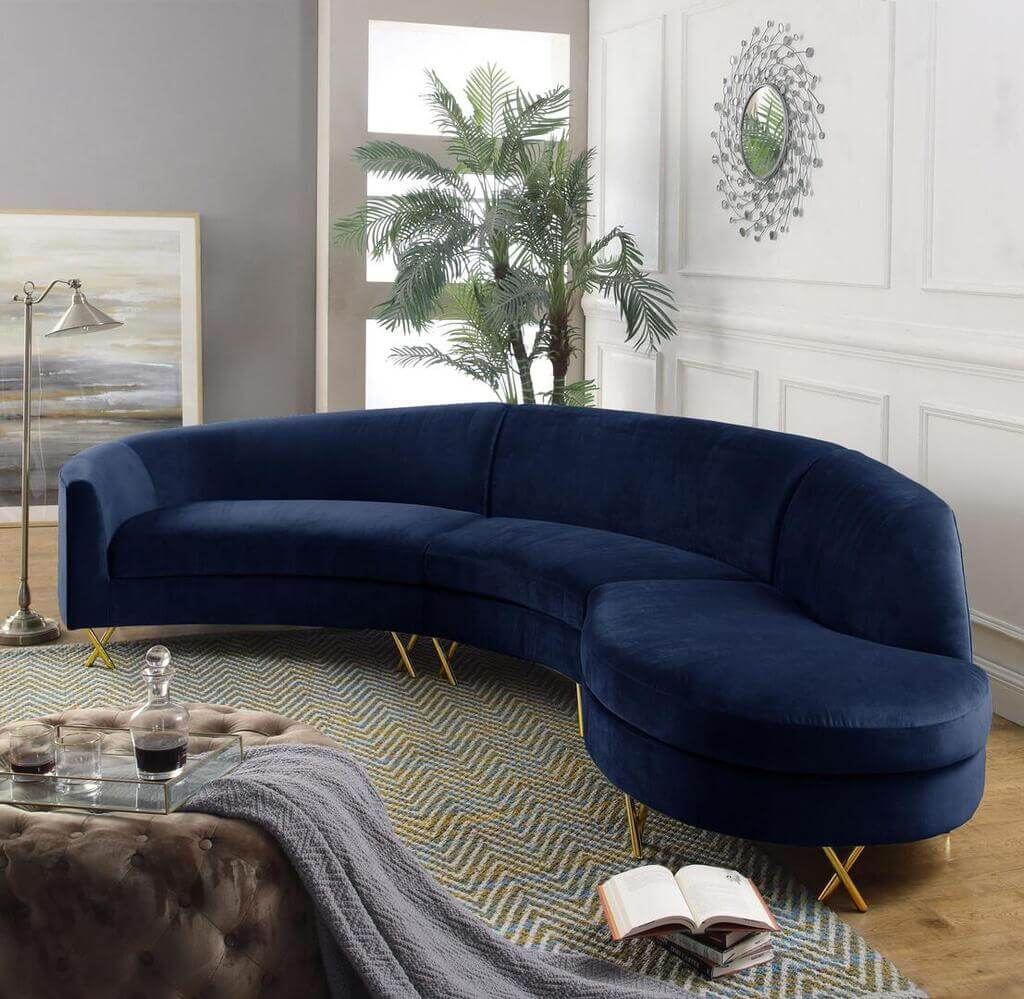
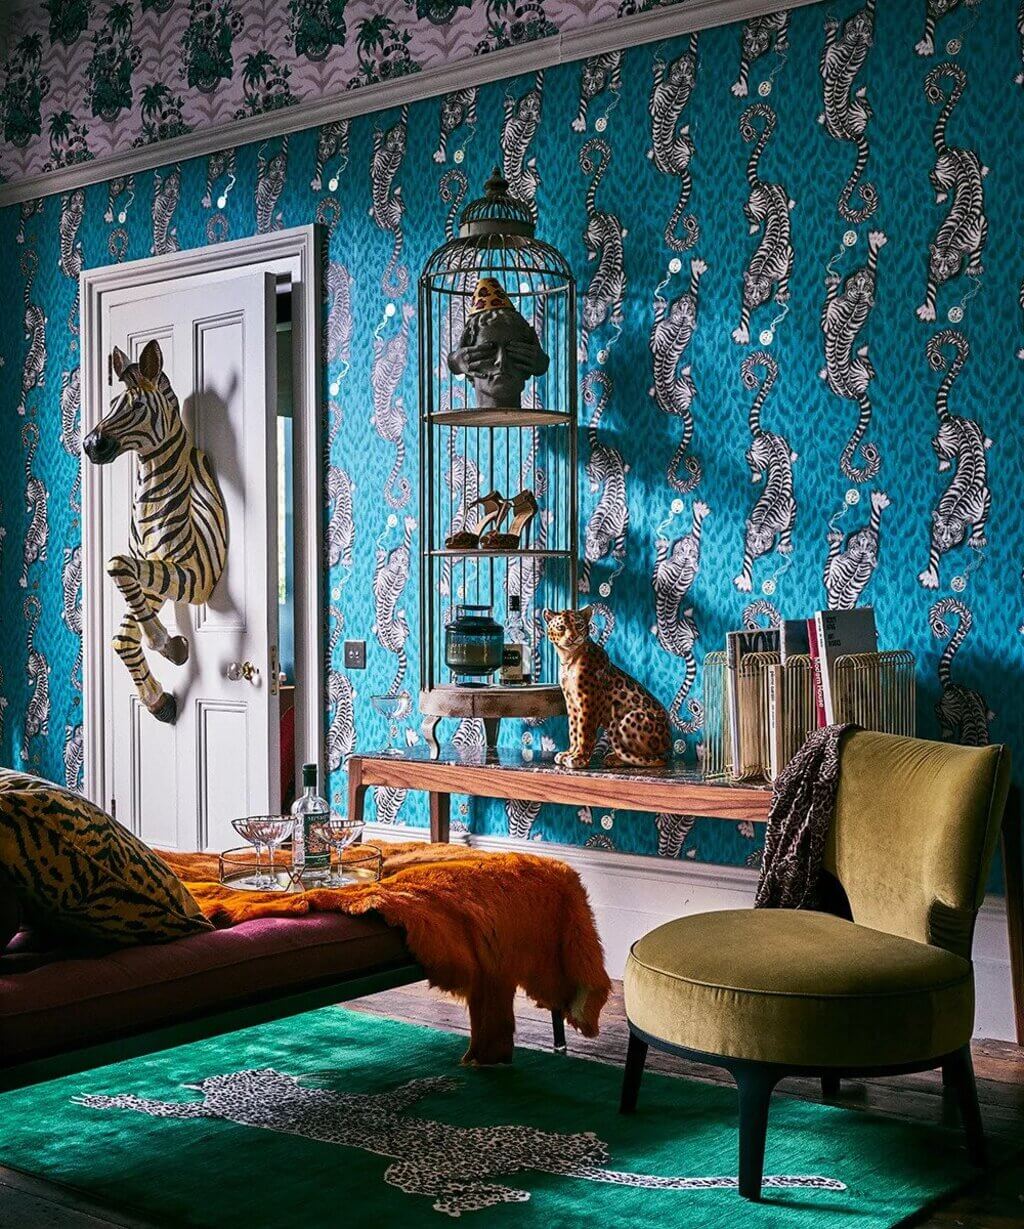
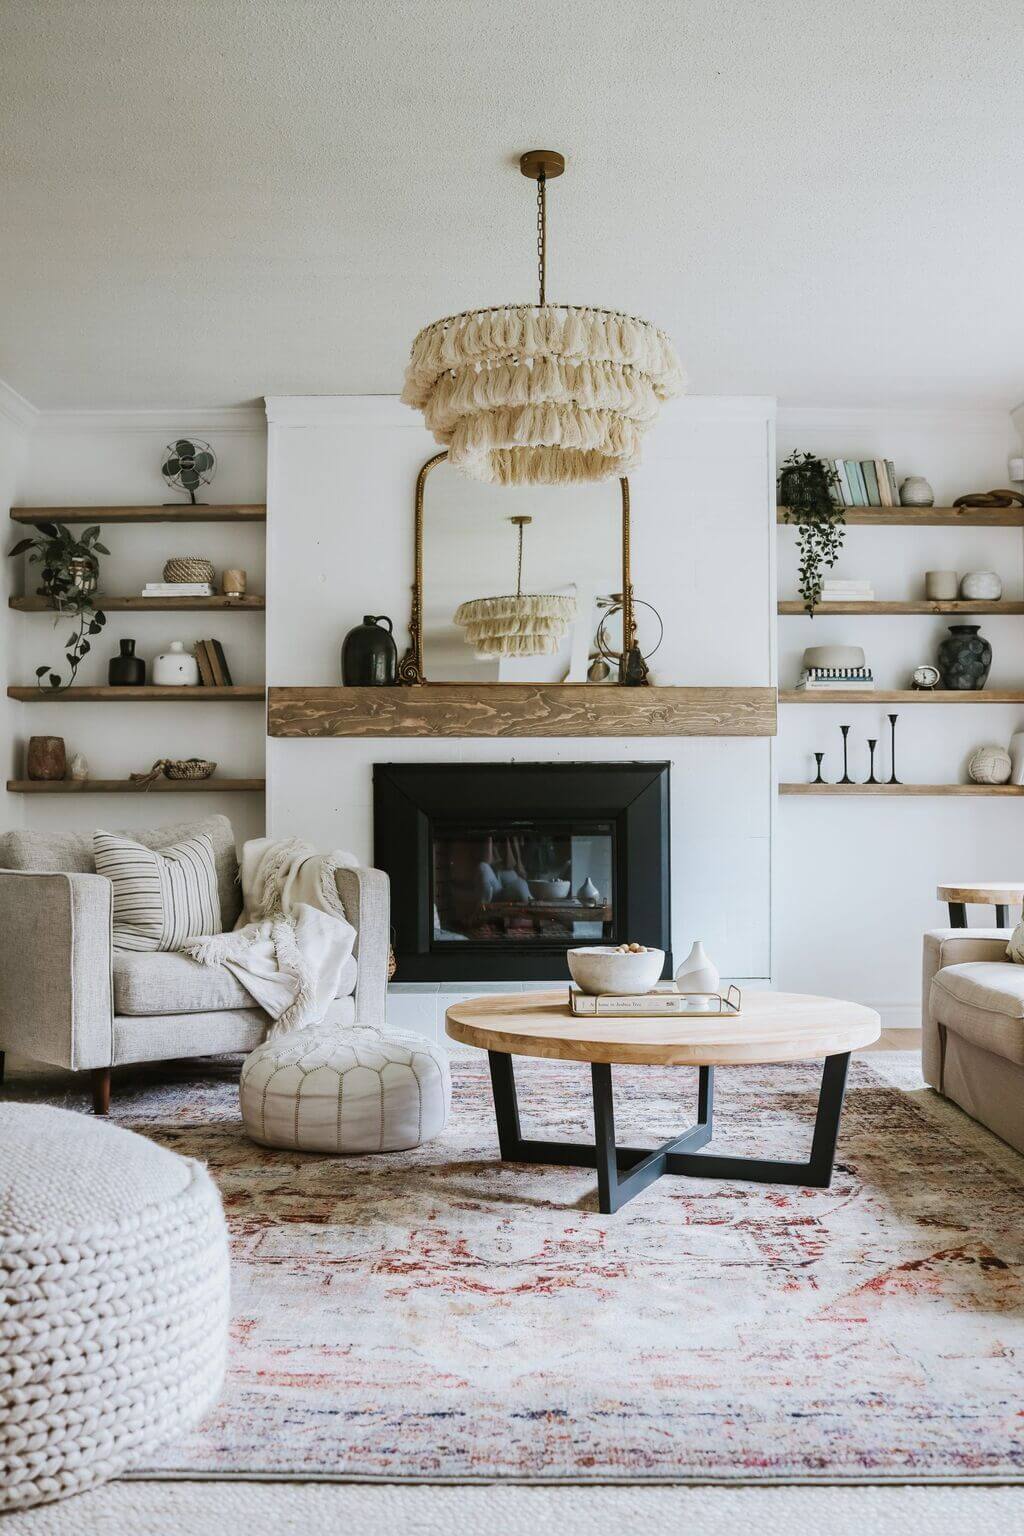
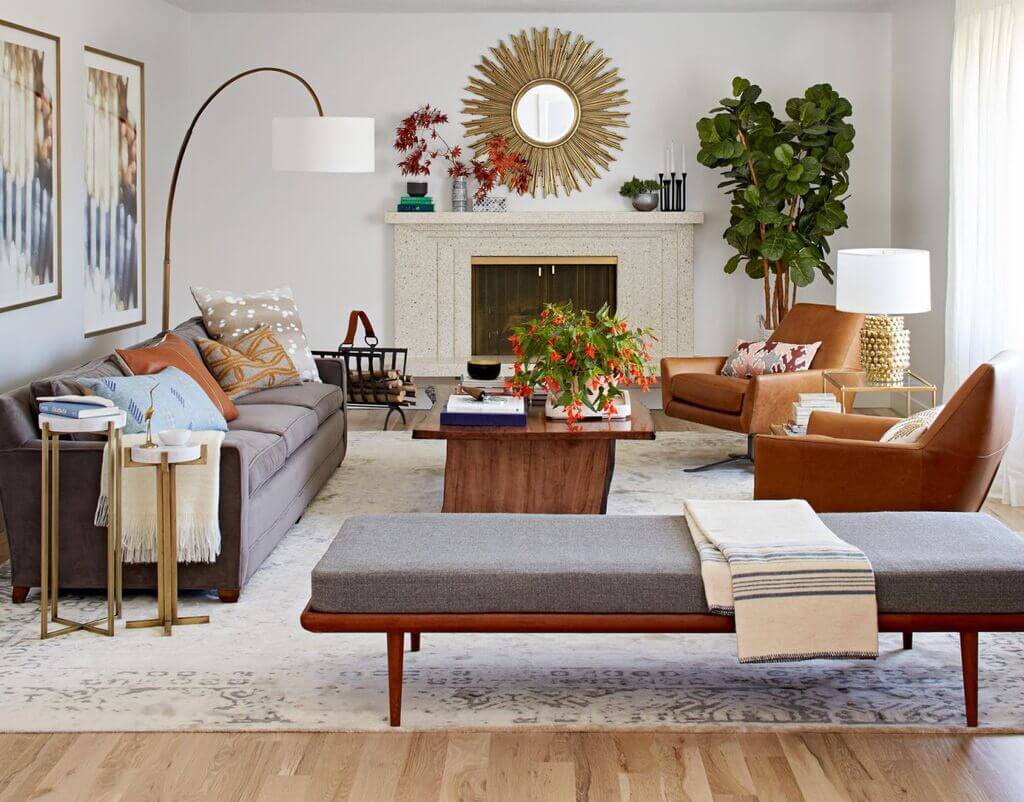
8. Splurge on Statement Decor Items
Chandeliers, unique rugs, dining room tables, and statement sofas can all elevate a home’s impression of luxury. Determine whether it makes sense to spend money on a few important pieces that you see and use frequently.
If you decide to go forward with it, pick colors and fabrics that are easy to clean and won’t stain or ruin easily. This chandelier will bring a touch of elegance to any living room or dining room design.
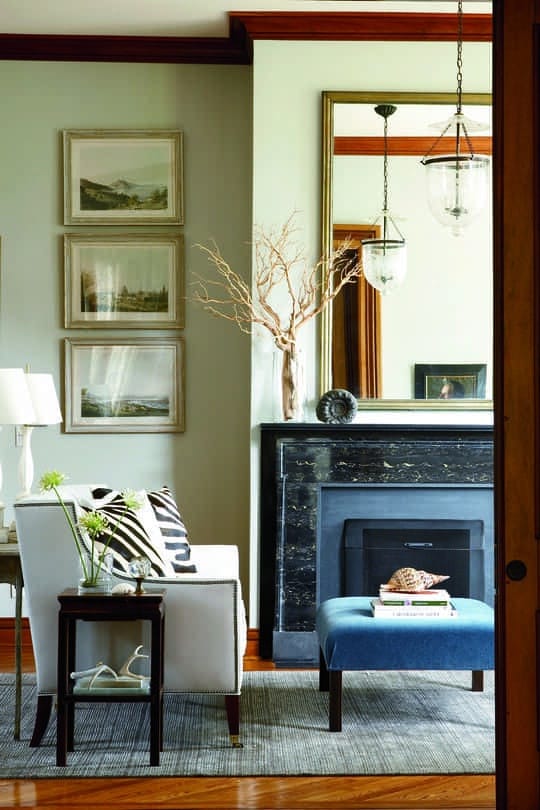
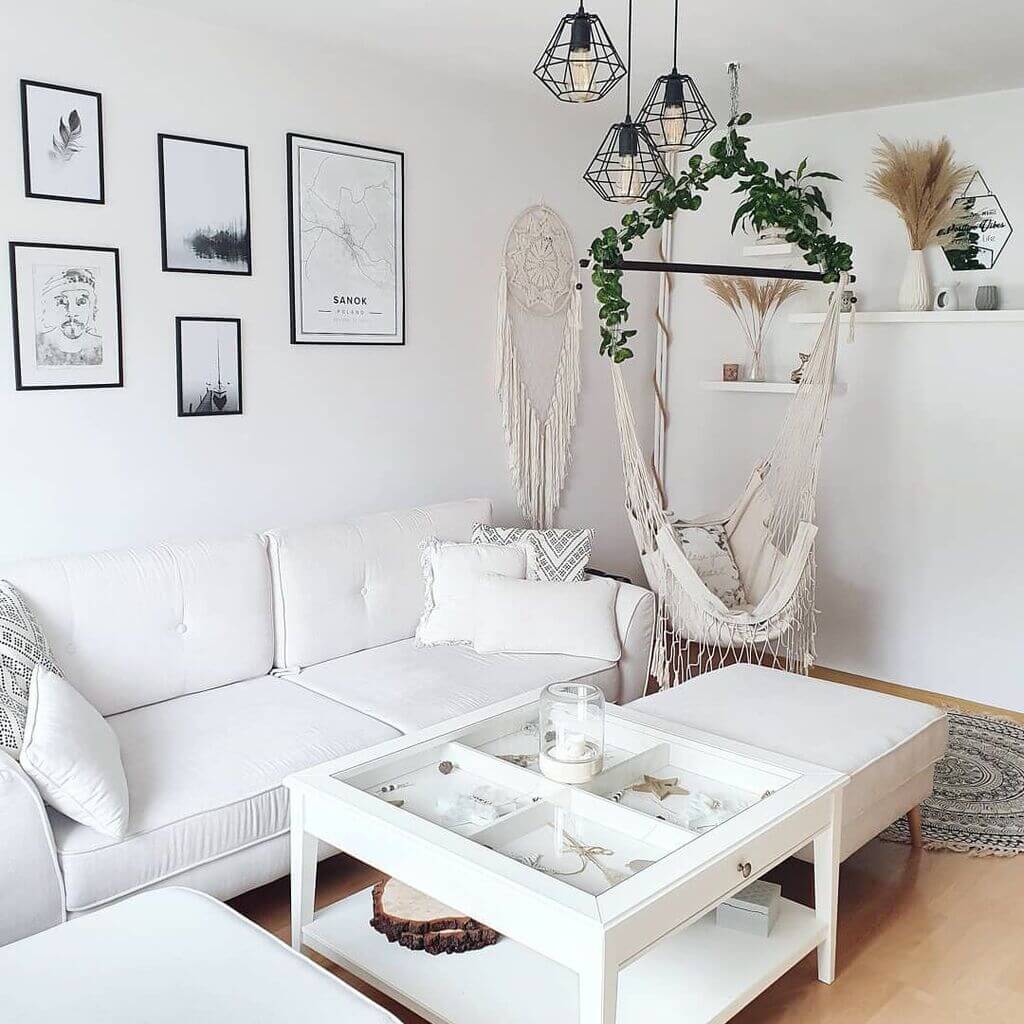
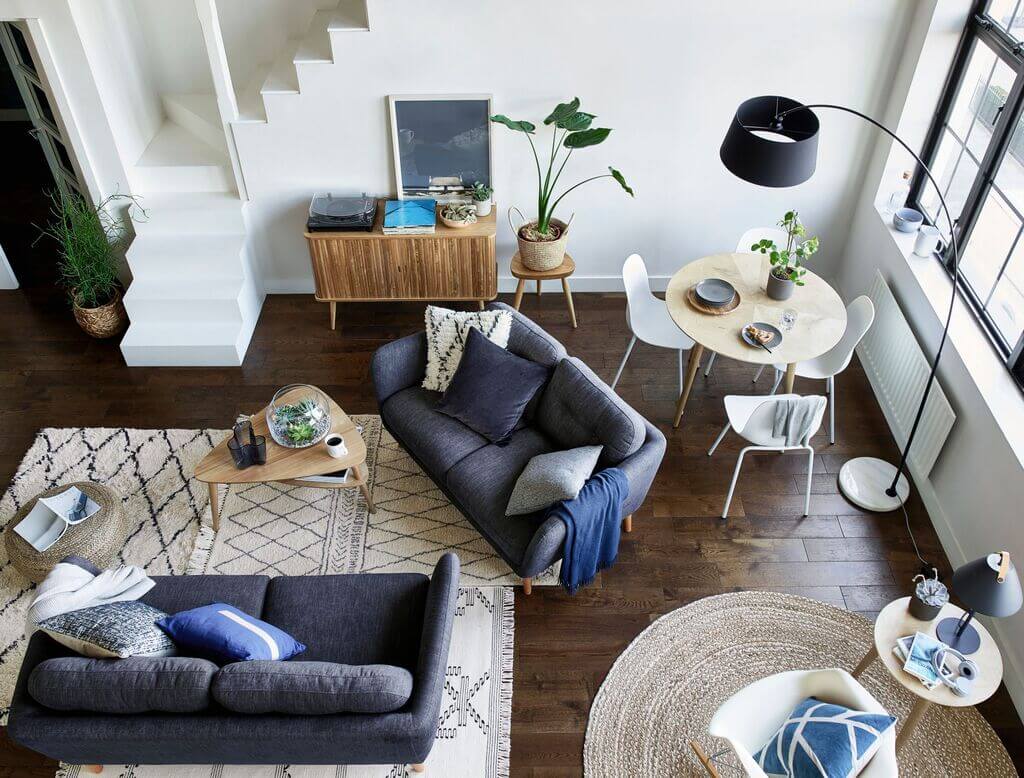
9. Keep Your Home Clean
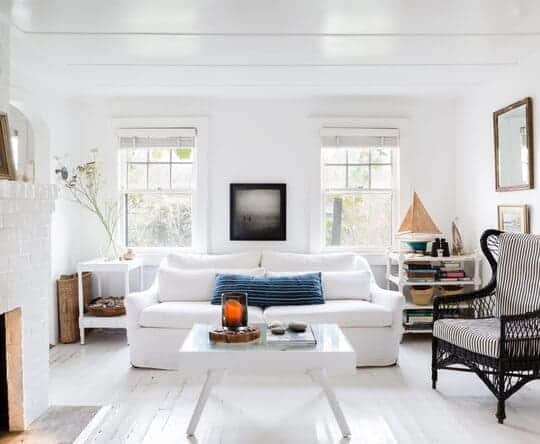
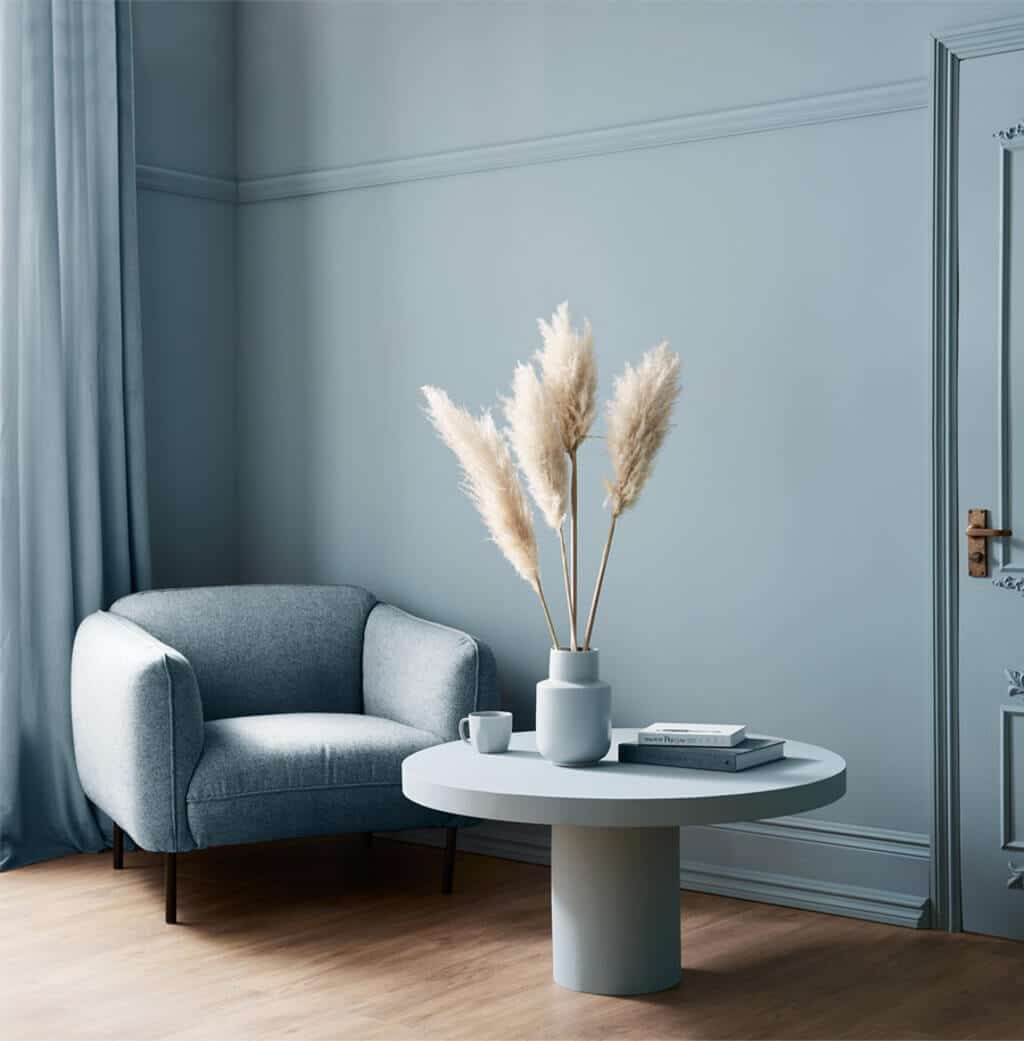
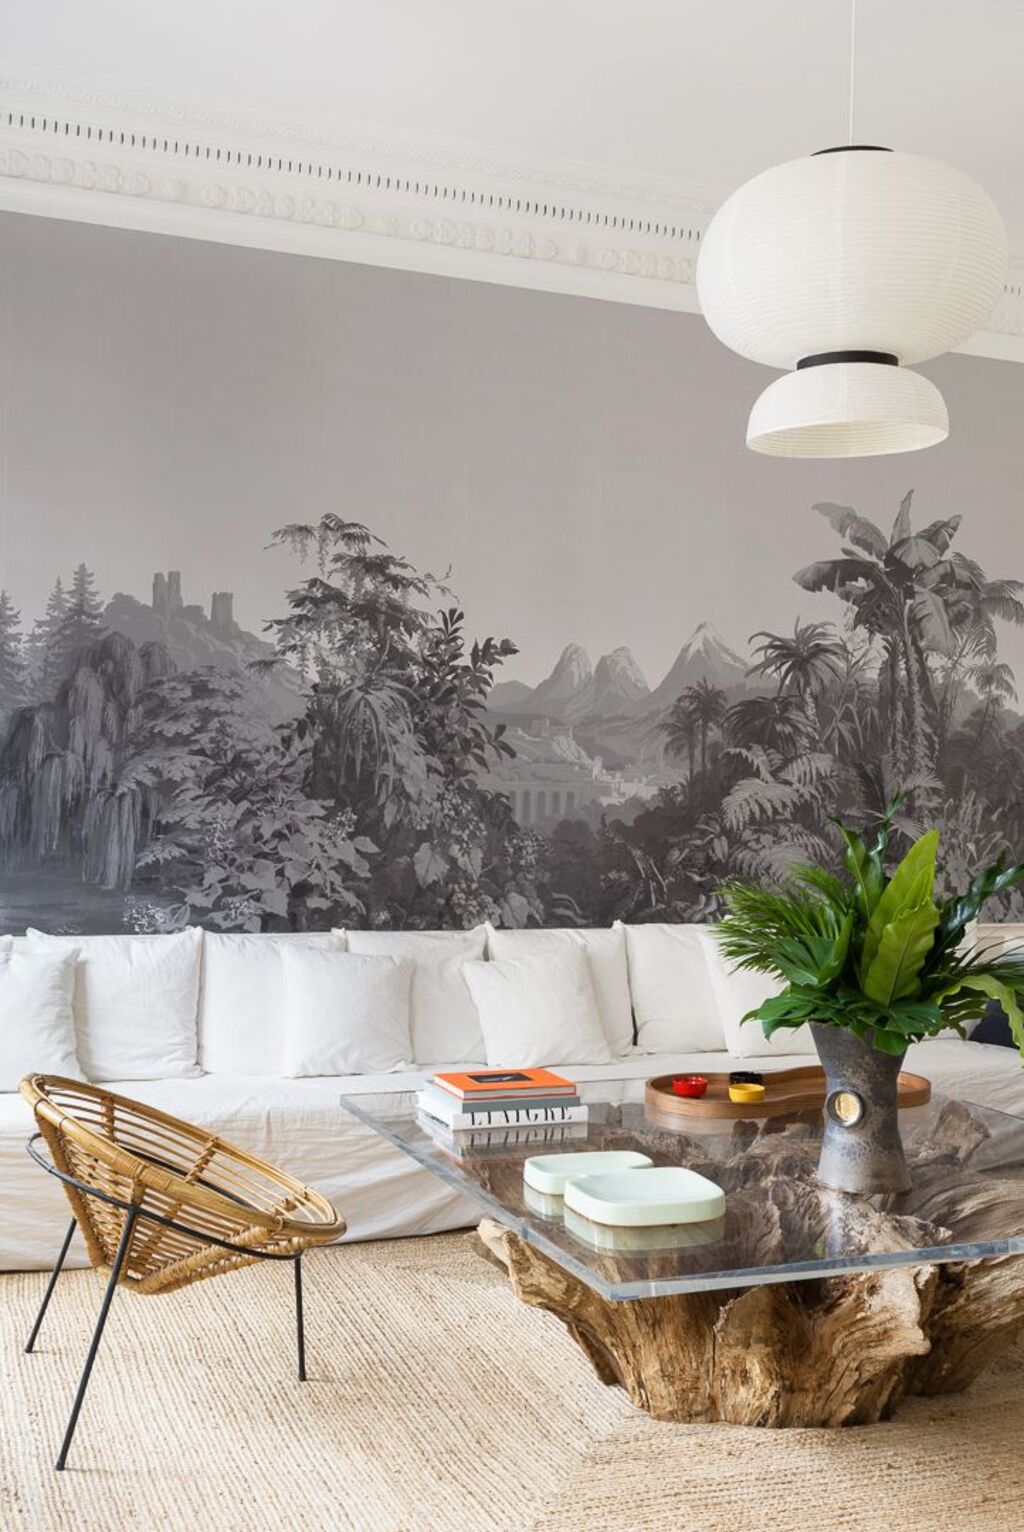
No amount of decor and interior design matters if a home is cluttered and untidy. There is beauty in simplicity, so refrain from stuffing your shelves and tables with heaps of decor items.
Leave a generous quantity of white space on your walls and surfaces, as less is often more when it comes to looking posh. Clear the clutter by filing paperwork out of sight, finding a space for everything, and donating any outdated decor/furniture.
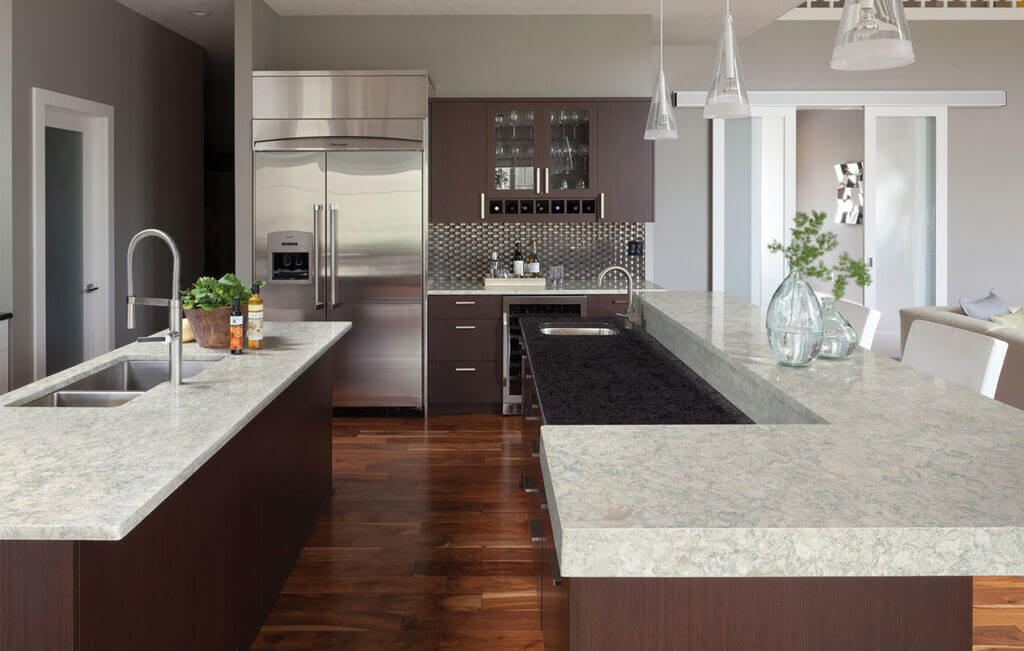
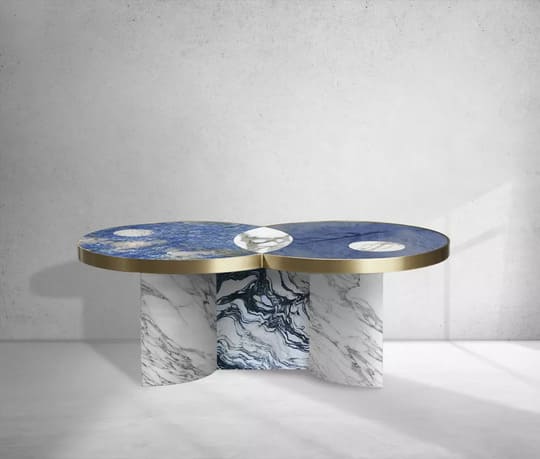
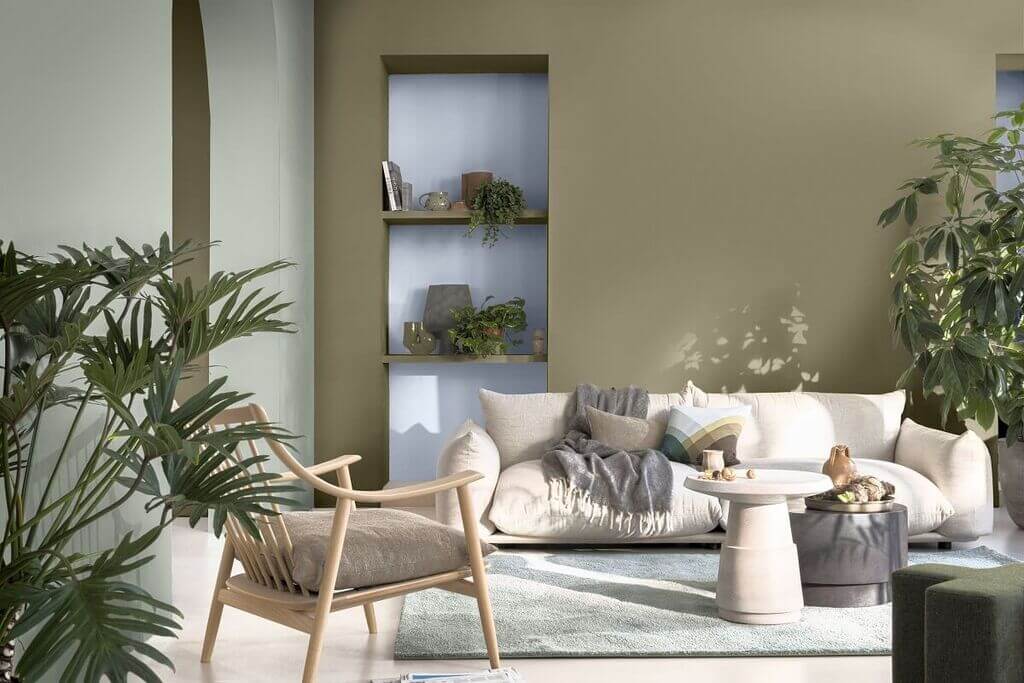
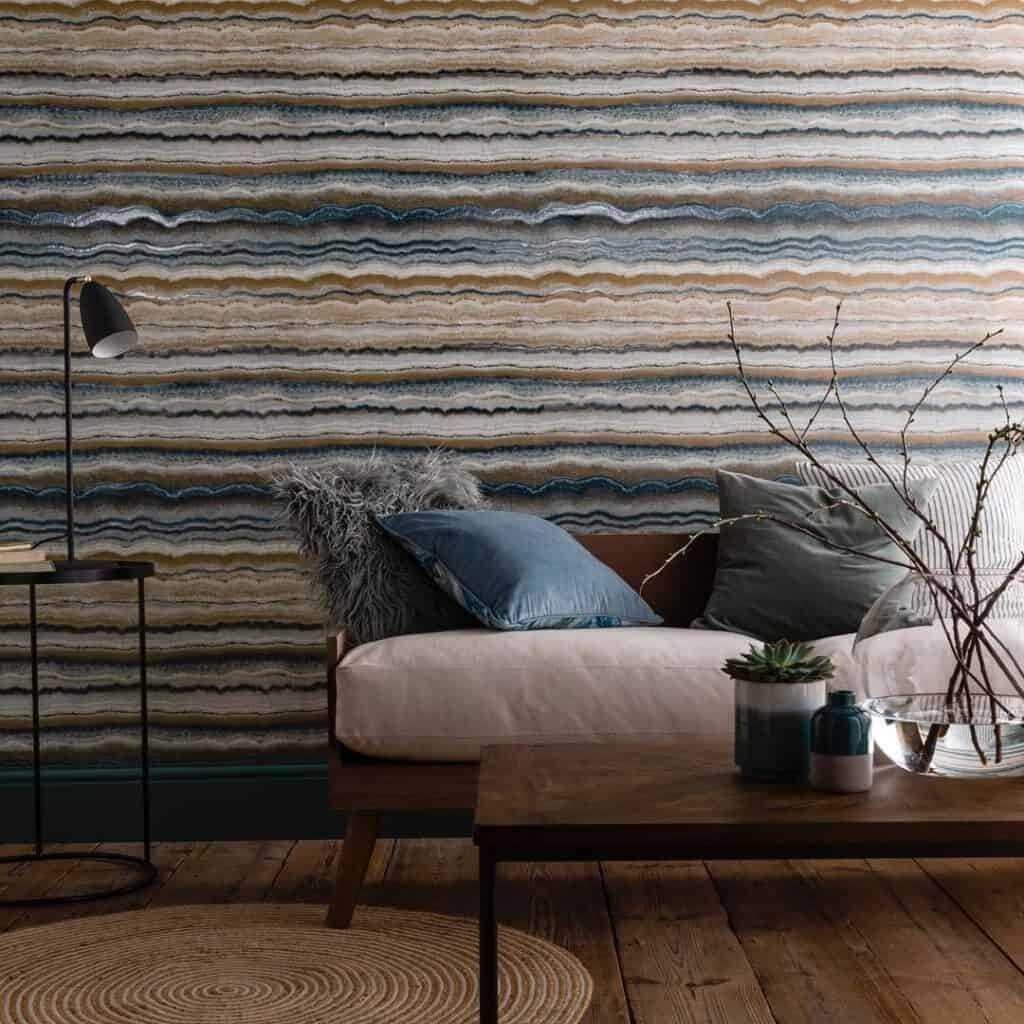
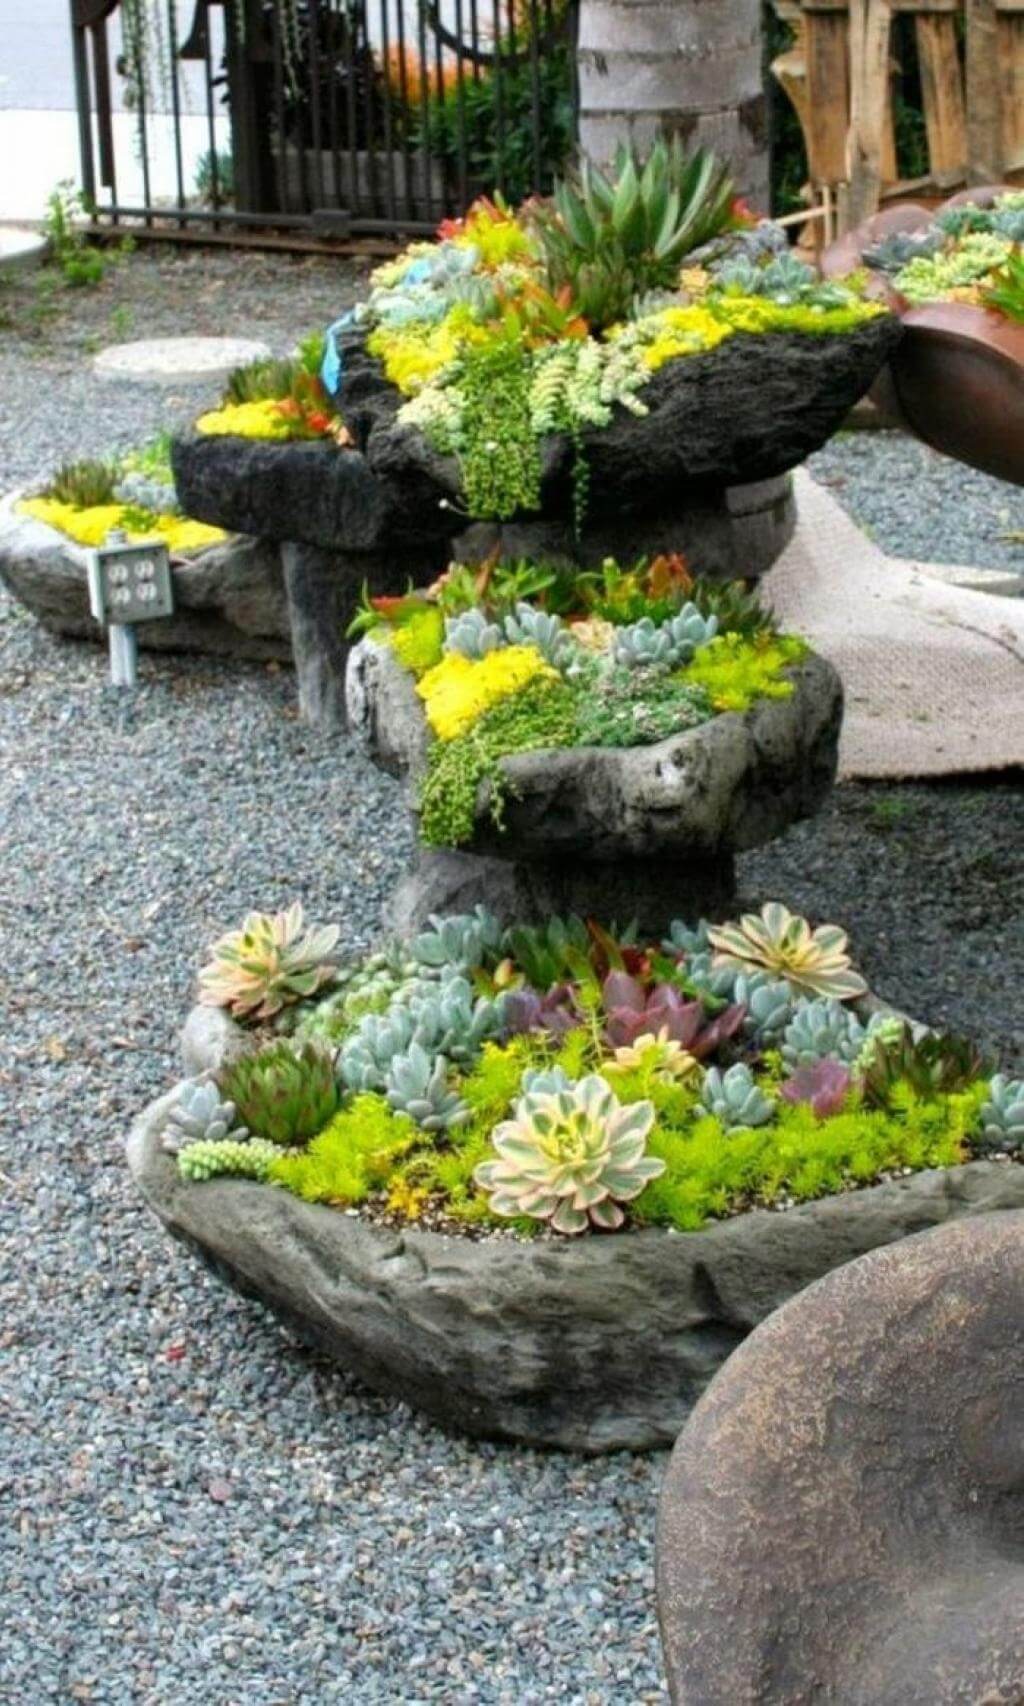
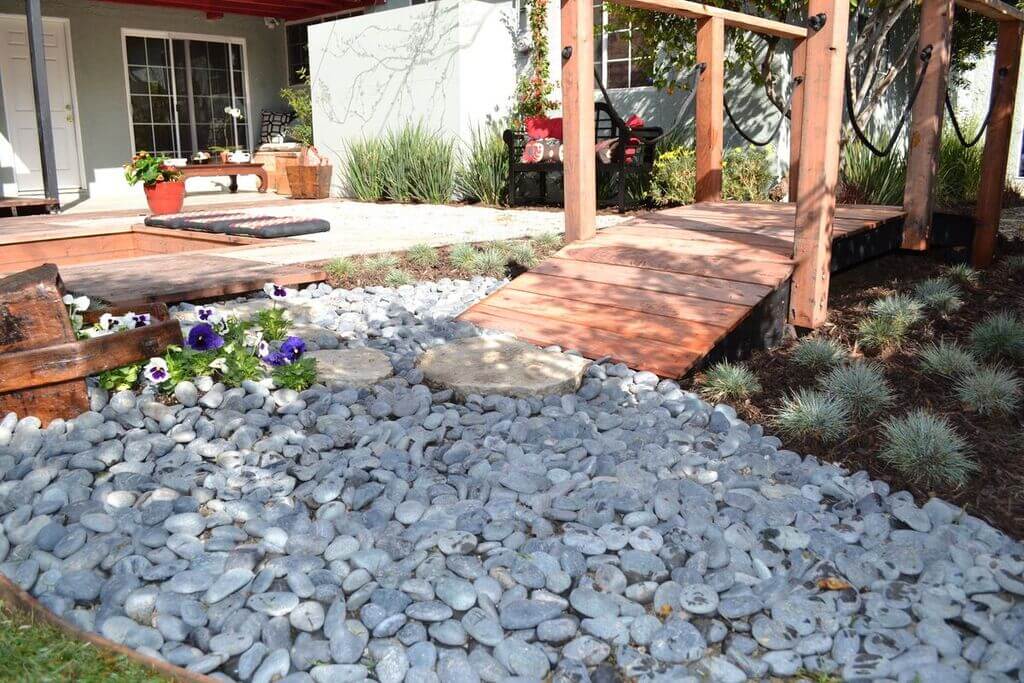
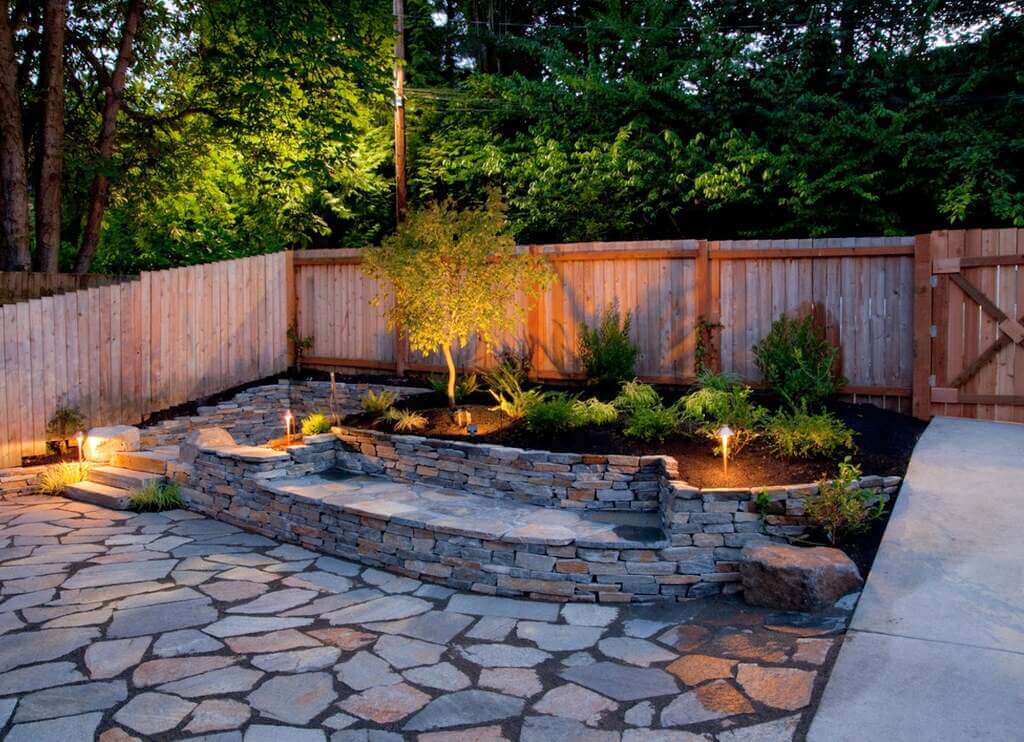
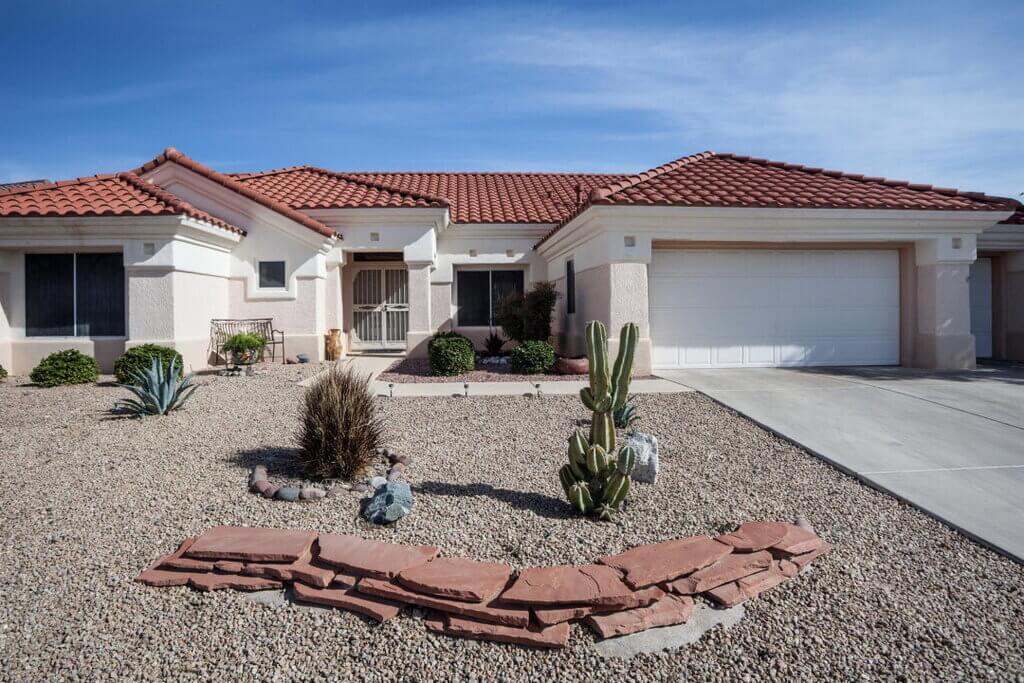
10. Look for Natural Stone Surfaces
Natural limestone and granite countertops appear to be far more luxurious than acrylic counters. However, they can be costly. To look for deals on natural stone countertops, head to your local stone yard, where you may sometimes find an outstanding value on a natural stone top.
Adding natural stone marble tops to your kitchen and bathrooms will make your home look more luxe.
Takeaway
Lastly, if you want to transform your home without spending a dime, then getting rid of clutter is a great place to start. Assemble your bookshelves and use paintings, boxes, and memories to create a unique and personalized look.
Keep your surfaces clean, and add a piece of art and some flowers on display. Use the following budget-friendly home decor tips to design a home for yourself that makes you feel happy and relaxed.
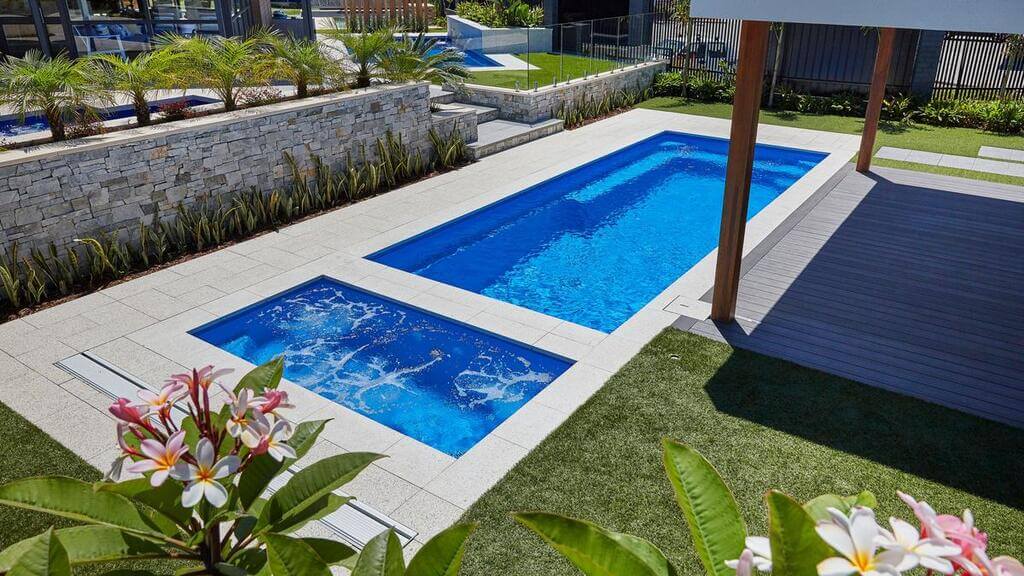
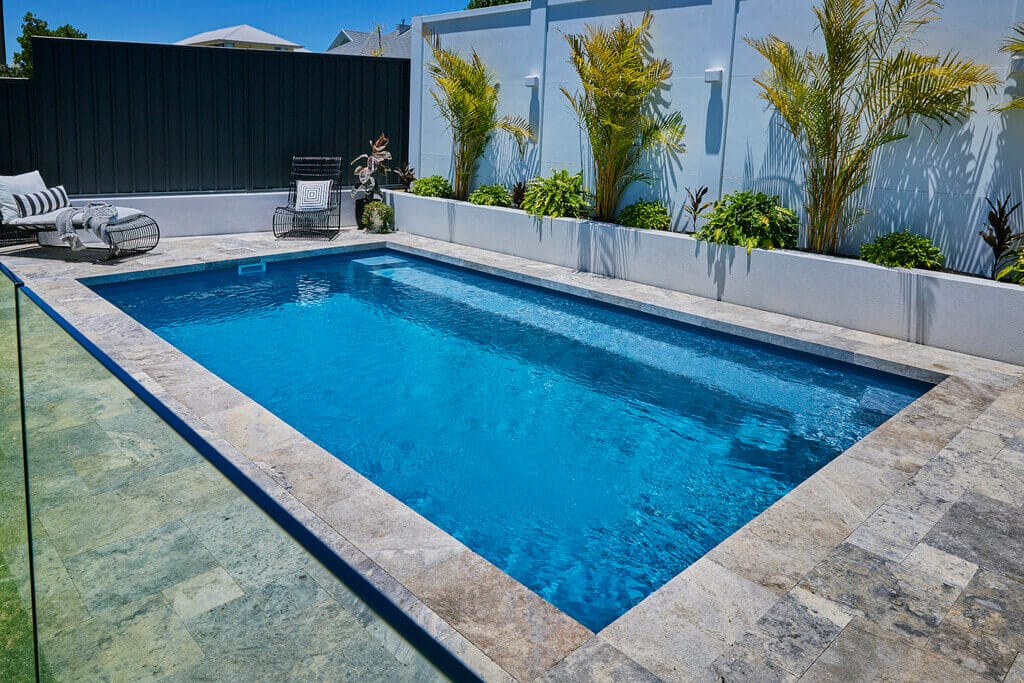
Dreaming of a backyard pool that’s easy to maintain and built to last? Fibreglass pools are quickly becoming the top choice for homeowners who want fast installation, superior durability, and low ongoing costs. In this guide, we’ll explore 12 compelling reasons why a fibreglass pool is the smart investment for your home, so you can enjoy more time swimming and less time on upkeep.
1. Integrated Safety Features
Quality fiberglass pools such as ours here at Newcastle Swimming Pools have a lustrous gel-coat surface that is non-slip and soft underfoot. This can prevent injuries from slips and falls, and you don’t have to worry about getting sore feet or scratches from abrasive tiles or aggregate finishes. While it may seem like a minor thing, it can affect your overall enjoyment of the pool.
Along with non-slip surfaces, all our medium to larger pool varieties feature a built-in safety ledge. It runs around the entire pool, which is perfect for children who are gaining confidence in the water; rather than having to swim back to the step, they can make their way to the closest part of the ledge from anywhere in the pool.
2. Pool Installations Completed in a Fraction of the Time
Unlike some other types of pool installations, which can take upwards of 6 months to complete, fibreglass pools are quick to install. Having construction workers at your home for months on end can be burdensome. With a fibreglass installation, most of the work is already done as the shell is manufactured off-site; all that’s left to do is prepare the ground to make room for it.
Choosing a fibreglass pool means you can swim in your pool sooner rather than later, and if the weather is on our side and there are no delays in permits, your pool can be installed in as little as 7 days.
3. Huge Selection to Pick From
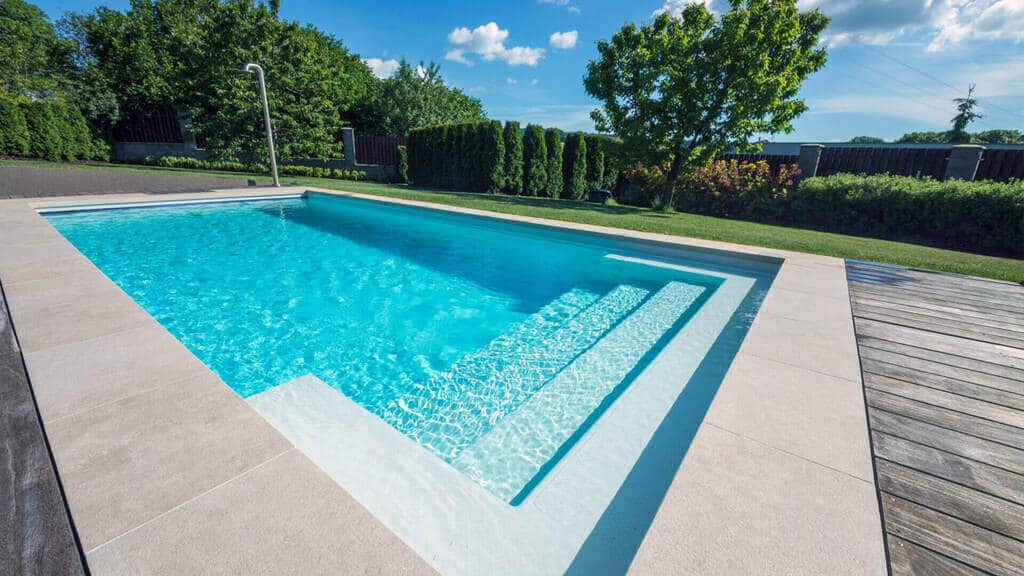
Fibreglass pools come in a huge variety of styles and shapes. Whether you are after a modest pool to fill a small space or a big swimming pool with enough room to host the largest of gatherings, there is something for every taste and home. With so many options to choose from, the most difficult part is locking in a design.
4. Choose the Installation Method to Suit Your Backyard
If you have a backyard that isn’t “perfect” for installing an inground pool, a partially above-ground or above-ground installation may give you a better result. Not only that, but it can also be more economical too as minimal groundwork is required to put the pool in.
Our fibreglass pools are skillfully engineered to be installed both inground and above. They won’t shift, bow, or be structurally compromised in any way by installing them partially above or above ground. While other pool types can be built via these methods, the process is generally labor-intensive and costly.
5. Cleaning Is a Breeze
As we mentioned above, the surface of a fibreglass pool is smooth. It is also non-porous, which makes it hard for algae spores to attach to it and multiply. Because of this, algae growth is hindered, and you don’t have to dedicate as much time to pool cleaning. Not having to clean the pool constantly allows you to do better things with your free time, such as swimming!
6. Lower Running Costs
As algae infestations aren’t a constant battle with fibreglass pools, the need for heavy doses of chemicals is significantly reduced. This can equal big savings over the lifespan of your pool. Often, when algae break out in the water, the treatment is pool shock.
To distribute the chlorine throughout the pool and to prevent the sun from degrading it, it’s advisable to run the pump overnight. In a concrete pool, you may have to do this a few times a week in summer, and this can send your energy bills skyrocketing.
7. No Ongoing Upkeep
Once your Newcastle Swimming Pools fibreglass shell is installed, that’s it! You don’t need to do anything to keep it looking as great as it does. Other permanent swimming pools cannot offer the same benefit. Concrete pools need to be resurfaced every 10 to 15 years.
This doesn’t come cheap either and will set you back around $10,000. Vinyl liner pools need the inner vinyl liner replaced every 5 to 10 years, and these cost approximately $4,000. Vinyl liners are susceptible to tears, and you may need to replace them sooner than this.
8. Heat Effectively
Heating used to be a luxury item that only those with deep pockets could afford; however, nowadays, many everyday Australians are including it in their pool setup. This is because it is much cheaper now. The great thing about fibreglass swimming pools is they retain warmth, and they heat up quicker than some other types, such as concrete. This means you don’t have to use your heating for extended periods to get a great result.
9. Strong and Durable
Most in-ground swimming pools are durable, but there are a few key differences that set fibreglass apart. The technology that is used to manufacture fibreglass pools is simply unmatched by their handmade concrete counterparts.
The conditions are controlled, and no external factors such as rain or extreme temperatures can affect the result. Our fibreglass shells are made in a state-of-the-art temperature-controlled facility, and each of them undergoes a comprehensive quality control check before leaving the site.
Concrete pools generally come with a 7-year warranty, whereas our fibreglass pools come with a lifetime warranty. We know the stringent measures that are taken when constructing every one of our pools and spas.
10. Engineered to Withstand the Extreme Aussie Climate
Our fibreglass swimming pools are designed to have an imperceptible flex. That prevents them from cracking when exposed to freezing temperatures or slight earth movements. The gel-coat finish can tolerate exposure from the often unceasingly intense sun over decades without the risk of fading from UV rays.
11. Flexibility When Choosing a Sanitizing Agent
There is quite a selection to choose from when it comes to sanitizing systems for your pool. Chlorine, salt, minerals are just a few to name. The good news is, it doesn’t matter which one you choose; none will damage the integrity of the inner gel finish, and it will maintain its vibrant color without peeling or blistering along the way.
12. It Can Increase the Value of Your Home
Australians are obsessed with swimming pools. We have the most pools per capita in the world! When people are in the market for a home, they don’t want a swimming pool. That is potentially going to cost them an arm and a leg to run. Fibreglass pools are modern, and they are the easiest and most affordable pools to maintain. Increase the Value of Your Home and make a selling point at any home.
The benefits that a fibreglass swimming pool can offer are hard to overlook when choosing a type for your home. If you have any questions about our fibreglass swimming pools or spas, simply get in touch, and one of our friendly team members here at Newcastle Swimming Pools will happily help. Contact us today!
Looking to improve your sleep quality with the right support? A body pillow can offer enhanced comfort, better alignment, and pressure relief, especially for side sleepers, pregnant individuals, or anyone dealing with chronic pain. But with so many options available, choosing the best body pillow can be tricky.
This guide covers everything you need to know before buying a body pillow, including material types, shapes, firmness levels, and practical care tips. Whether you’re shopping for pain relief, pregnancy support, or just better sleep, this article will help you make an informed choice.
Tips for Buying a Good Body Pillow
With the increasing demand for body pillows, the brand selling them has also increased, so you may find many different types of body pillows. Now, this can also lead to an improper selection of the body pillow. Thus, we will tell you the tips that will help you know
1. Material of the Body Pillow
The first thing you must pay attention to while buying a body pillow is the material of the body pillow. The material of the body pillow will play a significant role in its comfort & durability. Choose the material that suits you and comforts you.
2. Size & Shape
You can get the body pillow in various sizes and shapes, but you need to select the size & shape that suits your body and sleeping position.
The C-shaped and U-shaped pillows, in general, are ideal for side sleepers since they appropriately support your entire body. Moreover, if you sleep on your back, use straight pillows.
3. Material of the Cover
One must also look for the cover material while buying the body pillow. The cover should be of soft, breathable fabric that is easy to clean. Cotton and bamboo are the most popular cover materials as they are soft, hypoallergenic, and breathable.
4. Firmness
For proper body support, the appropriate stiffness is crucial. One should choose a cushion that is comfortable for you; some individuals prefer a hard pillow, while others prefer a softer one. It all depends on your comfort preference.
5. Price
Body pillows can range in price from affordable to very expensive. It is important to set a budget and stick to it. However, keep in mind that a high price does not always mean a better quality pillow. It is possible to find a good quality body pillow within your budget.
6. Brand Reputation
It is important to choose a reputable brand when buying a body pillow. Read reviews and ask for recommendations from friends and family. A reputable brand will ensure you get a quality product lasting for years.
7. Purpose
Consider the purpose of the body pillow. Are you buying it for pregnancy support, recovering from an injury, or just for general comfort? Knowing the purpose of the body pillow can help you choose the right size, shape, and firmness.
8. Cleaning and Maintenance
Choosing a body pillow that is easy to clean and maintain is important. Look for a pillow with a removable cover that is machine washable. Some pillows for your bedroom may require professional cleaning, which can be expensive.
FAQs
1. How Do You Clean a Body Pillow?
Cleaning instructions may vary depending on the type of body pillow, but most can be machine-washed on a gentle cycle and dried on low heat.
2. Can a Body Pillow Be Used for Other Purposes Besides Sleeping?
Yes, one can also use body pillows for reading, watching TV, or as a cushion for lounging.
3. How Much Space Does a Body Pillow Take?
The space taken by a body pillow will depend upon its shape. A U-shaped pillow requires more space than a rectangular body pillow. The companies add the dimensions of the body pillow in the description. One should consider the measurements while buying it.
4. How to Wash a Body Pillow?
The body pillow will not require much cleaning, but one should wash the body pillow once in 6 months and the cover of the body pillow once in 7 to 15 days. However, do note that all the body pillows won’t be washable.
5. How Do You Choose the Right Body Pillow?
Think of elements like shape, size, and material. Also, it’s crucial to think about your sleeping position and any particular requirements, like support for a pregnant woman or back problems.
Conclusion
In conclusion, consider the size and shape, material, cover material, firmness, price, brand reputation, purpose, and cleaning and maintenance when buying a body pillow. By taking these factors into consideration, you can find the right body pillow for a comfortable and restful night’s sleep.
Choosing the right electronic lock manufacturer is an important step in securing your home, business, or property. With a wide range of options available, narrowing down the best fit for your specific needs can be challenging. This guide outlines a clear process for evaluating your security requirements, researching manufacturers, reviewing cost factors, and testing product models before committing to a purchase. The goal is to help you make a well-informed decision that aligns with both your security expectations and budget.
Section 1: Identifying Your Security Goals
Regarding selecting the right electronic lock manufacturer for you, it’s important that you take some time to identify your security goals. To start, determine the type of locks needed for your building or facility. Different types of locks offer varying levels of security and convenience, so be sure to consider all your Lock options before deciding.
Once you’ve identified the type of lock that best suits your needs, you should look into electronic lock options that provide additional convenience. These types of locks often include features like keyless access methods and remote access control systems, which can be useful for certain situations.
Finally, evaluate the budget for purchasing and installing the locks. Electronic locks are often more expensive than traditional ones because they come with advanced features and technologies; however, many manufacturers offer discounts on bulk orders or special pricing plans to help make their products more affordable.
It’s also important to factor in installation costs when considering a budget, since installing an electronic lock is typically more involved than adding a traditional on,ein some cases requiring professional help from a qualified technician or electrician.
Taking all these considerations into account will make sure that you select an electronic lock manufacturer that meets both your security goals and budget requirements.
Section 2: Researching Different Lock Manufacturers
In this section, we will look at the process of researching different electronic lock manufacturers to find the right one for you. The research process involves reading customer reviews, verifying credentials and certifications, inquiring about installation and maintenance services, and analyzing the market for trends.
Reviews from customers can be a great way to learn about a product or service. Read through customer feedback on websites such as TrustPilot or Yelp to gain insight into how others are finding their experience with a particular manufacturer.
It is important to remember that customer reviews can contain both positive and negative experiences, so it’s best to look at overall ratings as well as individual comments when making your decision.
It is also important to verify any certifications held by the manufacturer. This will help guarantee that their products meet industry standards for quality and safety. Be sure to inquire about any accreditations, such as third-party certifications or ISO standards held by the company.
Also, ask questions about installation and maintenance services offered by each manufacturer before deciding. Does the company offer free installation? What kind of after-sales support do they provide? How long have they been in business? Asking these types of questions will give you an idea of whether a particular manufacturer is reliable enough for your needs.
Finally, keep an eye on industry trends when researching different manufacturers. Look at news reports and blogs related to electronic locks and security systems to get an idea of what is popular in the market right now. This information can help you decide if a particular product or solution will still be relevant in the future or if something else may become more popular over time.
By doing this research, you can gain valuable knowledge that will enable you to make an informed decision when choosing an electronic lock manufacturer for your needs.
Section 3: Analyzing the Market for Trends
Analyzing the electronic lock industry is an important step for any business looking to purchase quality products. By researching market analysis reports, industry news and customer feedback, companies can better understand trends and emerging technologies in the market. This will help inform decisions about which brands are reliable, what features may be beneficial, and how long-term warranties could affect overall costs over time.
Additionally, staying apprised of new developments, such as biometric or smart locks, will enable businesses to invest in the right solutions that meet their security goals while protecting their budget constraints.
Section 4: Understanding the Cost of Different Solutions
Regarding selecting an electronic lock manufacturer, one of the most important considerations is understanding the cost of different solutions. You should know that different manufacturers may offer different prices for installation, maintenance, repairs, warranties, and other guarantees.
The cost of installing electronic locks will depend on the type of locks you need for your building or facility. This can range from simple door locks with keypads to more complex systems like biometric locks and remote access control systems. It is important to understand what features are available and how much they cost to make an informed decision.
In addition to installation costs, there are also ongoing maintenance costs associated with electronic locks. Regularly checking the system for any malfunctions or signs of damage can help make sure that your security system remains effective. Maintenance costs will vary depending on the manufacturer and type of lock you have installed, so it’s important to research all potential options before making a purchase.
Finally, some companies offer warranties that guarantee their products against defects or malfunctioning components within a certain time frame. Additionally, some governments offer tax incentives or grants for businesses that invest in electronic lock technology; these could significantly reduce the overall cost of investing in an electronic lock system.
By understanding the full range of costs associated with different solutions, ranging from installation fees to warranty programs, readers can make an informed decision when selecting the right electronic lock manufacturer for their needs.
Section 5: Previewing Models with Demonstrations and Trials
In this section, we will explore the importance of previewing models with demonstrations and trials when selecting an electronic lock manufacturer. Previewing is a great way to gain hands-on experience with different models to ensure you are making the right choice for your specific needs. There are various types of locks available, each best suited for different applications. It is important to understand what type of locks you need to make an informed decision.
One way to get hands-on experience with different models is to ask for demonstrations from manufacturers or attend trade shows where they may be exhibiting their products. This allows customers to try out different solutions and better understand how the locks work in practice.
Additionally, customers may also want to look into trial periods for certain models, which give them a chance to test the product before purchasing it. This can help guarantee they are buying the right product and not wasting money on something that may not fit their needs.
Finally, it is also important to consider customer reviews when selecting an electronic lock manufacturer. Reviews can provide insight into how well customers have been served by each company, as well as any issues that have arisen during installation or maintenance services. Reading customer reviews can help inform your decision when selecting an electronic lock manufacturer and give you peace of mind knowing that you have made a good choice.
By following these steps and taking time to preview models with demonstrations and trials, customers can make an informed decision when choosing the right electronic lock manufacturer for them. Doing research ahead of time will save time and money in the long run while guaranteeing that your facility remains secure at all times.
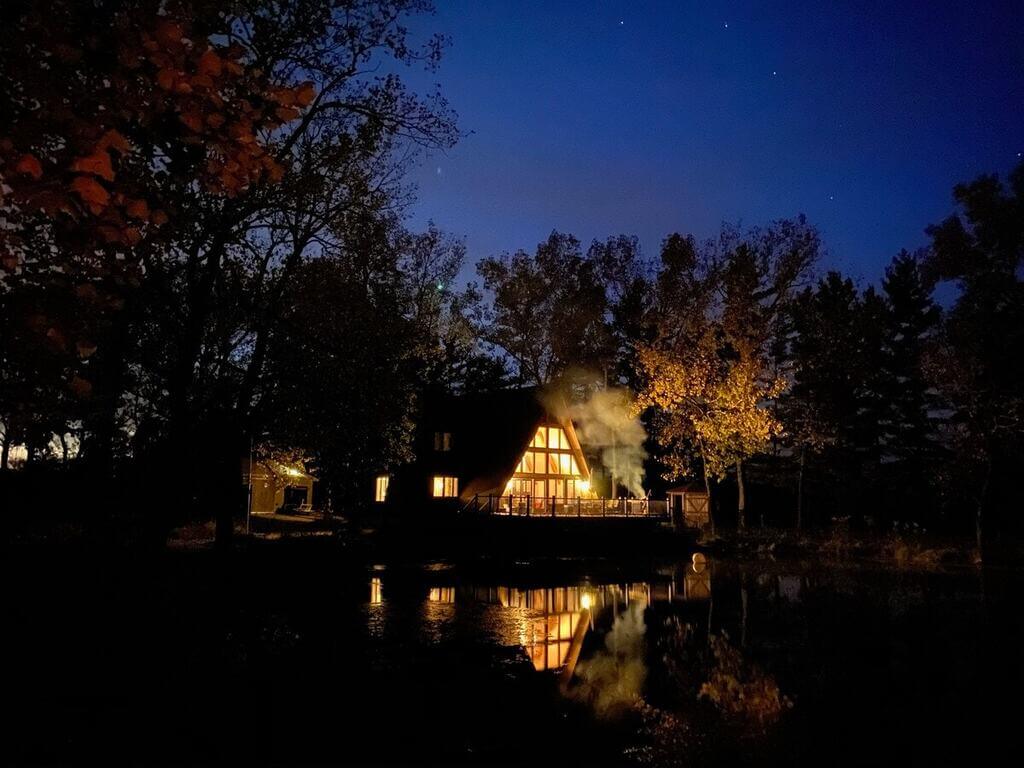
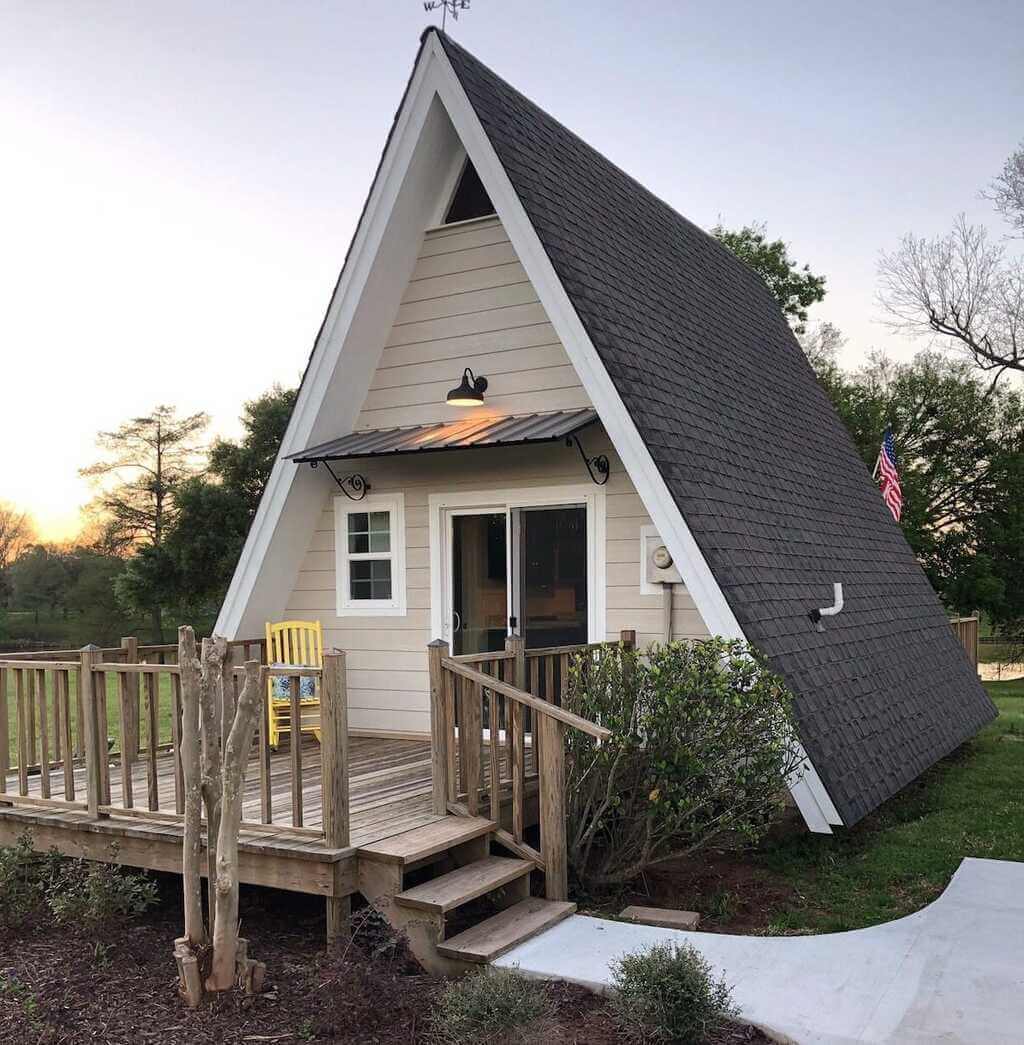
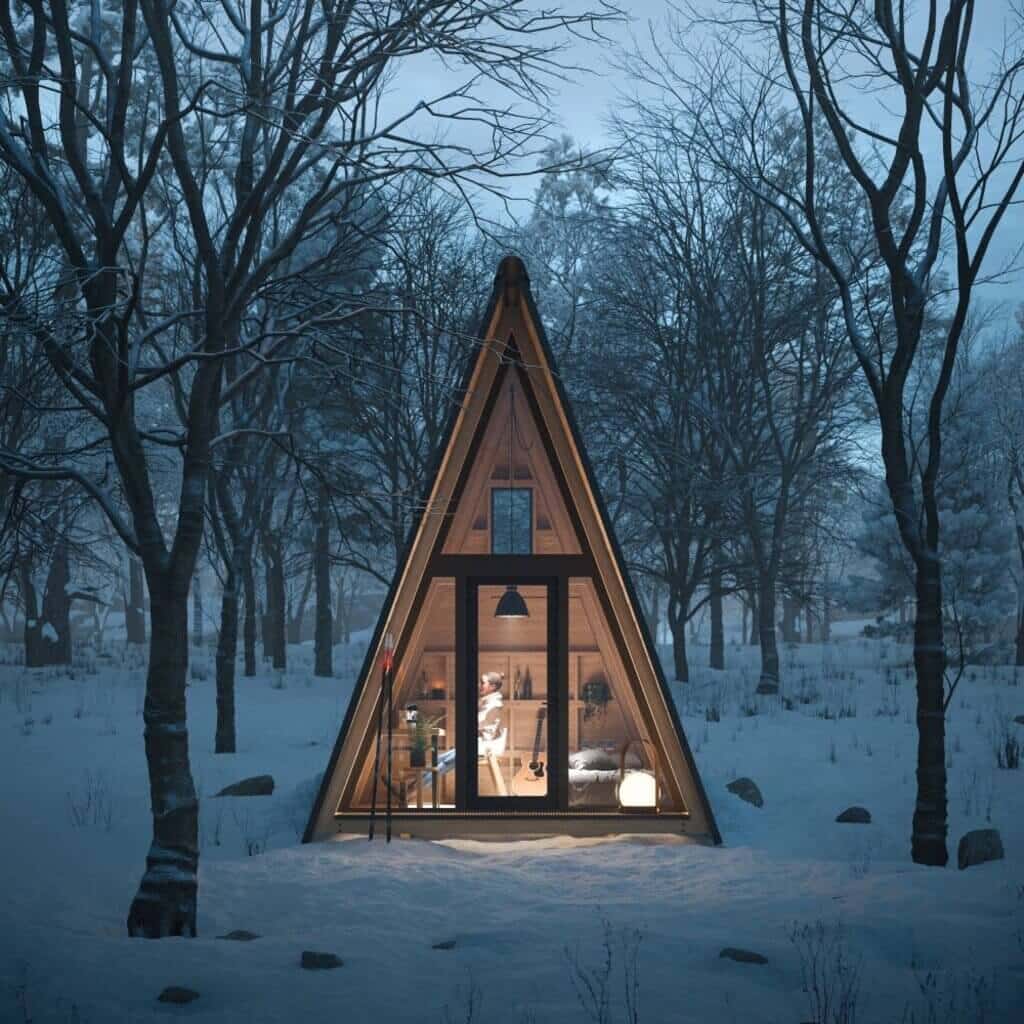
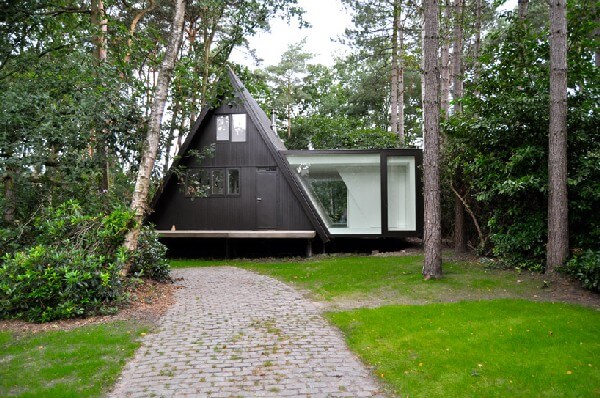
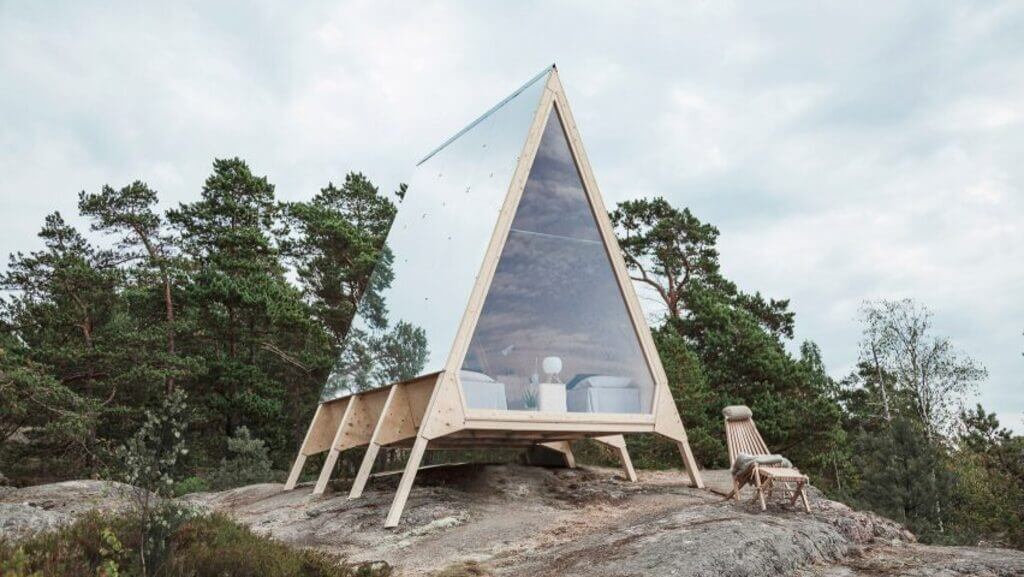
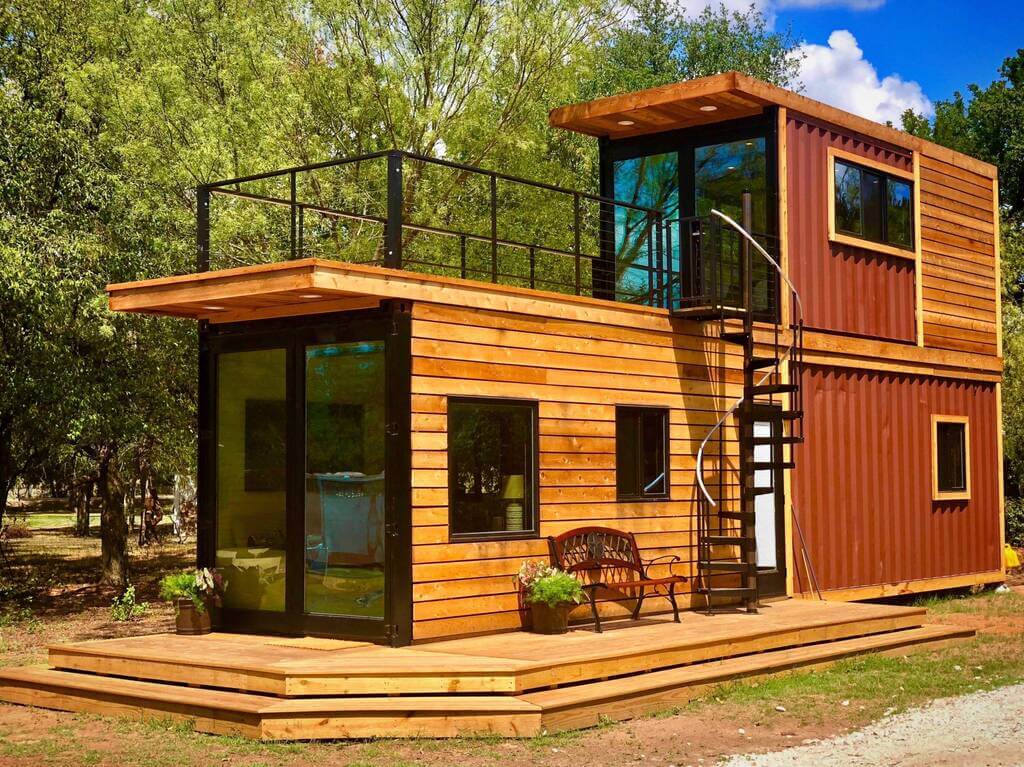
Looking for a home that’s as unique as you are? A-frame houses are making a major comeback, and they’re here to stay! Inspired by the tiny house movement, these iconic structures have become the go-to choice for those seeking charm, simplicity, and a touch of adventure, especially as vacation homes in the U.S. and around the world.
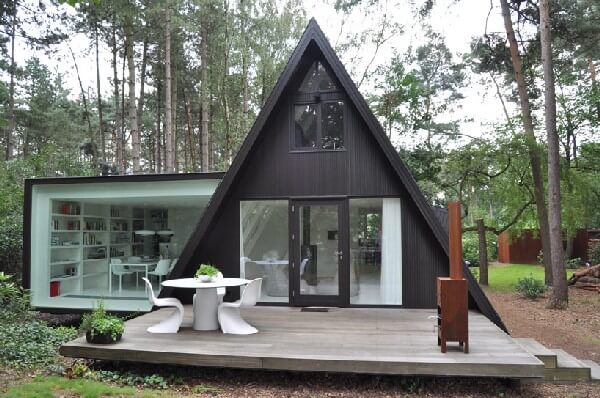
The A-frame’s signature roofline, which mimics the shape of the letter ‘A,’ creates a striking silhouette that’s not only visually stunning but also incredibly functional, shedding rain and snow with ease. Inside, these homes are all about serenity—think open spaces, minimalist design, and a cozy atmosphere that’s perfect for relaxation.
Want to know what makes A-frames so special? Keep reading! In this blog, we’ll dive into everything you need to know from the pros and cons of A-frame living to clever interior design ideas, and even tips on building your very own A-frame sanctuary. Plus, we’ve rounded up 15 incredible A-frame homes from around the globe to spark your imagination!”
So, let’s start with the benefits and drawbacks of A-frame houses:
Advantages and Disadvantages of A-Frame Houses
Below are some of the key advantages and disadvantages of A-frame houses:
Pros
Cons
These houses are easy to design, engineer, and build.
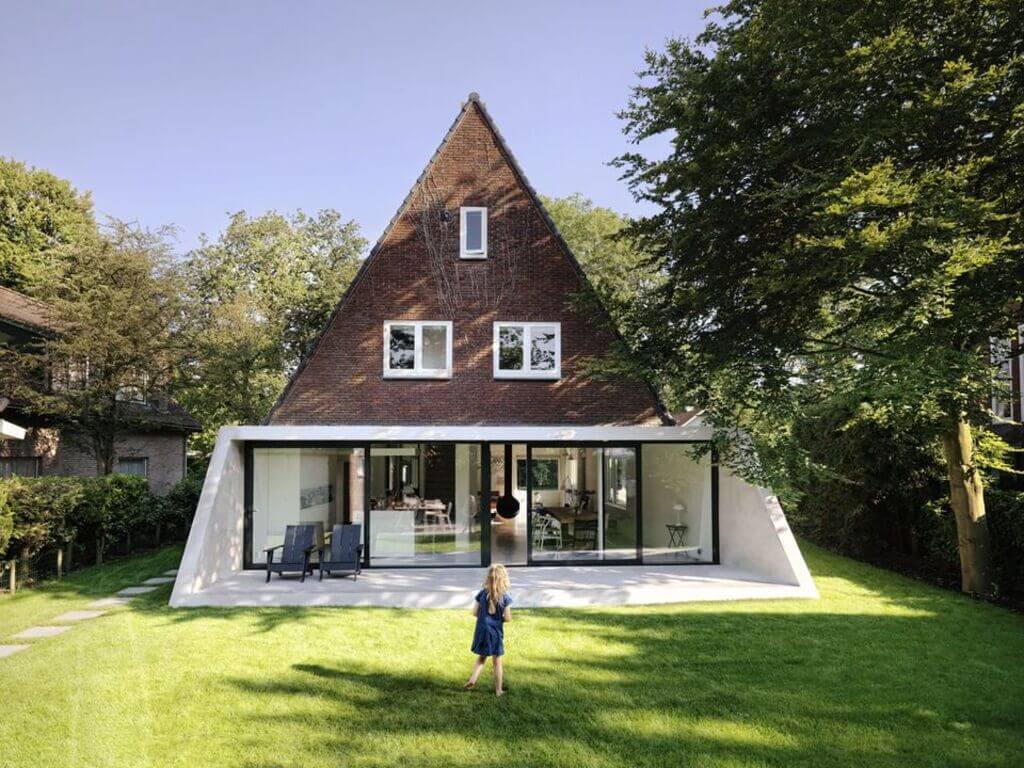
These homes have an A-frame shape, so they all look the same from the outside.
These homes are affordable.
The top part of the A-frame house collects the heat, so it’s a bit difficult to keep the ground floor warm in winter.
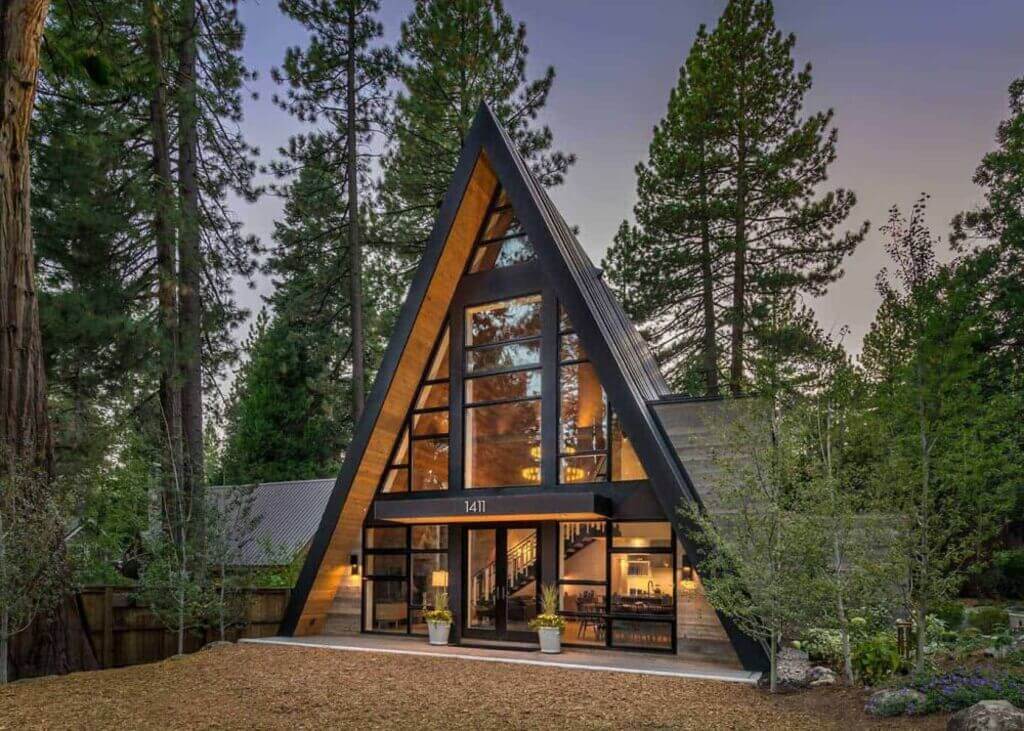
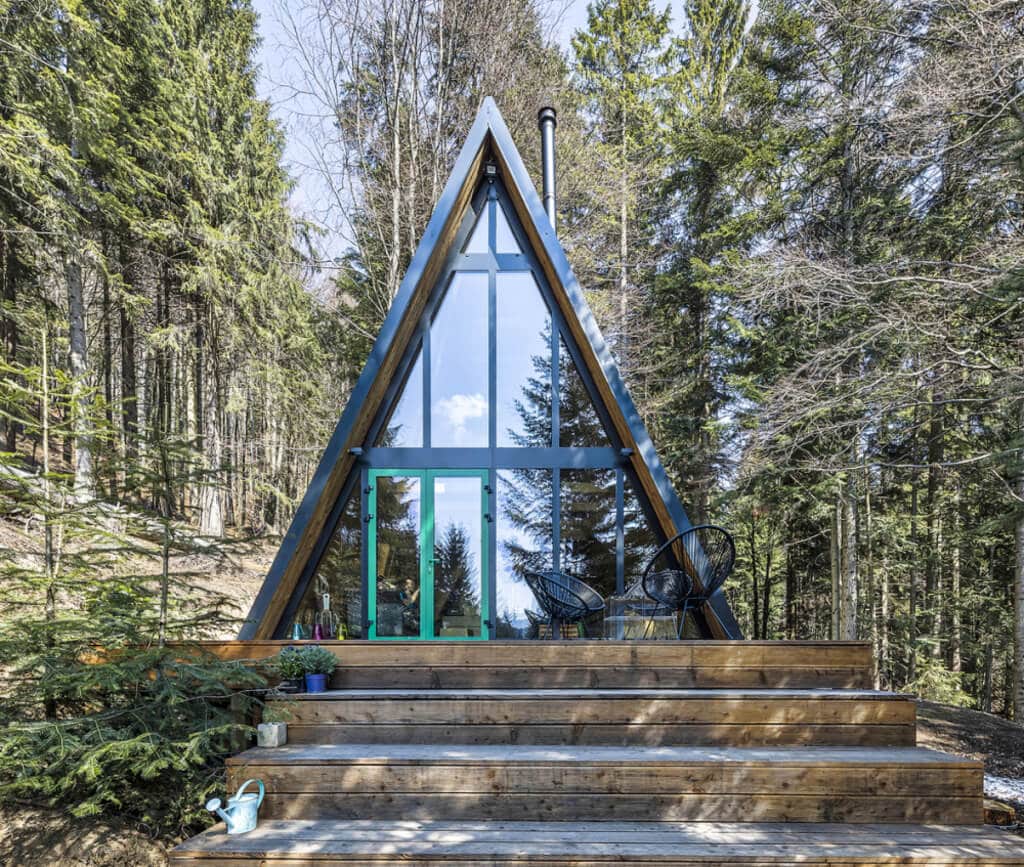
They have large windows to get plenty of natural light.
There is limited space in A-frame houses.
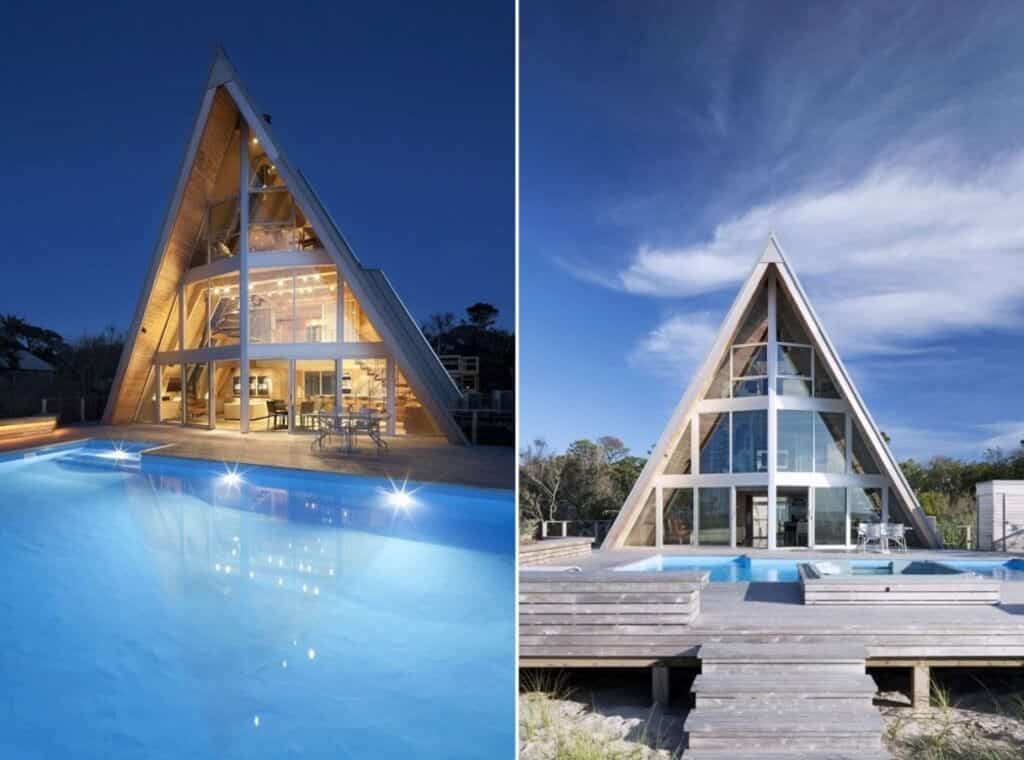
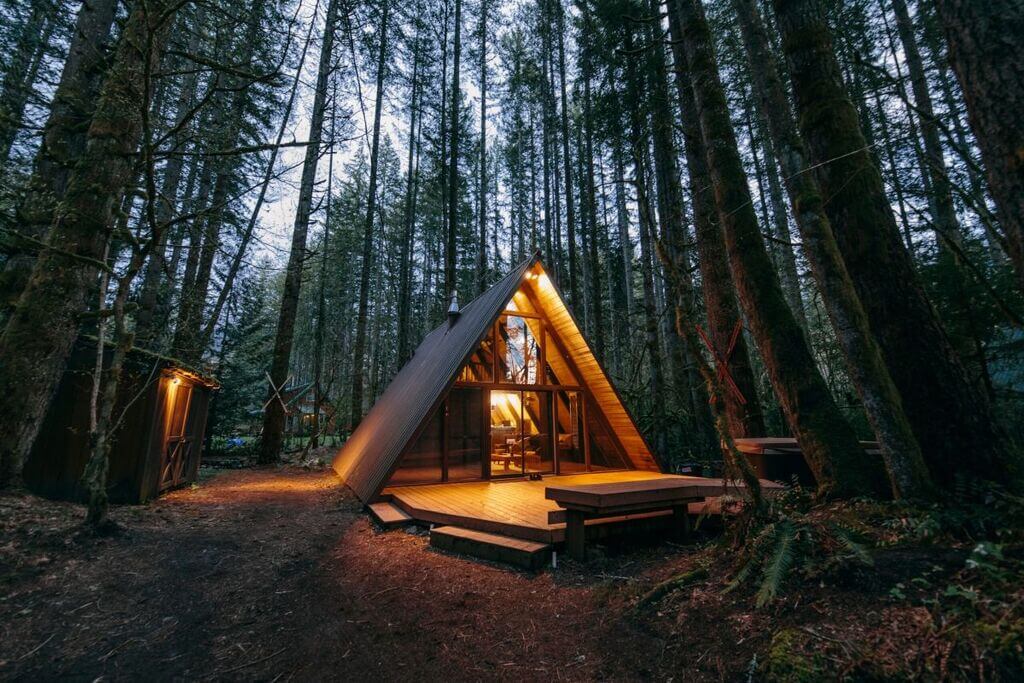
The A-frame houses have sloped roofs that keep snow from building up and prevent damage.
Not suitable for the windy climate.
These homes are great places for hot climates.
Minimal maintenance is required.
Now let’s move onto the list of some of the best and most beautiful A-frame houses.
15 Beautiful A-Frame Houses Around the World
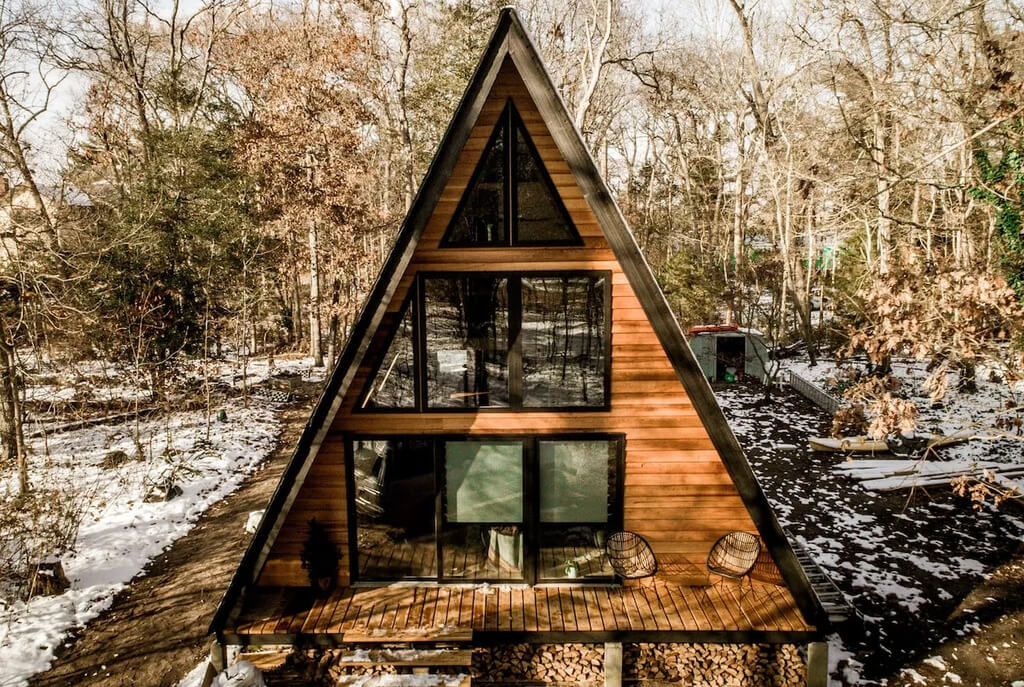
1. Maurice River, New Jersey
This gorgeous A-frame house is located in South Jersey, only an hour from the south of Philadelphia and a two-hour drive from New York City. This three-bedroom home features a 2.5-acre private lot, a wood-fired hot tub, and Scandinavian-style plywood interiors. It also has a spacious modern kitchen, a Sonos sound system, and many more amazing things.
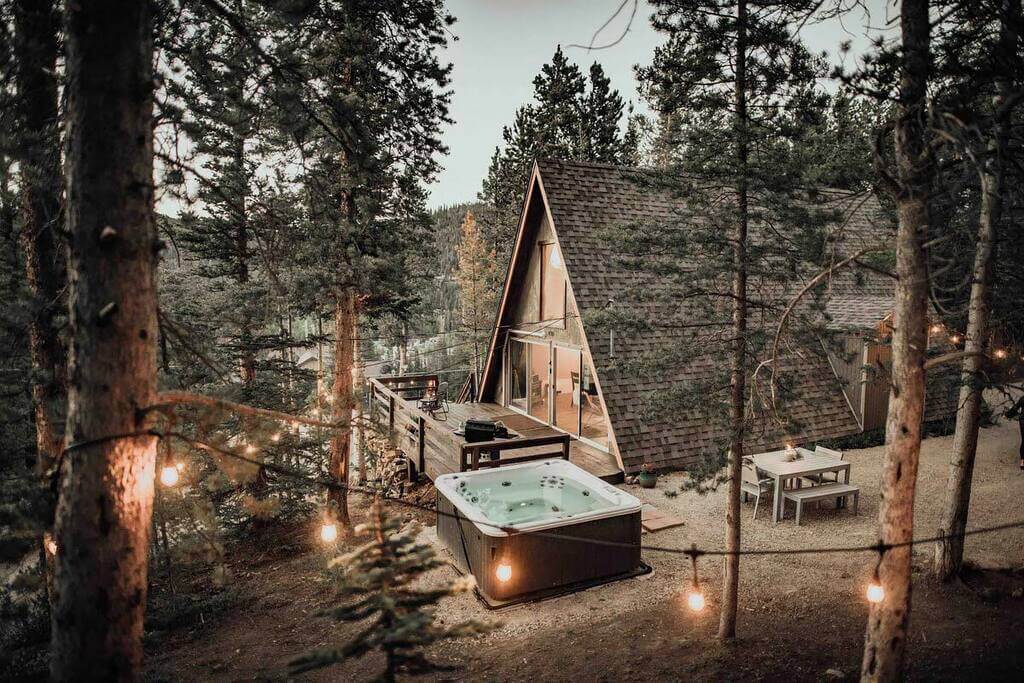
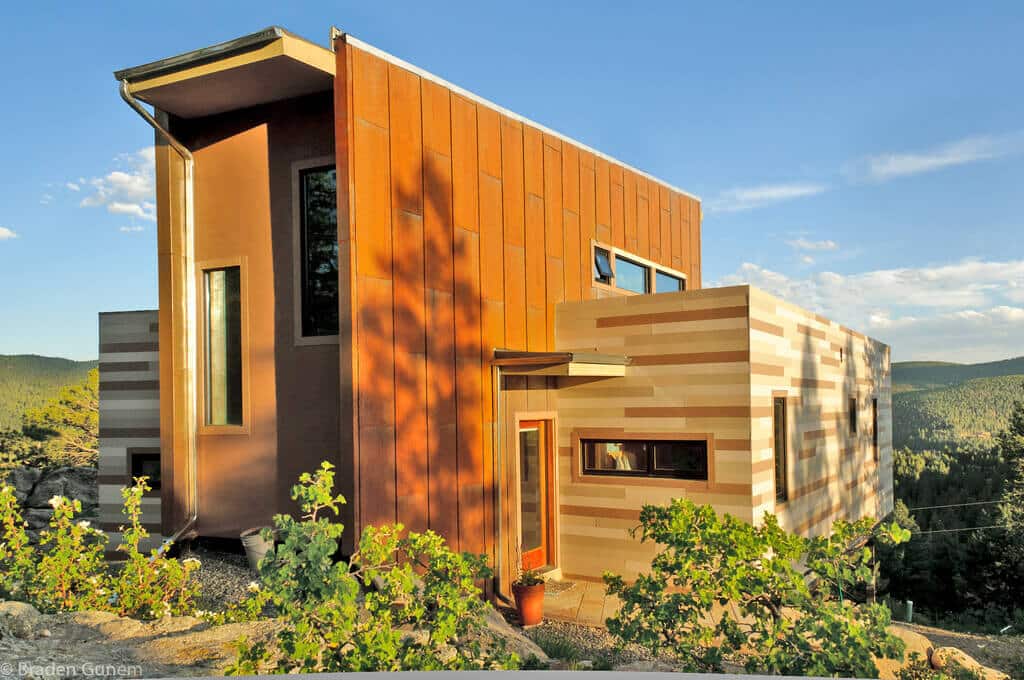
2. High Point Hideaway, Colorado
If you’re looking for a home away from the cities, you should definitely love this place!
The High Point Hideaway is a wonderful restored A-frame house in Colorado. This lovely house has great exteriors and interiors, complementing its natural surroundings. It features a spiral staircase and a bubbling hot tub. There are twinkling lights that brighten the natural wooded exteriors of the house.
3. The Pink Seahorse, Florida
As its name suggests, this is a pink beach house on Florida’s eastern coast. This house has many interesting things, such as several outdoor areas where residents can enjoy neighborhood views and a huge backyard that also boards the Guana River Preserve.
4. Secluded Lakehouse, Illinois
This place is perfect for those travelers and visitors who are looking for a secluded home in the forest. Located on a private lake, this is a Secluded Lakehouse in a unique architectural style. The lake is filled with fish, and a floating trampoline is between Champaign and Kickapoo State Park.
5. Rockaway Beach, Oregon
If you want to experience something different, you should try this fall stay! This is a beachside getaway in Oregon. It is situated just six hundred feet from the sands of Rockaway Beach.
The house features spacious two bedrooms, blond wood, and floor-to-ceiling windows. These windows bring plenty of natural light and make the ambiance warm and cozy. There is also a large fenced-in outdoor space where habitats can hang out with family and friends at night.
6. Shasta County, California
This house may look small and tiny from the outside, but there are many things to explore. This is a Northern California A-frame known as Shasta County, situated within three hours of Lassen Volcanic, Redwood, and Crater Lake national parks.
This area has over 200 miles of hiking and biking trails. So if you want to stay in a secluded area, you can stay in this house and enjoy indoors or engage in outdoor activities. The home has modern and advanced features such as an essential-filled kitchen, a wood stove in the living room, a grill, and more.
7. The Golden A-Frame, Maryland
Are you one of those people who like to travel with their pets? If yes, this destination will be perfect for you!
Located in the beautiful land of Maryland, this Golden A-frame house is actually pet friendly. This home has many great features and amenities, such as stylish interiors, a shuffleboard table, hammock chairs, and a hot tub on the deck. There are also waters of North Glade Cove nearby, where guests can enjoy swimming, boating, and kayaking.
8. The A-Frame on the Cane, Louisiana
This time when you’re planning for a vacation or trip, consider this tiny home. This is a spectacular A-Frame home situated near the Cane River Creole National Historical Park and the roads of Natchitoches. This is a perfect place to spend the weekend with your friends and family. The home features a unique spiral staircase and cozy interiors.
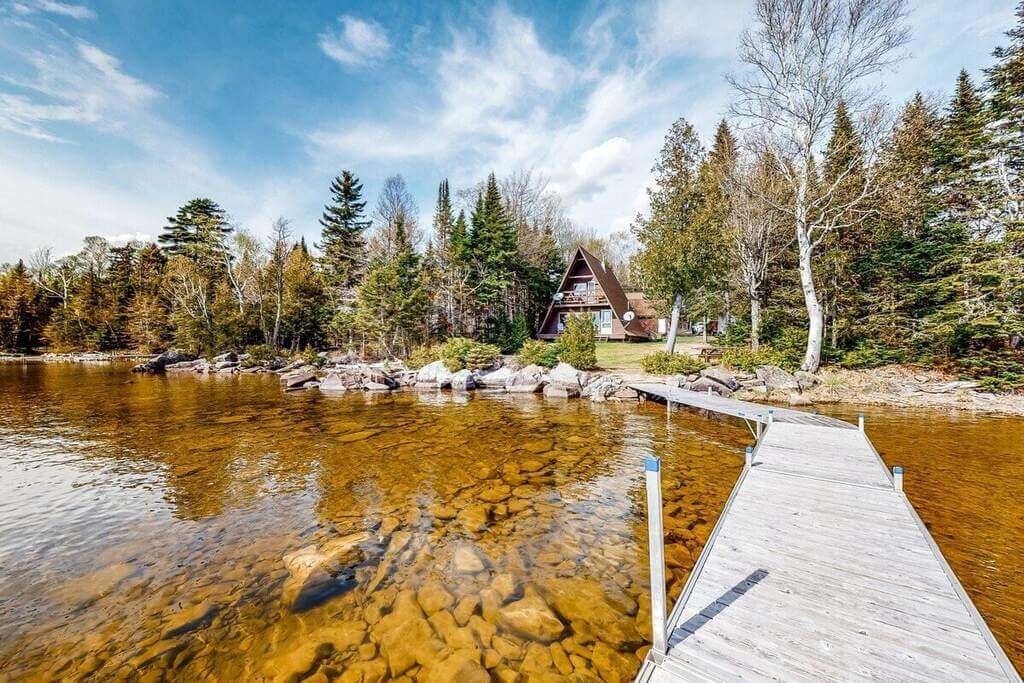
9. Lakefront Home, Moosehead Lake
Look at this breathtaking A-frame house with clear stargazing views of Lily Bay on Moosehead Lake. This lakefront cabin has all the essential facilities and amenities to make your stay comfortable and memorable.
It has a private dock, clean amenities, and a yard fire pit so visitors can hang out at night.
10. Breckenridge, Colorado
Originally built in the 1970s, this traditional three-bedroom home was renovated a few years back. It has a unique A-frame structure with all the facilities. It has a hot tub from where you can get amazing views of the surrounding forest. There is also a spacious outdoor dining area with a modern washer and dryer unit.
You can visit this cabinin winter with your family and friends and get the best experience of an A-frame house living experience. You can also explore Breckenridge’s skiing which is just 10 minutes away from this place. This place is also a great spot for summer to enjoy hiking and camping.
11. Fernside A-Frame Michigan, Sturgeon River
Imagine living in a riverside cabin with amazing views and comfortable living. Sounds like a dream, right?
Not anymore, because you can fulfill your dream by visiting and staying at this Fernside A-Frame near the Sturgeon River. This is a small two-bedroom cabin that will give you the best-staying experience. With a wide deck and firepit, you can spend your evening stargazing and having conversations while staying warm.
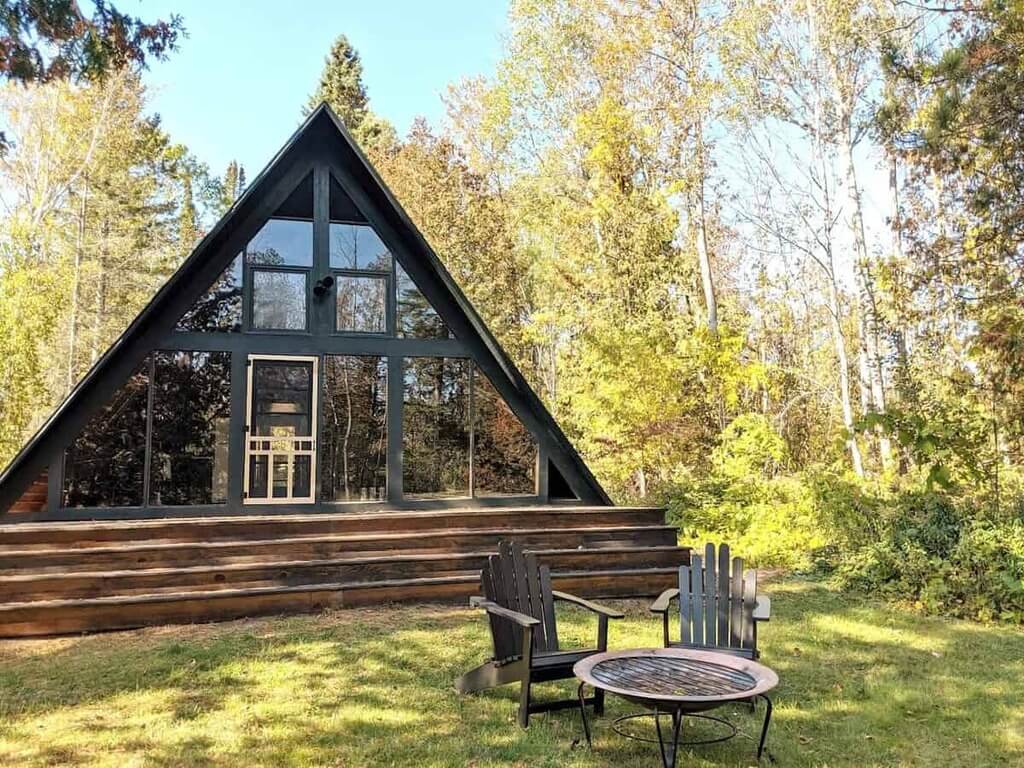
12. Rockbridge. Ohio
This is another one of the best A-frame houses in the world where you can experience complete serenity in a secluded place. The house has many interesting things, like a full wall of geometric window panes and numerous skylights through which plenty of light comes inside.
This three-level house is located in the south of Columbus, Ohio. Here you’ll get a comfortable king-size bed on the third floor, which is surrounded by windows. There is also an additional loft that has two twins. This makes it perfect for even large families.
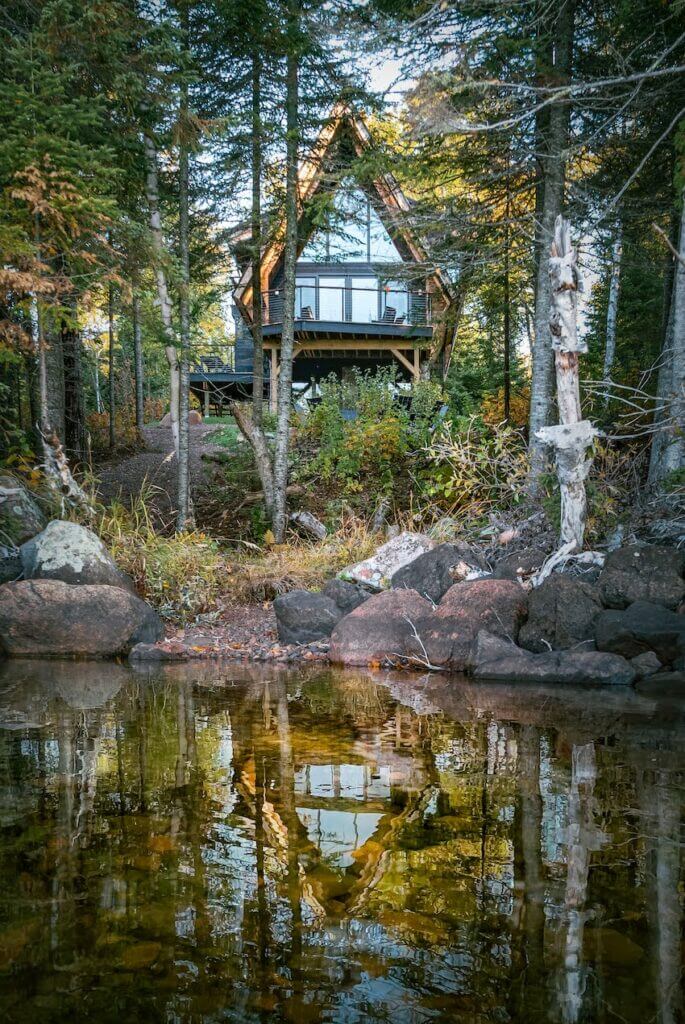
13. Lilla Norr. Minnesota
Do you love architecture with vintage accents? If yes, you’ll also love this A-frame house, which has a Swedish-inspired design! The entire house design is created while sustainability is kept in mind.
The Lilla Noor is just an hour and 15 minutes drive from Minneapolis. It is near the Snake River in a small town with various shops.
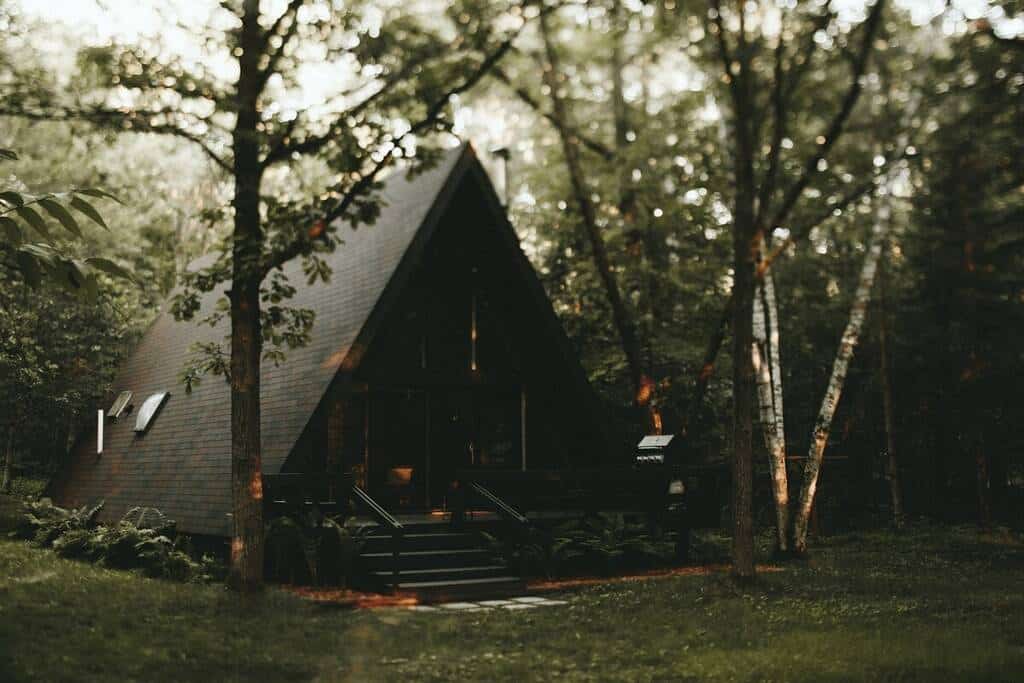
14. Montana A-Frame, Montana
The next A-frame house on the list is this Montana A-frame which is located near Georgetown Lake and Discovery Ski Hill. This quaint cabin is perfect for travelers who are looking for an escape from the chaos of the urban cities.
This property has a spiral staircase leading to a loft, where you can enjoy spectacular views of the surroundings through huge floor-to-ceiling windows. There is also an RV pad with hookups.
15. Saco river A-Frame, New Hampshire
In the National Forest of the White Mountains, an A-frame cabin called Saco River A-Frame is situated. Here you can also access a private beach on the River. The house interiors are also warm and cozy. Vaulted pine ceilings and outdoor amenities are used here, providing an amazing living experience in the mountains.
Top 5 Interior Ideas For A-Frame Houses
Are you planning to buy an A-frame house? If yes, you might be wondering about the interiors and how you can decorate them. No worries, here are the five best ways to decorate A-frame homes.
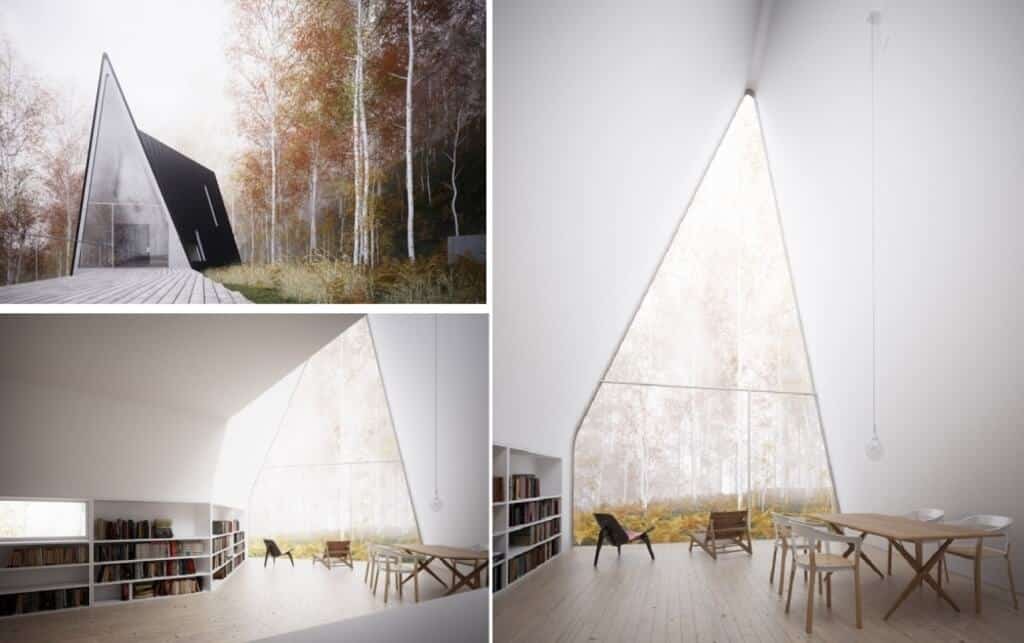
1. Open Interiors
A-frame houses are less spacious than traditional houses, which is why open-concept interiors are best. The open interiors will make the home look more spacious and accessible. You can also spend more time together with your family in space without feeling left out.
2. Neutral Colors
It is always best to go with neutral color schemes like beige, white, cream, and light grey. These colors and shades will enhance the architectural details and elements, including beams and hardwood floors. They will make these details stand out, which looks fantastic in the A-frame houses.
3. Geometric Shapes
You can include geometric shapes in two ways, either in decor or in the interior design of the houses. This single thing will immediately elevate your simple A-frame house design and transform them from boring to spectacular.
For example, add curved walls with different angles. These curbed can also be used as seating areas and art display corners.
4. Plants
Plants are one of the simplest and quickest ways to change the whole ambiance of any place. A-frame houses are mostly located in forests, rivers, and mountains with beautiful nature and landscape views, but still, it’s a good idea to bring nature in. You can add indoor plants to create a sense of natural flow from the inside out.
5. Mix and Match Materials
Try mixing two opposite or complementary materials together to create a unique design. For example, you can add steel with natural wood to bring modern vibes into your space. This will still be the rustic and natural ambiance but with little touches of modern elements.
3 Tips For Building A-Frame Houses
Do you want to build your own A-frame house? That’s a great DIY construction project, but you have to keep a few things in mind. Here are some tips that you can follow to get the best results:
1. Elevate the House
A-frame houses are similar to tiny homes with less storage. So, consider elevating the house a bit off from its foundation. By doing this, you’ll get some space between the ground and your lower floor joists. This extra space can be used as additional storage space. And if you want to make this storage area waterproof, build your entire foundation with concrete.
2. Blend Outdoors & Indoors
Add tall, massive windows with wood frames. These windows will bring ample natural light and make you feel close to nature. You can also bracket your A-frame house with wide decks for more outdoor space. Here, you can also add a firepit or hot tub to completely use the outdoor space and have a better living experience.
3. Focus on Functionality
You can either build your A-frame houses from scratch or buy a prefab unit. In both cases, you have to prioritize its functionality. You have to ask yourself questions like:
Will this house be your second home or a primary residence?
Will you list this A-frame house as an investment real estate?
This is important because the interior elements, like the floor plan of an A-frame vacation house or rental property, completely differ from permanent residence. So always try to consider these points while building your A-frame house.
I hope this guide on A-frame houses has helped you understand what A-frame houses are, their advantages and disadvantages, how to decorate the interiors, and what key things you should consider while building them. If you find this post helpful and informative, share it with your family and friends.
Looking to brighten up your kitchen and enjoy a better view while cooking or cleaning? Kitchen windows over the sink are a perfect solution. Not only do they bring in plenty of natural light and fresh air, but they also make everyday tasks more pleasant by connecting your space to the outdoors.
Since cabinets and countertops often dominate kitchen walls, placing a window above the sink is a smart way to maximize both function and design. Whether you’re renovating or planning a new build, the right window style can completely transform the feel of your kitchen.
In this blog, we’ve rounded up some of the most practical and stylish kitchen window over sink ideas to inspire your next update. Keep reading to find the perfect match for your kitchen layout and personal taste.
45 Ways to Stylize Your Kitchen | Kitchen Windows Over Sink Ideas
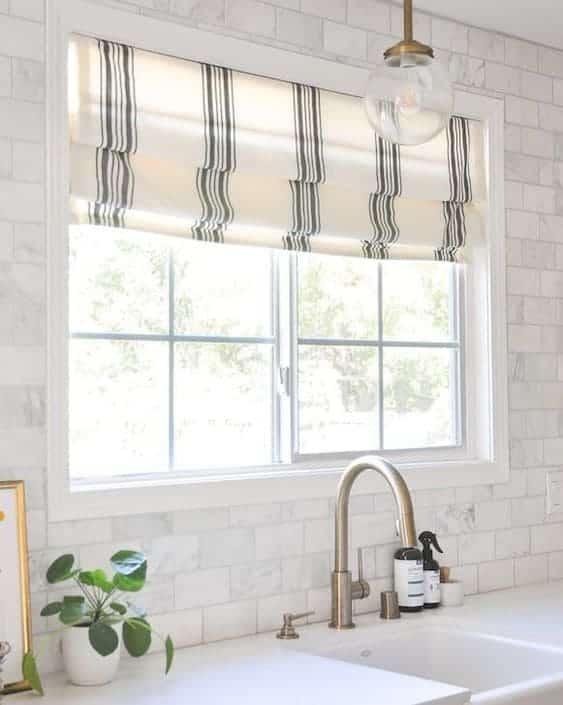
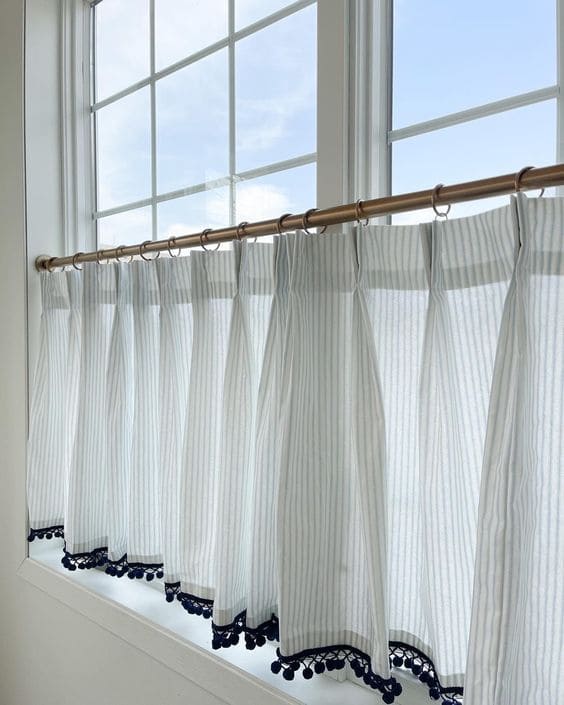
1. Curtains For Kitchen Window
Curtains may be a chic method to provide privacy when necessary while also allowing light in when needed. Curtains may be available in a variety of styles, sizes, materials, and shades. Because of its proximity to the sink, the material itself needs attention. You can always go for curtains for kitchen windows over sink ideas.
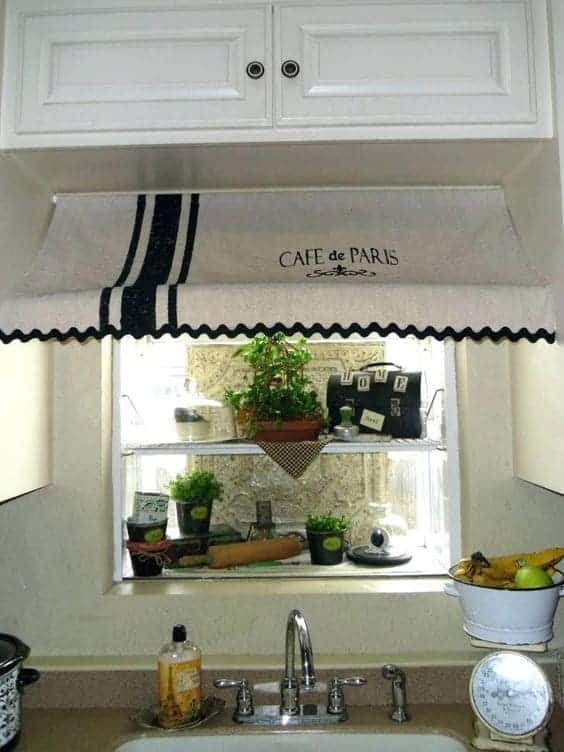
2. Cafe Curtains For Kitchen Window Ideas
When you’re washing your dishes, cafe-style curtains are a terrific way to screen sunlight and provide a lovely touch of texture. They are the ideal option for kitchens with traditional or farmhouse sinks.
In addition, when considering renovations, installing new windows can brighten your kitchen space and offer energy efficiency benefits. Opting for larger, strategically placed windows can amplify natural light and elevate the overall aesthetic appeal.
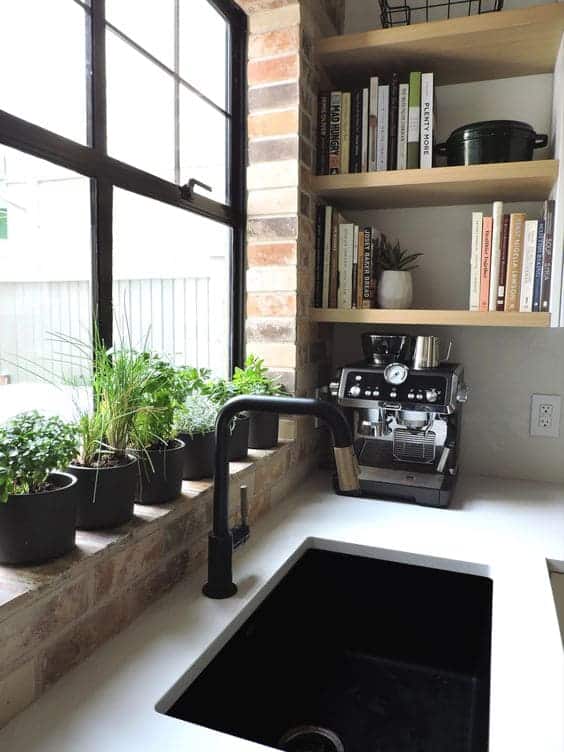
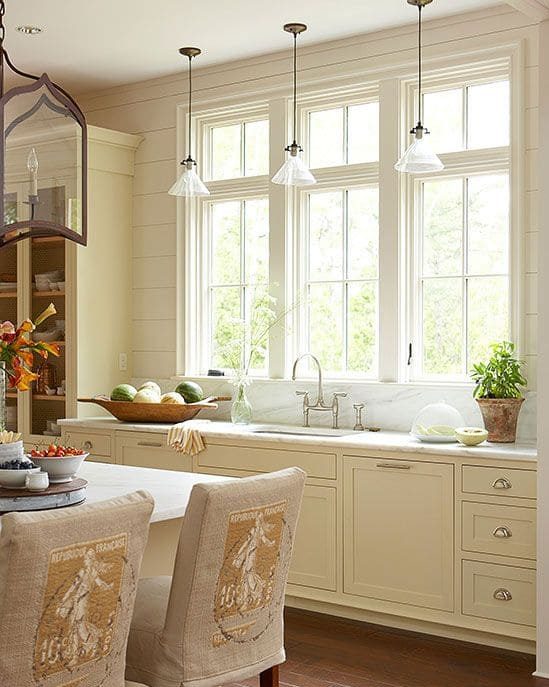
3. Flower and Sunshine
One of the best kitchen windows over sink ideas is to let nature into your kitchen. In a clean and airy kitchen, when sunlight penetrates through the window it brightens up the space and makes it alive.
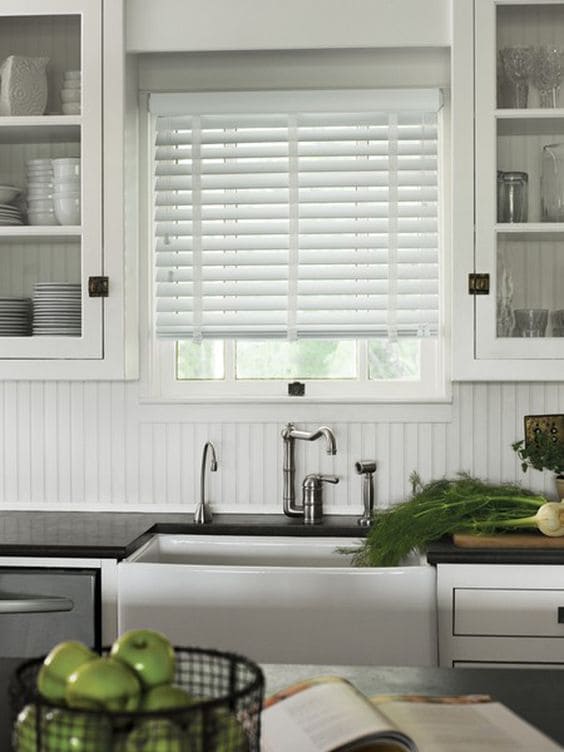
4. Kitchen Window Blinds
Blinds may appear to be the less exciting choice, but there are situations when this is not the case. Usually, the blinds are white or beige to blend in, which is sometimes helpful if the kitchen has a different focus point.
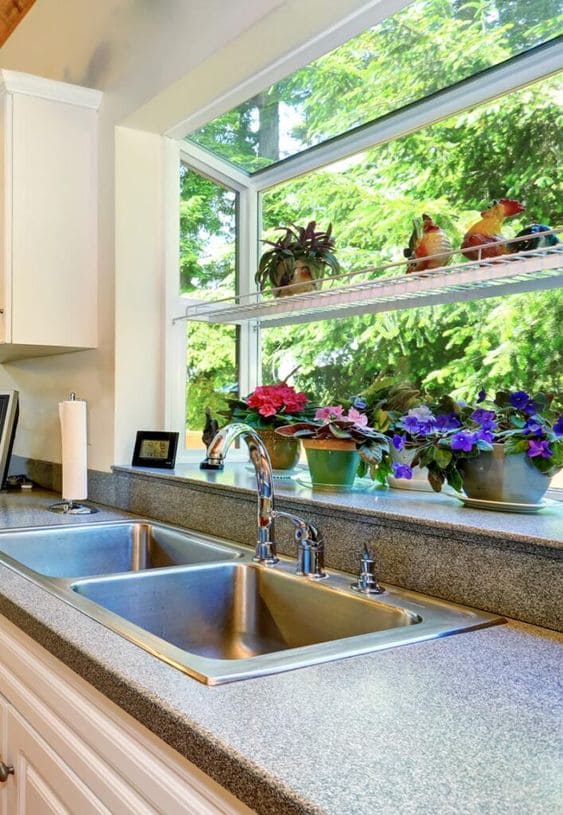
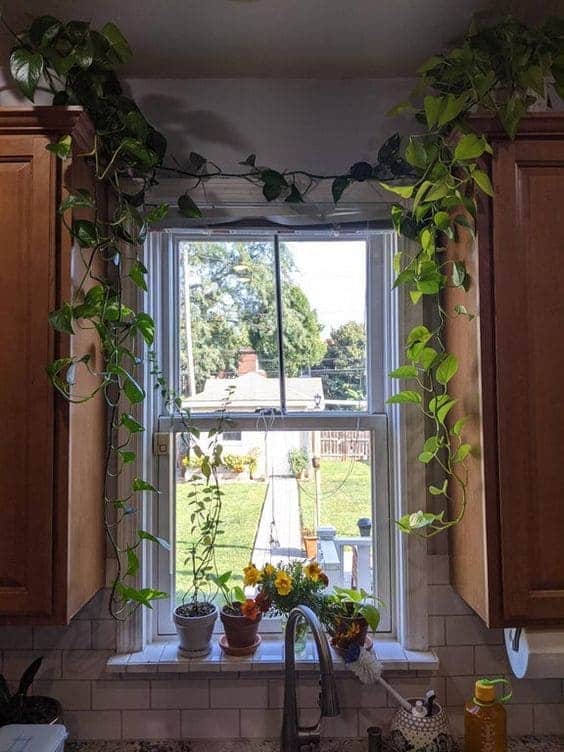
5. Add A Potted Plant To Your Kitchen Garden Windows Over Sink
A simple potted plant can make a window spot come alive. It’s also recommended to avoid cluttering up a windowsill area as it will almost certainly come into touch with moisture and be exposed to direct sunlight.
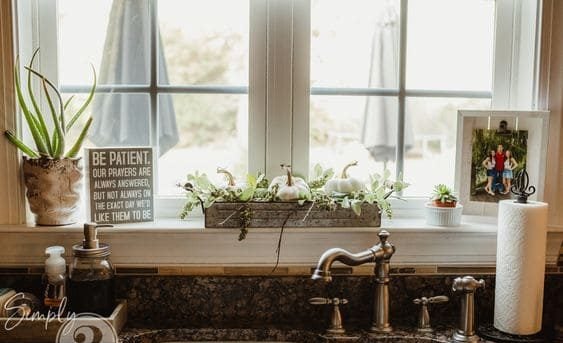
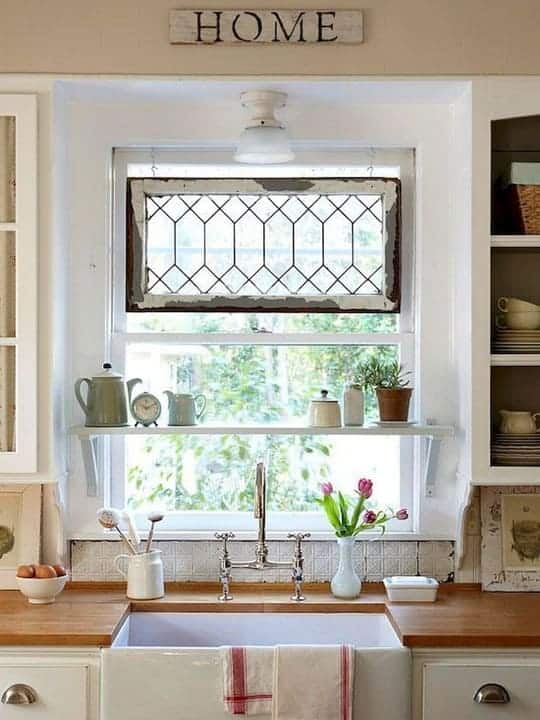
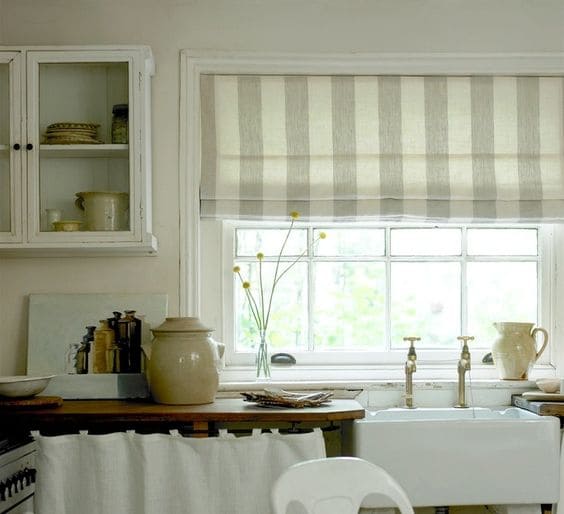
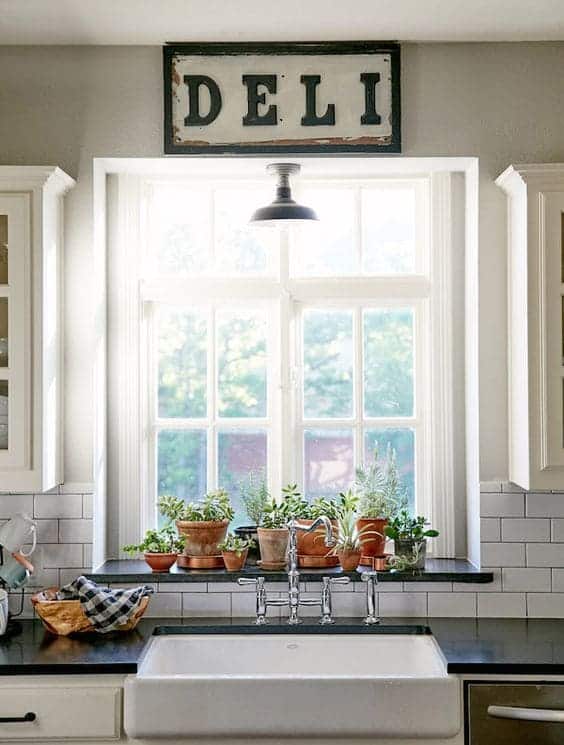
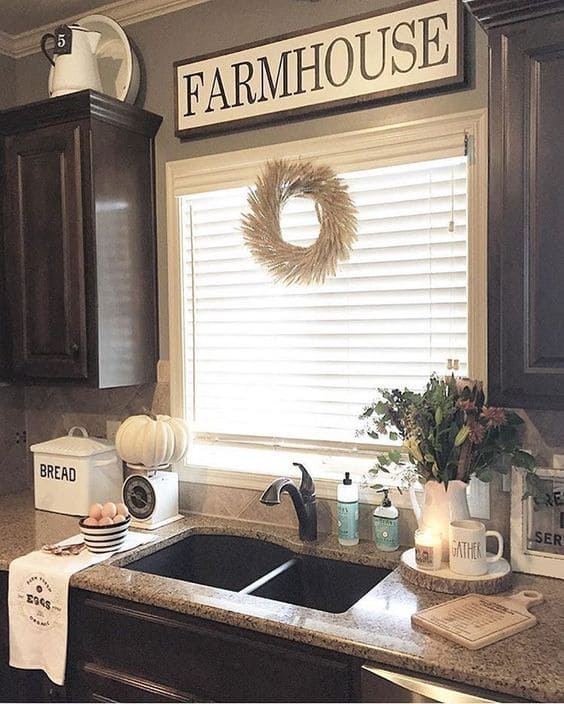
6. Thrift Decor in Window Ledge
A wood and white kitchen can be turned into a country-style design with rustic accessories on the window ledge. The vintage chandelier over the window and the antique sign up the appeal a notch.
7. Decorative Trinkets in Kitchen Window
You may arrange your favorite objects on the ledge around the sink to decorate the space. To brighten up the window area, use things you appreciate, such as fragrant candles, plants, soap bottles, or vacation souvenirs.
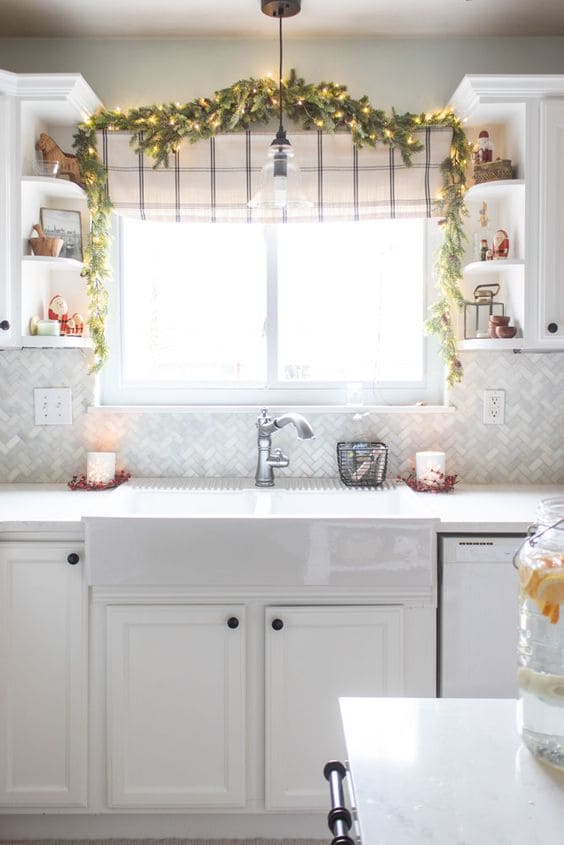
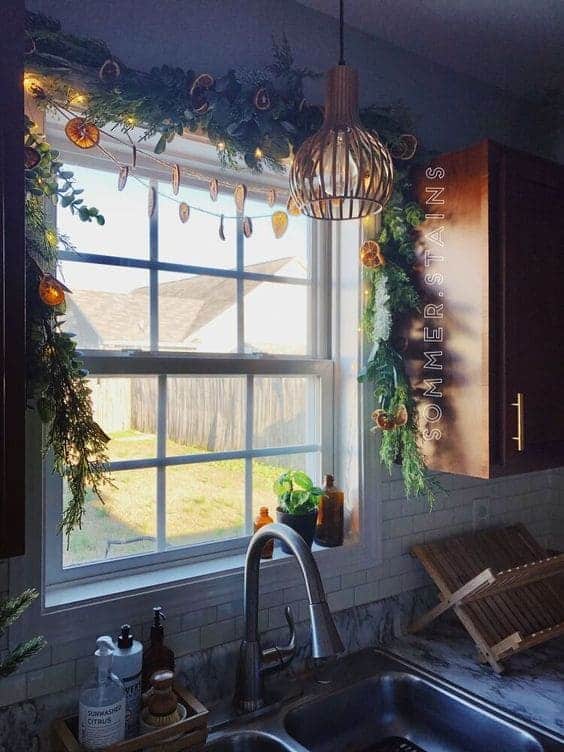
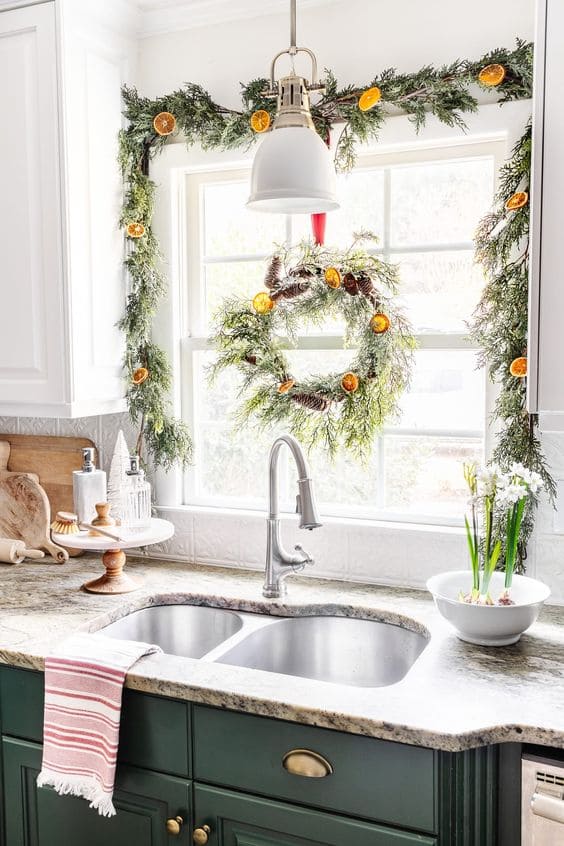
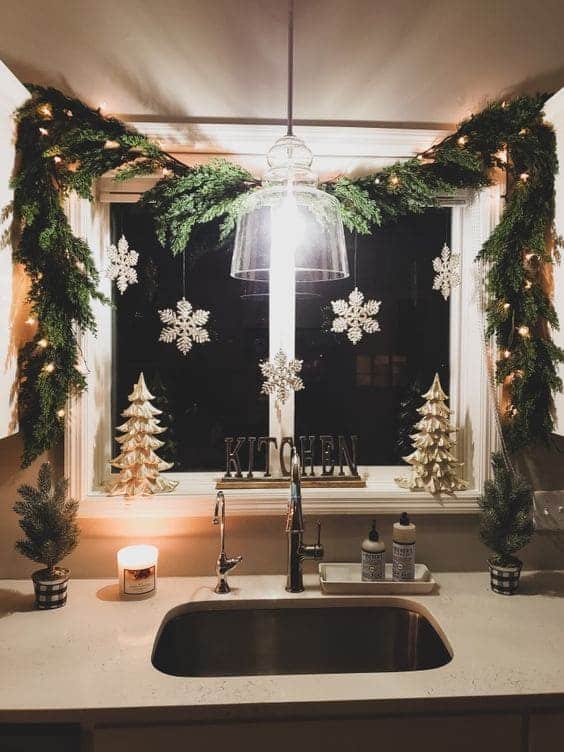
8. Seasonal Garland For Small Kitchen Windows Over Sink
Acknowledge the changing of the seasons by installing a seasonal garland on your windowsill beside the sink. It is a creative way to give your kitchen some color and personality.
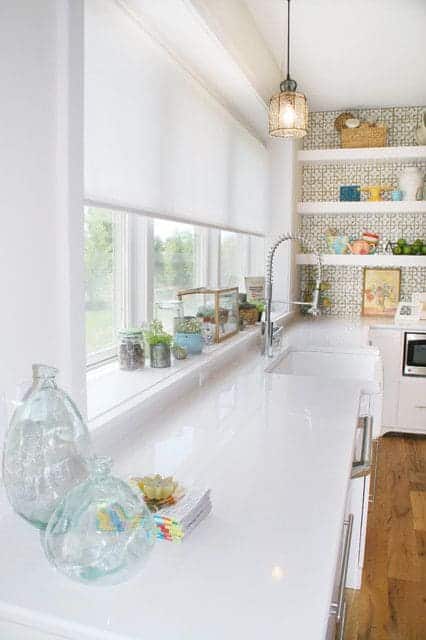
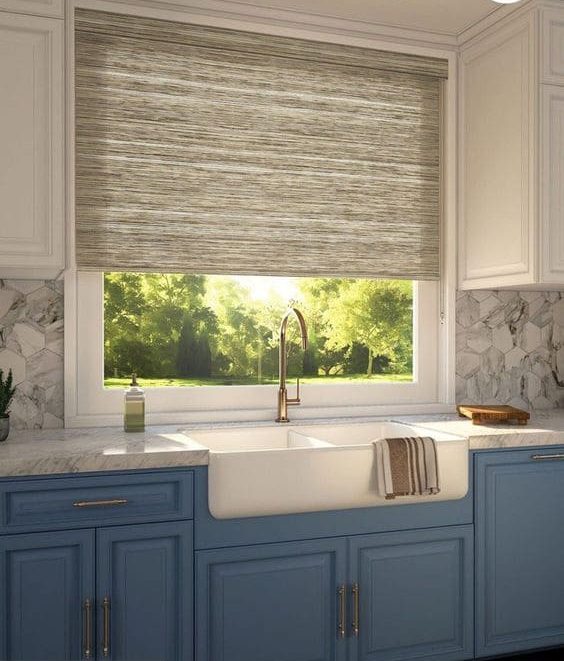
9. Roller Blinds For Kitchen Window
When it comes to window treatments for kitchens, there are many options, but a classic roller blind is one of the least expensive and most effective. If you want to keep things simple, use a neutral color, or for a more eclectic look, add a bright flash of color or pattern.
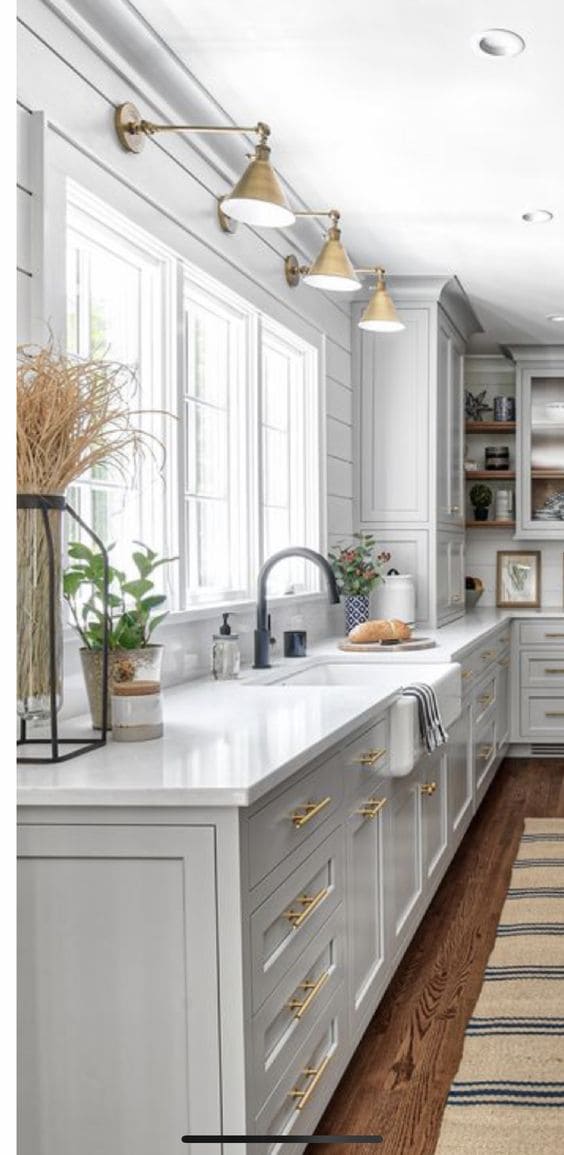
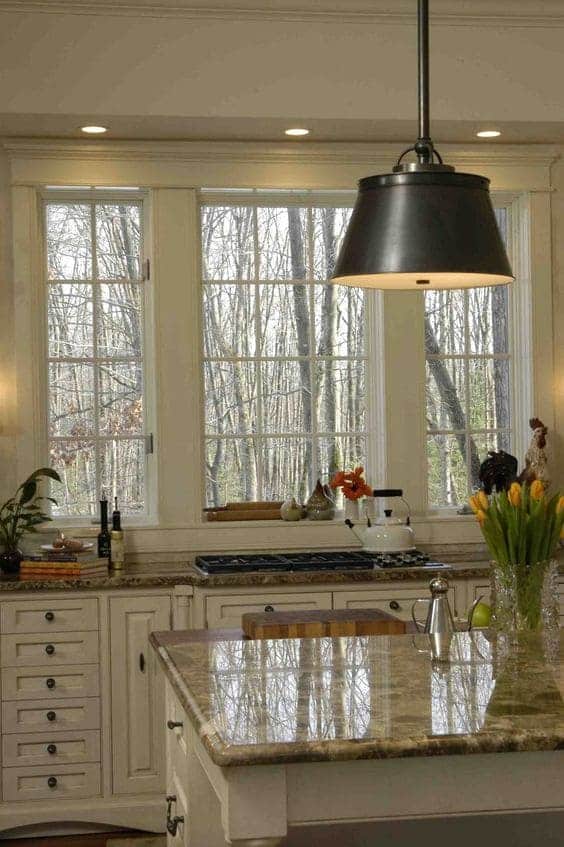
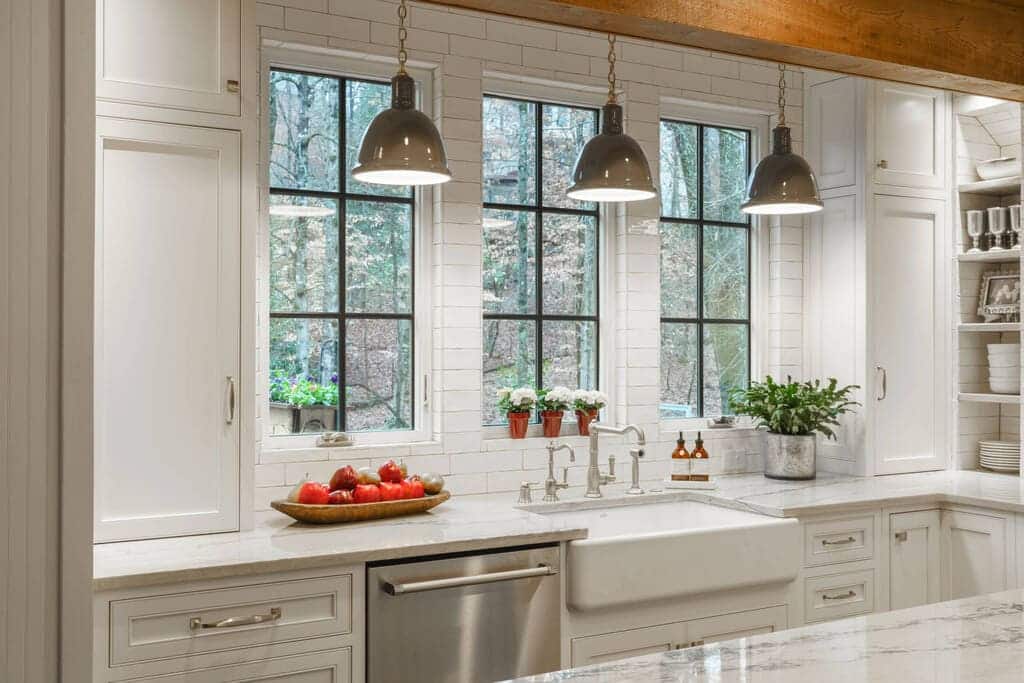
10. Lighting in Kitchen Windows Over Sink Ideas
Even if there is a window there, lighting above the kitchen sink is still vital. This is because the sun doesn’t constantly shine, the window doesn’t always let light in, and you often need additional light for meal preparation.
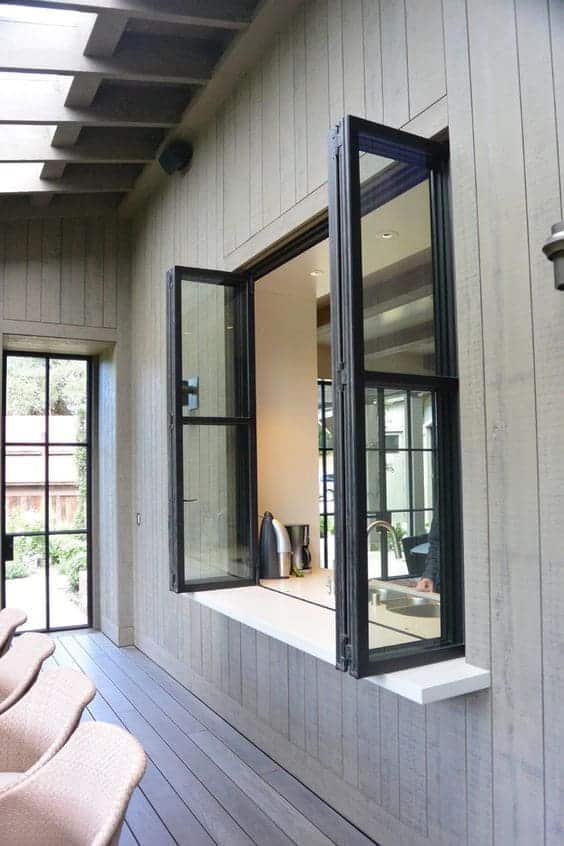
11. Kitchen Pass Through Window
Food may be conveniently transferred from the backyard grill to the kitchen through a window that is situated over the sink. There are also pass-through windows linking the dining room and living room.
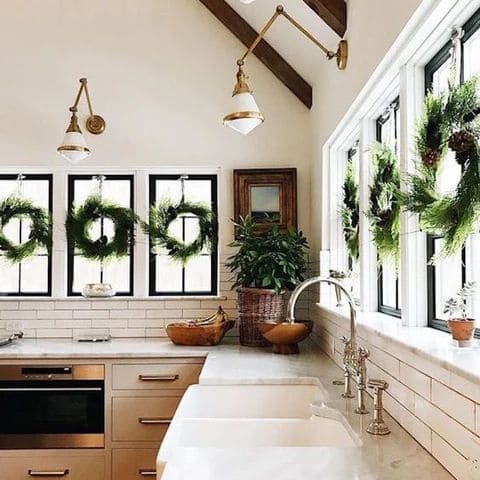
12. Seasonal Wreaths and Wooden Beams
This casement window over the farmhouse sink has a charming appearance because it is surrounded by wood. The ceiling’s exposed wooden beams create a cozy contrast with the white cabinets.
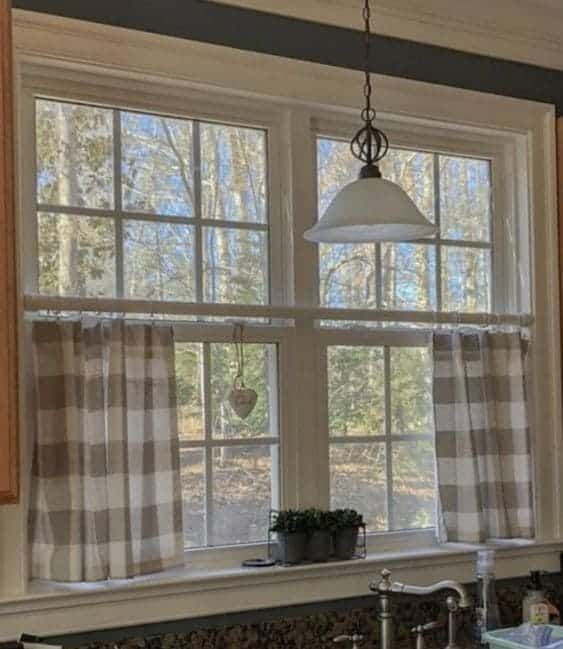
13. Plaid Valances with Ribbons in Kitchen
Hang a black and white plaid valance on the window and tie the ends loosely with black ribbon to give your kitchen a classic look. To complete the farmhouse appearance, hang a rustic sign over the kitchen window.
14. Antique Lighting and Lower Half-Curtains
Half-curtains may be hung on the lower half of your windows to give them a light appearance. An antique light fixture over the sink will complete the ornamental touch.
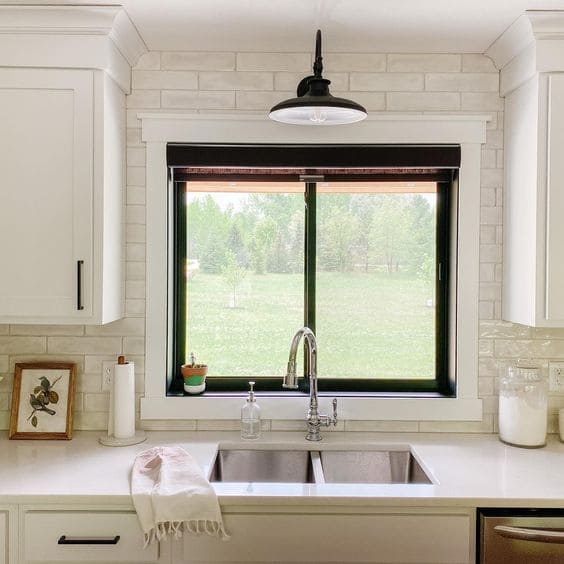
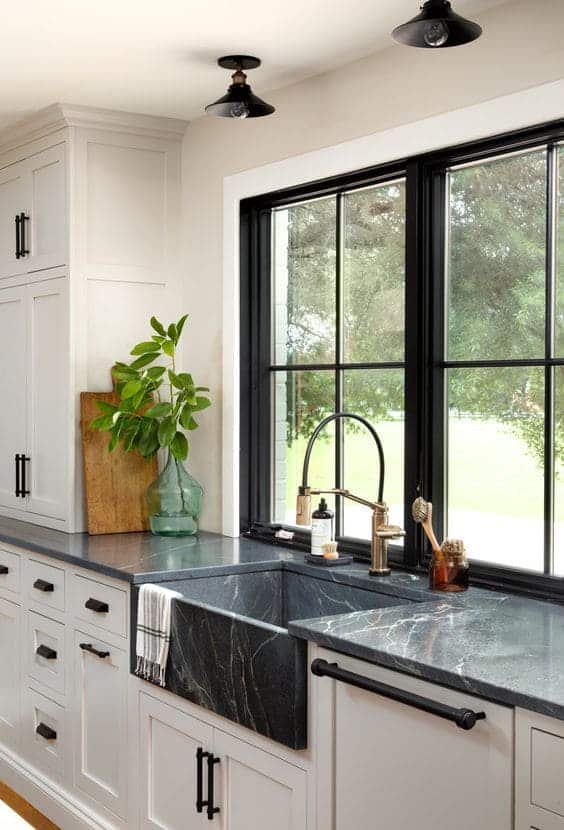
15. Subway Tiles On Backsplash
A backsplash in a kitchen made of subway tiles is modern and attractive. With the correct colored grout, it gives a sink area a wonderfully distinctive look in addition to providing more visual appeal than simply painting the walls. It also protects your walls from moisture and filth.
16. Add a Large Terracotta Pot
A large rustic terracotta pot looks great on a windowsill in a kitchen because terracotta is a popular color for interior design right now.
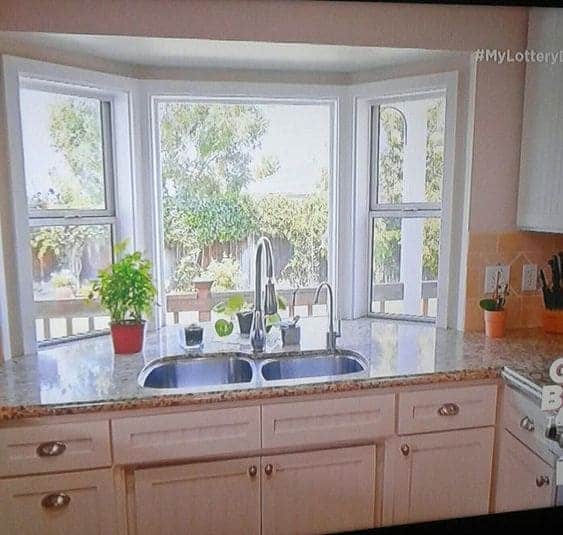
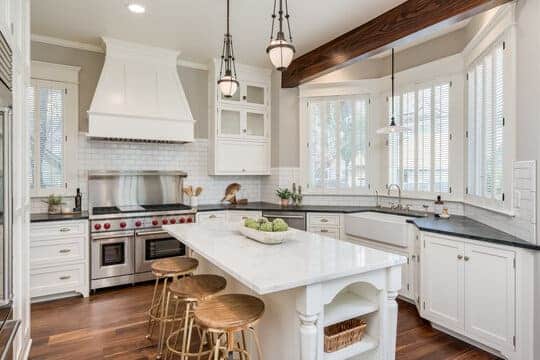
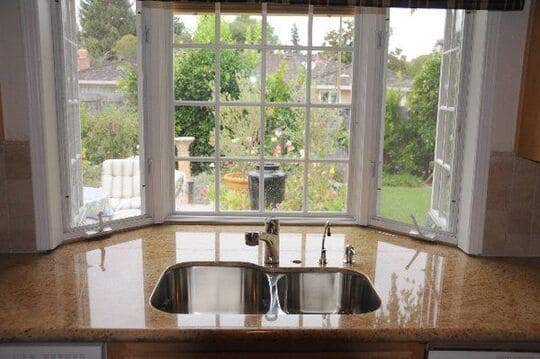
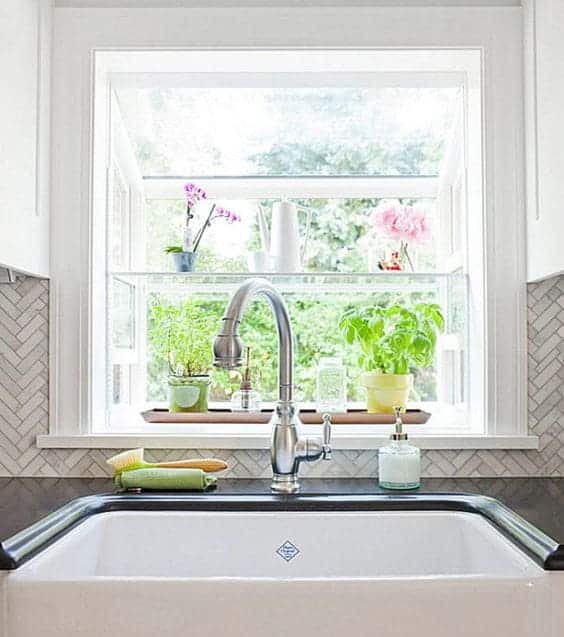
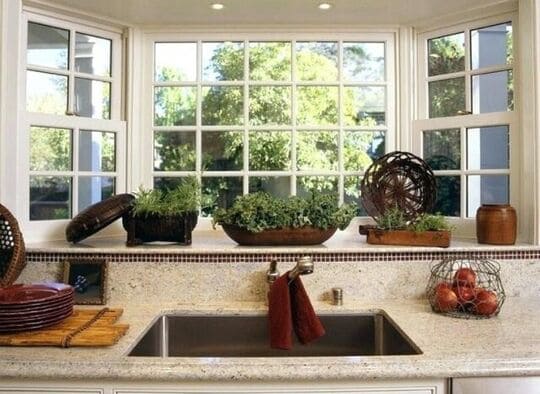
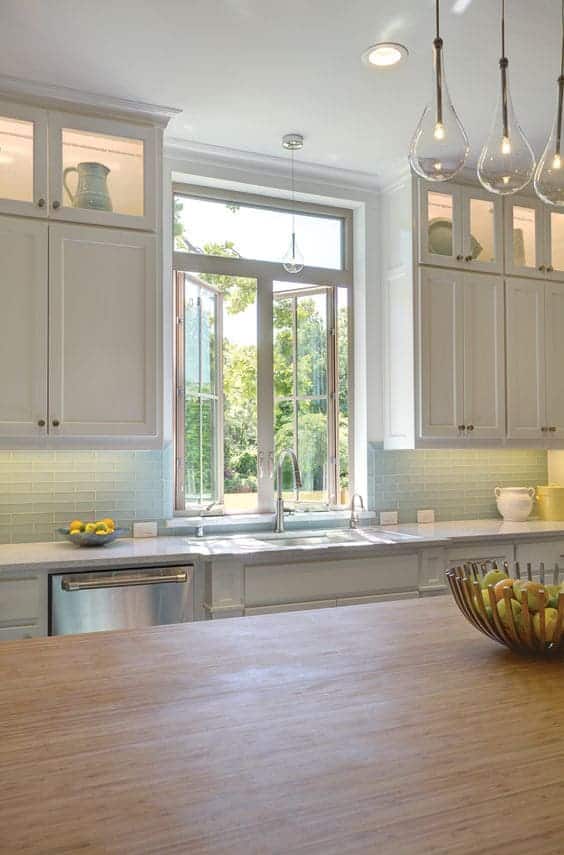
17. Bay Window in Your Kitchen Sink Area
A tiny bay window offers the area above the sink a relatively sizable ledge where various plants may soak up the light and trinkets can be placed to beautify the house. The bay window is a stunning window design in and of itself, providing interest and maximizing the morning by having three open planes despite the limited area.
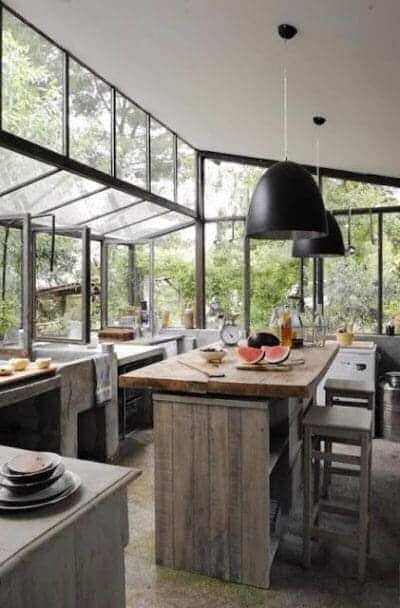
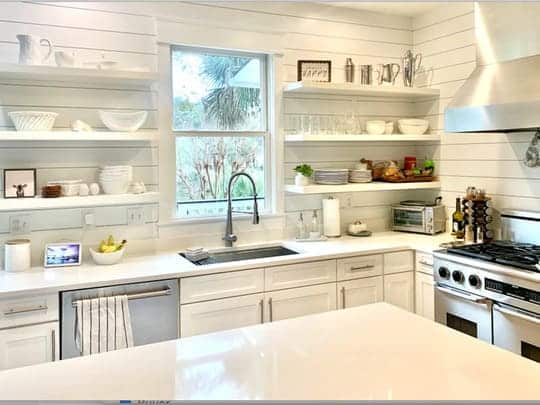
18. Picturesque Kitchen Windows
Unobstructed views are provided by the large picture windows above the kitchen sink, which are ideal for people who want to watch small children play or simply admire the view while doing the dishes.
19. Vintage Curtains For Kitchen Window Over Sink
Your rustic kitchen will feel cozier if you add curtains to the windows. Since the curtains will be so close to the sink, choose a light, splash-resistant material for them.
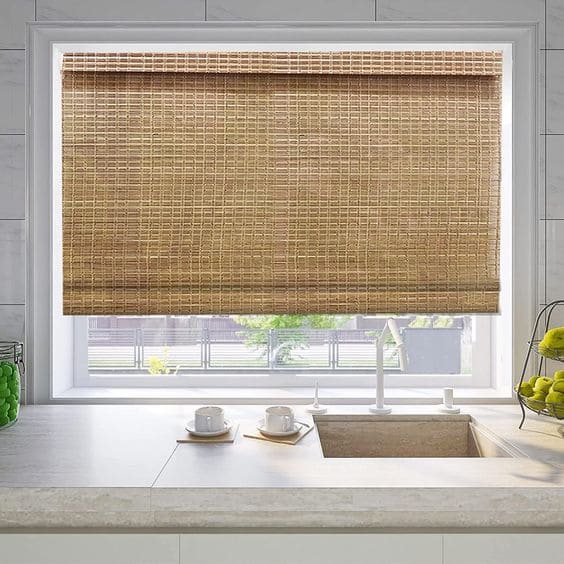
20. Bamboo Roller Blinds on Kitchen Window
Roller blinds made of bamboo or rattan are an efficient window solution for reducing glare while still letting in some lovely sunlight. They provide ornamental flair with their warm hues and organic textures.
21. Casement Kitchen Window
Casement windows have a crank to open them and are hinged to the frame on the side. They are effective and energy efficient in windows where you cannot directly push the sash up to open.
22. Patterned Blinds For Kitchen Windows Over Sink Ideas
A neutral kitchen may be made more visually stimulating and less simple and bland by adding a little bit of design. To add color and flair to the area around your kitchen sink, just add a little floral or plaid design element.
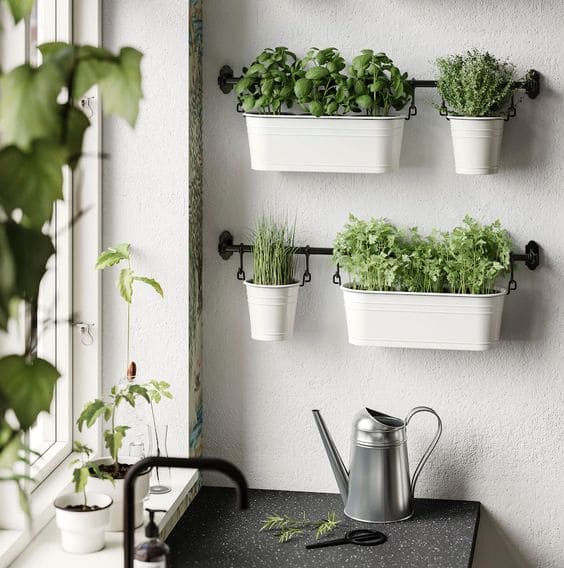
23. Herbs on Kitchen Sink
One of the finest places to accomplish this is next to your kitchen window, where a single herb plant in a pot may be placed. The greenery will also add a much-needed splash of color. Herbs should be within easy reach of a sink and for cooking, and they also flourish near direct sunlight.
24. Statement Piece Over Bay Windows in Kitchen
This luminous and airy bay window is given texture and visual appeal by a statement snowflake sign and a sentimental garland. This beautiful winter wonderland kitchen looks exquisite thanks to the colorful candle holders that pop against the sink area.
25. Lush Garland Along Kitchen Window Frames
This grid window is the center of attention in this lovely kitchen thanks to decorative items on the sill and a lush garland along the frame. The farmhouse sink’s transparent light bulb ups the coziness quotient of the area.
26. Black Spotlights on Kitchen Window Over Sink
Be proud of your kitchen sink window and put some distinguishing black spotlights above it for additional focused lighting. Besides assisting with duties, spotlights may also be utilized to beautify the environment at night using tiered illumination.
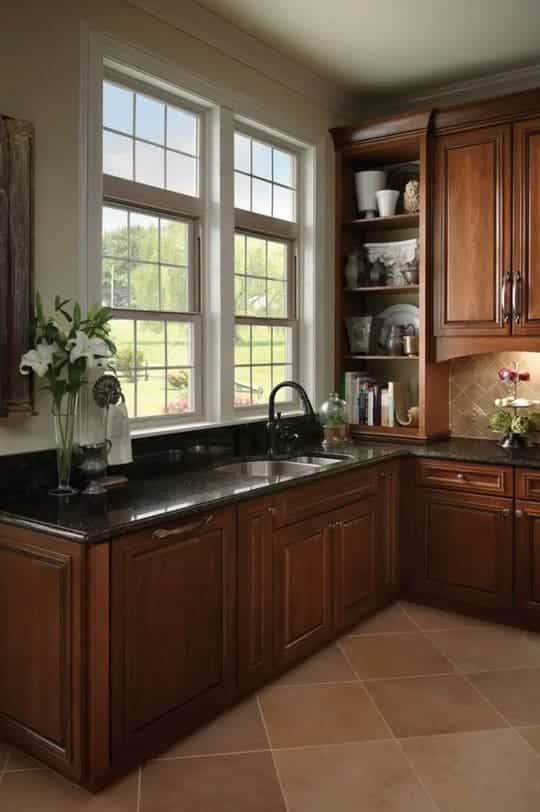
27. Colonial Grid Kitchen Windows
“Muntins” is often used to describe colonial-style windows. The lights, which are tiny glass panels, are held in place by colonial grids that split up single or casement windows.
28. Bold Colours For Kitchen Window Over Sink
There is always a chance to add vibrant colors to a melancholy or monochrome kitchen. Incorporate it in the most unexpected places, such as on cleaning tools, tea bag holders, or stunning bouquets that catch the eye right away.
29. Roman Blinds Over Casement Kitchen Windows
A dark kitchen or monotone is a great place to add some colors. Include it in the most unexpected locations, such as on cleaning supplies, tea bag holders, or eye-catching flowers.
30. Succulents Plants on Grid-Style Windows
In addition to adding aesthetic appeal and foliage to the space around the sink, placing a plant next to your windows will enable it to flourish in the sunshine. A snake plant perched atop a beautiful stool brightens and brings a touch of nature into this comfortable kitchen.
31. Small Kitchen Windows Over Sink Ideas
Most of the windows used above the sink are deemed tiny because of the nature of the area above the sink. Some of the windows are so tiny that they don’t even fill the entire area above the sink.
32. Decorating Above a Kitchen Window Over Sink
The kitchen window over the sink may be decorated in a variety of ways. Anything as simple as adding some window curtains decorated with ornamental elements or something more complicated like installing shelves and cupboards above the window, string lights, or other decorative items.
33. Seasonal Wreath on Kitchen Window
The holidays were made for style, and the kitchen shouldn’t be excluded from the celebration in any way. Put a plain, green wreath on your window to provide quick holiday pleasure and ease the burden of those responsibilities.
34. Glass Wall Lights on Window
Above a sink and for basic kitchen lighting, glass wall lamps are ideal. Even when not in use, glass lights will still reflect, distribute, and retract light.
35. Bay Window Over Rustic Kitchen Sink
The bay windows with a stunning outlook give this farmhouse kitchen a striking yet cozy appearance. Above the window, the shiplap wall with the little rack and old sign serves as a magnificent focal point.
36. Awning Kitchen Window with Vintage Styling
With its awning window and rustic furnishings, this kitchen with French country influences appears to have been taken right out of a historical source. Everything in this kitchen screams antique chic, from the half curtain below the farmhouse sink to the thrift store finds over the window awning.
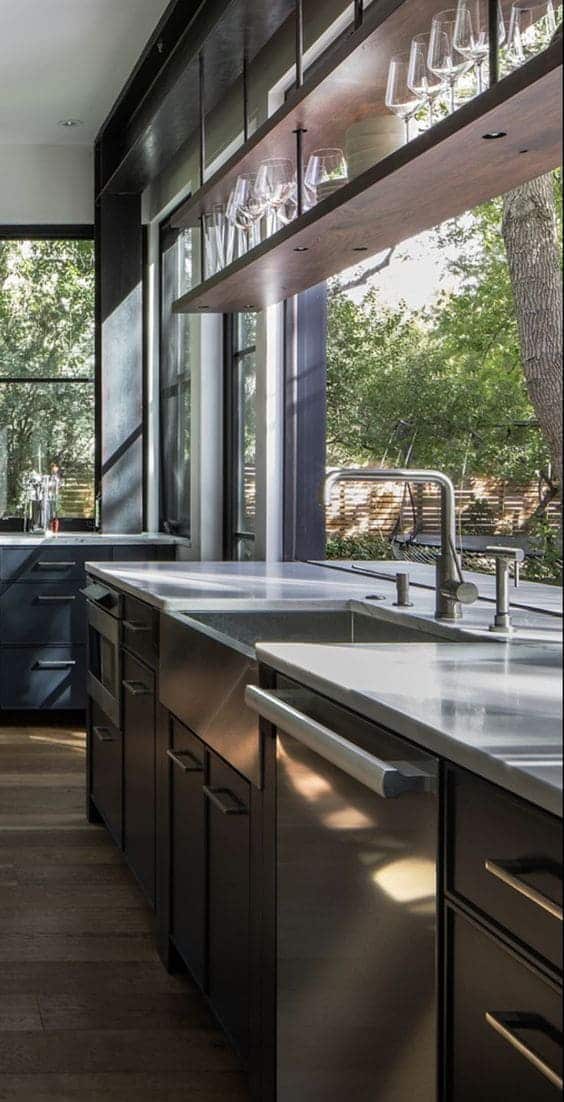
37. Add An Industrial Touch To Your Kitchen Window
If minimalism is your style, choose a beautiful combo of a metallic sink and single-pane windows. The shapes and materials will stand out owing to the cool, neutral shades of grey and white as well as the metallic touches on the sink and fittings.
38. Kitchen Window With A Row of Posies
One of the cutest ways to decorate a kitchen window is with a row of posies delicately arranged on a ledge. It gives the room color, character, and enjoyment.
39. Farmhouse Sign Above the Kitchen Window
You don’t have to limit yourself to plants. Items for decoration such as wooden boards, colorful jars, or colored bottles are excellent alternatives to provide diversity and textures.
40. Contrast in Kitchen Windows Over Sink Ideas
The pristine peel-and-stick vinyl countertop contrasts beautifully with the black window frames that have been spray coated. Both hardware and fixtures’ black accents heighten the contrast and draw attention to the double-hung windows.
41. Cute Kitchen Sink Decor
Add a relevant vase, planter, or another adorable decorative item. To complement your kitchen’s design, make it eccentric or add tastefully placed color accents.
42. Neutral Casement Kitchen Windows Over Sink
If you want to work inside while having a clear view of the outside, casement windows are a great option. The interior screen of these window’s shades may be colored to match your decor.
43. Decorating Below a Kitchen Window Over Sink
Just below the picture windows, a series of potted plants create a vibrant backdrop in this white country kitchen.
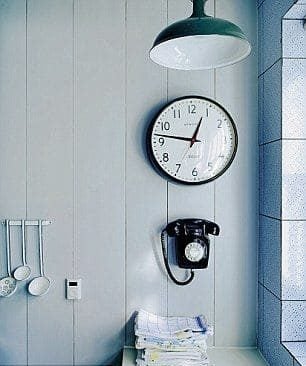
44. Statement Clock near Kitchen Window
Add a big statement clock to the vacant wall space in your kitchen next to the sink. It will take center stage in your kitchen and draw attention away from the sink’s finer points.
45. Candles Over Kitchen Sink
To infuse the space with your favorite perfume, place your favorite scented candle near the kitchen sink’s windows. For aesthetic intrigue, add a single large candle or an asymmetrical row of candles.
Get Inspired By These Kitchen Windows Over Sink Ideas!
These kitchen windows over sink ideas should have convinced you that kitchen windows do not impede your design. Instead, you use them to add natural light and ventilation while also improving the aesthetics of your kitchen.
The kitchen windows over sink ideas are made to bring a traditional as well as a modern look, along with practicality and style, to your kitchen. So, take a step forward and add a kitchen window over sink in your kitchen.
FAQs
1. How Big Should a Window Be Over the Kitchen Sink?
There is no such thing as a minimum size for your kitchen window over the sink. The only thing required is proper space over the sink. But to create a unified aesthetic and maintain the eye line, windows above kitchen sinks are often the same height as the cabinets on either side of the sink.
2. Which Window Is Best Suited for the Kitchen Sink?
Some of the best kitchen window over sink types are – Casement window Awning window Garden window Sliding window Double-hung window
3. What Can You Have on Your Sink, If You Don’t Have a Kitchen Window Over Sink?
There are no restrictions on what you can put on your sink if you don’t have a kitchen window. If it fits in the area, you may hang paintings, clocks, photos, lights, cupboards, shelves, and other items above the sink. The only thing to keep in mind is that if you place something too close to the sink, it might splash.
What Can Be Done to Make the Kitchen Windows Look Nice?
To make your kitchen window look nice, you have several options, some of them are – Woven wood shades Faux wood blinds Roman shades Faux wood shutters Roller shades
5. How Can a Large Kitchen Window Be Covered?
These 10 ways can help you cover your kitchen window – Curtain awning Roller blinds Venetian blinds Plantation shutters Decorative grilles Roman shades Window films Cordless cellular shades Honeycomb blinds Patterned roller shades
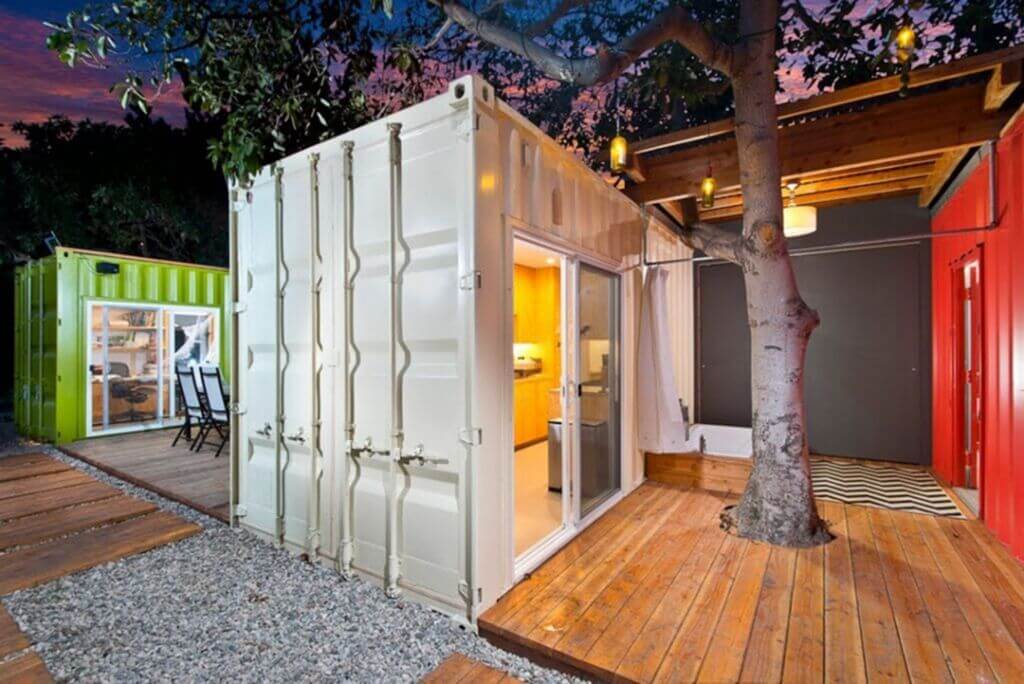
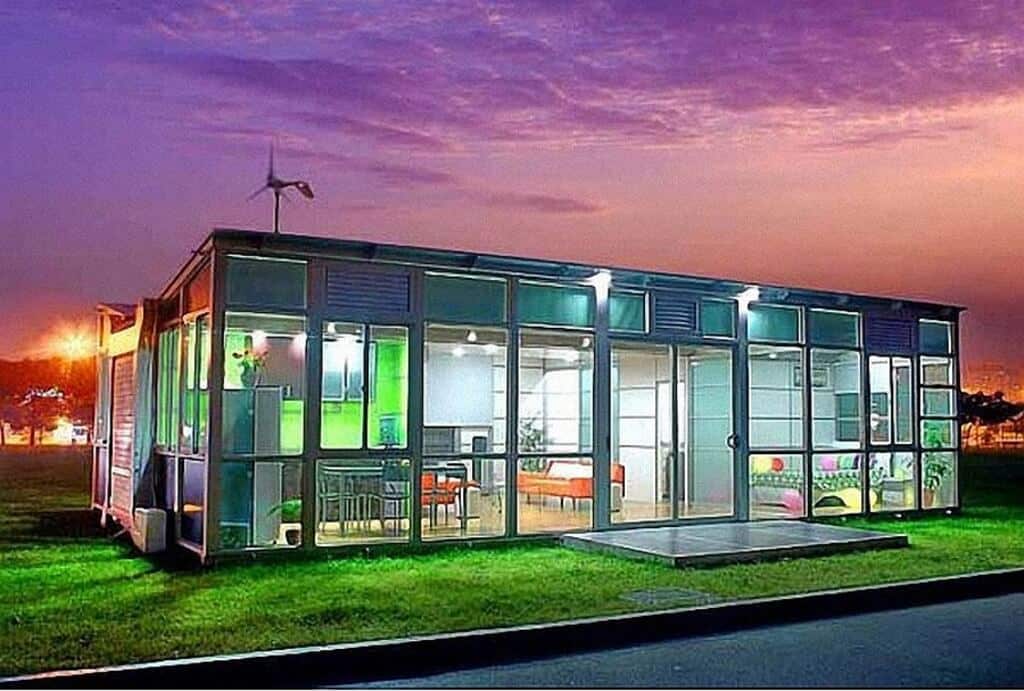
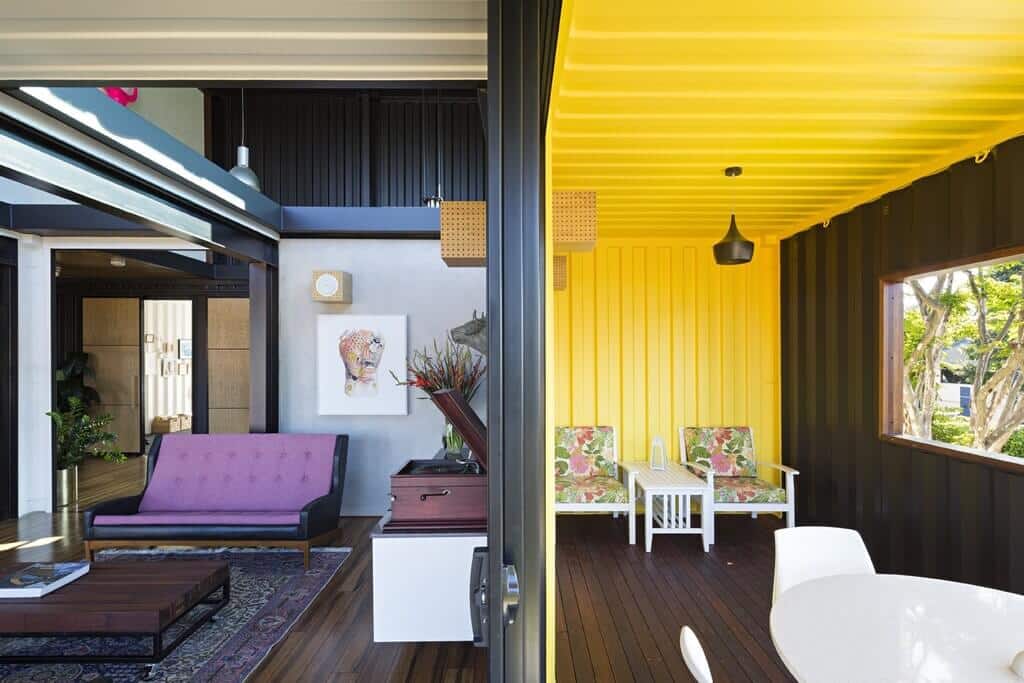
Shipping container homes are an eco-friendly approach to building livable fancy houses. How dreamy is it to live in a compact, warm container house while unwinding on a lazy weekend?
These shipping container homes are extremely durable, easy to build, and an affordable housing option. The cargo container homes can easily be stacked to offer multiple levels and these can be taken along with you to any part of the world with their ease of transportation.
Let’s look into creative shipping container ideas to help you build your coziest dream home.
30 Ideas for Shipping Container Homes
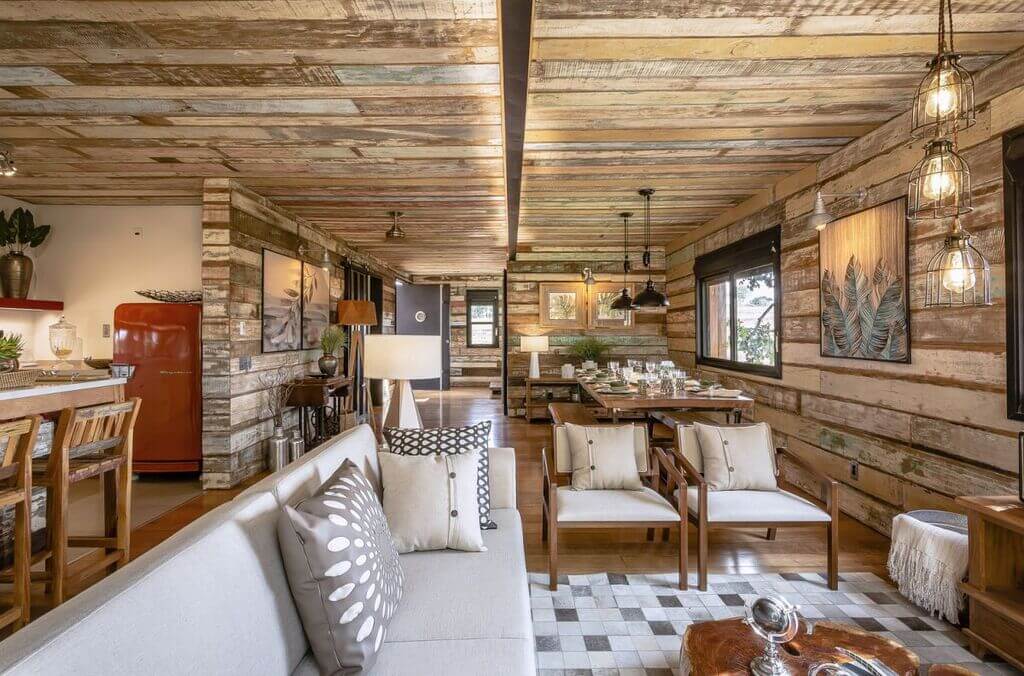
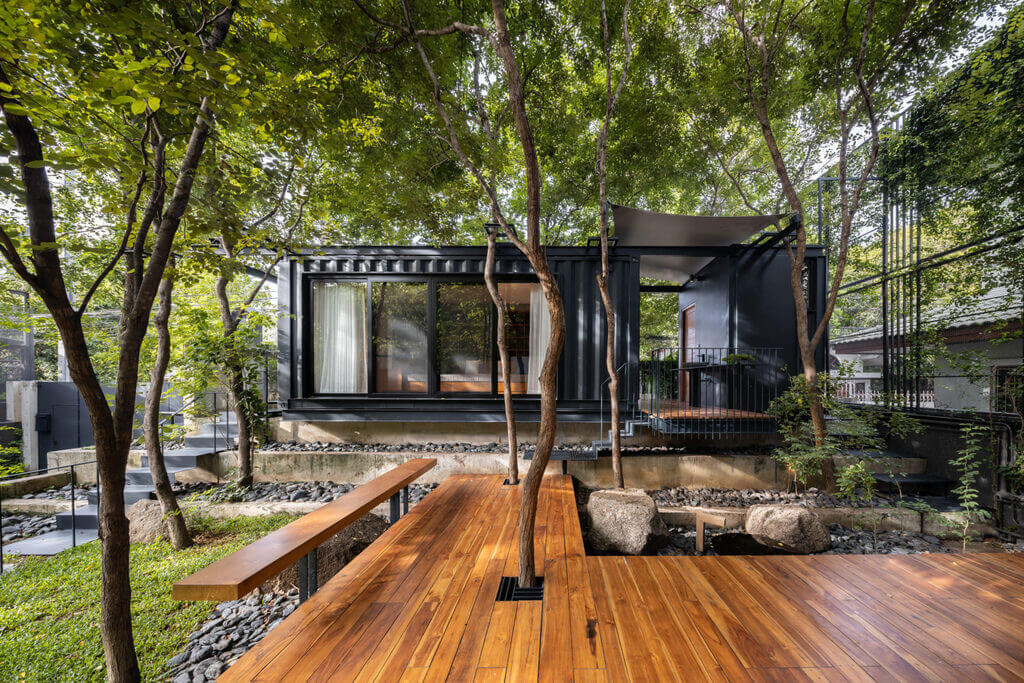
1. A Rustic-themed Shipping Container House
For the ones aiming at an industrial theme for the house, shipping container homes are the ideal choice. Design with the rustic decor elements inside out and enjoy the industrial aesthetics within massive interior spaces.
2. Container Homes and Covered Pathways
Rather than sticking to the typical layout, consider playing around with a staggering design and covering the intermediate spaces with trees. These shipping container homes offer much-needed private zones and the patio allows you to connect with nature.
3. The Cargo Guest House
Design the most comfortable guest house for your extended family or friends with a container house. This approach offers them the desired privacy and a cozy experience. Plan the interiors with all their amenities placed inside the segregated zone.
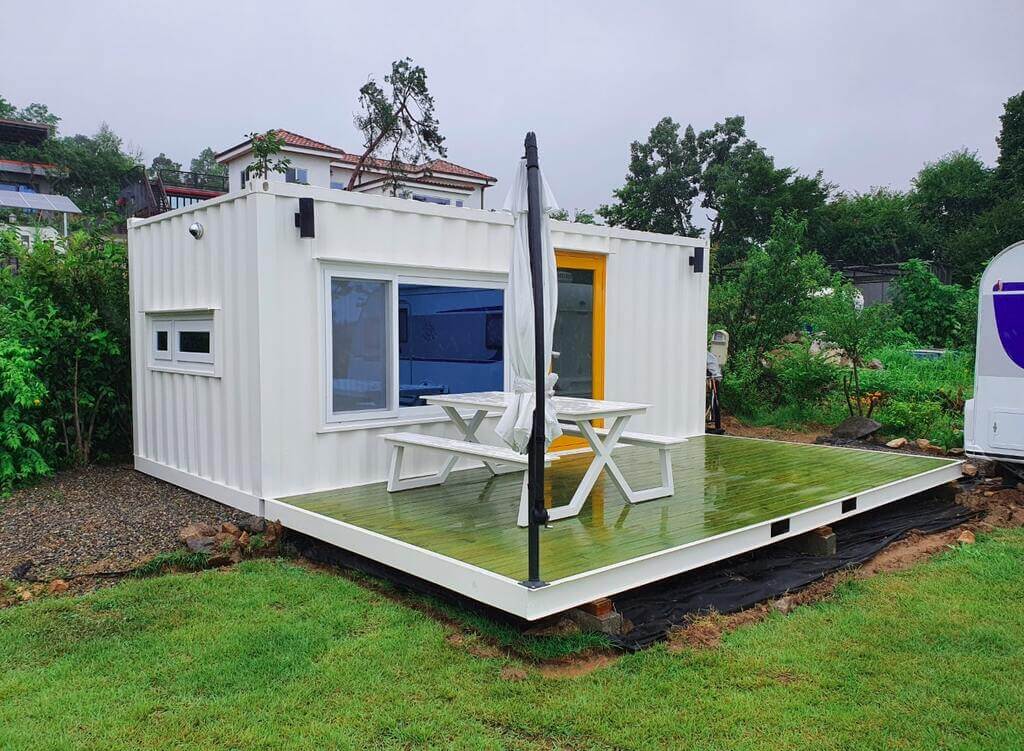
4. A Home next to Home!
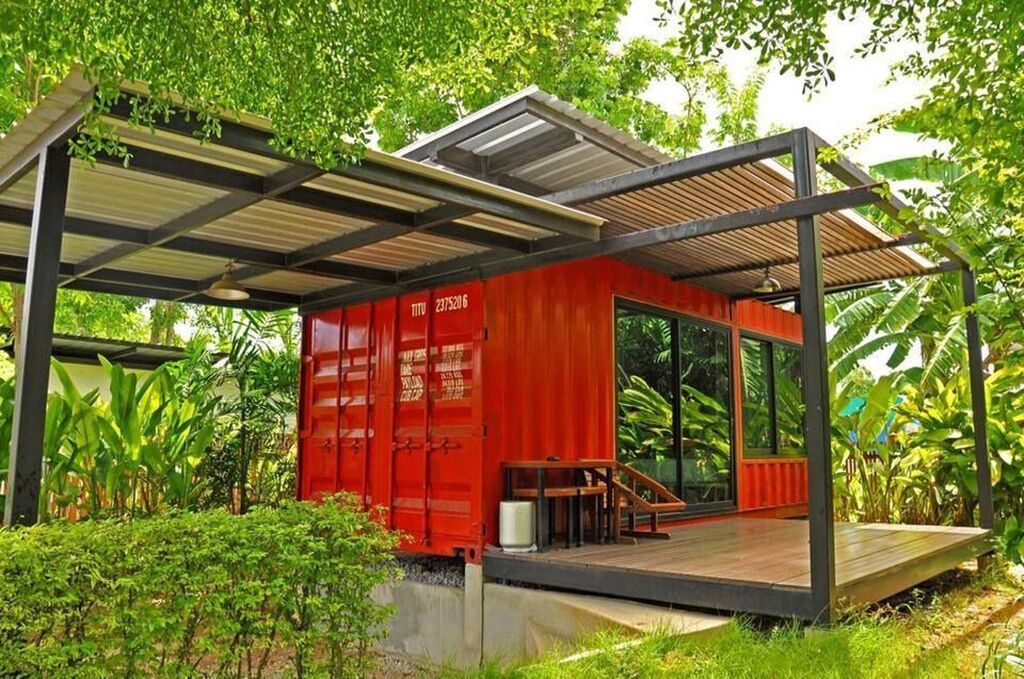
Shipping container homes don’t necessarily have to be separate living units. These could also serve as an extension to your existing house or an alternate option nestled right next to it. Consider placing a tiny shipping container house on the lawn that serves as your weekend getaway spot with all the essentials kept right in place.
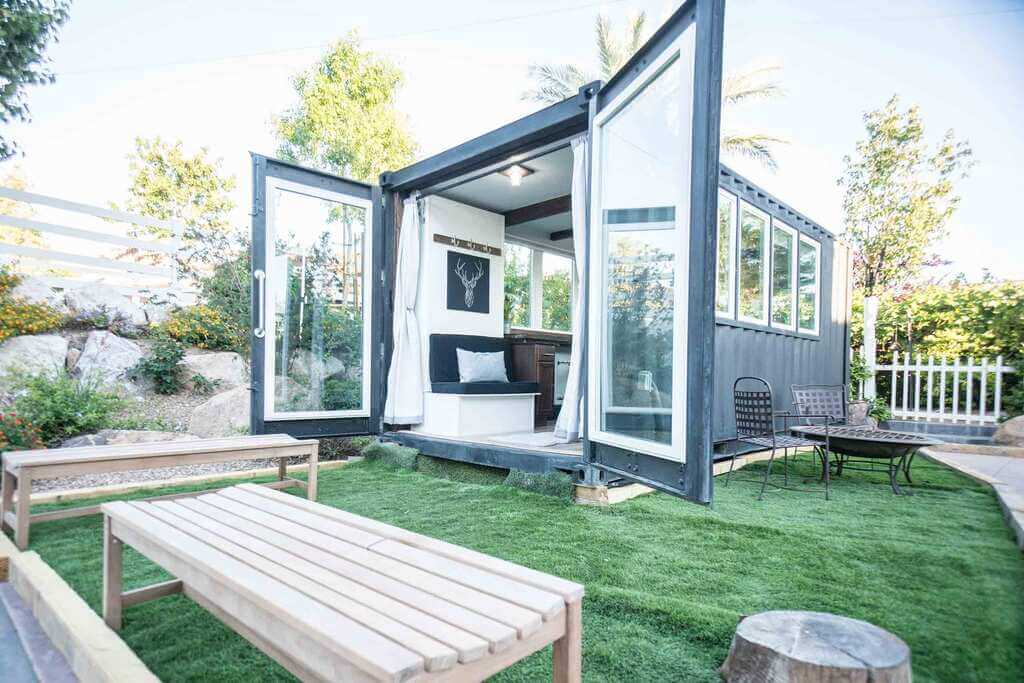
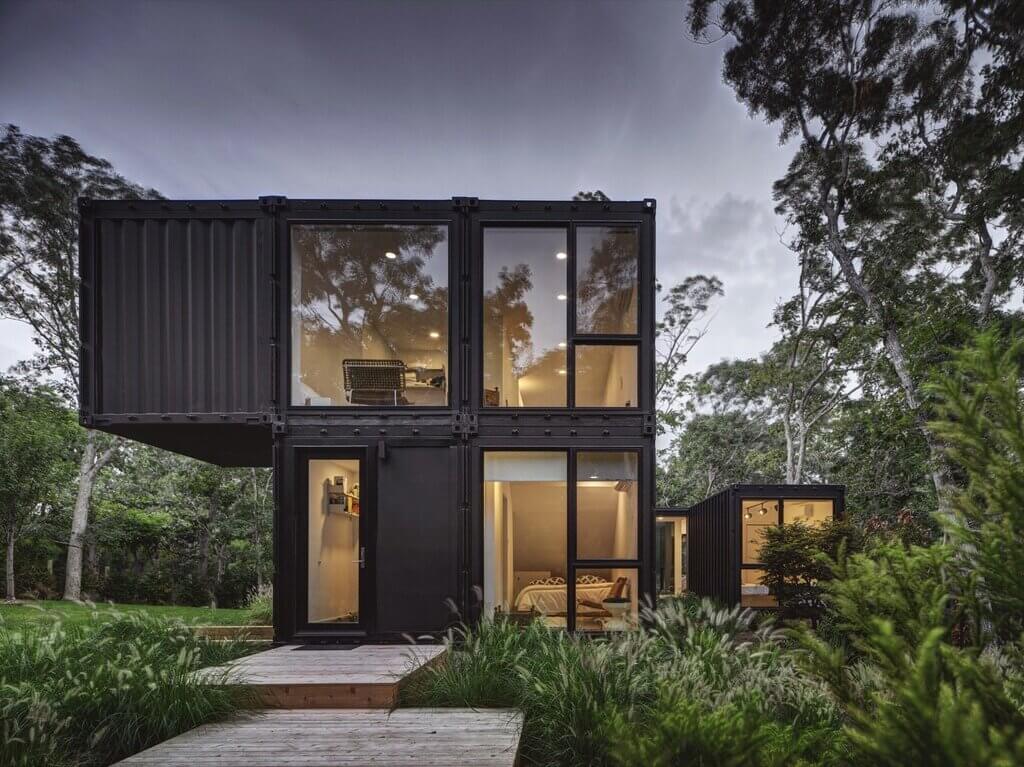
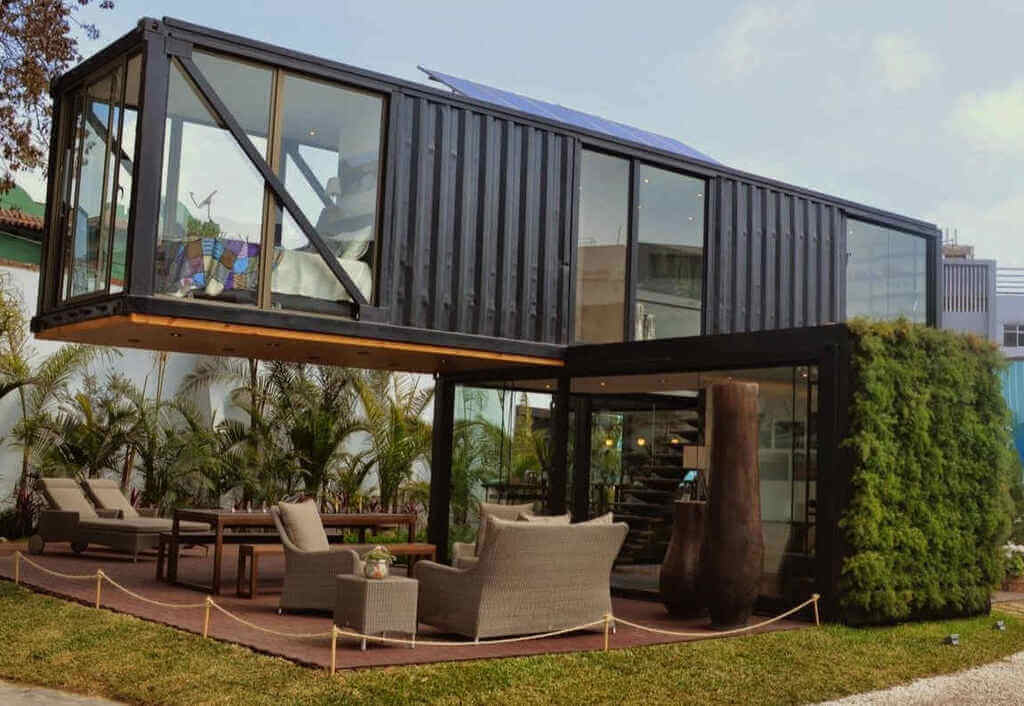
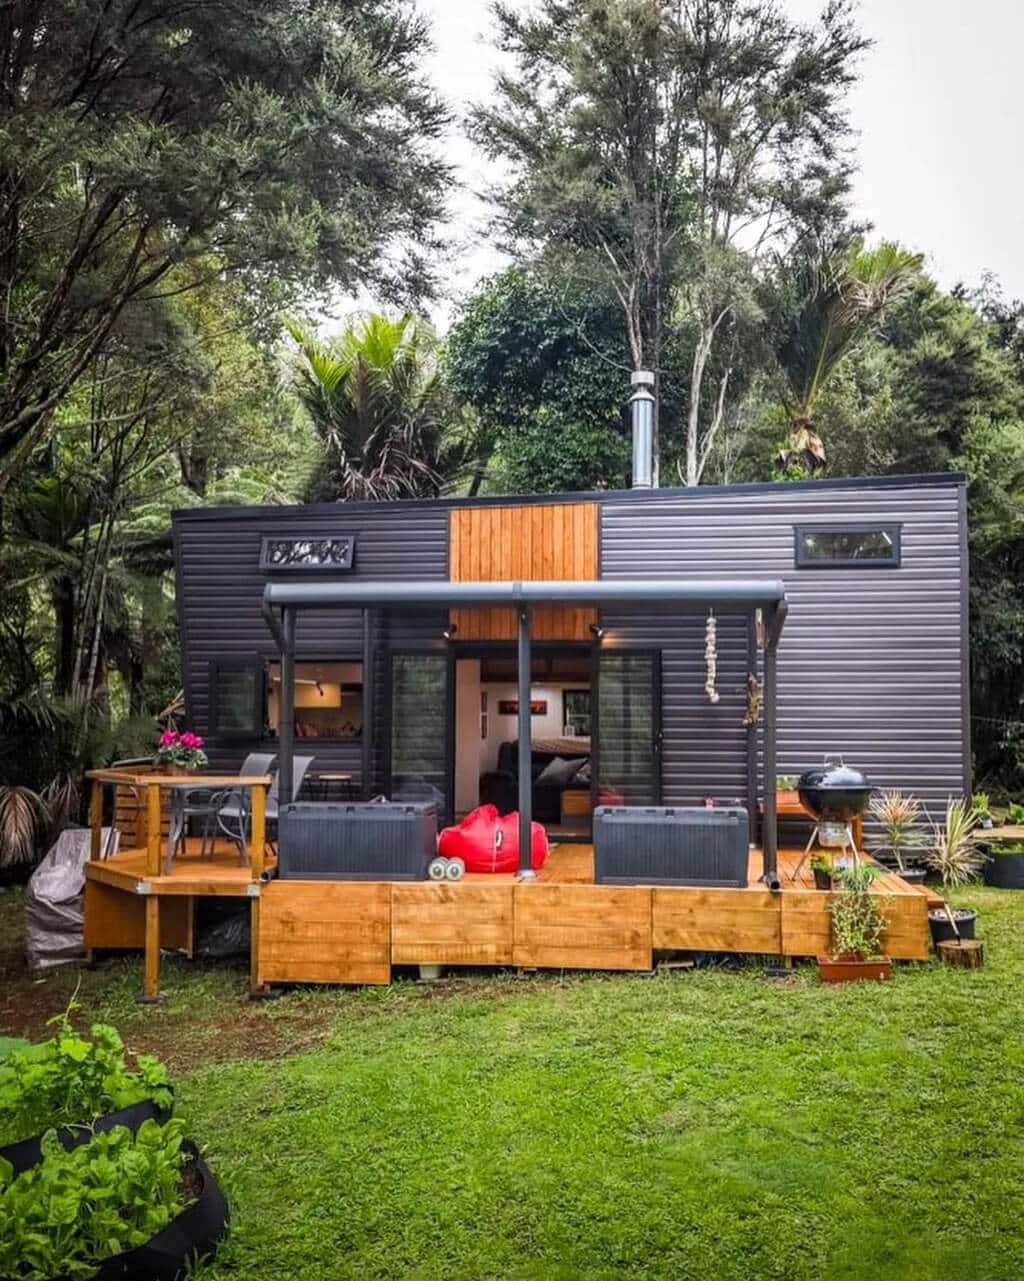
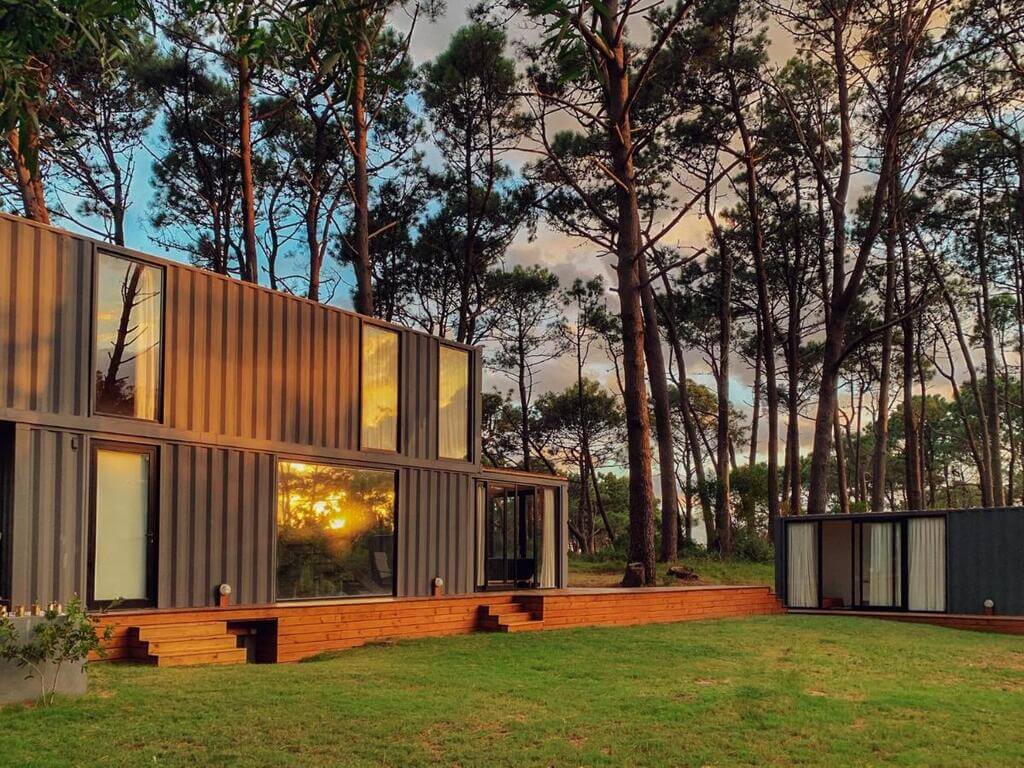
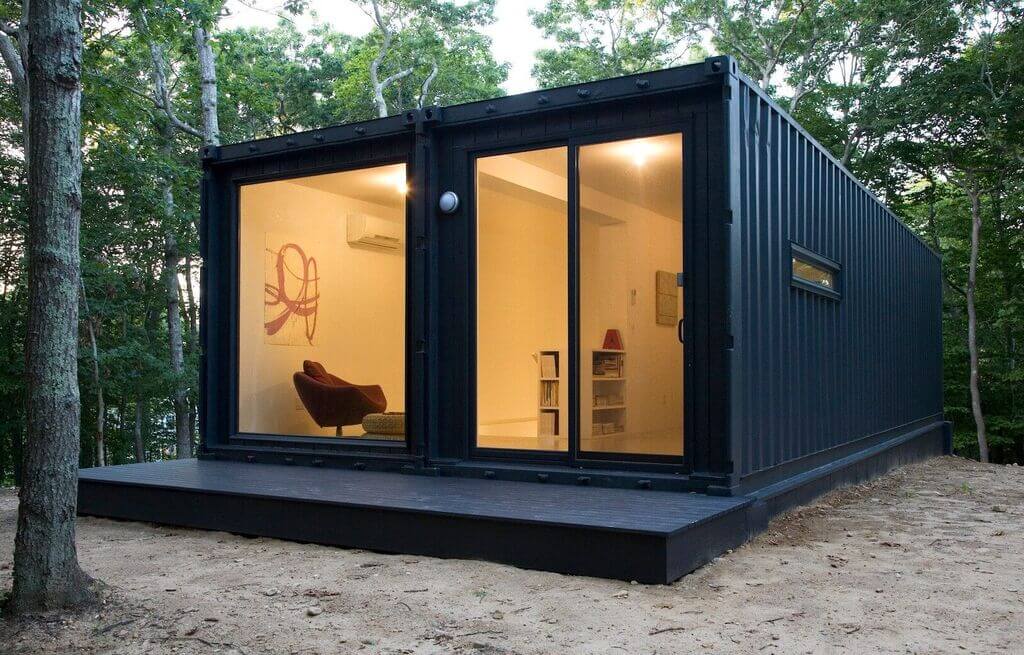
5. The Bold and Black Container Homes
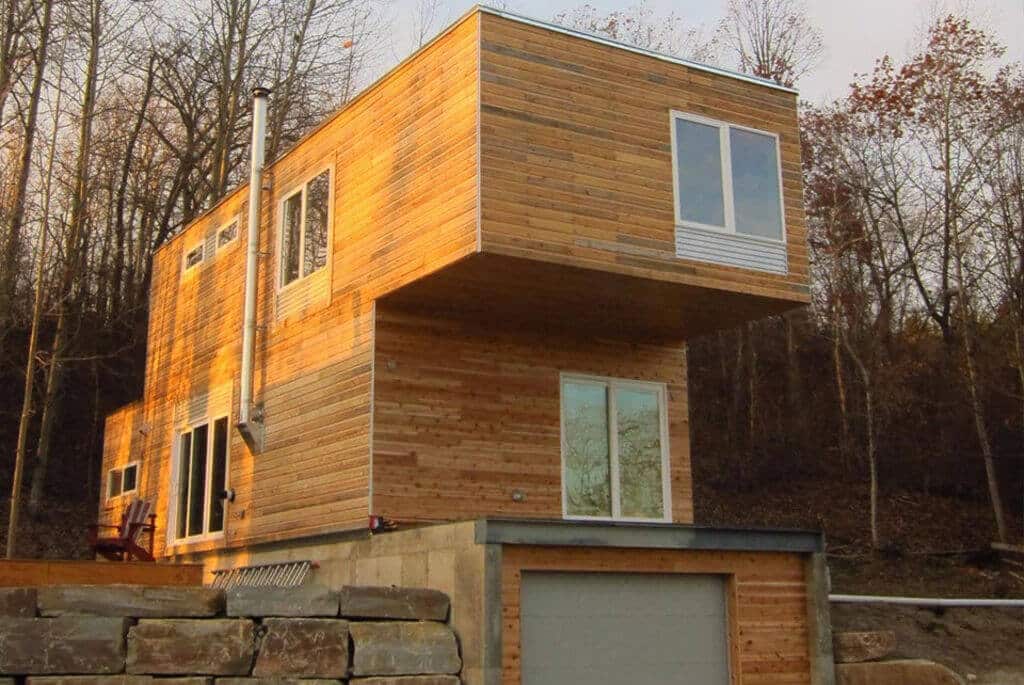
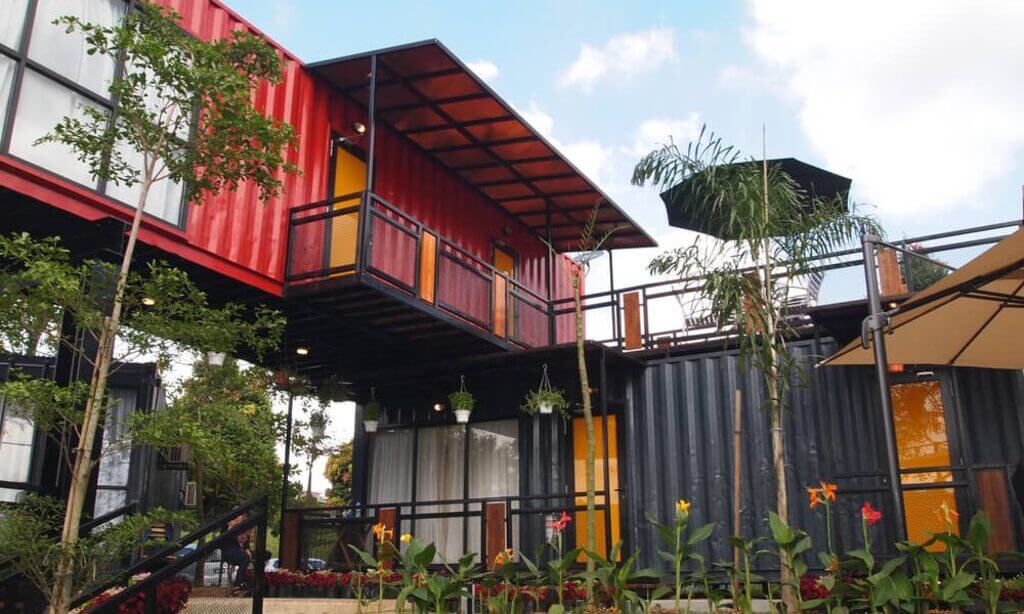
Build cargo container homes in a bold look by opting for black exteriors. While the exteriors are kept dark, the interiors can be extremely warm with earthy tones splashed from the floor to the ceiling. When it comes to shipping container homes with a dark theme, restrict the design to a single level or blend it with contrasting shades to balance the design visually.
6. Modular Storage Container Homes
The best part of a shipping container house is its flexibility to play around with different forms and levels. Consider staggering the container house to make the design stand out. With strategic planning on the levels, you can the most comfortable and luxurious spaces inside shipping container homes.
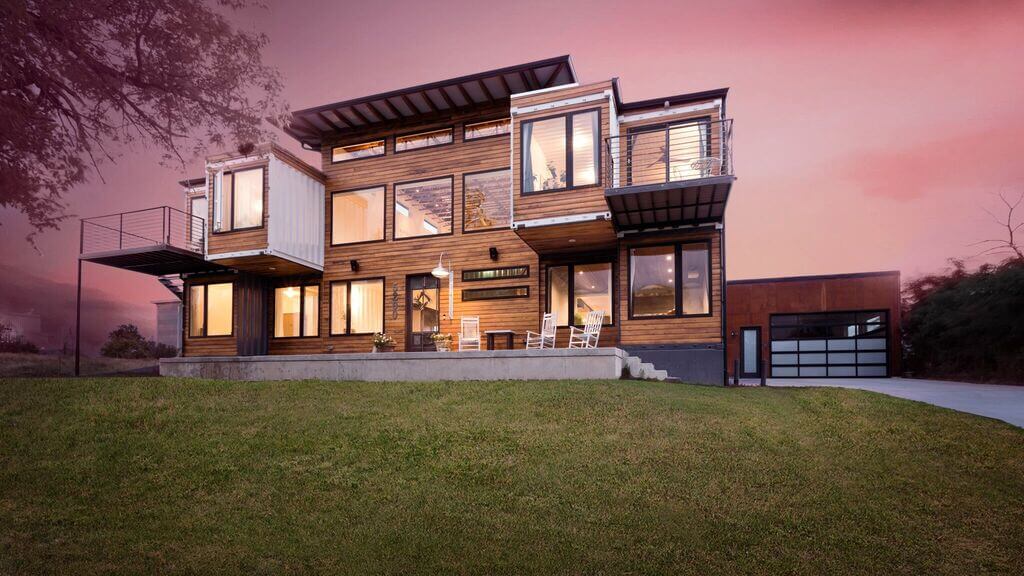
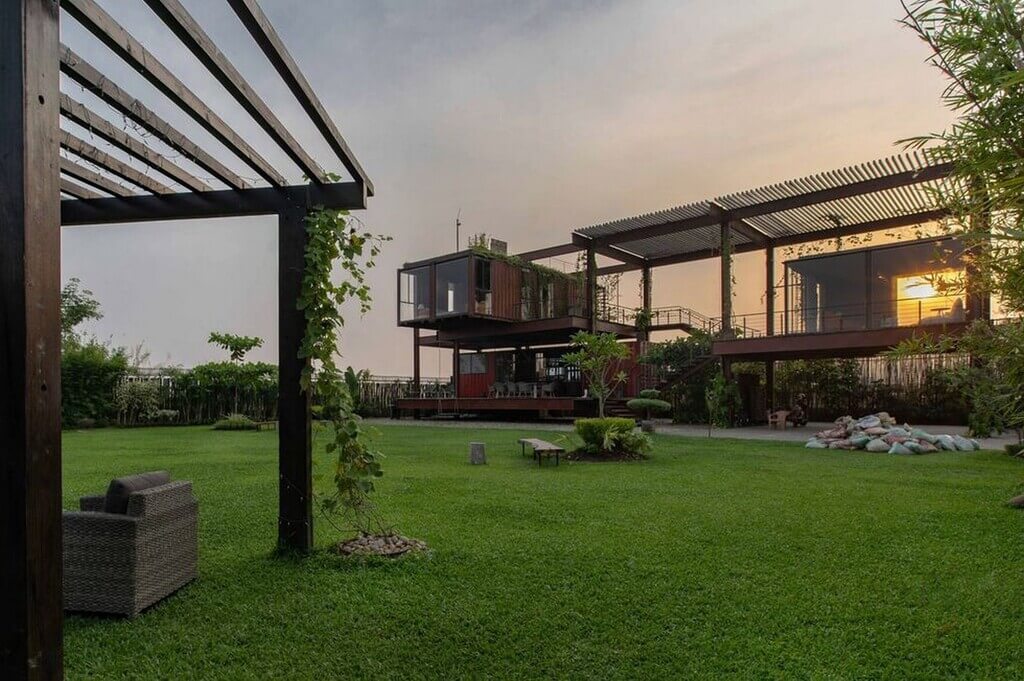
7. The Luxurious Cargo Container Homes
There’s no limit to the scale of cargo container homes when it comes to stacking it up or staggering on the ground. You can even build a villa out of these small shipping containers. Opt for a modern design that plays with muted tones and vertical levels for an aesthetic yet functional home.
8. Ship in the Shipping Container Homes
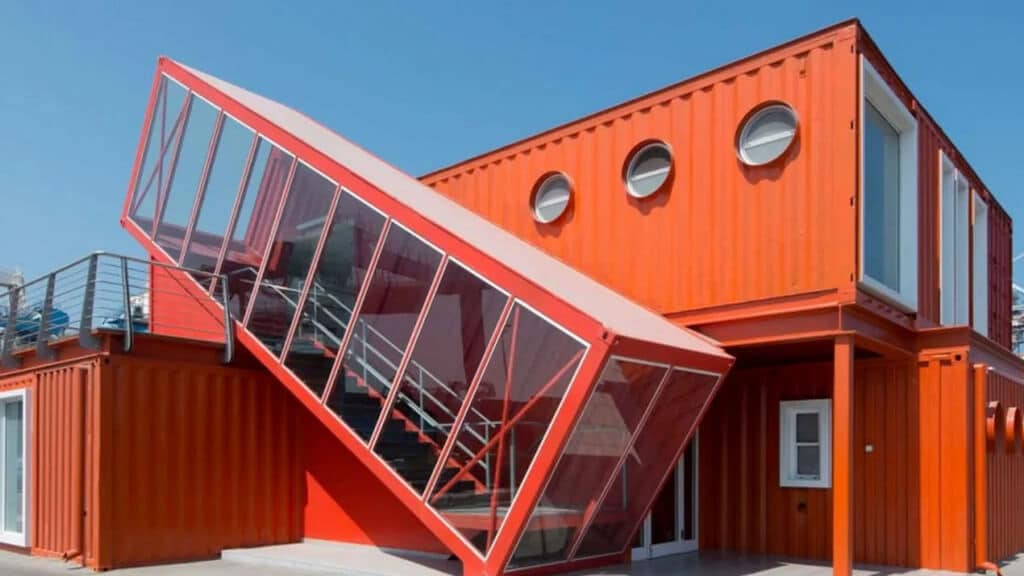
Shipping container homes can offer the most playful designs with the ease of handling the material and executing the design. Consider the idea of giving your home an actual form of a ship with a tilted container and porthole windows. Make your design even more exhilarating by splashing bright colors on the exteriors.
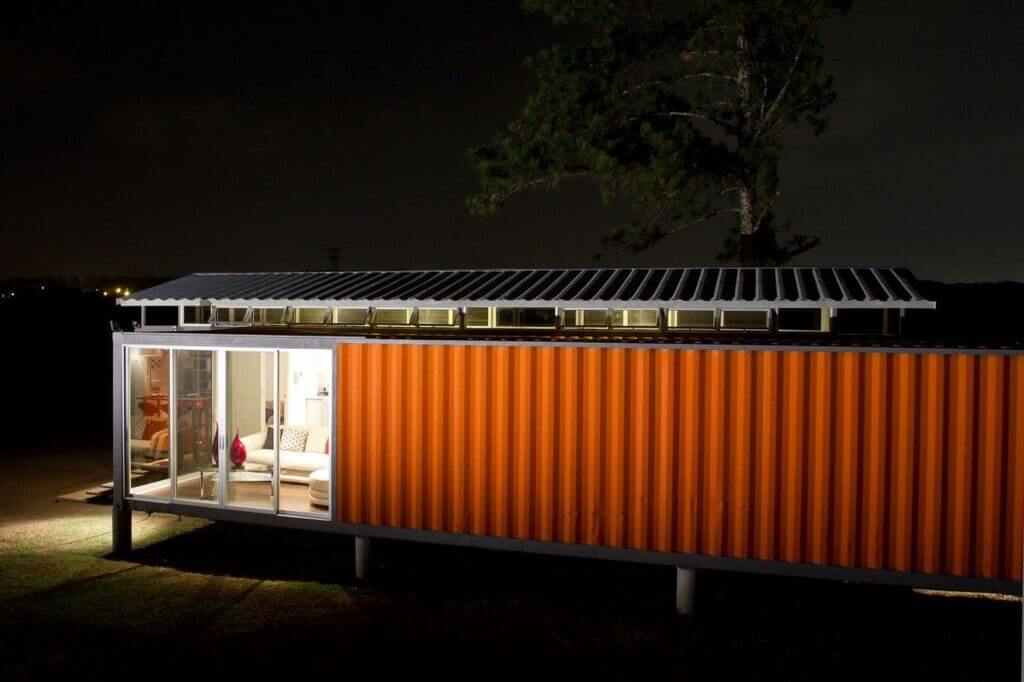
9. Neon-freshness in Container Homes
How about taking a bolder path with neon shades splashed on the facade? Your shipping container homes can benefit from a play of color palettes with vibrant hues added to the external walls. It won’t only make the design stand out but also introduce a sense of freshness to it. Paint the window frames in shining tones and subtly them down with a more neutral color composing the rest of the design.
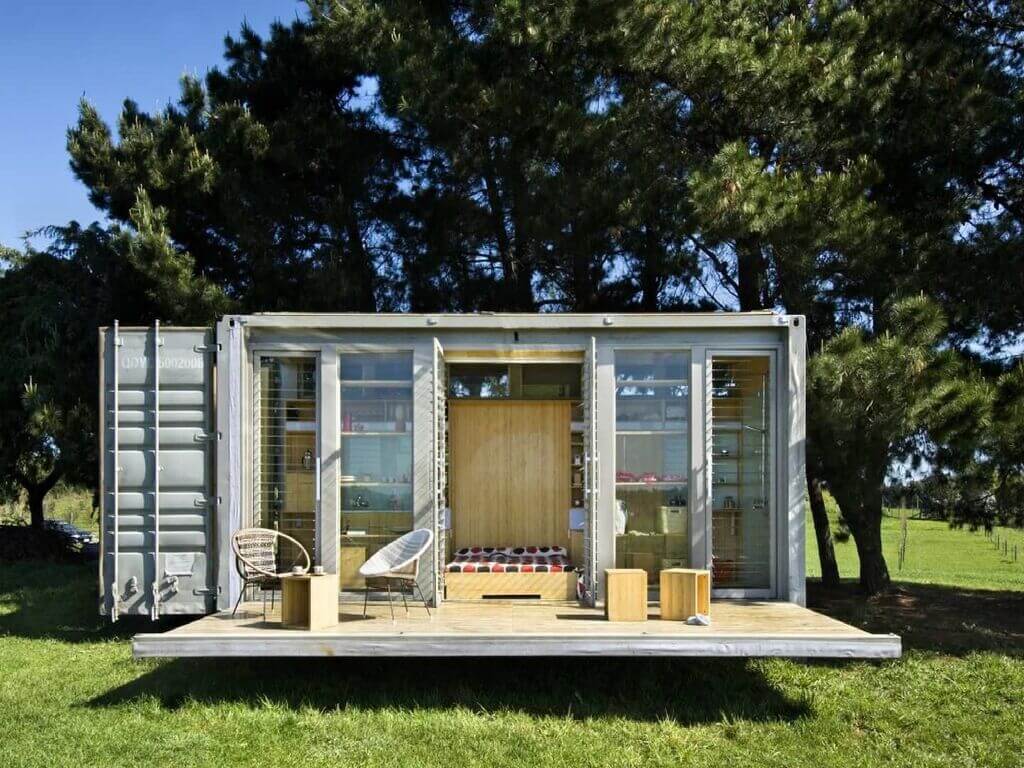
10. An Extroverted Container House
A porch is the greatest lounging spot for any home. Ensure an open porch in the design of your container house and plan to keep it open to the sky. You’ll not only get a spacious chilling zone but the natural light will flood into the interiors and brighten them up.
11. High and Tilted Roofs
Instead of restricting the height of the shipping container homes to their actual size, you can increase it for added depth by tilting the roof in the upward direction from one edge. As you get more height, the furniture and interior layout can be composed in rectangles to complement the space.
12. The Mansion-like Container Homes
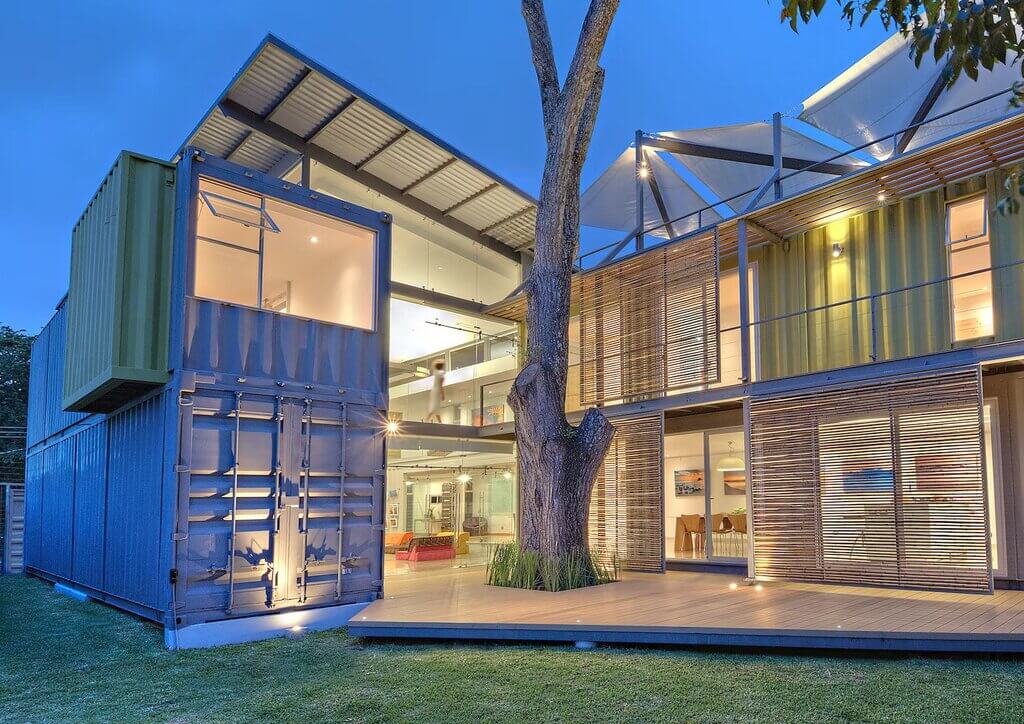
There is no restriction on the number of shipping containers that can be combined to build your dream home. You could even build an economical mansion out of these containers. Let the cargo containers get stacked above one another and connected through angles. Align the design towards a common view and enjoy the luxury home that’s right on the budget as well.
13. The 5s Play
Rather than sticking to a single cargo container, make an enticing composition of 5. These shipping container homes are flexible with the levels and layouts. Aim for the desired geometry in the facade and plan the spaces for a functional design inside shipping container homes.
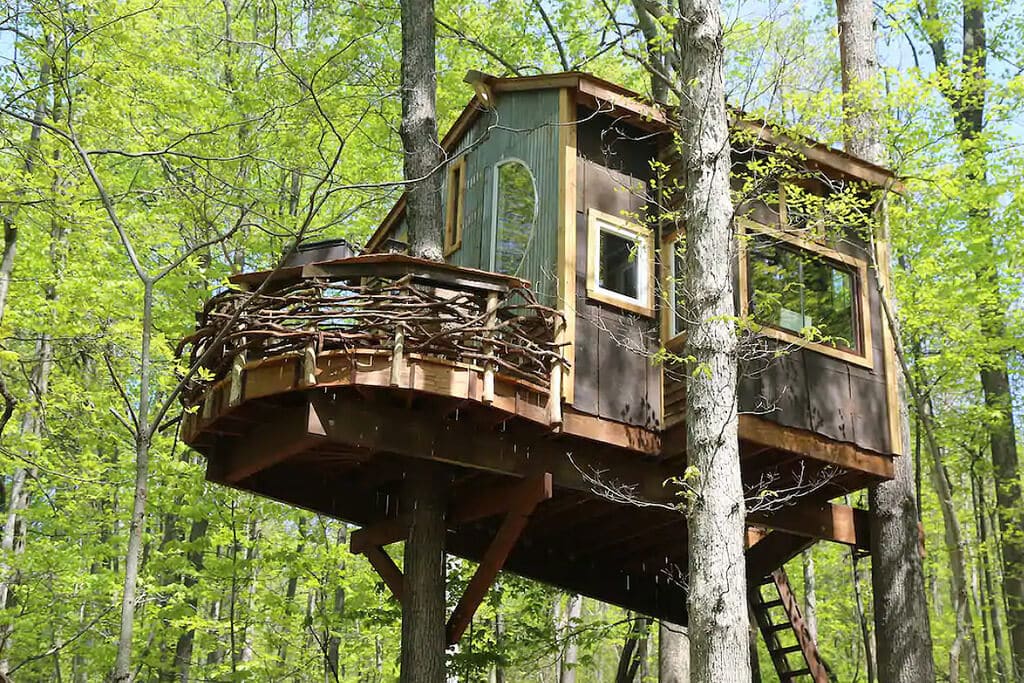
14. The Container Treehouse
Treehouse with shipping containers? Yes, that’s what we’re exploring. Take support from a solid tree on the site and let metal beams offer structural stability to your container homes. The only consideration in this design is that the beam can only let a single cargo container be placed on top of it. The tiny studio home will offer you the utmost comfort and allow you to coexist with nature.
15. Cantilevered Shipping Container Homes
Shipping container homes can prove to be the most exciting part of the entire neighborhood when planned well. Consider the idea of making the upper levels hut over the open spaces of the lower floor. The cantilever will compose an enticing design and there could be an incorporation of full-height glass windows to maintain transparency between the interior and exterior spaces.
16. White Cargo Container Homes
There’s nothing as soothing as fresh white tones inside shipping container homes. While the walls and furniture can be painted white, the flooring can either go in contrast or be kept neutralized. White interiors won’t only make the space look bigger but also give you a clean aesthetic look to the house.
17. The Play of Natural Tones
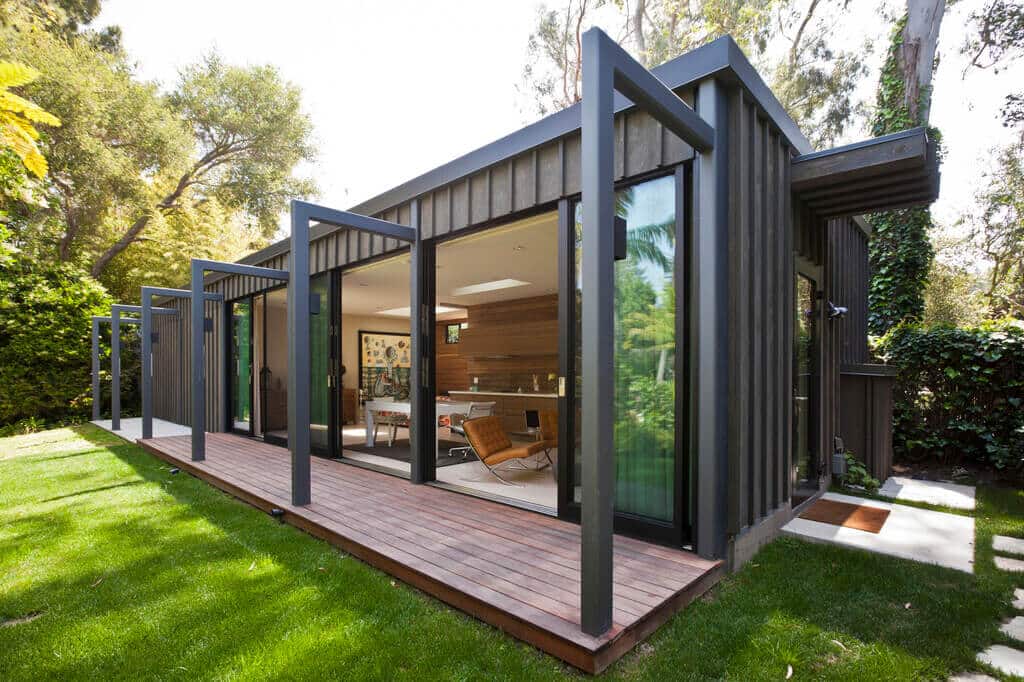
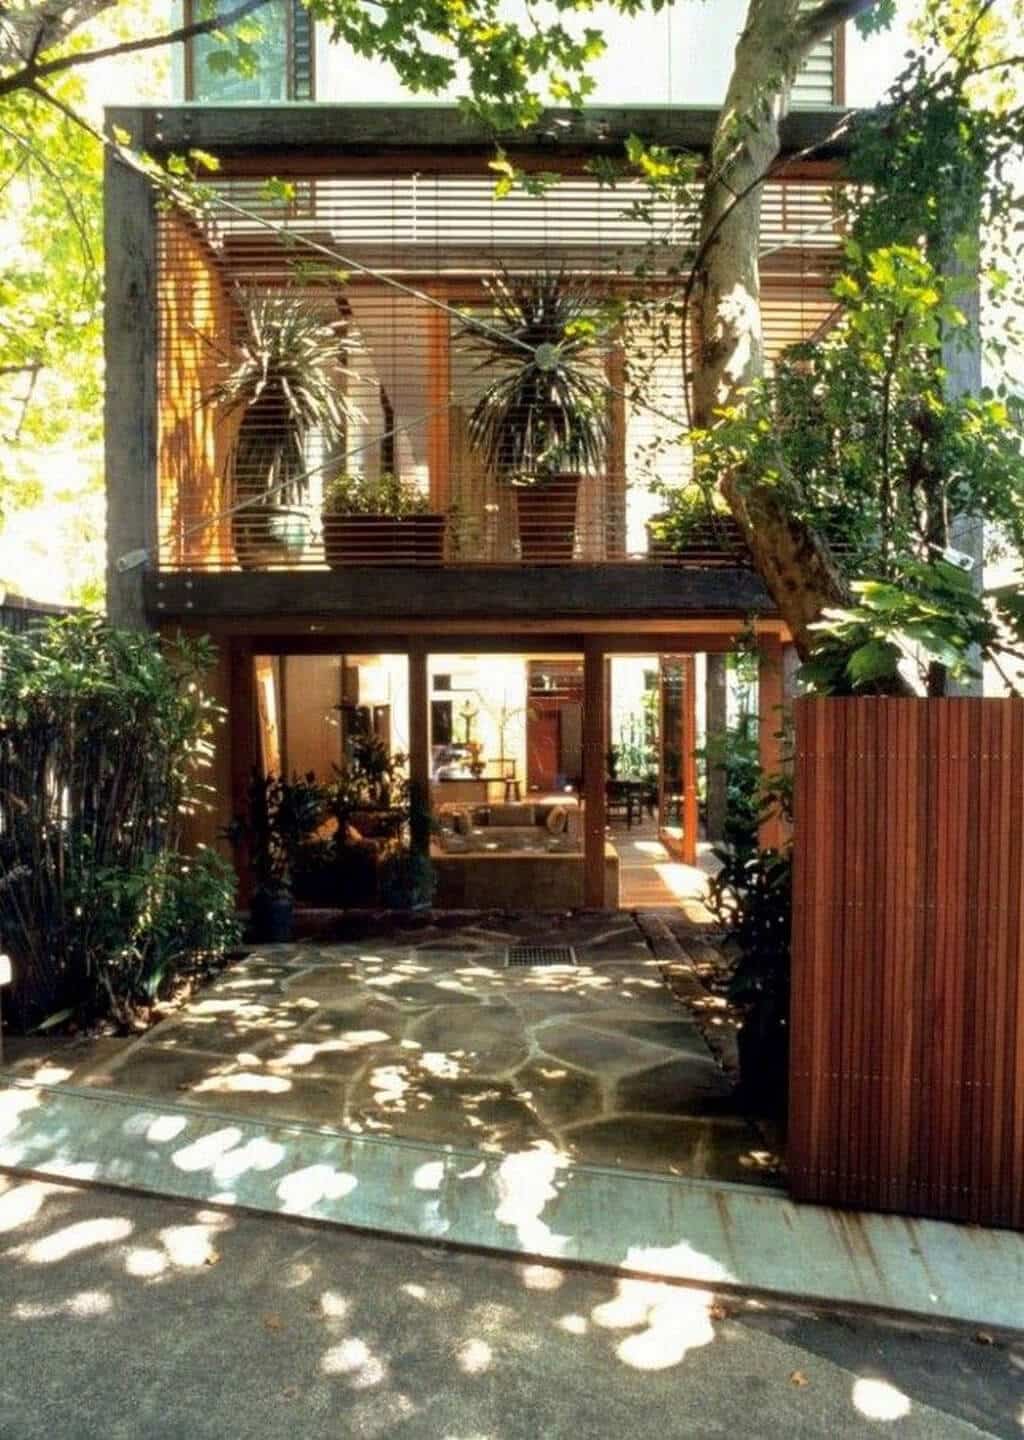
While the shipping container homes are conventionally kept narrow, this feeling can be made exciting by introducing a natural color palette that plays with the accents of green, white, and brown. Keep the interiors composed of natural wooden flooring that can be enhanced with an introduction of metallic design elements. Let the earthy house exude a modern flair with new-age forms and angles.
18. An Outdoor Bridge
For shipping container homes serving as an extended unit of the house, introduce a lovely outdoor seating that bridges the two units together. This space could be utilized as a common family zone. Enhance the way to your container house with a lot of greenery and natural stone on the floor.
19. Traditionally Modern Shipping Container Homes
While the facade of shipping container homes could be typical, the interiors don’t have any rules to follow. The home interiors could be a blend of your favorite design languages or kept simple. Try amalgamating modernly bright tones with traditional patterns for eclectic decor. Opt for wooden flooring to bring a natural essence inside the home while allowing vibrant shades to inject cheerfulness into the spaces.
20. An Inside Out Container House
The real luxury lies in shipping container homes that become a part of their surroundings. Rather than going for a lavish house, consider the idea of nestling inside shipping container homes and placing the home within lush greenery. The cargo container homes and nature, in this case, intertwine to offer a calming living environment. Paint the container house in a vibrant tone that makes it a part of the otherwise green backdrop.
21. The Natural Twist
The most comfortable homes enable interior spaces to open up to the exteriors. Retain the essence of living within nature by opting for floors and walls composed of wood and keeping one side of the shipping container homes open to natural views. The furnishings can be kept colored and patterned to let them bring a contrast while balancing out the monotonous look of the interiors.
22. A Mini-Home
Aren’t we all fascinated by the idea of residing in our own little homes? Shipping container homes can make your dream come true with its affordability. You can either use this home as your retreating zone or build it as a small guest house. The tiny lodge will minimize the extra materials and prove to be a sustainable choice with a minimized carbon footprint.
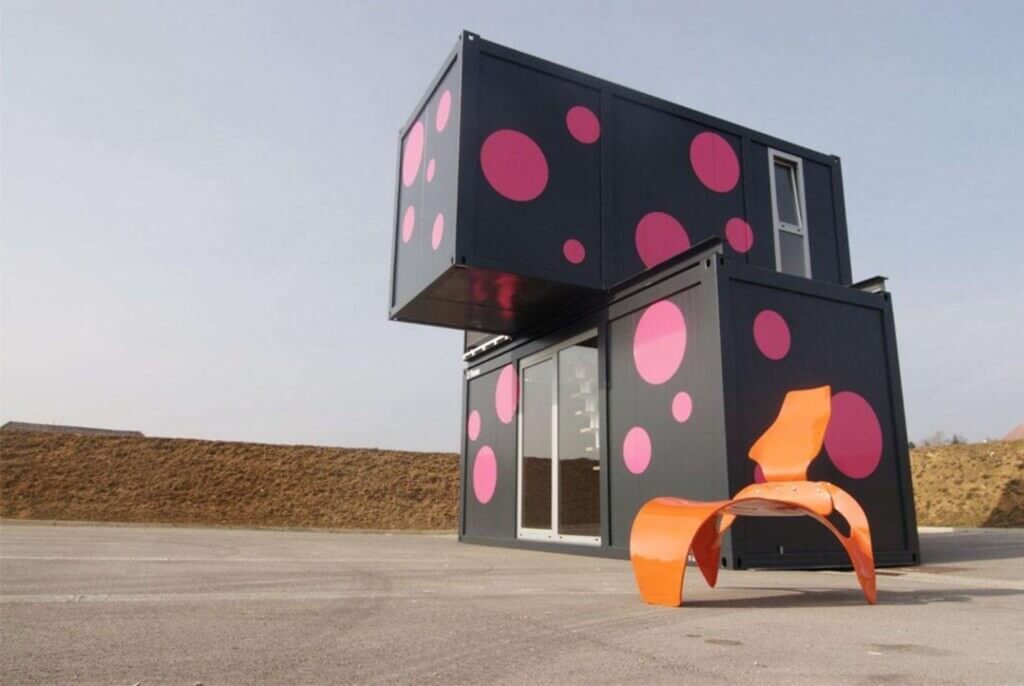
23. The Fashionable Home
Your shipping container house could be the statement-making home in the entire set with an out-of-the-box approach. Rather than painting the exteriors in single or double tones, how about introducing a pattern? Make a bold choice and paint the home black. This black shade can be made even more enticing by introducing large pink dots on it. The tiny home can prove to be the loudest one in the entire neighborhood.
24. Step-Up the Container House
There are endless possibilities when it comes to designing shipping container homes. If not add multiple levels, you can lift up the container house from the ground. Introduce steps at the entrance of the house that will lead you to a small foyer and then the interiors. Introducing steps will define the entry and also lead to a sense of mystery in the design.
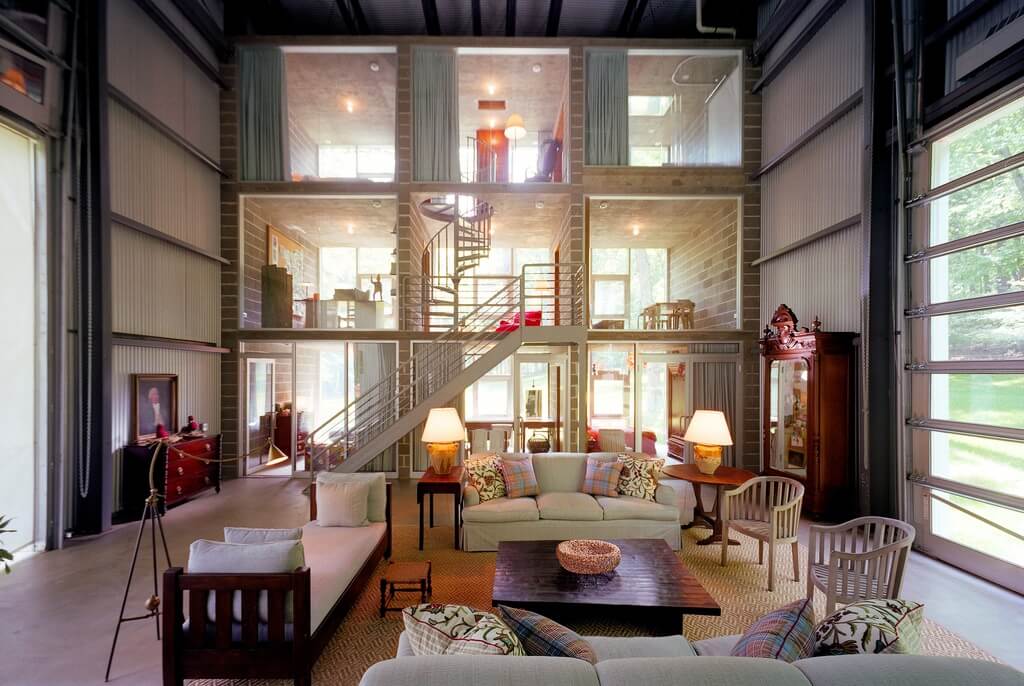
25. The Factory Home
Instead of building an independent shipping container house, blend it with the existing architecture. For an industrial design concept, combine the factory interiors with the shipping container homes. You can bring design elements speaking a unique language to jazz up the look of the interiors.
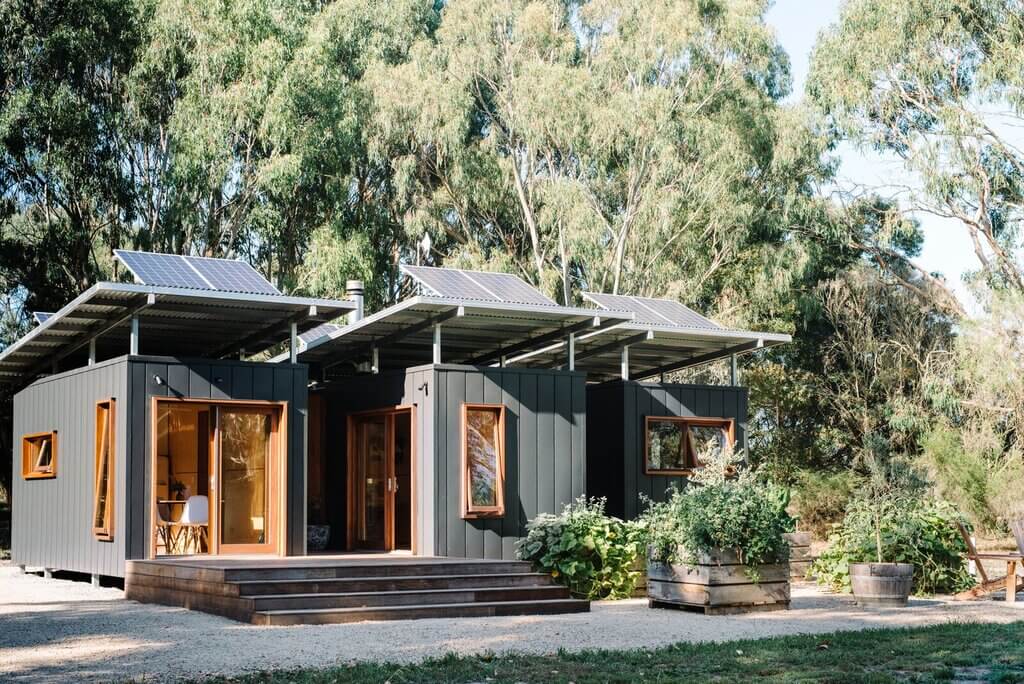
26. A Tiny Eco-roof for Shipping Container Homes
Whether it’s a concrete home or a storage container homes, every house needs to have space for a garden. The roof of your container house can be transformed into a tiny yard that can serve as a kitchen garden. This approach not only takes the design towards sustainability but also offers you fresh veggies from the garden.
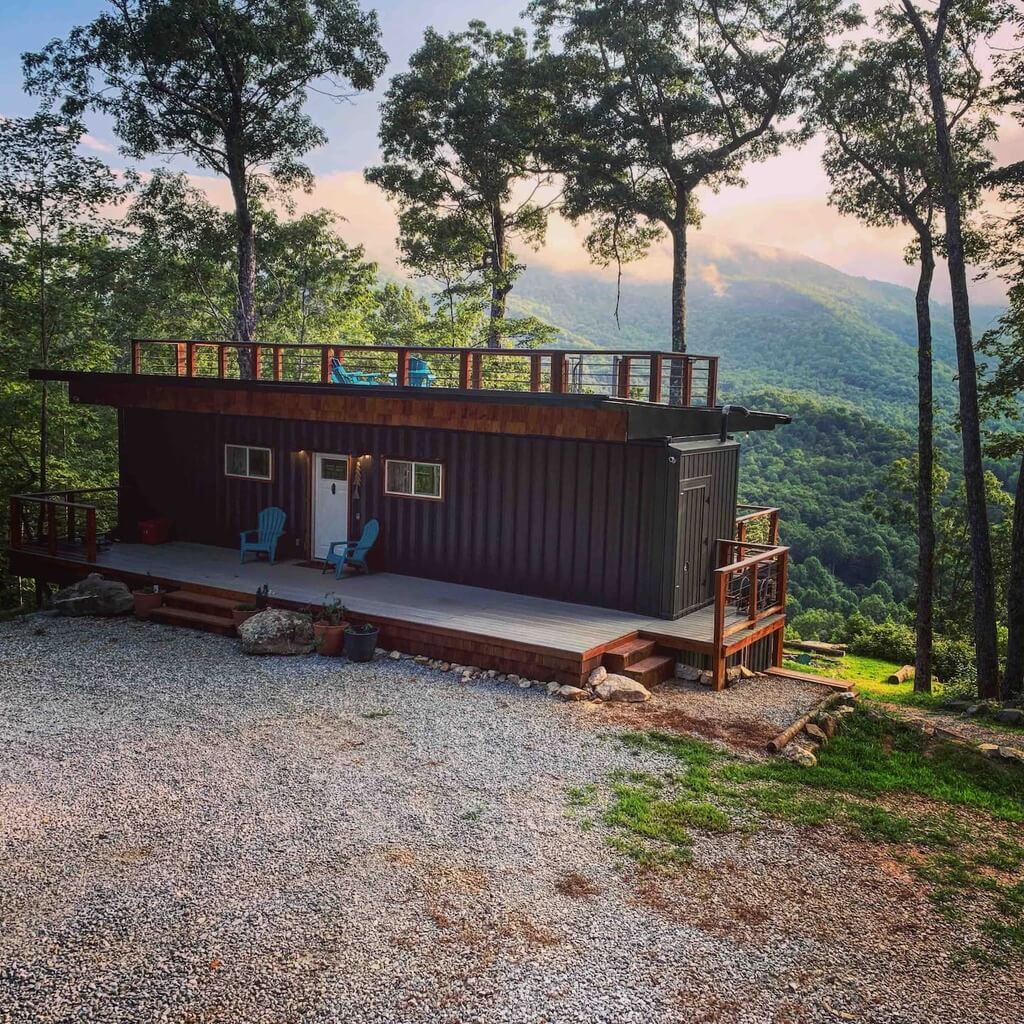
27. A Soothing Beach House
Jazz up the beach vibes with shipping container homes serving as your summer holiday homes. These comfy homes will fit your budget and offer you an excellent investment that promises great family time. You can either keep it restricted to a single level or expand it vertically as per the requirements. Make sure that your container house has a great terrace that opens up to mesmerizing beach views.
28. A Studio Container House
In this era following the work-from-home culture, make your container house a bit flexible with its spaces. Plan your personal workstation in the design that opens up to the views of the garden. This approach will boost your productivity and offer you a versatile space that could either be used for relaxation or finish off tasks.
29. A Rustic Living
Shipping container homes could offer you a much-needed break from the city hustle. Rather than following the urban design language, keep your container house extremely simple and open to natural views. Introduce two patios in the middle of the living zones. Paint the home with tones that make it blend with the surroundings.
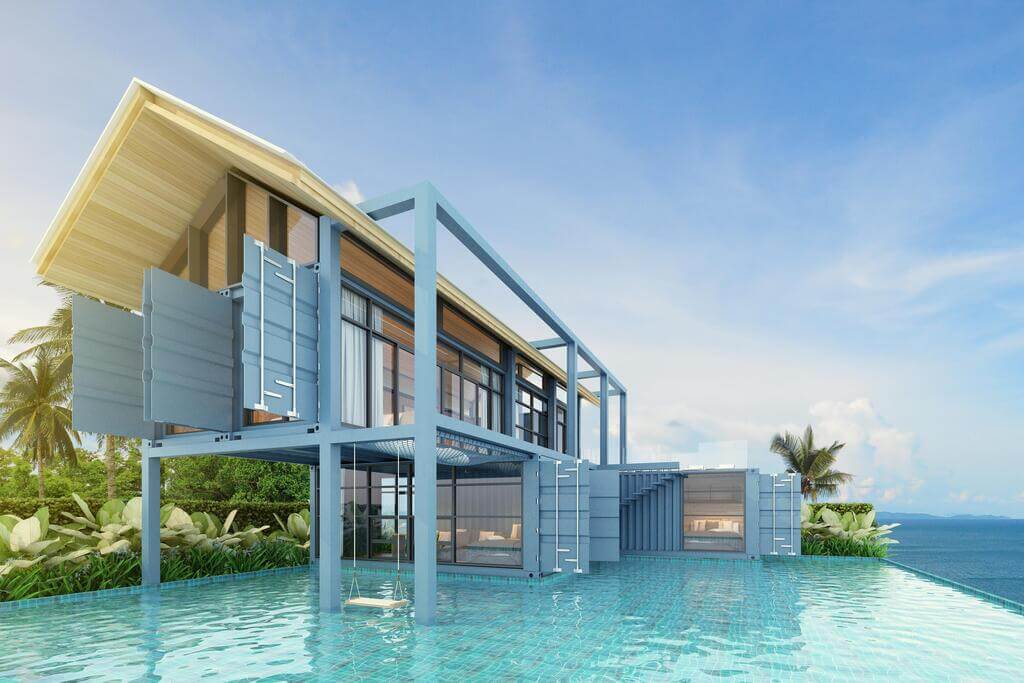
30. Floating Shipping Container Homes
Make your container house seem floating in the water with this innovative design approach. Pick modern aesthetics in the structure and compose the home next to the swimming pool. Utilize the structural elements to stack the house and make it appear to be rising from the water.
Curate the design with straight lines and clean aesthetics. Opt for the design elements that reinforce the relationship between the interiors and exterior spaces. Let the large windows establish a sense of seamlessness in the overall design.
Why Shiping Container Homes?
With the help of innovation, a shipping container could be given the form of a house easily. There are multiple benefits associated with these shipping container homes that have made them a trend in the industry. Let’s look into these.
Quicker Construction
Storage container houses are extremely easy and quick to build. A small project can be constructed and delivered within the time of 3 weeks.
Affordable Living Solution
Shipping container homes are extremely affordable as compared to traditional homes. The cost of containers and decor can be planned to fit the budget and you’ll be promised the most welcoming house.
Minimized Materials
If you’re picking the idea of a shipping container house, you’re on a green path as the demand for concrete, wood, and steel gets minimized.
Mobile Homes
Haven’t we always dreamt of taking our homes along with us? Shipping container homes are extremely easy to transport which means you can take them along with you. While conventional homes restrict you to one place, you can explore the world comfortably with cargo container homes.
The Creative Allowances
There are multiple sizes in the shipping containers that open up several possibilities to play with their designs. You can blend it together, keep it apart, or stagger it out to get your desired home layout and form. Shipping container homes are easy to work with and the materials let you be flexible and extremely creative in the design.
The Era of Container Architecture
Shipping container homes have not only proved beneficial in terms of cost and materials but also served as the quickest solution to any of the natural calamity-affected areas. These container homes allow you to define your aesthetics while offering the most functional home.
The spaces can easily be connected to form a big house. The best part of opting for shipping container homes is the lavish designs that can be built without breaking the bank. Explore the different possibilities and build your desired dream home to be taken along with you to any part of the world.
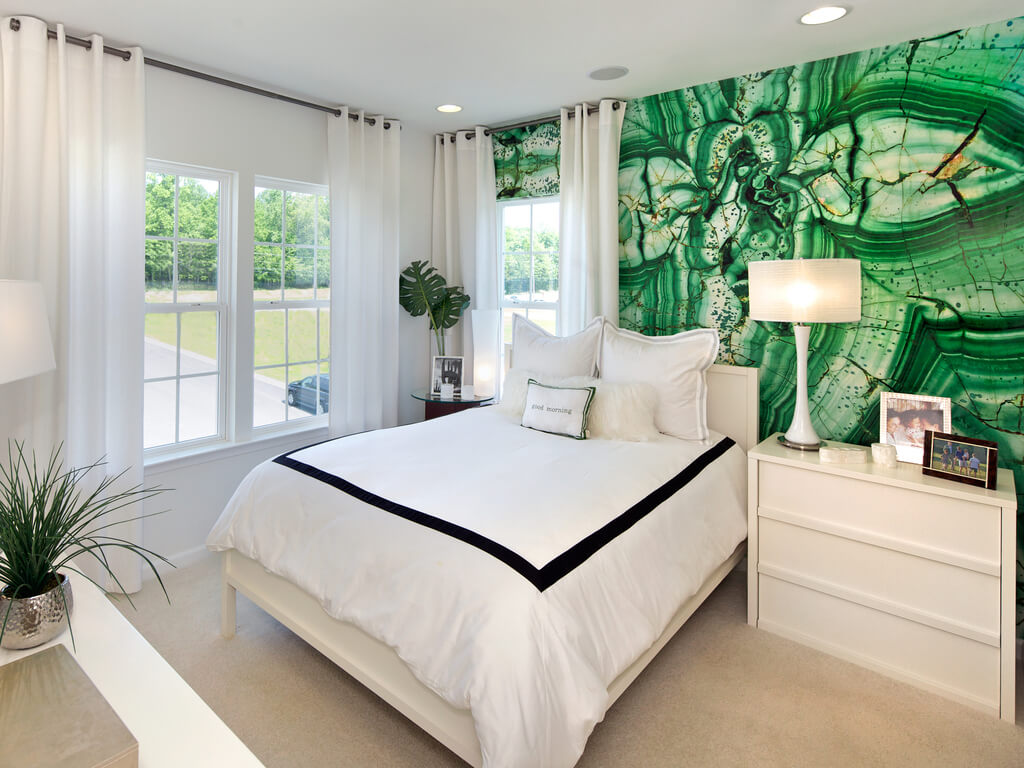
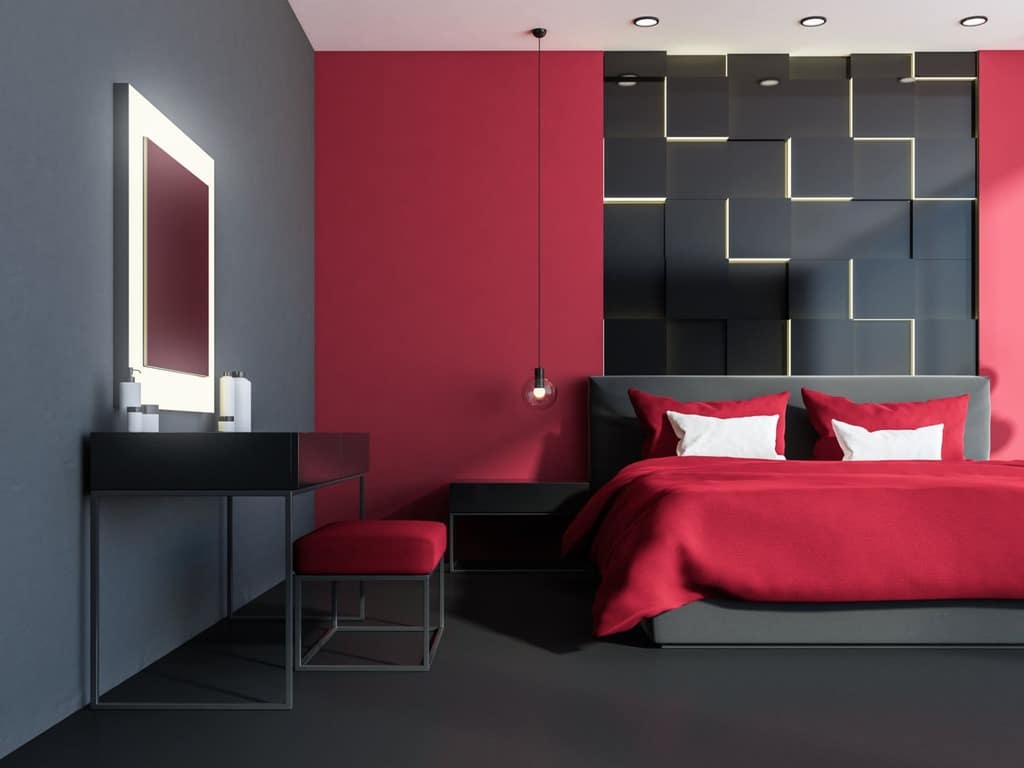
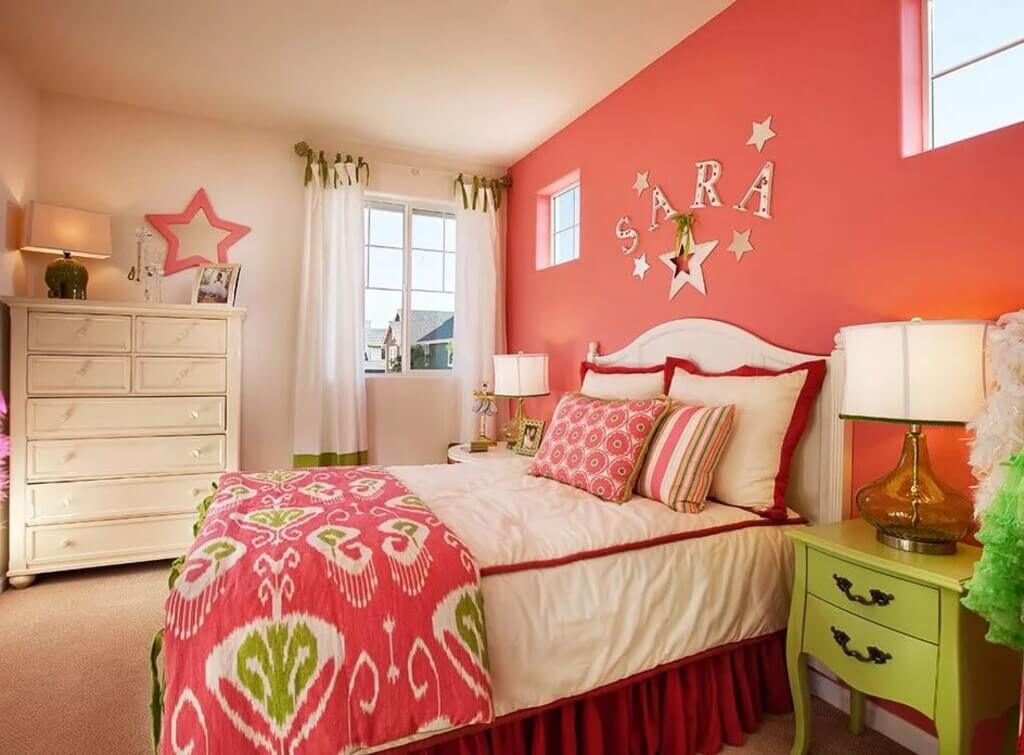
Your bedroom is more than just a place to sleep, it reflects your personality and sets the tone for how you start and end each day. Choosing the right two colour combination for bedroom walls can completely transform the look and feel of the space, making it more relaxing, stylish, or energizing based on your preferences.
The right colour pairing adds depth, balance, and visual interest. While every colour has its own charm, combining two complementary shades can bring harmony and elegance to your bedroom. Whether you prefer calming neutrals, bold contrasts, or soft pastels, the right mix can highlight your design style and make the room feel more personal.
In this guide, we’ll explore some of the best two colour combinations for bedroom walls that suit a variety of styles and moods. Whether you’re after a modern, minimal look or something more vibrant, these ideas will help you choose colours that match your taste and create a welcoming bedroom atmosphere.
Stunning Two-Color Bedroom Wall Ideas
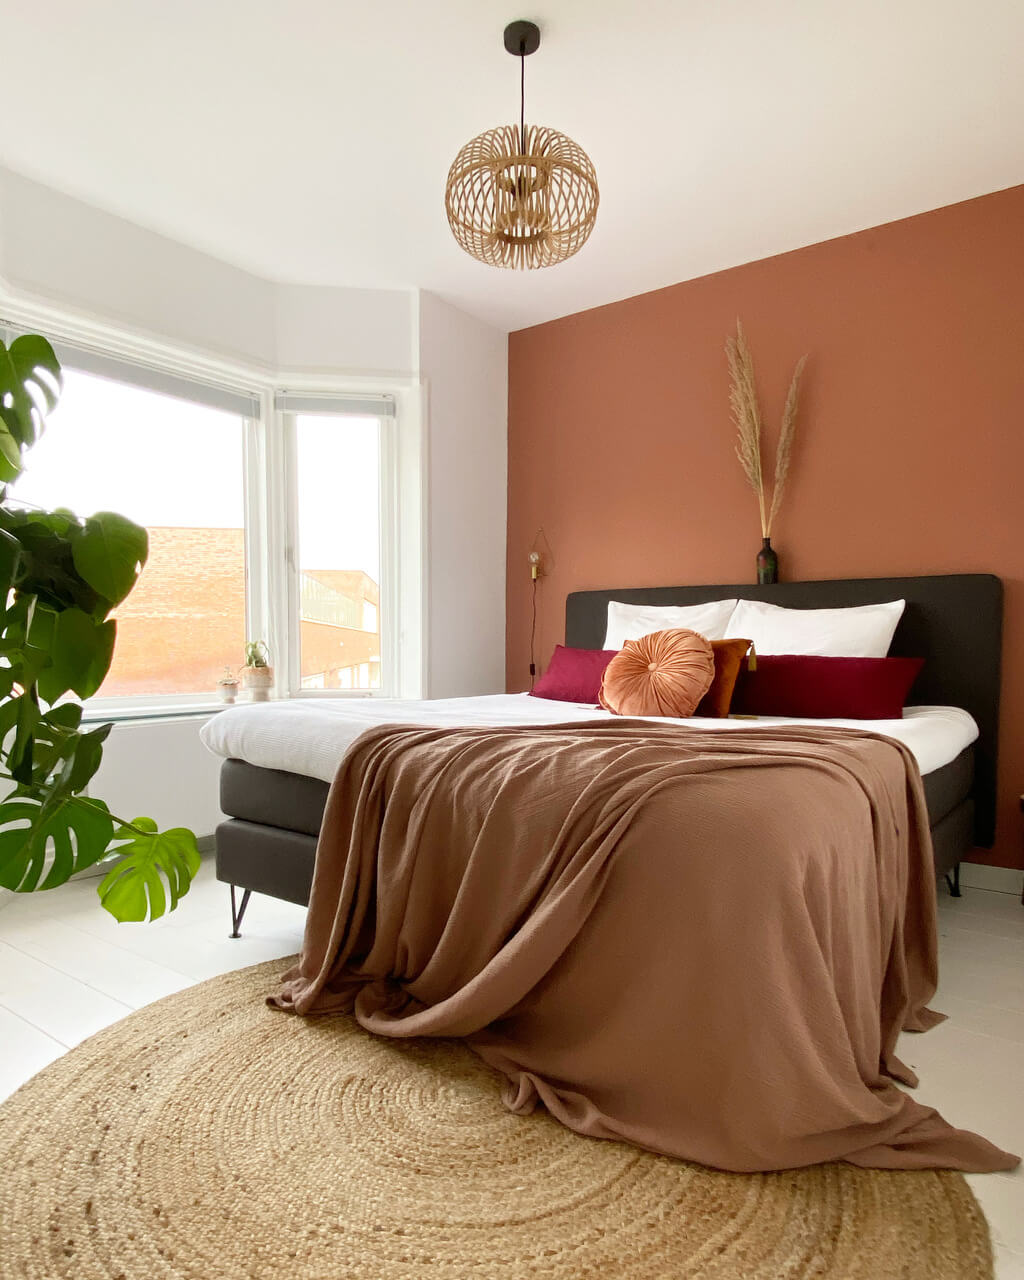
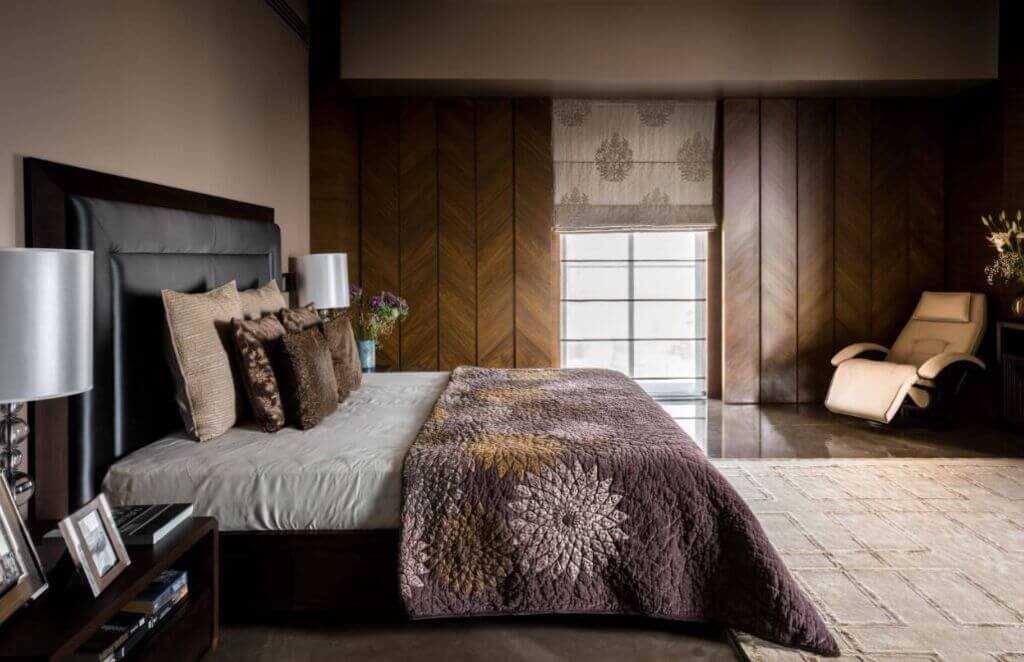
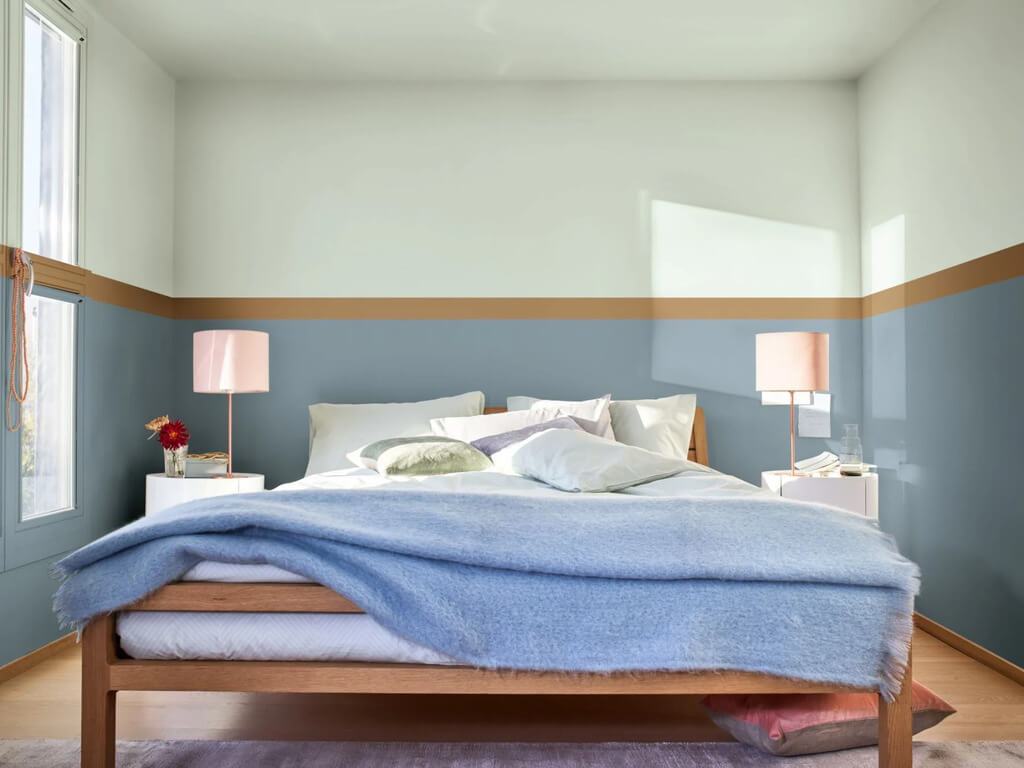
1. Terracotta and Ivory
Terracotta, an earthy colour lends an air of naturalness to the space where it is used. Combining this colour with ivory colour will give an elegant balance between the two colours. With a rustic bedroom look, it complements wooden furniture and mono-coloured upholstery wonderfully and adds an elegant touch. Its the best bedroom 2 colour combination.
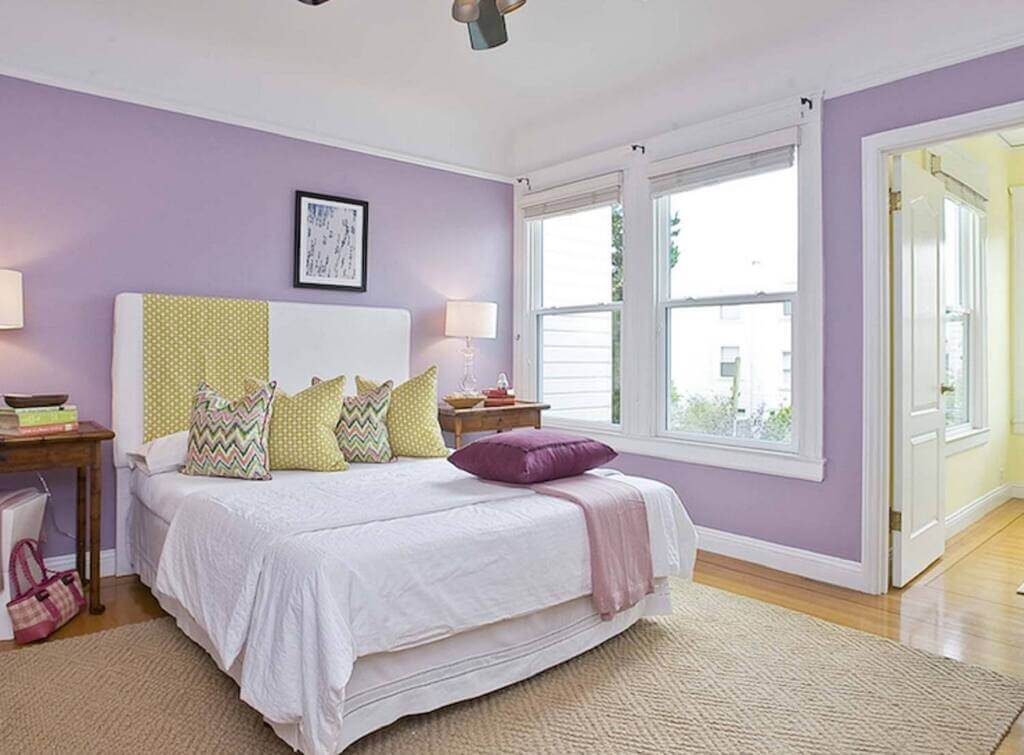
2. Lavender and Off-White
The combination of both of these bed room 2 colour creates a winning combination for the bedroom, which translates into a sense of stability, peace, and calm. The combination of these colours would go well with white or soft coloured upholstery. It has a pleasant combination of both colours that do not overpower one another, but instead create a relaxing effect to make the room feel like a perfect sleeping environment.
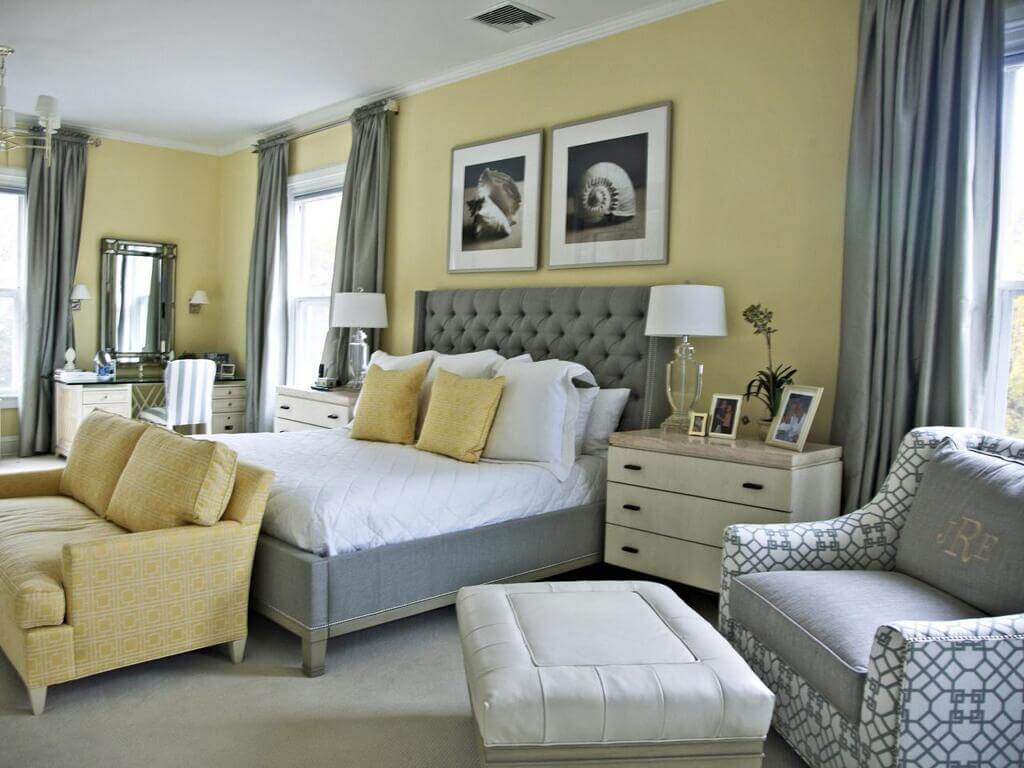
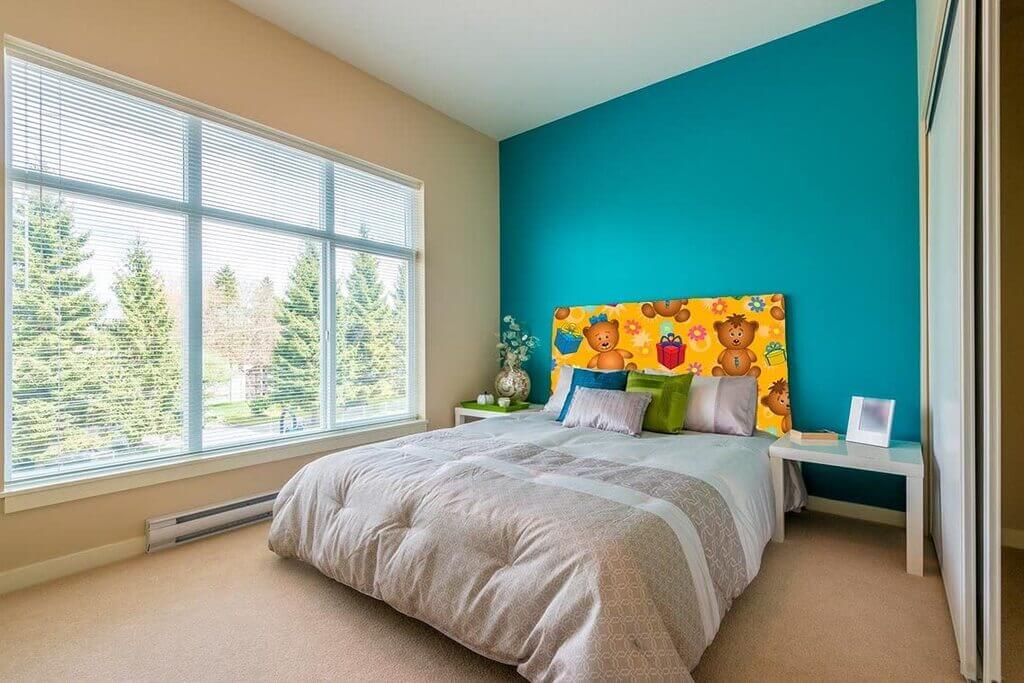
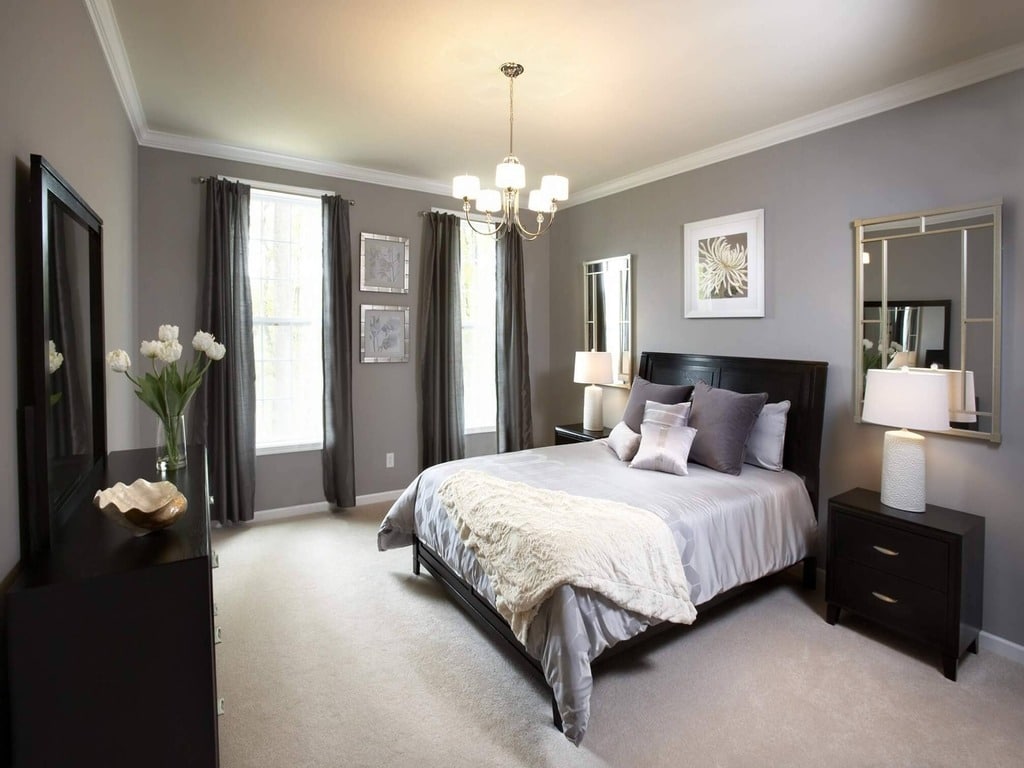
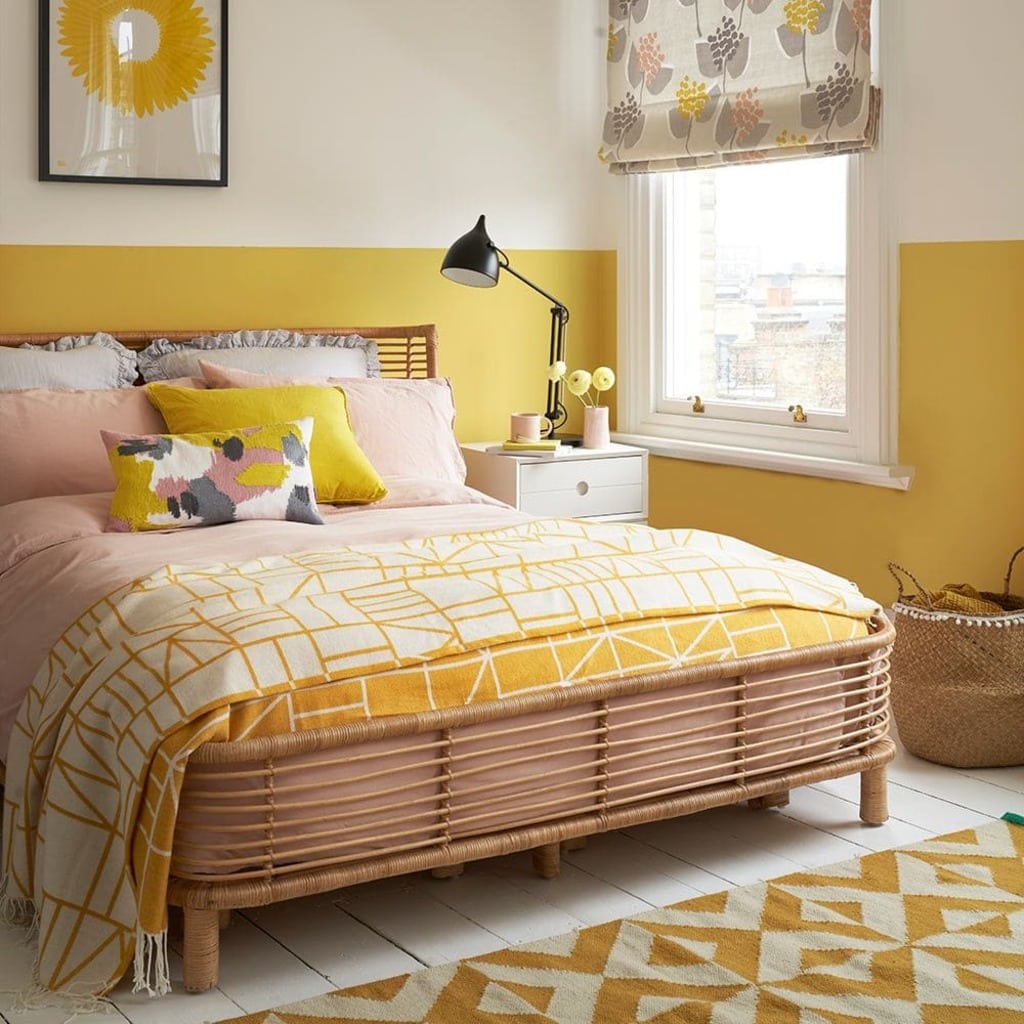
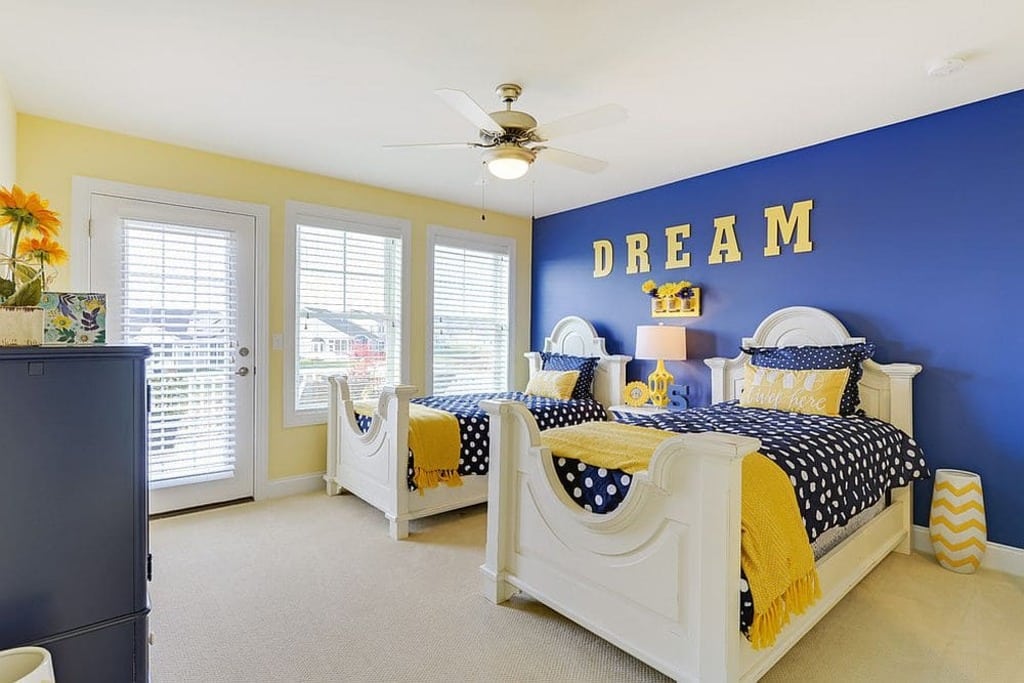
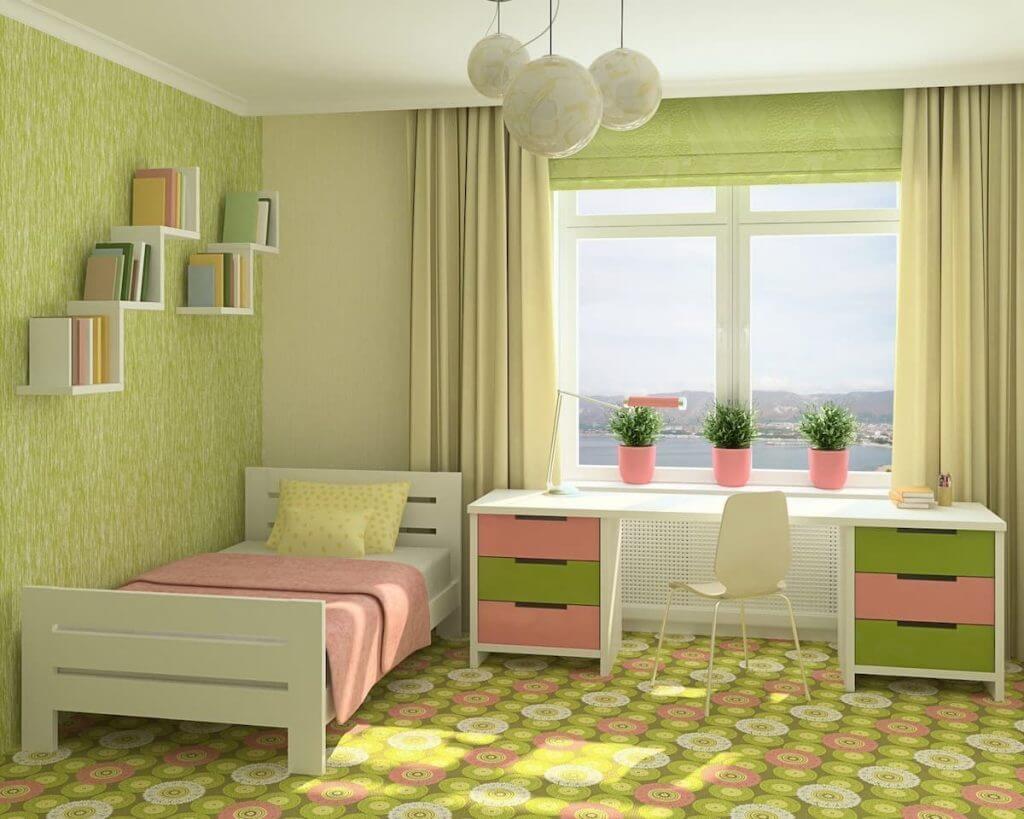
3. Yellow and Grey
Colour yellow provides a cheerful and positive atmosphere that looks great on a child’s room wall. Yellow stimulates babies’ metabolism and keeps them active when they are surrounded by it. In addition, too much yellow can overstimulate infants and make them fussy and aggressive. Add a shade of grey to the colour combination and you will achieve a harmonious tone that is both stable and elegant at the same time.
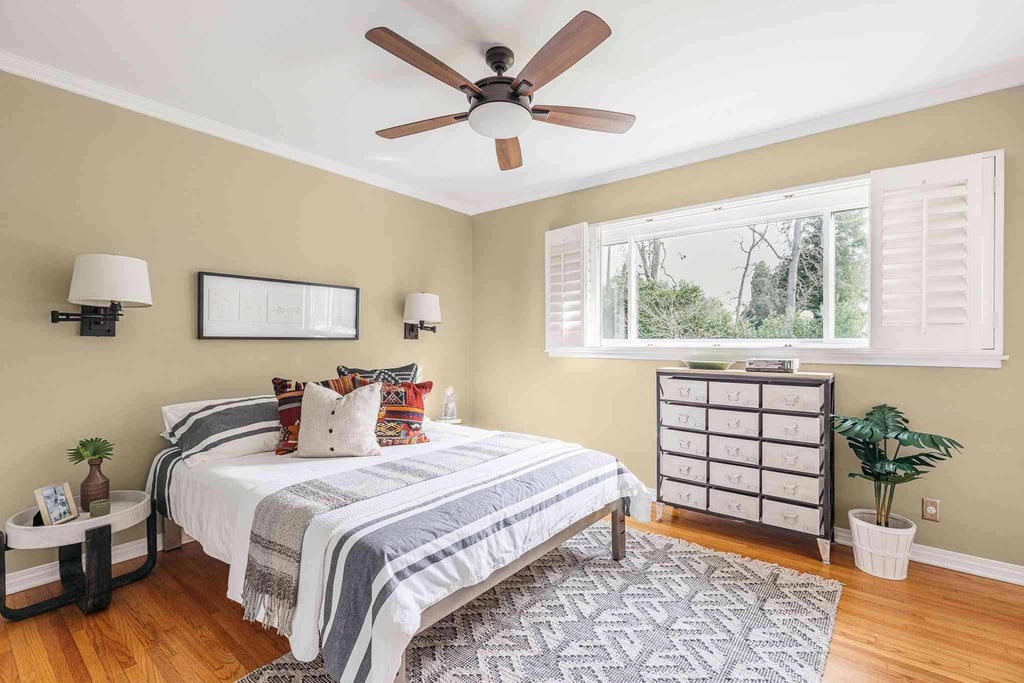
4. Cream and Brown
A cream or brown shade is elegant and happy, and it will keep you relaxed. It’s a neutral shade and can be combined with almost any kind of furniture. A bedroom paint two colors are suitable whether you have wooden furniture in your bedroom or a collection of different items of furniture.
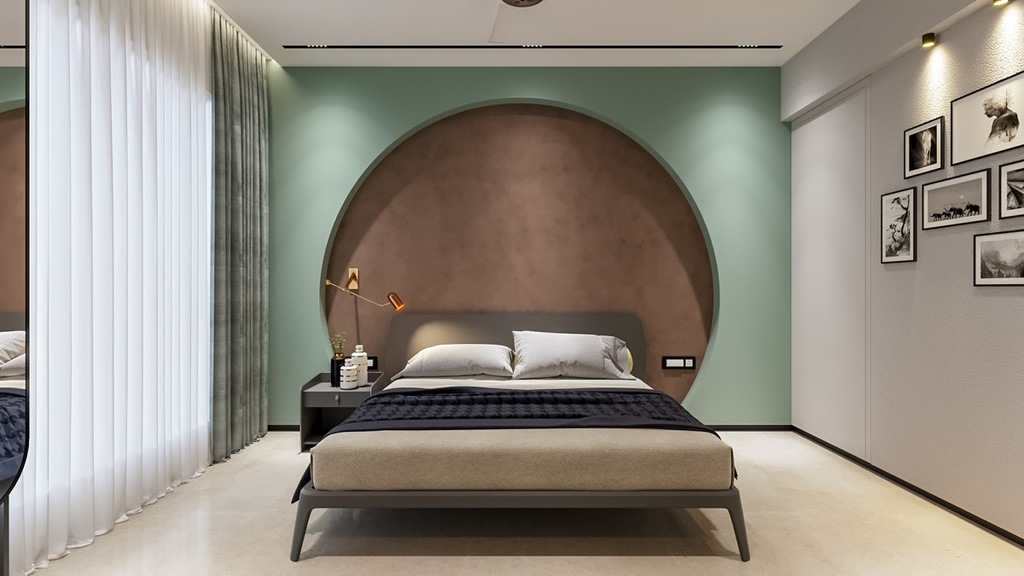
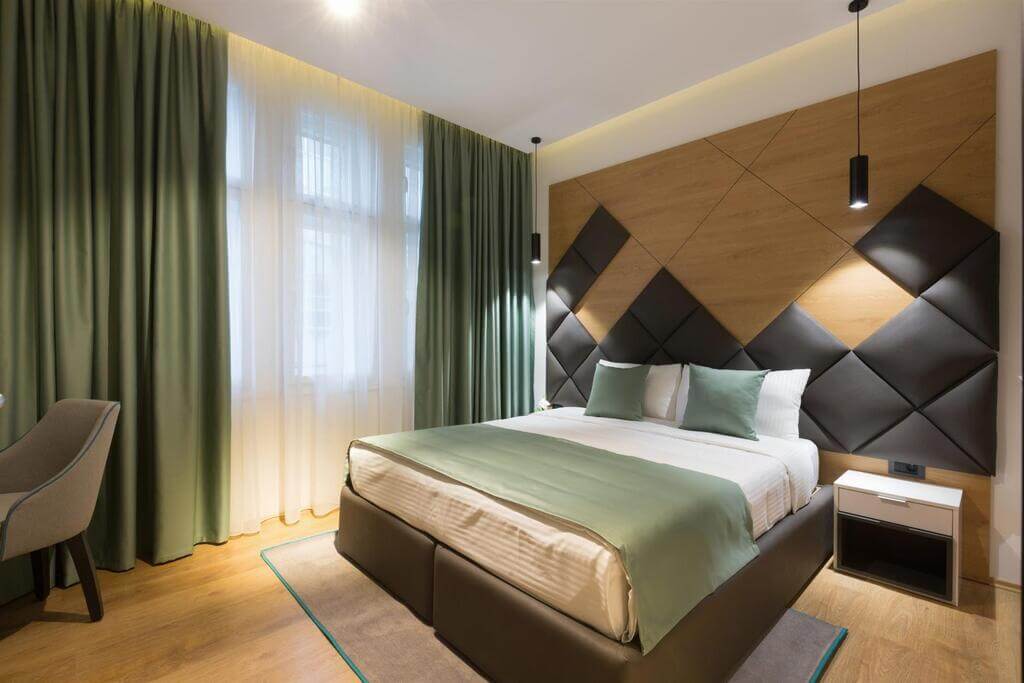
5. Light Brown and Muted Green
People who prefer a natural vibe in their sleeping space would love this combination of light browns and muted greens. With this two colour combination for walls, your flat will have a spacious appearance along with a natural feel that makes it a very healing space
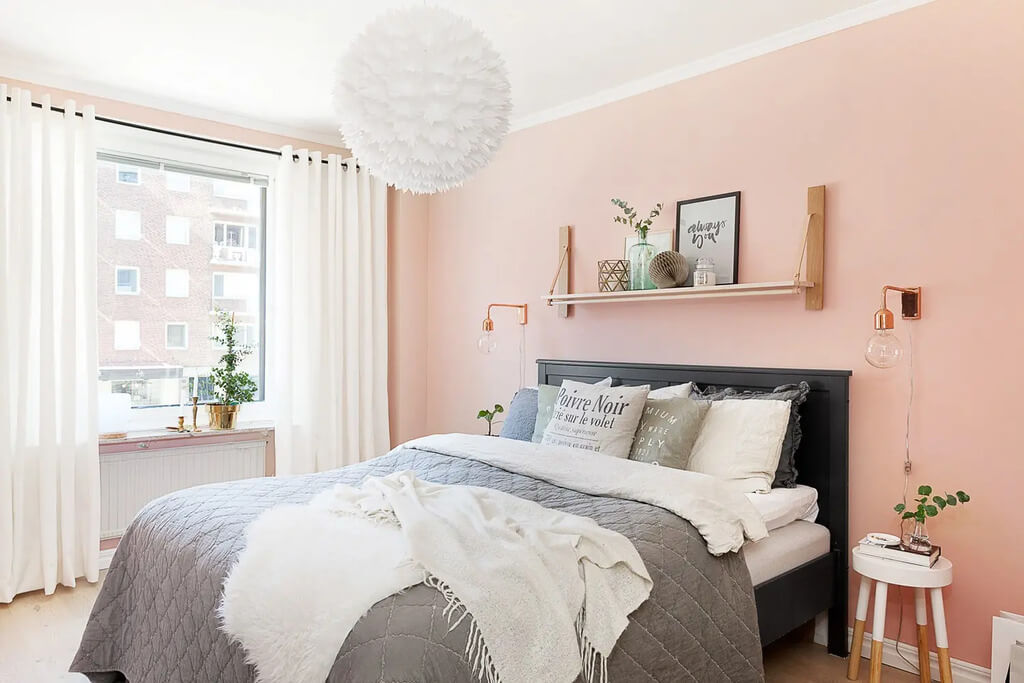
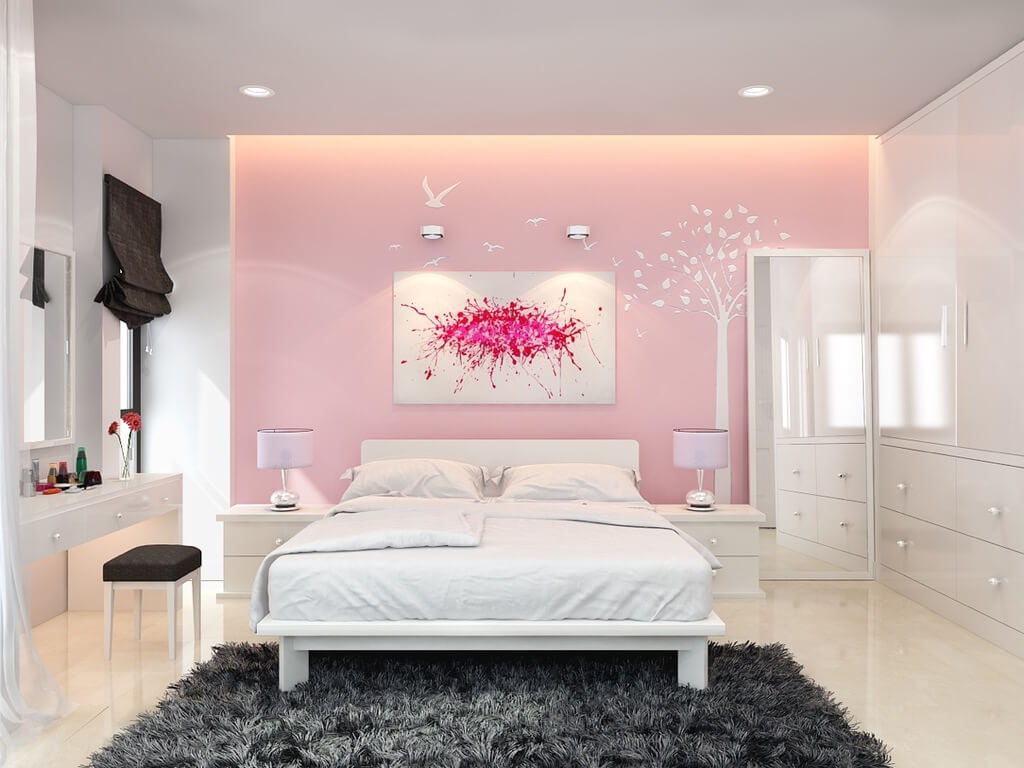
6. Peach and White
This peach-white combination adds coziness to the room. Moreover, you will find that it provides a pleasant and comfortable ambiance for your resting time in the bedroom. For a sophisticated, modern look, use it all over.
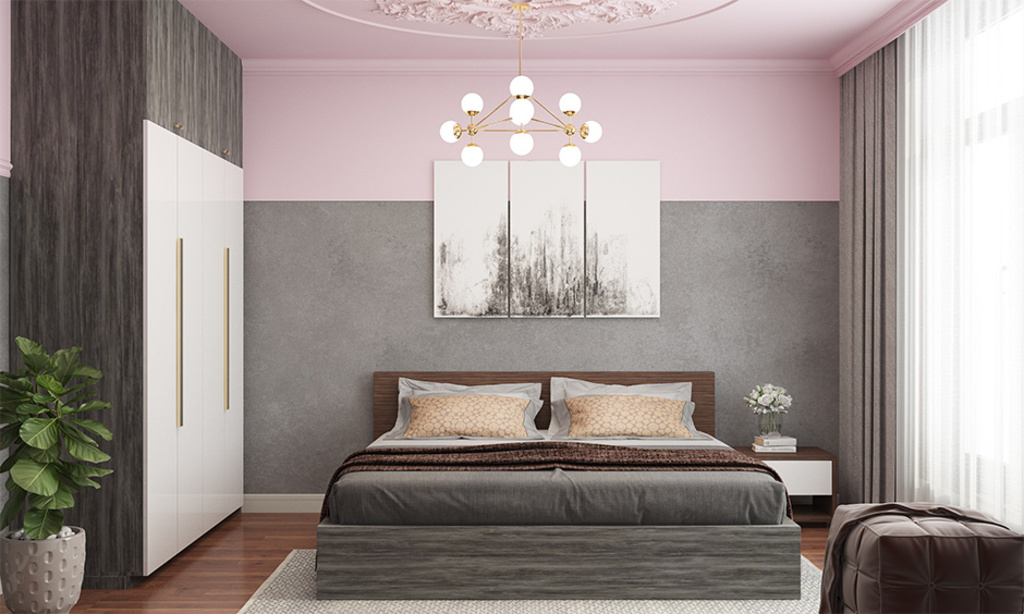
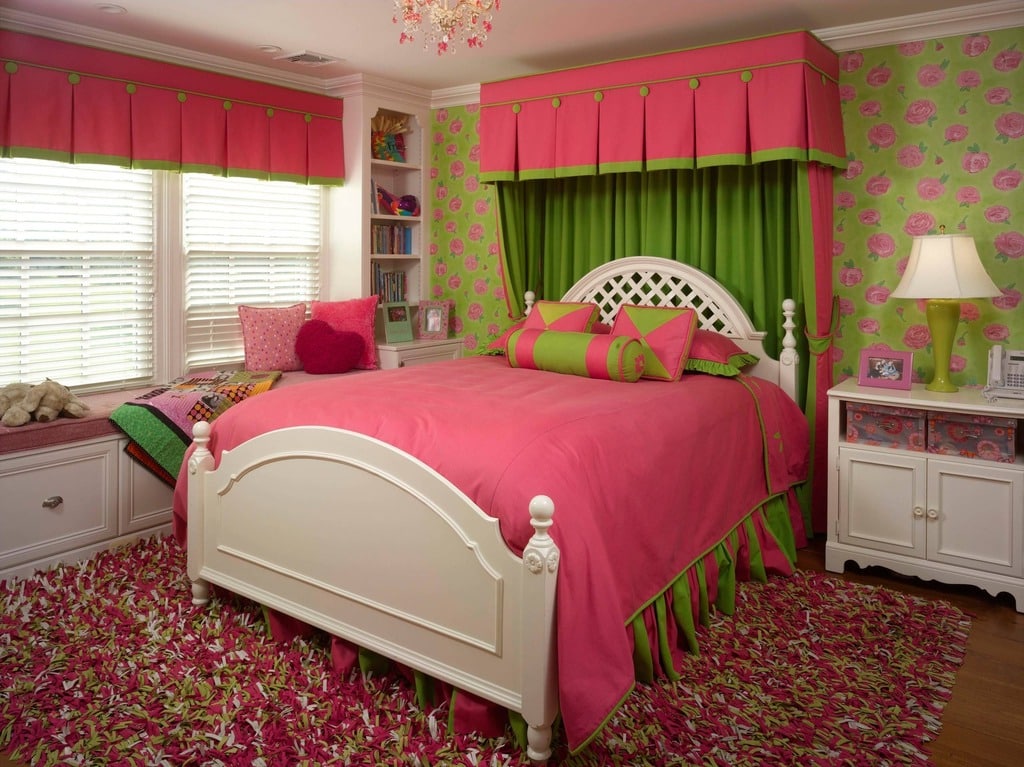
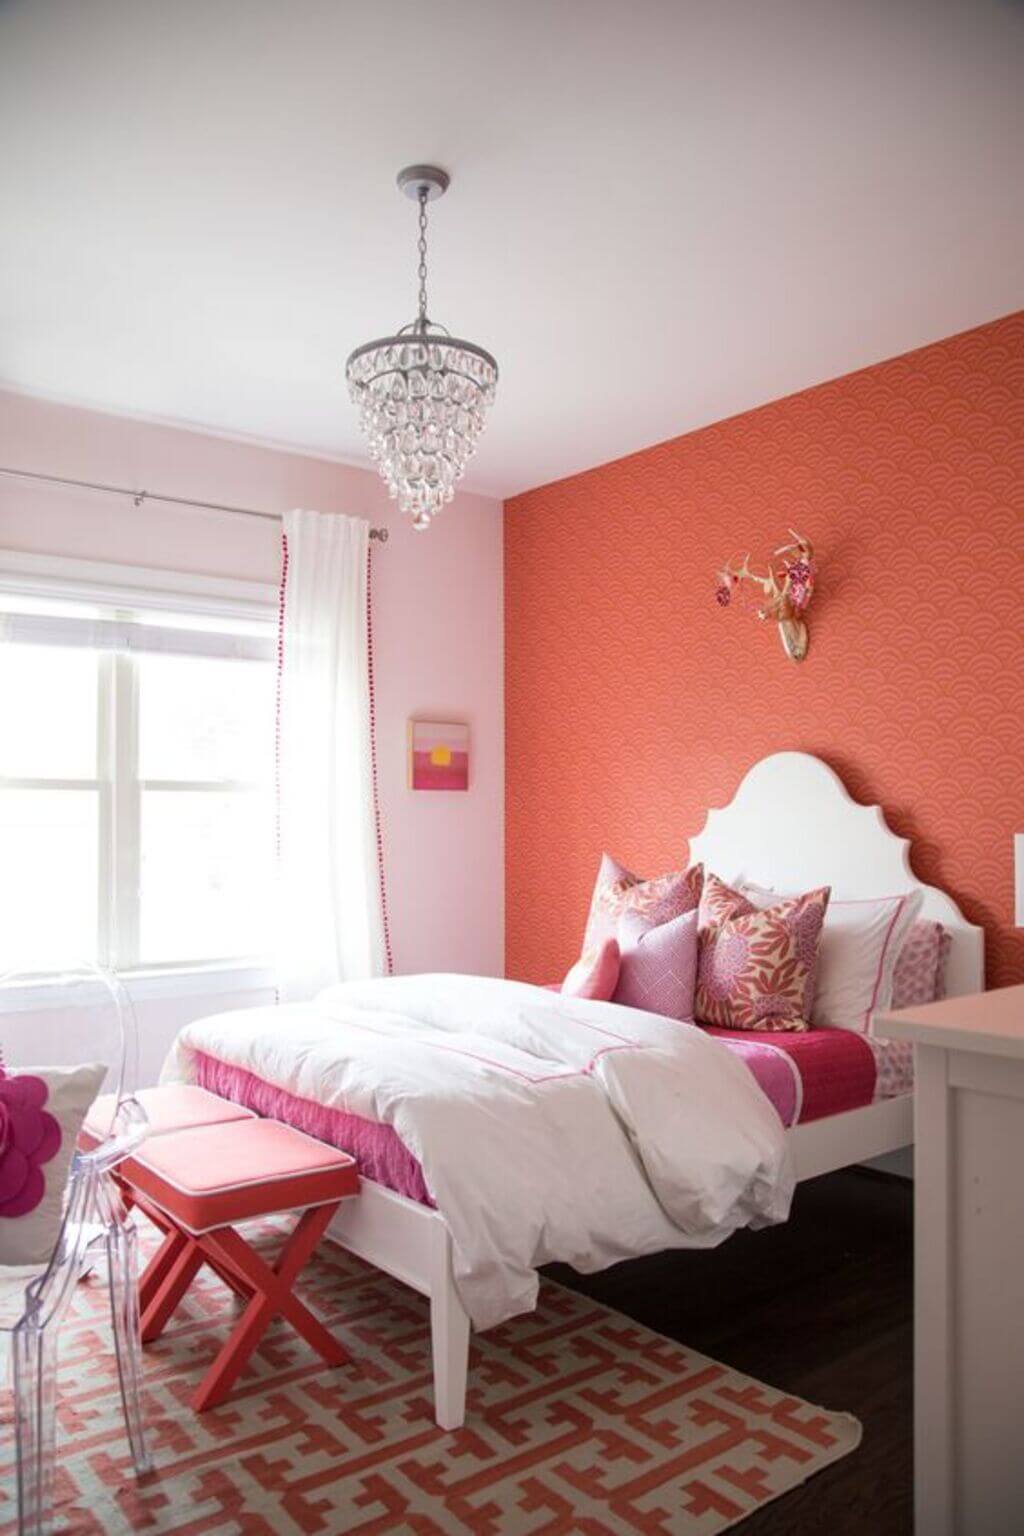
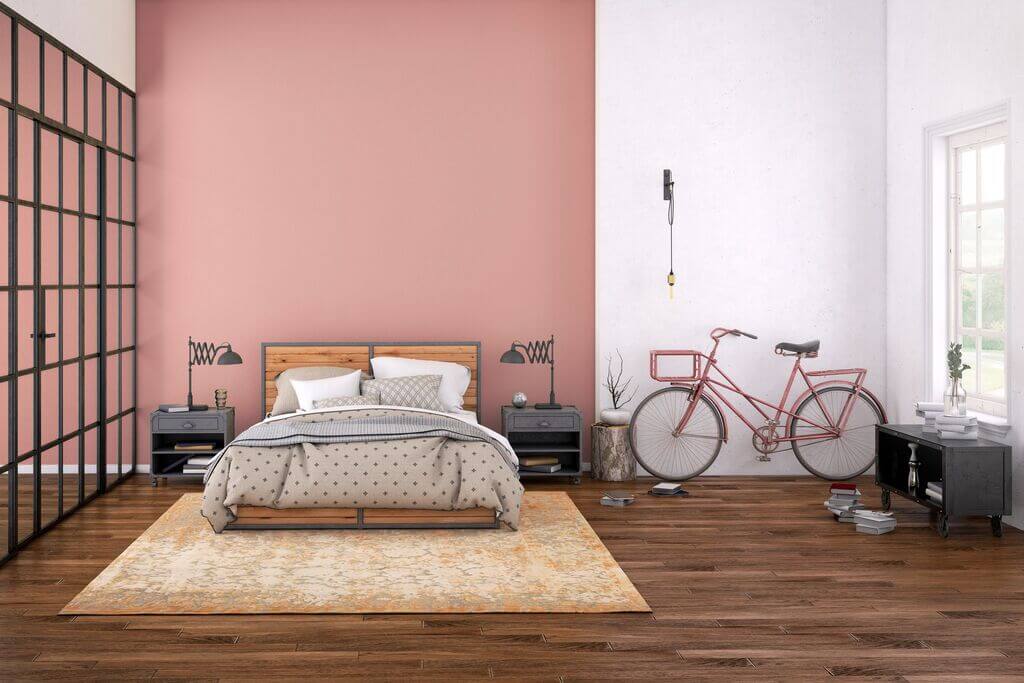
7. Pink and Grey
Pink and grey are great colour combination to use if you want to add a touch of femininity to your bedroom walls. Combining pink and grey colours can make the room interior appear extra spacious in addition to creating a sunny ambiance. This is an example of a feminine two colour combination for a wall.
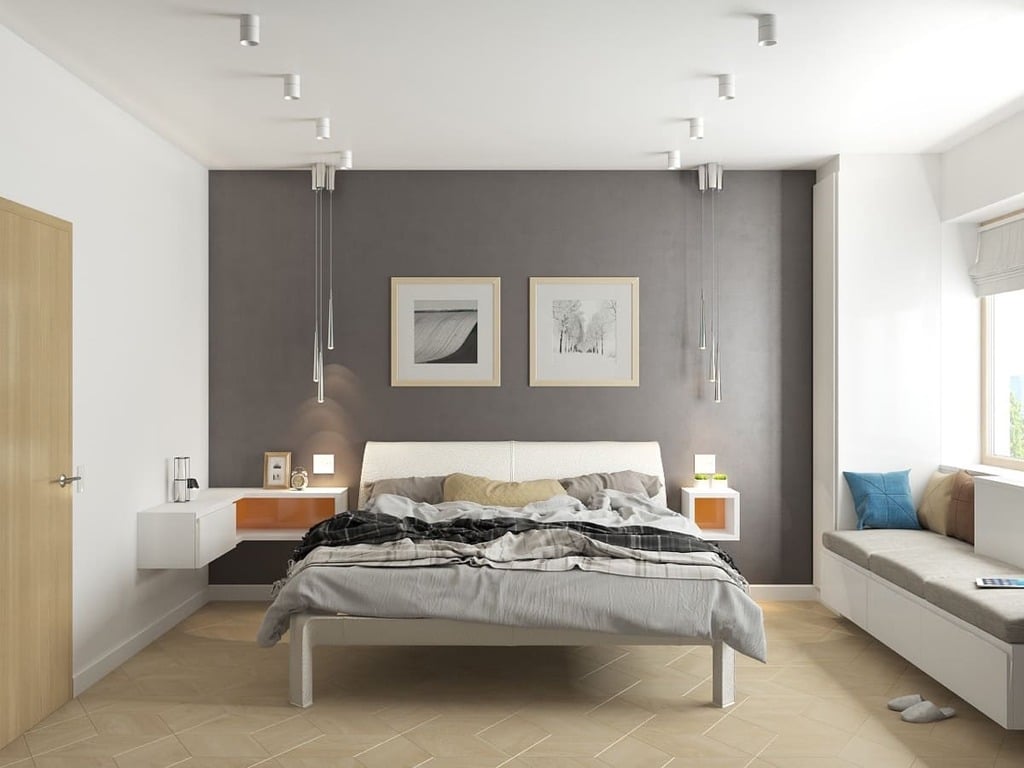
8. Pastel Grey and Yellow
Gray is the colour of sophistication, while yellow is the colour of sunshine. It creates a relaxing atmosphere in the bedroom. For bedroom ceilings and walls that’s an extremely soothing colour combination.
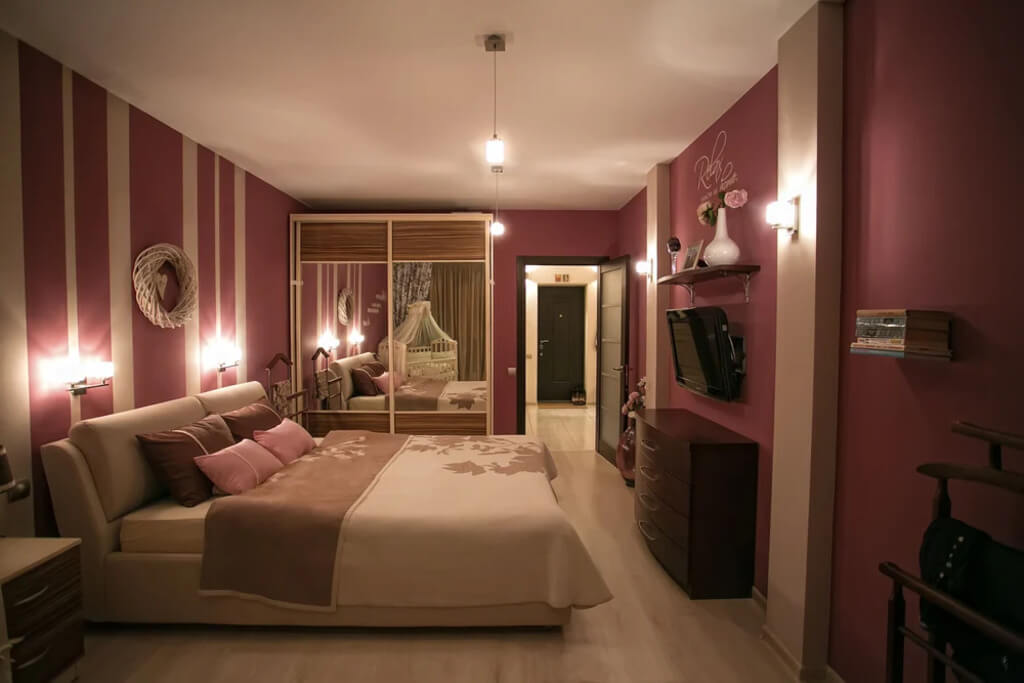
9. Burgundy and Beige
The burgundy and beige colour combo looks luxurious. The colour beige is a neutral shade, and it creates a subtle highlight when paired with burgundy colour, which brings that extra shine around. An excellent combination of neutral tones and deep, rich shades that are both alluring and comforting at the same time, make this combination very appealing. The color combination creates a relaxing atmosphere and a beautiful transparent ambiance.
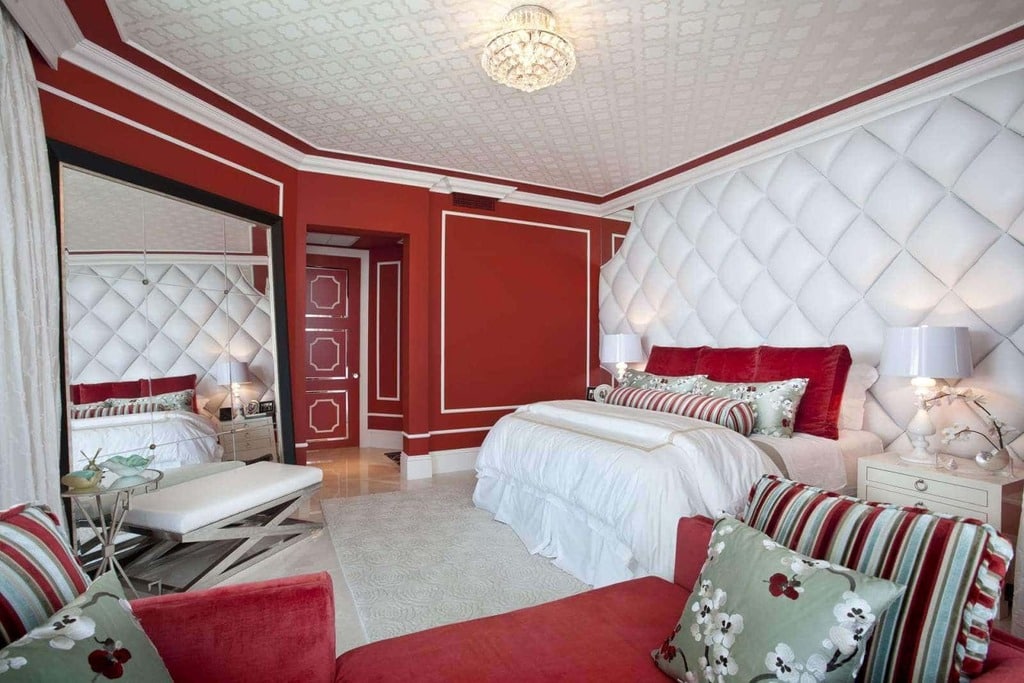
10. Maroon and White
An elegant and breathtaking space can be created by combining the colours maroon and white. It is the perfect combination, since maroon makes your space look cozy and white makes it look spacious.
Natural light during the day will bring out the richness of maroon, and soft bedroom lighting at night will add a calming, inviting atmosphere.
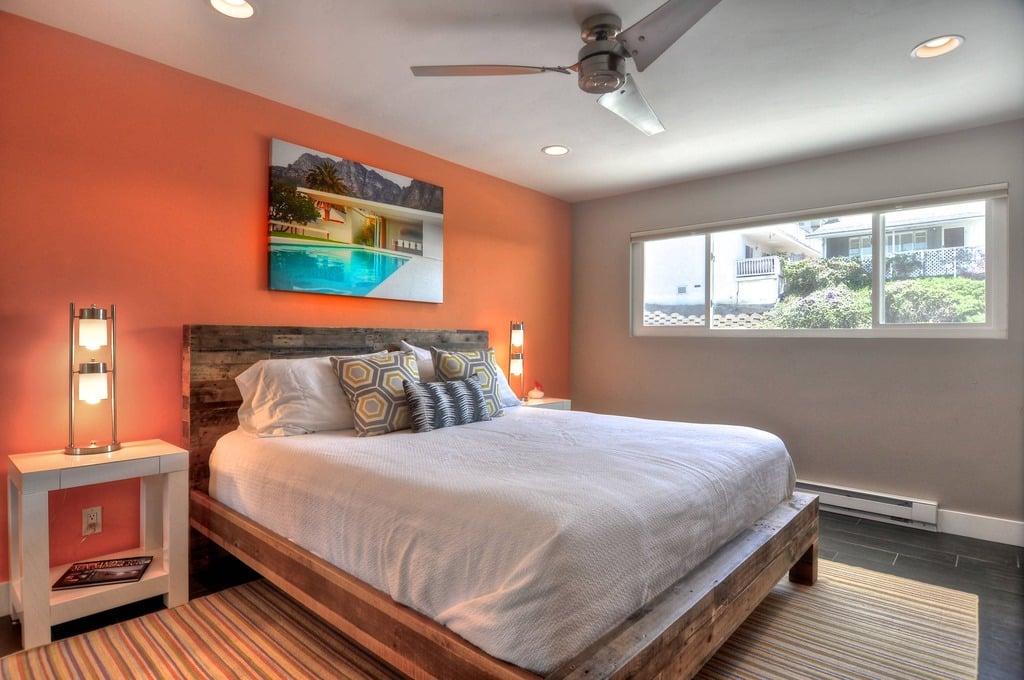
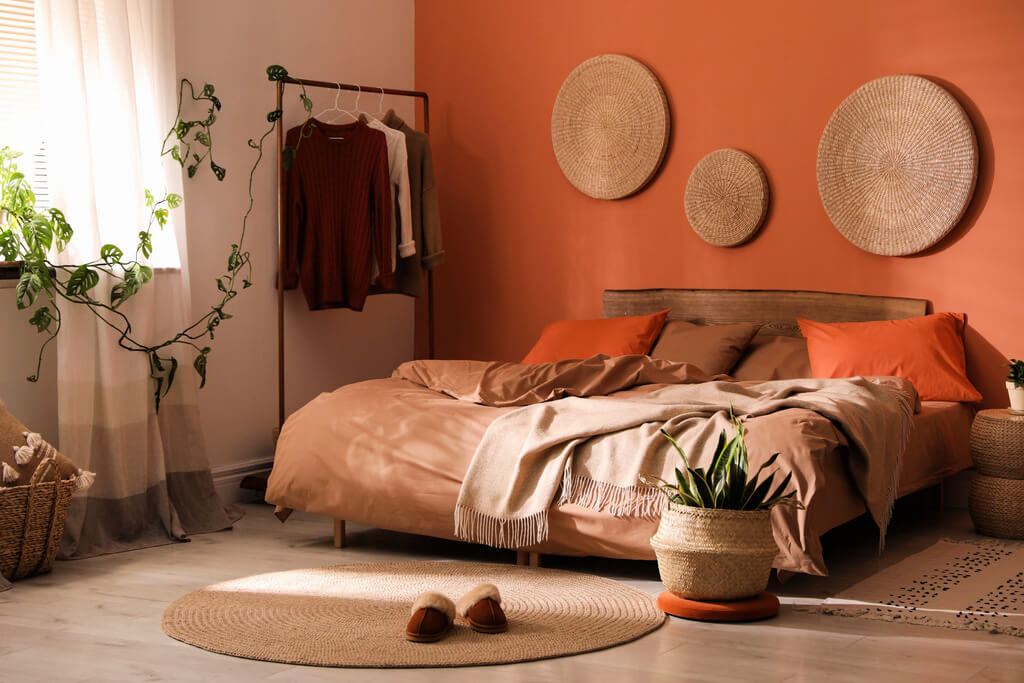
11. Burnt Orange and Off White
It is a flavourful colour with a touch of brightness that might seem extra elegant in the bedroom. Combined with an ivory colour, the brightness will be reduced to a few degrees and the soft glow will be achieved. A major advantage of using bold orange colours is their versatility. The bedroom can be furnished and decorated with light or dark-coloured furnishings and accessories with this colour combination.
The colour combination is soothing to the eye. This is an elegant bedroom wall colour combination consisting of two different shades of colour.
12. Almond Brown and Muted Green
Green and almond make a great combination for any bedroom, regardless of its size. Known for its tranquillity and balance, green has a soothing effect on the eye. With almond brown, it creates a charming natural vibrancy that soothes the senses and creates a sense of calm.
This kind of colour combination is perfect for releasing negative energy.
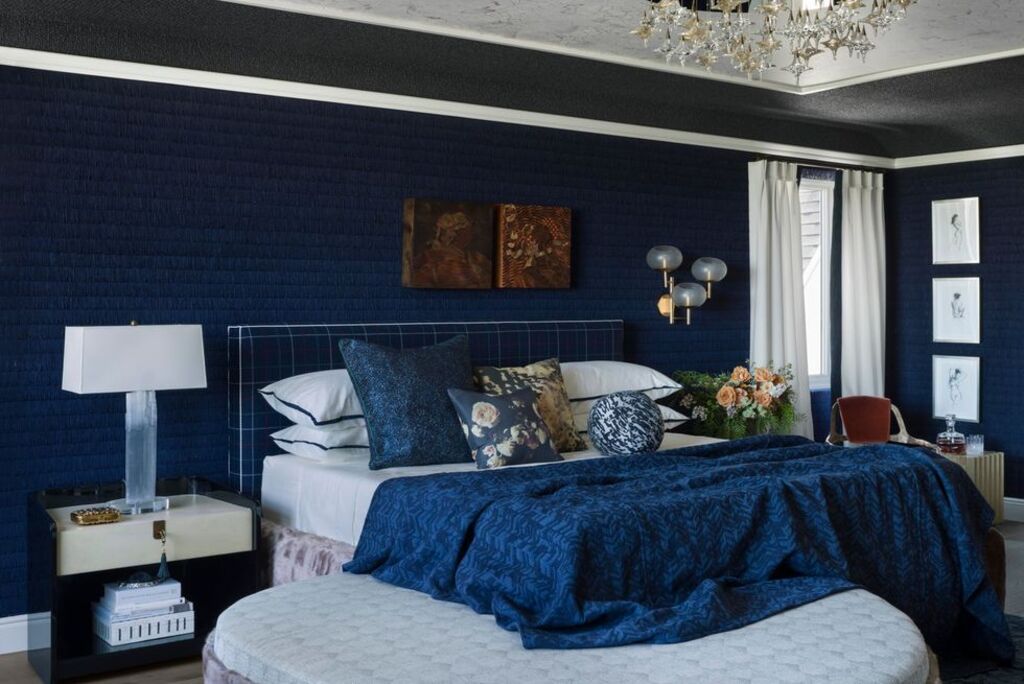
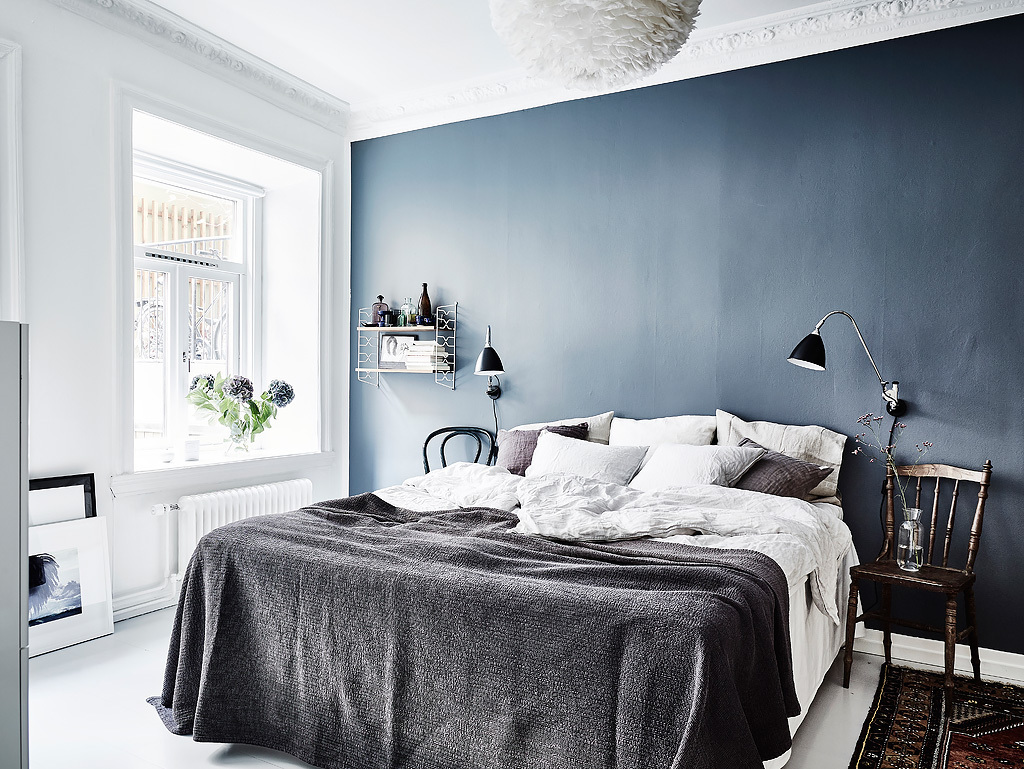
13. Blue and Black
Blue represents confidence, while black represents authority. Adding some warmth to the space and incorporating some wooden essence will give it the appearance of a bachelor’s quarters. In addition to being considered manly colours, black and blue complement each other quite well.
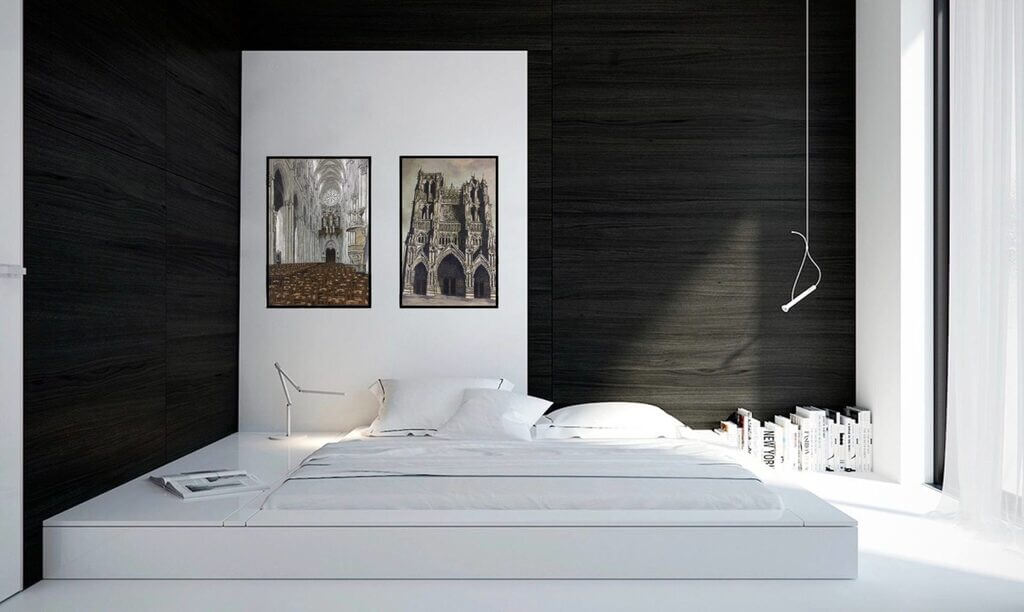
14. Black and White
A black and white two-colour combination for the walls of a bedroom is most certainly elegant and stylish. There is a strong contrast between black and white, and it works well together as a whole. White represents light, simplicity, and purity, while black represents authority and strength. It creates an elegant and mysterious ambience in the bedroom.
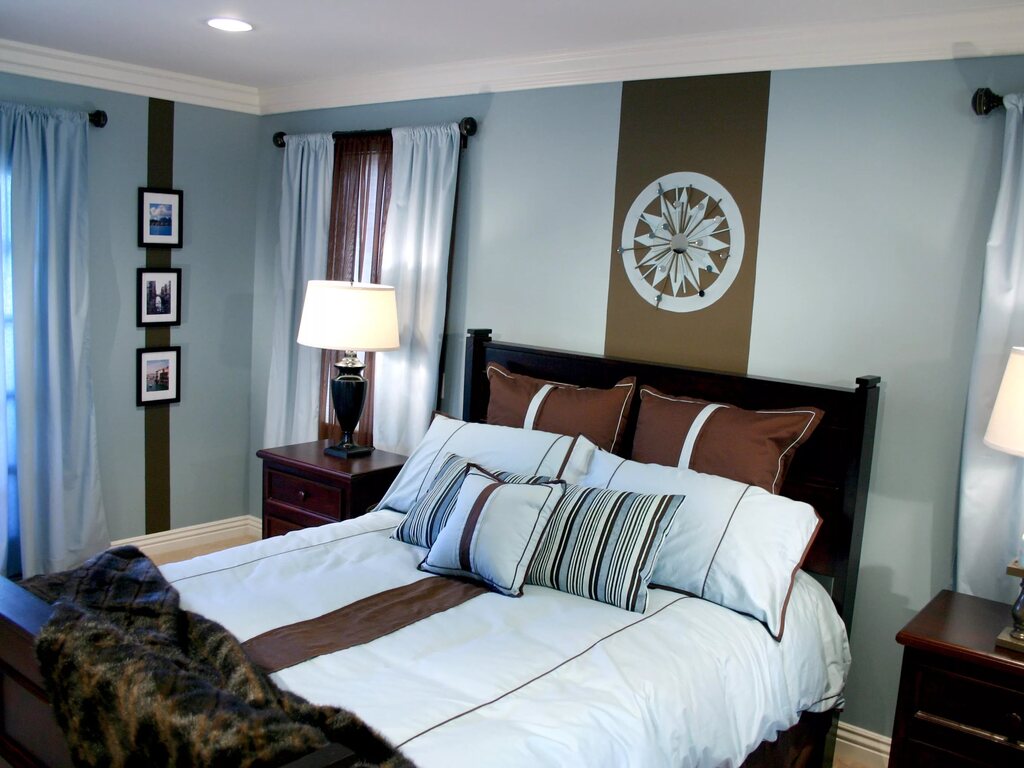
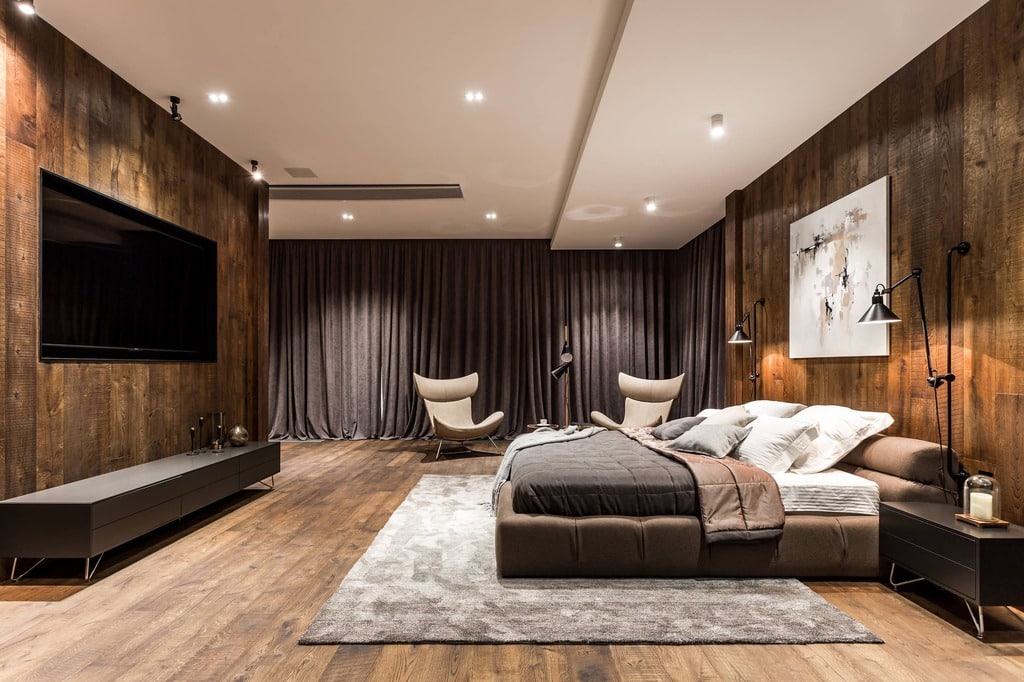
15. Chocolate Brown and Beige
This combination of two different shades of brown on the walls of the bedroom looks great due to the contrasting shades. The colour brown symbolises resilience, security and warmth. Beige, in its simplicity and calmness, perfectly complements it. They help create a happy, peaceful atmosphere.
16. Blue and Brown
Blue is usually regarded as a symbol of serenity, health, and wisdom, which makes it a great choice for use in a child’s room. A shade of brown will accentuate the contrast in the room while also providing warmth and stability.
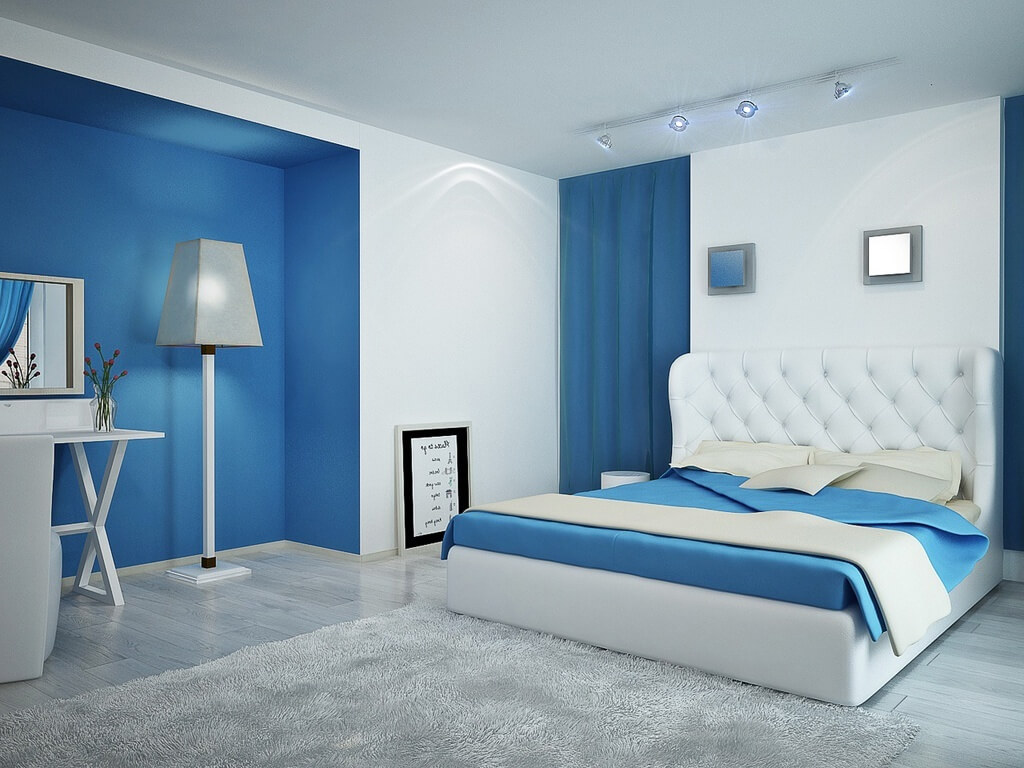
17. White and Blue
The colour combination for this bedroom is bright and attractive and it creates a peaceful ambiance. Different shades of blue are available and can add beautiful depth and dimension to the bedroom walls. Furthermore, using blue and white accent colours in the bedroom enhances its aesthetic appeal.
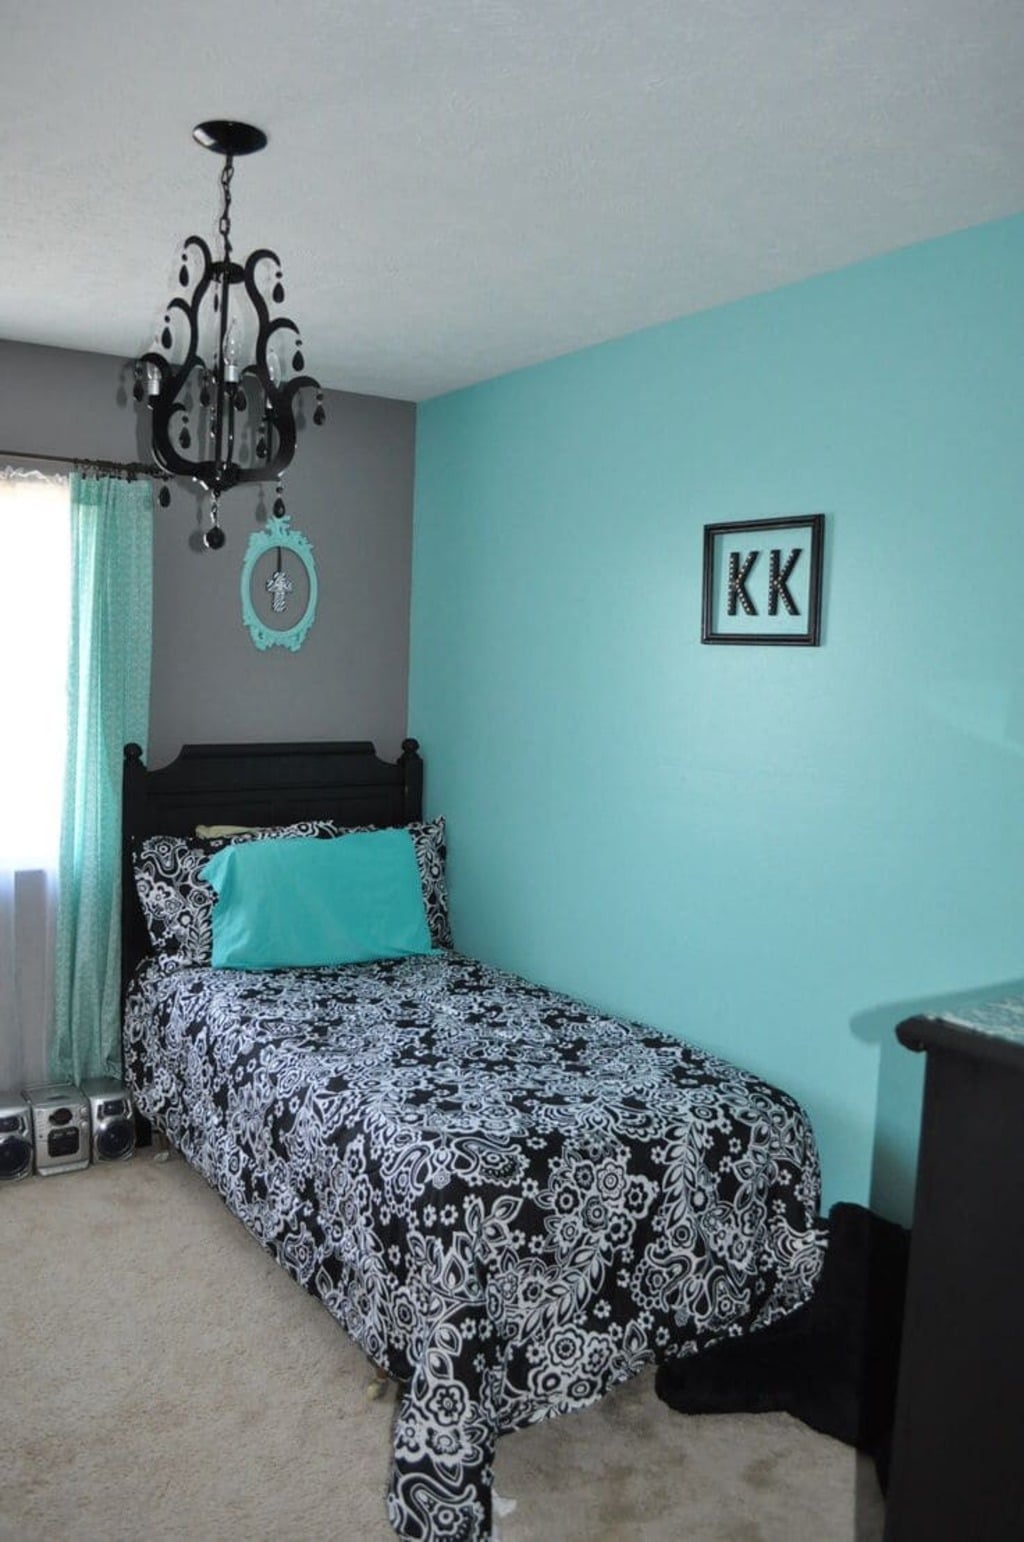
18. Turquoise and Cream
The colour turquoise represents calmness. The combination of this pattern with a neutral colour such as beige will create a bedroom that is aesthetically pleasing and stylish. Its gentle simplicity and mellow elegance will complement the turquoise, creating a harmonious balance.
19. Mustard and Green
The green colour is often regarded as the most obvious representation of nature. However, mustard is complementary to its character despite its contrasting shade. The mustard colour represents warmth and diversity, it celebrates creativity.
It is pleasing to the eye in a bedroom to see green and mustard colour combinations on the walls.
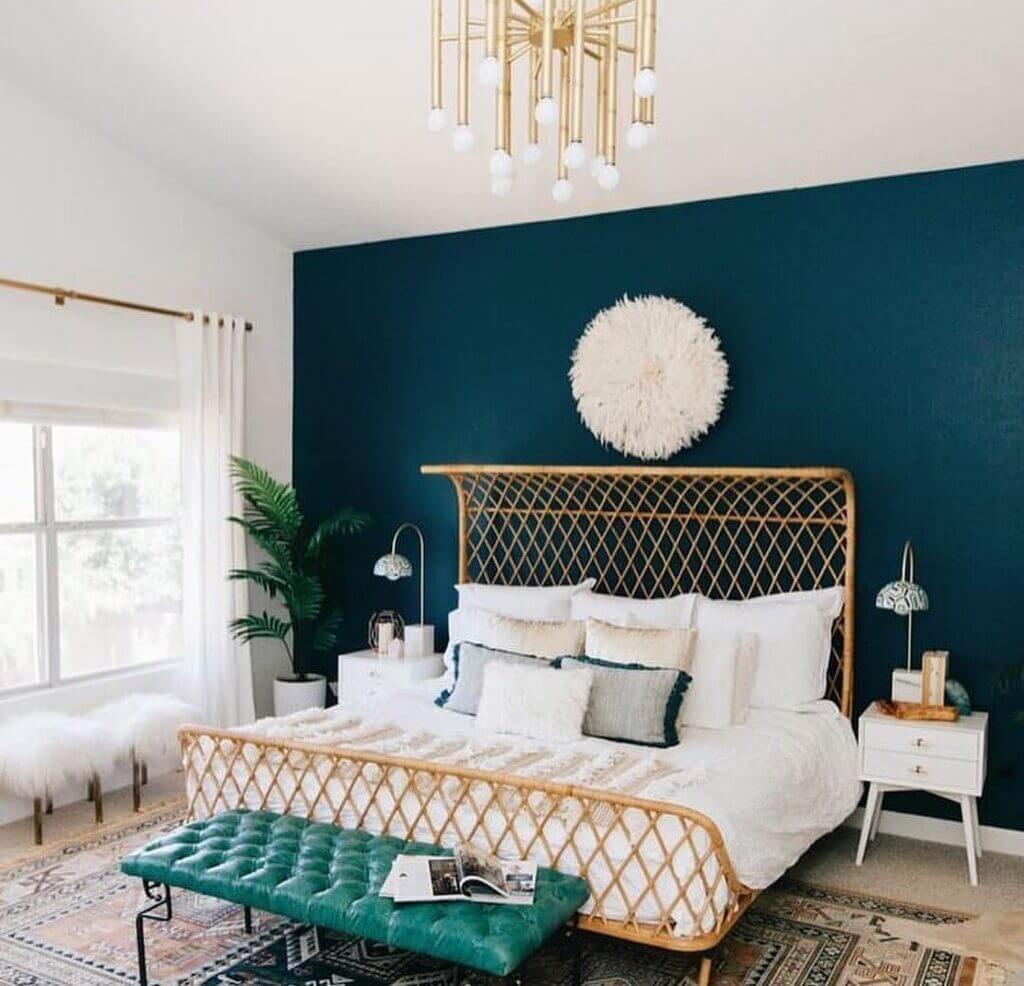
20. Emerald and White Colour
Emerald green symbolises elegance and abundance. When paired with contrasting white, it is simply stunning. The emerald can be used on an accent wall, such as textured or plain panels. For more elegance, you can have some fresh plants as decor in the room along with the emerald.
21. Baby Pink and Lime Green
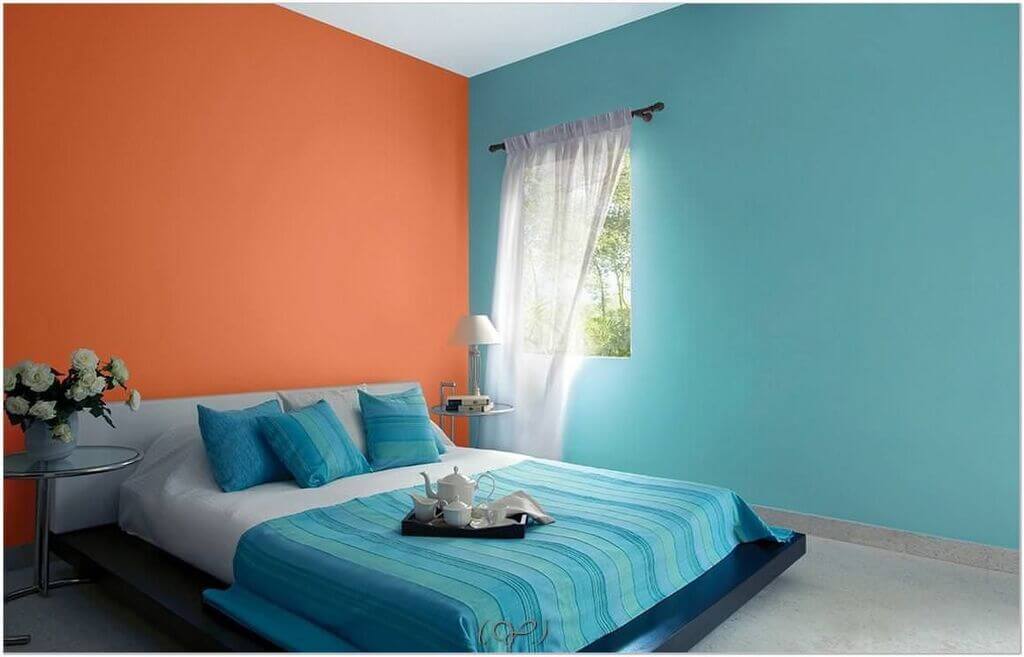
22. Orange and Charcoal
23. Black and Brown Bedroom Walls
24. Red and Grey
25. Red and White
26. Light Brown and White
27. White and Grey
28. Black and Grey
29. Yellow and Cream
30. Blue and Yellow
31. Mint Blue and Grey
FAQ’s
Does White Work Well for Indian Bedrooms?
A white colour for an Indian bedroom is a good choice because it provides a bright appearance. Furthermore, it matches almost every other colour perfectly.
What Is the Best Colour for a Bright and Spacious Bedroom?
Classic looks will never go out of style. The combination of black and white will make your bedroom look spacious and bright, so it’s the ideal choice if you’re looking for a two-colour combination.
Which Colour Soothes the Mind the Most?
Pattern Combination With White is always a great choice. In addition to its elegance, this combination provides a calming effect that can help you unwind after a long day’s work.
What Is the Most Luxurious Colour Combination?
If you combine a colour combination such as Royal Blue And Light Grey Cotton, you can really make your bedroom walls more colourful and lively. Moreover, it adds an air of luxury to your space.
What Are Two Formal, Elegant Colours?
White and black are two of the most popular colour combinations when it comes to painting bedrooms. Your room will look formal and elegant with this shade. This light colour scheme will bring life to your bedroom without being too overwhelming.
Conclusion
There are so many ideas when it comes to selecting two colours for a bedroom wall like purple two colour combination for bedroom walls, orange two colour combination for bedroom walls, brown two colour combination for bedroom walls 2023, pink two colour combination for bedroom walls and many others! With the help of this blog, we hope you have been able to get some inspiring ideas for two-colour combinations. There is no denying that your bedroom is a little sanctum of comfort. The colour of the wall, the style, and the hues must all be a reflection of your personality!
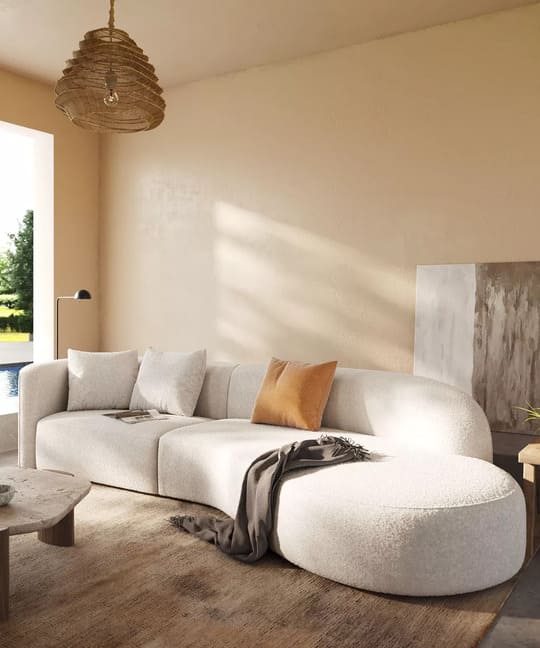
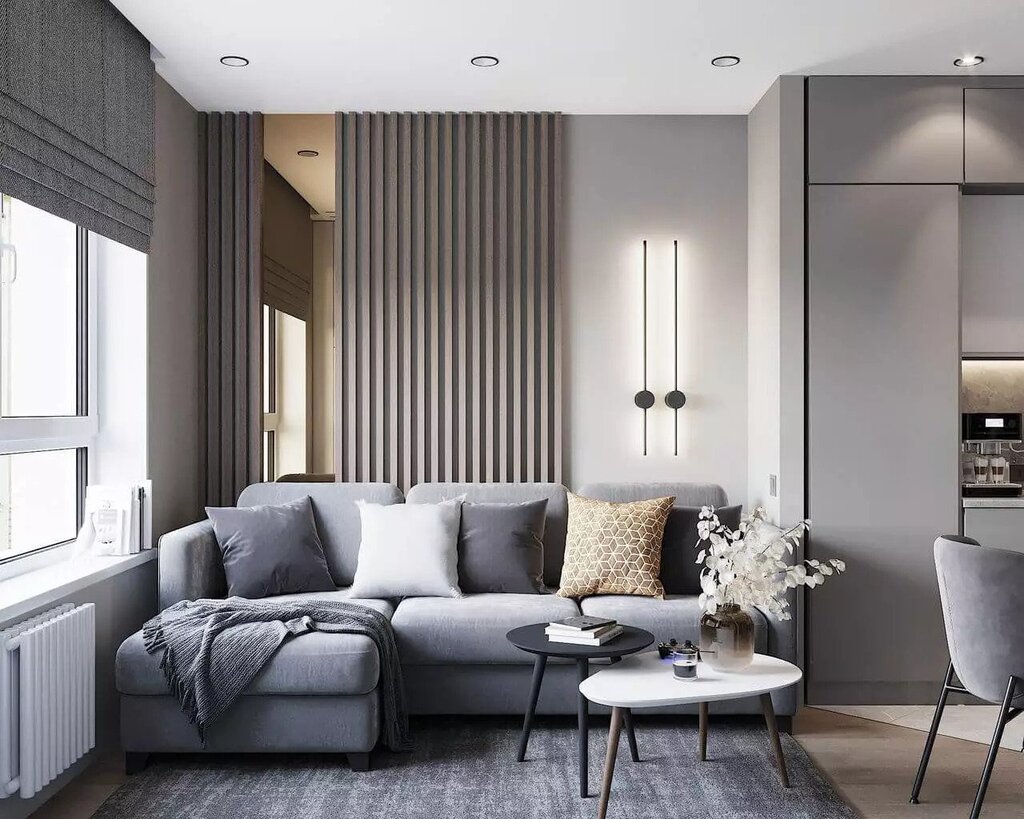
Looking to refresh your space? Living room trends this year are all about combining comfort with style. From bold accents to smart furniture upgrades, there are plenty of ways to make your living room feel updated without a complete overhaul. Whether it’s swapping in statement lighting, mixing textures, or trying out modern color palettes, small changes can make a big impact.
Today’s living rooms lean into a mix of relaxed minimalism and personal flair. Think cozy seating, warm tones, layered textiles, and curated decor that reflects your lifestyle. These trends aren’t just about looks—they’re about creating a space that feels lived-in, functional, and welcoming.
In this blog, we’re sharing the top living room trends for the year—ideas that will help you create a modern, inviting space your family and guests will love. Keep reading to discover how to give your living room a fresh, on-trend update.
Latest & Modern Living Room Trends
When it comes to decorating living rooms, there are many ways. You can transform your space into different styles: modern, art deco, loft, hi-tech. This mainly depends upon your living room interiors and characteristics and your personal taste and lifestyle.
What are the most popular living room trends? There are numerous living room design ideas and trends that you can follow to keep your living area updated. Below are the freshest and hottest trends that can be expected to see in the upcoming year. Let’s observe them all and find out the best colors, designs, and decors for your space.
1. Cocooning Bends
Generally speaking, you would wish for a simple design for your living room. But with the changing times, interior decorators today suggest experimenting with more curvaceous and free-flowing forms. This is not limited to your furniture settings. But it goes beyond that and includes lighting accessories, and much more.
You can experiment with light shades and textured materials like white and cream. While designing a sofa, ensure that it is curvaceous. It should have soft edges and rounded shapes, which will ensure that you have a great time sitting on the sofa.
2. Marshmallow Soft Furnishings
Ever considered giving your living room a cushion of soft furnishing? If not, here is your chance to do it with marshmallow soft furnishings. The key phrases here are bulging, soft, and relaxing. The objective here is to ensure that your living room is the space where you love sitting for hours in a relaxed position and enjoy healthy conversations with your partner and loved ones.
Go for white color as it symbolizes purity of thought process and makes your living room feel spacious. Along with that, go for curved sofas with oversized rounded arms. This will make your living room heaven on Earth!
3. Blue Marble Furniture
Marble has been in trend since last year. But this year, interior designers have started to favor unconventional varieties of marble. If you are someone who loves to experiment with your living room, I would suggest you go for blue stone as it looks elegant. It provides a distinct personality to your living room. You can always try experimenting with metallic finishes to give your living room a distinct look and appeal.
4. Multifunctional, Airy Spaces
Eco-friendly well-being and sustainability have become very important this year. Today, interior designers recommend having airy spaces with light backgrounds. Multifunctional spaces in the living room have gained a lot of popularity. The reason is it helps you handle many activities you can perform in your house.
5. Velvet is the Go-To Color
Velvet has been the go-to color of interior designers for a very long time. Hence, it comes as no surprise to see it finding a prominent place in the living room. Today, there is a growing demand for velvet color but with a major twist.
Velvet sofas make an impactful presence felt in the living room. You can try experimenting with creased curves, restrained fluting, and lounge latching, which gives the furniture a contemporary look.
If you are not considering purchasing furniture for your living room, we suggest you go for a velvet cocktail chair or a stylish lighting unit which can upgrade your living room like never before!
6.Try More Observant Design
This is the year when interior designers are shifting towards mindful designs that can change the perspective of your living room and give a distinctive look. It is all about creating the right ambiance instead of filling your living room with physical items.
For example, you can think about filling your living room with garden grass. It is an innovative idea (although far-stretched!) which can result in an artful effect. Think about different things that can make your living room more eco friendly.
Try purchasing decorative accessories for your living room. Alternatively, you can also go for decorating the study table of your little pal. These small touches can make a huge difference in giving a fresh appeal to your living room.
7. Use Mirrors Effectively
You are absolutely wrong if you think mirrors are just there in your house as a showpiece. Mirrors provide a distinctive edge to your living room. If you add a mirror on top of your fireplace, it will add more appeal to your entire space. Also the other benefit is that mirrors create an illusion that their space is quite spacious. This is a big advantage, especially when you can add them to your living room.
8. Green Living
Whether it is the living room, bedroom, or dining room, one thing that is going to be prompted in the interior design trends is the sustainable and eco-friendly lifestyle.
From indoor plants, furniture in raw materials to green shades, the upcoming year will be full of these things. In short, the word for the living room is NATURE & NATURAL SHADES!
Don’t hesitate to add a lot of plants and organic materials to your home. You can use furniture in natural fibers such as rattan or linens in linen or cotton gauze. These organic decors and textures will look absolutely stunning with wood, concrete, marble.
Bring life to your plain and boring walls with green shades and textures. Include earthy, herbal, or vegetal tones like sage and hues on the green/blue spectrum. These shades will look contrasting with terracotta furnishings and metallic finishes such as gold and brass.
The more green you can add, the better – so don’t be afraid to indulge green and natural materials in tactile rugs, cushions, and throws, either.
9. Modern Scandinavian Interiors
The second living room trend is the Scandinavian Interiors. This style is all about clean lines, simple designs, and minimalist color accents. From furniture, decors to interiors, expect to see many Scandinavian elements in the upcoming year.
Scandinavian style mainly consists of white walls, wood floors, modern furniture, and minimalist decor. This is because the Scandinavian winters are dark, so people living in these areas usually use light-colored and fresh interiors in their homes. You can include white, gray, and beige tones and natural materials. You can mix cozy pillows and blankets with fresh plants and wooden furniture to create this simple yet attractive interior look.
In a Scandinavian-designed room, you can also expect bare wood floors and white painted brick walls that add a rough texture while maximizing the light streaming in through large windows. One of the best things about Scandinavian style is that it goes perfectly both for large country houses and small apartments. The simplicity, natural elements, and functionality are the three key points in Scandinavian interiors.
Add ornate lighting fixtures, simple geometric furniture, and living plants, pots for a personal touch. Take a glimpse at the above living room decor with Scandinavian interiors and make an organized and comfortable space.
10. Zoning Out
We’ve been spending more and more time in our homes, specifically in living rooms. They’ve become busy offices for working, a playground for kids and entertaining spots.
So it’s pretty clear that living rooms are more than just a place to watch TV or hangout spots. So zoning out the spaces will be the emerging trend in the interior designs. You can either put a small desk for work or a multi-functional coffee table that can be transformed into a workplace. From multifunctional bedroom couches, tables to cupboard desks and built-in furniture, numerous smart pieces of furniture are available in the market.
You can divide your living rooms in three ways: paint, furniture, and partitions. Try using bold wall murals like geometric designs or accent walls. This will make lounge ideas stand out and also look separated from the rest without actually separating. The second way is to use various kinds of furniture and placing them in a particular manner.
The last way is to use room dividers and partitions. These things will instantly give your room a new look and some privacy. Use dividers made of nature-inspired materials, such as wood or rattan. This way, you can easily switch between your working area and the entertaining zone.
11. Round Shapes
We all know that interiors featuring clean lines and sharp shapes are so popular for over a decade now. The interior design will be more focused on softer and rounder shapes in the upcoming year. Living rooms will be full of round shapes, whether it’s about decorative elements, furniture, or overall interior theme.
Whenever we think about furnishings, coziness and functionality are two things that always come first to our minds, right? We always want to add comfortable and stylish-looking furniture to our living areas. So the living room ideas will feature sofas, chairs, tables, and other components of this room with round shapes.
Go with the simple, sober, and multifunctional pieces of furniture. You can skillfully decorate these pieces with the rest of the angular decors, such as picture frames, wall cupboards, and art elements. You can easily create a softer and more delicate finish with curved or rounded shapes.
12. Wallpapers & Wallcoverings
In recent years, wallpapers have become an important part of interior design. Even architects and experts also recommend using wallpapers to add some drama and character to the space. The following year, wallpapers will be one of the prominent designs in the living room.
From pretty floral, textured to patterns and graphics wallpapers, you can find wallpaper in any design and color. Even some companies offer to customize it according to your home interiors.
Not only wallpapers but the coverings made from jute, silk, linen, and cotton will also be seen in many living rooms in the upcoming year. They’re eco-friendly, inexpensive, and the easiest way to bring comfort and coziness into space.
Styles like cottagecore, Scandinavian, and minimalism will be seen in the wallpaper trends. You can decorate your family room with these modern and dramatic wallpapers.
13. Comfy Minimal Style
Whether it is a living room, bedrooms, or bathrooms, minimalist modern interior design is becoming more and more popular. Due to easy integration into various styles, this style is always in demand, especially in big cities and urban areas.
Living rooms filled with oversized couches, lots of storage spaces, and walls with many decorated pieces look so tiring and clumsy, and people are so over it. They now prefer the more clean, sophisticated, and minimal approach known as the minimalist style. As we already mentioned, the main emphasis upcoming year will be on comfort and functional space.
This decorative style mainly consists of materials like concrete, glass, stainless steel, wood, stone, and artificial materials such as vinyl, PVC, or acrylic. Minimal style is all about having a room with maximum space, large windows, and good lighting. Everything else should be reduced to a minimum, including furniture and eliminating excess decoration, optimizing functionality.
The overall look of the minimalist design is simple and concise, and it is perfect for open interiors filled with natural light. Include furnishings with smooth curves, cozy sofas, and upholstered furniture and try to highlight their minimalist lines. So, apply this new living room trend and create a comfortable and aesthetically pleasing entertainment area where you can spend your entire day.
14. More Natural Lighting
The last living room trend on our list is the lighting! We all know lighting plays an important role in creating an ambiance and mood. So, the selection of the right lighting is as important as following other trends.
As the main interior design theme of the upcoming year is minimal and soft, you can expect to see retro and contemporary lighting fixtures everywhere. So if you’re planning to remodel or renovate your living room, think about the lighting. Place your furniture in such a way that more and more natural lighting can come into the room.
Good natural lighting with artificial ones can really make your room stand out. With the help of lighting fixtures like pendant lights, chandeliers, and wall lighting, you can easily make your room appear spacious and change its environment instantly.
For example, if you want a warm atmosphere, go with simple fixtures with softer lighting. Whereas if you want a more natural and organic look, add chandeliers and floor lamps made of glass and rattan. You can also pick a particular theme according to your interiors, such as vintage, art deco, or contemporary.
Here are some more inspirations for you to stay updated with the latest and modern living room trends:
FAQs
1. What Are the Living Room Decor Ideas?
Here are some of the living room decor ideas: Mixed metal finishes Luxurious living Statement lighting Natural stone surfaces Closed floor plans Influence from the ’60s and ’70s, specifically for furniture design
2. What Are the Modern Living Room Ideas?
This year, you will see a gradual shift towards the earthy, texture-rich territory. It includes handmade pieces, customized touches, brown and wooden furniture, and neutral color palettes. These provide coziness and character to a living space.
3. What Colors Are Trending in Living Room Ideas?
Deep browns, coffee-tinged creams, earthy reds, and terracotta tones are some of the colors trending when it comes to living room ideas.
4. Is Gray Color Still in Trend for Living Room Inspiration this year?
Gray is not the preferred color. Instead, warm neutral tones are considered the best color choices for living room inspiration this year.
5. What Color Should Replace Gray for Living Room Inspiration this year?
Gray used to be a go-to color, but it has been replaced with beige for living room inspiration this year.
Final Words
So, which of Living room trends are you the most excited about? Upgrading homes with the latest trends is always fun and exciting, but it also requires proper planning and designing. The central theme of the next year will be to focus on simplicity, functionality, and the beauty of nature within the room.
You can follow the latest trends but don’t forget to add personal touches. Do your research properly, form a general picture of how you would like your living room to look, and then finally, you can start shaping your dream living room.
So these are all the latest living room trends. I hope this blog has helped you to understand the upcoming trends for the living rooms. You can easily follow the trends that we mentioned in this blog and create a comfy, stylish living room in your home. Don’t forget to share this blog with your family and friends so that they can also create warm and cozy living rooms in their homes.
Do you love the idea of owning a lovely garden but are haunted by the thought of maintenance? This has been a concern for all the gardening enthusiasts but we have something exciting with us- low maintenance front yard landscaping ideas!
Sounds unreal, right? But that’s what is going to help you in building a lively yard, filling your home with a lovely aroma, and serving as eye candy for the spectators. With our current lifestyles keeping us swamped at work, there’s very little time and energy left at the end of the day. That’s where low maintenance landscaping ideas come into the picture.
The impact of a lovely yard on enhancing the home’s curb appeal cannot be undermined. It makes it extremely important to build a yard filled with your favorite plants. Here’s a little secret: owning a yard not only keeps you active but has proven to be highly beneficial for mental health as well. Let’s jump right into the whimsical world of low maintenance front yard landscaping ideas.
21 Low Maintenance Front Yard Landscaping Ideas
Are you ready to walk on a lush green landscaped lawn? Are you thrilled to curate the design for your garden to make a statement in the entire neighborhood? Let’s look at the 21 low cost low maintenance front yard landscaping ideas to set the first steps on this journey.
1. The Cheerful Windows
Planting a colorful edge of blooming plants to brighten the gateway is one of the simplest ways to add flair to the home’s front porch. A combination of seasonal and everlasting flowers, such as hydrangeas and petunias, can be utilized for a splash of color in such low maintenance landscaping ideas, while a few evergreen shrubs provide year-round foliage.
The utilization of planter boxes on the windows is what renders this style an unmatched charm. They not only assist to decorate the entranceway, but also aid to capture people’s attention to the property. This is a fantastic method to instantly add beauty with minimal need for maintenance.
2. Step up the Design!
Exotic grasses are indeed a gardener’s greatest friend when it comes to low maintenance front yard landscaping. They’re simple to grow, appear dense and luscious even in the tiniest of places, and behold a modern, clean style that’s about all the rage right now. For a subtle and modern effect, match them with taller species for a stepped design.
3. A Symmetrical Low Maintenance Front Yard Landscaping
One thing that has never gone out of the trending list: Symmetry. Whether it’s architecture, interior design, or landscaping, symmetric design always works. It is especially suited for tiny front lawns as it creates a vista, which optically increases the area.
A conventional symmetrical pattern can be blended with casual, textural plants and a gravel walk smartly. It’s one among the extremely stylish front yard landscaping ideas low maintenance. Gardening in a simple color palette will help to create a balanced landscape. For a pristine, formal effect, choose all-white blooms.
4. Front Yard Landscaping Ideas Low Maintenance with Succulents
Are you aware of the extreme friendliness of succulents? It makes them ideal for low cost low maintenance front yard landscaping. The dramatic and impactful textures of these plants can spruce up the curb appeal of the house.
Succulents are low-maintenance plants that are ideal for tiny front yards. They have a lot of dramatic texture and look fantastic in a container or a front yard area. For a great impression, cluster succulents of different heights, forms, and colors outside the house. For a streamlined, modern design, place them in low concrete bowls exactly at the front access to your home.
5. An Eclectic Water Feature!
Running low on space but big on ideas? Believe it or not but a water feature can be placed even in a compact space to let your creativity come to life. The modest niche between the front entrance and the driveway can serve as a perfect spot for a pondless fountain. The water can be made to keep circulating by a little pump within the glazed vessel.
A tiny water feature is an excellent substitute for a rock garden if you have a shadowed location where seedlings fail to flourish. This is an ideal solution to listen to the music of water while not having to worry about its maintenance.
6. Fantastically Flowered Wheelbarrow
What could be more charming than a vintage wooden wheelbarrow brimming with blooms and vines? This charming low maintenance front yard landscaping design will work well on practically any property. While there are several species of flowers appropriate for this type of landscape presentation, petunias, fuschias, and other popular suspended basket florals look especially lovely while overflowing from the sides.
7. Of Annuals and Evergreens!
All it takes is a clever hack and you may maintain a consistent parade of colors across the year by blending flower species that blossom during particular periods. To design a luxuriant cottage yard with low maintenance demands, evergreen shrubs can be alternated with springtime blooms as well as seasonal greens.
The explosion of pastels, reds, and green does not come together to complement a house’s appearance, but it also makes it look more welcoming. The window pots can be loaded with the same perennial species as the yard’s edge, which not only catches viewers’ attention but also unifies the overall landscaping’s visual appeal.
8. A Rustic Affair!
Striking but easy, contemporary but rustic, this low maintenance landscaping features a succulent-featured lawn. Available in a wide range of colors and demanding minimal attention, this is an ideal solution for all those having a green thumb.
For the greatest effects, utilize a variety of textures and sizes, such as miniature Yuccas or Aloe Vera for height and crawling succulents to fill in the voids.
Pro-tip: Place the succulents in tiny planters and bring them home if the weather conditions are too harsh in the winters.
9. Low Maintenance Landscaping with Stones
Complement the greenery with a locally-available stone and see how the lawn is brightened up. Adjust and opt for the material that requires minimal upkeep and your low cost low maintenance front yard landscaping is ready to please your eyes.
10. A Native Yard
Pick local plants for minimal care, much like you must grow grasses that are local to your area. A native low maintenance front yard landscaping will promise you savings on money and effort.
11. The Talking Tones
What’s low maintenance front yard landscaping without a splash of color? While the evergreens are there to prevent the lawn from seeming bleak, add vibrant flowers that speak for the beauty of nature.
Ranging in their tones, textures, and sizes, create a smart mix of the species that are easy to maintain and thrive in the local weather conditions. Mismatch the blooming beauties with non-blooming plants for eye-catchy but low cost low maintenance front yard landscaping.
12. Let them Climb up the Walls!
Are you seeking a way to conceal an unappealing fence, wall, or postbox? How about letting your favorite climbers do that for you? There are numerous climber species with gorgeous flowers reaching up the walls. Keep in mind to choose the one that is suitable for the weather conditions of your locality.
For the greatest results, nurture them in cold, wet soil and give it lots of suns and you’ll be treated with a profusion of colorful blooms every summertime. While pinkish and lavender are the most prevalent colors, flowers come in a variety of colors and forms, ranging from white to brilliant red or yellow.
13. A Whimsy Upcycling
Cycle around the vintage landscape with a planter composed of an antique bicycle. This low cost low maintenance front yard landscaping will add a bit of quirkiness to the yard. You may create a whimsical upcycled decor by changing the bicycle’s front carrier and back seat into swinging baskets.
Use colorful plantings and lean them against a solid contrasting surface. Rustic features can be used to develop more touch of elegance. Consider using a high-quality potting mix that is easy to drain yet retains moisture to keep the blossoms cheerful throughout the seasons.
14. Modernly Staggered!
Does a planter always have to be typically boxy? Not anymore! Creativity and innovation have taken over the conventional with a modern twist. Consider low maintenance front yard landscaping ideas with modified planter boxes.
Stagger the typical look of the planter and create small but multiple bases for succulents around the border. This modern design in the planter wall has a basic and clean appearance that goes well with the landscaping. You can go for the species that are particularly well suited to your environment instead of foreign plants.
15. Small yet Bold
Do big plants belong to a little front yard? Why not! Instead, a large number of tiny, low-growing species will make the small front yard appear considerably smaller. Many tiny pots are also a high-maintenance alternative, requiring constant watering.
So, even for the tiniest of the front lawn, go bold. The tall, prickly palm trees contrast beautifully with the well-kept grass and make a statement within the limited space.
16. The Fun Zoning!
Have fun and create different zones for multiple activities on your front lawn. Dedicate a flower bed with edging. The edging will aid in easy maintenance and offer a lovely form for the plants to grow.
17. Japanese Zen!
Japanese-inspired zen concepts are ideal low maintenance front yard landscaping ideas with a soothing effect on your mind. The mix of pebbles, slow-growing trees, grass, and moss is low-maintenance and extremely beautiful. These designs don’t take up much area and can be added to even the smallest lawn. Japanese plants require little to no trimming, which means reduced effort for you.
18. The Statement-making Tree!
There’s no rule stating that the incorporation of multiple species will make the landscaping look enticing. The job can be done with equal charm with a well-placed tree. Go for a unique but native species of such a tree that has a one-of-its-kind appearance that makes it stand out from the rest.
Whether you have a tiny lawn or a huge garden, one such tree is enough to create a lovely manicured effect. This is a smart low maintenance front yard landscaping idea that is functional and equally beautiful.
19. The Petunias Porch
Can you think of anything better than the lovely petunias sprawling across your porch? Probably not! Front yard landscaping ideas low maintenance can offer a colorful delight to your garden. Whether you lay a flower bed or hang them in baskets, these are sure to catch attention and enhance the overall visual appeal of your house.
With optimum tolerance to dry soil and long-term blossoming, these are an ideal choice for your garden. This front yard idea apart from being highly utilitarian also aids in stylistically binding the property and lawn together.
20. Say No to Fuss!
Add a burst of color to the landscape without breaking a sweat. Go for the non-fussy species that bloom throughout the year to add extra life to the yard.
21. A Potted Low Maintenance Front Yard Landscaping
Pots are the ultimate solution for low maintenance front yard landscaping. They can prove to be multi-functional by integrating into the landscape. These are very simple to move about allowing you to relocate them to the patio if you’re throwing a party there. Sync the flowers with the seasons for an endless pop of color on your lawn.
4 Tips for Low Maintenance Landscaping
Low cost and low maintenance gardens can be made possible with these simple 5 tips. Follow them and see your dream come true!
1. Skip a Large Lawn
It’s the lawn area that demands timely maintenance. How about keeping its size low and investing in plants or other fun outdoor spaces? A clever hack to offer you the luxury of a lawn with a provision to host multiple activities.
2. Mulch the Plants
Want to get rid of weeds? Keep mulching the plants. Not only will it eliminate weeds from the lawn, but also make your plants less thirsty.
3. The Trick to Pick
An easy hack for low maintenance front yard landscaping is to choose plant species that demand no maintenance. Once planted , these must grow on their own without you having to keep a daily check on them. Native species can serve you with the luxury of little or zero maintenance.
4. The Slow Watering!
The daily need for plants to be irrigated can be a task with busy lives. Pick the ones that demand minimal water or opt for drip irrigation to keep your plants happy and blooming.
Paint the Picture of Tailored Landscaping!
Low maintenance front yard landscaping doesn’t limit your creativity. Rather it’s an expanse of innovation with smart work. With these inspiring ideas, invest a few minutes to set up the lawn and sit back to enjoy the magnificent views it’ll offer in return. And the best part? Everything runs on low cost and maintenance! You can also read farmhouse front door ideas.
FAQs
Which Plant Species Are the Easiest to Maintain?
Undoubtedly succulents! All you need to do is place them in a suitable location and they’ll grow without creating any hassle for you.
How to Select the Plants for Low Maintenance Landscaping?
The easiest way is to go local. As local species are adapted to the environment, you don’t have to worry about them getting dried up. It also follows the path of sustainability.
Can I Own a Large Lawn Without Having to Maintain It Daily?
Yes. If you’re a grass lover, opt for laying artificial grass and there’s nothing to worry about for decades to come.