Home Blog Page 154

Hat Storage: Hang Em’ Up With These 20 DIY Hat Racks ideas!!

0
hat organizers

Hats are such a functional and trendy fashion item these days! From saving you from a bad hair day to uplift your whole outfit look, hats are quite handy and useful. Furthermore, wearing a hat also protects our heads from the harsh sun. So, it will be no surprise for us if you have a lot of hats in your home! In fact, I do also love hats, and over the years, I also have collected a decent number of hats. 

Hats can create a mess…a huge mess…if you have no place to store them. Yes, that’s the only drawback with the hats that they can instantly create clutter and mess. So what’s the solution? The answer is simple- Get a hat rack! 

A hat rack seems like such a simple item to have in your house. It consists of multiple hooks to hang our and our guest belongings, and we usually placed it in an entryway. But this single simple organization item could have a significant styling effect.

So add a hat rack in your home for better organization. But wait, why buy a new one when you can DIY it! Just with simple things that are already in your home, you can actually create many useful things with simple DIY skills. A hat rack is one of many things that you can build from your creative ideas.

Are you looking for inspiration? Today we have collected twenty creative DIY hat rack ideas that you can build in no time. The main advantage of making your rack is that you can decide the exact size, design, and shape. 

20 Cool Hat Rack Ideas of the year!

So, grab all your baseball caps and fedoras off of the floor and get ready to organize your stylish hat collection with these awesome hat rack ideas. These rack ideas we are about to show you are not only for the hat, but also you can hang your baseball caps, scarfs, coats, purses, bags, jewelry, ties, and many more. So, let’s have a look at these innovative ideas:

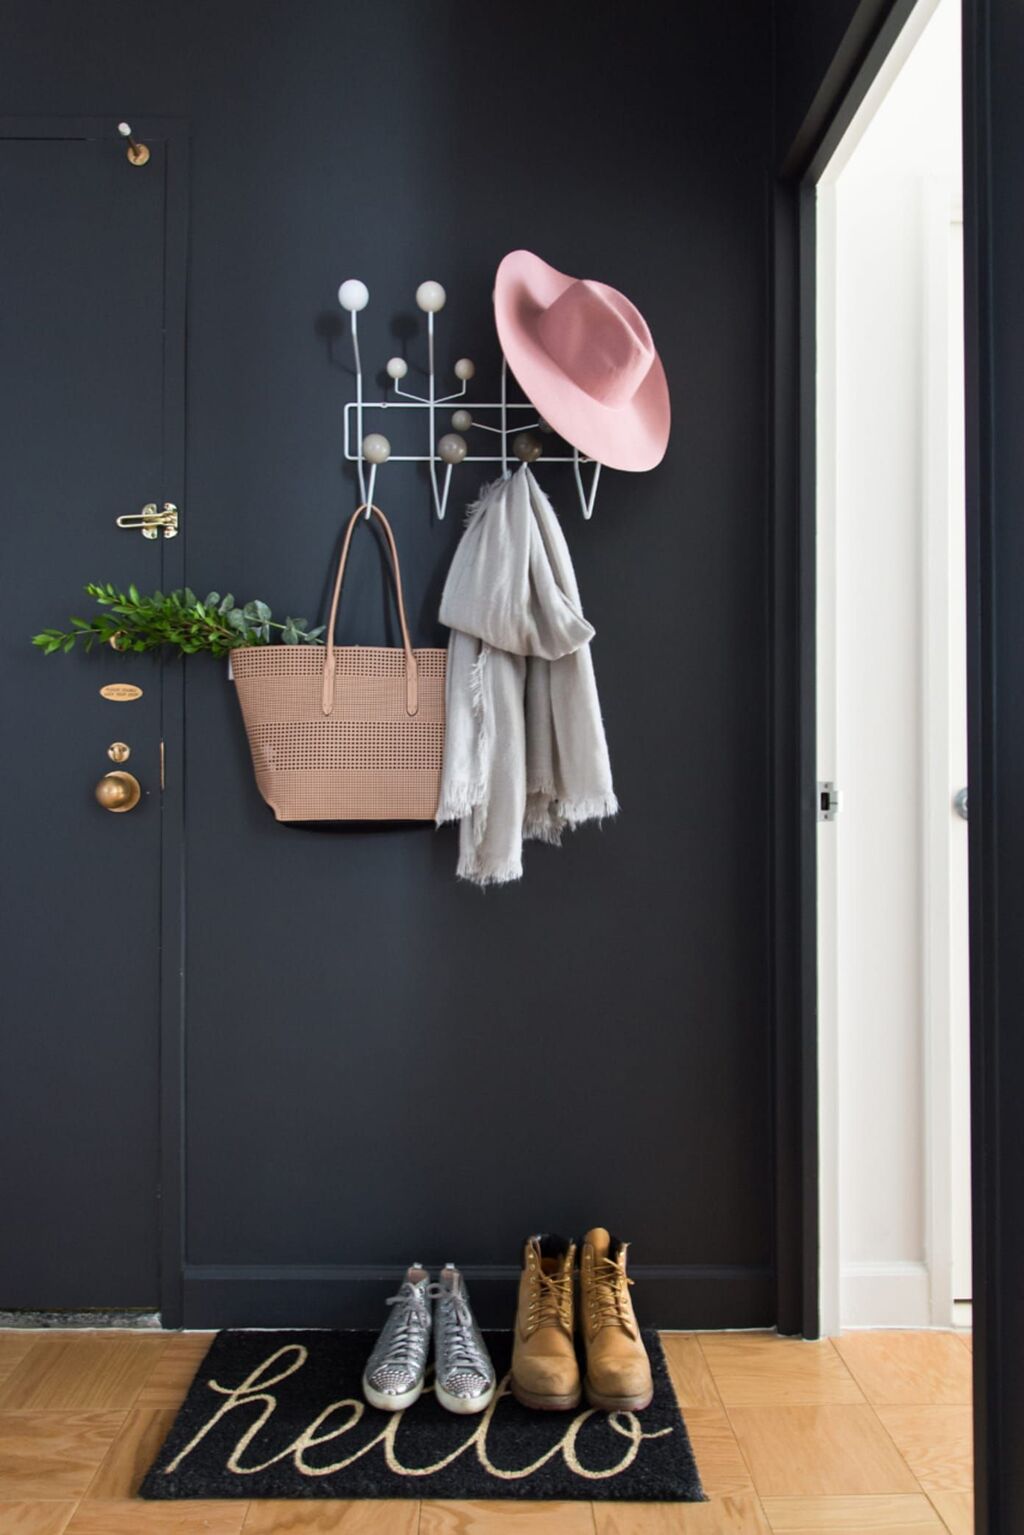
1. White Retro Hat Rack

White Retro Hat Rack

Simple but really eye-pleasing, this rack is perfect for those who are looking for something old and in retro style. The white hooks are directly attached to the wall, and they look absolutely gorgeous against the dark wall. This creates a balance, and the rack looks simple, yet still looks elegant. 

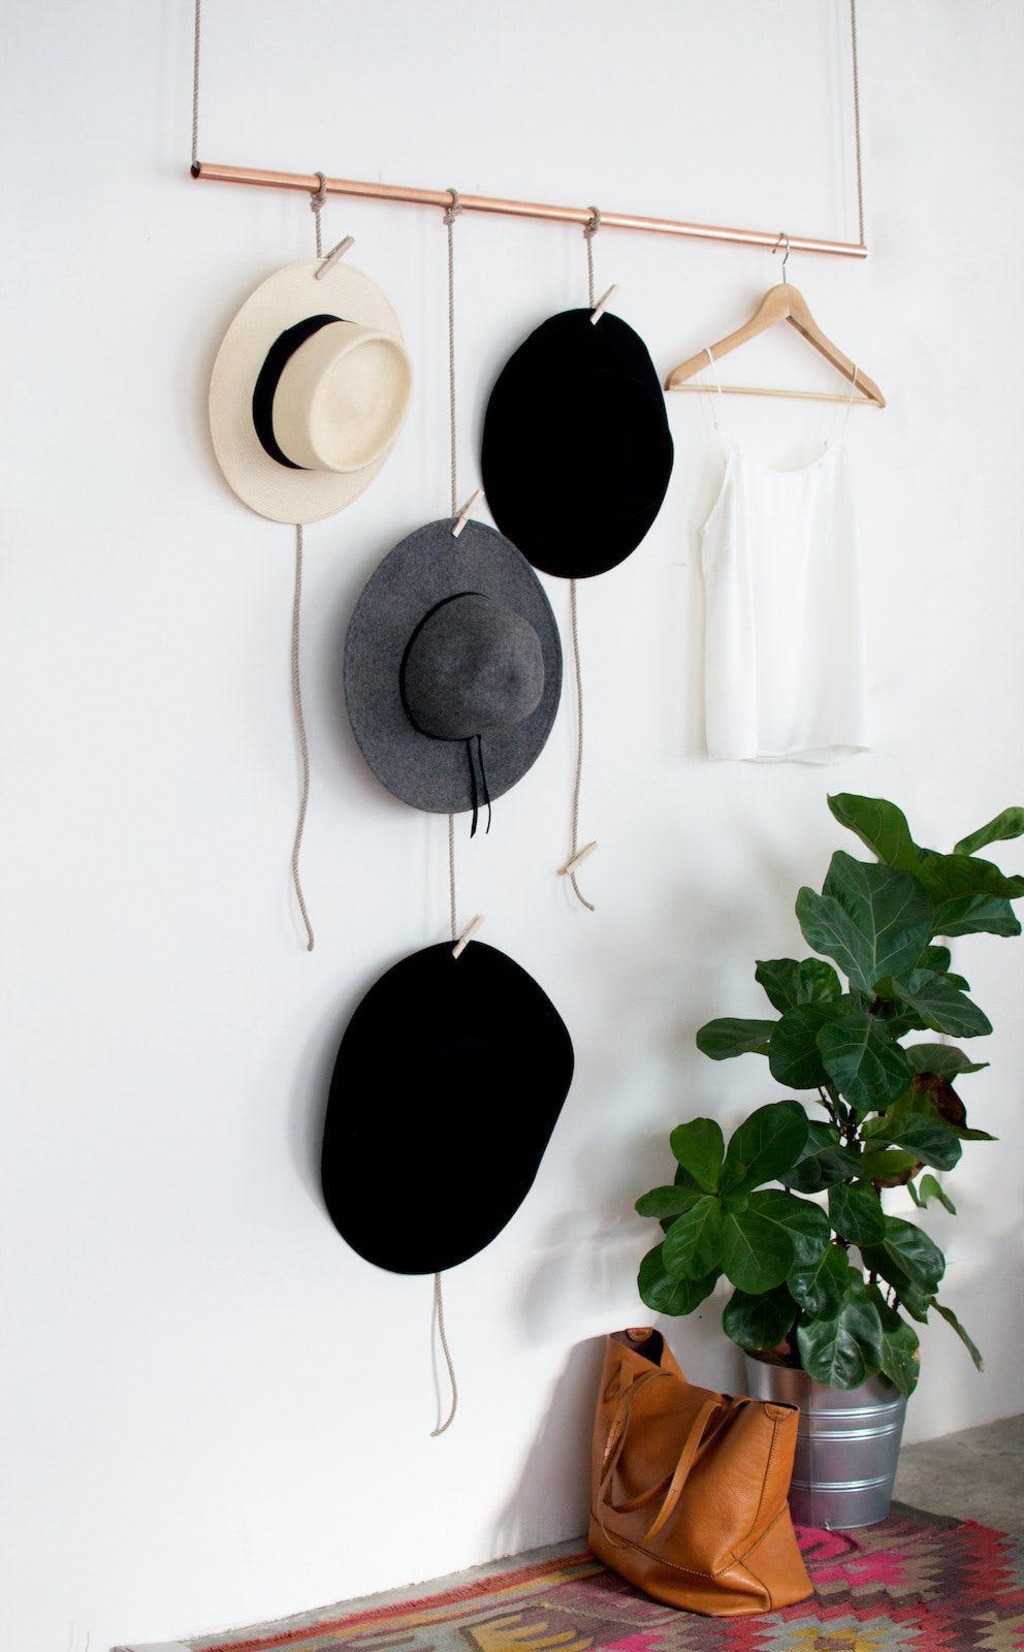
2. Stylish Copper Hat Rack 

Stylish Copper Hat Rack 

To create this minimal design hat rack, all you need is a piece of copper and some rope. Very stylish, very classy…this copper rack is super easy to make. So, decorate your foyer, studio apartment, dorm room, or bedroom into something a little chicer and organized with this rack. 

3. Simple Hat Hanger Ideas with Clippers

imple Hat Hanger Ideas with Clippers

Gather all your hats and get them in one place well organized by this hanger. Super easy to make, this hanger will keep all types of your hat in one place. Also, you don’t need many tools or various materials in order to make this minimalist hanger.

Just thin strings and clippers to hang all of your fancy hat collection and your wall will look stylish than ever. 

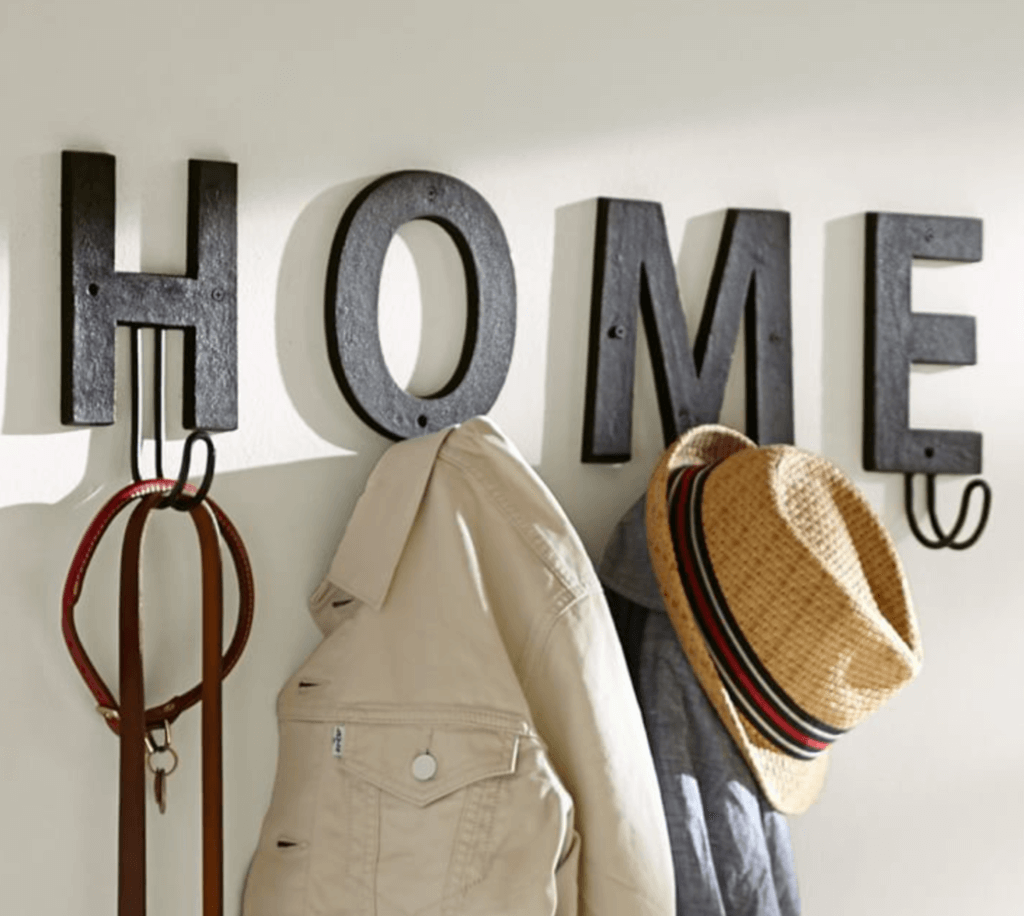
4. DIY Hat Rack Made of Letters

 DIY Hat Rack Made of Letters

This rack is made of letters. Here it says H-O-M-E, but you can design the letters as you like it, such as L-O-V-E, P-L-A-Y, or S-L-A-Y. 

You’ll need cable cutters, cord pliers, heavy metal cable, layered telephone angling, tape, and also a cable to create this piece of art.

5. Hooks Mounted On Solid Wood

hat rack ideas

Simple and sober, these two words describe this rack perfectly. As you can see, the hooks have been placed on the wood’s surface, which is later mounted to the wall. The whole process is not that complicated. 

You require a wood board, hooks, screws, nails, adhesive. First, fix the hooks on the boards at the equal distance, then let it dry. After this, fix this board on the wall with some screws, and your hat rack is ready! 

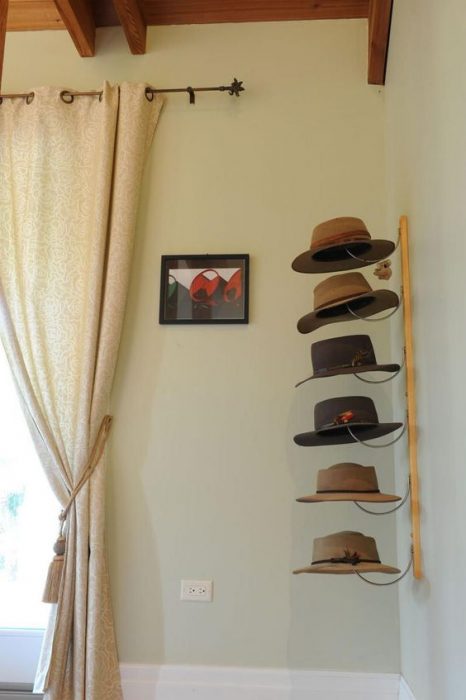
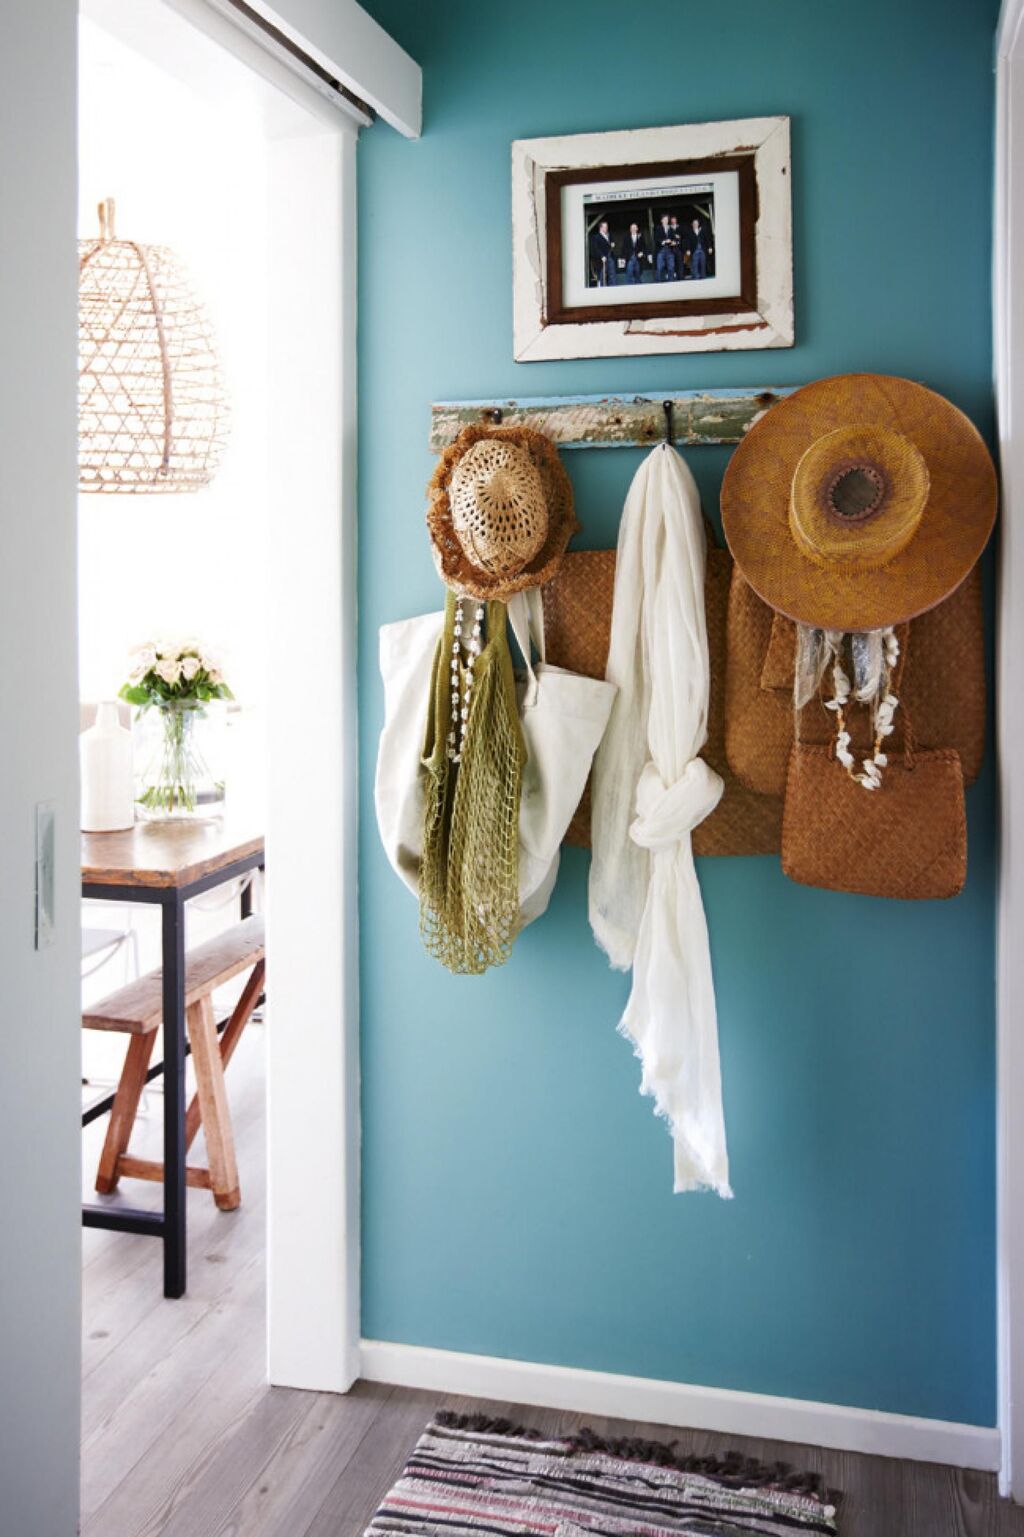
6. Vintage Brass Hat Holder

Vintage Brass Hat Holder

Look at this beauty! Isn’t it gorgeous? It will give your space a glamorous and industrial edge. It is made from metal c-shaped hooks, and it will well support all your cowboy hats. The exposed wooden beams are giving a rustic character and warmth you the whole area. The ivory wall and cream floral-patterned old curtains are completing the whole look. 

7. Creative Trophy Hat Rack Idea

Creative Trophy Hat Rack Idea

Have a lot of old trophies in your house? If yes, then create something creative and useful from them instead of throwing them away. Isn’t it a clever and unique hat rack?

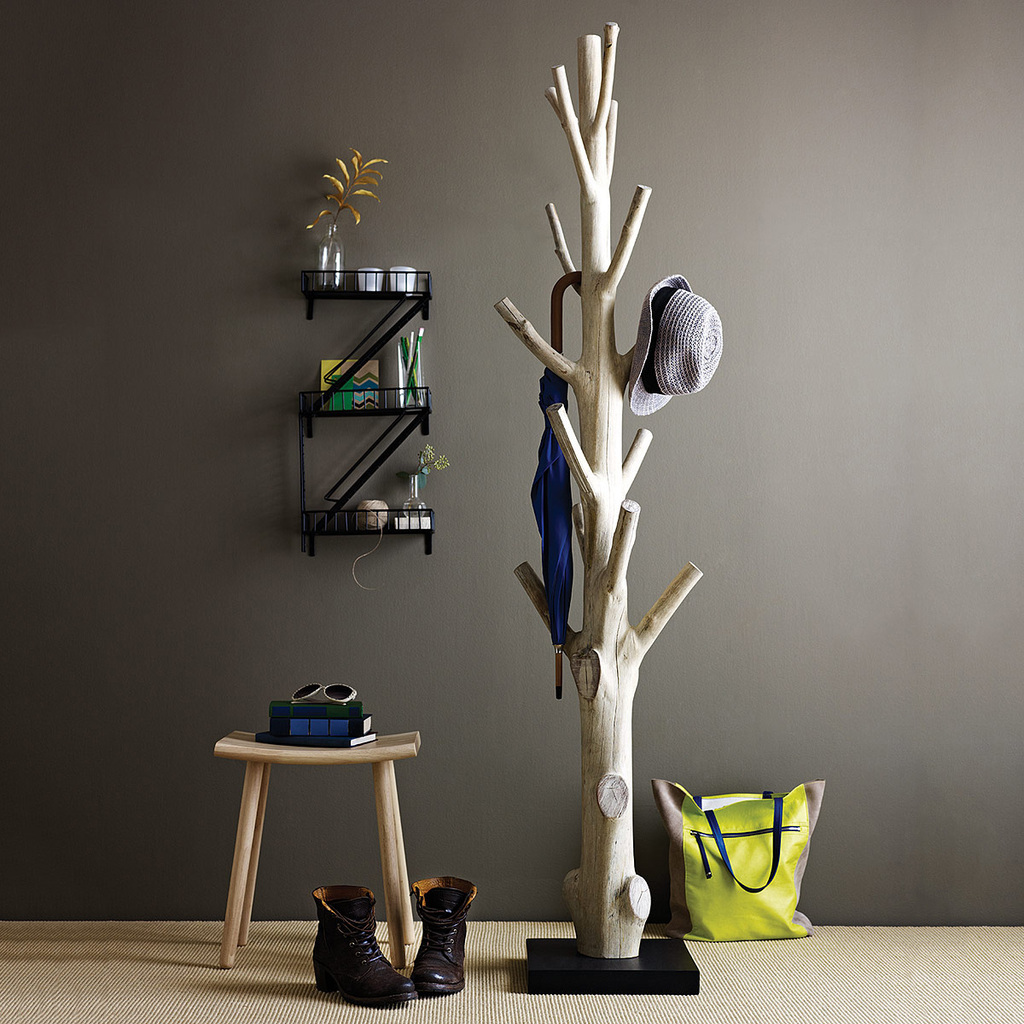
8. Tree Trunk Standing Hat Rack

Tree Trunk Standing Hat Rack

Want to be connected with nature? Bring the greenery from outside to inside. This idea utilizes a tree trunk on top of a black painted wood board. To make this, you’ll need a wood board, a tree trunk with as many branches as possible, and paints in various colors. (Please don’t cut down a green tree, use an old tree trunk!)

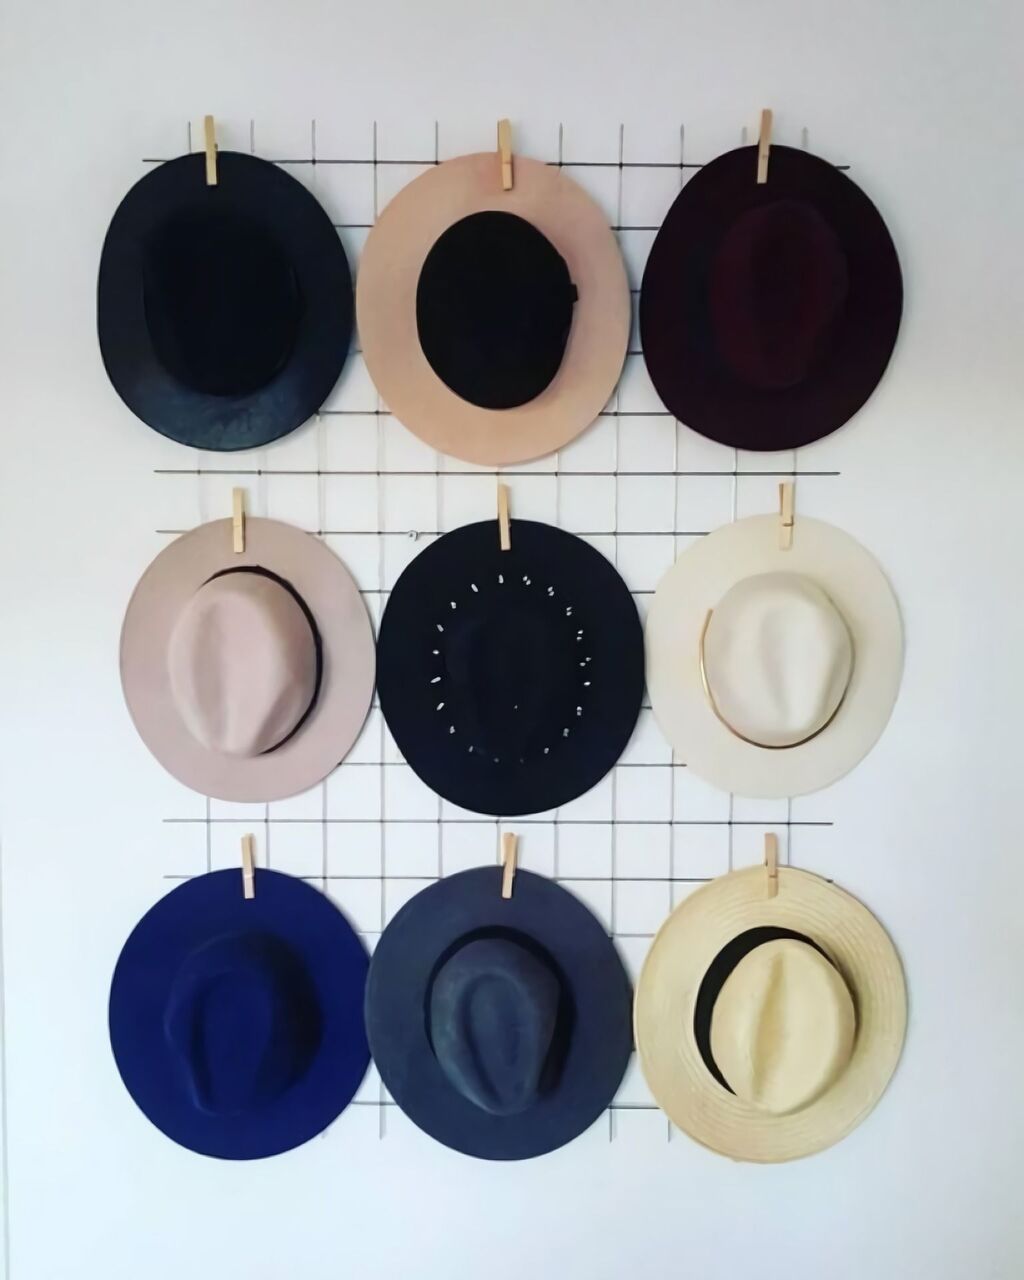
9. DIY Wire Hat Organizer 

DIY Wire Hat Organizer 

Have you ever thought that a simple metal wire sheet and laundry clips can be made into a beautiful hat rack? Yes, take a look at the above image. Just stick the wire to the wall and hang and arrange the hats in any formation you like to create a pretty display.

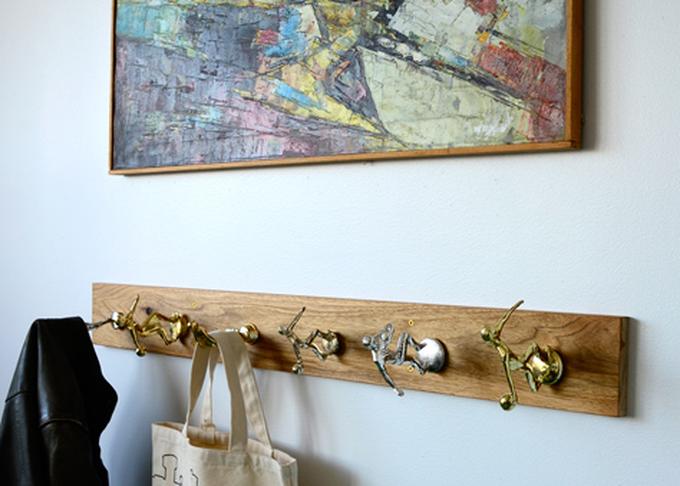
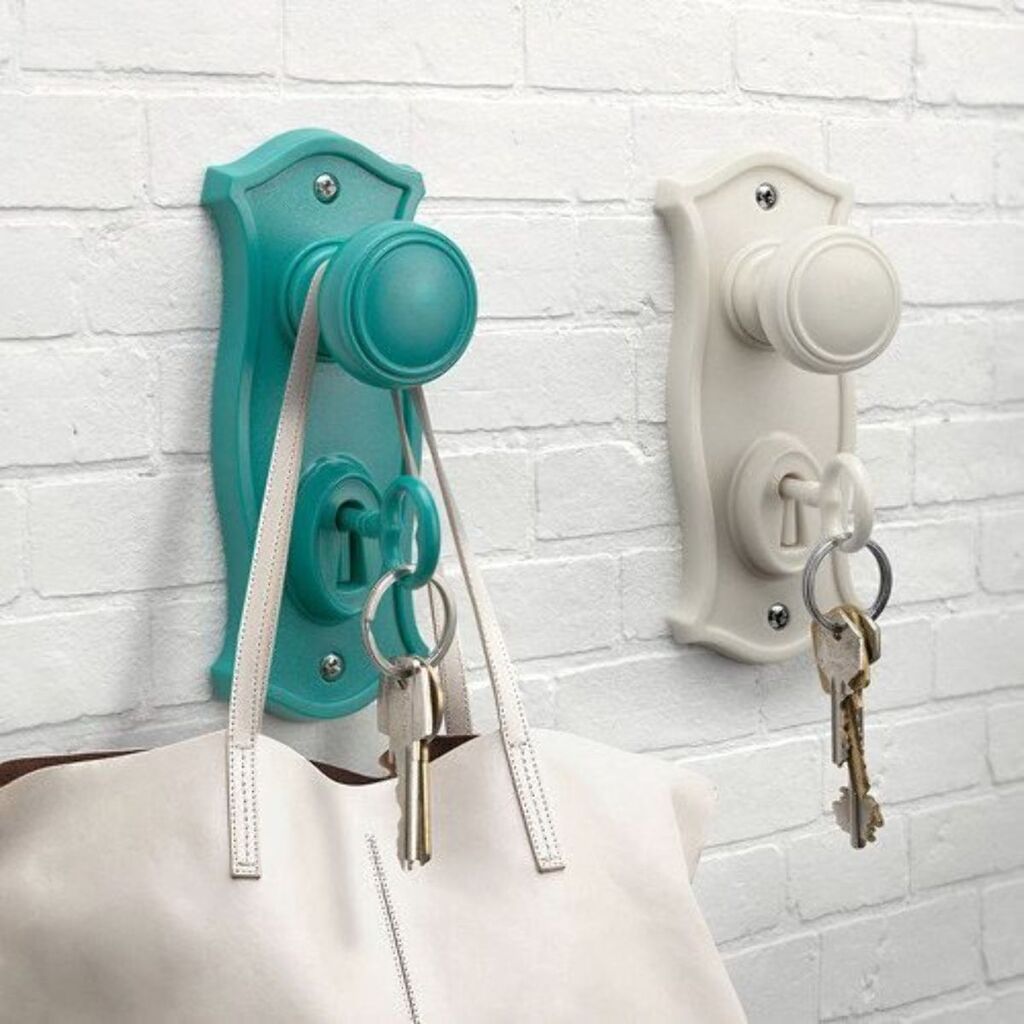
10. DIY Key Holder Hook Organizer

DIY Key Holder Hook Organizer

Another budget-friendly and creative way to organize your hats is this pretty hat organizer made from old door locks. These handles can be used to hang anything from bags, coats, and, most importantly, hats. 

These locks are installed on a wood board; then, it is connected to the wall using a strong adhesive. This will give your room a modern vibe. 

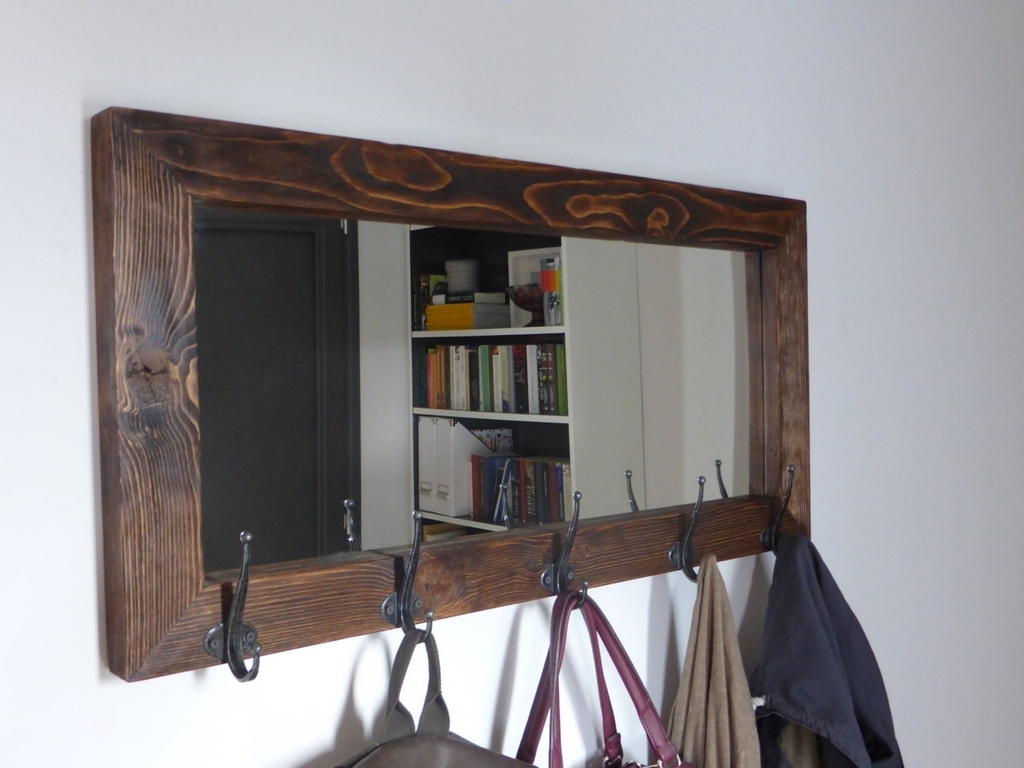
11. Classy Mirror Hat Hooks

Classy Mirror Hat Hooks

Reuse your full-length mirror as a hat rack by placing some hooks on it. It looks pretty simple, but it will bring coastline vibes. This idea offers you simplicity and elegance, so try this one. 

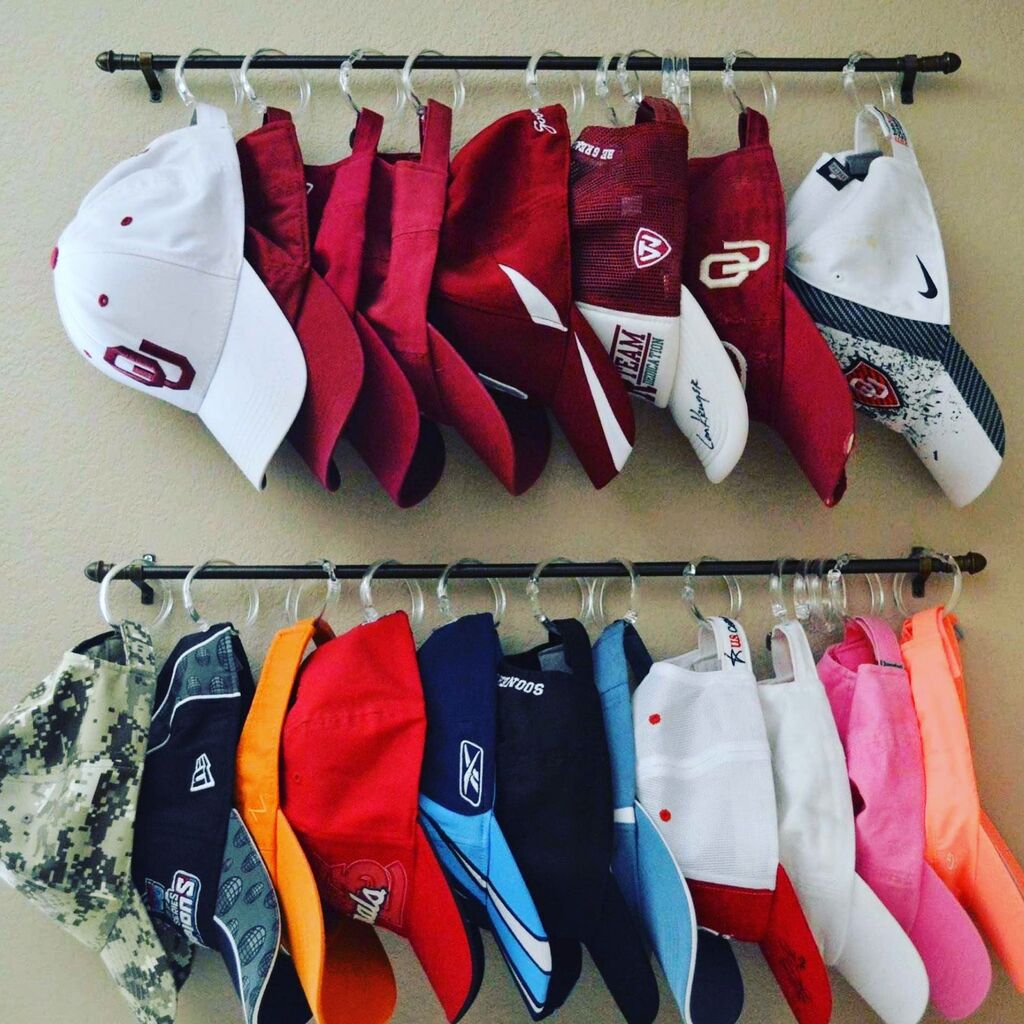
12. Hat Organizer for Small Space

Hat Organizer for Small Space

Have lots of hats but short on space? Don’t worry; this idea will work for you. This is a two-layer rack that will help you to stay organized without taking up much space. The long thin steel rods give an industrial aesthetic, and plastic rings manage all your hats. 

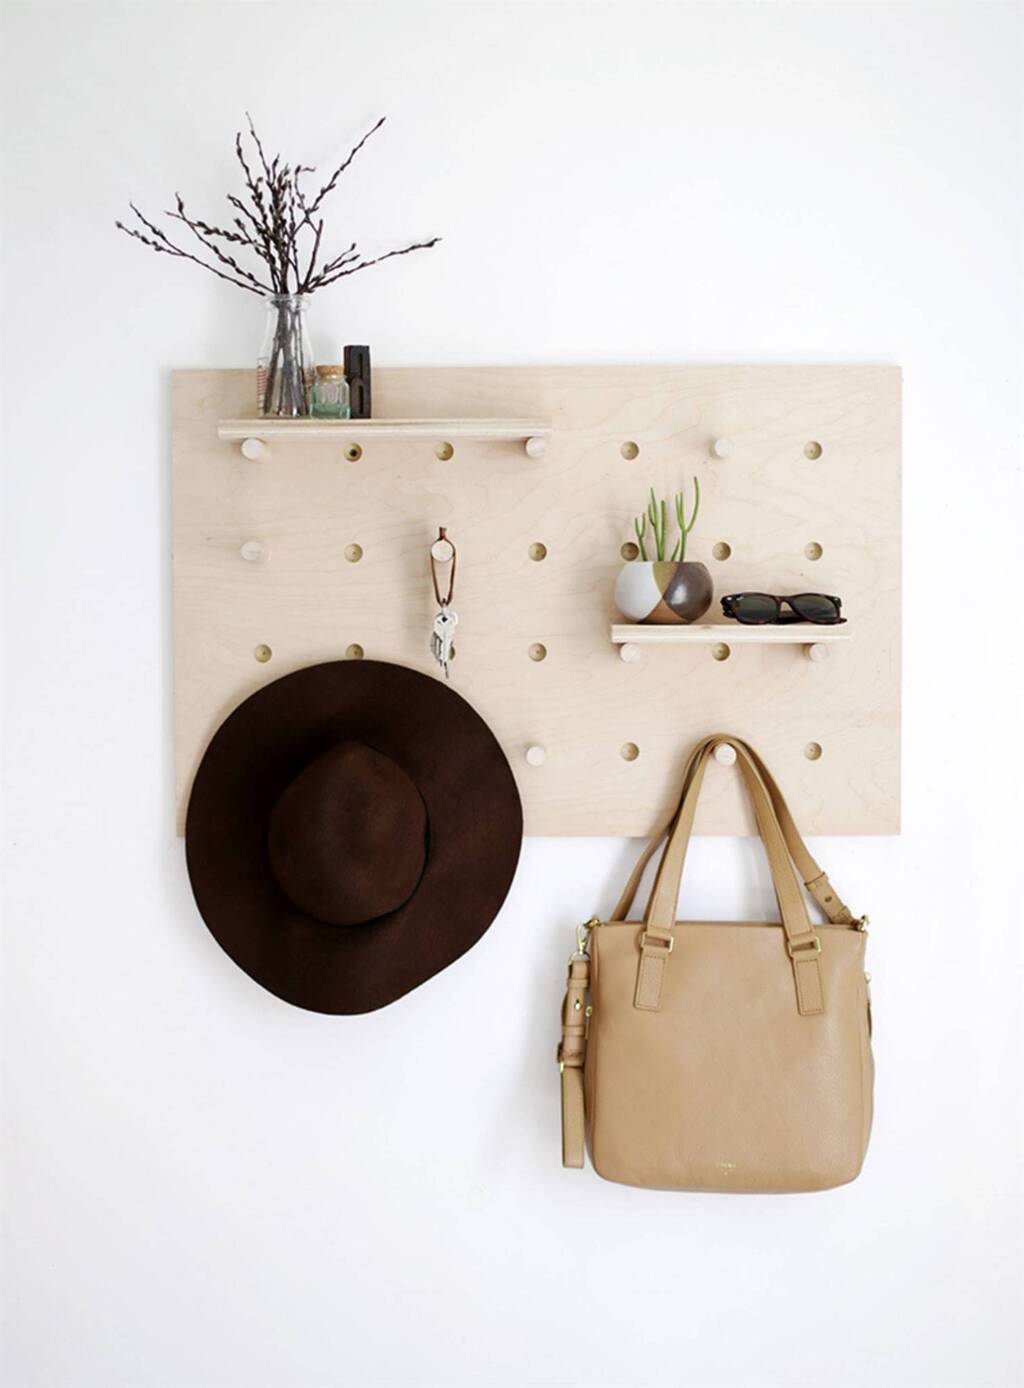
13. Modern Wooden Pallet Hooks

Modern Wooden Pallet Hooks

Love the minimalist style? Try this type of hat rack organizer! First, take a wide wooden pallet and then drill holes at equal distances. After this, insert cylinder-shaped woods into the holes.  And your minimalistic looking hat rack is ready to use! 

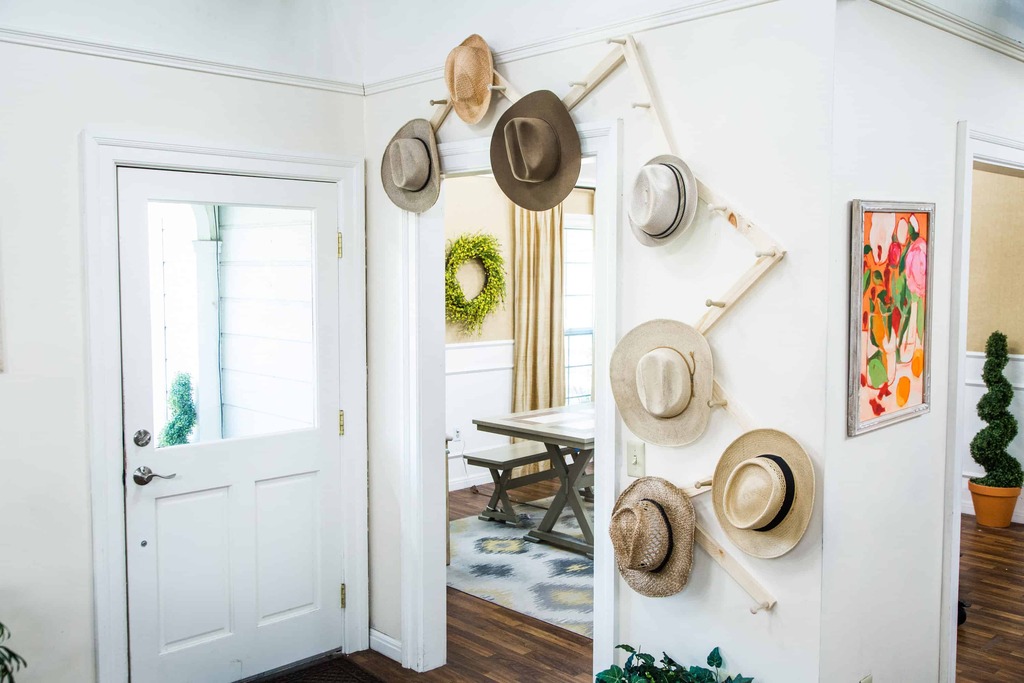
14. Trendy Family-Style Organizer

Trendy Family-Style Organizer

This is another great imaginative idea on our list; I personally love this one. Going in a zig-zag pattern all around the door. It can hold many hats and this is a quite trendy and useful rack. 

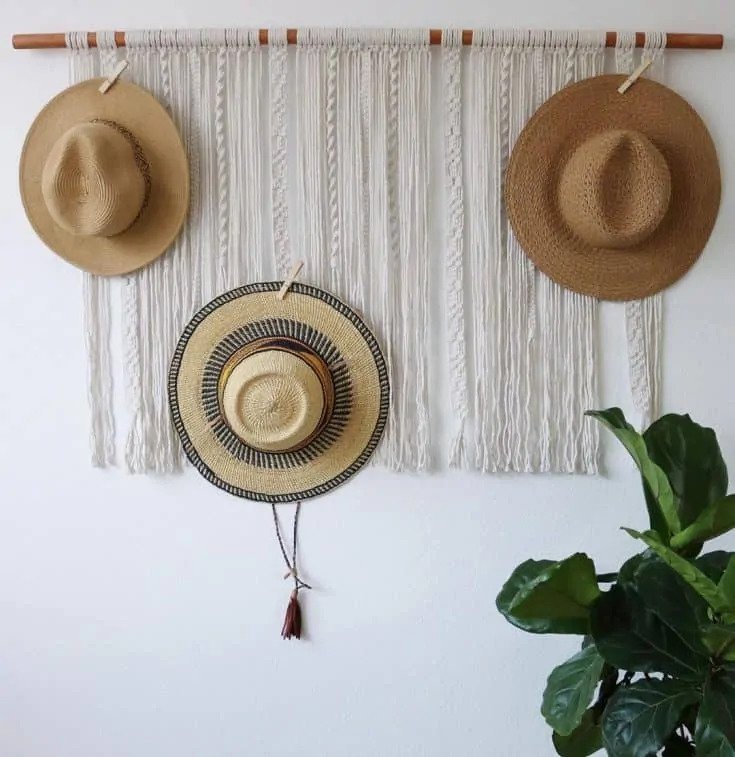
15. Bohemian Wooden Bar and Linen Hat Hanger

Bohemian Wooden Bar and Linen Hat Hanger

Here the hats have been placed on a wall hanging, which is made from pretty ropes. You can simply use laundry clips to attach the hats on the linen. This bohemian hanger is perfect for displaying wide, elegant hats.

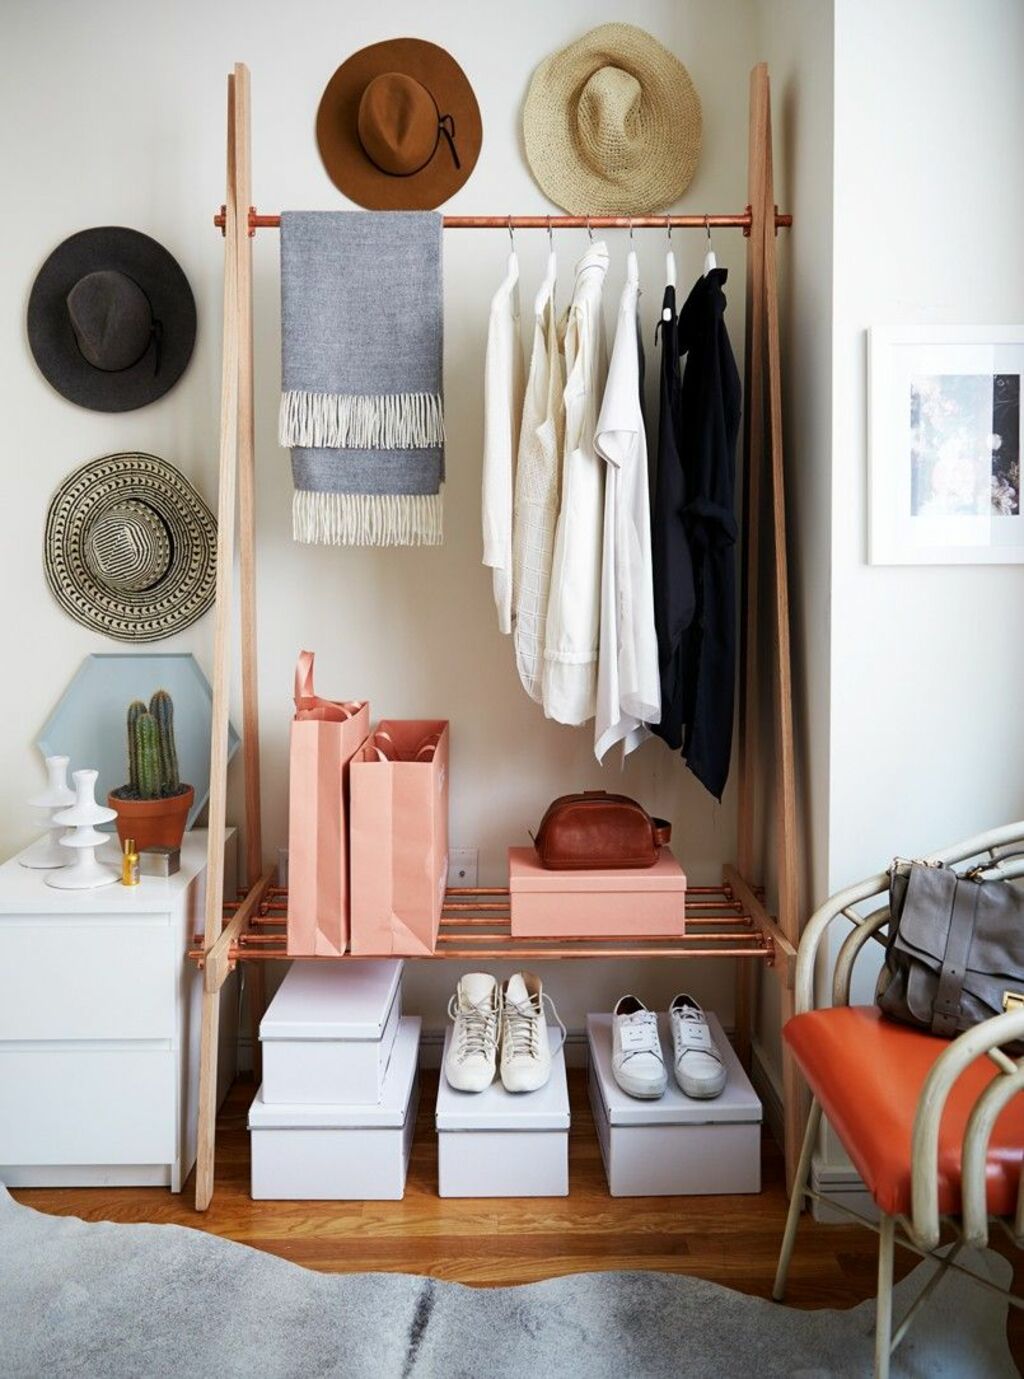
16. Hat & Clothes Rack

Hat & Clothes Rack

This idea will work for you if you have less number of hats. You can just hang them around your cloth rack. They’ll not take too much space and look neat and tidy. They can be easily hidden among your clothes or at the corner of your room.

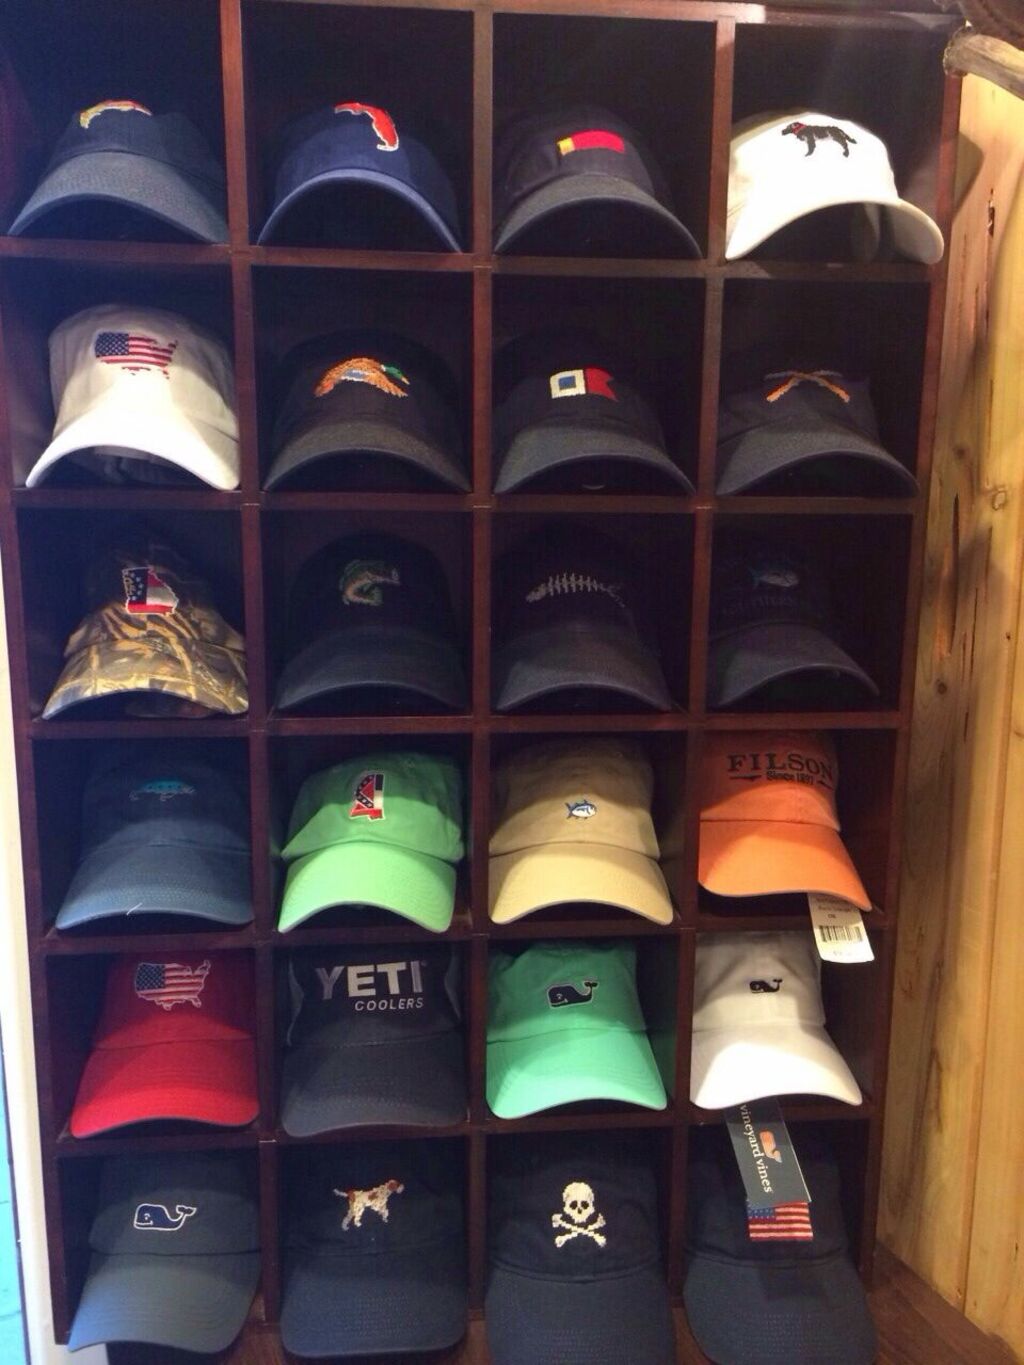
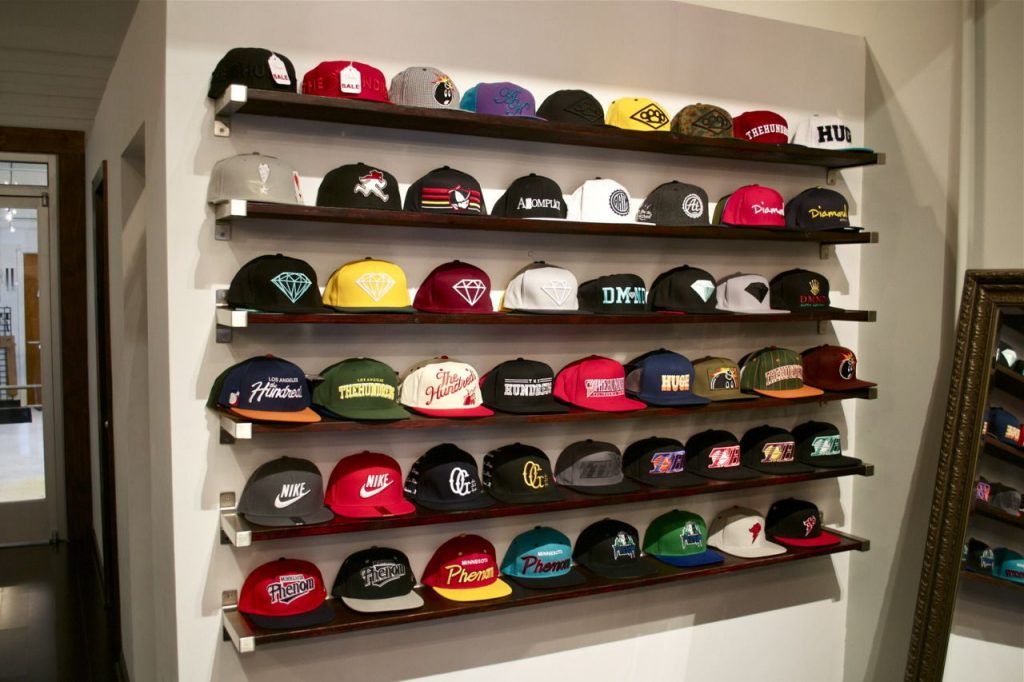
17. Space Saving Baseball Cap Storage

Space Saving Baseball Cap Storage

Do you have dozens of collections of hats at your home? This will save you a lot of space and wisely organize all your hats. It has a lot of compartments to store all of your hats. But this rack idea needs some carpentry skills. Worry not if you don’t know; just take help from your dad and build this kind of stylish looking rack. 

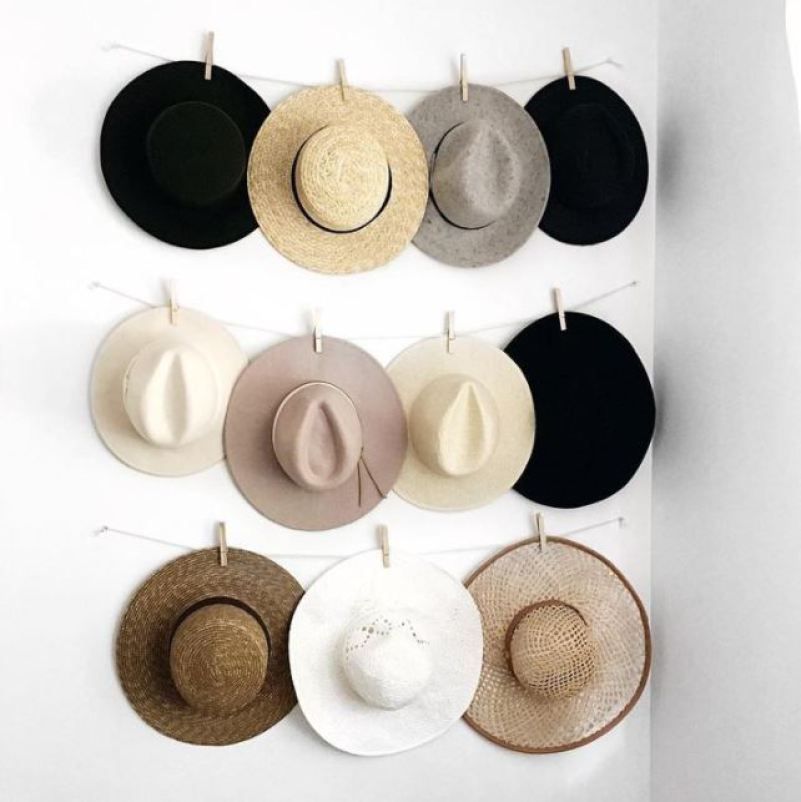
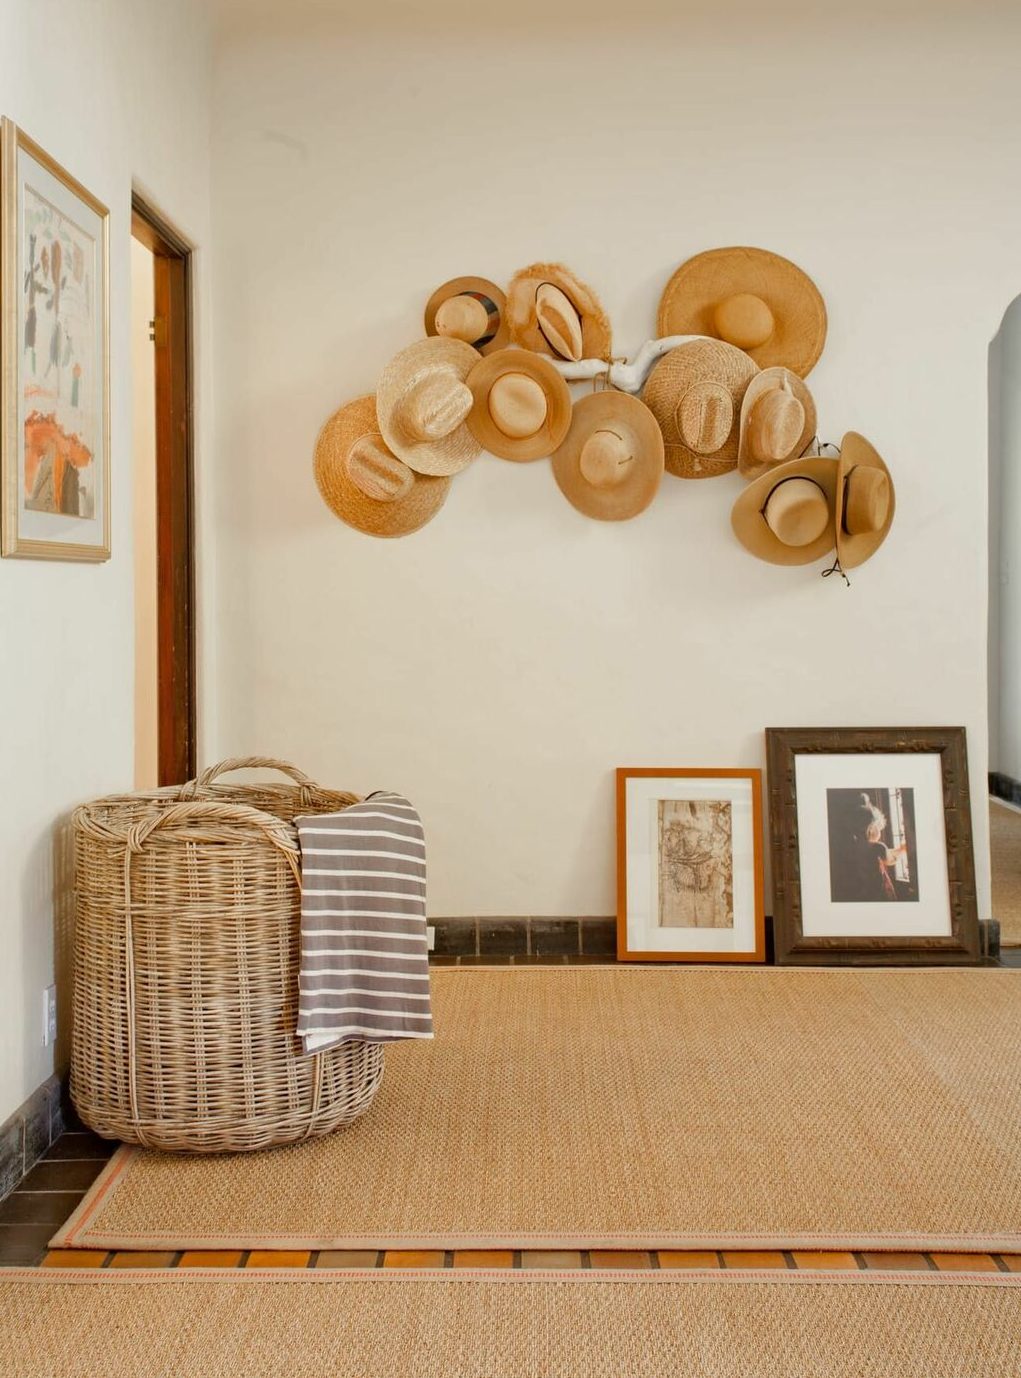
18. Fancy Decorative Mediterranean Hat Rack Ideas 

Fancy Decorative Mediterranean Hat Rack Ideas 

It is an art.. no, it is a hat rack…what is it? Actually, it is both! Here, the hats in the same color and style are placed decoratively. Pretty impressive, right? It can be used both as decorative and functional.

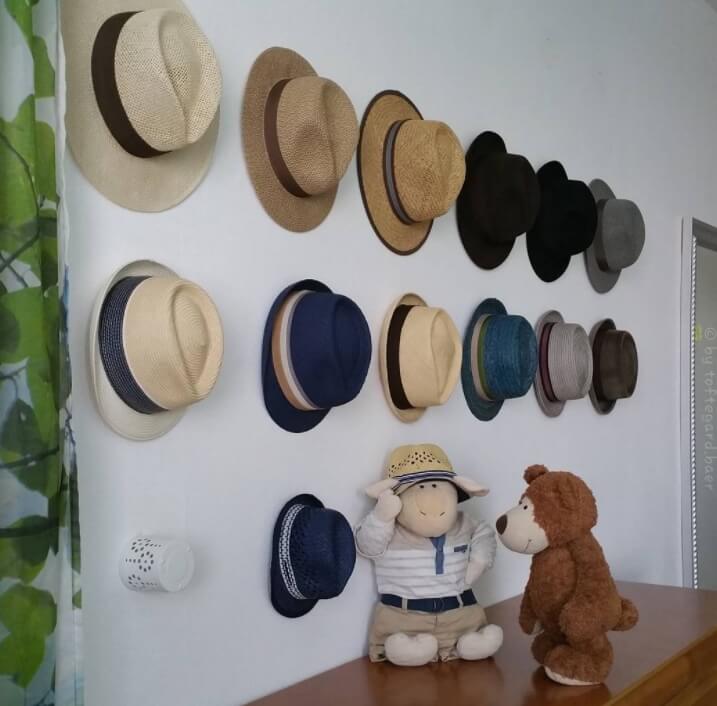
19. Clean Hooks on The Wall

Clean Hooks on The Wall

Do you have a habit of keeping everything in order? Build this type of rack within minutes. Just place some nails on one wall in the same manner, and it is ready! Now all your hats will be well organized, neat, and tidy. 

20. Showcase Your Hat Collections

Showcase Your Hat Collections

Instead of keeping all your hats in storage boxes or baskets, why not showcase them all! Yes, it will look super trendy, stylish, and you can see all your hats at the same time. This DIY project won’t take much time, and it will display all your hat collections in a cool way. 

Conclusion

Which of the hat rack ideas from the above do you like the most? All the ideas presented here are simple, but it does require your attention to make it functional and decorative according to your space! 

Racks are very important as they organize not only the clutter of your hats, but also store jackets, coats, bags, scarves, and ties. So get all your accessories organized in a decorative way by these wonderful rack ideas.

After looking at all these various and unique types of hat racks, you already found the one that you are looking for. After all, all of the above ideas don’t require any advanced woodworking skills; you can simply make a hat rack of your choice with minimal material that too in no time!

Explore More

Tips to Quicken the Construction Process

0
Tips to Quicken the Construction Process

In the past, construction used to be very time-consuming work. Though you may find construction masterpieces erected centuries ago, they will be few and far between. It is because the construction industry fell short of adequate equipment. The workers had to undertake nearly all the work with their bare hands.

However, times have changed now. The construction process is far less hectic compared to the past. All thanks to the availability of the latest machines at job sites. If you are also one of those contractors who typically lag behind their schedule, you should consider the following tricks to fuel the construction speed:

1. Maintain Transparent Communication with Clients

Maintain Transparent Communication with Clients

According to a well-documented study, miscommunication with the client accounts for the loss of nearly 177 billion dollars every year in the construction industry. It is a staggering figure. But poor communication not only comes up with significant financial repercussions; it also delays the overall project. More so, when contractors have to bear with the midway changes. That is where maintaining full commutation with the client can come very handy.

One way to convey your message correctly is to minimize the usage of industry-oriented words, aka jargon because they would barely make sense to an outsider. If simplifying the language does not get the job done, guide your clients through drawings. They help break down the complex concepts, thereby leaving no room for the communication lapses to occur.

2. Opt for Off-Site Construction Method

Opt for Off-Site Construction Method

Construction falls into two categories, namely, on-site and off-site. On-site construction refers to the process where the workforce performs every activity at the site. The biggest problem with the on-site method is that it can take things quickly out of your control. For example, you are all set to be caught off-guard in the face of unexpected rain. The raw material will get wet, and contractors might not be able to resume the work anytime soon. Undoubtedly, it will prolong the construction or slow down the work pace to a significant degree.

On the other hand, off-site construction is a different deal altogether. It takes place in a controlled atmosphere. The material at the site in a pre-built form and workers have to fix it accordingly. A sudden change in weather conditions or any other environmental interference would be non-existent.

Furthermore, for construction work on oilfields, it is best to locate the staff at a distance as it can be dangerous at times. Many supervisors prefer oilfield housing such as oilfield man camp for this particular reason to avoid any repercussions. And the heavy-duty vehicles have made life much more comfortable. Broadly put, the off-site technique will heavily increase your odds to finish off the project on time or perhaps before that.

3. Hold Regular Meetings with the Workers

Hold Regular Meetings with the Workers

We are not talking about typical meetings where low-key workers do not get a chance to speak up. It would help if you allowed everyone to participate and come up with suggestions regarding catching up with a tight deadline. If conducted tastefully, these meetings will multiply the productivity big time.

Remember, not all workers come from a similar background. The higher-ups might have snuffed some of them for speaking their mind previously. Therefore, they could be reluctant to chip in with anything worthwhile even though they may be bubbling with innovative ideas, which could turn the tide for you. Passing out postcards is an excellent way to encourage everyone for the input. Ask them to submit 2-3 short proposals to speed up the work.

Once done with this, set your eye upon the best recommendations, and discuss their execution strategy.

4. Expand the Crew

Expand the Crew

If you are completing a project within four months with a team of 100 workers, you could wind up a similar project within two months by doubling the number of workers. There is nothing complicated about this equation. At the same time, you should be mindful that hiring anyone and everyone is akin to mess things up. Because less skillful workers could be a liability instead of an asset.

Some tips for hiring the best prospects:

Word of mouth:

You can’t expect most construction workers browsing on the internet for a job. They still rely on suppliers and their fellow construction workers to get hired. Therefore, make it a point to spread it in your trusted circle to look for someone with the respective qualities.

Job fairs

Lately, the popularity of job fairs has spiked like anything. These fairs are peppered with ideal candidates for every industry. And the construction industry is no exception.

The Final Verdict

construction process

The projects that would take years to complete are now done and dusted within a few months. Indeed, this is a remarkable leap. Sometimes, contractors fail to complete the project within the due deadline despite the wealth of modern equipment. As a result, their reputation takes a nosedive, and clients’ part ways with them in the future.

You can readily come across a wide range of turns and tricks that will accelerate the construction. But, at the same time, they could hamper the efficiency, and client-satisfaction will hit the rock-bottom. But the tricks mentioned above have proved their mettle over time. As a contractor or project manager, you can rely upon them wholeheartedly.

Discover More:

Deck Footings – Types, Importance & Other Details

0
Deck Footings

You can’t build a deck without building a proper footing for it first. The decks or any other overhead structures require load-bearing posts that support the framing. Each of these posts must be set in the footing. Generally, a footing is a hole that gets dug into the ground. It is extended below the frost lines and generally filled with concrete. 

The builders of GTA Decks – A Decking company, however, points out that the type of footings of the decks depends on the condition of the soil, building codes and the climatic conditions. 

 Depending on these elements, the type of footing can vary significantly. This article introduces the different footing ideas you will need to consider before building your deck. Check the following section of this article out to find more about the deck footings. 

What Is a Deck Footing? 

A backyard with a lot of gravel and a fire pit

Before going into details about the deck footing, you should understand what a deck footing is. A deck footing is a structure that creates a sturdy foundation for your deck. They are the connecting point between the deck and the ground. That indicates that the footings are the key that helps you to have a secure and firm deck. 

If you are thinking about building a deck without any footing, then know that only very small decks can be built without the support that footing provides. If you want a large surface that would support the weight of many people and furniture, then you definitely need to build a footing for your deck. 

Why Creating A Footing for Your Deck Is Necessary? 

Creating A Footing for Your Deck Is Necessary

A deck footing simply ensures that your deck does not cave or tip after the installation. Footing keeps your deck high and dry above the land and helps it to fight the rot. 

In some states, the construction code requires you to build a footing if you are building a deck for your home. So, not adding a footing to your deck can not only reduce the load-bearing capacity of your deck but also create the chances of facing the wrath of the local government. 

What Are The Different Types of Footings? 

As we have mentioned earlier, depending on the conditions of the soil and the legal requirements, the type of footings can be different. Each of the following footings serves different purposes and comes at different prices. Let’s check a few different footing techniques and find out the materials that you can use. 

Precast Cement Block

The precast cement blocks are the cheapest and probably the easiest footings that you can install. In this type of footing, each of the blocks is buried right beneath the surface of the ground. While building the deck, you should place the blocks close to each other. 

Even if you are building a small deck, you might require quite a several blocks. These blocks come with a convenient notch that helps GTA Decks – A Decking Company to fit it into ground treated lumber. If you are building a deck close to the ground, then the cement-treated blocks could be a great pocket-friendly option for you. 

 However, the blocks might not be the most durable footing that you can get for your deck. Some of the states might not approve the usage of such footings for building the deck. 

Poured Concrete Footings

This footing involves digging a deep hole below the frost line and then pouring the concrete directly into the ground. The poured concrete footing is one of the most labor-intensive types depending on the place you live in. 

As we have mentioned earlier, the first step of installing his footing is to dig a deep hole below the frost line. In some northern states, the frost line can be even 70 inches deep. Once the holes are dug, you have to pour concrete directly inside it. This will create a strong concrete pillar. You can attach the deck posts with the top of the pillars using a metal bracket. 

During the pouring process, you can use cardboard to give the pillars the form you want. Even though it takes a lot of time and trouble to build concrete pillars, they create one of the strongest footings. These footings are perfect for the larger decks that are high above the ground. They are also perfect for supporting the weight of the hot tub or any other larger items. 

Deck footings

Precast Stackable Cement Footing

These are similar to the previous one. However, they do not require you to pour the concrete anywhere. You just need to dig a deep home and place the pieces inside it. These footings will help you to create a strong structure that is safe for your friends and family members. 

Buried Post Footings

The buried post footings are a lot similar to that of the poured concrete versions. However, they save a lot of labor on your part. You need to dig the hole below the frost line and then pour concrete into it. Secure a pressure-treated wood post into the concrete once the pouring is completed. The entire process does not require as much concrete, and it helps you to save a lot of money as well as time. Additionally you can checkout to guide on pile foundation

So, these are some of the footing options that you can try while building the deck. As it is almost impossible for a novice to understand which type of the footing would suit your deck the best, you should get in touch with the builders of GTA Decks – A Decking Company. They can guide you and help you choose the right footing for your deck. 

For additional insights:

Why is a Professional Window Cleaning Crucial For Home and Office?

0
Professional Window Cleaning

The exterior of a building is what catches the attention of the visitors. It is the first impression on a person. Investment of any sort on the exterior dimension will go well with the image you wish to create for your visitor or guest. Whether it is a residential building or corporate, the exterior plays a significant role in creating a positive impact on the guests therefore it is recommended that people must opt for professional window cleaning every now and then.

If you have dirty, grimy, and dirty windows, then they may distract your guests. They may feel that you are not cautious about the cleanliness of the building. To keep the cleanliness of the windows intact, you may need professionals to get a proper cleaning. They have special training to take care of your windows. They also have the necessary equipment that you may use for keeping the windows up to the mark.

The fact that they are available in the market makes it easier for people to avail of their services. There is immense competition faced by entrepreneurs in the external sector; thus, you have to keep every aspect of your business up to date. If you compromise on any of the significant elements, then you might lose out on consumers.

Hence, it is imperative to keep the look of the building, the products you provide, and the service you offer up to the mark. It should be according to the expectation of the customers that you serve. You may contact Scottsdale window cleaners for premium window cleaning services with the necessary safety and precaution procedures.

Why should you go for a professional window cleaning service?

1) Saves Time:

As the owner of a business firm, you will have to ensure that the employees spend most of their time on productive tasks. They should get involved in work-related tasks. If they are engaged in a cleaning service, then it may not turn out to be fruitful for you. You may have to compromise on your company’s bottom line. Also, the process of washing windows is a complicated task. It requires a lot of patience and effort.

If you clean them incorrectly, then it may damage the windows. In this scenario, it is the professional who can prove to be of much help. They will help you save time as they have all the necessary equipment to help do the task in a short time. They are also well trained in the scheme, which will help you get a high standard of cleaning. You will thus get clean and shiny windows in no time.

2) Specialized Cleaning Method:

window cleaning service

As an owner, you will not have to worry about the professionals’ technical cleaning method. The different types of windows will require a variety of cleaning methods that only professionals know. The stained glass and tinted windows require special treatment. If you use the regular cleaning material, then you will end up damaging the windows. It may also result in a long repair bill that you will have to pay. It would help if you left the work to a professional who knows how to take care of your costly windows, thereby leaving your home or office sparkly clean.

3) Try to Let the Light Inside:

If your building has a clean window, it will allow more light to get inside. A cleaner and brighter environment can result in many advantages like increased focus that will result in greater employee involvement, better impression on your guests and visitors, energy efficiency, enhanced curb appeal, and many more. The professionals will remove all the streaks, smudges, and build-up dirt that will increase the amount of light into your area. People usually find a well-lighted place more appealing.

4) Ensure Your Safety:

If you go for window washing without the proper protection, it may result in an accident. The professionals have all the necessary equipment that will ensure the safety of the people involved in the task. You will not have to take up the job of getting the ladder, work with hazardous materials, or even maneuver around the tricky areas to clean the windows. You can leave the task on the professional who is there to look after the entire process.

5) Extension of Window Lifespan:

The build-up of dirt and blots can result in permanent damage to your windows. It may result in a problem that will cause a lot of extended and demanding cleaning procedures. The marks can weaken the panes of the glass window and lead to cracks. Other expensive damages like chipping and smudging might arise out of this. The professionals with their knowledge and experience can ensure that your window lasts for a long time.

6) Special Equipment:

window cleaning service

The professionals have the knowledge and the equipment that is necessary for the task. It will help you to get the work done in no time. You will be able to focus your attention on other aspects that are worth your time and effort. The professionals nowadays use a variety of equipment that is available in the market. There are different materials for different windows that only they can discern. For this, a prior inspection of the building is mandatory. You may provide them with all the necessary information that they would require in the process. You will thus be able to take care of the investment that you have already made.

Hence, the people you think can help out with your building’s maintenance should be selected carefully. All you need to do is gather information about the different types of available professionals. You will choose accordingly, depending upon your needs and requirements. Try to collect data about their mode of operation and experience. Go through their available online website.

It will be quite beneficial for you. The reputation of the company also needs proper scrutiny. It will help you fetch the most reliable person for the job. So a good deal of research is advisable before you trust them with your home and office windows.

Discover more:

21+ Stylish and Trendy DIY TV Stand Ideas For Your Next Weekend Project!!

0
DIY tv stands

From binge-watching our favorite shows to playing our favorite games to bonding with our peers over a terrible movie, we all spend most of our time in front of the TV. We have all of our game consoles, stereo sets, and DVD collections all together, so it would be a bit uncomfortable to watch our favorite series or play games without a TV stand, right? 

Buying a new TV unit might have cost you a fortune, and also, there is no guarantee that it’ll match your house’s interior aesthetics. So what to do in this case? Why not you make one for yourself! Building your own TV stand yourself gives you a few benefits such as you’ll save money on furniture, and a handmade TV stand will offer a touch of exclusivity to your room. That’s why today, we have brought some creative DIY TV stand ideas for you. 

Below are some fun, easy, and unique TV stand ideas for your home. Take a lot at these twenty-one ideas and keep busy this weekend making these:

1. DIY Classic Rustic Media Plan

DIY Classic Rustic Media Plan

This media console plan has both open and close shelves with doors. You can put woven baskets on the open shelves, just as shown in the picture. It is finished in a rustic style but with less distressing, which is looking classic. This media center will give your living space a whole new look. 

2. An Old Dresser as a TV Stand

An Old Dresser as a TV Stand

Look at this gorgeous TV stand! You have never thought that it is made from an old dresser. Yes, if you also have an old dresser which you’re going to throw away…wait… just make a TV stand from it!  

With the right tools and endless creativity, you can transform it into a beautiful TV stand. It will give your home a vintage aesthetic and also give your old furniture a fashionable strength.

3. Wall Mounted Corner TV Stand

Wall Mounted Corner TV Stand

Are you living in a compact place and looking for a TV stand? Create something like this. It is very easy to make, and it will also save a lot of space. This TV stand is specially designed so that it can be fixed in the corner to reduce space.

You will need 2 wooden pellets, screws, and nails. First, install the straps behind the TV to hold it firmly in place (you can also add more wood pieces for the stereo). And ta-da … your TV stand is ready!

4. Gorgeous Farmhouse Style TV Console

Gorgeous Farmhouse Style TV Console

Another TV stand idea is this one. It is a simple TV stand plan that has two open shelves and details like planks and X frames. This is sturdy and a great looking piece of furniture, that you’ll keep using for years to come.

5. 5 Minutes DIY TV Stand From Crates 

5 Minutes DIY TV Stand From Crates 

Too lazy to create a stand for your TV? Look at the above stand; it can be made in under five minutes. Yes, it is made out of crates and requires little-to-no effort or expenses! You can also create something like this from your old crates in just 5 minutes!  

6. DIY Industrial Pipe TV Stand

 DIY Industrial Pipe TV Stand

How about this DIY TV stand? This is an industrial-looking TV media unit that will look cool in your home. To make this, you’ll need a minimum of four pieces of wood pallet boards and two pairs of metal pipelines to keep the TV stand as sturdy and durable as possible.

To make its legs, you can use a galvanized pipeline or the ones that are taken apart from your old queen-sized bed.

7. Tall Corner Media Stand 

Tall Corner Media Stand 

Here’s another corner media stand plan. It is a tall TV stand with a simple yet intriguing design. Will be a perfect choice for a large room or a bedroom with an awkward layout. 

8. Repurpose an Old Door into a TV Console

Repurpose an Old Door into a TV Console

Recently you have changed your doors and are planning on throwing away the old ones? Think again…These old, forgotten doors can be repurposed into a brand-new TV unit if you have the right tools and creativity to make it happen.

Yes, the above TV console is made from old doors. Unbelievable right? This is probably the most inexpensive and eco-friendly way to give your living room the makeover it deserves!

9. TV Stand on Wheels

TV Stand on Wheels

This is probably the most unique TV stand on our list. Super easy to make from simple materials, this DIY project will be fun for you to create. You’ll need just three larger wood pieces with similar lengths, some screws, and nails. 

First, connect them together and form a painting tripod-like configuration. Lastly, connect the wheels on each tip of the leg using screws or nails, and there, you have it! This is a unique movable TV stand that looks like a painting tripod with a canvas! 

10. DIY X-Leg TV Media Plan

DIY X-Leg TV Media Plan

This DIY project is great for beginners; it’s a simple but great-looking stand for your living room, rec room, or bedroom. The X frames on the side and a large open lower shelf is the main highlights of this stand.  

11. DIY Modern Wooden Wall Media

DIY Modern Wooden Wall Media

Do you have a lot of media, and they didn’t fit on a single unit? Then consider building a media wall unit that will hold all your stuff such as DVDs, CDs, gaming consoles, and a plethora of other devices. 

This unit is not that hard to create as it seems. You can make this from recycled wood, and you’ll be amazed by the results. 

12. TV Stand from Cable Drum

TV Stand from Cable Drum

Do you have a cable television drum that has been lying in your garage for many years? If yes, then today is the day to create something creative out of it! 

To make a nice TV console out of it, all you have to do is to cut the drum in half. After this, utilize one half and some pallet woods as a board and glue all of them together. Isn’t it extremely easy and unique to make?

13. Edgy looking TV Stand

Edgy looking TV Stand

This TV stand is built with large boards and galvanized pipes for the legs. The design gives it an industrial and rustic feel without feeling overwhelming. This is a versatile TV stand that you can use anywhere in your home.

14. Barn Door TV Stand

Barn Door TV Stand

We all know the beauty of barn doors: they’re rustic yet comforting, and they bring the warmth of the countryside straight home. If you agree, then why not use them to design a TV stand from scratch?

Take inspiration from the above door; it is a perfect rustic-looking barn TV unit that will look good anywhere in your house. 

15. Contemporary TV Media Unit

Contemporary TV Media Unit

This is a free TV stand which is specially made for this oddly shaped Living area. Add mood lighting to decorate the whole space. 

16. Minimalist TV Stand with Concrete Blocks

 Minimalist TV Stand with Concrete Blocks

Love minimalist designs and decors? This next DIY TV media unit will surely win your heart. Made from concrete blocks, this is an unbelievable project. The industrial, minimalistic aesthetic of grey cement, this project is a simple yet effective way to enhance the look of your entertainment area.

17. Stylish Pallet TV Stand 

Stylish Pallet TV Stand 

What do you think about this DIY project? This is a stylish and budget-friendly TV stand that is made out of one pallet, some stain, and a few hairpin legs.  

18. Timeless Farmhouse TV Stand

Timeless Farmhouse TV Stand

This unique farmhouse TV stand will give a sense of exclusivity. Don’t you agree? Use walnut wood planks to create the wall mounting stand, which is stronger than the pallet boards. 

Decorate it with some plants and some rustic decor to achieve the authentic countryside farmhouse vibes. 

19. Add Personal Touch 

Add Personal Touch 

Sometimes when we buy furniture, it is not well-matched with our theme. Then we have to add a personal touch to them to match our aesthetics. 

20. Mid Century Modern TV stand

Mid Century Modern TV stand

Mid-century style is evergreen. This style never goes out of fashion, so why not make your TV stand in this amazing style. The clean lines and minimalistic beauty of Mid-century modern designs will elevate your house’s interiors.

21. Rustic Wood Pallet TV Console Unit

Rustic Wood Pallet TV Console Unit

Look at this simple-looking DIY TV console that is giving the entire room a sense of unique style. To create this type of stand, all you need to do is collect some quality woods from around your home and then cut the woods into several pieces.

Lastly, fix all of them with nails and screws, and your TV stand is ready! You can also paint them in your desired colors. 

22. Old Window Frame into a New TV Media Plan

Old Window Frame into a New TV Media Plan

You think that old window frames are junks…no they are a valuable treasure! Yes, they can be a part of your new TV console. Don’t believe us? Take a look at the above picture; here, the console is made from old window frames. 

DIY tv stand

Keep Creating New Stuff

And…that’s all, folks! Those are 22 ideas for building a DIY TV stand. So, have you decided which one is your style? Be creative, simple, and, most importantly, feel free to create your ideal TV unit. The thing is that there are a variety of television stands that you can create with simple and unused materials. 

Just imagine how you can create fantastic stuff from specific materials such as pallets, wooden boards, pipes, or even solid stones. So, from now onwards, don’t throw away the leftover piles of wood and crates; just create something extraordinary things from them.

Discover More

3 Amazing Benefits Of 3m Thinsulate Window Film

0
3m Thinsulate Window Film

When the season of summer is about to and then the use of air conditioners becomes less like a well. When the winter arrives then people are looking for other heating solutions for their homes and households. If you are residing in an area where it is extremely cold and harsh weather during the winter then you must be familiar with the amount of cost that you have to spend on fuel and other kinds of heating solutions for your home.

But what if we tell you that you have a solution for this if you install and all-season 3M Thinsulate window tinting in the windows of your home and it will decrease the heating cost up to a huge extent for your household!

In this article, we are going to discuss 3 amazing benefits of the 3M Thinsulate window film. So keep on reading to find out more information below about 3 M low e window film.

How Does 3M Thinsulate Window Tinting Actually Work?

3M Thinsulate Window Tinting Actually Work?

Now you must be wondering that what kind of Window film it is that blocks the rays of the sunlight and prevents them from entering your home. The fact about 3M Thinsulate window tinting is that it prevents the sunlight and its heat from entering your home and insulates your home. So let’s take a look at the benefits that you are going to get from 3M Thinsulate window tinting!

Benefits Of 3M Thinsulate Window

A girl looking out a window at mirror

 1. Fluctuating Weather Conditions

 The most comfortable home or work environment is the one that stays unaffected only inside no matter how Harsh the climate is on the outside. You want to make sure that the inside climate of your home or workplace stays comfortable and unchanged no matter what is going on outside of the building.

 If you install the 3M Thinsulate window film in your home then it will keep your home cool in the summer and warmer in the winter season. This way your home will stay protected and you will not have any harsh effects on your health due to the change in the climate even if it is extremely harsh.

 2. Lower Bills

 The second major benefit that you are going to get by the installation of 3M Thinsulate window film in your home is that it is going to save you a whole lot of energy costs and bills at your home. That is because when you install a 3M Thinsulate window film in your home then N8 keeps your home cooler during the summer season. 

This Way the air conditioner in your home will not have to work as hard to keep your home cooler during the summer season. As a result, your electricity and energy bills will be much lower as compared to before after the installation of Thinsulate Window film at your home.

 3. Good For The Environment

 The third major benefit of the 3M Thinsulate window film installation is that it is very environmentally friendly. Not only its installation reduces the cost of your energy and building but also it has a minimal environmental impact.

To get more information:

Choose Your Residential Contractor With Care

0
Residential Contractors

Hiring a residential contractor can be a daunting and nerve-racking task. How do you know if you are hiring the correct person for the job? What questions do you ask to ensure you’re dealing with a legitimate contractor and not a scam artist who will take your money and leave your property in ruins?

Residential Contractor

The numbers tell us that many property owners are failing to hire the right contractor. A recent survey from the Consumer Federation of America (cited in the infographic below) reveals that home improvement and construction-related complaints to state and local consumer agencies ranked second highest among all types of complaints, topped only by auto-related complaints. The most common types of construction job complaints included poor workmanship and failure to start or complete the work on time. 

Conclusion

The infographic below, Red Flags Before Hiring a Home Contractor, should be required reading for anyone thinking about a renovation or remodeling project beyond the DIY scope. The infographic tells you what to look for when interviewing a contractor and describes warning signs that the person you’re talking to is not the one to hire. A 10-minute time-out to digest this information could save you thousands of dollars and prevent months of stress and anger. 

Discover More

How to Install Burglar Alarm Yourself? Step By Step Guidance

0
burglar alarms

Would you like to render your home safe from burglary? Do you think your burglary alarm will fit? A burglar alarm can be a significant warning to intruders and burglars when adequately mounted. As a landowner, you can also enjoy great peace of mind. If you have any issues, you can contact burglar alarm installation in Cardiff. We also install Burglar Alarm for your home safety.

Steps to Install Burglar Alarm

Steps to Install Burglar Alarm

Step One: See your limits. 

See your limits. Could your fences or haunts and gates improve? Check your doors, your windows, your sleeves, and the like. These should protect legally until electronic protection starts.

Step Two: Identify what you want to safeguard.

  • Personal value objects (e.g. not readily substituted by insurance jewelry or collections)
  • Your house.

Step Three: Plan the alarm system burglar. 

You are using the minimum number of sensors to protect your home’s strategic areas-hallways and corridors, for example. The fewer sensors you use a false alarm is, the less probable. At all costs, false alarms need to avoid.

Step Four: Use Best Sensors.

They are using the best available sensors better than ten cheap sensors is a suitable sensor. You can count on that.

Step Five: Use loud external sounder.

I am using a noisy external sounder and a noisy inner sound and using the excellent standby battery control unit. The battery is essential to make the device more stable because it will regulate the power supply. Replace standard batteries.

burglar alarm

Guidance:

  • Sensors with a low profile are also desirable to have. Burglar alarm installation hull (a specialist in electronics) offers shallow profile magnetic sensors, but not always of the same excellent standard.
  • If you have infrared sensors, you may also be able to discover, since you usually make a lot of noise, that you have infra-red sensors and to stop them.
  • Get local experts’ recommendations. There is a different criminal profile in every neighborhood.
  • Preserve it as straightforward. If the answer time is too long, it is of no value to having a complicated system linked with a security firm.
  • Make it bright. Intruders cannot easily overcome warning systems-especially at relatively low risk of payouts-in contrast to what you can see in the films. If they think that they will interrupt, they will not stay long.
burglar alarm guidance

Alerts:

  • Don’t get an attacker tackled. Your urge to flee will override your determination to avoid it, and you’ll only get worse. They’re going to the arm. Even if it’s just the tool used to enter.
  • Don’t attempt to mount your device unless you have good electronics and installation experience. The wrong warning hasn’t been worth it.
  • Place the control box in an unavailable spot, for instance, a cupboard or a dressing room, and ensure a strong lock and key attached.
  • Prevents intruders from failing to protect the safety device.
  • Fast action during break-ins is crucial, and burglary alarm systems make it easier for people in the neighborhood to respond quickly to compromised safety as soon as it happens.
  • It is essential to understand what the fundamentals of a burglary alarm system are and how they function.

Gutters Necessary for Homes

0
gutter

Gutters are an exciting subject in buildings, as while the general function of gutter seems to all too known. There are still many misunderstandings (such as gutters are the cause of ice dams and even confusions over whether or not gutters are necessary and how much they do.

Gutters are built to redirect the water from your home and base. Rainwater and other precipitation fall through the gutters when clean and working correctly, and the water then flows safely from the building. Gutter cleaning Edinburgh provides services to clean your home and office gutter. Gutters have several Benefits mentions here:

Advantages:

advantage of gutters for home

1. You Move Water Away From Home

Without gutters, the rain falls near your home directly, eroding the earth. • Prevention of erosion.

2. Secure The Foundation

Too much water through your foundation requires a highly costly solution which can be harmful rather than eroding the soil that is a comparatively less costly repair.

3. Secure Siding

Regardless of what, Rainwater will pound your siding. Nevertheless, it will stain the siding (and, depending on the type of siding, maybe rot) if additional water drips slowly off the roof.

4. Prevent Overflows

The drainage or protection of water prevents puddles that can contribute to flooding. Know, if you do not keep your gutter clean, all these advantages go away and might even get worse.

Are Gutters Always Required?

No regulations need to require canisters in new buildings. Even if it is unusual, it could be nothing more than an extra project of costs and repairs, depending on your living place and the building’s form. However, in most cases, you will make smart, if less glamorous choices for your homes by installing and maintaining gutters.

Is It My Home? Do I need Gutters?

need Gutters for home

It is more likely that you have gutters on your house. Although it can be a messy, tedious job to clear and maintain the canals, the initiative to prevent potentially expensive and dangerous problems deserves recognition.

However, You Do Not Need Extra Costs And Repairs

Need Extra Costs And Repairs for gutters

If your house surrounds by concrete, which protects the land, somewhere with extremely little rainfall, you might feel fantastic without a rib. You may go without downhill or complete roofs, but we suggest that you obtain expert guidance before making your decision if one of these circumstances happens. The bottom line, you can almost certainly have ribs at home.

Do I Need To Walk Around The Entire House?

Possibly you don’t need your house surrounded by ruins unless your roof runs in all directions. It would help if you had them on any route at the bottom. For example, if your roof pitches towards the front and rear of the house in two directions with a peak in the middle. You do not need a rib on the house’s side but build it at the front and your roof design to direct water down the slopes, where the canisters then carry out their work.

Expert Point of View

Expert Point of View for home gutters

Gutter cleaning Edinburgh experts will instruct you on your canopy system during a roofing consultation. Is it appropriate to clean it? Re-installed completely? Each part of your roof, including the ribs, is built to extend your home’s life. The rest of the house runs much better if you proactively clean up and preserve the top of your house.

Helpful tips for recruiting locksmiths

Here are a few tips for recruiting locksmiths:

  • Decide whether the service requires extra costs.
  • Locksmith Edinburgh will unlock the door without injury, so beware of being locked out of the car or home, and the locksmith advises repairing or drilling.
  • Review previous ratings, job history, insurance, and authorize the service provider.
  • Make sure that your locksmith has been trained and is well regarded in the industry.
  • Earn numerous local locksmith citations. Brief them the issue and figure out what they are costing.

Read More:

Chalk Paint – Everything You Need to Know (Pros and Cons)

0
Chalk Paint

Is your place filled with old and vintage furniture pieces? Do you want to give them makeovers? If yes, chalk paint is the answer to all these questions. These days, from Pinterest to Instagram, beautiful decoration pieces painted in chalk paint can be seen everywhere.

What makes them so popular and how to use them? We have answers to all your questions. This is why we are here today! Today we’re going to tell you all about Chalk paints. From what is chalk paint, how to use it for painting furniture to the pros & cons of paint, we have covered everything. So keep scrolling.  

We can’t send our furniture to repair centers for every wear and tear that happens, right? That’s why chalk paint is invented to save all our unwanted expenses. Just with a few coats of paint, you can transform the whole look of your furniture. It will give a matte, chalky appearance that is perfect for achieving a rustic, vintage, or shabby-chic style. Let’s know more about this incredible paint.

What Is Chalk Paint?

chalk paint

These days the Chalk-style paint has become a trend. But still many people get confused about this paint and wonder what sets it apart from the traditional paints? 

In simple words, “A Chalk paint is a versatile color treatment that has a soft, ultra-matte finish, and designers use it on furniture, fabric, and more.”

Yes, it somewhat resembles a surface that is covered in Chalk (You may have already guessed it by its name!). The paint is latex-based, and that’s why it can easily be cleaned by simple water if you know how to remove chalk paint. Unlike the other paints where you have to use mineral spirits to remove them. 

Never get confused in paint and chalkboard paint, which creates a surface on which you can write on. The Chalk paint is a specialized paint that lends a chalky appearance and feels to surfaces.

History of Chalk Paint

History of Chalk Paint

The next question that may be coming to your mind is, who came up with the idea of ​​chalk paint? It is the invention of a British woman named Annie Sloan, an artist in the 1990s.

She is the founder of the self-named company “Chalk Paint.” She wanted a paint that required less prep and was easier to work with. As an artist, she was not satisfied with the paint options that were available in the market. 

Sloan wanted a paint that was easy to work with, that required minimal preparation, and a quick clean up. When she couldn’t find a product on the market that met her needs, she herself created one. How brilliant an idea is this, right?

The paint dries to a matte finish and gives any surface a dreamy, matte look. Sometimes it is used with soft wax, which seals the paint and leaves a silky finish. Sloan created chalk paint products without any black pigment, which means it allows you to mix it without it looking dull. 

It gained popularity so quickly that it now becomes a go-to for anyone creating distressed furniture or shabby chic decor. Nowadays, other companies are also starting to sell similar products, but they’re branded as “chalk-like” or “chalky finish.”

What Is So Great About Chalk Paint? 

So why do people prefer chalk paint over other paints? What is so special about them? Not one but there are many reasons behind this:

  • There is no need for beforehand preparations before using the chalk paint. They are ready to use after it is bought.
  • No need to prime and sand the surfaces. 
  • Super easy to paint and can be easily applied by using a sprayer. 
  • Dries quickly.
  • They are flexible and blend easily, which is a plus point for artistic painting techniques and applications.
  • You don’t have to buy special brushes.
  • Distresses easily, and these distinct finishes are not found in other types of paint.
  • Easy clean-up; wipes up beautifully.
  • Mistakes can be easily fixed.
  • They are long-lasting.
  • They can be used to paint any sort of surface desired.
  • Doesn’t have a foul odor
  • Finished surfaces look richer and more elegant.

Drawbacks of Chalk Paint

The followings are the disadvantages of chalk paint:

  • Chalk paint products, wax, and brush are expensive.
  • You have to seal them with some wax.
  • They’re often confused with “blackboard paint.”
  • Sometimes it could take up to 4 coats to achieve color consistency.
  • May leave brush marks on surfaces.
  • Sanding may be necessary if surfaces aren’t pristine.

How to Use Chalk Paint?

How to Use Chalk Paint?

Chalk paint is most commonly used to give the furniture a matte look, but you can also use it to paint an entire wall. As we already told you that you don’t have to sand or prime beforehand. Just open the can and start painting. Use any technique to get a layered, solid opaque, or distressed finish.

You can apply as many layers of paint as you want but make sure to give at least an hour gap between each layer. After you’re done, apply two to three coats of wax for a polished look. If you mess in between, don’t worry because this is a water-based paint, so it can be cleaned up easily. 

Where should I Use Chalk Paint?

The main concern is on what surfaces you can use this amazing Chalk Paint? Below are all materials on which you safely use this paint: 

  • Old and new tired furniture
  • old picture frames, lamps, or outdated home decor
  • inexpensive metal or wood decor from the craft store
  • mason jars
  • fabric 
  • any item you want to have a rustic/distressed appearance

Where Should You Avoid Using Chalk Paint?

Where Should You Avoid Using Chalk Paint?
chalk paint  on cabinet
chalk paint on table
chalk painted dining table
  • Kitchen Cabinets
  • Bathroom Cabinets
  • Unfinished Furniture 
  • Furniture that is breaking down or ultra-low quality
  • Furniture made from wood
  • Furniture prone to staining

FAQs

If still some questions are in your mind, look at these. Here we have tried to give answers.

#1. Is Chalk Paint Different From Chalkboard Paint?

Chalkboard paint creates a surface on which you can write with chalk, and you can easily erase it and then write on it again. Whereas, Chalk paint is more similar to standard wall paint, just with a different finish. 

Therefore, despite similar names, they are way different from each other and used for various purposes.

#2. How do I apply Chalk Paint?

The application is super easy. Just apply on the surface just like any other paint. If you want a more distressed look, apply 2-3 coats of Chalk paint. Make sure to leave about an hour gap in between the consecutive layers of paint. 

After your paint is completely dried, then use wax to get the polished look. Or, for a more high-gloss look, you can top off your chalk paint with lacquer.

#3. How long does the chalk paint take to dry?

Annie Sloan, the creator of Chalk Paints, suggests that you should wait at least a day (24 hours) between coats of paint. Like traditional paints, the Chalk Paint will feel dry to touch within an hour, but it is always good to allow extra dry time so that each layer of paint solidifies and becomes durable.

When you’re distressing the finish, leave the paint overnight. This will eliminate cracks in the second coat and give a really lovely distressed finished look. 

#4. Is Chalk Paint Durable?

Many people worry about chalk paint, whether it is sufficiently durable or not. The answer is yes, it is quite durable and can be used on high-quality furniture pieces. But you must seal it properly with soft wax. If you follow the instructions carefully, your chalk paint will look beautiful for many years.

#5. How Much Does Chalk Paint Cost?

Yes, chalk paints are a little bit on the pricier side. But you also need only a small amount to paint your surfaces. If you want to paint your dresser, then the original Chalk Paint from Annie Sloan will be enough for you. It typically costs around $35 per quart.

Have Fun With It!

Even the whole chalk paint procedure sounds costly, but I assure you that it will all be worth it. The best part about these paints is that you don’t need to know the technique of application. Just open the can of your favorite color and start painting. 

Read more: