Home Blog Page 153

Things to Consider When Choosing Awnings for Your Shop

0
Choosing Awnings for Your Shop

An awning is an excellent way to turn the attention of bystanders to your shop. This way, your business will stand out, and at the same time, you will provide some sun or rain protection for potential customers looking at your display window. 

These days, when it comes to awnings, you can count on a number of styles, sizes, and designs. So what should you consider before buying a shop awning? Here is everything you need to know. 

Different Types of Awnings

Different types of awnings for shop

This is a crucial point to consider is what type of awning you should buy for your shop. You should be aware that there are three basic types of awnings: stationary, free-standing, and retractable. 

Retractable awning roll-up, meaning you can control the amount of natural light getting inside your shop at all times. Also, some advanced models have wind and sun sensors and adjust themselves to the weather automatically. Keep in mind, however, that they cannot withstand heavy rain. 

Free-standing awnings are also a great idea for your shop, but they require a good amount of space in front or back of your shop. On the other hand, they can double as an advertisement. 

Stationary awnings are a permanent addition to your shop. They should work for shops that benefit from constant weather protection. 

The Proper Materials

There are different materials you can choose for your awning that will need different levels of maintenance and suit different shop designs. You will most probably have to choose between a few different materials: 

  • Aluminium – blinds made out of aluminium are sturdy, but they have some customization limits.
  • Outdoor fabrics – typically came in various different colors and patterns, but might require more maintenance. 

The Quality You Should Look For

A blue shop with tables and chairs outside of it

When it comes to the proper quality of an awning, you should most definitely look for fabrics that are waterproof, protective from UV rays, and do not fade. For the frame, go with aluminium because it is strong, lightweight, and doesn’t rust. The better the building materials, the longer the awning will serve your shop, so it is worth it to invest in the beginning rather than pay for repairs or replacements. 

Perfect Visual Impact

The way your awning will look is of most importance, as it will be responsible for what the first impression of your customers will be. Make sure to choose colors and patterns that will suit the style of your business and represent it well. Go for a timeless style that will complement your shop window and have the perfect visual impact. 

Protection – Warranties and Guarantees

Last but not least, you should also make sure that the awning you are willing to buy has a warranty or a guarantee that goes with it. If you want to invest in something as important as an awning for your storefront, it is important to make sure that you have the necessary protection. You can recognize a reliable, good awning company when it offers a guarantee, so look out for those that do. 

shop awning

Conclusion 

Investing in an awning can add a lot of benefits to the visual appeal of your shop. It can differentiate you from your competitors and give your business a fresh, modern look. Find a quality product and improve the way your shop functions. 

Keep reading:

How to Use a Pole Saw

0
Pole Saw

If you plan to prune and clear up your garden tree branches, then a pole saw can perfectly have the job done. Knowing how to use a pole saw is vital for cutting hard and difficult tree branches right at your compound—the reason being the tool’s ability to reach intricate tree limbs or branches. You can efficiently and effectively use this type of saw for pruning and cutting lighter branches.

This article should help you use the tool safely for your daily pruning activities. Why is it a must to know how to operate the device? Working with such a tool at heights is very dangerous. I suggest you go through this report to make safe cuts.

What is a Cordless Pole Saw?

Cordless Pole Saw

A cordless pole saw is a powerful tool that features a chainsaw.

If you want to know to get more information about chainsaw numbers then click here.

Using this tool is straightforward and is suitable for cutting tree limbs from safe ground. The device resembles a pole saw but with a chain and is automatic. You can also use the tool to prune branches before falling on their own.

How to use a pole saw steps by steps guide

Step 1: Clearing your working area

Before you kick off your pruning job, you have to ensure that the place you will be standing while cutting tree limbs or branches is free from any property or people. Remove anything that can limit your movement; you need to move smoothly and freely while working.

More so, if you are operating in a public space, rope off the work area to keep off passersby. You are free to move to the next step after clearing and securing the operation area.

Step 2: Identifying your cut

Before placing the saw on the branch or limb, you have to plan first to make cuts. You don’t have to start cutting the stems or branches without figuring out where to kick off the process. Under this step, you may mark all the limbs you want to cut off.

More so, it would help if you sifted through the tree to know which branches to cut. After inspecting the limbs for cutting, move to the next step.

Step 3: Position yourself well

Position yourself well

Here, it is advisable to stand on the opposite side of the branch unless you want to commit suicide. I guess that is not your intention; I mean avoiding standing directly under the limb. This position will prevent the branch from falling over you.

Furthermore, ensure that you are in a good position to hold the pole saw at your chest level. Hold it at a suitable angle to allow you to make cuts quickly and safely.

Step 4: Adjusting the tool’s length

After positioning yourself and holding the machine well, the next thing to do is adjust the pole saw. There might be a need to adapt the tool to achieve the length of your desires. Of course, for higher branches, you will have to use a long distance. If you cannot do so, read the manual instructions or seek experts’ advice before kicking off the pruning process.

You can stretch out the tool to allow the blade to reach lower branches.

Step 5: Positioning the blade

Under this step, you will have to hold the pole saw with both your hands and move it to the limb or branch you wish to cut off. Hold on for a while to see if you can sustain the tool’s weight. If you are comfortable with the equipment’s value, position it on the branch’s weight.

Step 6: Cutting the limbs and branch

Cutting the limbs and branch

When cutting, start at a low speed because full speed can slip off the blade, making the work harder. What you need is to begin by making a groove on the branch. You cannot make a groove with full speed; go slowly.

Furthermore, It is awkward to begin with, upper branches when cutting branches from the ground. The components may fall over you or the machine; hence, damaging it. It would help cut the lower limbs or branches first to have a clear view and path to the upper branches. Cut systematically to reduce unnecessary injuries and accidents.

A groove is essential for guiding you to full speed. However, cutting limbs sometimes is more accessible than branches because they are thin. More so, if the blade slips off, hold on and reposition it. Adhering to this safety measure will result in safe cuts of the higher limbs or branches you plan to clear off.

Step 7: Making the final cut

After making a groove, you can now move on and increase the stroke speed. Under this step, be much more keen when the cuts get deeper so that the branch doesn’t fall over you. Sometimes, a limb may fall over a place that you don’t expect. Therefore, ensure that your standing site can allow you to move away quickly to avoid injuries.

Step 8: Clearing debris

After cutting the first branch is over,  there is a need to remove all twigs or components from your working area. When the place is clean, you are free to move to the next branch.

FAQs

What is the importance of making a groove on the branch before increasing stroke speed?

You cannot make a groove at full speed; go slowly. A guide is necessary for guiding you to maximum speed. However, cutting limbs is sometimes easier than branches because they are thin; hence, there might be no need to make a groove.

Why should I begin by cutting lower branches?

It is ironic, to begin with, upper branches when pruning a tree from the ground. The units may fall over you or the equipment; hence, damaging it. It would help if you started with lower limbs or branches to get a clear view and path to the upper branches.

Conclusion

Hopefully, this step-by-step guide on how to use a pole saw helps you clear your garden safely. From the above discussion, you have to agree that using a pole saw is simply the aid of precautionary measures. It would help if you were much more keen at every step to prevent unwanted injuries and accidents from happening.

For more information:


What Height/Length of Masts are Good for TV Aerial Satellite

0
TV Aerial Satellite installation

Masts or Poles are the necessary objects for the installation of the tv aerials. Choosing the right pole or mast is not so easy. There are lots of masts available in the market with different qualities and lengths. In this article, we will discuss the length and heights of the masts. This will help you in choosing the right mast for the tv aerial installation. In the mast or pole, we usually see the shape, wall thickness, diameter, and height of the pole in order to install the ideal tv aerial set up. 

TV Aerial Masts Height and Length

TV Aerial Masts Height and Length

The main difference between the poles of the aerials is the height or length. Remember every aerial or antenna installation has a different length or height. It will depend on your requirements whether your tv aerial installation will be in a lower or higher area. The higher size of the pole means you are expecting the good but sometimes the higher poles can be your headache. It can be a problem for you in the storm or the heavy rain. There is a famous sentence: there is a higher chance of falling off the higher body. So try to get the pole which is enough in height to complete your signal requirements. 

Usually, we need large height masts where there are lots of trees and buildings around your house and you are getting disturbance in catching good signals. But if you are living in an unurban or wide area there you don’t need the large height poles or masts you can even adjust with the small masts. 

While you are installing the masts for the TV aerial then follow the 1:5 ratio. This is actually bracket size and it should be less than the total height of the mast.

Famous Aerial Mast Heights

Famous Aerial Mast Heights

In the market, you can find the mast of the following heights 3, 6, 8, 10, 12, 16, and 20 (feet). If you are the tv aerial installer and you have a huge budget then you can get the stock of the all heights mast, but if you don’t have a budget then it would be not a good idea to get stock of all these. Usually, the professional tv aerial installer stocks the mast of 6 feet height, because usually 90% of the installation can be done with this. If the installation is a bit high then the mast of 10 feet or 12 feet can be used for the installation.

Seriously it is very rare I have seen the use of the 16 feet mast in the installation. Plus the 16 feet mast is not available in the UK easily because there is a rare use of this. If you want to use it for the installation then you need to get on the custom order.

Different Diameter TV Aerial Mast / Poles

Different Diameter TV Aerial Mast / Poles

Above we have read about the heights of the poles or masts. Do you know the masts or poles are available in different diameters? Of course, they are available in different diameters for different installations. The masts or poles are available in different diameters which are mentioned below.

  • For a mast with height of 2 feet to 4 feet the 1” diameter mast is available.
  • For a mast with height of 6 feet the 1.25” diameter mast is available.
  • For a mast with height of max 10 feet the 1.5” diameter mast is available.
  • For a mast with height of max 16 feet the 2” diameter mast is available.

I think after reading the above diameters you will get to know which one will be better for your tv aerial installation. So during choosing the mast for the tv aerial installation make sure the diameter or height you will choose according to the parameters mentioned above. 

Different TV Aerial Mast Thickness

Different TV Aerial Mast Thickness

After the diameter, I think the next thing you need to see is the thickness of the mast. This is also known as the mast gauge. Again for considering the good mast for the tv aerial installation you need to look for the correct thickness as well. The following thickness is available for the masts.

  • 14G mast mean 1.8 mm
  • 16G mast mean 1.6 mm
  • 18G mast mean 1.2 mm
  • 20G mast mean 0.9 mm

Keep reading:

Wine Rack Plans: 21+ Creative Ways to Store Your Wine Collection!

0
Wine Rack Plans

Just grab a glass of wine, and everything will be fine!!Check out best wine rack plans.

Whether it be a celebration or breakup, wine is a must, right? These days storing wines is pretty common. You can see beautiful wine holders and bars everywhere. So are you planning to buy one? Wait… why spend time and money on buying when you can make yourself one for you. 

Why DIY a wine rack when you can just buy it? This is a pretty common question that people often have in their minds. There are many benefits to it, such as you can easily customize it according to your space, and most importantly, they’ll be inexpensive. So why spend a fortune on buying these expensive wine racks. Just DIY it, right! 

Building a wine rack is a super easy project that you can be completed in a day or two. (depending on how large you want to be a rack). This is the only place where you’ll come back to over and over again to grab a drink. Today, we have made a list of some creative and unusual shaped wine rack ideas to get you started. All the projects we’ve compiled here are as stylish as they are functional and practical.

So, whether you drink super-fancy $100 wine or just $5 one, these wonderful racks will keep all your wine bottles in order (and at the ready). So check them out. 

21+ Brilliant Wine Rack Design Ideas

All the racks in the below list have different shapes and styles, so be sure to check every wine rack idea. There are vertical, horizontal, wall-mountable; some can hold 6-bottles of wine, whereas some of them can hold dozens.so just take a look and pick the one that suited best for your style and your space.

1. DIY Simple Wine Rack Plan 

DIY Simple Wine Rack Plan 

Simple but edgy, this wine rack plan is perfect for those who have less number of wine bottles, but still, they want to show them. The finished rack can hold four bottles of wine, and it will just take you only an hour to build it. Whether your home decor is modern and traditional, it’ll look good with both styles. 

2. Fixer Upper Style Wine Rack Designs

Fixer Upper Style Wine Rack Designs

This wall-mounted wine bar has Magnolia vibes all over it, and it also features hanging storage underneath for wine glasses. If you love to entertain, but don’t want to spend a lot on wine racks, this setup is perfect for you. 

3. Ladder Rack For Wine Storage

Ladder Rack For Wine Storage

What do you think about this wine storage? For those who want to show their wine collection! Check out wall wine rack ideas, so it is quite strong and sturdy and looks absolutely gorgeous. 

4. DIY Circular Wine Rack

DIY Circular Wine Rack

This wine rack is stylish and functional at the same time. When your guests see this rack with circular inserts for bottles of wine, they will definitely get surprised!

5. Wall Mount DIY Wine Rack

Wall Mount DIY Wine Rack

Not storing the wine properly: This is the most common wine mistake that people make. This nine-bottle rack, which can be mounted directly and conveniently onto your wall, fixes this problem. How? It will store bottles horizontally, which will keep the cork moist, so your wine stays fresher for a longer period.

6. Wine Bottles + Glasses Rack 

Wine Bottles + Glasses Rack 

Placing the wine bottles and glass at different places might be a little inconvenient for you and your guests. So, build something like this; it will gracefully hold all your bottles and glasses simultaneously.

7. DIY Chest Wine Rack

DIY Chest Wine Rack

Looking for a chest wine storage? Take a look at this cute and glamorous blue three drawer chest. You can also simply create it from any old drawer that you already have. 

8. Luxurious Wine Bar

wine rack plans

If you’re lucky enough to have an additional kitchen or extra space in your home, convert it into classy wine storage. This Luxurious wet bar features impressive, glass-enclosed liquor and wine storage. 

Here the placement of wine holders on the left really catches my eyes. The homeowners cleverly created a minimal-style grid that gives the impression that bottles are floating.

9. Minimalist Vertical Bottle Holder

Minimalist Vertical Bottle Holder

Short on space but want wine storage? Grab this idea, where there is a vertical holder that beautifully stores all the bottles without taking much space. This idea will work for even the tiniest kitchen. 

10. Countertop Wine Rack Plan

Countertop Wine Rack Plan

This wine rack plan is easy to build and looks like a piece of art. Place on your countertop and enjoy hosting the coming festive parties. The best thing about this is that it can be finished in just a few hours for less than $20. 

11. Classy Copper Pipe Wine Rack

Classy Copper Pipe Wine Rack

Do you believe that you can build this in just a few dollars? Yes, you can buy these types of copper pipes from any nearby hardware store for very low prices. 

12. Metal Wine Rack Under The Stairsmage

Metal Wine Rack Under The Stairsmage

Another great space-efficient wine rack is this one. Made from iron bars and that too under stairs, it will save a lot of space. Quite modern looking, this contemporary wine rack will surely be the point of attraction in your home

13. Modernized Heirloom

 Modernized Heirloom

We all want to treasure our family furniture, right? But the right way to do this by reusing them instead of placing them in the storeroom. If you also have a big antique buffet or chest of drawers like this, turn it into a wine bottle cubbies.

14. Industrial Wine Rack Plan

Industrial Wine Rack Plan

Isn’t this looks super unique and unusual? To build this wine rack plan, all you need is reclaimed lumber and wooden dowels. 

15. Secret Wine Storage

Secret Wine Storage

Make this Halloween party a little more fun by hiding your wines. Here the homeowner created a secret area in their media room built-in just for wine. Cool, right! Your guests never are able to find this hidden wine storage until you tell them! 

16. Vertical Wine Storage

Vertical Wine Storage

This is another true DIY easy 6-bottle wine rack plan that you can build it in no time. 

17. DIY Dowel Wine Rack

DIY Dowel Wine Rack

Sometimes your wine collection requires a 4-foot-long DIY wine rack. To build something like this one for you! 

18. DIY Vintage Wine Rack Plan 

DIY Vintage Wine Rack Plan 

For our next DIY, you have to do some recycling. If something like this already is in your garage, then bring it out and reuse it. You can even paint it your desired color, and this old movie reel will become your wine storage rack. 

19. DIY A-Frame Wine Rack Plan

DIY A-Frame Wine Rack Plan

This A-frame wine rack that holds 6-bottles can be made in under 20 minutes. All you need is two plywood pieces and some metal brackets. First, make six holes in them and then join them securely with metal brackets or screws. 

20. Picket Fence Wine Rack Plan

Picket Fence Wine Rack Plan

This picket fence wine rack is a perfect addition to your home decor. Put this “happily ever after”rack to your outdoor parties. 

21. Chic Wine Cart

Chic Wine Cart

Transform an ordinary table with pallet wood or any other aged wood into a lovely mini wine bar cart. 

22. Industrial Tabletop Wine display

Industrial Tabletop Wine display

This edgy looking industrial pipe wine bar will be perfect for your table. You buy these pipes from any hardware shop and create this fine wine display.

A bunch of wine bottles that are on a wall
A wine rack with several bottles of wine on it
A wooden wine rack holding two bottles of wine
A metal wine rack holding several bottles of wine
A wall mounted wine rack holding several bottles of wine
A wooden wine rack with two wine bottles on it
A wall mounted wine rack with three bottles of wine
A couple of shelves that have wine glasses on them
A wine rack with a bunch of wine glasses
s
A wooden wine rack with wine glasses on it
A shelf with wine glasses and bottles on it
A wine rack with two bottles of wine
A close up of a wine rack on a wall
A wine rack with several bottles of wine
A wooden wine rack holding wine glasses and bottles

The Bottom Line

So which wine rack plans is your favorite? I know it’s hard to pick one from all these pretty ones. But my advice to you is that always select the one according to your wine collection and space. For example, if you only have a few wine bottles, there is no sense in building large rack ideas. Go with the six-bottle rack or tabletop ones, as they occupy less space and also look great. 

Read more:-

5 Reasons on Why you Should Buy a Smart HVAC System

0
Smart HVAC System

This is the decade where everyone is turning their homes into smart homes, and about everyone wants their home to be smart. But a few only pay attention to the Smart HVAC (Heating, Ventilation, and Cooling) system is one of the first things which makes your home truly smart.

There are a few professional furnace repair services in Barrie who are only using Smart HVAC systems and had removed the traditional HVAC systems from their products and services list because they know what the future is.

In this article, we will discuss the 5 main reasons because of which most of the people are buying smart HVAC systems, and why you should also buy a smart HVAC system for your home.

What exactly a Smart HVAC System is?

Smart HVAC System

A Smart HVAC system is modern or we can say a smarter version of an ordinary HVAC system. There are a lot of features that you get in a Smart HVAC system and these features are not available in an ordinary HVAC System. A smart HVAC system is the first step towards a smart home, and everyone wants a smart home.

And the major feature out of them is the ability it gives to control Cooling and Heating remotely. You can control the temperature of your home using your phone or tablet if you have a Smart HVAC system installed at your home.

You might want to know about the differences between an ordinary and a smart HVAC, so we will also discuss them.

Differences Between a Smart and Ordinary HVAC system

The first and major difference between a Smart and an ordinary HVAC (Heating, Ventilation, and Cooling) system is the power to control it remotely. You can remotely control the heating and cooling of a smart HVAC system using your smartphone and an iPad also. This feature is not available in an ordinary HVAC system.

Another difference between them is energy efficiency. Both systems run on electricity which we all know, but the Smart HVAC system is energy efficient, which means it saves electricity.

Automation is another advantage that a Smart HVAC system has over an ordinary HVAC system. A smart HVAC System automatically adjusts heating and cooling whenever needed.

5 Reasons to Buy a Smart HVAC System

The following are the 5 reasons after knowing which you will buy a smart HVAC system for your home or office. 

1. Power to Control HVAC Remotely 

Smart HVAC System

The main reason why you should buy a smart HVAC system is that you can control it using a smartphone, tablet, or computer. You can regulate or change your home’s temperature even when you are not at your home with a Smart HVAC system.

This is quite useful, just imagine that when you come home from work your home will not be too cold or hot for you because you had adjusted the temperature of it before arriving home.

2. Increases your House’s Resell Value

Another Benefit of a Smart HVAC system is that it increases the value of your house. By that I mean it increases the resell value of your home because anyone will be glad if he/ she gets Smart HVAC installed in a house before they are buying. And anyone can pay extra because of a smart HVAC system, also, it can be a great sales pitch.

3. Purifies Air

This feature is not available in all Smart HVAC systems but the majority of them come with an air-purifying feature. A smart HVAC system can automatically detect if a room’s contaminated level is high and then it automatically provides fresh air to that room or part of the home. And some smart HVAC systems also come with Humidifiers which is quite an impressive thing.

4. Reduces Electricity Bill

Reduces Electricity Bill

Smart HVAC systems are more energy-efficient than traditional ordinary HVAC systems. Smart HVAC systems consume less electricity thus saves your money by lessening your electricity bill. On average, a Smart HVAC system consumes 20% to 30% less power or electricity than an ordinary HVAC system., and that’s quite impressive. For those homeowners who always look to find ways of saving daily home expenses, shifting to smart HVAC from an ordinary HVAC system is the perfect option.

5. Convenience

Convenience

Smart HVAC Systems has another advantage that is the convenience they bring to you. You can control the whole Smart HVAC (Heating, Ventilation, and Cooling) system with a phone or a tablet. And this kind of convenience is not available in an ordinary HVAC system. In today’s world convenience is the topmost priority and that is also given by a Smart HVAC System.

Conclusion

So, these were the 5 reasons because of which you should buy a smart HVAC system for your home or office. And I hope now you know what is a Smart HVAC system and what are the differences between a Smart HVAC System and a traditional ordinary HVAC system.

To find out more:-

Benefits of Epoxy Resin for That Next BIG Project

0
Benefits of Epoxy Resin

When you think of epoxy resin your mind probably jumps to classic woodworking projects such as a river table, or maybe you think of epoxy resin floors that are in basements or garages. However, there is another unique benefits of Epoxy Resin in Architecture Projects. One of the reasons that epoxy resin is a staple in all of these projects is that it is high-strength and can mold to any shape that you happen to be working with. It also is low density, which makes it up to five times lighter than equivalent metal parts. 

The Benefits of Epoxy Resin for That Next BIG Project

The Benefits of Epoxy Resin for That Next BIG Project

Strength and density aren’t the only benefits of using epoxy resin. 

There are five main reasons to choose epoxy for your next project:

  1. Fantastic insulation for electrical work 
  2. Ability to handle high-heat and high pressure
  3. Excellent adhesion to reinforcements
  4. Low shrinkage and shapeshifting
  5. No odor or VOCs when working with the right epoxy resin

Electrical Work and Epoxy Resin

For years electricians have had a secret ingredient that they use for coating and encapsulating electrical circuit components and electronic devices. And that secret ingredient is epoxy resin. Epoxy is the go-to choice when you’re looking to seal off your electrical work from the effects of atmospheric gasses, moisture, and possible leaks. It has the perfect ability to easily mold and harden around any electrical work you may be trying to encapsulate.

Epoxy Resin in High Heat and Pressure

Epoxy Resin in High Heat and Pressure

Depending on your project, the heat exposure that your epoxy resin will need to withstand will vary. Different epoxies can resist different temperatures as well as different amounts of pressure.

A crafting epoxy or an epoxy that is used on a woodworking project will typically withstand heat up to 150 degrees Fahrenheit. However, if you are looking for a heat-resistant epoxy, you can find certain epoxy resins can withstand up to 600 degrees Fahrenheit. 

Another important element to consider when thinking about heat is also if your epoxy resin needs to be UV resistant. Many epoxy resins aren’t UV resistant and will turn yellow with long amounts of exposure. If maintaining that crystal clear consistency for the lifetime of your project is important, ensure the epoxy resin you’re using is UV resistant.

Leveraging Epoxy Resin for Adhesion

It’s no doubt that epoxy can adhere to two objects together. Whether that is two slabs of wood to create a table, used as a glue to put a chair leg back into place or to combine multiple structures.

Epoxy resin is the top choice for adhering materials because it doesn’t require outside elements for the adhesion to take place. The only requirement for epoxy resin creating the strong adhesive is letting it fully cure.

The majority of epoxy resins come in a perfectly balanced ratio, and all you have to do is combine the two parts and pour them. 

However, there are a few things to make sure you look out for when you’re selecting epoxy resin as an adhesive. 

Ensure that the epoxy resin you’re purchasing: 

  • Has an easy 1 to 1 ratio
  • Has self-leveling properties
  • Has NO VOCs and is low odor

Epoxy Resin That Resists Shrinking and Warping

Epoxy Resin That Resists Shrinking and Warping

The best and worst element to using epoxy resin is that exactly how you pour is exactly how your project will turn out. This is perfect when you need an adhesive that will hold its structure once cured, but it can be tricky when you’re a first-time epoxy user. 

The trick to getting your epoxy to hold it’s shape is ensuring you have the correct epoxy resin ratios, that you mixed properly, and that you poured enough to cover your entire project. As you start to research epoxy resin products, ensure that you’re finding products that showcase their easy mixing ratios.

A bonus tip is making sure that there are positive reviews from first-time epoxy users to experienced woodworkers. This will help you ensure that you’re purchasing a product that you’ll know how to use.

Working with a SAFE Epoxy Resin

Working with a SAFE Epoxy Resin

Epoxy resin works the way it does because it’s a balance of chemicals that are reacting to one another. And when you’re working with a chemical product, you want to make sure that you’re working with one that was safely produced, and safe for you to use.

When searching for epoxy resin make sure to look for and epoxy resin that is:

  • Produced in the U.S.A.
  • No VOCs
  • Low odor
  • Food Safe (Complies with FDA Standards)

And whenever you’re working with epoxy make sure you have gloves and goggles in a ventilated workspace. 

In Conclusion

Whether you’re working on a craft project, to a wood table, to a new structure, there is a good chance that epoxy resin will be one of your go-to tools. 

But before you buy, make sure you do plenty of research to make sure that the epoxy resin you’re purchasing is the right epoxy for your next project.

In case you missed it!

How to Keep Your Home Tidy and Clutter-Free

0
Tidy and Clutter-Free home

Thanks to Covid-19 we’re all spending a lot more time at home than we’re used to. You’ll want to ensure your house is a comfortable, relaxed, space for you to be in. You don’t want to be constantly cleaning up after yourself. Whether you want to create a tidy workspace or you’re in desperate need of a sort out, there’s plenty you can to keep your home looking lovely. 

Invest in Storage 

Invest in Storage 

When it comes to keeping your house tidy, storage will play a vital role. It allows you to put everything away and gives you much more room to move around. From finding the right wardrobe for your bedroom to making the most of your shelves – you need to find a storage solution that works best for your living space.

You could look at your current method and think about what works, and what doesn’t. Do you have a house with limited floor space or small rooms? Then why not look to the walls for storage? Building a floor to ceiling bookcase or utilizing the space above doors will keep clutter off the floors and can be a great design feature if done well.

For smaller fixes that can be implemented quickly why not try hanging things on the backs of doors or investing in a bed with built-in storage. No matter the size of your house, sorting out a good system for tidying up is key.

Stick to a System 

So, this brings us on to find a system to keep things as clutter-free as possible. You want to make sure that there’s a space for everything to go and then get into the routine of returning it to that place. A good investment for any house is baskets – they offer a quick solution for getting things put away quickly. Don’t be put off if you’re working with a smaller space, all these means is that you have to get more inventive with your ideas. You can make the most of the wall, windows, and the space under the stairs with some creativity. 

One In, One Out

One In, One Out

Of course, a fantastic way of keeping your house tidy is to not let clutter in from the start. Try to pay more attention to your shopping habits. Do you really need this? How often will you use it? Where will it fit? A good place to start for keeping things tidy is the one in, one out rule. For example, you need a new winter coat.

Once you’ve bought it, you can donate your old one. You want to try a maintain a balance in your home, which would be hard to achieve if you keep buying stuff for the sake of it. Having a donation box visible at all times will encourage you to donate any items that you come across that you no longer use or need. Donating unwanted items instead of simply throwing them away is also better for the environment and your carbon footprint. 

Keep on Top of Things 

Do you find piles of paperwork building up around the house? This is often a common cause of clutter and one that can easily be rectified. Instead of using every available surface to pile papers on, create a system in which everybody knows what to do with certain things such as bills and where to put them.

To avoid getting piles of flyers through the door, put a sign on your letterbox that politely says, ‘No leaflets or junk mail please’, this avoids the clutter from ever entering the house. Magazines can also be a source of clutter in the kitchen or living room, especially if you have a monthly subscription to your favorite reader.

To avoid the pile of magazines replicating a game of Jenga on your coffee table, why not pass on any magazines you have read to family or friends to read too. This is a great way of sharing and decluttering too. 

Declutter Throughout the Day

Declutter Throughout the Day

It’s easy to let clutter build up over the week, papers pile up, clothes get left on a chair or the floor; we’ve all been guilty of having a ‘floordrobe’ at one time or another, but simply tidying up things as you go about your daily routine keeps clutter to a minimum and more manageable too.

When your house is tidy, you’ll feel so much more at ease. It’s important to find storage systems that work for your space. Do you have any tips on keeping a house clutter-free? 

Read more:-

9 Tips for Cleaning Your Carpet

0
Cleaning Your Carpets

Decorating the floors of your home with carpets is a great way to have a warm feeling on your feet during the cold season and some soft comfort in the summer. Carpets help increase your house’s value because they are a long-term investment, even with its high-maintenance quality. Here are some cleaning ideas you can do by yourself to help maintain the quality of your carpets.

1. Use a Lint Roller

Cleaning Your Carpet with Use a Lint Roller

You might think that a powerful vacuum cleaner could get rid of any stubborn dirt that collects on your carpets, but it may not always get the job done right. If you vacuum your carpet correctly and there are still crumbs, crud, and hair on the surface, consider using a lint roller and exerting a little force to collect all the dirt fully. 

2. Squeegees for Pet Hair

Cleaning Your Carpet with Squeegees for Pet Hair

How can a squeegee help you in cleaning your carpet? Sometimes, lint rollers will not be enough to remove all the dirt thoroughly, especially pet hair. When your pets start to shed, it can cling to your carpet and give you a hard time when cleaning.

Contrary to popular belief, squeegees are not just for cleaning windows, but they can also be used to dislodge gunk, ice frost, and other substances that create thin sheets that will attach to a surface. You can water the squeegee and treat your carpet like you would a window, and remove all the pet hair.

3. Eliminate Stains By Ironing

Eliminate Stains By Ironing to Cleaning Your Carpet

There are three steps in removing stains on your carpet using an iron. First, vacuum the affected area to remove hard particles and concentrate only on the stain. Apply the stains with water and vinegar solution. Formulate a 3:1 ratio to get this mixture to work on the stained area in about five minutes. Next, lay a towel on top of the stain and plant the heated iron to create pressure and transfer the stain into the towel.

4. Blotting

Blotting to Cleaning Your Carpet

When you have a stain on any surface, your instinct might be to rub it away, but if you rub a stain on the carpet, this can cause it to spread further. Blotting is a technique that can remove the stain on the carpet. When you apply light pressure on the stained area, it will transfer to the cloth. Make sure that you blot inwards from outside the stained area so it will not spread further.

5. Homemade Carpet Cleaner

Homemade Carpet Cleaner to Cleaning Your Carpet

If you want to be resourceful about cleaning your carpet, you may want to try formulating a homemade carpet cleaner. There are available detergents on the market for deep cleaning carpets, especially if you own a shampooing machine. However, some may prefer a healthy and organic way of cleaning that helps protect the environment. You can create your cleaning solution with ¾ cup of Hydrogen Peroxide, five drops of essential oils, ¼ cup white vinegar, two tablespoons of fabric softener, two tablespoons of dish soap, and one gallon of hot water. 

6. Baking Soda Removes Oil Stains

Baking Soda Removes Oil Stains to Cleaning Your Carpet

Oil stains can be one of the worst problems that you encounter in cleaning your carpet. As it turns out, baking soda can be effective in extracting oils from carpets. Spread some baking soda over the oil stain and leave it there for a while. The baking soda will absorb the stain, which you can then remove with a vacuum. After you extract the oil, you can proceed to dab the stain.

7. Rubbing Alcohol Can Clean Nail Polish

Rubbing Alcohol Can Clean Nail Polish to Cleaning Your Carpet

Applying rubbing alcohol on carpets may cause bleaching and damage the dye, but rubbing alcohol is a good nail polish remover, in which you let the nail polish dry up and try to chip off some of it. Gently dab a paper towel or a piece of cloth to help dissolve the nail polish.

8. Use Shaving Cream

Cleaning Your Carpet and Use Shaving Cream

For ordinary dirt stains, you may use shaving cream for cleaning. You can easily spot dirt on carpets with light color due to high traffic, resulting from dust accumulation. You may use shaving cream by applying on the stain and leave it there for a while. Applying this technique can also make your carpet more fluffy.

9. Deep Clean Your Carpet

 Deep Clean Your Carpet

You can perform a deep cleaning on your carpet without using harsh chemicals. Club soda can work as a cleanser after you spritz it on your carpet. It is one of the best solutions for removing dirt and stains on your carpet. Dab a cloth on the surface until there are no more visible stains. You may gently rub the area with a cloth or paper towel to remove the stain.

Steam cleaners are also a great option for thoroughly cleaning your carpet. For carpets with deep-seated stains, you can mix baking soda, vinegar, and water in equal parts. Apply it directly on the stain and let it sit for a few hours. Once the carpet has absorbed the cleaning paste, you can use your steam cleaner.

How Often Should You Clean Your Carpets?

Experts say that you need to vacuum your carpet at least twice a week. You might also consider hiring professionals such as Emerald Carpet Cleaning to clean your carpet every year. If you have heavy “traffic” in your houses such as smokers, children, or pets, you should vacuum your house three to seven times a week and get deep cleaning done every three to six months.

For households with family members with lung diseases such as asthma, carpets placed in high humidity areas should be checked regularly for mold growth, as it can produce allergens. As much as possible, allow your carpet to dry outside your home immediately once it is spilled on by any type of liquid to prevent molding. 

There is a wide selection of residential flooring products such as bamboo, vinyl, stone, laminate, tile, and cork, but carpeting your floor remains the most popular floor treatment. The carpet industry is growing stronger with all the best reviews from users. With proper maintenance, carpets can be a great investment that can give your home an elegant look and feel. 

Explore More:-

15+ Chic and Trendy Macrame Wall Hanging DIY Ideas for Beginners!

0
macrame wall hangings

While scrolling down on Instagram, you might have seen some really interesting Macrame arts such as macrame plant hangers, macrame wall hangings, macrame curtains, and more. Some of you might have also pinned these cute bohemian art pieces on your Pinterest. After all, these designs are so eye-catching and beautiful. Each Macrame piece has some kind of charming vintage appeal to it, which gives our home an incomparable touch of cozy, neutral texture.

Back in the days, macrame was connected to the hip and happening kind of style from the ’60s and ’70s, but now this trend shifted toward boho and eclectic decors. Thanks to the innovative artisans, crafters, and designers that continue to turn a fresh eye towards this knotted and woven art. They transformed it and made its neutral palette and heavily textured patterns look even better. Great! 

So today, we have brought some creative and fun DIY macrame wall hanging ideas so that you can decorate your home for the upcoming festive season. 

15+ Cute and Creative Macrame Wall Hanging Ideas

From white and cream macrame string, cording, or roping, you can actually make so many awesome stuff like coasters, wall hangings, jar holders, and so much more. So check every DIY listed below: 

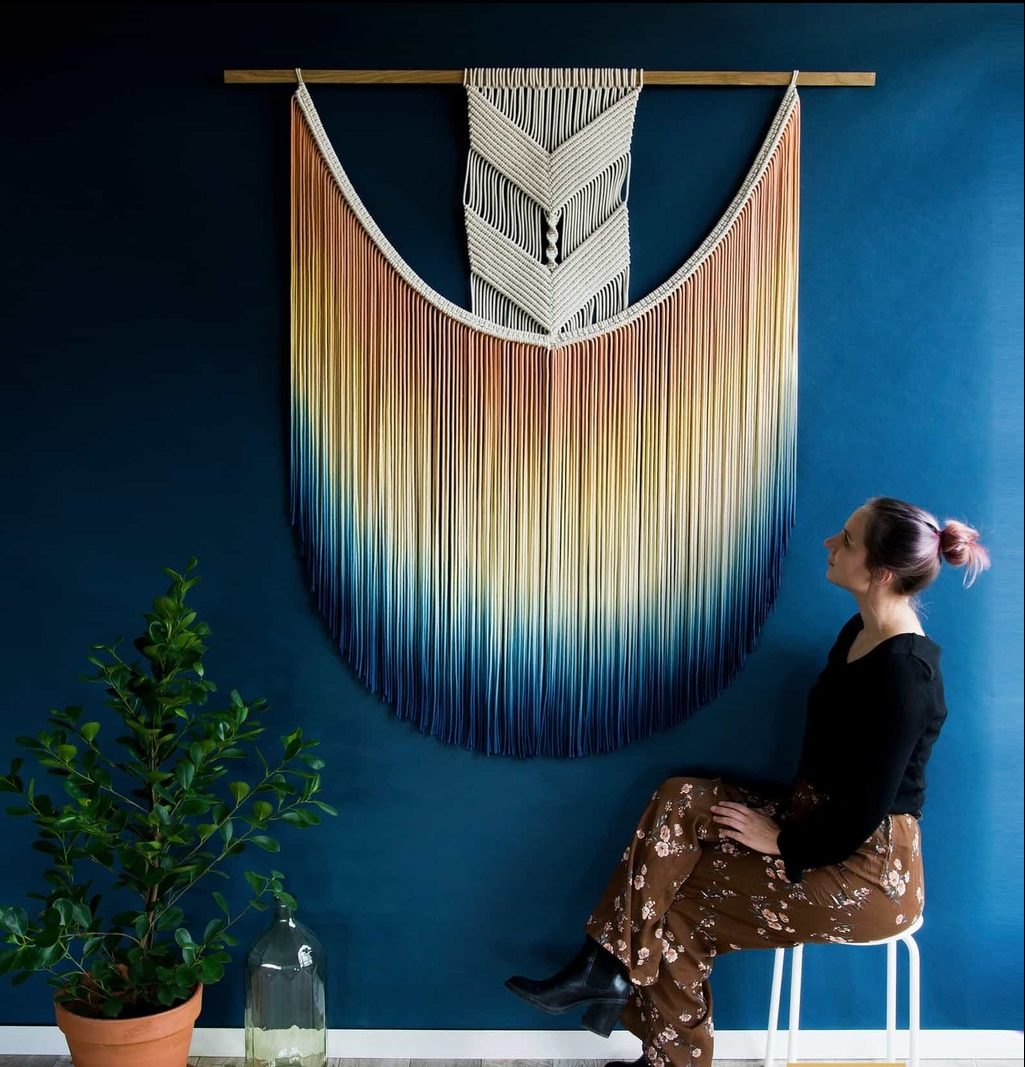
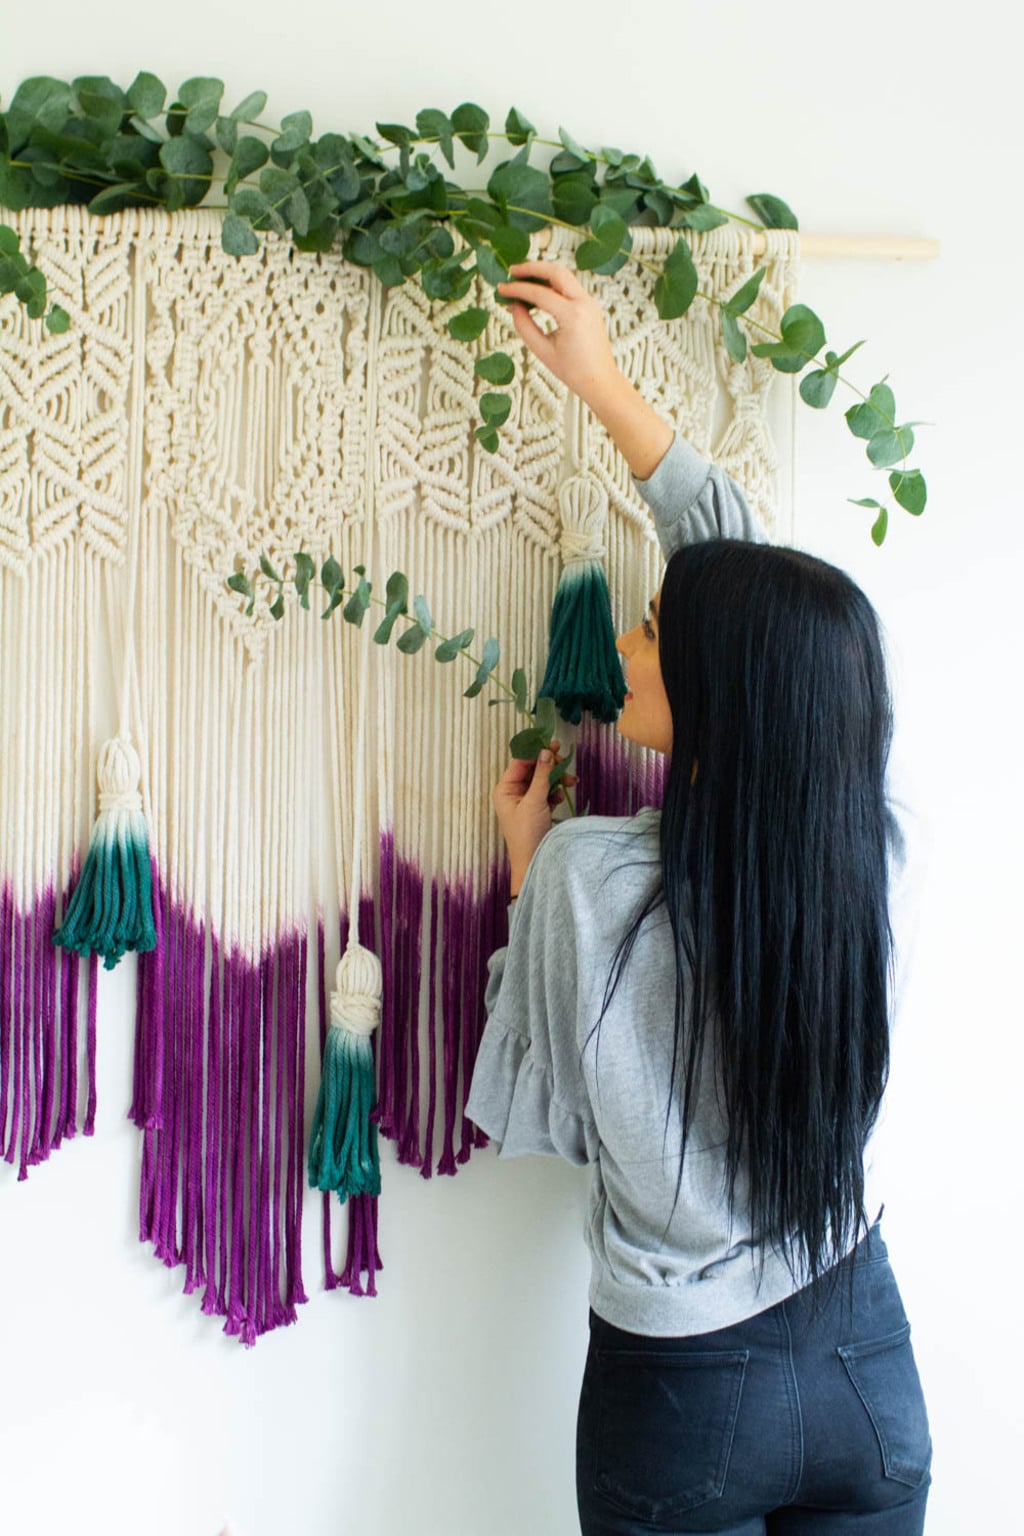
1. Dip Dyed Huge Wall Hanging

Dip Dyed Huge Wall Hanging

As soon as I saw this, I just fell in love with this gorgeous large wall macrame hanging. Aren’t these colors lively and rich? This dip-dyed large wall macrame hanging will surely bring a new depth to any wall of your home. From the foyer to the bedroom, this versatile piece will fit in any place with ease.

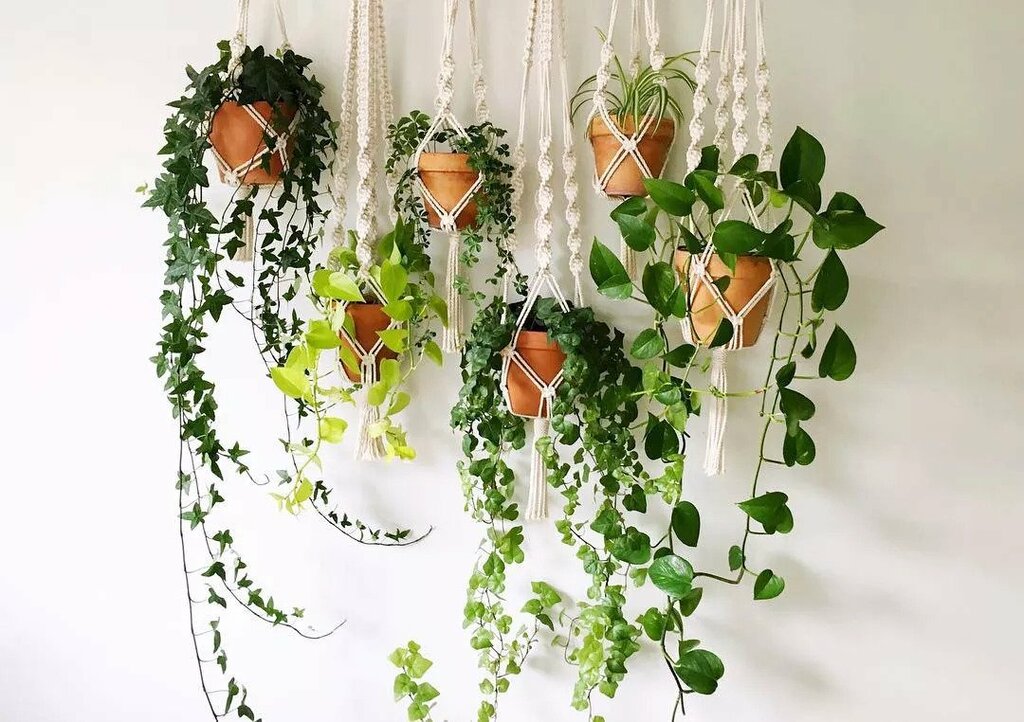
2. Adorable Twisted Plant Hangers

Adorable Twisted Plant Hangers

When it comes to macrame, this is the most common DIY that anyone thinks of. So if you still didn’t have a plant holder like this, it’s time to make one. You can create as many according to space and hang your plants in them. The twisted and textured pattern will surely look delightful and classy. 

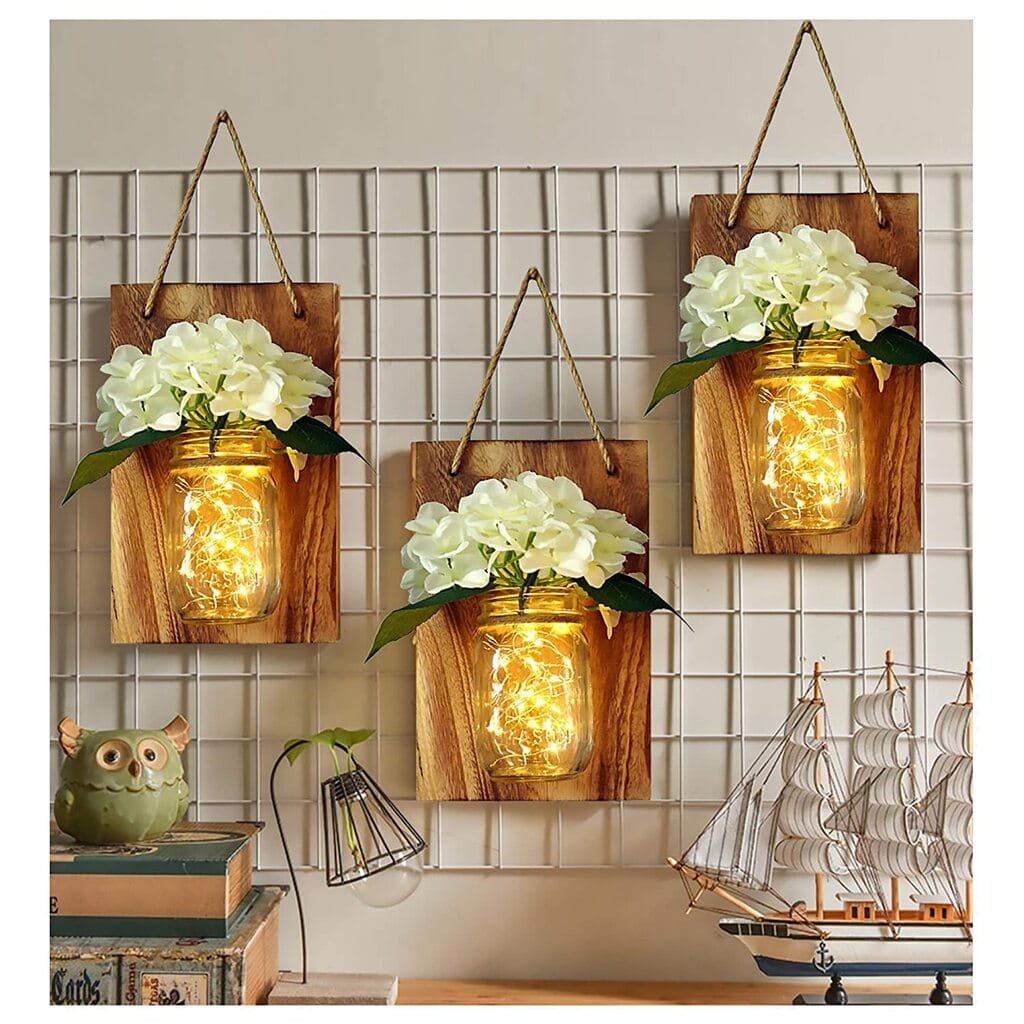
3. Glowy Mason Jar Holders

Glowy Mason Jar Holders

Quite similar to the plant holder but a little bit easier, these mason jar holders will create a mesmerizing ambiance in your outdoors. You can effortlessly create them and can hang them in trees. They’ll look really awesome at night! 
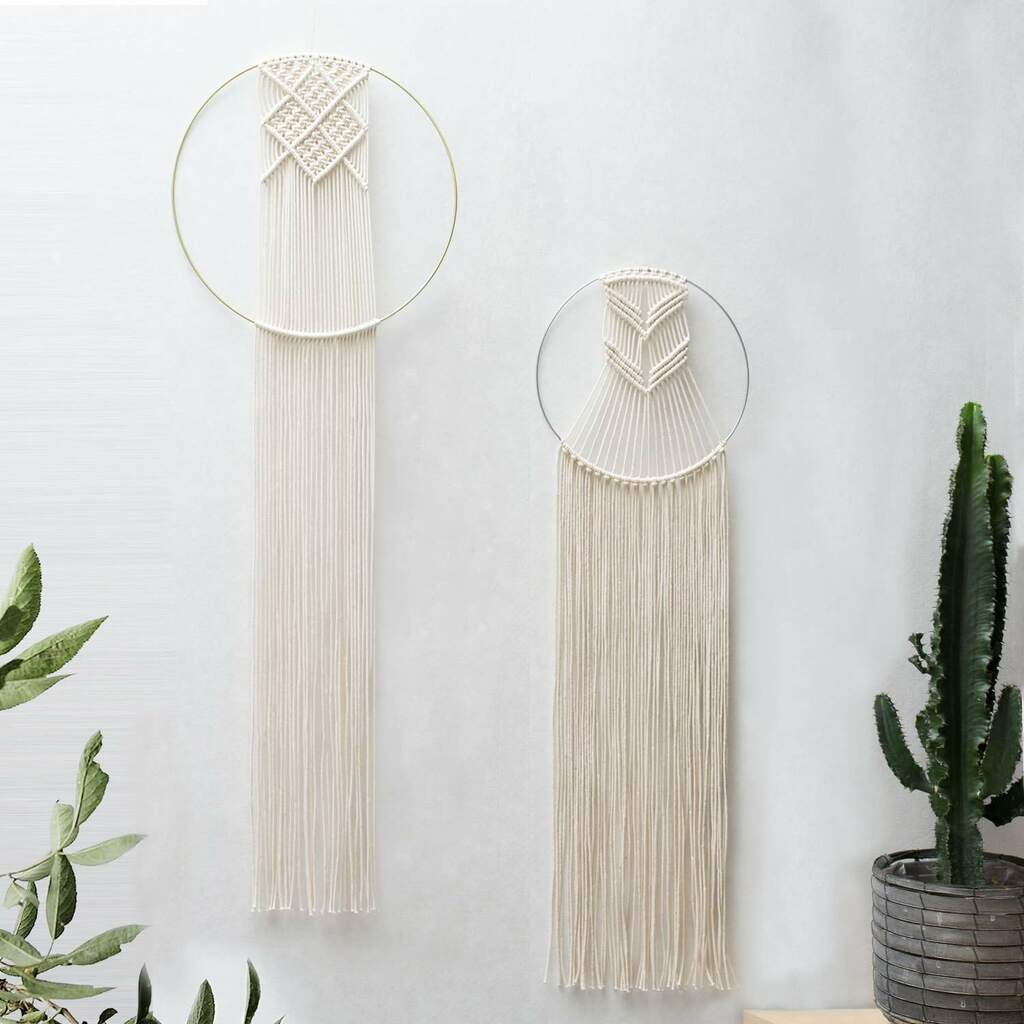
4. Dreamy Art Piece

Dreamy Art Piece

Yes, they kind of look like a dream catcher. These cute macrame artworks are large and contemporary versions of dreamcatchers. To create this, all you need is some hoops and macrame. 

Lightly woven macrame around the loops in your desired pattern, and voila, your contemporary dream catcher is ready to grab some attention from your guests. Also, don’t forget to keep your woven works pristine and free of dust to retain their soft and delicate appearance.

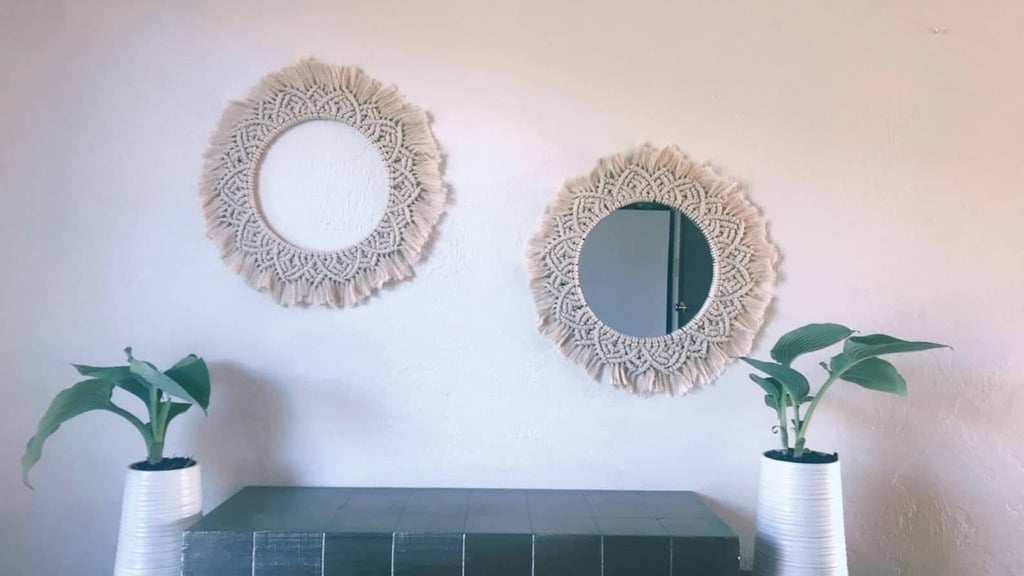
5. Macrame Mirror Mandala

Macrame Mirror Mandala

Another circular art piece that you can DIY from macrame is these beautiful mirrors. A couple of these artworks provide the same boho flair but with a dash of contemporary flavor to your room. We all know that mirrors are a great way to create an illusion of extra space and light as well.

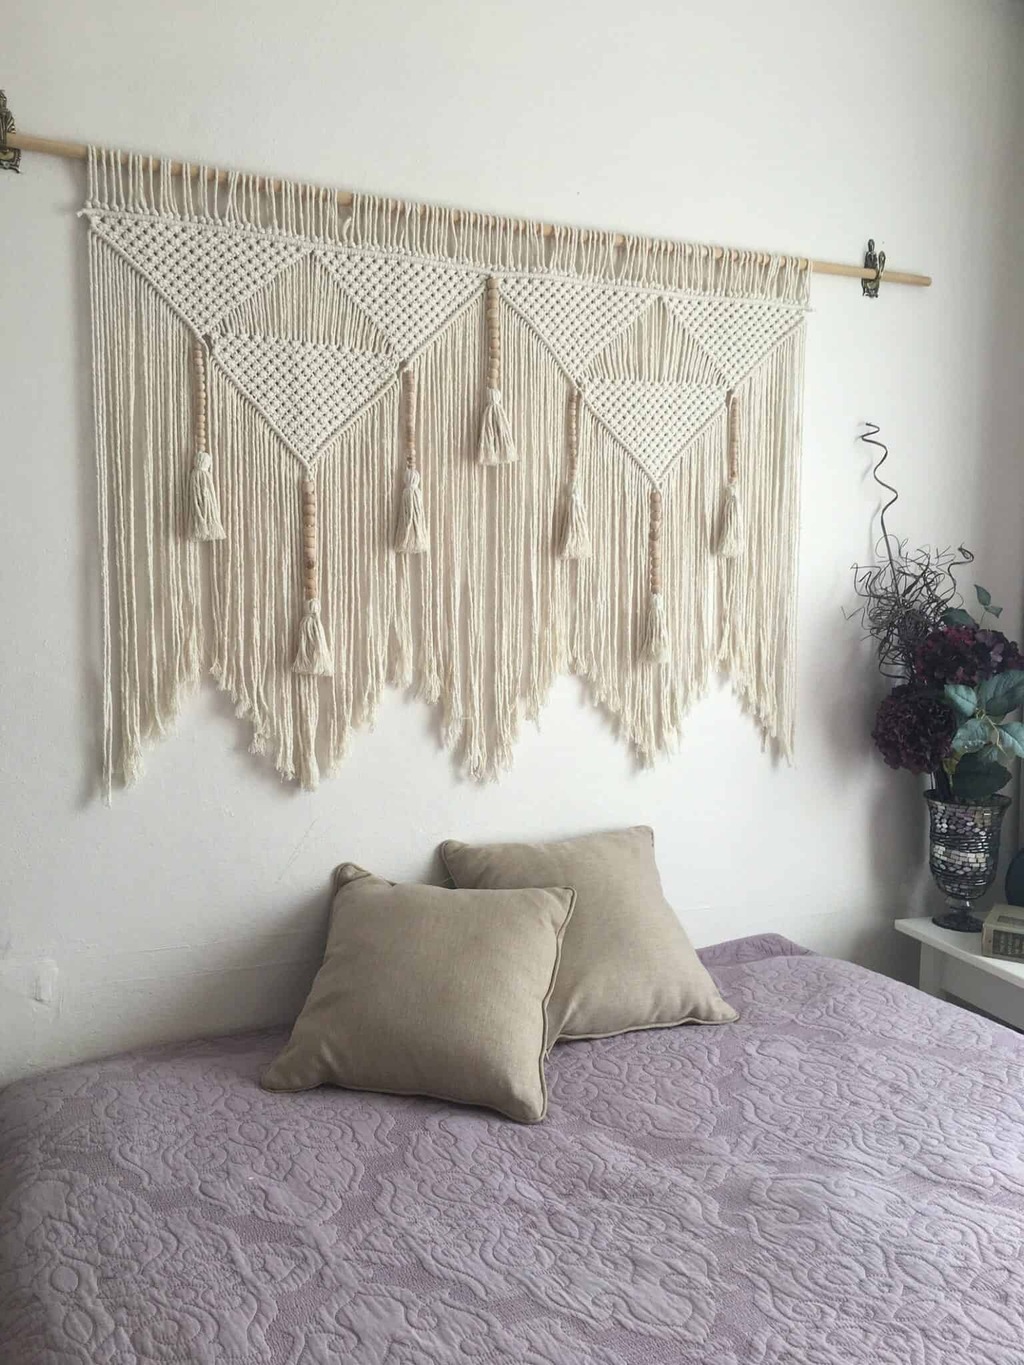
6. Headboard from Macrame

Headboard from Macrame

We’re pretty sure that after looking at this cute macrame DIY, you’ll fall in love with it. Yes, this is a vast macrame wall hanging, but you can use it as a headboard. It’ll look lovely! You can also add some pop of colors by dip dying the ends just like the first one. 

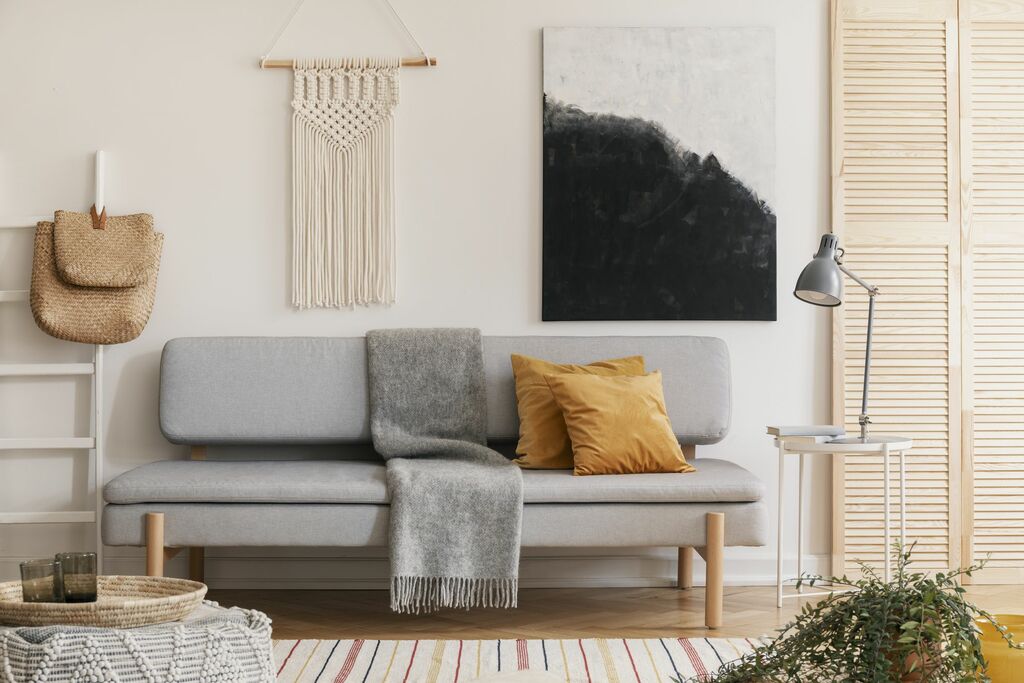
7. Flowing DIY Macrame Wall Hangings

Flowing DIY Macrame Wall Hangings

When it comes to macrame, your DIY will never complete without creating at least one wall hanging. There is a dizzying array of wall hangings that you can make from macrame. 

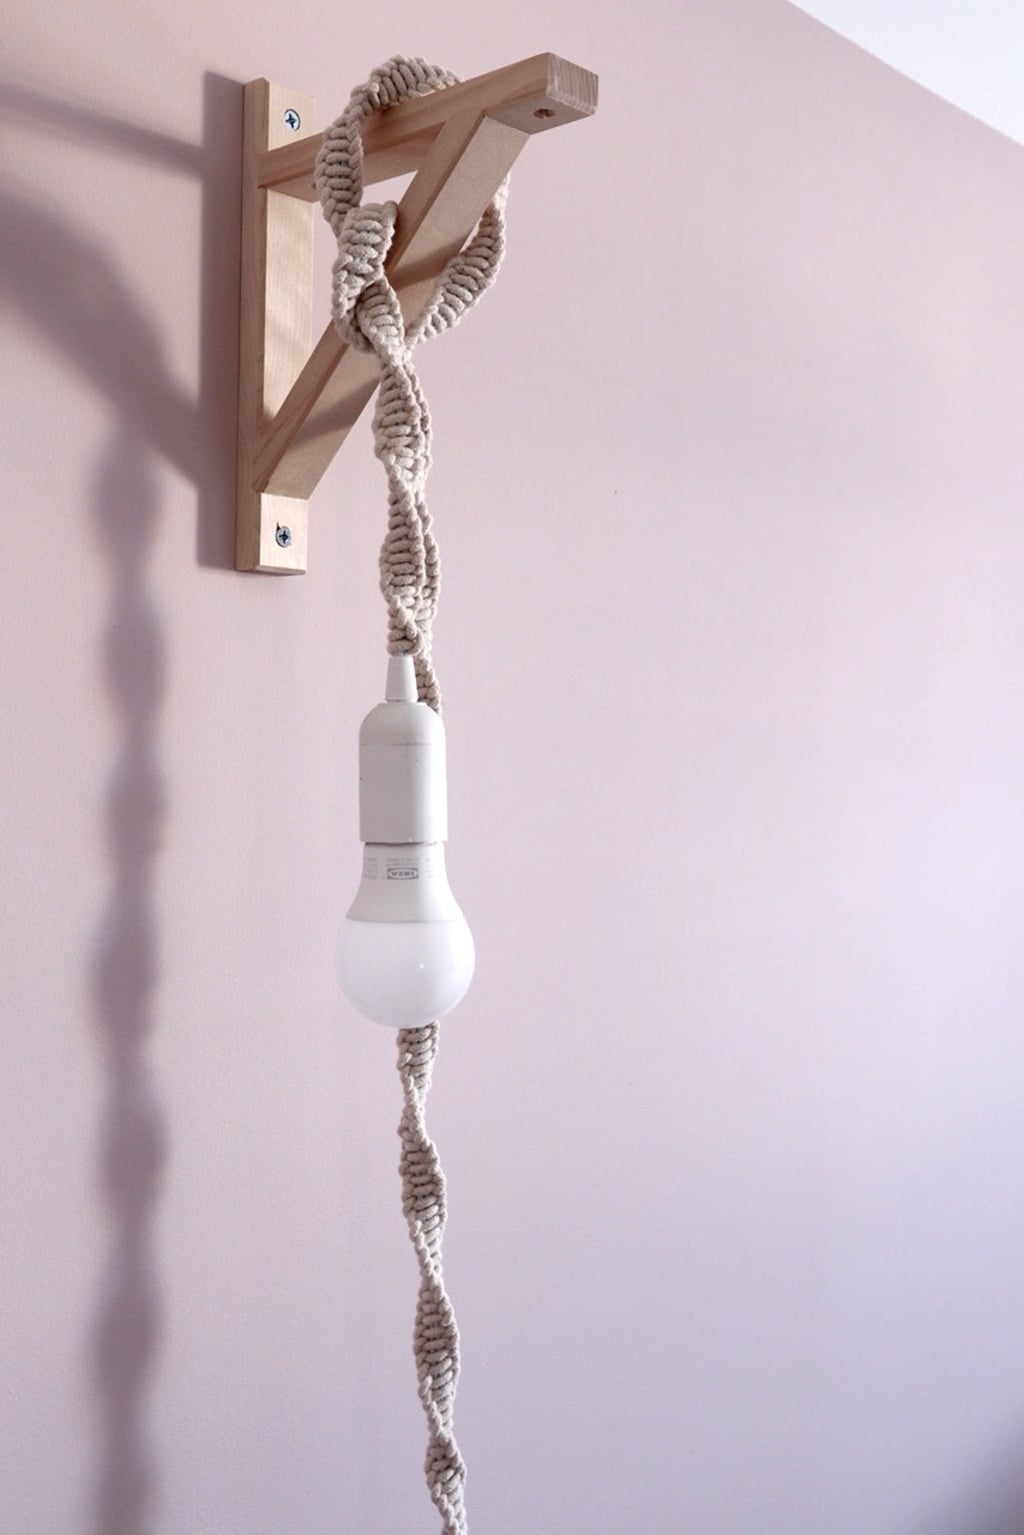
8. DIY Macrame Lamp Cord

 DIY Macrame Lamp Cord

Another really fun and unique DIY is this lamp that is entirely made from macrame. Just keep making a rope-like design, and at last, just put a bulb holder, and your lamp cord is ready. You can put this in your reading corner. 

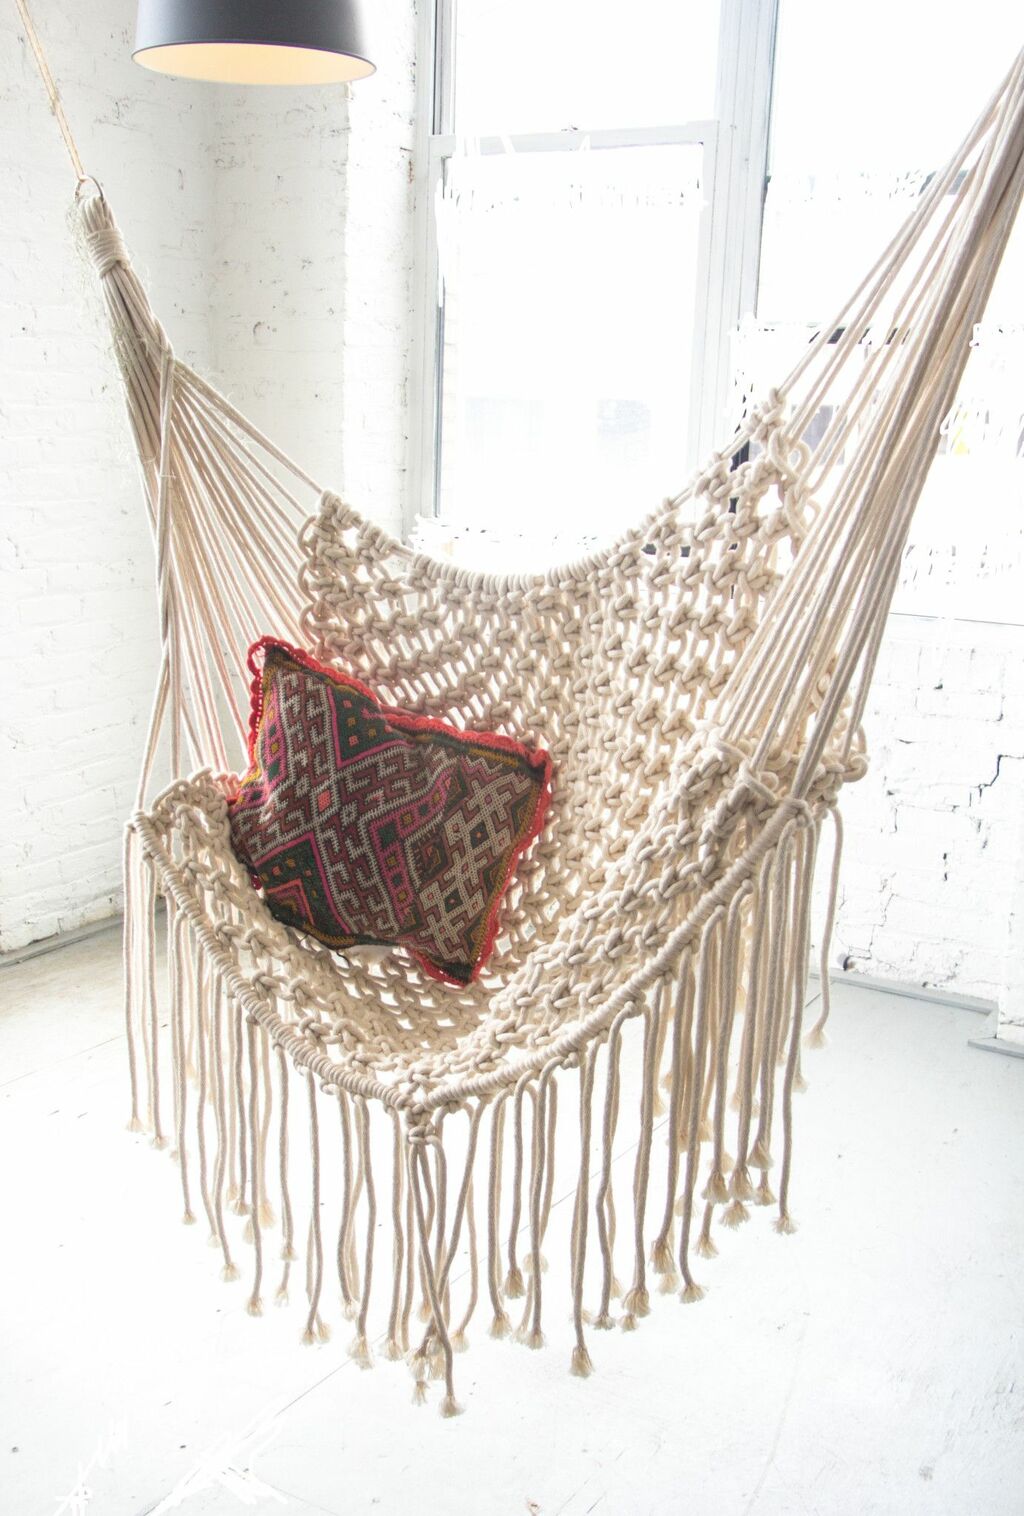
9. Woven Macrame Hammocks

Woven Macrame Hammocks

This DIY is for my those readers who are pro in weaving macrame. Traditionally, macrame hammock is used outdoors, but there is no rule that you can’t use it indoors. It will bring a feeling of relaxation to your place.

Just hang this in your reading nook on a three-season porch where you can take in the outdoor scenery. 

10. DIY Azurite Pattern Art

 DIY Azurite Pattern Art

These types of patterns are pretty commonly seen in handmade macrame artworks. These patterns look extremely good, even without colors. You just have to make all the details carefully, and your Azurite Pattern macrame art will be ready in no time!

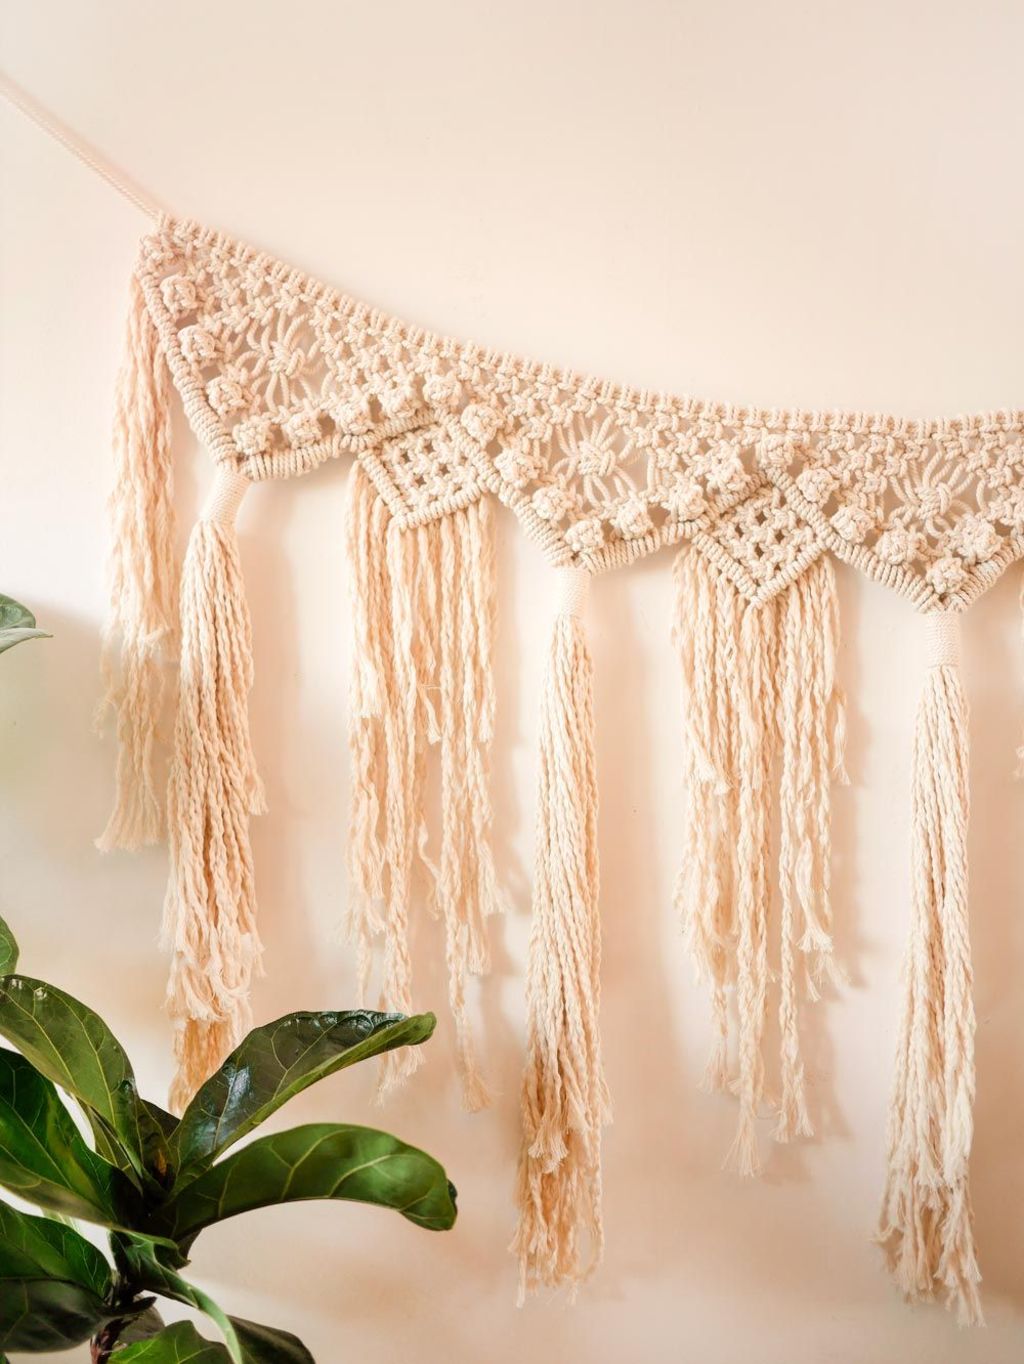
11. Decorative Macrame Garlands

Decorative Macrame Garlands

Do you have a boring looking hat rack? If so, then spice it up with some cool macrame garlands. It will bring a touch of hipness and happiness to your home! You can even place them above your bed or on a door. Even they look cool on a fireplace mantel, floating shelf, or window sills. 

Read our previous blog on stunning hat rack ideas and get inspired and make one for yourself. 

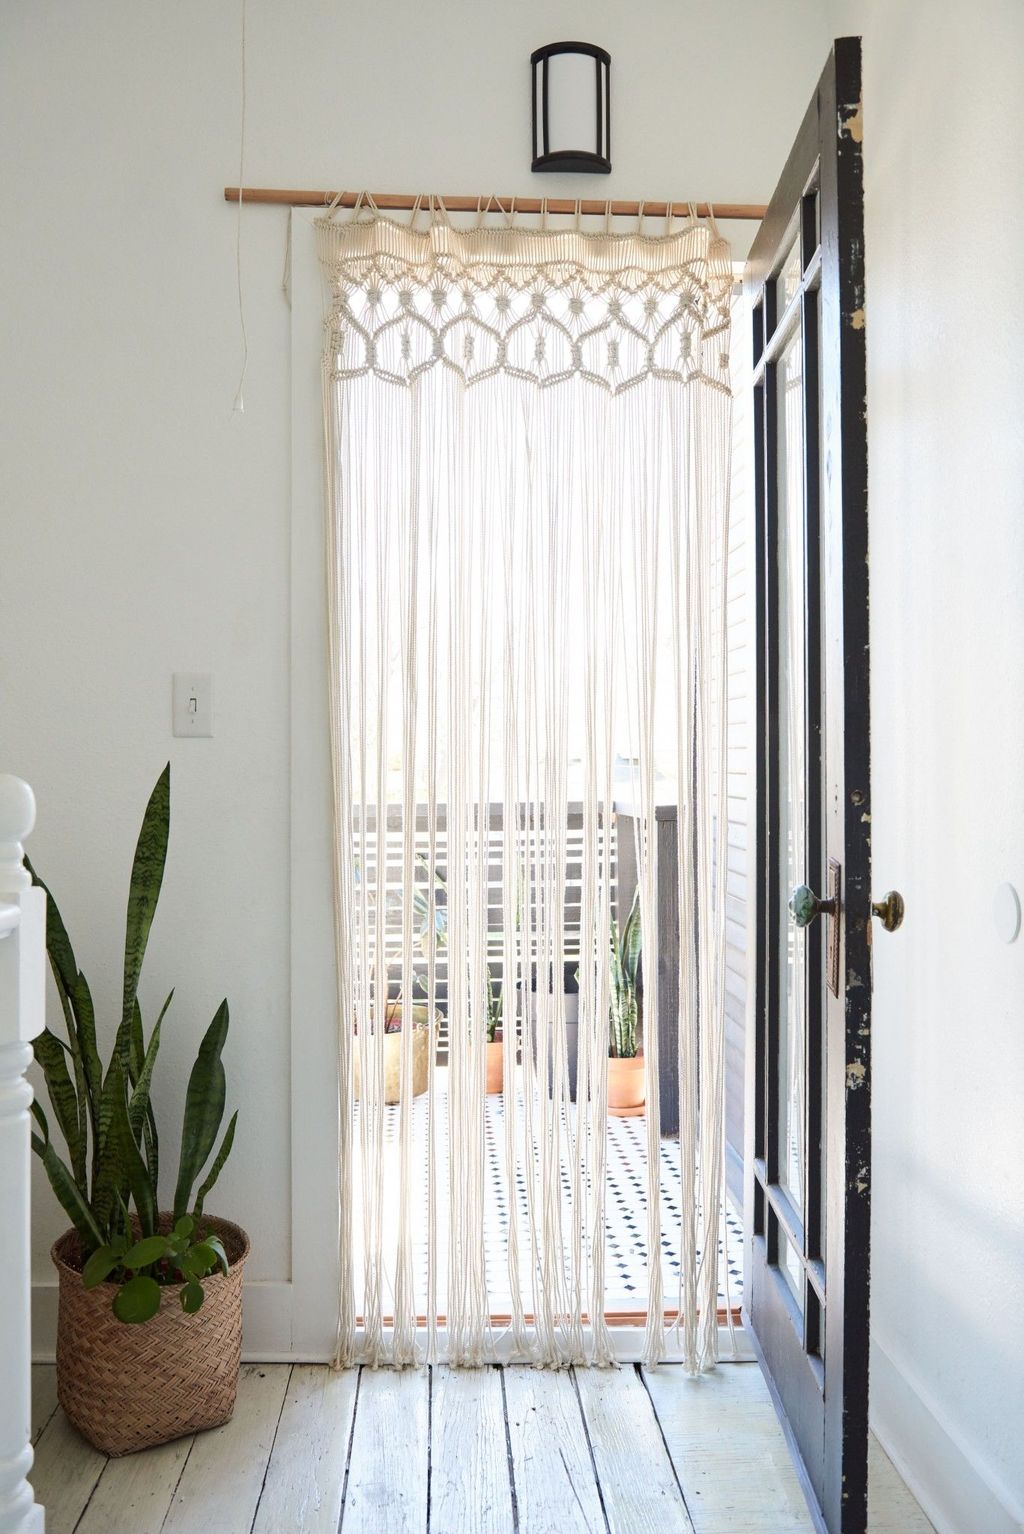
12. Easy Breezy Macrame Door Curtains

Easy Breezy Macrame Door Curtains

From Instagram to Pinterest, these flowy curtains are everywhere. These flowing macrame coverings will instantly add a dash of dreaminess to any doorway or window. You can even use them on your closet door because this makes access quieter, quick, and simple!

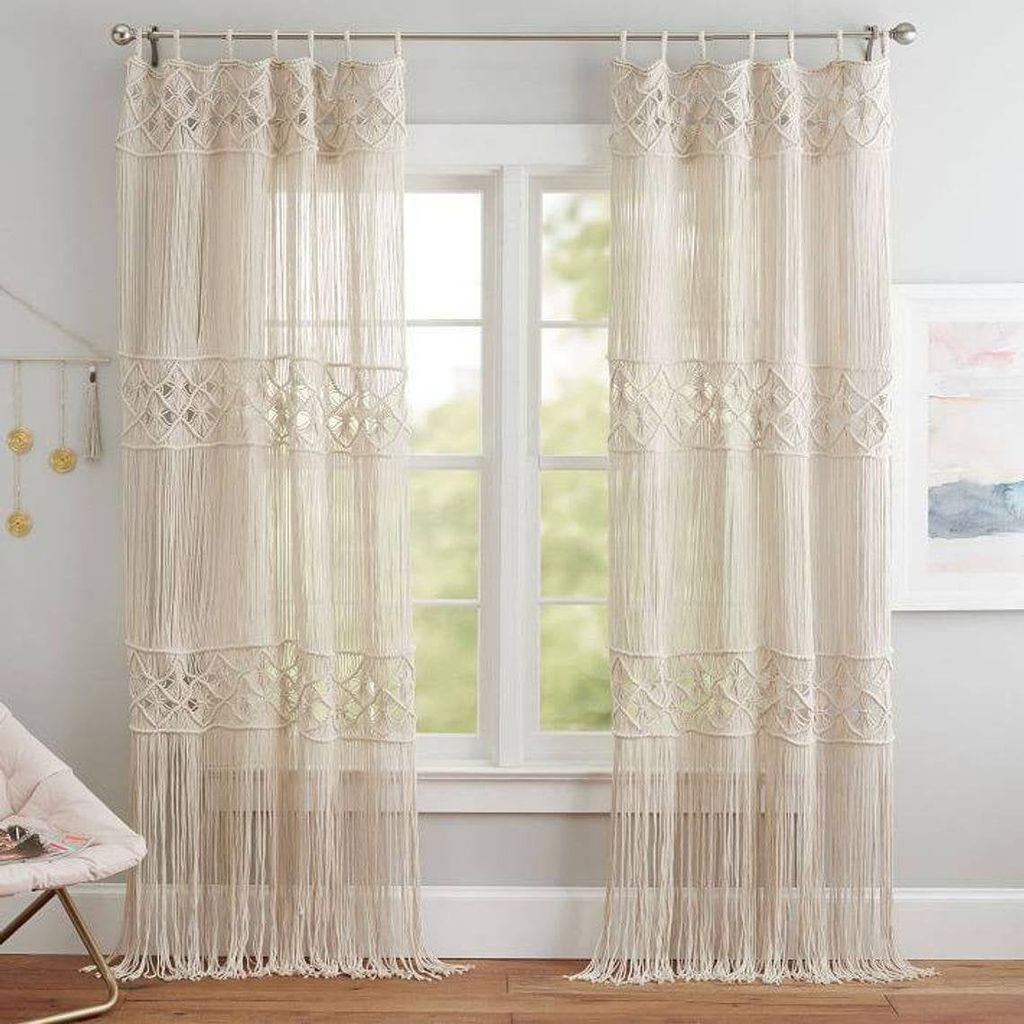
13. Flowy DIY Macrame Panels

Flowy DIY Macrame Panels

Just like the macrame door curtains, these are the window panels. Aren’t they making the whole space more cozy and welcoming?

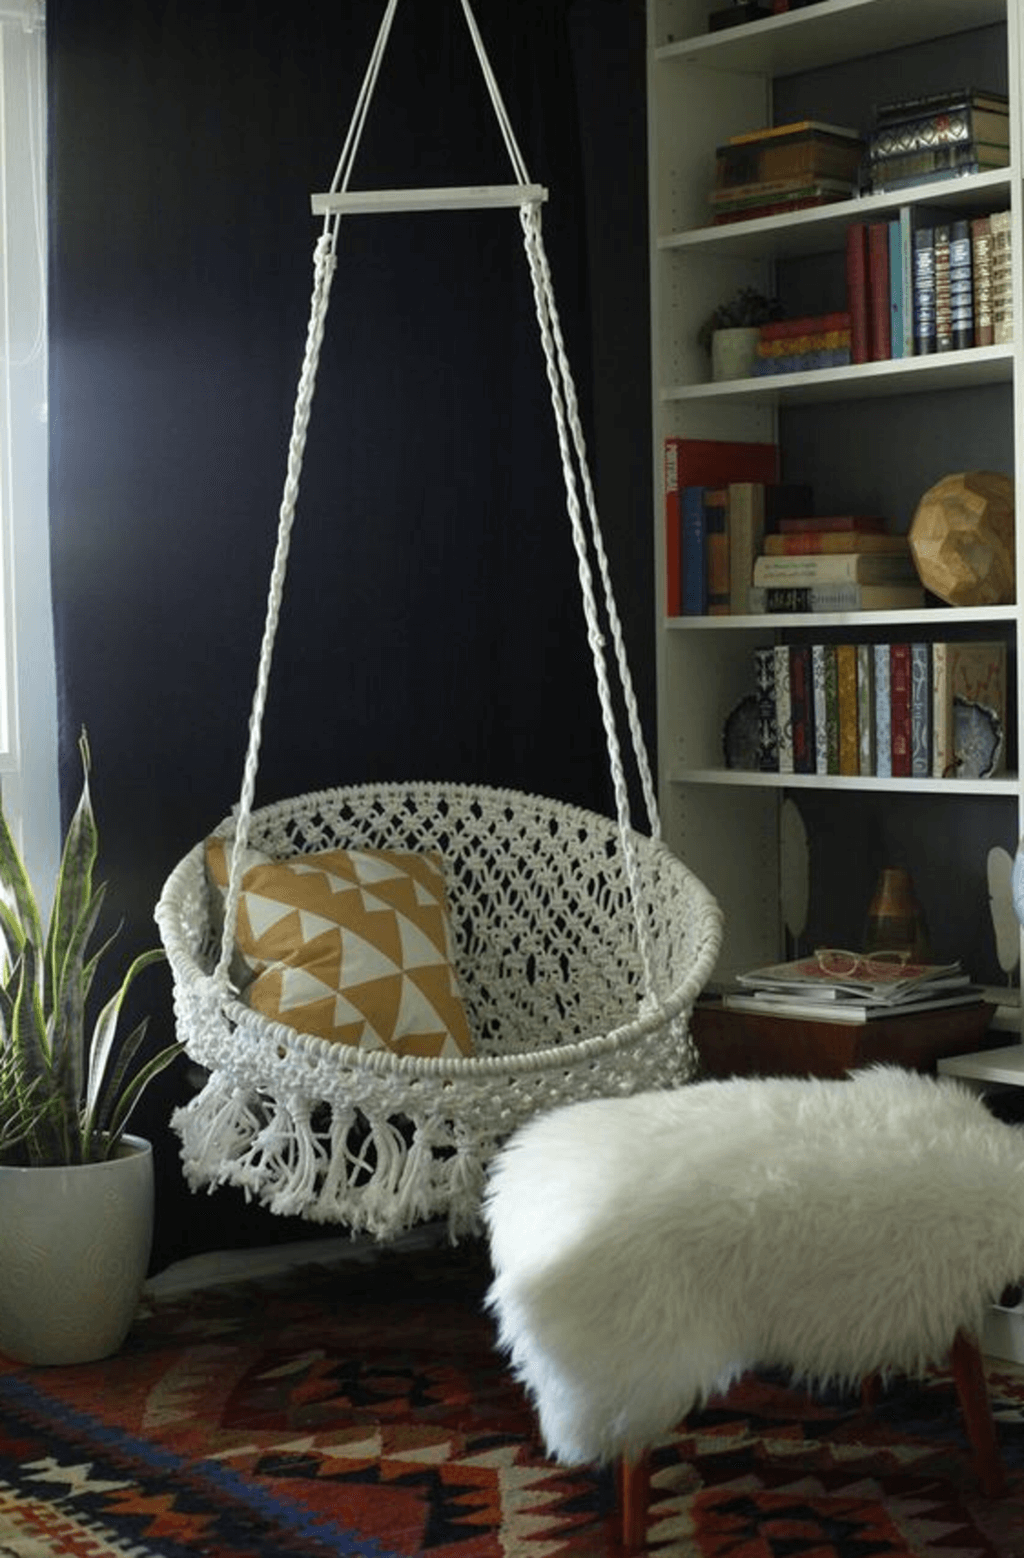
14. DIY Rotating Macrame Chair

DIY Rotating Macrame Chair

This festive season, don’t leave any corner of your house undecorated. Put a bookshelf in a corner and fill it with your favorite books. Hang a macrame chair and some fluffy throw pillows, and this boring corner will transform into a lovely reading nook. 

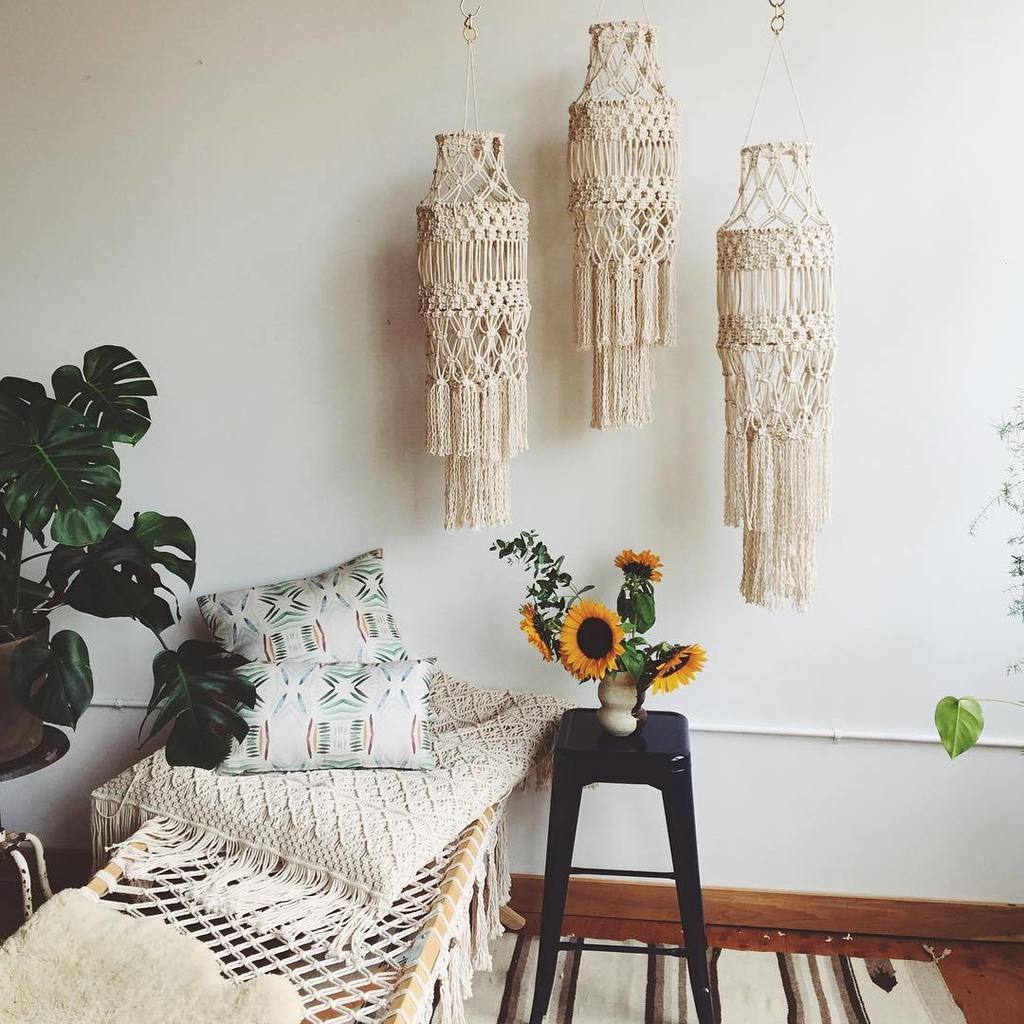
15. Magical Hanging Chandeliers

Magical Hanging Chandeliers

Cast a magical and mystical glow throughout your home with these really pretty macrame covered chandeliers. You can also include some artisanal woven pendants made from bamboo and rattan. They both look great together. 

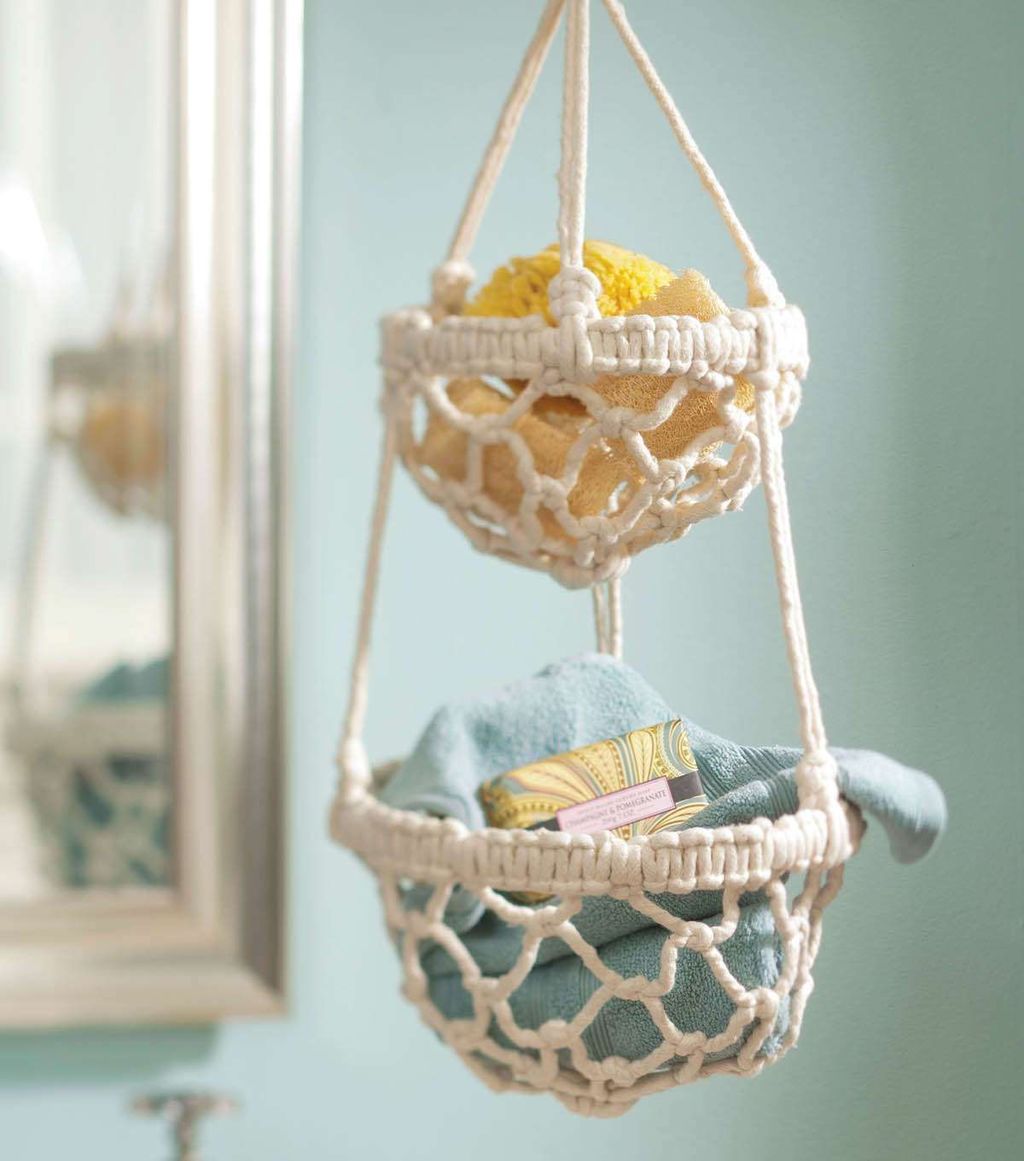
16. DIY Macrame Bathroom Basket

DIY Macrame Bathroom Basket

Macrame arts doesn’t limit to the living rooms and bedrooms; you can use them anywhere. Yes, even in bathrooms. Look how cute these small baskets are being used for storing bathroom essentials. 

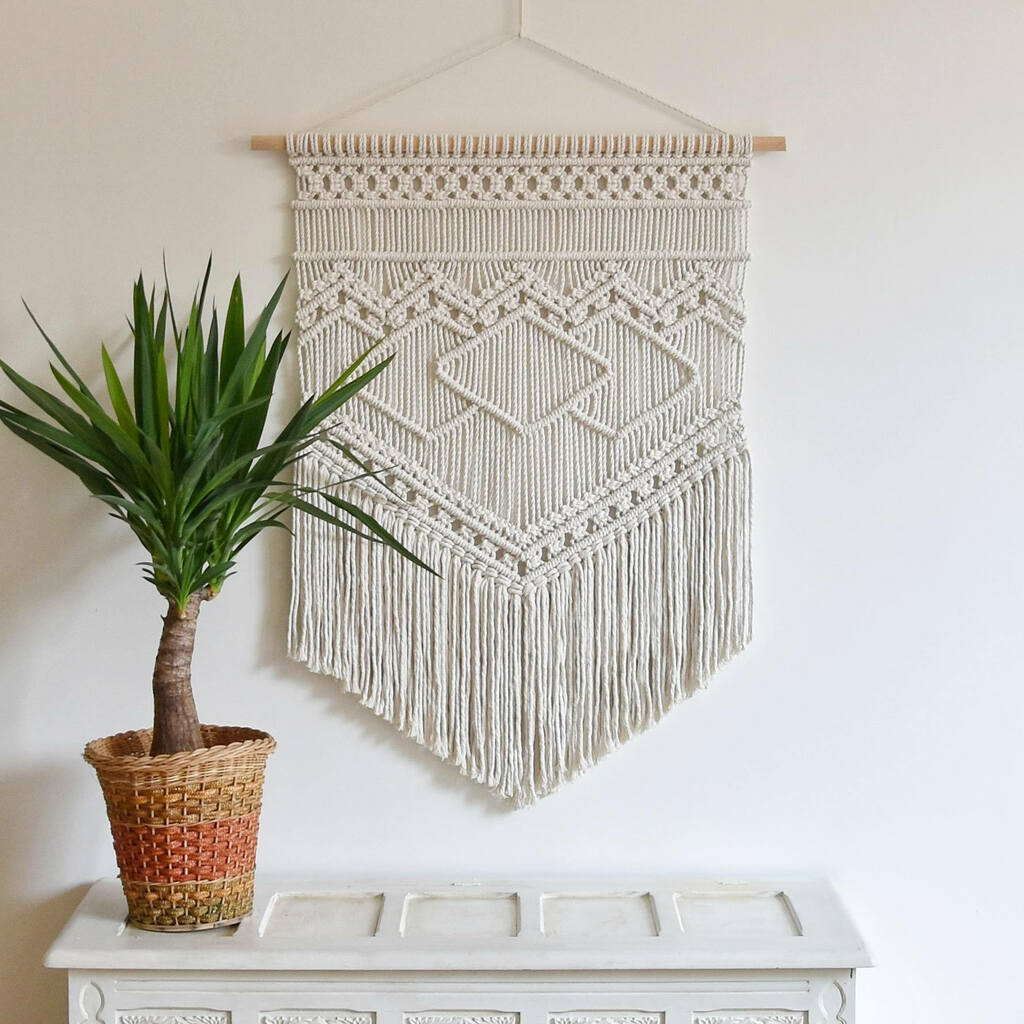
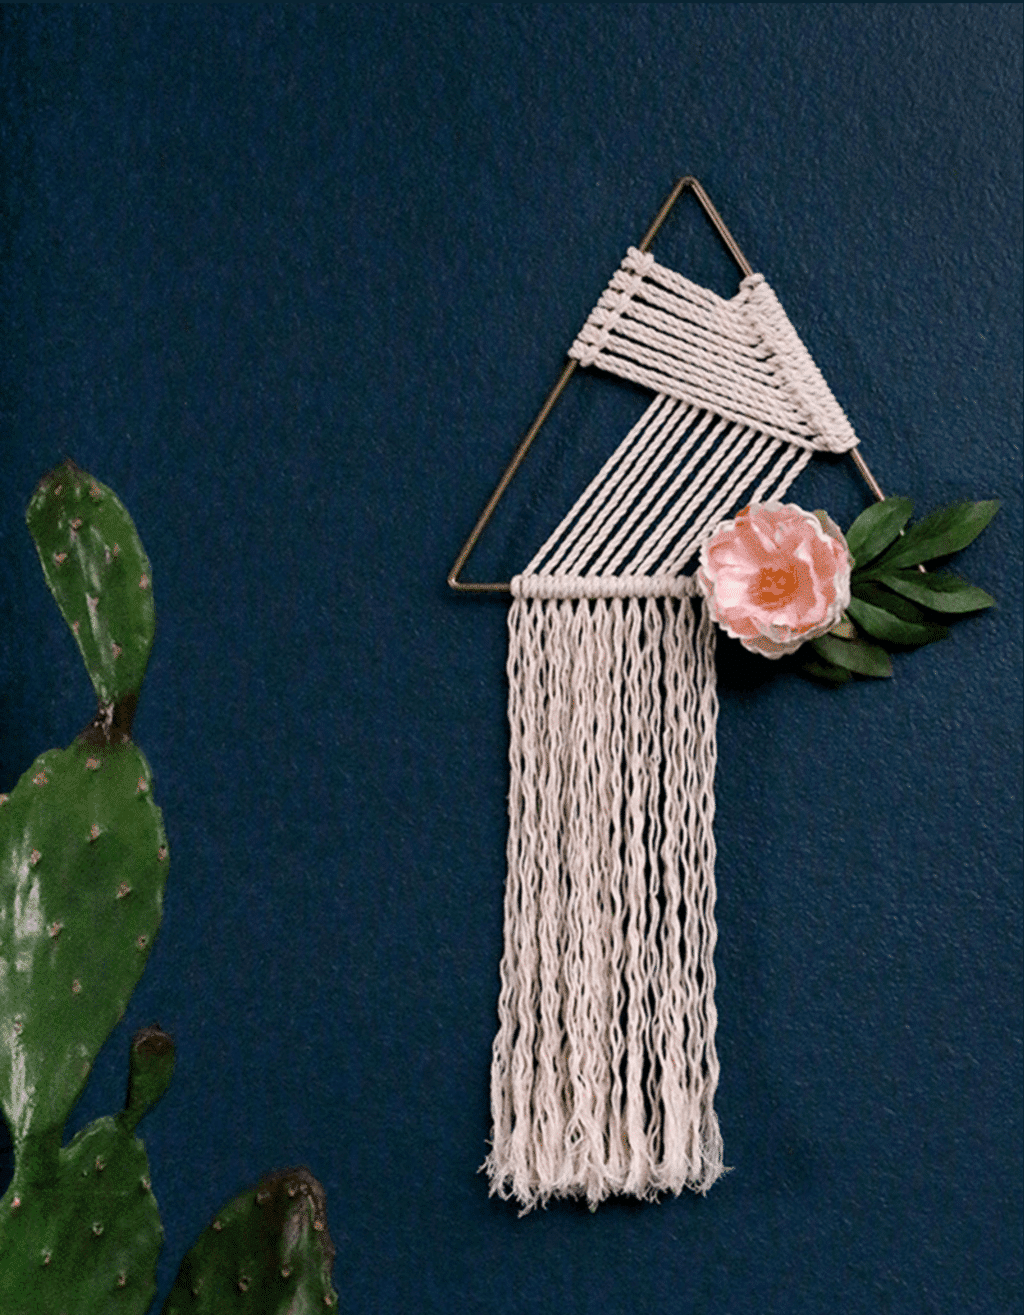
17. DIY Floral Triangle Macrame Hanging 

 DIY Floral Triangle Macrame Hanging 

The last macrame Diy on our list is this floral wall hanging. This flower embellishments on this triangular piece give you all the character. Yes, many people stick with the circular wall hangings, but this uniquely shaped triangle holder will surely grab some attention. Wouldn’t this be pretty in a baby nursery?

macrame wall hanging ideas

All in One! 

Confused between all these charismatic and eye-pleasing macrame wall hanging ideas? It happens!! From decorative macrame cord lamps, chairs to the macrame door curtains, each DIY I personally selected for both beginners and the experts. 

These 17 macrame wall hangings will elevate the trendiness of your space within minutes of installation. This list has covered all types of macrame arts; some are smaller, some are larger, some are filled with natural layers, and others carry colorful tones with ease. There’s a design or style woven for everyone within this list. 

The best thing about these simple projects is that they can be made in many different shapes, and there’s always a way to make them unique. I hope these ideas will inspire you enough to create a macrame art for your place.

Explore More

How to Start a Successful Coworking Space Today

0
Coworking Space

If you’ve been working entirely from home for the last 6 months because of the global pandemic and are itching to get a change of scenery to keep yourself productive, then chances are, so do many other people. Now you have this wonderful idea of starting your very own coworking space but you haven’t the slightest idea how to, especially during this time. No worries, this article will arm you with all the necessary things you have to know to start a successful coworking space today.

Finding the Right Place to Start

Finding the Right Place to Start

The first and probably most important consideration should be a perfect location. However, to be honest, this will really depend on what kind of clients you are actually pursuing. If you want to appeal to companies who want to allow their workers to already grind in an office environment (that’s not really theirs) then go look for a space in a business district. But if you want to cater to the needs of remote workers who’ve been doing okay at home but can no longer stand the sight of their own WFH setup, then try scouting locations near residential areas. 

Keep in mind though, the current setup might not be forever (since of course countries are racing for a vaccine and cure as we speak) so plan for a COVID-free future, too.

Safety and Security Consideration

There’s no denying that we are in an extraordinary situation and our goal is to capitalize on this and not become a hotbed for the deadly virus! So safety and security must be one of our top priorities for setting up a new coworking space.

Fortunately, there are lots of existing models to follow. Some have set their tables and seats a few meters apart. Others have made social distancing mandatory within their premises. And of course, they also made sanitizers and other disinfectants readily available for clients. Find out the good practices and apply what you think works best for you. 

Strong Internet Connection

A blue and white background with a globe on it

We all know that a coworking space is nothing without a good and reliable internet connection. A middle-tier connection just won’t cut it. After all, your clients are paying by the hour or sometimes even every month for them to be productive and without a good internet connection, that’s impossible. Think about the maximum capacity of your space and understand the internet requirement for each. The bigger allocation, the better.

Create a Welcoming but Productive Space

Coworking spaces are famous for having a better office environment than most offices in the area (except probably for over-the-top buildings like Google). So you must understand what it takes to have the perfect setup.

The key to this is space, comfort, and productivity. You must provide your clients with enough space to do all their necessary work and I’m not just talking about desk space! They should have enough areas to walk around and probably stretch while taking a break from their actual jobs. You should also provide ample electrical outlets to charge several devices that your clients will need. Lighting is also an important

Go the Extra Mile

A group of people sitting around a living room

This is not necessary really, but it will make you stand out and succeed. Going the extra mile will allow you to stand out against other coworking spaces and boost your income right then and there. For one, you could offer pour-over coffee services complete with fresh beans. Or if tea is more your thing then you can do that. Another suggestion is to possibly put in a small pantry of healthy items that your clients can eat out of for a quick bite while working. Or you can partner with a professional parking company that will strip away the parking worries of your clients and essentially saves them time to do more important stuff. 

Coworking spaces are innovative areas in and of itself that cater to various needs of an office worker. It redefines the boring and standard office space as something better, brighter, and bigger. So if you thought of other exciting and more creative things to implement for your coworking space, don’t be afraid to do it.

Read more:-