Staring at the same walls every day can make your home feel uninspired and outdated, but refreshing your space doesn’t have to be complicated or expensive. In 2025, wall decor is all about turning plain surfaces into statement features that reflect your style and add personality to any room.
Whether you live in a cozy apartment or a spacious house, small updates-like a fresh coat of paint, adding mirrors, or experimenting with textured accents-can quickly transform your living environment. So we had shared with you 5 creative yet stylish wall makeover ideas which will make your home feel new and uniquely yours
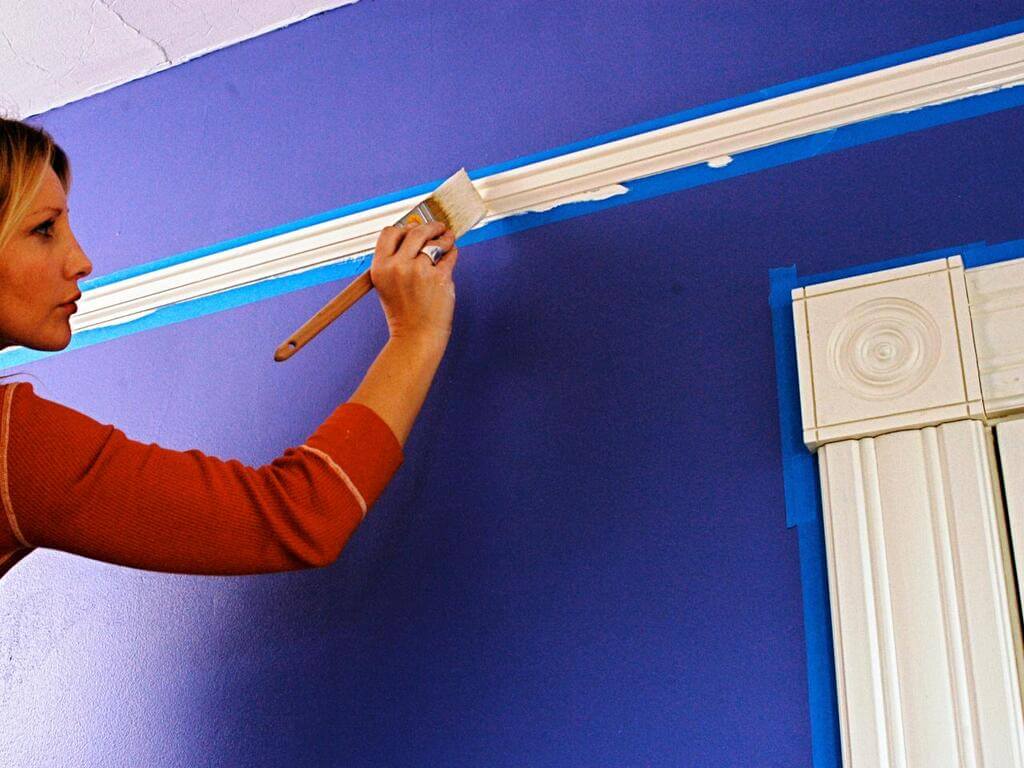
1. Add Fresh Paint
There is no real technical expertise needed here at all. And whether it’s an accent wall or all of your walls, a new color or a fresh coat of paint can add immediate interest to an existing room. Paint does wonders to a room, and can completely change the look and feel. Also, choose a complementary color that can serve as a base for what goes on your walls after you paint: there are all kinds of decorative accents that you can add after the painting is done that can change with the seasons or that you can update as inspiration hits you.
2. Add a Mirror
A bigger mirror can easily open up your space and make smaller rooms like home offices and dining rooms much bigger than they appear. Whichever you choose, the result will be a room that feels significantly larger and more open without having to do an ounce of the demo.
3. Let There Be Light
Once you have lightened up the place a bit, be sure to check the walls to make sure they aren’t laying bare — now that you can actually see them! If they are, don’t hesitate to add a decorative accent to a wall that has literally just had a light shined upon it.
4. Add Texture
Pillows, blankets, accents oh my! Adding quick pops of texture in the form of accent pillows, a chunky knit blanket, decorative frames, and pieces for the walls are all easy, quick, and inexpensive.
5. Add A Vinyl Wall Decal
Vinyl decals for walls are more than manageable. Whether you choose an inspirational phrase for your home office or child’s bedroom, or a loving sentiment for your bedroom or living room, vinyl lettering for walls is an effective way to transform your wall from drab to fab.
Conclusion
No matter which of these five simple ways you choose, you’re sure to find an approach that can freshen your home’s decor without breaking the bank. And you really can’t go wrong with experimenting with a few or all of these approaches. The truth is, you don’t have to take out a loan, hire a construction crew, and wait months and months for your home to feel updated and contemporary. It can happen right away!
So if you’re looking for a fast, easy, affordable, and eye-grabbing addition to your home’s decor, start where your eyes land the most: Your walls.
The front door is the focal point of your home’s exterior and plays a crucial role in creating a welcoming first impression for visitors. Among the many door options available today, composite doors have become the preferred choice for modern homeowners due to their exceptional combination of durability, security, and aesthetic appeal.
Unlike traditional doors made from a single material, composite doors are crafted from multiple layers of high-quality materials, offering superior strength, thermal efficiency, and low maintenance. Choosing a composite door not only enhances your home’s curb appeal but also provides peace of mind with advanced security features and long-lasting performance. In this article, we explore why composite doors are an excellent investment for your home and what makes them stand out from other door types.
What Are Composite Doors?
Unlike other types of doors made from a single material, composite doors are special types of doors made from a combination of different materials. Some of these include wood, foam, glass-reinforced plastic, and uPVC.
When these materials are compressed together, they form a strong single material. This makes doors have more benefits than those made from single materials.
Why Should You Consider Composite Doors?
While there are many advantages you can enjoy from composite doors, this article explains the benefits you’re likely to enjoy once your composite doors are installed. Here are some of them:
1. Security
If you’re looking to improve the security of your home, then composite doors should be your best deal. As earlier noted, composite doors are made from different materials, making them very strong. This offers higher security than any other type. In addition, most composite doors come with a high-security locking system. This adds more security to your home because no intruder can get inside without your knowledge.
2. Thermal Efficiency
One of the major material components in composite doors is polyurethane foam. Polyurethane foam is the best material offering the highest level of thermal insulation, which can allow your home to retain more heat. This means with composite doors, you can significantly reduce your heating bills because your house will always be warm.
3. Low Maintenance
Another advantage of composite doors is they require little or no maintenance at all. Unlike other types of doors, composite doors don’t fade or easily crack. This means you won’t waste your time repairing or repainting your doors. This is possible because composite doors always remain in perfect condition. All you need to do is to clean them now and then to help retain their good look.
4. Customized Designs
Composite doors can be the best option for anyone looking to give their homes a new look. This is because, unlike other types that come with a standard design, with composite materials, you can uniquely design your doors to fit your needs. You can also choose either traditional paneled doors or modern full-height glass panels.
5. Weather-Resistant
Composite doors can last long because they’re made to resist poor weather conditions. This becomes possible due to the presence of uPVC material that can allow your door to adjust to all weather conditions. Areas worldwide experience different weather conditions such as rain, wind, drought, and icy temperatures.
While most other types are prone to some of these weather conditions, composite doors can withstand them. This means they can’t affect by weather changes. So, with composite doors, you can significantly save on replacement or repair costs.
6. Noise Reduction
If you live in a noisy area, you can deal with it by installing composite doors. While some other types like wooden doors can also have an insulative property, they don’t provide a long-lasting solution. Composite doors are well-insulated, and this can allow them to prevent noise from entering your house.
Takeaway
While there are many types of doors, composite doors are the best because they can last for a long time. Composite doors can also match both traditional and modern homes. As you’ve seen above, there are many reasons why you may want to install these. Replacing your old doors with composite doors will allow your house to look attractive and add value to your home.
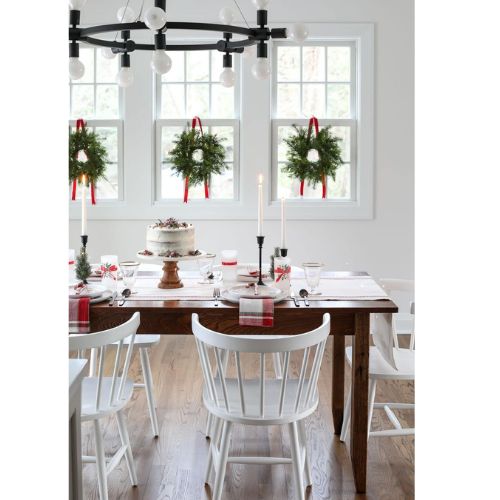
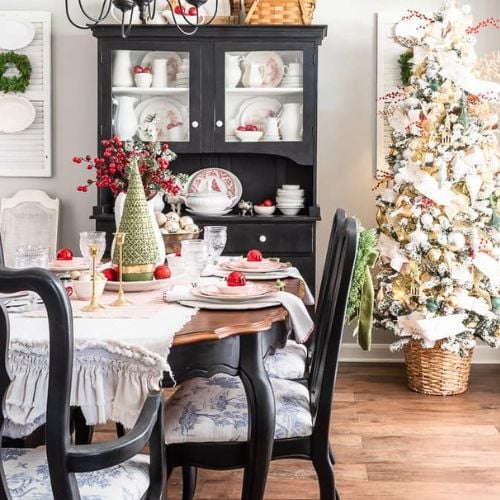
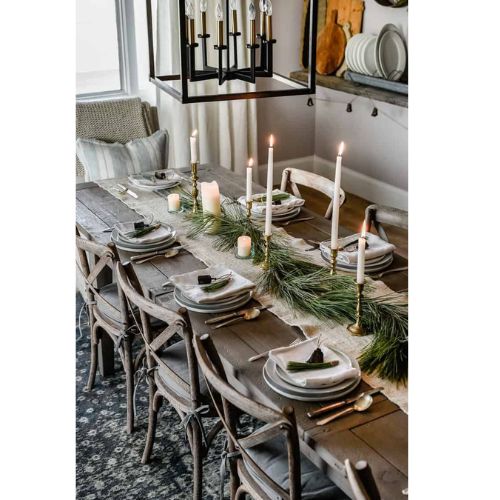
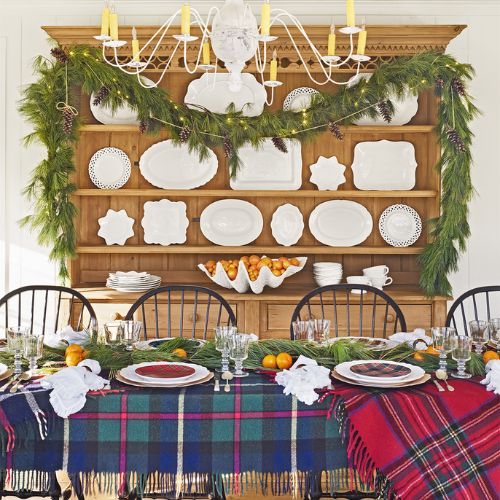
Transform your dining room into a festive wonderland this Christmas with stunning table decorations that capture the holiday spirit. While the Christmas tree and front door often steal the spotlight, your dining table is where cherished moments and joyful celebrations truly come alive. From elegant centerpieces and cozy runners to creative place cards and nature-inspired accents, the right table decor sets the perfect scene for memorable holiday meals. Whether you prefer classic reds and greens, modern minimalist styles, or rustic natural elements, these Christmas table decoration ideas will inspire you to impress your guests and make your festive gatherings unforgettable.
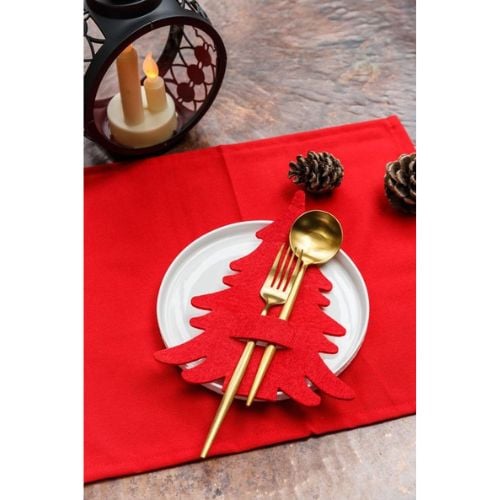
1. Silverware Tied in Ribbon
A lovely ribbon is an easy way to add a festive touch to candles, fine glassware, and silverware when you’re in a rush. Choose a luxurious jewel-tone silk ribbon for an elegant appearance, or go with the tried-and-true green, red, or gold.
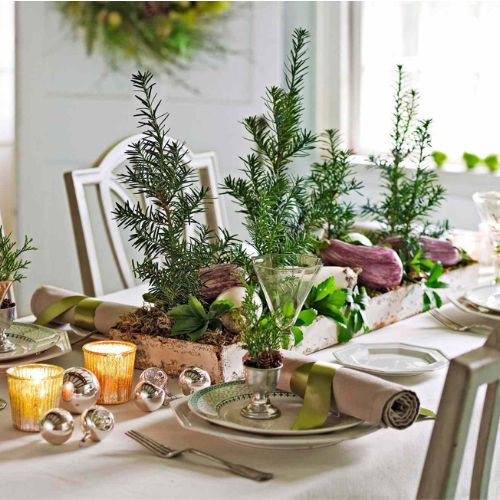
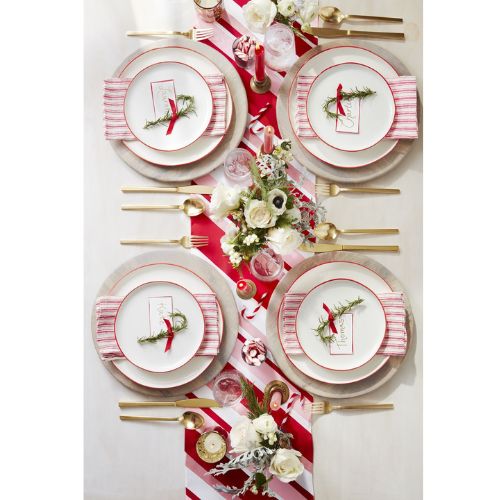
2. Pattern Layering
Incorporating a variety of patterns and colors into a tablescape is one of our favorite Christmas table decoration ideas. Everything from the tablecloth—a nature-inspired design—to the napkins—paisley ones bound together with a crimson velvet ribbon—to the centerpiece—a blossoming arrangement of flowers.
3. Candle Holders from Upcycled Bottles
Think wine bottles when you want to make a stylish centerpiece out of a glass bottle. After cleaning and removing the labels, fill the bottles with water and then add the evergreens. Would you want some color? Throw in some fresh cranberries! The next step is to put a taper candle in the bottle’s opening after applying sticky candle wax to its base. In order to maintain the appearance of the greens, remember to change the water every few days.
4. Evergreen Tree Cuttings
Displaying a large glass vase with fresh green sprigs is a great way to get ideas for Christmas table decorations from the pros. Want to add more charm? Add some pinecones to a bowl and set it nearby for a more rustic touch.
5. Blue and White Décor
From table runners and napkins to vases and plates, keep to a simple blue-and-white color scheme. The key ingredient for that additional dramatic touch is to add some golden accessories, such as those vintage-inspired candlesticks.
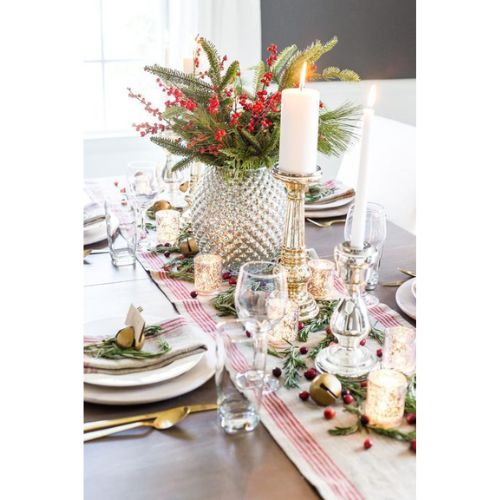
6. Candle Rosemary Centerpiece
You can whip together this beautiful centerpiece in no time at all using simple household goods like candles, ribbons, a few rubber bands, fresh rosemary branches, and either real or faux cranberries for the base. The ingenious flameless candle method is at your disposal.
7. Decorative Table Wreath
Make a beautiful display piece by transforming your Christmas wreath. To make a wreath without hanging it, just join candlewood cups to a wreath shape. To round off the image, gather a bunch of tapered candles and plenty of foliage.
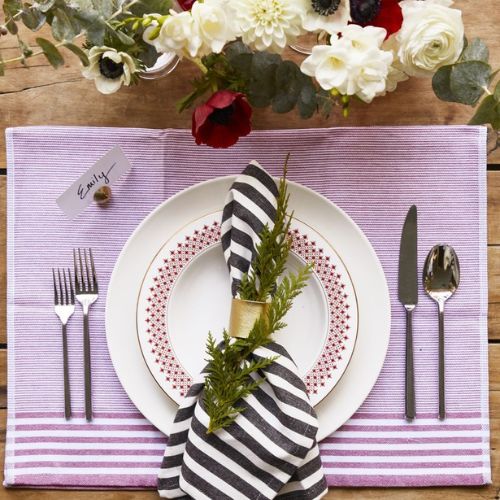
8. Christmas Tree-Shaped Napkin
Your dinner guests will be captivated by the origami-inspired place setting the moment they lay eyes on it. Allow me to show you the way: We used green fringe napkins, which are square, and embellished them with little baubles for a festive touch.
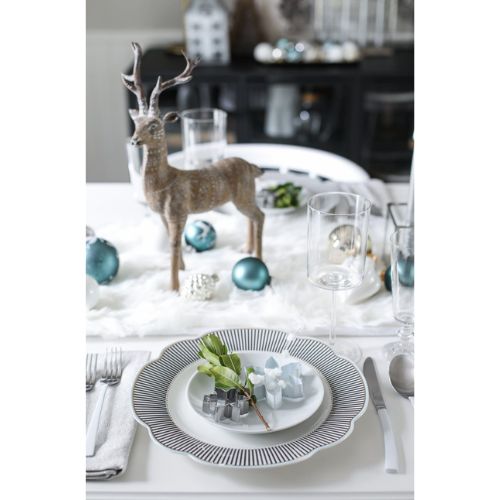
9. Metallics and Icy Blues
On a white faux fur table runner, there are big deer ornaments and Christmas dining table decor ideas in shades of blue and silver. With cookie cutters and a bayberry sprig as a garnish, the place setting consists of solid white salad plates coupled with striped dinner plates.
10. Candlesticks Made by Hand
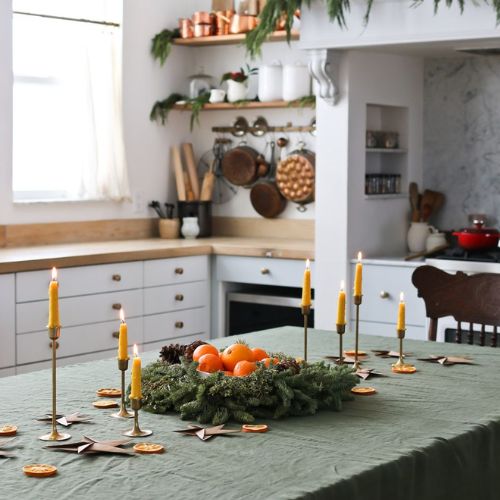
Use a bowl of oranges and a fresh wreath as a nod to tradition for a beautiful centerpiece. As a finishing touch, they scatter paper stars and dried orange segments about the table. However, who really stands out? The show-stopping homemade beeswax candles melt and drip into a lovely ambiance.
11. Furoshiki Gift Wrap
In addition to looking lovely in your place settings, this sophisticated bowknot would be a thoughtful surprise for your dinner guests. Japanese wrapping could seem complicated, but trust me, it’s really rather simple. Simple materials include standard 20-inch napkin linen and some fake cranberry sprigs for garnish.
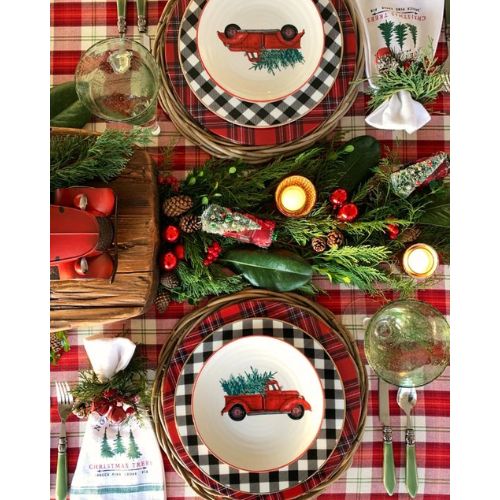
12. Go with Plaid
For a homey vibe, consider combining tartan with buffalo check or any other plaid pattern. Adding a cinnamon stick and an evergreen sprig to your plaid napkins will give them a more rustic look.
13. Upcycle Your Old Bulbs
Those antique lightbulbs still have life left in them! Discover an ingenious method to transform them into sophisticated Christmas accents. Start by applying a little dab of hot glue to the bulb’s larger side. Coil some twine over it; sage green and shiny gold are our favorites. As you wrap, continue to glue. After that, create a stem by attaching a twig and then place a paper leaf on top.
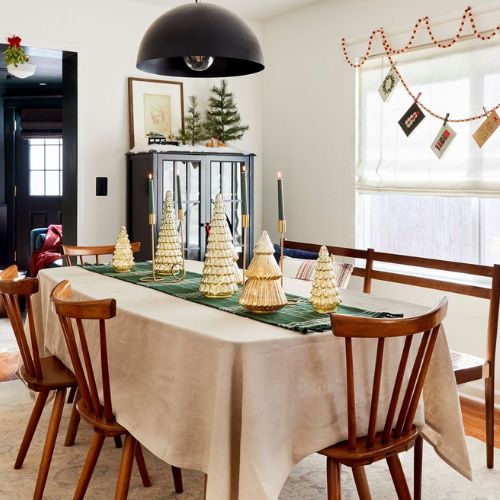
14. Miniature Christmas Trees
Decorate your table runner with little Christmas trees of varying hues, as seen in interior design publications. For a more interesting appearance, combine bottle brush trees with paper ones and wooden ones.
15. Golden Leaves
For an additional glamour boost, scatter some artificial leaves that are glittering and adorned with dazzling gold foil about the dining table. But you know what? Applying gold leaf enhances almost any surface. Always begin by cleaning the surface. Apply the glue with a brush, then carefully place a sheet of gold leaf on top. Use a delicate brush and your hands to gently smooth it in circular strokes. Wait a few hours for it to dry, and then seal it lightly for a mirror finish.
16. Christmas Shakers
You will LOVE this easy activity if you enjoy making festive decorations! To make your table seem festive for the holidays, fill ordinary salt and pepper shakers with little trees or reindeer.
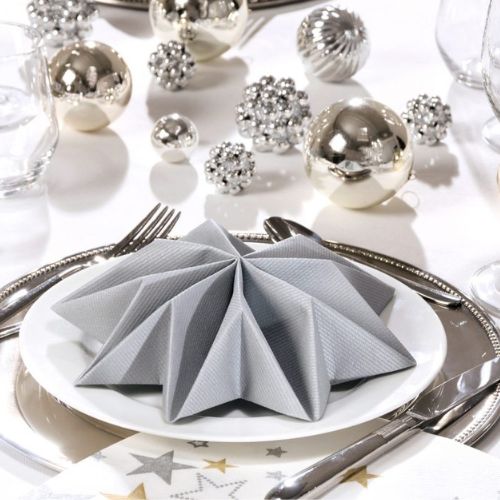
17. 8-Point Star Napkin
To add style to your tablescape in an instant, just rearrange any ordinary 20-inch napkin into a stylish star shape. No need to worry; even novices will find this one simple!
18. Dash of Greenery
If you want to make your wooden dining table seem as chic as Emily Henderson’s, try adding some festive touches. Add some festive flair with some fresh foliage, taper candles, and tealight holders made of ceramic village—just right for the holiday season!
19. Make a Leaf Garland
Make a leaf garland out of green craft paper to express your creativity. Add some red jingle bells to cap off the holiday vibe.
20. Napkin Rings Made from Cookie Cutter
As napkin holders, these star-shaped cookie cutters have an air of understated elegance. On top of that, they make great small Christmas presents for your visitors to take home with them.
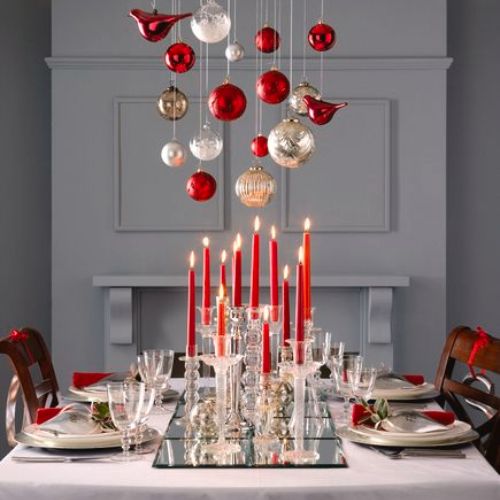
21. Ornaments for Ceiling
A traditional and joyous Christmas tablescape in reds and whites. Need a little something more? To get the same lovely effect, just use thread or a fishing line to suspend decorations from the ceiling.
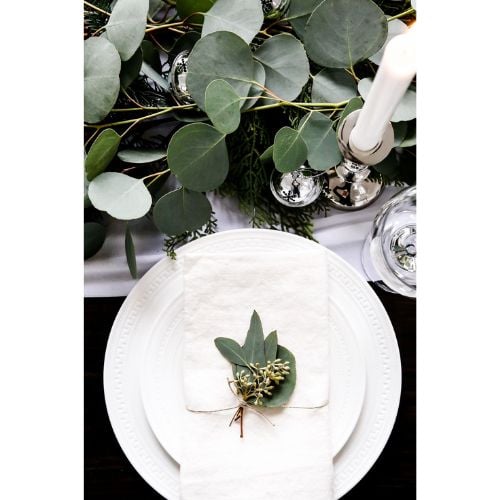
22. Fresh Eucalyptus
For every table setting, you can whip up a little bouquet. She twisted a transparent hair tie around a silver dollar eucalyptus leaf, and a couple of seeded eucalyptus leaves.
23. Candy Cane Bow
Tie a neat knot around a red and white striped napkin to create a peppermint candy décor. Put a red ribbon in the middle to keep it in place—at least until supper is served!
24. Napkin Rings from Christmas Light
Repurpose your old Christmas lights into charming napkin rings instead of throwing them away! At the base of each bulb, attach a loop of white and red baker’s twine using hot glue. Once you have your multicolored rolled napkins ready, use these innovative napkin rings to wrap them.
25. Tree Napkins
Create tree shapes out of folded napkins and use little name cards cut from leftover paper for the trunks. That way, at the dinner table, everyone knows where to sit.
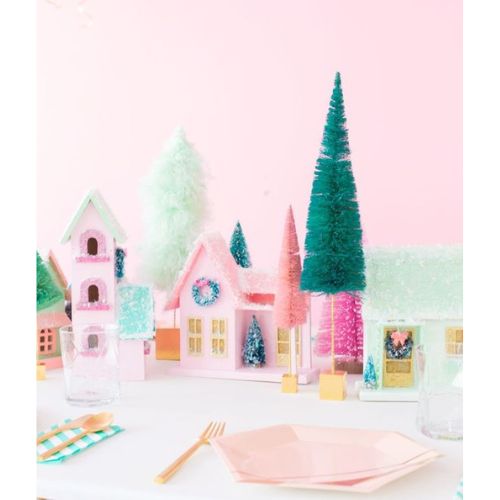
26. Pastel Christmas Village
Have you had enough of the same old Christmas hues? For your table arrangement, why not try something quirky and unique? For a whimsical twist, try using pink dishes colorful bottle brush trees, and create your own pastel-colored Christmas town.
27. Mix Up the Glassware
Using a variety of plates, bowls, and glasses can really liven up a dinner party. Distribute separate goblets to each guest; this kind gesture will spark conversation about your exquisite table setting.
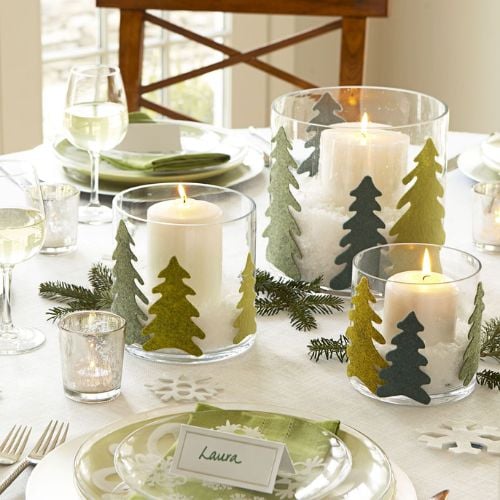
28. Felt Christmas Trees
With these adorable felt cutouts, you can transform your dining table into a whimsical Christmas tree garden. Your silverware will blend in with ease after following this little guide!
29. Peppermint Inspiration
Use pink, red, and gold tones to create a tablescape reminiscent of a Christmas candy buffet. A multicolored table runner, some sprigs, and some candy-cane-patterned napkins will do the trick. And to top it all off, before dinner, lay out some actual peppermints and candy canes for your guests to nibble on.
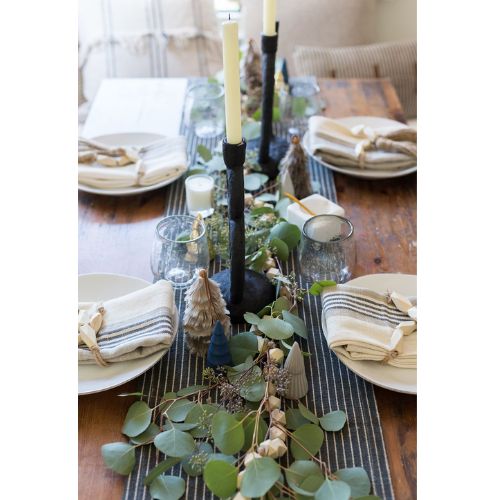
30. Modern Vintage Décor
This inviting tablescape is a perfect example of how to blend contemporary and old elements. He began with a white runner with red stitching. Then he added matte black candlestick holders, little evergreen trees, antique high-ball glasses, classic water goblets with gold trim, and so on.
31. Gold and Green
The combination of golden hues and verdant greens is regal, but because it is Christmas, don’t forget to sprinkle in some red accents here and there.
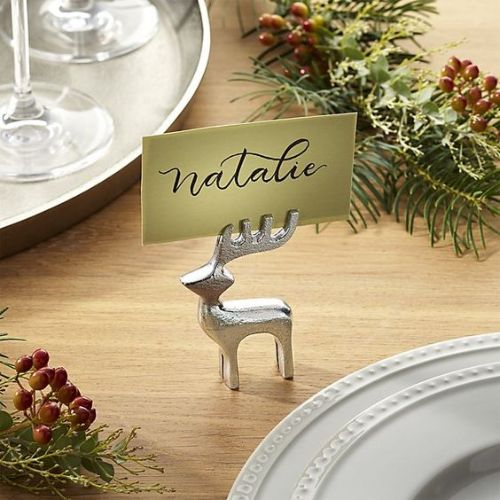
32. Place Card Holders of Reindeer
Make adorable name card holders out of these miniatures of deer. Another advantage is that you may keep these adorable tiny guys as house decorations even when you’re not entertaining.
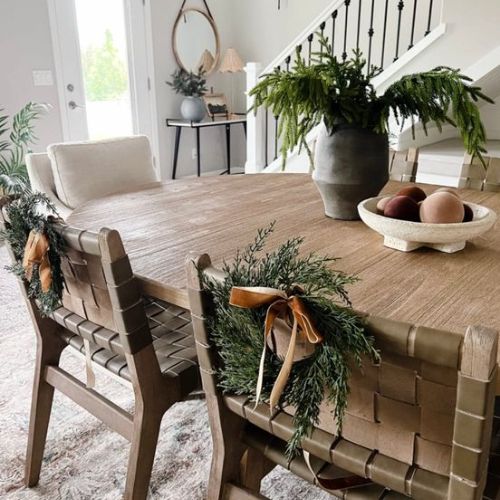
33. Adorn the Chairs
Attach little wreaths to chair frames using raw-edge ribbon to make each guest feel unique. A little gesture that makes every visitor feel special.
34. Monogrammed Napkin Ring
Simple napkin rings and a handful of pipe cleaners (glittery ones are really fun!) will do the trick. Create personalized napkin rings by twisting pipe cleaners into the form of each guest’s name.
35. Rustic Décor
Use burlap as a table runner, gold candlestick holders, and a long garland of luxuriant pine for a traditional look. Add a finishing touch to each place setting with a single pine sprig.
36. Picks for Drinks
Use festive selections to liven up your visitors’ beverages! Trim the drink picks to a length of about 3 inches. Then, using basic hot glue, attach little bottle brush trees in vibrant colors to the top of each pick. This project is both simple and upbeat!
37. Golden Tabletop Trees
These beautiful pre-lit tabletop trees will add a touch of ethereal light to any tablescape. Add a touch of elegance and sophistication to your tablescape by combining them with taper candlestick holders and a green table runner.
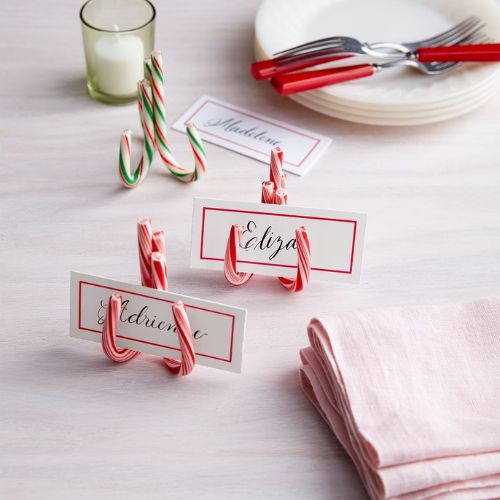
38. Place Card Holders with Candy Cane
Instead of letting those little candy canes go unused on your Christmas tree, use them to hold place cards. For a lively and carefree style, try combining different hues.
39. Felt Tree-Topped Forest
Cut out felt fir shapes and use hot glue to attach them to candle holders loaded with fake snow to transform your table into a mystical pine forest.
40. Place Card Holder from Gingerbread
For a change of pace this year, ditch the traditional place cards. Think about using linen napkins instead, layering gingerbread cookies on top, and then tying them with a ribbon that matches.
41. Laid-Back Style
Your Christmas table may be eye-catching without becoming overwhelming. For a simple but stylish arrangement, use folded tea towels in lieu of tablecloths and turn red wine glasses into flower vases.
42. Fancy and Fun
Vibrant pinks and golden accents will liven up any tablescape. There was even a scarf that we turned into a table runner! Use your imagination and make name cards out of shards of shattered terracotta pots for a one-of-a-kind look!
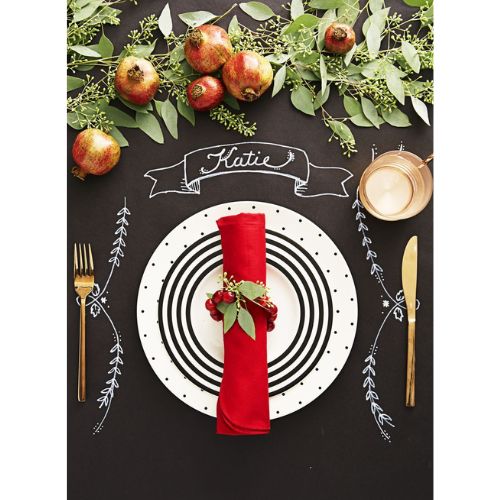
43. Chalkboard Nametags
For an extra special touch, use blackboard paper instead of tablecloth and sign each guest’s name on the dish. Make your own napkin rings by forming a circle with fine wire, stringing cranberries onto it, and finishing it off with a festive sprig of eucalyptus.
44. Napkin Bells
The enchantment of holiday bells is hard to resist. Place a little bell on the corner of your dinner napkin to add a touch of festivity to your table.
45. Twisty Formal
Experiment with a silver and icy blue color scheme. To create the name cards, attach a store-bought tag to a metallic glass ornament.
46. A Hint of Plaid
Create a snowy New England atmosphere by using some plaid throws as tablecloths. It’s best to use old ones that can handle any spills that might happen.
47. Cozy Christmas
Infuse your space with a gentle scent by using fresh flowers and real pine cones, evoking memories of past holidays. Create your own snowflake napkin rings using wooden snowflakes for a charming touch.
48. Chandelier Wreath
Hang greens above your table by using a hook and ribbon for a lovely effect if you can’t hang them from a permanent light fixture, drape pine around the frame and secure it with ribbon for a similar look.
49. Bead Stars
Enhance your table runner’s look by using wooden beads to make star-shaped decorative accents for added visual appeal.
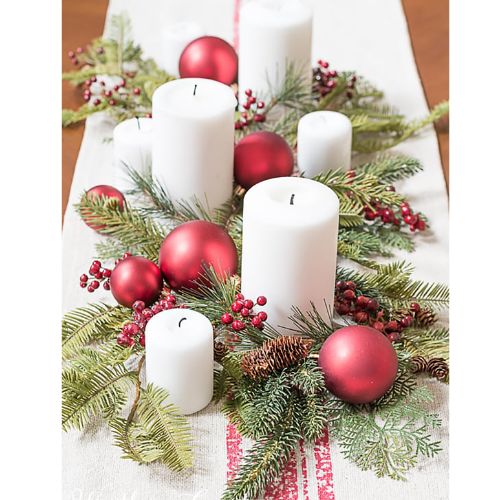
50. Cranberries and Mercury Glass
Create an elegant green and red tablescape by combining mercury glass, a burlap table runner, candles, and fresh cranberries for a sophisticated look.
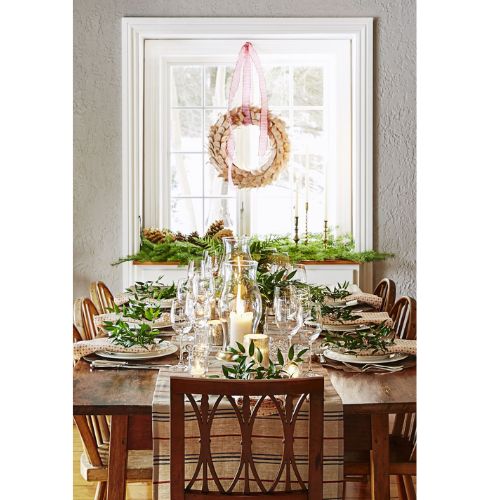
51. Indoor Wreath
Turn a nearby windowsill into a cozy spot by layering it with candles, greenery, and pinecones. Complete the Christmas table decoration ideas by hanging a rustic wreath at the top for that final touch.
52. Fancy Plates
Get fancy by using your fine China, or add a gilded salad plate on top of your everyday set to give each place setting a special touch. Opt for a runner made of greenery and blooms as a subtle floral option that won’t obstruct conversations among guests.
53. Woody Centerpiece
Create a quick centerpiece in just five minutes by filling a glass container with unshelled nuts, pine cones, faux cranberries, dried citrus, and cinnamon sticks. Place it on a polished wood slice, and your table is all set!
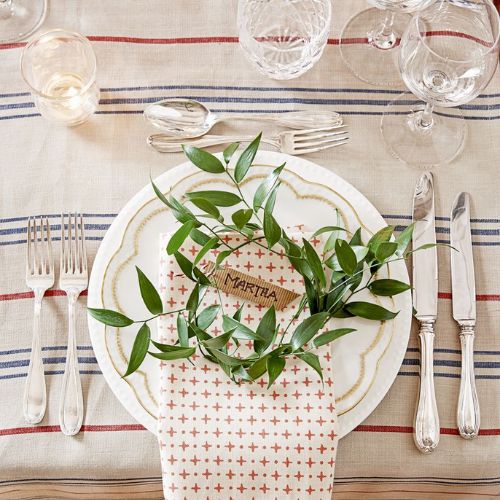
54. Personal Place Settings
All your neutral linens need is a touch of greenery. Make name cards using cut cardboard, then attach the tags to a circle of leaves to welcome each guest.
55. Piles Up Gifts
Not every gift has to be under the tree! Display your beautiful wrapping paper on the dinner table instead. Try using pink instead of red for a unique touch. Add homemade confetti-filled ornaments in matching colors to complete the festive display.
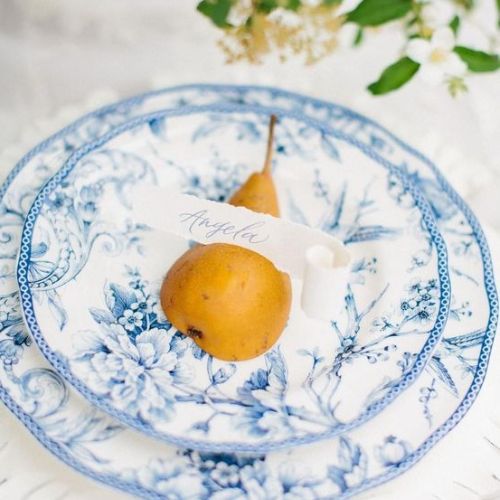
56. Edible Name Card Holders
Use ripe pears as edible name-card holders by simply adding a pearl-topped pin. Incorporate pears, along with greenery and small ornaments, for a budget-friendly centerpiece that you can easily put together yourself.
57. Winter Wonderland
Create a white Christmas ambiance, regardless of the weather, with these Christmas table decoration ideas. Set the scene with monochrome florals, tiny gingerbread houses, and even miniature marshmallows to evoke a snow-dusted landscape.
58. Fancy Fruit
Make your own icy-looking faux fruits that seem straight out of Jack Frost’s orchard and will last for years. Simply coat the fruit with spray adhesive and then roll them in a mix of three parts white glitter to one part silver glitter.
59. Golden Fronds
You can create a beautiful display using wheat stalks from the craft store, just as pretty as fresh blooms. Simply tie the sheaf with ribbon and place it inside a clear vase over faux snow. Add evergreens and almonds around the vase for an extra boost of charm.
60. Cranberry Pinecones
Want quick Christmas table decoration ideas to add some festive flair to evergreen seeds? Try this: lightly spray-paint half of the cones in cheerful cranberry and the other half in shimmery silver, then display them in a clear glass bowl. For a more eye-catching look, paint the cones entirely in a bright lime or gold for a pop art-inspired piece.
Conclusion
No matter if you’re planning a cozy brunch, a fancy dinner with a stunning centerpiece, or a fun cocktail party, we’ve got you covered with expert tips to make hosting this Christmas like a pro. Dive in for our top Christmas table decoration ideas in the perfect seasonal spirit.
There is no permanent solution for keeping insects, rodents, or birds away from your home forever. As long as there is a slight chance of shelter and food, you are bound to have a pest. It is possible, though, to keep them at bay so that they do not pose a threat to small children or wreak havoc on food or other animals. Here are a few tips on how to keep your home clear of pests:
Ants
When it comes to pests often found in your home, it is best to keep the areas where food is as clean as possible. Ensuring that kitchen counters and bathrooms are kept clean with disinfectant will deter ants from searching for food and water. Try these tips to help you:
Cleaning detergent with ammonia will keep the kitchen counters clean of food and free of food smells. In most cleaning detergents, ammonia is a good repellent and is non-irritant for most people’s skin.
Cucumbers are bitter for ants, who are usually attracted to sweeter smells and tastes. Leaving a few thin strips alongside the entry points where the ants are seen walking will leave them to try another entry point and not return at all.
Cloves crushed or mixed with garlic are a strong deterrent that sends ants moving in the other direction because of the smell. It can be an irritant for anyone with allergies because of the scent, but you won’t have to worry about any ants.
Dust Mites
Dust mites can pose a problem for anyone with severe allergies, but they can be found everywhere in the home, which is unavoidable. The only solution most people have when it comes to dust mites is to keep their homes as clean as possible through daily vacuuming, washing down surfaces, and doing the laundry regularly. You could also do the following:
Keep your bedding and furniture clean. Dust mites are attracted to fibers, and anything that they can stick to, so keep bedding, clothing, and furniture vacuumed and cleaned at all times. The more woolly carpets and bedding you have, the more you need to keep it clean. Wash children’s toys in a good laundry detergent regularly and keep them off the floors when they are not playing with them.
Keep your home free of clutter at all times If you are done reading books or have bags and boxes lying around you do not need, throw them away. The more chaos you have, the more your chances of attracting mites and other insects.
Diatomaceous Earth Using the food-grade version is less harmful to humans but effective with bugs. It can be used for fleas and bed bugs and only needs to be dusted onto the areas. You can leave it on for two to three hours before vacuuming it up and changing your bedding.
A humidifier will be an excellent accessory for your rooms. Dust mites thrive at high temperatures, so keeping the room at a lower humidity level will help keep them from procreating.
Cockroaches
Every home has this problem at some point or another because of how fast cockroaches travel and how quickly they can procreate. It might be the smaller roaches that most people find in their kitchen, or it could be the larger ones usually found on drains outside the home, but either way, they are a nuisance. Here is what you can use to deter them from staying in your home:
Apple cider vinegar works well to keep roaches away because the scent is an irritant for insects. You can spray it around the counters and areas where you see roaches escaping to lure them away from their feeding site.
Catnip has an active nepetalactone, a natural repellent for cockroaches but non-toxic to humans or other animals. Place a bit of catnip into boiling water and let it simmer. Once it is done, use it as a spray in areas where you have spotted cockroach activity. You can also stuff small pieces of catnip into cracks along with the kitchen counters or skirtings.
Boric Acid placing this powerful insect killer in places like the top of kitchen cupboards or inside cupboards that are high up will make it easy for you to get on with your life without worrying about hard-to-reach places. Boric acid can be dangerous when ingested so keep it safe from children.
Pigeons
These pesky birds can be a nuisance when they find a home for the area, which usually includes being someone else’s home. They poop in awkward places, and their poop can be dangerous, so it is always necessary to keep the area clean. However, you can keep them from making a home for themselves through ads. It is illegal to kill them, but you can make sure that the house that they make is not on your property. Here are a few things you can do to keep them at bay:
Can spray water, vinegar, and baking soda mixed in a spray bottle around areas where the pigeons like to land. The pungent smell will help stop them from landing there, so be sure to spread the area every alternative day if you have a considerable pigeon problem.
Putting reflective strips helps to blind them temporarily.
Anti-roosting spikes will stop them from landing on window sills and gutters or chimneys.
Conclusion
As mentioned initially, you cannot get rid of pests forever. Still, if you cannot call for Northampton pest control to come and assist you, you will need alternative solutions to the problems. These solutions are meant to deter the pests from coming into your home and making a home for themselves, but call a professional service to assist you if it doesn’t work.
Buying a sofa is one of the most important furniture decisions you’ll make for your home, as it serves multiple purposes- from relaxing and entertaining guests to sometimes even sleeping. To find a sofa that fits your lifestyle and space perfectly, it’s crucial to consider several key factors before making your purchase.
From measuring your room and ensuring accessibility to choosing the right style, size, and fabric, this checklist will guide you through the essential steps to select a durable, comfortable, and stylish sofa that complements your home.
When purchasing lounges and sofas, these are the five things to keep in mind. The checklist below will help you with everything, from getting accurate dimensions to selecting a sturdy frame.
5 Things to Consider Before Taking the Final Call for Your Sofa and Lounges
1. Measure Your Space and Map Its Requirements
When looking for a new living room couch, one of the first pieces of advice is to measure your space. To get the appearance and feel you want from your new sofa, you need to ensure it doesn’t overcrowd the room. Make sure you know the maximum couch dimensions that will fit your room before you buy one.
You should note the breadth (as measured across the sofa’s back) and depth (the measurement from the back of the couch to the front). You should keep in mind that the depth of a couch’s seat seldom varies from a large to a small sofa, so pay attention to that if you’re shopping for a smaller space. If your area contains radiators or storage, take the sofa’s height into account.
If you want to make sure your couch will fit in your room, you may cut out the form of your sofa from newspaper and put it on the floor. To ensure that you have enough area to move about it comfortably, you should also leave enough room for bookcases, radiators, and other pieces of furniture.
Finally, make sure the sofa can go through any doorways or stairways. It will have to travel up and down when delivered; your clean walls will appreciate it.
In cases where access is limited, you may need to choose a low-back type, a chair with detachable legs, or a modular design that you may supply in portions. Smaller rooms may necessitate the use of two-seaters or snugglers. Though your ideal sofa may be just around the corner, don’t forget to keep your budget in mind. The good news is that it’s never been easier for couch customization.
2. Accessibility
If you’re going to buy a new couch, you’ll need to take measurements of your living room and ensure that it will fit in your house, including any steps or hallways. There is nothing worse than picking the lounge sofa of your dreams only to discover that it is too large for your living room or that it is impossible to get there.
3. Choose Your Personal Style
The ability to express one’s individuality through one’s sense of personal style. Ensure that your home’s aesthetic complements the lounge couch design you’re considering. If you have a conventional house and aren’t yet ready to renovate, you’ll need to find a lounge sofa that complements your existing décor even if you adore a crazy modern sofa. Classic, contemporary, mid-century, and modern designs are all viable options.
4. What Size to Consider?
Sofas come in a wide range of sizes and styles these days. This type of sofa is ideal for large families and for hosting parties and movie evenings with friends. A two-seater sofa may be all you need if you’re a couple living in a small apartment in a city and rarely at home. Looks aren’t everything, but a healthy lifestyle is.
5. It’s Essential to Choose the Type of Fabric You’ll Use
Your fabric choice is next once you’ve decided on the style and size of your lounge sofa. Depending on your family’s needs and lifestyle, you may choose a deeper color and hard-wearing textured weave that won’t quickly reveal dirt and can sustain wear and tear. Use your imagination when it comes to choosing textiles. Pick a pattern, a color, a texture, and then add matching cushions or an ottoman to complete the appearance.
Your choice of upholstery fabric will significantly influence the area, so make sure it matches your design plan carefully before making a purchase. Choosing a synthetic material over a natural one is recommended if the couch is near a window. Make sure you select a fabric that’s easy to spot clean, especially if you have a dog or cat. Loose coverings, which can be taken off and washed, are an option to consider in this situation.
You’re All Set to Buy, Aren’t You?
If you’re hesitant to use bolder colors and patterns in your sofa, a unique ottoman that doubles as a coffee table is a great alternative. It’ll give your living space a more subtle feeling of diversity while complementing more traditional sofas and chairs.
It’s understood that purchasing new lounges and sofas is a difficult task, but we hope that the following really useful recommendations will inspire you to get the perfect piece for you.
A clean dryer vent is essential for both home safety and appliance efficiency. Over time, lint and debris can build up in your dryer vent, increasing the risk of fire and causing your dryer to work harder, which leads to higher energy bills and potential breakdowns.
Regularly cleaning your dryer vent not only speeds up drying times but also extends the life of your appliance and helps prevent dangerous house fires. In this guide, you’ll learn why dryer vent cleaning is important, how to spot signs of a clogged vent, and step-by-step instructions on how to clean your dryer vent from both the inside and outside.
Why Dryer Ducts Need to Be Cleaned
Cleaning your dryer vent has additional advantages beyond saving your life, including as boosting the longevity and efficiency of your dryer and increasing your general health. I want to go into each of them in more detail.
1. To Maintain a Healthy Life
A clogged dryer vent poses a risk not just to your house but also to your life. Neglected dryers can lead to major issues, such as hazardous gas emissions and fire hazards. Homeowners must thus take precautions to keep themselves safe from potentially fatal scenarios and clean their vents regularly.
2. To Keep the Efficiency of Your Dryer
Your dryer vent will function at its peak efficiency if you remove any debris and dust. Your garments remain in top condition and dry more quickly. It’s time to contact a professional if you notice that your laundry requires many cycles to dry.
3. To Increase the Dryer’s Lifespan
Cleaning your dryer vents regularly greatly increases their longevity. A blocked vent reduces the machine’s efficiency by making it work harder. Maintaining an unobstructed dryer vent ensures optimal operation and minimizes the need for repair.
4. Save Money
Maintaining the cleanliness of your equipment will make it last longer and need fewer repairs. Vents function at maximum efficiency and reduce component wear and tear when they are clean. This lowers the cost of repairs in addition to saving you money on a new machine. A clean dryer uses less energy than a clogged one, so there’s an extra benefit of decreased power expenses.
Signs of Blocked Dryer Vents
A blocked dryer vent can lead to several issues that affect your dryer’s performance. The main symptoms and indicators of a clogged dryer vent are as follows:
1. Longer Time to Dry Clothes
You should be concerned if your dryer is suddenly taking longer to dry your garments. Over time, even the greatest dryers may lose some of their efficiency; however, a clog in the dryer vent can hasten this process. After calling in a dryer professional, a few people found out that the dryer’s incapacity to release moisture and air out the vent was the primary cause of the efficiency decline.
2. Burning Smell Around the Dryer
It’s a worrying indication if you smell burning next to your dryer. You must switch off the dryer immediately if you believe that it is the source. Dryer vent lint and debris are very combustible; thus, leaving them uncleaned may constitute a fire danger. Furthermore, it’s never a good idea to combine heat with combustible materials. One should never let anything as easy as a burned scent be a red flag for when it’s time to clean your dryer vent and get your dryer serviced.
3. Dryer or Clothes Are Hot to the Touch
Poor ventilation is indicated if your dryer feels very hot to the touch or if your garments are overheated after the cycle is over. For the dryer to keep up the right temperature and remove moisture from the garments, there has to be efficient air circulation. The dryer may overheat if there is insufficient air exchange, which might result in malfunctions, a shorter lifetime, or, in the worst case, a fire.
4. Issues with the Flap on the Duct Hood
Your dryer may be having issues if the flap on the duct hood isn’t opening as it usually does. Look around for any lint or debris. The accumulation of lint around the dryer hose or vent aperture may sometimes obstruct airflow. Don’t let the problem persist. To have your dryer cleaned and returned to normal, get expert help. While cleaning the plastic wire mesh may fix the issue, seeking outside assistance helps prevent unneeded difficulties.
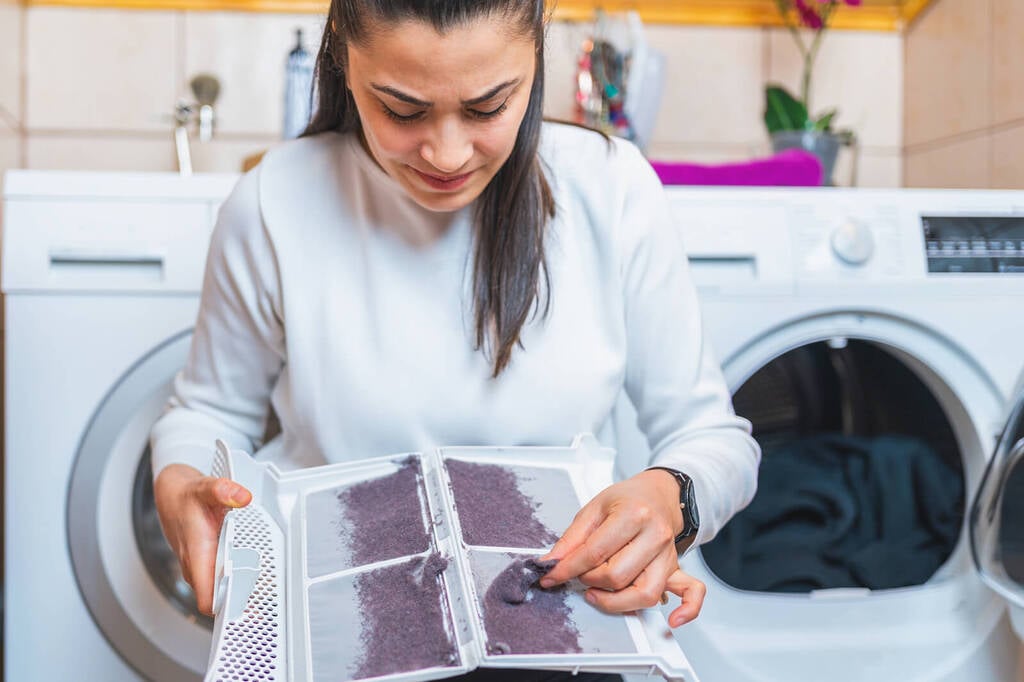
How Much to Clean Dryer Vent
You can clean out the dryer vent using the following methods every three to six months, depending on how often you use your dryer. Furthermore, remember to remove the lint filter after every usage.
If the vent is longer, clean it more often. In contemporary houses, dryers are often situated close to living areas after formerly being mostly found in basements or outside laundry rooms. This implies that to go outside, they could need a longer vent. In residential spaces, clogged vents from gas dryers may cause harmful carbon monoxide to back up into the house.
Choose a straight vent channel; the fewer curves, the slower the lint accumulates and the fewer cleanings required.
Tinier or older dryers are often less effective and might accumulate a little bit more lint.
Safety Considerations
Dryer vents are very combustible, often used as campfire kindling, and may quickly spread fire throughout your house if they catch fire due to lint accumulation.
Here is a checklist to help you make sure your dryer is secure and reduce your risk of fire:
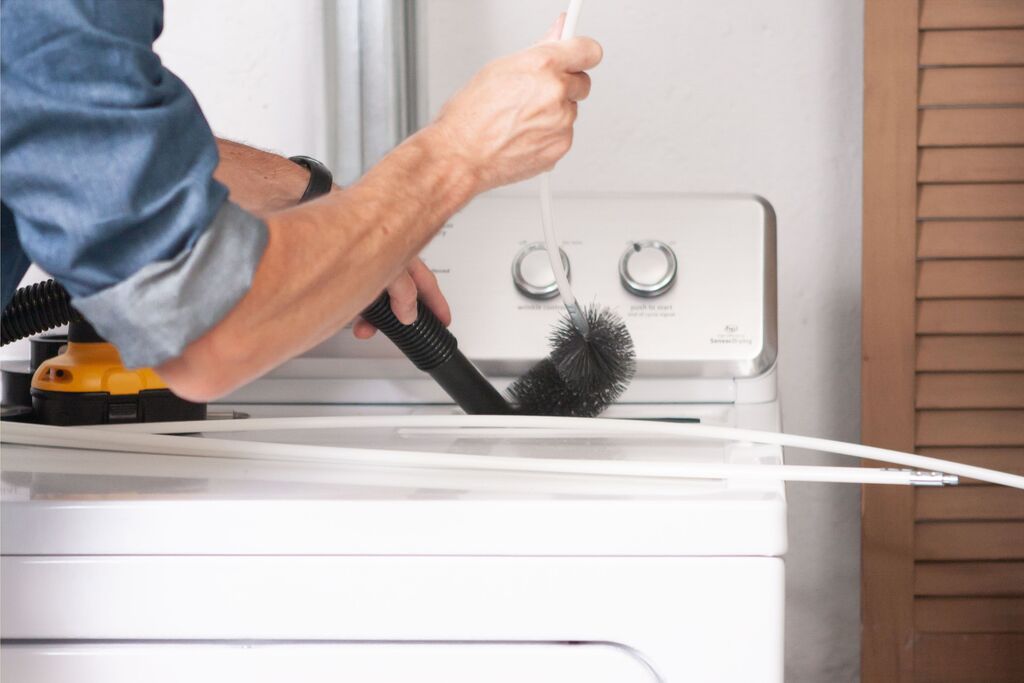
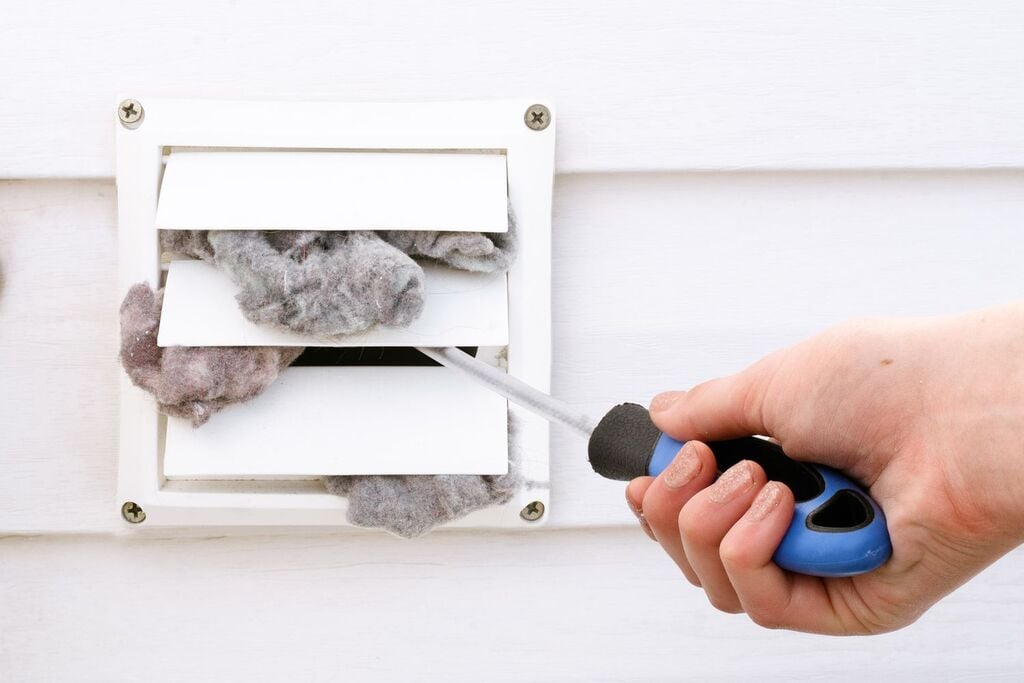
1. Inspect the Dryer Vent Outside
Feel the exterior dryer exhaust vent while your dryer is operating to be sure hot air is leaving. In the event that there is no air movement, cleaning the dryer vent ductwork is advised since this might be a sign of a lint accumulation.
2. Dust the Lint Trap
A frequent source of dryer fires is lint. To lower the danger, clean the lint screen both before and after each wash cycle. To eliminate extra lint that the screen may have missed, also clean the dryer’s inside. The lint trap protects against lint buildup in more hazardous regions, so never use the dryer without it.
3. Examine the Area Around the Dryer
Under and beneath the dryer, lint may gather. Make sure there is no lint or debris in the vicinity of your dryer.
4. Learn Fire Safety Regulations
When upgrading or installing your dryer, be sure to follow all local fire safety regulations. The exhaust duct should be no longer than 25 feet, the dryer vent shall have a minimum diameter of 4 inches, and it should exhaust outside. To stop exhaust from seeping into your house, make sure the fittings are tight.
5. Maintain a functional fire extinguisher close by
For the protection of your dryer vent, have a fire extinguisher in your laundry room. It could be very important to put out a fire before it becomes bigger.
6. Never Leave the Dryer Running While Leaving the House
To avoid house fires caused by appliances, always be present while the dryer is operating.
7. Use Ductwork for Metal Dryers
To preserve appropriate airflow and lower the possibility of lint accumulation, replace accordion-style dryer ducts with flexible or stiff metal ducts.
8. Keep Items That Can Catch Fire Away
Make sure that nothing combustible, such as paint, lint, dust, clothes baskets, or cleaning supplies, is near your dryer.
9. Keep Combustible Materials Out of the Dryer
Avoid using the dryer to dry clothing that has come into touch with gasoline or that contains flammable materials. Avoid plastic and rubber products as well, since they may get damaged or even catch fire in extreme heat.
Other Guidelines
Make sure that the diameter of the dryer vent and the dryer duct match.
If the duct is concealed, use a semi-rigid, non-flammable metal material. Don’t use foil or accordion plastic.
Outside is the best place to vent the dryer—not into an attic, crawl space, chimney, or other vent.
Avoid using screws or non-metal tape to secure the dryer duct; instead, use metal tape.
Prior to drying every new load of laundry, make sure the lint filter is clean.
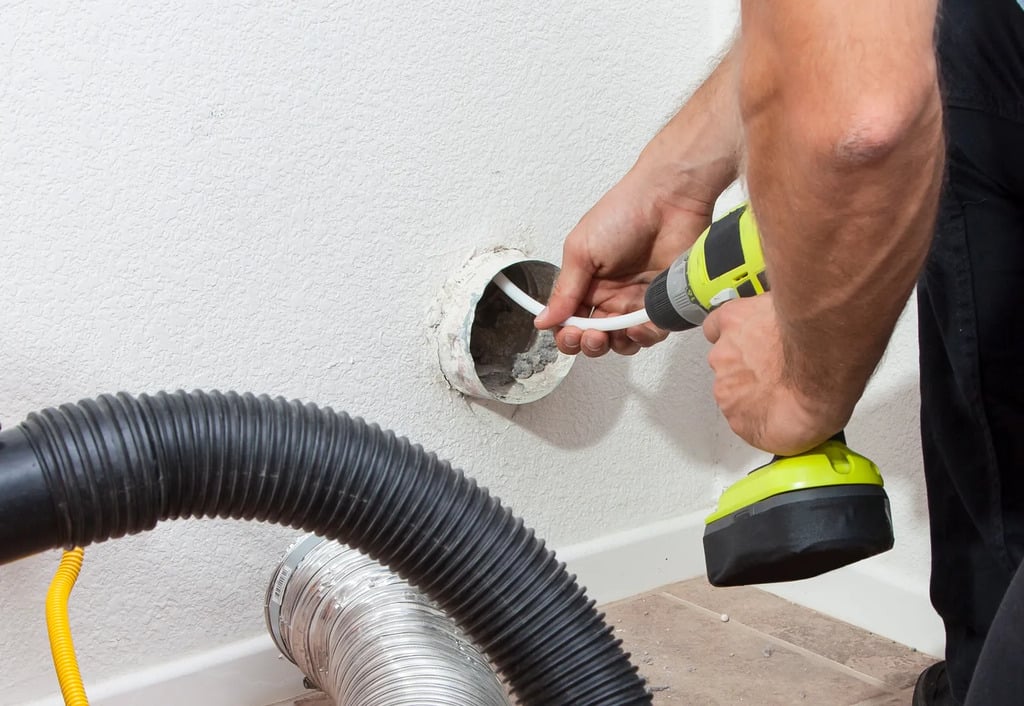
How To Clean Dryer Vent From Outside
It’s better to utilize a dryer vent cleaning kit together with a shop vacuum for a complete clean. These kits are inexpensive and come with firm bristles to help remove lint and dust. The lengthy, curved tubing makes it easier to thread the brush through the whole system of ducts. Although they work best when used in conjunction with a drill for a deeper clean, you may get good results even without one.
To clean your dryer vent from the outside, you’ll need the following:
Essentials
Screwdriver
Wipes and rags for cleaning
Dryer vent cleaning kit (comes with a long, flexible stick with a stiff brush inside)
Cleaner vacuum
Extra tools:
Shop-Vac
Drill
Take these easy steps to clean the exterior of your dryer vent!
Step 1: Find the External Vent
Turn on your dryer and explore the outside of your house to locate the vent that needs cleaning. You should be able to hear the machine, feel the heated air, and perhaps even smell your detergent.
Step 2: Unplug the Dryer
Please disconnect your machine to ensure safety. While working, shut off the gas valve on your gas dryer if you have one.
Step 3: Remove the Lid and Outside Vent Grille
To get access to the vent’s interior, remove the grille with a screwdriver.
Step 4: Clean the Inside with the Brush
To remove dust and lint, feed the brush into the vent. For a cleaner and easier approach, connect the kit to the vent’s mouth if you’re using a shop vac and drill.
Step 5: Gather the Lint with the Vacuum
Remove the brush and use a vacuum to gather the lint. When compared to cleaning inside, this reduces cleanup.
Step 6: Clean the Vent Cover
Wipes or soap and water are good options for removing stubborn dirt from the vent cover. Remove any obstructions inside the grille.
Step 7: Replace the Vent Cap with a Screw
You’re almost finished! Reinstall the vent cover and fasten it firmly with screws.
Learn to Clean Your Dryer Vent from the Outside
Here you have it: A simple how-to for cleaning the exterior of your dryer vent. It’s not too difficult, and in the long term, it will have a big effect on the efficiency and safety of your dryer. Cleaning your dryer vent from the outside is an important home maintenance task that’s often disregarded, but it may significantly reduce your house’s danger of fire.
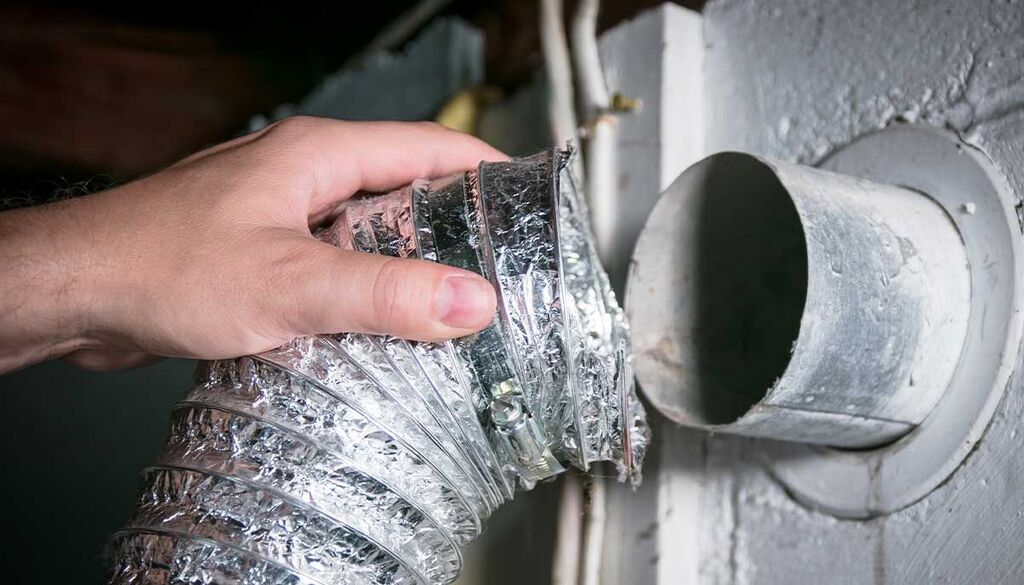
How To Clean a Dryer Vent From the Inside
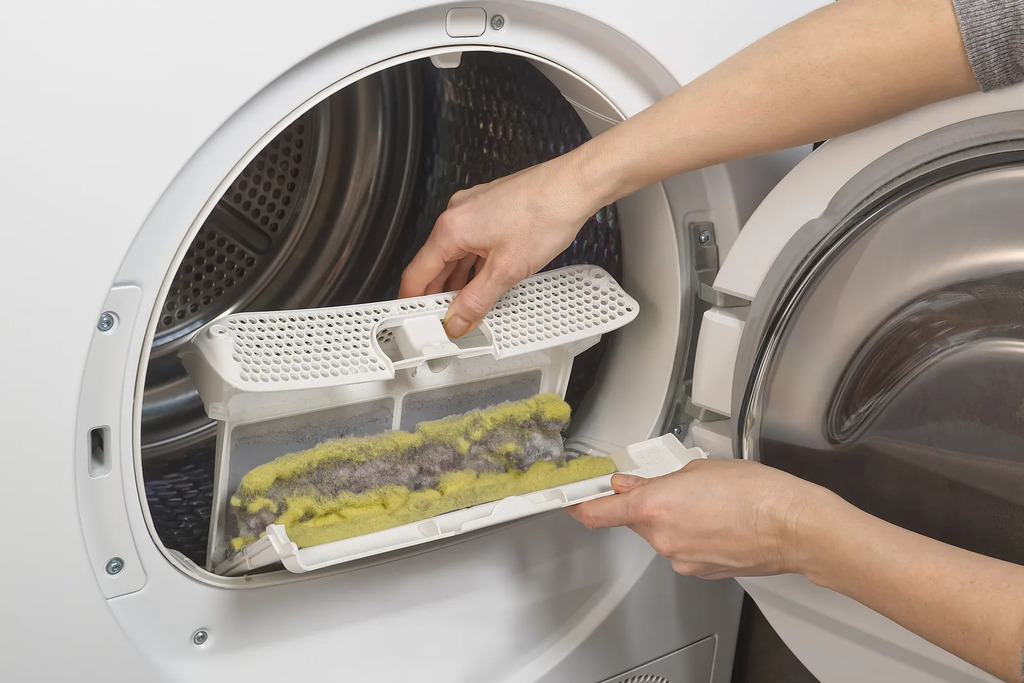
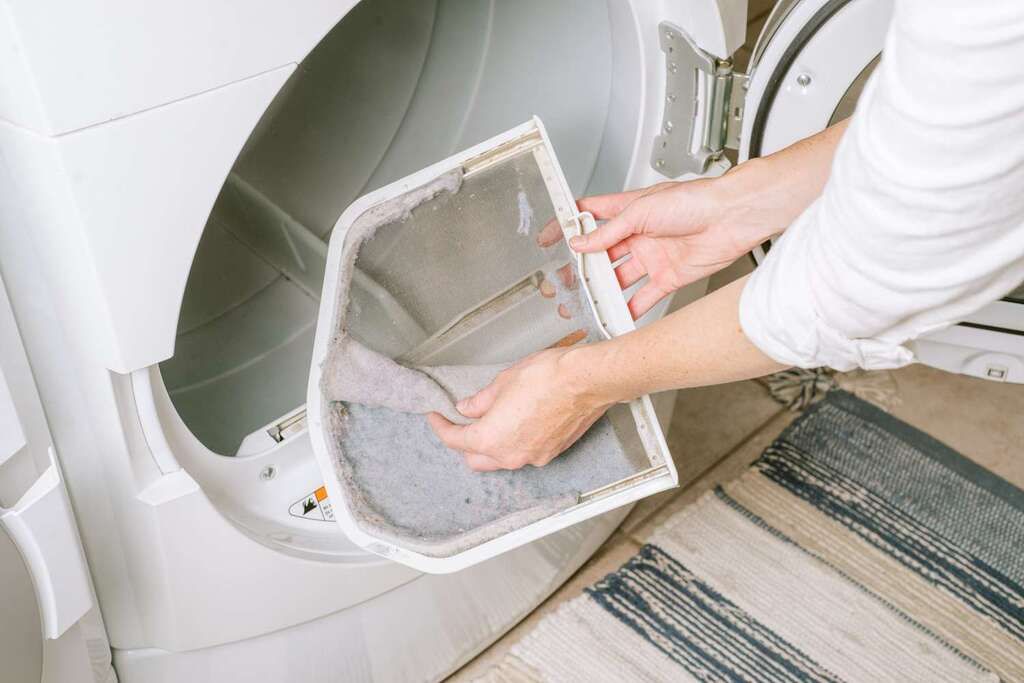
Step 1: Remove and Cleanse the Lint Trap
Locate the lint trap on your dryer, which is often located at the bottom or on top of the door. For particular areas, see the manufacturer’s information or the handbook. Take out the lint trap, clear away any big lint particles, then clean the interior of the lint trap housing with a shop vacuum. To access the bottom of the housing, use a tiny hose attachment.
Alternately, thoroughly clean the interior of the lint trap housing using the brush included in a dryer duct cleaning kit.
Step 2: Find the Dryer Vent
Determine the dryer vent’s two ends. The outdoor vent end is often located on the outside of the house, next to the laundry room, while the internal vent end is generally located behind or above the dryer.
Step 3: Unplug the Dryer
If applicable, disconnect the dryer and close the gas supply valve. To reach the indoor vent end, slide the dryer away from the wall by one or two feet. Ask for help if it’s too heavy. Unplug the dryer from the vent; some hoses fit in easily, while others need screws to tighten.
Step 4: Vent for a Vacuum Dryer
Attach the lengthy hose to a shop vacuum and use it to reach into the dryer vent. To gather trash, place the hose into the dry exhaust vent after turning on the vacuum and sucking up any loose lint around the vent hole.
Step 5: Clean the Dryer Vent
Use a dryer duct cleaning kit with extensions and a flexible brush if necessary. To get to the end of the vent, feed the brush into it and add extensions. For powered cleaning, you may also use a drill bit attached to the brush.
To clean, carefully remove the brush from the vent and rotate it. To dryer clean vent without using a drill, move the brush back and forth.
Step 6: Take a Vacuum to the Outside Dryer Vent
Go outside and see whether there is any free movement in the vent aperture. Spray lubricant on the slats if they get stuck. To clean the area surrounding the vent entry, connect and turn on the vacuum. To gather loose debris, place a thin hose connection into the vent.
Step 7: Clean the External Dryer Vent
Set up a vent cleaning brush. Feed the brush into the vent, making any required extensions. For effective cleaning, either manually rotate the brush or use a drill attachment. When you remove the brush, expect some debris to fall out.
Step 8: Clean Up Any Garbage
Use warm, soapy water and a microfiber cloth to clean the outside vent cover. Clear the dryer vent of any loose dirt by vacuuming or sweeping.
Step 9: Reconnect the Dryer
Reattach the dryer to the vent, plug it in, and, if necessary, activate the gas valve. Verify the connections once again and reposition the dryer, making sure the ducting is not bent.
Step 10: Check the Dryer
Reinstall the lint screen, switch on the dryer, and make sure hot air is properly vented outside.
How to Stop Dryer Vent Buildups and Clogs from Happening Again
Cleaning your dryer vent can save not only costs but also lives. It safeguards not only your clothing but also your health. Thus, pay attention to these cleanups. These days, folks may even clean things up by following an easy do-it-yourself method.
First, take the dryer out and unplug it.
When you get to the vent duct, remove the clamp holding the vent pipe in place.
Examine the clamp for any damage, and replace it right away once you find any cracks. If not, look for obstructions throughout the remainder of the vent.
To remove all of the lint and dirt that has accumulated within the dryer, use a vacuum. It’s a good idea to look around for anything that could be obstructing the passageway.
Reinstall all the screws and switch on the machine after cleaning.
If you do this once a year, your dryers will last longer.
FAQs
How often to clean dryer vent?
Experts suggest cleaning your dryer ducts twice a year.
What happens if the dryer vent is dirty?
Not only is a clogged dryer vent irritating, but it poses a danger to safety. Your dryer vent’s accumulated lint is very combustible. It retains heat and may cause a fire when it builds up. Your clothing is protected, and the chance of a home fire is decreased when you clean your dryer vent.
Where do dryer vents get clogged?
Typically, lint accumulates in vents over time and obstructs airflow. Nests and other detritus may sometimes cause a blockage as well.
Why do I smell my dryer vent?
Steam may revert to water if a vent blockage occurs. The stench coming from your dryer vent is like a dead creature because of the combination of heat, water, and lint.
Conclusion
According to the U.S. Fire Administration, each year, clothes dryers cause close to 3,000 fires, resulting in five fatalities and more than $35 million worth of property damage. A quick but essential way to improve your family’s and your home’s safety is to make sure your dryer vent is clear.
In addition to raising the danger of fire, blocked vents reduce the efficiency of your dryer and raise the cost of power and malfunctions. Your dryer may have a lint blockage in its vent if it is taking longer to dry a load.
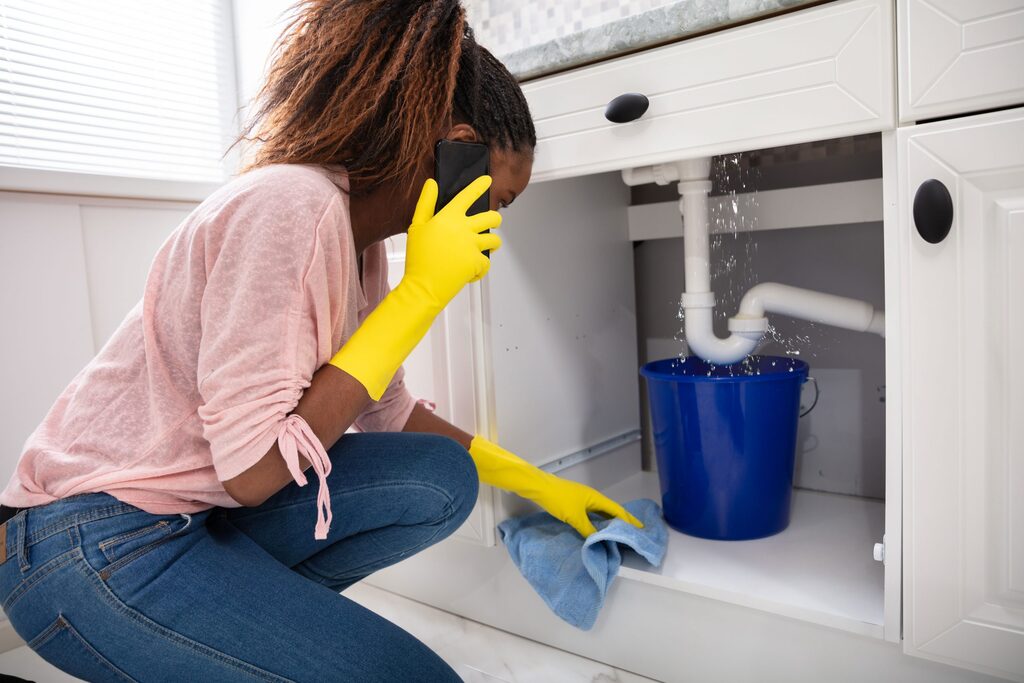
Emergencies can strike at any moment-and plumbing disasters like burst pipes or overflowing drains are no exception. In today’s fast-paced world, being prepared for emergency plumbing situations is crucial to protect your home from costly damage and disruption. This guide covers the essentials of emergency plumbing, from immediate steps to take during a crisis to preventative measures and advanced DIY techniques. Whether you’re facing a flooded bathroom or want to be ready for the unexpected, understanding emergency plumbing can help you respond swiftly and confidently, minimizing stress and safeguarding your property
Common Emergency Plumbing Issues and Causes
Picture this: a burst pipe flooding your basement or a clogged drain turning your kitchen sink into a murky swamp. These scenarios, though daunting, are not uncommon.
Burst pipes can stem from freezing temperatures or excessive pressure, while clogs can result from debris buildup or invasive tree roots. Meanwhile, water heater malfunctions are often traced back to faulty heating elements or thermostat settings gone awry.
Understanding the root causes of these emergencies is key to prevention and quick mitigation. Regular maintenance checks, proper insulation, and mindful usage habits can go a long way in averting disaster.
Steps to Take in a Plumbing Emergency:
In the heat of the moment, staying composed is vital. Begin by locating your main water shut-off valve to stem the flow of water. Then, assess the situation – if it’s a minor leak, a temporary fix might suffice. However, for major issues like burst pipes, it’s best to enlist the help of a professional plumber promptly. Time is of the essence in emergency plumbing, and swift action can prevent further damage.
Essential Tools and Supplies for Emergency Plumbing:
Arming yourself with the right tools can make all the difference. A trusty plunger, a pipe wrench, and a plumber’s tape are indispensable allies in battling plumbing catastrophes. Additionally, keep buckets, gloves, and a utility knife on standby for cleanup and repairs.
When to Call a Professional Plumber:
While DIY fixes have their place, certain emergencies demand professional expertise. A burst pipe, sewer backup, or gas leak are instances where a licensed plumber’s intervention is non-negotiable. Likewise, recurring issues despite DIY attempts warrant a professional’s attention to unearth underlying problems and prevent further headaches.
Advanced DIY Techniques:
In some cases, you might find yourself facing a plumbing issue that doesn’t necessarily require immediate professional intervention. Learning a few advanced DIY techniques can empower you to tackle minor emergencies effectively. For instance, mastering the art of soldering can be invaluable when dealing with pipe leaks or repairs. Similarly, understanding how to use a drain snake or drilling can help you clear stubborn clogs without the need for professional assistance.
Emergency Plumbing Kits:
To further enhance your preparedness, consider assembling an emergency plumbing kit. This kit should include essential items such as pipe repair clamps, epoxy putty, and leak-sealing tape. Additionally, stock up on spare parts like faucet washers, O-rings, and hose clamps. Having these supplies readily available can expedite repairs and minimize damage during emergencies.
Environmental Considerations:
We all know the current environmentally conscious world, so it’s essential to consider the ecological impact of plumbing emergencies. For example, leaks and bursts can lead to significant water wastage, putting strain on local water resources. To mitigate this, explore eco-friendly plumbing solutions such as low-flow fixtures, rainwater harvesting systems, and greywater recycling. Not only do these initiatives help conserve water, but they can also lower your utility bills in the long run.
Community Resources and Support:
Sometimes, dealing with a plumbing emergency can feel overwhelming, especially if you are unsure where to turn for help. Fortunately, many communities offer resources and support services to assist residents during crises. These may include emergency helplines, community workshops on plumbing maintenance, or even volunteer groups willing to lend a hand during emergencies. Don’t hesitate to reach out to your local authorities or community organizations for assistance and guidance when needed.
Educational Opportunities:
Expanding your knowledge of plumbing systems and emergency preparedness can be an ongoing process. Consider taking advantage of educational opportunities such as online courses, workshops, or seminars focused on plumbing fundamentals and emergency response. By staying informed and continuously honing your skills, you will be better equipped to handle any plumbing crisis that comes your way.
Innovations in Emergency Plumbing Technology:
Advancements in technology are revolutionizing the field of emergency plumbing, offering innovative solutions to traditional problems. For example, smart leak detection systems can monitor your plumbing system in real-time, alerting you to potential issues before they escalate into emergencies. Similarly, remote-controlled shut-off valves allow you to turn off your water supply from anywhere using a smartphone app, providing added peace of mind when you are away from home.
Conclusion:
In the realm of emergency plumbing, preparation is paramount. By understanding the common issues, equipping yourself with the right tools, and knowing when to call in the cavalry, you can navigate plumbing crises with confidence. Remember, in the face of adversity, a cool head and a plumber on speed dial can be your greatest assets.
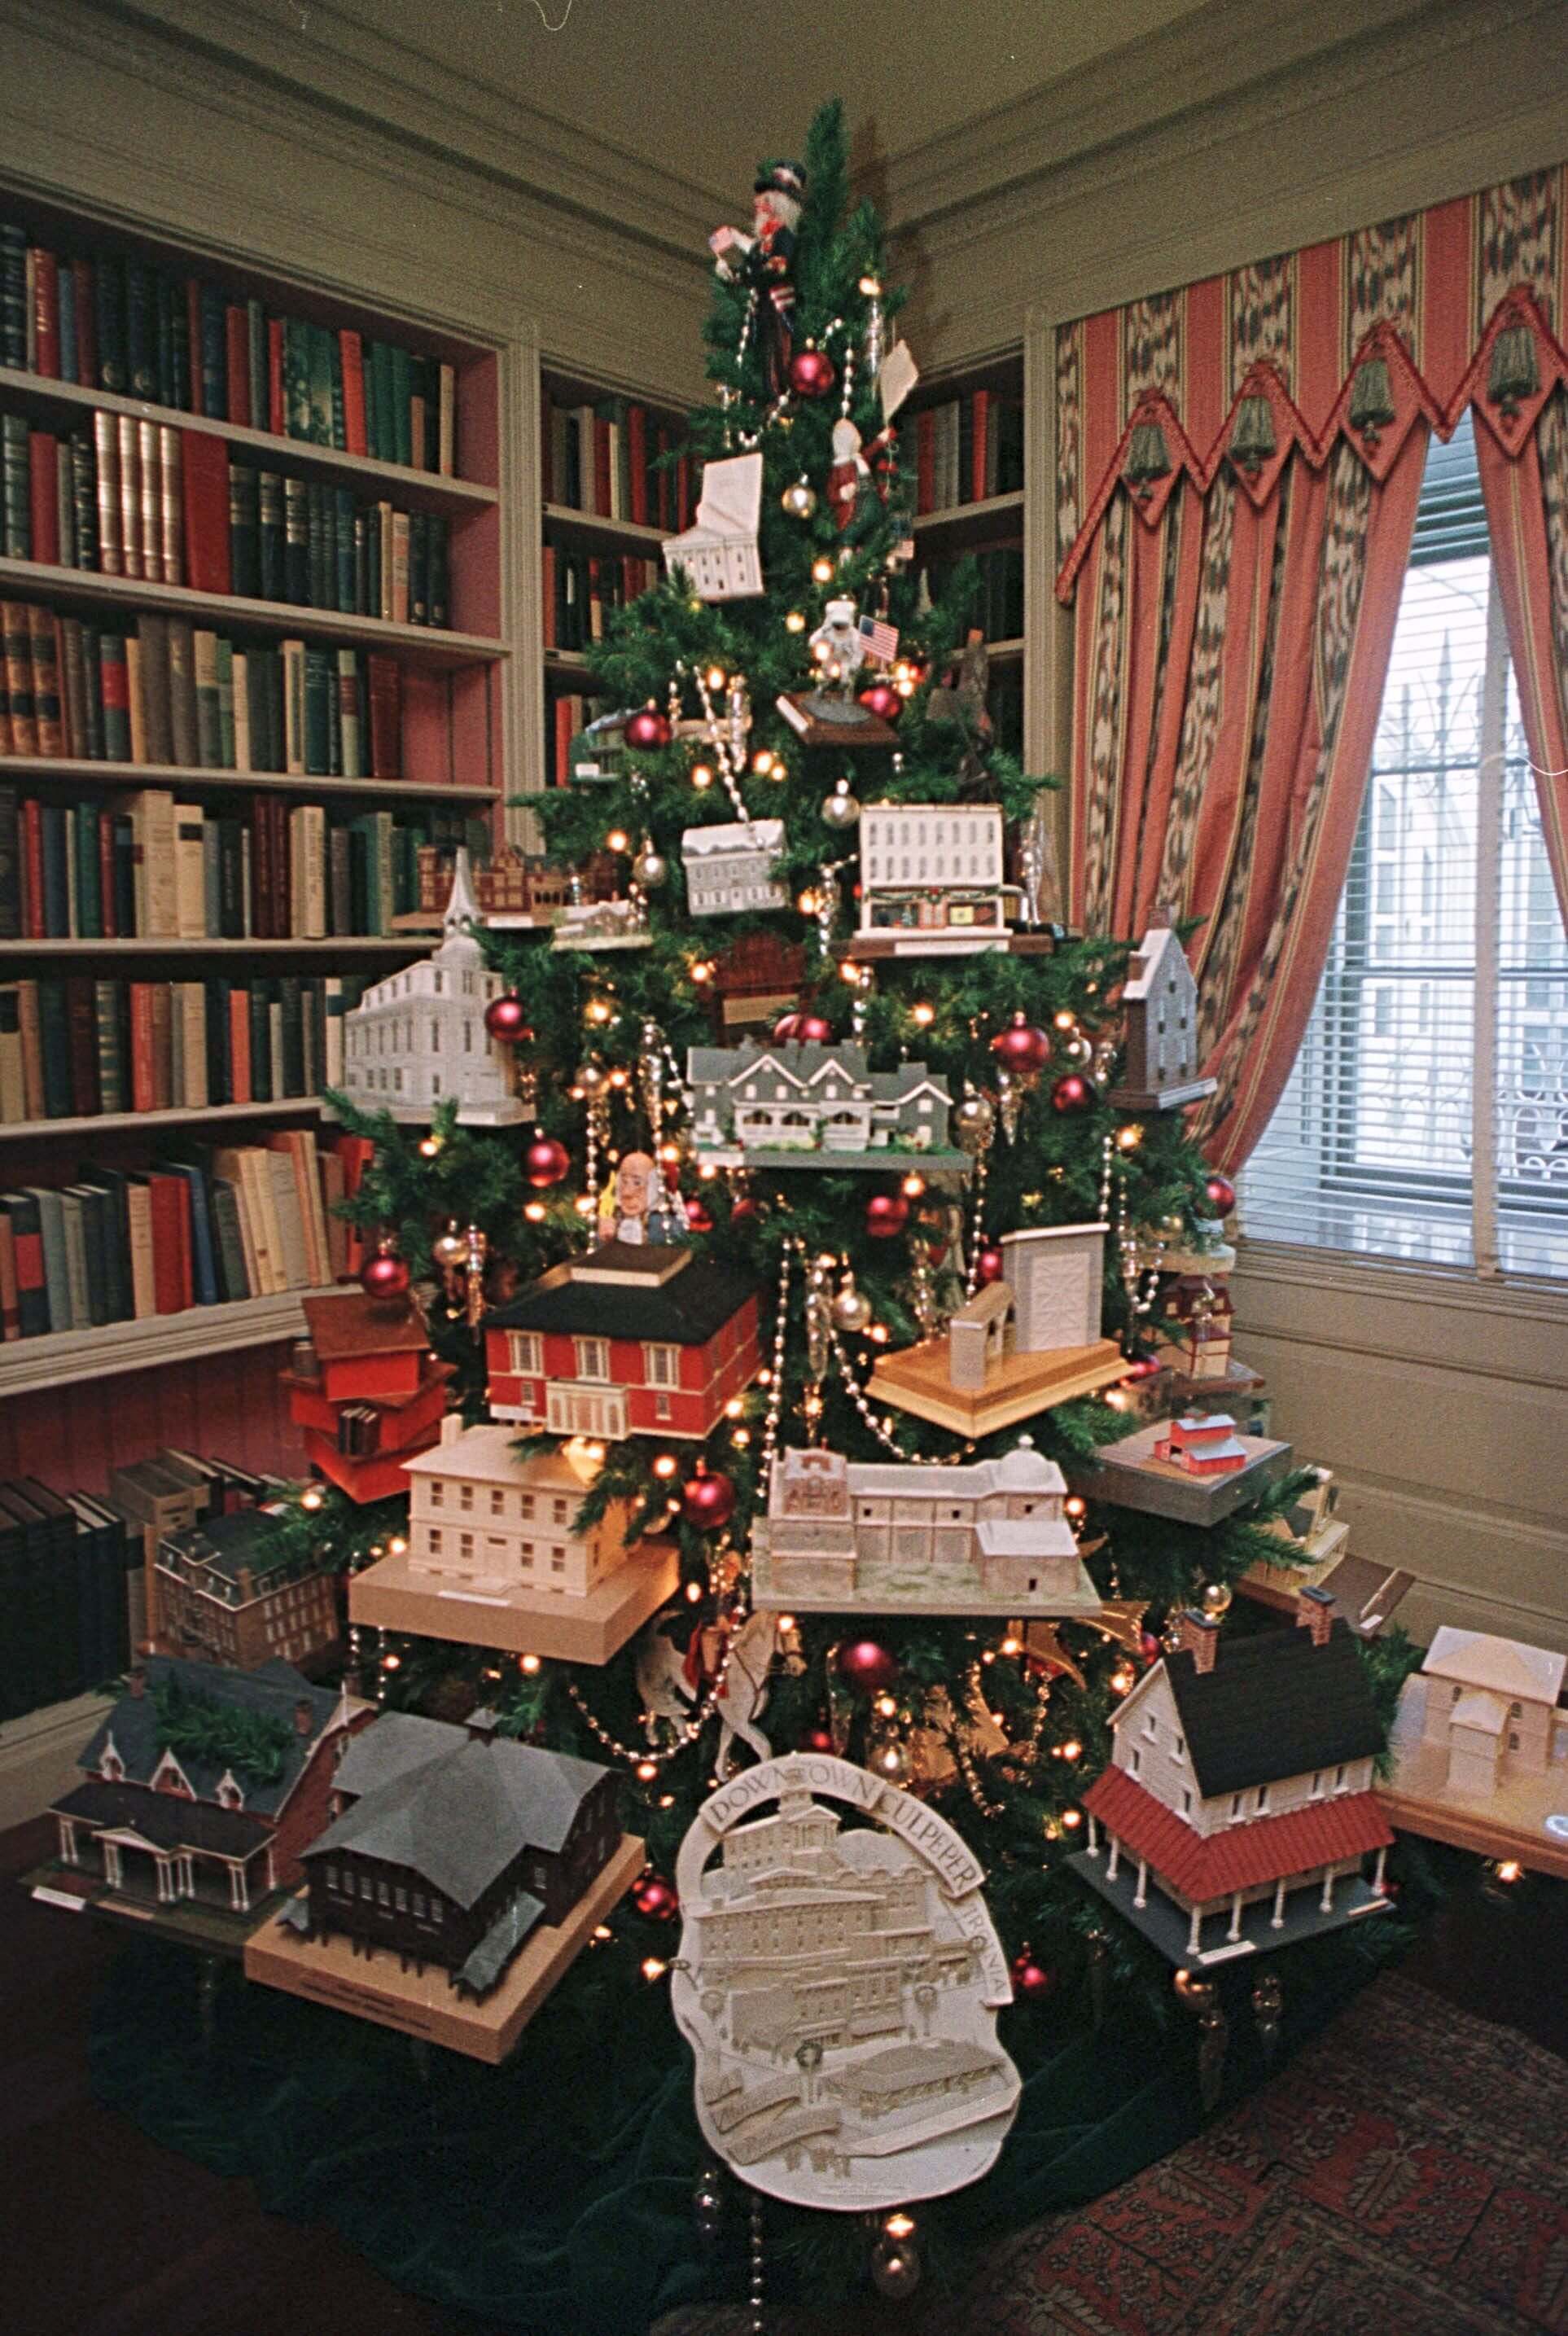
The White House Christmas decorations are among the most iconic and creative holiday displays in the United States. This cherished tradition dates back to 1889 when President Benjamin Harrison placed the first official Christmas tree inside the White House. Since then, every First Lady has taken on the special role of decorating the White House for Christmas, often selecting unique themes that reflect the spirit of the times and the family’s personality.
These decorations, featuring magnificent trees, handcrafted ornaments, and festive motifs, are showcased annually during public tours, inspiring millions and setting a standard for holiday décor nationwide. Join us on a virtual journey through the last four decades of White House Christmas decorations, highlighting the distinctive styles and themes brought to life by America’s First Ladies.
Here is how America’s Frist lady prepared the White House for the Christmas:
1. Nancy Davis Reagan (1981-1989)
1981
Nancy Reagan decorated the White House in a very creative and casual way. She kept things simple and clean. Here’s she posed with the Ronald Reagan in the white living quarters.
1982
On her second Christmas, she decided to embellish the tree with gold angel ornaments with white lights.
1983
That year, the Nancy Reagon was accompanied by Mr. T (Star of the A-team), who was dressed as a Santa Clause.
1985
“Old-fashioned turn of the century Christmas” was the Christmas theme of the year 1985. And guess who the Santa was? Larry Hagman was showed up as a Santa for the Christmas White House tour.
1987
This year Reagon’s bring an 18.5-foot Fraser fir “ musical” tree. White House carpenters made 300 wood candles for this tree and some of the decors were reused from the previous celebrations.
2. Barbara Pierce Bush (1989-1993)
1989
Barbara Bush decorated her first Christmas tree with the cute dolls, which are the famous characters in the storybooks of kid’s.
1991
With the 1,200 needlepoints, ornaments, the blue room tree was decorated. From which, three ornaments were handmade by the First Lady.
1992
This year, the decorations are very classic and traditional. The Christmas tree was adorned by the giant red ribbons and silver ornaments.
3. Hillary Rodham Clinton (1993- 2001)
1993
It was the first Christmas for Hilary Clinton. So, she decided to decorate a Fraser fir tree with cool and funky ornaments.
1994
In the year 1994, the first lady includes an 18- foot tree in the white house Christmas decorations, which was made by American artists and School children.
1995
“Twas the Night Before Christmas, When All Through the House…” themes were expressed by the culinary and elementary schools, embroiderers and architects. The White House pastry chefs also prepared a 70-pound gingerbread model of Hilary’s childhood home.
1997
An 18.5- foot tall Christmas tree is installed in the main hall, which was made by the NNA (National Needlework Association). It is the Council of Fashion Designers of America.
1999
This main focus of this year’s decorations is the series of the gingerbread models of the Washington Monument, Mount Vernon, the Jefferson Memorial, and the White House.
2000
As this the last year for the Clinton, she selected the “Holiday Reflections” theme and decorated the tree with the miniature of the historical places.
4. Laura Welch Bush (2001- 2009)
2003
The first lady embellished the tree with storybook characters. By this, she shows paid homage to her mother-in-law (Barbara Bush).
2006
It had been felt like a white Christmas in the White House. With the “Deck the Halls and Welcome All” theme, Laura decided to decorate the tree with silver ornaments, red ribbons and lots of fake snow on the tree branches.
2007
This year Christmas tree is paid tribute to the country’s National Parks. A total of 347 handmade ornaments was hanged on the tree. All these represent America’s memorials, seashores, parks, monuments, and historic sites.
5. Michelle Obama (2009- 2017)
2009
In 2009, Michelle Obama celebrated her first Christmas as the first lady of the united states. “Reflect, Rejoice, and Renew,” was an environmentally friendly theme for Christmas. After trees being displayed, National Parks Service replanted Six of them.
2011
Michelle Obama wanted to shows respect for the people who serve the country. So, she decorated the main tree with the military medals and Christmas cards which were written by their families.
2012
Obama selected the cool and classic theme of Christmas “ Joy to All.” This year they added a Gingerbread model of the White House, and also a new member was added to the family- Bo (Dog).
2014
Michelle decorated The House with the theme “A Children’s Winter Wonderland.” she also invited defense personnel and their families to be first to visit the installations.
2015
And, for 2015 she chose the star and stripes theme. She decorated the Blue room with a Christmas tree in multiple colors ( Red, Blue, and White). The tree was wrapped in a ribbon, which displays the messages from the U.S troops for their families.
6. Melania Trump (2017- Present Date)
2017
As “Time-Honored Traditions” was the central theme, the decorations were full of mysterious and surprising elements. The white house is decorated with 53 Christmas trees, 71 Wreaths, and more than 12,000 ornaments. Cross Hall and The Grand Foyer were decorated by multiple Christmas trees with beautiful crystal ornaments. Inspired by the 1961 white house holiday “ Nutcracker Suite” theme, all Christmas trees were covered with the artificial snow.
2019
Like the last year, this year, Melania Trump will definitely have some unique and exciting ideas to decorate the White House at Christmas.
So, how do you feel after reading this? Definitely, the decorations are Bizzare but with full of festive vibes. There is always a specific theme, and according to that, all the decorations were set. So, of which year you liked the Christmas decoration theme of the White House the most?
Finding a reliable air conditioning contractor in Plano, TX is essential for maintaining comfort during the city’s intense heat. With so many HVAC companies to choose from, selecting the right professional can feel overwhelming. The contractor you hire will directly impact your system’s performance, your long-term expenses, and your home’s comfort. To make an informed decision, it’s important to compare price estimates, research company reputations, and verify qualifications. By following a careful selection process, you can ensure your air conditioner receives quality service from a trustworthy expert
Ask For Price Estimates
Before choosing your preferred HVAC contractor, you should ask for price estimates from several contractors in Plano, TX. As a result, it will be easier to identify an HVAC expert that fits your budget.
It is advisable not to accept over-the-phone price estimates. There are several factors that a prospective contractor has to consider before giving you an estimate. For instance, they have to consider the size of your home, the number of windows, numbers of individuals living in your home, etc. Therefore, they must inspect your home first to provide the right estimates.
Even though the purpose of asking for price estimates is to identify the most affordable contractor, it is advisable not always to accept low estimates. Cheap HVAC experts are likely to offer low-quality services, which will cost you more in the long run.
Do Your Research
To choose the right air conditioning contractor, you need to do in-depth research. Do not rely on advertising and first page rankings. It is because there are contractors who use black hat SEO techniques to rank higher on search engines.
First, create a list of potential contractors in Plano, TX. Secondly, use the available resources to identify the most reliable one. For instance, you can contact the Better Business Bureau to confirm whether they are any complaints against your prospective air conditioning contractor.
Additionally, you can check for reviews and testimonials from previous clients online. As a result, you will get to know whether people enjoy their services or not. However, a few negative reviews don’t mean that the contractor is not reliable or professional.
It is important to note that there are HVAC experts who buy or fake reviews. Therefore, proceed with caution when you see many positive reviews without details and specifics.
Ask For Referrals and Recommendations
When in the process of choosing an HVAC expert, you can ask for referrals and recommendations from friends, relatives, and neighbors. You can also request Plano trade organizations for the names of reliable contractors.
There is a good chance that one of the above has hired an air conditioning contractor at some point. If they enjoyed the services, they would be more than happy to refer you to a trustworthy and professional HVAC contractor. On the other hand, they will advise you to avoid a particular contractor.
You can also request your prospective HVAC contractor for customer references. Make an effort to call them to confirm the contractor’s performance and adherence to time and budget. Here are some questions you can ask the customer references.
Did you confirm if there are any complaints against the contractor?
Consider Reputation
Before hiring a contractor in Plano, you need to make sure that they have quite a good reputation. Having a good reputation can mean that the contractor is trustworthy and professional. You can ask around or check their previous accomplishment.
A contractor becomes popular when they offer quality and affordable services, also if they participate in charities and community events.
Ensure That They Are Credible
Before hiring an HVAC expert, it is essential to confirm their credibility. The right contractor should have a physical office where you can go if you have any queries. An office also reduces the chances of being scammed by unprofessional contractors.
A website can also boost credibility. The contractor can add their contact information, making it easy for potential clients to contact them.
Experience
Your air conditioning unit is one of the most expensive appliances you are likely to install. Therefore, it is only reasonable that the contractor who will work on it is experienced and has appropriate training. Additionally, an experienced HVAC expert will help you choose the right size air conditioning unit for efficiency.
Do not be afraid to ask your prospective contractor how long they have been in the industry. It is advisable to hire an HVAC expert with more than five years of experience.
Ask For Verification
In Plano, TX, it is a requirement for HVAC contractors to have licenses and other essential certifications to confirm that they have undergone training. It will help you know whether your HVAC technician has experience with replacement, maintenance, or repair.
Most contractors place the above documents on their website and in their offices for people to see.
The above documents can help you determine whether the contractor is experienced or not. Additionally, it is advisable to hire a contractor who is insured. As a result, you will not incur more costs when the contractor is injured during the job.
Home Evaluation
When installing an air conditioning unit, the right contractor should offer to evaluate your home to determine the best air conditioning unit. During an evaluation, the contractor needs to consider factors such as the square footage of a room, size of windows, and insulation.
Additionally, they can check the duct system for leaks and inspect loose segments. After an evaluation, it will be easier for the contractor to give a detailed price estimate.
Conclusion
The above are tips that can help you choose the right air conditioning contractor in Plano, TX. Remember that efficiency is one of the factors to consider when looking for the right HVAC expert. Make sure that the contractor you choose is available 24/7 in case you need assistance.
With the rise of smart devices and entertainment systems, messy cables and tangled wires have become a common headache in modern homes. Not only do exposed wires create visual clutter, but they can also pose safety risks for children and seniors. Fortunately, there are practical and stylish solutions to hide and organize wires, from simple cable ties to creative DIY hacks and furniture-based tricks. This guide explores the best ways to manage cables, helping you keep your living space neat, safe, and visually appealing.
Use Cable Ties and Cord Wraps
One of the most popular ways to organize wires is by using cable ties and cord wraps. This method is simple, cheap, and effective. All you need to do is group all the wires together and use a cord wrap or a cable tie to hold them in place. You can find these materials in any hardware or home improvement store.
It’s an excellent solution, especially if you don’t really have the time to sort them and make them look aesthetically pleasing. Plus, it’s affordable too, so it’s a win-win situation mostly for people who don’t mind having a clump of wires hidden behind a desk.
Get a Cable Management Sleeve or a Wire Cover
If you want something a little more aesthetically pleasing, then you can opt for a cable management sleeve or wire cover. This solution is also relatively cheap and easy to do. All you need to do is slip the sleeve or cover over the wires and secure it in place.
Utilize Your Cabinets and Boxes
This is probably one of the best ways to organize and hide your wires. Most people don’t think to use their cabinets and boxes as a way to store their cables and wires, but it’s actually a very cost-effective solution. You just need to cut holes on both sides so that you can feed the wires through.
You can use any type of cabinet or box, depending on your preference and where it will be placed. You can also use your old TV stand if you want to save some money. Just make sure that the holes you’re going to cut are big enough for the cords to fit through.
Make the Most Out of the Furniture You Have at Home
This solution is a bit more creative and will take some time, but it will be worth it in the end. This method is also great if you want to save money since you won’t be buying anything new. All you need to do is get creative with the furniture that you already have at home.
For example, you can use an old ladder and turn it into a makeshift wire hanger. You can also use an old stool and drill some holes in the legs so that you can feed the cords through. The possibilities are endless! Just use your imagination and repurpose any furniture that is simply there or those that you don’t use anymore.
Opt for the Do-It-Yourself Wire Hangers
This solution is for people who are crafty and love DIY projects. If you have the time and patience, then you can definitely try this method. There are a lot of tutorials online that can help you with this project.
You can either use PVC pipes or metal hangers. It’s really up to you. Just make sure that you measure everything correctly so that your wires will fit snugly in the hanger. You can paint it to match the color of your walls or furniture so that it will blend in perfectly.
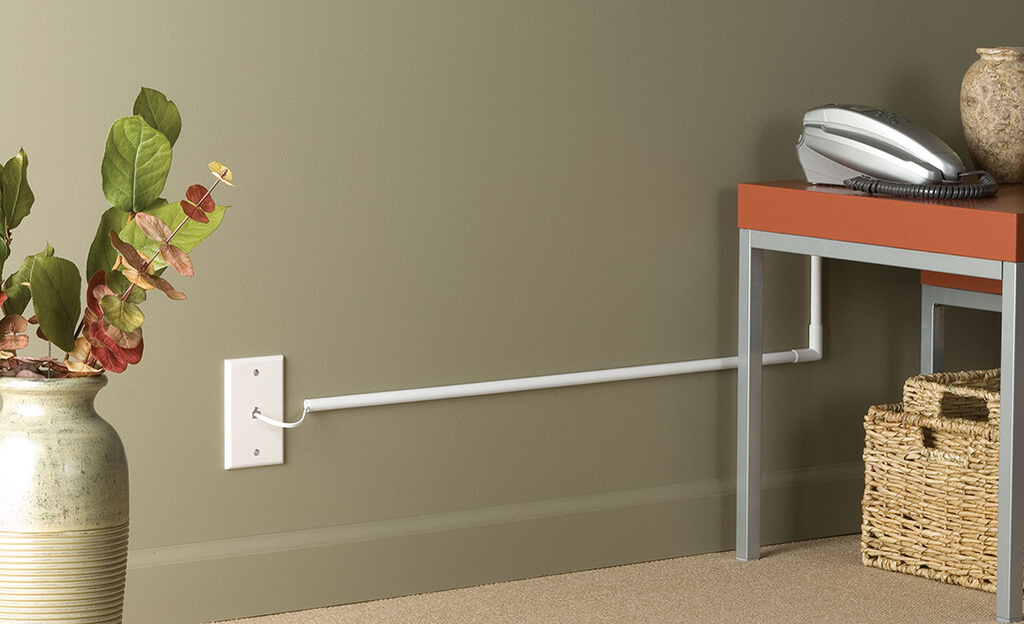
Use Wall-Mounted Wire Systems
This solution is perfect for people who don’t mind spending a little bit of money on getting the job done. There are a lot of wall-mounted wire management systems that you can buy online or in home improvement stores.
The good thing about this solution is that it’s very easy to install, and it’s also very effective in hiding your wires. Plus, it gives you the option to change the design anytime you want.
Conclusion
These are just some of the ways that you can hide and organize your wires at home. It’s really up to you which solution you want to use. Just make sure that you take into account the amount of time and money you’re willing to spend on this project. Whichever method you choose, just make sure that it’s something you’re comfortable with and will work well for your home’s design and functionality.