Home Blog Page 31

How to Make a Small Bathroom Look Bigger

0
Small Bathroom looks bigger

Tired of feeling like your small bathroom is a cramped elevator? It’s time to unlock the secrets to creating the illusion of space and airiness in your compact washroom.

With a few strategic adjustments and clever design tactics, you can transform your petite powder room into a surprisingly spacious retreat. But how, you ask?

Well, let’s just say that the solution involves more than just knocking down walls. Intrigued? Keep reading to uncover the key strategies for making your small bathroom look bigger and more inviting.

1. Optimize Storage with Clever Solutions

Optimize Storage in bathroom

Maximizing storage in a small bathroom can be achieved through clever solutions such as wall-mounted cabinets and multipurpose furniture. Wall-mounted cabinets not only save floor space but also provide ample storage for your toiletries and towels. Consider installing them above the toilet or vanity to make the most of vertical space.

Additionally, multipurpose furniture like a vanity with built-in shelves or a mirror cabinet can help declutter the bathroom while serving multiple functions.

To further maximize storage, utilize the back of the bathroom door with an over-the-door organizer for items like hair tools, cleaning supplies, or extra toiletries. This simple addition can free up precious cabinet and counter space.

Another clever trick is to install floating shelves above the toilet or along unused wall space, providing a spot for decorative items or extra storage bins.

2. Use Light Colors to Open Up the Space

Light Color in bathroom

To create the illusion of a larger space in your small bathroom, consider using light-colored materials and finishes that reflect and bounce light around the room. Light colors such as white, cream, soft gray, or pastel hues can make the space feel more open and airy.

These colors help to reflect natural and artificial light, brightening up the room and creating a sense of spaciousness. Opt for light-colored tiles for the walls and floors, and choose light-colored paint for the walls and ceiling.

Additionally, consider using light-colored fixtures and fittings such as sinks, bathtubs, and vanities to further enhance the feeling of openness in the bathroom. By incorporating light colors throughout the space, you can visually expand the boundaries of your small bathroom and create a more inviting and comfortable environment.

3. Employ Strategic Mirror Placement

Mirror placement in bathroom

How can you strategically place mirrors to make your small bathroom appear larger and more spacious?

One effective way to create the illusion of space is by employing wall-to-wall mirrors. By using full-size mirrors that run from wall to wall, the reflection of light and space is maximized, making the room feel more expansive.

Additionally, you can hang light-reflecting tiles behind the mirror and add wall lights on either side for extra brightness. Consider installing a decorative pendant light in front of the mirror to further reflect light and create a lofty effect.

Another option is to use wall-hung units or units on slim legs to give the impression of openness. Avoid a wall of fitted furniture, as it can make the space look smaller.

4. Enhance Natural and Artificial Lighting

Natural Lighting in bathroom

Consider incorporating a combination of natural and artificial lighting to create a brighter and more spacious atmosphere in your small bathroom.

Start by maximizing natural light through the use of sheer curtains or frosted windows to allow sunlight to filter in without compromising privacy.

Additionally, strategically placing mirrors opposite windows can help bounce light around the room, making it feel larger.

When it comes to artificial lighting, opt for fixtures that provide ample illumination without overwhelming the space.

Consider installing recessed lighting to brighten up the entire room evenly, and add task lighting around the vanity area for practicality.

A well-lit bathroom not only creates the illusion of more space but also enhances the overall ambiance.

5. Choose Space-Saving Fixtures and Fittings

Functional space in bathroom

Maximize your small bathroom’s space by opting for compact fixtures and fittings designed to enhance functionality without compromising on style. Choose a wall-mounted sink or a pedestal sink to free up floor space and create a more open feel. These options provide the necessary functionality without overwhelming the limited area.

It’s worth browsing for space-saving baths as these baths can really make your bathroom look much bigger than it is!

Consider a compact toilet with a round bowl that takes up less space compared to elongated models. For the shower, install a sliding door or a bi-fold door instead of a hinged door to save space. Additionally, consider a corner shower with a curved front to maximize space without sacrificing comfort.

When it comes to storage, select a slimline vanity unit or consider built-in shelving to keep the floor clear and create a more spacious ambiance. These space-saving fixtures and fittings will help you make the most of your small bathroom without compromising on style or functionality.

Frequently Asked Questions

What Are Some Innovative and Unexpected Storage Solutions for a Small Bathroom?

Consider utilizing tall, mirrored cabinets, wall-to-wall vanity counters, and wall-hung units. Opt for light-colored materials and reflective surfaces like marble and glass to create a brighter and larger feel. Incorporate full-size mirrors and wall lights for extra brightness.

How Can I Incorporate Pops of Color in a Small Bathroom Without Overwhelming the Space?

Incorporate pops of color in a small bathroom without overwhelming the space by strategically placing colorful towels, rugs, and accessories. Use vibrant shades as accents and keep the majority of the space light and neutral.

Are There Any Tips for Using Mirrors to Create a Focal Point in a Small Bathroom?

To create a focal point in a small bathroom, use full-size mirrors from wall to wall, install a decorative pendant light in front for reflection, consider antique-style mirrors, and reflect adequate background for a more spacious feel.

What Are Some Creative Ways to Bring More Natural Light Into a Small Bathroom?

To bring more natural light into your small bathroom, consider using light-colored materials, reflective surfaces, and incorporating wall-to-wall mirrors. These tricks will bounce light around the room, creating a brighter and more spacious feel.

Can You Recommend Space-Saving Fixtures and Fittings That Are Also Stylish and Modern?

You can maximize space in a small bathroom with wall-hung units and a wall-to-wall vanity counter. Incorporate light-colored materials and reflective surfaces like marble and glass to create a brighter, more spacious feel.

Conclusion

So there you have it – with the right storage, color choices, and lighting, you can make your small bathroom feel much bigger.

Don’t let limited space hold you back from creating a beautiful and functional oasis.

By implementing these tips and tricks, you can transform your compact bathroom into a more spacious and inviting space.

Say goodbye to cramped quarters and hello to a bigger, brighter, and more beautiful bathroom.

Explore Further:

How to Operate a Skid Steer Bobcat: Master Control!

0
how to operate skid steer bobcat

To operate a skid steer Bobcat, start the engine, then use the joystick controls to steer and manage attachments. Ensure safety measures are in place before operating the equipment.

Operating a skid steer Bobcat requires familiarity with its controls and functionalities. Before you begin, getting proper training on handling this compact but powerful machine is advisable. 

The Bobcat is versatile, serving various construction, landscaping, and agricultural needs, but mastery of its operation is crucial for efficiency and safety.

The operator’s cabin, typically equipped with hand and foot controls, serves as the command center. Engaging the parking brake, adjusting the seat and mirrors, and fastening the seatbelt are preliminary steps you should never skip.

A clear understanding of the job at hand and the terrain will dictate how you navigate and utilize the attachments, showing that competence with a skid steer Bobcat is an amalgamation of preparation, awareness, and skill.

Getting Started with the Skid Steer Bobcat

Skid steer loader Bobcats are compact and agile machines. They can perform a variety of tasks in construction and landscaping. Operators should know the basics before starting. Here’s how to get going:

1. Safety First

Safety is crucial with heavy equipment like the Bobcat. The following key steps ensure a secure operation:

  • Wear appropriate gear: Hard hats, safety glasses, and steel-toed boots are a must.
  • Inspect the machine: Check for any damage or issues before use.
  • Read the manual: Understand safety features and procedures.
  • Secure the area: Make sure the work zone is clear of people and obstacles.

2. Understanding the Controls

Knowing the Bobcat’s controls is essential. They might look complex, but they’re easy to learn:

  1. Buckle up: Use the seatbelt before touching anything else.
  2. Joysticks: These control the movement and the bucket.
  3. Foot pedals: They can manage the machine’s attachments.
  4. Dashboard: It shows vital information about the Bobcat.

Practice with the controls while the Bobcat is off. Develop a feel for the machine’s layout. Users gain confidence and ensure smooth operation.

Operating the Skid Steer Bobcat

Operate a skid stir bobcat

Mastering the controls of a Skid Steer Bobcat transforms tough tasks into simple chores. Whether handling construction debris, landscaping or clearing snow, knowing how to operate this equipment safely and efficiently is crucial. 

Let’s dive into the essential steps to running a Skid Steer Bobcat like a pro.

1. Starting the Engine

Before starting, conduct a pre-operation inspection. Check the machine, looking for visible damage, leaks, or loose parts. 

Ensure that the area is clear and that you have complete visibility. Climb into the cab, secure the safety belt, and lower the safety bar. 

Follow these steps to ignite the engine:

  • Turn the key to the ‘on’ position to activate the machine’s electrical systems.
  • Glance over the control panel for warning lights or messages.
  • Push the safety press button, usually located on the left.
  • Rotate the key further to start the engine while holding the safety button.

2. Basic Maneuvering Techniques

Controlling a Skid Steer Bobcat is unique due to its skid steering mechanism. The machine turns by speeding up the wheels on one side while slowing down those on the other. 

Practice these maneuvers in an open space:

  1. Pull the levers or joysticks to move forward or reverse.
  2. Press the left lever or joystick forward to pivot right.
  3. Push the right lever or joystick forward to pivot left.
  4. Apply gentle pressure to the controls for smooth navigation.

3. Using Attachments

Attachments enhance the versatility of your Skid Steer Bobcat. From buckets to augers, each attachment demands specific handling:

AttachmentOperation
BucketUse the control stick buttons to lower, tilt, or dump the load.
ForksApproach loads evenly, then lift using the vertical control.
AugerGuide into position, then drill using the auxiliary hydraulics.

Remember to read the manual for each attachment for specific instructions. With practice, changing and using different attachments becomes a swift and effortless process.

Safety Tips And Best Practices

Safety tips while operating skid steer

Using a skid steer Bobcat isn’t just about getting the job done. It’s critical to work safely and effectively. 

From checking the machine to handling various terrains and managing loads, following these tips will help ensure heavy equipment operator safety and machine longevity.

1. Inspecting The Machine

Before operating, carry out a thorough inspection. This can prevent accidents and machine damage.

  • Check tire pressure and tread wear
  • Examine hydraulic hoses and fittings for leaks
  • Ensure all lights and signals are functional
  • Verify that the bucket or other attachments are securely fastened

2. Operating On Different Terrains

Navigating varied terrains calls for adaptability and caution. Here’s how to stay safe:

  1. On slopes, keep the heavy end uphill to maintain stability
  2. Avoid sharp turns on inclines to prevent tipping
  3. Adjust speed according to surface conditions
  4. Stay clear of unstable ground to prevent accidents

3. Loading And Unloading

Correct loading and unloading practices are essential. Follow these steps for a smooth process:

StepAction
1Secure the skid steer Bobcat on the trailer with chains
2Ensure ramps are stable and clear of debris
3Drive slowly up or down the ramps to avoid skidding

Maintenance And Care

Maintenance of skid steer

Keeping your skid steer Bobcat in top condition is essential for performance and longevity. Proper maintenance and care mean fewer breakdowns and a longer life for your machine. Follow these steps to keep your skid steer running smoothly.

1. Regular Inspections

Regular inspections prevent unexpected problems. Start with a visual check each day before use. Look for any signs of wear or damage. Make sure to check the following:

  • Hydraulic hoses and fittings for leaks
  • Tires for proper inflation and cuts
  • Attachments for correct operation
  • Engine oil and coolant levels

Refer to the operator’s manual for a complete checklist and inspection frequency.

2. Cleaning And Lubrication

Keeping your Bobcat clean prevents dirt buildup that can damage its parts. 

After each use, do the following:

  1. Remove debris from the cabin, tracks, and attachments.
  2. Wash the machine to prevent rust and corrosion.
  3. Apply lubricant to moving parts to reduce friction.

Lubricate joints and bearings as specified in the manual for optimal performance.

3. Storage Tips

Proper storage protects your skid steer Bobcat from the elements. 

Follow these steps:

  • Store in a clean, dry space.
  • Disconnect the battery if not in use for extended periods.
  • Cover the exhaust and intake to keep pests out.

Before storing, check fluids and fill up the fuel tank to prevent moisture inside the tank.

Advanced Techniques And Considerations

Techniques of operating skid steer

Mastering the operation of a Skid Steer Bobcat requires practice and skill. Once you are comfortable with the basics, you can move on to more advanced maneuvers and handling techniques. 

Now let’s dive into expert advice for precision handling, working in tight areas, and managing different load types effectively.

1. Precision Handling

Seamlessly maneuver your Skid Steer Bobcat with these pointers for precision handling:

  • Throttle Control: Adjust the throttle gradually; smooth inputs lead to fluid motion.
  • Steering Techniques: Apply slight movements for straight lines or sharp turns.
  • Attachment Mastery: Understand your attachment limits to enhance control.

2. Working In Confined Spaces

Finesse is key when navigating through cramped environments. Tips include:

  1. Scout the space first: Ensure enough room for the machine and load.
  2. Plan movements: Visualize paths to prevent jams or damage.
  3. Go slow: Movements should be deliberate and measured.

3. Adjusting For Various Loads

Skid Steer Bobcats can handle diverse loads, but adjustments are crucial:

Load TypeAdjustmentTip
HeavyLower your speedKeep the load low to maintain stability
UnbalancedSteady & slow movementsSecure the load whenever possible
LiquidSmooth acceleration and decelerationUse a specially designed bucket

Quick And Easy Steps To Learn How To Drive A Bobcat

Steps how to drive skid steer bobcat

Mastering the controls of a skid steer Bobcat can seem daunting, but it’s simpler than you might think. With these straightforward steps, you’ll be navigating like a pro in no time. 

Here’s how to confidently start, operate, and turn off a Bobcat, with a strong emphasis on safety every step of the way.

1. Starting The Bobcat

Beginning your Bobcat adventure starts with understanding the startup process. To ignite the engine:

  1. Find a comfortable position in the operator’s seat.
  2. Ensure the safety bar is in place and locked.
  3. Check that all controls are in neutral.
  4. Turn the key to start the engine.

2. Operating The Bobcat

Operating the Bobcat is intuitive once you get the hang of the controls. Use this guide to maneuver:

  • Push both levers forward to move forward.
  • Pull both levers back to reverse.
  • Control the arm and bucket with the foot pedals.
  • Always keep your eyes on the path and surroundings.

3. Turning Off The Bobcat

Wrapping up your work requires a safe shutdown of the Bobcat.

  • Return the Bobcat to a flat, level surface.
  • Bring all controls to neutral.
  • Lower the bucket to the ground.
  • Turn the key to the off position and remove it.

4. Safety When Operating The Bobcat

Safety is paramount when operating heavy machinery like a Bobcat. Follow these tips to ensure a secure operation:

  • Wear appropriate safety gear, including a helmet and seatbelt.
  • Check the Bobcat for any maintenance issues before starting.
  • Avoid operating on steep inclines to prevent tipping over.
  • Be aware of bystanders and maintain a safe working area.

Frequently Asked Questions  

What Is A Skid Steer Bobcat Used For?

A skid steer Bobcat is a versatile machine used for digging, lifting and loading materials. It’s often found on construction sites, in landscaping, and for snow removal. Its compact size allows operation in tight spaces.

How To Start A Skid Steer Bobcat?

To start a skid steer Bobcat, first ensure the area is clear. Sit in the operator’s seat, fasten the safety belt, and lower the safety bar. Then, according to your specific model, turn the ignition key or press the start button.

What Safety Precautions Should You Take?

Before operating, always conduct a pre-operation inspection. Wear seat belts, keep limbs inside the cab, and be mindful of your surroundings. Never exceed the machine’s operating capacity and follow all manufacturer’s safety guidelines.

Can You Change Attachments On A Skid Steer?

Yes, you can change attachments on a skid steer. Turn off the engine, release hydraulic pressure, and follow the quick-connect system’s protocol to swap out tools like buckets, forks, or snow blowers.

Conclusion

Mastering a skid steer Bobcat requires practice and attention to safety. By following the steps outlined, operators can ensure efficient and secure handling. 

Remember, routine maintenance is key to performance. Embrace these tips for a confident, successful operation. Drive, dig, and develop your skills—with safety at the helm, success follows.

In Case You Missed It!

21+ Garage Storage Ideas to Maximize Your Space

0
Garage Storage Ideas

The garage is a space that can be used in numerous ways, from a workstation to an extra storage area. However, just storing extra stuff randomly in this space will make it look messy and cluttered. This is why it’s vital to plan the layout to keep this place clean and organized! 

So, even after parking your vehicles, there is some extra space remaining that you want to utilize, so keep reading. Today, I’ve gathered some of the best ways to maximize garage space efficiently. These amazing garage storage ideas on a budget will turn your ordinary garage area into something functional and aesthetic. With the help of these hacks, you can easily store tools, gardening gear, sports equipment, cleaning supplies, and more. 

So, let’s get started with the list. 

1. Wire Shelving

Wire Shelving garage storage

Let’s start with the simplest way to organize your garage: wire baskets. Instead of regular baskets, go with wall-mounted shelves. This will utilize the wall space and provide more floor space. Add wooden shelves to the wall and hang baskets with the help of hooks. You can use these wire baskets for shoes, tools, or any random stuff. They are great DIY garage storage ideas for the weekend project. 

2. DIY Fishing Gear Storage

DIY Fishing Gear Storage

Do you love fishing? If yes, you’ll surely have fishing gear. Fish rods can get easily tangled, and it takes patience to untangle them. No worries, here is the perfect way to store them: build a pipe rack! This pipe has holes where you can put the fish rods and other gear. These storage ideas for garage are really helpful. 

3. Pegboard Shelves

Pegboard Shelves in garage storage

Pegboards have been used for storage for many years, and it’s a brilliant way to utilize the garage space. If you don’t have a large area, you can use just two pegs with mini wooden shelves. Now tightly put these sticks, hooks, or shelves on the board and use them to hang your supplies and stuff.

4. Stack Plastic Bins Vertically

Stack Plastic Bins Vertically garage storage

If you’re struggling with floor space in your garage, use the vertical space. Yes, look at these small garage storage ideas where plastic bins are vertically stacked. They’re easy to access and don’t take up any space on the floor. These are easy-to-build storage towers that are multi-functional. You can also add hooks at the side to hang pipes, ropes, or tools.

5. Canvas Storage Bags

Canvas Storage Bags garage storage

We often put out-of-season decorations in our garages. However, over time, these things can get dirty or get damaged unknowingly. This is why it’s better to put them in canvas storage bags or vacuum storage bags. From heavy artificial Christmas trees to bulky autumn wreaths, you can use these bags to protect them from insects and dust. 

6. Garage Ceiling Storage

Garage Ceiling Storage

Just like the walls, you can also use your garage ceiling for storage. How? Take a look at the above image. Here, plastic bins are placed on a steel frame that securely holds the bins. You can put your seasonal decorations, camping gear, or sports equipment in them. This will be another fun DIY garage storage system that will bring more functionality to your garage. 

7. Utilize Storage Tubes

Cardboard and tubes in garage storage

Sometimes, storing long and large tools becomes a challenging task. Worry not; here are fantastic DIY garage tool storage ideas! This is the tube storage made from cardboard concrete-forming tubes. In the above picture, you can see how neatly you can store your baseball bats, long-handled tools, or any extra supplies in these tubes. 

8. Heavy Iron Rack

Heavy Iron Rack garage storage

Do you have lots of heavy stuff that you want to store securely? If yes, get this gladiator shelving unit. This is made from high-quality and durable materials like iron and steel, which can hold up to 2,000 lbs. per shelf. These racks are available in various sizes, such as 48-inch, 60-inch, and 77-inch, so pick the one according to the ceiling height of your garage space

9. Hang Bikes and Boats

Hang Bikes and Boats in garage storage

Have a small garage? No problem! Buy the hanging racks and put them on the wall to hang your bicycles, boats, ladders, and kayaks. Additionally, you can add plastic bins next to it to store helmets and other riding safety gear. Try these garage storage ideas now! 

10. Mini Locker Room

Mini Locker Room in garage storage

If your kids like to play sports or games, there will surely be plenty of stuff, including gear and tools. So, this time, instead of putting them anywhere in your garage, build a mini locker in the corner. This will keep your things safe and dust-free. You can store anything from gym bags and water bottles to helmets and hand skates.

11. Add More Garage Cabinets

Garage Cabinets

If you lack storage space in your garage, you can add more storage bins. This is quite obvious, isn’t it? But the real task is to put them strategically, meaning adding garage storage cabinets that will take less space but provide more space for storage! Take inspiration from the above garage storage ideas. Here, different types of storage units and solutions are implemented to maximize the garage area.

12. Corner Shelves

Corner Shelves in garage storage

Sometimes, while adding more storage cabinets and wall-mounted accessories, we tend to forget about nifty corners. Yes, don’t leave this space empty and utilize it with garage corner shelves. These corner floating shelves can store a lot of stuff, such as glues, oils, waxes, and polishes. Moreover, they’re cheap and easy to build. You can use either scrap plywood you already have in your garage or buy wooden planks from the hardware store. 

13. Rake Rack Garage Organization

Rake Rack Garage Organization

Just like a coat or hat rack is essential at the entryway of a house, the rake racks are a necessary element to add in the garage! Yes, many people struggle to find the right space to store rakes, dustpans, and brooms. Most of the time, they have been lying on the floor, taking up ample space. This storage method has a separate wall-mounted space for these useful tools. 

14. Double-Duty Shelf Brackets

Double Duty Shelf Brackets

If you’re planning to add floating shelves to your garage, add these types of brackets or hooks with them. These double-duty shelf brackets and rod-holding hangers are quite helpful in workshops and garages. Put two hooks on one floating wooden shelf for support, and they can easily hold heavy items.

15. Ceiling-Mounted Shelves

Ceiling Mounted Shelves garage

Are you searching for simple and quick garage storage ideas? This idea is for you! All you need to do is buy ceiling storage racks and install them on your garage ceilings. These overhead garage storage ideas are the perfect place to store all your camping gear and equipment. 

16. Built-in Garage Storage

Built in Garage Storage

Do your kids enjoy playing soccer? If yes, make their dream come true by converting your unused garage space into a dedicated sports equipment storage space. From sports accessories to clothes, these built-in storage units can be used to store anything. This will help to keep everything in place, minimizing the clutter. 

17. Garage Shoe Storage Ideas

Garage Shoe Storage Ideas

If you have a good collection of shoes at home but no place to store them, use your garage! Transform your old garage into a shoe storage system with these types of open shelves or closed cabinets with transparent covers. This will neatly organize and make it easy for you to find your shoes.

18. DIY Customizable Wall Storage System

DIY Customizable Wall Storage System

If your garage is in a weird shape or size, or you feel no single storage works for your space, try building customizable wall storage ideas. For example, this one contains various types of baskets, bins, and wall storage to keep tools, ladders, and other random stuff. The best thing about this is that you can build it in a day or two without spending too much! So, if you want to save hundreds of dollars while maximizing your garage space, try this now. 

19. Long-Handled Tool Rack Design

Long Handled Tool Rack Design

The next garage storage idea is this simple DIY project, which can be done in a day. It is perfect for hanging long-handled tools like shovels, rakes, and a sledgehammer. This will provide easy and flexible access. It looks like a floating shelf with empty spaces in between to store tools conveniently. 

20. Labeled Garage Storage

Labeled Garage Storage

Another tip for you while keeping your things in your garage storage is to put labels on everything. You may remember when you kept things, but after some time you will completely forget where you kept your things. To save your precious time, put colorful labels on the bins, sliding drawers, and cabinets.

21. Clutter-Hiding Cabinets

Clutter Hiding Cabinets

Whether it’s your bedroom or garage, a messy and untidy space always looks unpleasant to look at. This problem can be easily tackled by using clutter-hiding wooden cabinets. These types of garage storage ideas are both functional and practical. This way, you can maximize the space while keeping all the mess out of sight and keep your garage in good shape.

22. All-in-One Garage Workstation

All in One Garage Workstation

No matter whether your garage is small or large, you can make it more functional and space-efficient. All you need to do is use your imagination and creativity to create the perfect storage space. Let’s take an example of the above space where a large work table, a steel rack, and overhead cabinets have been installed. Similar to this, you can also add wall-mounted hooks to hang aprons and bags. A rug has been added to the hard flooring to make it comfortable to walk on.

FAQs

What are some space-saving garage storage ideas?

Add storage solutions like overhead storage racks, hanging organizers, and wall-mounted shelves to maximize your garage space. 

How can I organize tools in my garage?

You can use small boxes, pegboards, or magnetic strips to keep tools organized and easily accessible.

How can I store seasonal items in my garage?

To keep your holiday decorations and seasonal items organized and accessible, use clear plastic bins, overhead wire baskets, and built-in cabinets.

Final Thoughts

So, these are the best garage storage ideas. The key to creating an organized and tidy garage is to add all types of storage solutions, including shelving, cabinets, built-ins, and wall organizers. It also requires proper planning and design. You should consider your garage size, shape, and the things you want to store. On the basis of these factors, you can either go with DIY garage storage ideas or ask professionals to remodel your garage for you. Go with a plan that offers plenty of storage with quick access and convenience.

Explore Further

25+ Creative Kitchen Island Ideas That You’ll Love

0
Kitchen Island Ideas

In every home, the kitchen island serves a different purpose tailored to the unique needs of the residents. For some, it is a culinary place to serve food; for others, it is a place to relax and unwind. For a few others, it is that extra storage hub in the kitchen for the pots and pans and the ingredients that bring flavor to the dishes. Regardless of the designated role, this practical & pivotal kitchen island demands a good design that is scene-stealing.

From minimalistic design to rustic charm, there are endless possibilities in which you can design this beautiful piece of furniture.

Before we move on to the kitchen island ideas, let us first briefly understand the term kitchen island.

What is a kitchen island?

A kitchen island is a freestanding cabinet or a countertop strategically positioned to serve multiple purposes in the kitchen. The kitchen island is highly adaptable; it is not confined by the size of the room or its position. It can either be built-in or can be used as a portable piece whenever you feel like extending the space in the kitchen. 

Also, the design possibilities are endless; you can tailor it to your convenience. You can incorporate kitchen stools for seating, designer storage solutions, or specialized compartments for culinary tools. This empowers the residents to design a kitchen island that seamlessly integrates the rhythm of cooking, dining, and socializing. 

Based on this understanding, let us look at the various styles of kitchen islands that you can design to elevate the kitchen experience. 

1. Rolling island

It is a flexible island with wheels that can glide around in the spaces as per your requirements. You have the freedom to add shelves and drawers to create that extra storage within it. 

2. Fold-down island

If you have limited kitchen space and can not afford to design a spacious island, you can use a fold-down island. You can tuck it away when not in use to maintain the visual interest of the space. 

3. Skinny island

A skinny island is basically for a narrow kitchen where space optimization is crucial. Skinny Island is a strategic asset that allows you to have an additional counter space for serving breakfast or casual gatherings. 

4. Double-duty island

Taking the multipurpose feature quite literally to new heights. You can design a double-duty kitchen island with a built-in sink, dishwasher, or cooktop.

5. Wall-mounted island

A very easy and go-to option for a kitchen island is to have it wall-mounted. This minimalist design gives extra space in the kitchen as it can be folded when not in use.

6. Cube island

Embracing both form and function, this island design provides sufficient storage space for you to put those miscellaneous kitchen extras into it. 

As rightly said, “If your kitchen is organized, your life is organized.” Decorating the kitchen island with the right elements and making it an entertainment place is a challenge. 

Let us explore some best kitchen island ideas that will accentuate the kitchen’s charisma. 

Best Kitchen Island Ideas:-

1. Irregularly Shaped Kitchen island

Irregularly Shaped Kitchen island

Asymmetry in design is a powerful tool to create a distinctive impression. For kitchens having contours or unconventional shapes, an asymmetrical kitchen island looks inviting. The asymmetry complements the curve and creates an eye-catching visual. The island top is made out of irregularly shaped remnants of granite, marble, or quartz to enhance the aesthetics. 

2. An Oval-shaped Kitchen island

An Oval shaped Kitchen island

An aesthetically appealing oval-shaped kitchen island stands out as a trendsetter on the list. Picture this: The island is adorned with pink stools carefully chosen to match the kitchen cabinet colors and marbles. The cherry on the top of this design is the designer pendant light hanging on the top, illuminating yellow light to create a cozy environment.

3. Double kitchen island

Double kitchen island

If you are fortunate enough to possess a long, generously proportioned kitchen space, this design is for you. In this kitchen island idea, you design two kitchen islands with the same color and pattern and make it look more functional & impressive. The mirror image island enhances the overall sense of balance. 

4. Paint it blue

Paint it blue kitchen

A kitchen with blue cabinets and an island looks exemplary. Don’t believe us? Look at this apartment kitchen designed by Emily Todhunter. To give your kitchen a touch of elegance that resonates with the Manhattan vibe, you can paint it shades of crisp blue and a bit of white. 

5. A makeshift pantry

makeshift pantry kitchen island

If your kitchen doesn’t have a dedicated pantry space, it is better to design a makeshift pantry kitchen island. This clever kitchen island design addresses storage limitations and also provides ease of access. The versatile kitchen island provides enough space to organize dry goods and make efficient use of it. The shelves are designed to integrate frequently used items in the space and prioritize their ease while cooking. 

Read More: 8 Modern and Functional Butlers Pantry Ideas

6. Island with storage

kitchen Island with storage

To prioritize storage efficiency in the kitchen without compromising on aesthetics, you can design a drawer embedded in the kitchen island space. The placement of drawers shouldn’t disrupt the cohesive feel while serving the practical purpose. 

7. Integrate kitchen appliances into the island

Integrate kitchen appliances into the island

The kitchen is that extraordinary space, the epicenter of the house, where you perform numerous activities, from cooking and dishwashing to just relaxing and enjoying meals. An island designed with all of these activities kept in mind is a great way to transform space. The multifaceted island incorporates a kitchen sink, mini refrigerator, oven, or dishwasher. 

8. Bright Banquette Island

Bright Banquette kitchen Island

How about the idea of setting up a cozy sitting space in your exquisitely curved kitchen? Look at this magnificent curved kitchen island adorned with a channel-tufted banquette back! The Birmingham Alabama home designed by Hundley Hilton Interiors is worth taking inspiration from. This brilliant design is a great combination of luxury and functionality. 

9. Farmhouse Island

Farmhouse kitchen Island

Let’s design a 19th-century farmhouse-themed kitchen using elements that elevate the feel of the concept. To capture the essence, you can combine blue and white theme cabinets with a wood countertop and a few designer lights casting soft illumination hanging over the kitchen island. To complete the picture, the farmhouse kitchen island is surrounded by high-seating chairs or stools. These classic additions add a touch of rustic elegance. 

10. Island in pink

pink kitchen island

Let’s embrace the power of pink. Give your kitchen a complete makeover by painting it in shades of pink. Pink radiates energy, which is unparalleled. To make the kitchen island more captivating, you can use contrasting colors such as teal blue or green for cabinets and white for kitchen marble countertops. The pink island makeover transcends the ordinary; have a look at the image shared below. 

11. A Live Bar Top

A Live Bar Top kitchen island

The live bar top kitchen island design will take boldness to another level. Black kitchen cabinets and countertops cornered by a wooden island and high chairs are things we have envisioned for this island idea. The bold look can be complemented by hanging metal lights or dark gray pendant lights above the island. The combination accentuates the modern and edgy vibe. 

12. Stone studded kitchen island

Stone studded kitchen island

Indulge yourself in the experience of a kitchen island designed using exotic marbles in multiple colors. This extravagantly designed kitchen island becomes a visual feast when cabinets and storage are colored in contrasting shades. A lavish-looking kitchen island design is one designed with exotic marbles in multiple colors. Marble and contrasting colors create a great fusion of luxury and style, making the kitchen a culinary haven. 

13. An island filled with sculptures

kitchen island filled with sculptures

This design looks like a kitchen island plucked straight out of a movie. Picture an island with pillar-like legs and a glossy stone slab adding to the grandeur and sophistication. Look at this meticulously designed Montana Labelle apartment for better visuals. The island transports you into the world of luxury and cinematic allure, right?

14. Natural wood island

Natural wood kitchen island

Create a harmonious balance by extending the warmth of the wooden kitchen cabinet design to your kitchen cabinet island. The wooden flooring, wooden stools, and cabinets elevate the woodland. The continuity in design helps in creating a seamless flow of natural aesthetics. 

15. Add statement lighting above the kitchen island

statement lighting in kitchen island

The impact of lighting is often overlooked while designing the kitchen. However, it plays a crucial role in enhancing the magical feel of the space. Add statement lights above the kitchen island to infuse magic and sophistication. You have some great options to choose from, maybe a sleek pendant light, an industrial chic fixture, or modern chandeliers. 

16. A vibrant purple kitchen island

purple kitchen island

Let’s add some drama while designing that unique kitchen island for your home. A glossy purple paint and golden lights hanging on the top look show-stealing. The allure doesn’t end here; the design looks extremely classy if you have open shelves near the kitchen island. 

17. Mint green kitchen island

Mint green kitchen island

Give your kitchen a breath of fresh air and modern charm by painting it in a delightful mint green. The hues of green bring instant newness into the kitchen. You can include metallic finish sinks and faucets and also wooden cabinets to create a dreamy island.

18. A two-in-one kitchen island

two in one kitchen island

If you have a small kitchen that doesn’t have enough space to incorporate islands separately, you can create an island and dining table together in one. With curved wood tops and comfortable seating, this island idea is the most sought-after as it helps optimize the use of limited space. The integrated, comfortable kitchen island with seating transforms the kitchen into a cozy dining nook. 

19. Seamless white kitchen island

white kitchen island

An epitome of sophistication is the sleek white kitchen island. The minimalist design of this culinary centerpiece brings a powerful vibe into the kitchen. The kitchen cabinets are painted in pristine white, while the stools are kept in contrasting colors, either black or dark wood. If you are eager to witness the design, check out the image below. 

20. A shimmering gold kitchen island

gold kitchen island

Let’s put some gold there! Well, not literally. In this kitchen island design, the front of the island is decorated with gold hexagons and wood trim. To add more to the allure of gold accents, you can extend these artful gold hexagons over the kitchen backsplash. The game of textures and tones brings that cohesive feel into the kitchen.

21. Cover it with marble

marble kitchen island

Have you seen anything more marble-y than this kitchen island design? We bet you wouldn’t have! Check out this art-filled San Francisco mansion decorated with white rippled marble all over the place. From kitchen countertops to cabinets to storage, everything is bathed in pristine white marble.

22. Patinated brass island

Patinated brass kitchen island

If you are looking for something minimalist, this kitchen island design is for you! The patinated brass island embodies simplicity and sophistication. Renowned designer Poonam Khanna decorated this piece of kitchen island with the elegance of patinated brass. However, the rest of the kitchen accessories are designed in pale colors, be it cabinets or floors. The muted tones allow the brass island to take center stage.

23. Marble and Tiles Island

Marble and Tiles kitchen Island

An extremely dramatic-looking kitchen island design is one designed with a stunning combination of marble and tiles. In this design, the lavish top of the island is cladded with black marble, while the sides are decorated with black tiles. The golden lights hanging over the tile-clad island bring in timeless elegance.

24. Swedish table kitchen island

Swedish table kitchen island

If you want to design something antique-looking, here is one kitchen design curated by Emma Jane Pilkington in Connecticut. It is decorated with the charm of a range of antiques in the kitchen and wooden floorings. The Swedish table becomes the focal point of the house and a place to rejoice at dinners and breakfast. We would say every antique piece tells a story as enchanting as it could be!

25. Ebony Kitchen Island

Ebony Kitchen Island

We bet you can not get your eyes off this beautiful traditional island designed by Todd Romano. In this design, the antique ebony table was turned into an exquisite island, making it the focal point of the entire kitchen. The Talavera tiles arranged in a graphic chevron pattern look dynamically exhilarating. 

26. Kitchen island for two

Kitchen island for two

One of the best ways to utilize the small space kitchen is to design a small kitchen island for two. With cozy chairs and comfortable seating arrangements, this place becomes a haven in the kitchen. This kitchen island becomes a workspace to gather and make connections during the meet. 

Key Takeaways

Well, the above kitchen island ideas showcase versatile placements around the kitchen. However, placing it in the center becomes a more strategic choice. Consider placing the island near the stove for a seamless transition between preparation and cooking. Or placing it near the sink for efficient dishwashing. The choice depends on the ease of functionality you wish to achieve. 

We hope these ideas inspire you to design an island of your dreams. If you have any specific requirements, we advise you to connect with an architect or an interior designer and get personal guidance.

Explore Further

How to Clean a Washing Machine? Ultimate Guide

0
How to Clean Washing Machine

Somewhere along the way, I missed the memo that cleaning a washing machine should be a regular thing, not something you never do. I thought the soap in the detergents would keep it clean, and I bet I’m not the only one who thought that. Oops.

But here’s the thing! Minerals and soap residue in detergents can build up in the washing machine over time. Eventually, you might notice that your clothes just don’t seem as clean as they used to. My washer was starting to feel a bit grimy. I thought maybe I was overloading it or not letting the rinse cycle do its job properly.

So, I did some research and found lots of different ways on how to clean your washing machine.

How Many Times Must You Clean a Washing Machine

clean washing machine with cloth

In order to maintain a washing machine in good working condition, you must know how to clean it. Also, be mindful of the method you choose; for example, a different strategy could be required for older machines than for newer front load washers. 

If you use the cleaning cycle to do a thorough clean on your own a few times a year, you can prolong the life of your washer. The majority of appliance makers really recommend giving your washer a good scrub every six months.

Follow these steps to give your washing machine a thorough cleaning. Every top-load and front-load washers have different cleaning processes, and you’ll find more about them as we explore the topic. These methods include using natural ingredients like vinegar, bleach, washing soda, baking soda, or washer cleaner. You can restore the internal as well as external luster of your washing machine with a little hard work.

How to Deep Clean a Washing Machine

Deep Clean a Washing Machine

Your garments will come out in pristine condition once you clean your washing machine. It doesn’t clean itself, even when your washing machine uses detergent every load. That is why periodic thorough cleaning is essential.

Many methods exist for thoroughly cleaning a washing machine; the one you choose will depend on your specific model and whether you choose to use homemade or store-bought cleansers. Rest assured, these procedures are not very challenging. Read on to learn about the many ways you can clean your washing machine.

DIY Washing Machine Cleaner

Your washing machine can be cleansed in a number of ways if you want to do it yourself. Keep to a single approach; as most ingredients do not complement one another. You can use borax, peroxide, bleach, baking soda, or vinegar, depending on what you have on hand. Below, we’ll outline the stages for each do-it-yourself cleaning approach on how to clean a washing machine.

Another option is to use a commercial washer cleaner. These are branded cleaning tablets made for commercial washing machines. If you decide to use a washer cleaner, be sure to follow the directions specifically for your brand.

For your safety, never combine bleach and vinegar.

How to Clean a Front Load Washer

It is essential to understand how to clean a front load washer. Unlike to top load washers, they are more likely to generate unpleasant odors due to their design. In smaller areas, water can readily pool and cause mold or mildew to bloom. Keeping your washer clean might aid in eliminating these undesirable smells and germs. This is a detailed guide on cleaning your side-load washer or front-load washer:

  • Wash the tub of the washing machine.
  • Clean and soak your drawers, detergent trays, and detachable pieces in the tub while it’s soaking.
  • Give the washer’s exterior a quick cleaning.
  • Use an old toothbrush to scrape the door gasket when the cleaning cycle is complete. Use vinegar or bleach to clean it, but never combine the two.
  • Empty the filter.
  • Clean the parts that were soaking along with your detergent trays.
  • Using a microfiber cloth, clean the door and the inside of the bathtub.
  • Use the cloth to give the washer a thorough once-over.
  • Try to leave the door open so that everything dries completely.

How to Clean Top Loading Washing Machine

In most cases, top-loading washing machines are simpler to clean than front or side-loading models. Soaking a cleaning solution in this washer is easier. To clean a top-load washing machine, follow these simple steps:

  • Begin by cleaning the washing machine’s tub.
  • Be sure to clean and soak any detachable pieces, drawers, or trays that contain your detergent while the tub is soaking. There may not be many detachable components on your washer, depending of its age.
  • Washing machines should have their exteriors wiped down.
  • After the cycle is complete, wipe off the area under the tub surround. Use either bleach or vinegar (but not both) to wipe them off.
  • Rinse the agitator and filter.
  • Put the detergent portions in the water and finish washing them.
  • Use a microfiber cloth to clean the interior of the tub as well as the lid.
  • Once again, use the towel to wipe off the whole washing machine.
  • Hold the cover ajar to let the contents air dry completely.

Clean the Washing Machine Tub

Clean the Washing Machine Tub

Cleaning the wash tub is the first step towards getting your washer clean. Because of its water-tight construction, it’s the simplest to keep clean. Many washers come equipped with a dedicated clean cycle that makes cleaning the machine easier. If not, proceed with the guidelines given below, taking into account the load size and water temperature.

Here’s how to clean a washing machine using some materials you could already have in your home:

Bleach

Here’s how to use bleach to clean your washing machine:

  • Start with a dry and empty washing machine.
  • Use warm wash and rinse cycles on the standard setting in your machine.
  • Transfer half a cup of bleach into the detergent section.
  • Completely fill the bleach chamber.
  • Turn on and leave the washing running.

Peroxide

Here’s how to use peroxide to clean your washing machine:

  • Start with an empty, dry washer.
  • Choose the hottest and highest setting or the cleaning setting on your machine.
  • Fill the tub with two cups of hydrogen peroxide.
  • Turn on and leave the washing running.

Vinegar and Baking Soda

Here’s how to use baking soda and vinegar to clean your washing machine:

  • Let’s start with a dry, empty washing machine.
  • Choose the hottest and highest setting or the cleaning setting on your machine.
  • Pour in three or four cups of white vinegar as the washer fills up with water.
  • After letting the washer agitate for a while, end the cycle.
  • Give the vinegar a minute to soak.
  • After adding half a cup of baking soda, restart the agitator.
  • Let everything soak for up to an hour after stopping the cycle. If you’re in a hurry, it’s recommended to soak for at least 30 minutes.
  • Run the washing machine through to the end.
  • Repeat the procedure if your washing machine isn’t as clean as you’d want.

Cleaner Tablets

Using washing machine cleanser tablets, follow these instructions to clean your washer:

  • Start with a washing machine that is empty and dry.
  • Fill the washer tub with one tablet of laundry detergent.
  • Run a normal cycle on the hottest water setting.

Borax or Oxygen Bleach and Washing Soda

Here’s how to use washing soda, borax, or oxygen bleach to clean your washing machine:

  • Start with an empty tub.
  • Pour two teaspoons of borax or oxygen bleach and two tablespoons of washing soda into the tub of a front-loading washer.
  • Pour half a cup of each powder into the wash tub of a top-loading washer.
  • Use the washer’s “clean tub” option or run the largest cycle at the highest temperature.
  • Pour vinegar into the washing tub or the tray of the liquid dispenser once the cycle is complete. For front-loading machines, use two cups; for top-loading machines, use one pint.
  • Start the hot water wash cycle again. After a few agitations, stop the cycle for a top-loading machine. After 30 minutes, let the solution settle before continuing.
  • Let a front-loading machine’s cycle finish as usual.
  • After the final wash cycle complete, wipe the interior of the machine with a microfiber cloth to clear off any residue.

Clean the Washing Machine Door or Lid

Clean the Washing Machine Door or Lid

It’s likely that you are aware that the door of a front-loading washing machine can get rather filthy. Hair, dirt, and lint are often drawn to the rubber gasket around the door.

In a similar vein, although it may not be as obvious, your top load washer can also gather lint and hair. The wash tub’s indentations may catch debris, and the lid may grow dirty as a result.

Thankfully, it’s easy to clean the door or lid:

  • Wipe down the sides or front of the washer with a clean, damp cloth.
  • Wipe the lid’s bottom and top.
  • Remember to wipe the inner lip of the lid as well, because lint and leftover soap might build up there.
  • You may use a bleach and water combination if mold or mildew is a concern. Another option is to use water and vinegar.
  • Use a paper towel or microfiber cloth to give the area a thorough scrub, and then rinse with water.
  • Finally, give it a dry wipe.

Clean Washer Parts, Detergent Trays, and Surfaces

clean a washing machine detergent tray

Cleaning your washing machine’s removable components on a regular basis is crucial. Both liquid and powder detergents have the potential to build up. These areas may also get clogged with lint and dirt. Maintaining them clean guarantees that they will function as intended. Cleaning your dryer vent is also imperative as it can accumulate dirt too.

How to clean detachable components is as follows:

  • Remove the fabric softener, bleach, and soap dispensers from the machine.
  • Put them in a hot bath. To remove any dirt, use a microfiber cloth, an old toothbrush, or tiny cleaning brushes.
  • After giving them a good rinse and drying, replace them.

Remember to clean the washer’s outside as well. The lint, dust, and filth can accumulate anywhere on the machine. To make your washer shine, give the top and sides a thorough cleaning with a microfiber cloth.

Clean the Agitator and Filter

Clean the Agitator and Filter of washing machine

Cleaning the agitator and filter should be your main priority if you want to give your washing machine an extensive deep clean. Depending on the kind of machine you have—particularly whether it’s a front load or top load model—the procedure may change. Remember to unplug the machine before starting:

  • For instructions on how to remove the washing machine filter, see your owner’s handbook.
  • To remove the bolt holding the agitator on machines with one, use a socket wrench. When the agitator is free, remove it from the machine by lifting it out.
  • Put the filter and the agitator in a bucket of hot, soapy water. As an alternative, you can mix 1/4 cup baking soda, 2 cups vinegar, and 1/4 cup water to make a homemade cleaning solution.
  • Using a scrub brush with soft bristles, thoroughly clean the removed portions.
  • After giving them a thorough rinse, pat dry with a microfiber towel.
  • In the washing machine, return the agitator and filter to their original positions.

Key Takeaways

Maintaining a spotless washing machine is simple now that you know how to clean it. Are you prepared to bid washer grime a last goodbye? Bleach and other cleaning materials can be readily ordered online and delivered straight to your house. When and whenever you need internet purchases delivered, we’re here to help.

Explore Further

The Essentials of Commercial Washroom Equipment Design

0
commercial washroom layout

The workload of such commercial washrooms and their intense utilization require smart solutions with regard to the optimum design and quality of equipment to increase functionality and durability. There is a need to plan well to provide amenities that will lead to proper sanitation, accessibility, efficiency, and customer satisfaction. This paper looks at critical factors that need to be considered when equipping public washrooms. The main points tackled include compliance with ADA accessibility standards and the combination of sensor countermeasures to the most optimal position of dispensers, waste containers, and baby changing stations.

By starting with understanding the basics of the engineering of an optimal commercial washroom design, business owners are able to make informed equipment selections and design choices, promoting the best interests of their client.

1. Compliance with ADA Accessibility Guidelines

The ADA (Americans with Disabilities Act) provides legally binding accessibility standards that commercial washroom design must comply with. This covers detailed requirements related to room clearances, grab bars, turning radius for mobility devices, toilet and sink heights/positioning, mirror mounting, dispenser placement, floor space, accessible routes, and much more. Maximize accessibility and legal compliance by choosing ADA-compliant fixtures and thoughtfully designing the layout based on current ADA requirements. 

2. Durable, Easy-to-Clean Materials 

Materials for commercial washroom

Heavy usage and mess are the ongoing future of public concession rooms. Foil durability and cleaning by choosing solid, non-porous building materials, especially solid polymer partitions, and countertops, will neither chip, degrade, nor absorb the stains over time. Apply heavy-duty industrial coatings and paints, including those formulated to be cleaned with repetitive heavy scrubbing.

3. Sensor-Operated Fixtures

For hands-free operation and enhanced hygiene, specify sensor-activated faucets, soap dispensers, hand dryers, and flushing toilets/urinals throughout the space. This prevents waste and messes compared to manual operation. Select durable, commercial-grade models designed for reliability with high traffic volumes. Ensure sensors can be adjusted in order to avoid malfunction.

4. Water-Efficient Plumbing 

Efficent plumbing in commercial washrooms

Conserve water and lower utility bills by installing low-flow toilets, urinals, and faucets purpose-built for commercial applications. Look for Water Sense-labeled models that provide high-efficiency water usage without sacrificing performance. Choose commercial-grade fixtures made to withstand constant heavy use.

5. Adequate, Well-Placed Lighting

Proper lighting prevents dark, gloomy spaces. Specify LED fixtures with color temperatures ideal for bathrooms—position lighting to provide uniform illumination throughout the space, avoiding shadows or dark corners. Use tamper-resistant covers and place them out of reach to prevent vandalism. Replace harsh overhead lighting with softer wall-mounted sconces. Provide task lighting at mirrors.

6. Odor-Controlling Ventilation Systems

Commercial washroom design

Proper ventilation is critical for odor control. Strategically install high-powered exhaust fans and HVAC systems to forcefully cycle air and keep restrooms smelling fresh—place exhaust vents near toilet areas where odors originate. Make systems demand-controlled to only run when needed. Treat ductwork and vents with antimicrobial coatings that prevent odor-causing bacteria growth.

7.Thoughtful Dispenser Placement 

Locate paper towel dispensers, soap dispensers, seat cover dispensers, and hand dryers conveniently within accessible reach of sinks according to ADA guidelines—position so users don’t have to walk far or maneuver awkwardly to use them. Install easy-to-change waste bins nearby to catch used paper towels. 

8. Creative Yet Functional Design Choices 

Commercial washroom design

Although equipment has to be strong enough, try to find ways of creating a nice atmosphere through decoration where every choice has to be consistent with your brand. For instance, add accent tile, framed artwork, artistic lighting fixtures or sconces, and custom accessories. Just make sure all embellishments satisfy commercial facility durability and ADA compliance requirements.

Bottom Line 

In summary, as compared to an average residential bathroom, the commercial washroom design is more complicated, and a more rigorous use of simplicity needs to be considered. All of these considerations impact the laying out of accessible, hygienic, and need-minimal facilities. The vested owners of washrooms for both patrons and staff are able to strategically outfit their washrooms towards the needs that can ensure the welfare of all. A well-designed washroom is a more front-loaded investment. Still, it will pay for itself in spades over time by way of enhancing the client experience, decreasing the fuss, and installing your particular brand image in the customer’s mind.

Explore Further:

Queen Size Bed Dimensions: Everything You Need to Know!

0
queen size bed dimensions

Have you ever dreamt of waking up feeling like royalty did in the old days? Have you imagined sleeping in a bed that’s as luxurious and comfortable as it is elegant? If so, a queen size bed could be the solution you’ve been looking for. Although everyone is aware of standard bed sizes like doubles and singles, you may not be as acquainted with queen size beds and their potential to improve your sleep quality.

Let us take a little historical tour of 1958 when the Simmons Bedding Company introduced the queen-sized bed. Though small, this revolutionary bed design is roomy enough to fit two people in comfort. Its moniker, “fit for a queen,” derives from this notion, and it has grown in popularity as a solution for those seeking comfort without sacrificing space throughout time.

A queen size bed is ideal if you’re looking for a stylish, big bed for your bedroom. Because of its proportions, it is perfect for medium-sized to big rooms, giving you plenty of freedom to decorate your area as you see fit.

History of the Queen Size Bed

History of the Queen Size Bed

Though it wasn’t always this way, queen mattresses are now the most common size. Twin beds and twin XL bed sizes were standard for a long period, particularly for adult singles and couples that slept apart. Many married couples slept on their individual twin-sized beds but shared a bedroom prior to the end of World War II.

Larger beds than doubles were necessary when couples began sharing beds in the 1950s. Many Americans were also purchasing larger houses at this period, which allowed for greater furnishings. The queen and normal king-size mattresses were available by the late 1950s, and the California king came. Among these bigger mattress alternatives, the queen bed soon gained favor due to its affordability and convenience, and this preference persists to this day.

What are the Queen Size Bed Dimensions?

Queen Size Bed Dimension

It’s critical to learn more about dimensions of a queen size bed before making a purchase. By being aware of these dimensions, you may better understand this bed’s relative merits and why it may be a wonderful addition to your bedroom.

With a typical queen size bed’s length of 80 inches, you have plenty of space to spread out and get a good night’s sleep. Its width of around 60 inches makes it a roomy but small option that works well in a medium-sized space.

A queen bed gives an excellent amount of room without being too small when compared to other types of beds, such as king-sized bed or double beds. It is possible to get a restful night’s sleep without cramming yourself into a small area or bending over to make the bedframe fit. A queen bed is ideal for conserving space or fitting into smaller spaces because it is smaller than several other kinds of beds.

Queen size bed dimensions in feet5 feet x 6.67 feet
Queen size bed dimensions in inches60 inches x 80 inches
Queen size bed dimensions cm152.4 cm x 203.2 cm
Comfortably fits1 person with a pet or two adults, no pets
Queen sizebed frame dimensions in inches
Platform bed 80” W x 60” L
Bed frame with headboard86” W x 64” L
Storage bed86” W x 64” L
Queen sizebed frame dimensions in cm
Platform bed 203.2 cm W x 152.4 cm L
Bed frame with headboard218.44 cm W x 162.56 cm L
Storage bed218.44 cm W x 162.56 cm L
Queen sizebed frame dimensions in feet
Platform bed 6.67 feet W x 5 feet L
Bed frame with headboard7.17 feet W x 5.33 feet L
Storage bed7.17 feet W x 5.33 feet L

Queen bed frames

The dimensions of a queen bed frame may vary based on its design, material, and thickness. However, people sometimes refer to queen bed frames as having the same specifications as a typical 60″ x 80″ queen size bed. When determining if a queen bed frame would work well in your room, its breadth is often a key consideration.

Queen mattresses

Queen mattresses typically fit within the typical queen bed proportions, similar to queen size bed frames; however, they might vary by two to three inches in either direction. The substance of the mattress—memory foam, ticking fabric, feathers, etc.—determines this variation.

Comparisons with other bed sizes

Queen bed vs. King Bed: A queen size bed is 16 inches narrower than a king size bed, despite both having the same length.

Queen bed vs. Full dimensions: A 54″ x 75″ full-size bed, commonly called a “double bed,” is 5 inches longer and 6 inches broader than a queen size bed.

Queen bed vs. Twin bed: Queen Beds are five inches longer and 21 inches broader than twin beds.

Queen size headboard dimensions

Average widths for queen headboards are between 60 and 63 inches, with an average height of 48 inches. Your style choices are generally more important when selecting a queen headboard than room or sleeping area factors. You may select whatever size queen headboard you want since so many options are available.

Non-standard queen size bed dimensions

The following corresponds to several typical non-standard queen bed sizes: split-queen, Olympic (or enlarged) queen, and California queen. These other mattress sizes may be a perfect fit for you, depending on your sleeping habits, the size of your room, whether you’re single or have a spouse, and if you have kids who sometimes share your bed. Finding beds and accessories that fit or function flawlessly for these sizes may be a little more difficult.

Types of Queen Size Bed

Queen beds size

Queen beds are available in three varieties but are not as common. The measurements of each queen mattress are shown here to help you choose the ideal mattress-size bed.

Olympic Queen Bed

Olympic Queen vs queen bed dimension

An Olympic queen bed, also referred to as an “extended queen,” is 6 inches wider than a typical queen size bed at 66 inches by 80 inches. Each sleeper receives 33 inches of room, with an additional three inches on each side.

The dimension of queen size bed is a great option for couples that require additional sleeping space yet have a limited room. An extended queen mattress, as opposed to a king or California king mattress, fits comfortably in most bedrooms and provides plenty of room for additional furniture. Also, parents whose kids often join them in bed will find these beds perfect.

California Queen Bed

Queen VS California Queen bed size

A California Queen bed is 4 inches longer than a regular queen, measuring 60 inches broad by 84 inches long. Taller sleepers will have enough room to relax comfortably without dragging their feet off the edge of the bed, thanks to this additional length. Furthermore, California queens may easily fit into the majority of standard-sized bedrooms because of their 60-inch width.

Split Queen Bed

queen vs split queen

Some mattress companies include split queen options, which are not often accessible. Split into two pieces, each measuring 30 inches broad by 80 inches long, these beds share the same proportions as a normal queen bed. With this configuration, users may choose varying degrees of hardness for either side of the bed. For instance, a split queen mattress allows two people to find their perfect sleeping positions if one loves a harder mattress and the other a softer one.

It’s common to combine split queen beds with split adjustable bases. With the use of these frames, users may customize the top and bottom of the bed to get their ideal sleeping posture. Each sleeper may alter the head and leg positions on a split adjustable bed to suit their own requirements. A split queen might be a fantastic choice if you’re considering getting an adjustable bed but have a smaller bedroom.

Why Queen Bed Size Dimensions Make for Better Sleeping?

queen bed frame size comparisons

With living spaces getting smaller, a queen size bed is a terrific way to conserve space without sacrificing comfort in today’s environment.

This is why investing in a queen-sized bed may alter your life:

Spacious

Although a queen size bed is not as large as a king size bed, it still offers a good amount of room for you to spread out and relax. A queen size bed provides plenty of space for everyone to sleep comfortably, regardless of whether you move around a lot while sleeping or share the bed with a partner or roommate.

Storage

Do you often find that clutter is all around you? Or do you need more room to keep your possessions? The ideal answer may be a queen size bed with storage features like shelves, drawers, or under bed compartments. It’s as if your bed had a built-in storage unit to save room!

Style Options

There are many styles of queen size bed. If you want a minimalistic design, a bed without a headboard or drawers might give off a sleek, uncluttered appearance. On the other hand, a queen size bed with a beautiful headboard and plenty of storage is a great choice if you like elaborate designs. There are several styling options available when using a queen size bed.

Comfort

A queen size bed provides a happy medium between size and comfort, just as Goldilocks did in her quest for the ideal bed. Considering that you’ll be sleeping for a large amount of your life, why not make the investment in a bed that offers the highest level of comfort? A cozy bed may reduce joint discomfort, enhance the quality of your sleep, and even treat sleep problems like insomnia.

Options for Mattresses

A bed is obviously incomplete without a comfortable mattress. Specifically made to accommodate these beds, queen size mattresses use contemporary technology to provide a comfortable night’s sleep. There are queen-size mattresses to meet your demands and enhance the quality of your sleep, whether you want an orthopedic mattress for support or a gel mattress for coolness.

How to Find a Queen Size Bed that Fits Best for Your Room?

queen bed rug size

Think about the following while selecting the ideal queen size bed for your bedroom:

  • Be sure the materials used to make the bed fit your decor and provide long-term durability. Something that will last throughout time is what you seek.
  • Consider the location of your bed before making a decision. Knowing the space you have available in advance can help you select the best choice, whether it’s for your kids’ room, bedroom, or guest room.
  • Select a bed that harmonizes with your house’s décor and general atmosphere. Choose a bed that suits you, whether your style is more classic, rustic, or futuristic.
  • Choose a bed with built-in storage if you want more space for storage. Whether the bed has shelves, drawers, or under-bed storage, be sure there is enough room for your storage requirements.
  • The most important thing about a bed is comfort while you sleep on it. The bed should be comfortable enough for both of you if you’re sharing it. To guarantee you and your spouse have a restful night’s sleep, take into account aspects like mattress firmness and support.

Explore Further

How Level 2 Electrical Services Can Transform Your Home

0
Level 2 electrical service

Welcome to our comprehensive guide on Level 2 electrical services for your home. In this article, we are offering a deep understanding of their capabilities. As technology evolves, the need for efficient and dependable electricity in our homes has never been more critical. By grasping the intricacies of Level 2 electrical services, homeowners can equip their residences with the essential infrastructure to meet rising electrical demands and enhance energy efficiency. 

The Fundamentals of Level 2 Electrical Services

Our comprehensive guide introduces you to the essential concept of Level 2 electrical services for your home. In today’s rapidly evolving technological landscape, the demand for efficient and reliable electrical power continues to grow.

Level 2 electrical services refer to advanced residential electrical systems that provide enhanced capacity and capabilities compared to standard household wiring. These services play a pivotal role in charging electric vehicles (EVs), powering high-demand appliances like dryers or air conditioning units, and catering to the expanding energy needs of households.

Investing in Level 2 electrical service upgrades offers several benefits. It facilitates faster EV charging by delivering higher voltage levels than traditional outlets, significantly reducing waiting times. Moreover, it provides ample power supply for heavy-duty appliances without overloading circuits or compromising safety. Additionally, an upgraded system optimizes efficiency by evenly distributing power among various devices in a home network.

Unveiling the Advantages of Level 2 Electrical Services

It brings a multitude of advantages to homeowners, ensuring efficient and reliable electricity to meet their growing needs. By exploring the intricacies of these services, homeowners can equip their homes with the essential substructure to fully harness these benefits.

One key advantage of Level 2 electrical services is enhanced energy efficiency. These services enable faster charging times for electric vehicles and other high-demand appliances, reducing overall energy consumption and long-term utility bills. Additionally, Level 2 electrical services seamlessly integrate with smart home automation systems, allowing homeowners greater control over their energy usage and resulting in additional savings.

Another crucial benefit is increased safety. With advanced circuitry and monitoring capabilities, these systems provide protection against power surges and potential electrical hazards, such as fires or equipment damage. Homeowners can rest easy, knowing their homes are safeguarded by superior technology prioritizing safety.

In conclusion, gaining a comprehensive understanding of Level 2 electrical services empowers homeowners to make informed decisions about their home’s electrical infrastructure. By unlocking the power and potential offered by these technologically advanced systems, homeowners can enjoy improved energy efficiency and enhanced safety in their daily lives while keeping up with evolving technological demands.

Key Considerations for Installing Level 2 Electrical Services

Installing Level 2 electrical services in your home requires careful consideration of several key factors. To begin, it is crucial to assess the capacity of your existing electrical system and determine whether it can accommodate the increased power demand associated with Level 2 charging. Upgrading your electrical panel may be necessary to support the additional load.

Additionally, the location of the charging equipment is of paramount importance. Level 2 chargers require dedicated circuits and should be conveniently located near your vehicle parking area. Adequate ventilation is essential to prevent overheating, so ensure sufficient airflow around the charging station.

Lastly, engaging a licensed electrician experienced in installing Level 2 electrical services is imperative. They will not only ensure compliance with safety codes and regulations but also offer expert guidance in selecting an appropriate charger tailored to your specific needs.

Conclusion

Understanding these key considerations for installing Level 2 electrical services will help homeowners make informed decisions about upgrading their home’s infrastructure, providing reliable power for their vehicles while ensuring safety and efficiency.

In Case You Missed It!

King Size Bed Dimensions: Ultimate Guide in 2025

0
King Size Bed Dimensions

It’s a common belief that one of life’s greatest gifts is sleep. You can rejuvenate and revitalize your body and mind after a good night’s sleep. However, it’s not always as easy as lying down and shutting your eyes to get a good night’s sleep. Perhaps you’ve even experienced dreading bedtime because your bed isn’t comfortable enough for you to relax on.

Have you ever struggled to get your whole body onto the bed only to have your legs awkwardly dangle over the edge? Or maybe you and your spouse quarrel every night over who can stretch out and sleep peacefully. A king-sized bed may be the perfect solution if you’re unhappy with your present bed or want to start over to get better sleep.

As its name suggests, a king size bed is designed to give you plenty of room to spread out and unwind. This bed’s roomy proportions allow it to comfortably fit you and your partner, enabling you to get the best sleep possible.

History of King Size Beds

History of King Size Beds

What is a king size bed, and how did it become the gold standard? Come with me as we dig into the past!

Most people in America were sleeping on twin or full beds in the late 1940s. Sales staff in the mattress business ingeniously promoted doubling the amount of bedding required by linking two twin beds side by side to increase sales. However, the idea of creating a bigger mattress didn’t take form until around 1945.

Enter the bed measurements for queen and king sizes. Americans didn’t start to embrace the concept of a larger mattress until the 1950s. The fact that Americans were becoming larger and needed more room to spread out comfortably was one factor contributing to the problem. Furthermore, people wanted roomy new houses and high-quality furnishings after the Second World War, which opened the door for bigger beds.

Furthermore, clever marketing strategies persuaded buyers to choose something more than simply a double bed mattress. The National Association of Bedding Manufacturers introduced a memorable slogan in 1961, “Buy bigger, sleep better,” which contrasted cribs and full-sized beds. Furthermore, what do you know? The king-size bed became an enormous success as a result of the brilliant marketing gimmick.

“Studies show that bigger beds provide couples with a better night’s sleep than ordinary ones. In a study, 15% of respondents said they would buy a bigger bed before checking it out, while more than 50% said they would buy a larger one after using one.”

What is a King Size Bed?

What is a King Size Bed

These are the largest beds currently available on the market. The Standard King and California King are the two varieties of king-size beds available in the US. The dimensions of king size bed are shorter than the California king. Two twin mattresses side by side take up the same room as a regular king-size mattress. It’s ideal for anybody who likes having plenty of space to sleep in, including couples. A conventional king bed’s dimensions are typically 76 inches broad by 80 inches long.

What are the Dimensions of a King Size Bed?

king vs california king bed dimension

King-sized beds are frequently associated with luxury for good reason—they are much larger than regular beds. Let’s familiarize ourselves with the precise king size bed dimensions before we compare bed sizes.

You’ll encounter two primary types of king-sized beds, each with distinct measurements:

Standard King Size Bed

With its generous dimensions, a standard king-sized bed provides plenty of room to spread out and enjoy a restful night’s sleep. With its 76-inch width, it can comfortably fit two persons. A typical king-sized bed is around 80 inches long, which provides enough legroom for most people.

California King Size Bed

A California king size bed can be a better match for you if you want additional length or are taller than average. It is around 72 inches wide, a little smaller than a typical king bed, but its 84 inches of length more than makes up for it.

Here is a table comparing the dimensions of different kinds of beds so you can better understand the variations in sizes:

Type of BedBed Width x Length (Inches)
California King72″ X 84″
King76″ X 80″
Olympic Queen66″ X 80″
Queen60″ X 80″
Double48”x78”
Full-Sized54″ X 75″
Twin38″ X 75″
Small Single30″ X 75″
Crib27.25″ X 51″

But that’s not all. King size beds run larger than these. Let’s look at additional types of King Beds available in the market.

“A sleeper twists and tosses 60–70 times on average throughout the night. Investing in a bigger bed might help reduce disturbances caused by frequent movement, which may cause you and your spouse to wake up throughout the night.”

Types of King Beds

Types of King Beds

Many people aren’t too familiar with all the different bed sizes, especially when it comes to kings. Although standard kings and California kings are the most well-known, there are a few others, such as Texas, Alaskan, and Wyoming king beds. 

Choosing the ideal king bed mostly relies on your goals. While some are shorter but much broader, others are longer but somewhat narrower. You can determine the size differences between these kings by comparing them, enabling you to choose a bed that complements your bedroom and your body type.

Regular King Bed

Regular King Bed dimension

The standard king bed is the most popular kind of all the available king bed types. Regular king beds are 76 inches broad, which is much bigger than queen mattresses. However, their lengths are the same, at 80 inches. It’s smart to upgrade to a king mattress if you and your spouse are having trouble finding room on your queen mattress. You can combine two twin beds to make a king-sized arrangement. Consider the following when deciding whether to choose a standard king size mattress:

Dimension: 76 inches wide x 80 inches long

Regular King Size bed dimensions in feet: 6 x 6.5 ft.

Pros: King-sized beds provide an additional 16 inches of breadth, substantially increasing over queen-sized beds. Regular king beds are so widely accessible that almost all of them come in this size. This implies that a large assortment of accessories, such as sheets, duvets, and comforters, are available to choose from.

Cons: Regular kings used to be broader than queens, but that is no longer the case. A standard king won’t fix the problem if your feet dangle over the edge of your queen bed. Furthermore, it might be difficult to fit king beds into compact spaces.

California King Bed

California King Bed dimension

Upgrading to a king mattress is an excellent choice if you notice that a queen mattress is long enough for you but needs extra breadth. A California king, however, could be the answer for you if you’re taller and your feet always seem to dangle over the edge of a queen or standard king bed.

Dimension: 72 inches wide x 84 inches long

California King Size bed dimensions in feet: 6 x 7 ft.

Pros: California king mattresses are much wider (12 inches) and longer (4 inches) than queen beds. Even though they’re not as broad as standard kings, they’re still a decent option if you need more length.

Cons: Because California kings are narrower than standard kings, they may not be appropriate for everyone. They may also be more challenging to locate and fit into your bedroom than other mattress sizes, so keep that in mind.

Texas King Beds

Texas King Beds dimension

The expression “Everything’s bigger in Texas” may be familiar to you. That applies to their king-sized beds, too. The second-largest enormous bed available is the Texas king mattress. With its enormous 98 inches in length and 80 inches in width, it is large enough for almost everyone.

Dimensions: 80 inches wide x 98 inches long

Texas King Size bed dimensions in feet: 6 x 8.16 ft.

Pros: Compared to a California king, a Texas king is 18 inches longer, offering plenty of room to spread out. It also suits most people’s heights and easily seats two adults thanks to its additional 4 inches of breadth.

Cons: Taking up more than 8 feet of space, the 98-inch length might be difficult to accommodate into many bedrooms.

Wyoming King Bed

Wyoming King Bed dimension

Wyoming king mattresses may be the answer if you want the extra length of a California king but wish they were wider. A Wyoming king is 84 inches long and 84 inches broad. Therefore, it is the same length as a California king, plus one foot.

Dimensions: 84 inches wide x 84 inches long

Wyoming King Size bed dimensions in feet: 7 x 7 ft.

Pros: Compared to regular kings or California kings, Wyoming kings are a pleasant boost. A Wyoming king should provide you an additional foot of room if you find the California king to be too narrow.

Cons: Because Wyoming kings are long and broad, you need to make sure your bedroom is spacious enough. Texas kings are longer than other kings but somewhat slimmer, so they could fit more easily in certain beds.

Alaskan King Bed

Alaskan King Bed dimension

Nothing matches an Alaskan king in terms of the biggest and most lavish mattresses available. With a width and length of 108 inches, these mattresses are enormous and can easily accommodate many people for comfortable sleeping arrangements. They are incredibly well-liked by households with many kids who share a bed or let their pets sleep with them at night.

Dimensions: 108 inches wide x 108 inches long

Alaskan King Size bed dimensions in feet: 9 x 9 ft.

Pros: The biggest kind of king bed available, Alaskan kings provide you with more room than you’ll probably ever need for a comfortable night’s sleep. An Alaskan king guarantees sufficient space for children or dogs that prefer to share a bed.

Cons: You’ll need to clear space in your bedroom of nine feet in each direction in order to fit an Alaskan king. Furthermore, Alaskan kings may be hard to acquire and are far more costly.

“You will have less room than a baby crib if you and your spouse share a double bed mattress, just around 2 feet and 3 inches between you.”

Factors to Consider When Picking a King Size Bed Mattress

King Size Bed Mattress

It’s crucial to consider a few things when buying a king size bed to ensure that it will be ideal for your bedroom.

Room Size

Ensuring your bedroom has sufficient space to fit a bigger bed, such as a king-size mattress, is essential. Larger areas, like the master bedroom, are perfect for these beds. Remember that the size of your mattress will increase by a few inches due to your bed frame

Experts advise a minimum room size of 12 by 12 feet for a suitable fit. You should leave around 30 inches of room surrounding the bed for maximum mobility. Make sure the mattress fits through the door frame, and consider any other furniture that may take up space in the room. Having a brand-new mattress that won’t fit through the door is the last thing you want!

Personal Sleep Preferences

Due to their individual body types, many couples prefer distinct ways to sleep. A king bed has the added benefit of being able to incorporate two mattresses into one. If you tend to sleep on your side, you may choose a mattress that supports that position, while your spouse can pick one that alleviates back discomfort. 

Compared to king size bed mattress dimensions, twin mattresses are much more budget-friendly and quite adaptable, so you can make them fit your every whim no matter which side you want to sleep on.

Compatibility with Bed Frames

Given how standard king size beds are, there are many options available. Nevertheless, make sure that the bed frame fits the dimensions of your mattress. The typical 76 by 80-bed frame should generally be somewhat broader than your mattress. 

Remember that sizes may vary throughout manufacturers, so it’s a good idea to confirm that both fit together properly by double-checking their measurements.

Co-sleeping

Although there is undoubtedly a pleasure in having a king bed for yourself, a king size bed is ideal for those who don’t sleep alone. However, a lot of us sleep in the same bed as a spouse, kid, or even a pet. To ensure that your Labrador or children don’t disrupt your sleeping habits, a king bed provides plenty of room.

Explore Further

31+ Best Laundry Room Ideas That You’ll Love

0
Best Laundry Room Ideas

Sorting clothing into whites and colored, loading and unloading washing machines, and folding and putting away garments are all part of a typical laundry day. The tedious and repeated nature of this chore makes it seem insurmountable to many of us. On the other hand, think about how much better laundry day would be if the room were thoughtfully planned and arranged. Take a look at these beautiful laundry room ideas for storage solutions and design ideas, including fresh paint colors, amusing wallpaper patterns, and magnificent flooring options.

Since it is usually not a large room, the laundry room is a great place to put your stamp on things. This collection includes everything you need to update your cabinet hardware, replace wall tiles, or embrace a new style. With each scroll, you’ll find more and more organizing advice, such as how to install clothing racks, make a multipurpose room, or conceal laundry baskets and hampers.

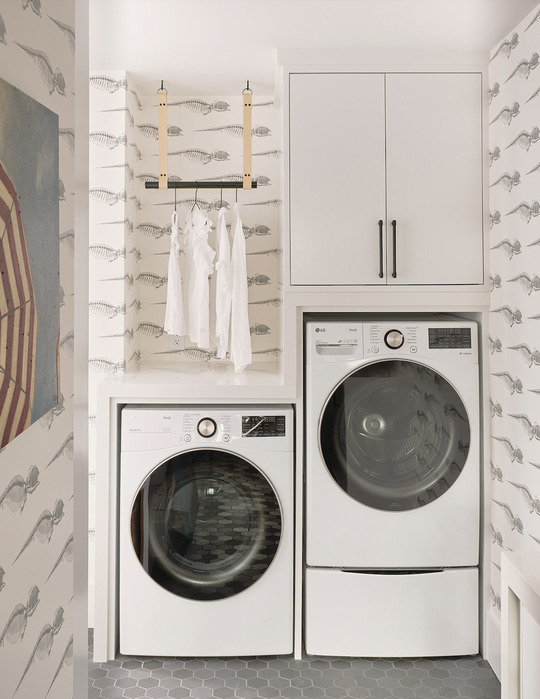
1. Make The Most Of Vertical Space

vertical washing maching

Get more done in a smaller space by making the most of the height. The small laundry room ideas make excellent use of every available space by stacking the washer and dryer and having cupboards that extend to the ceiling.

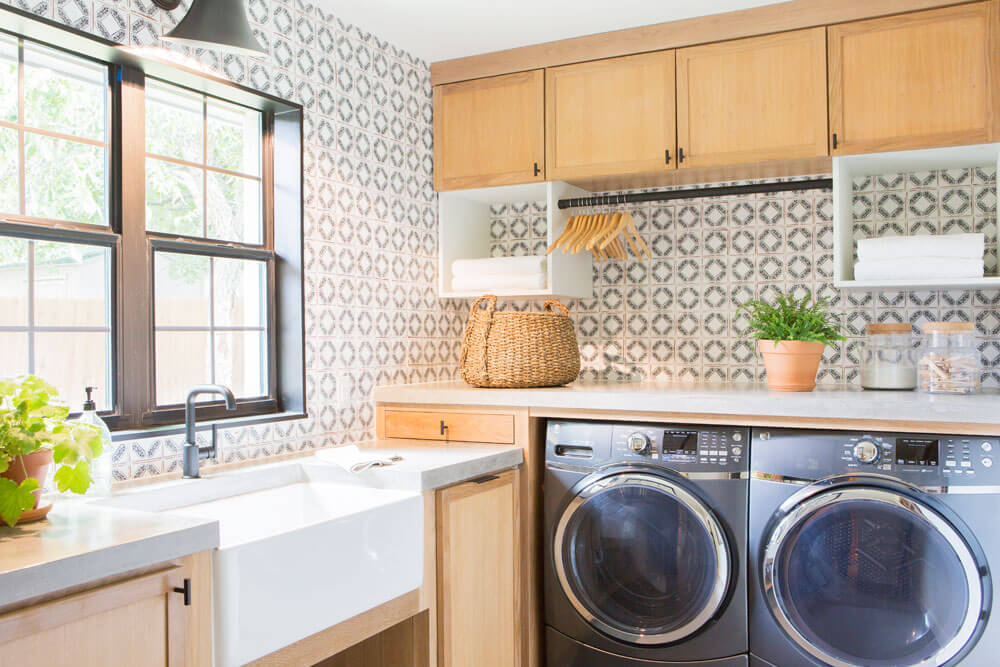
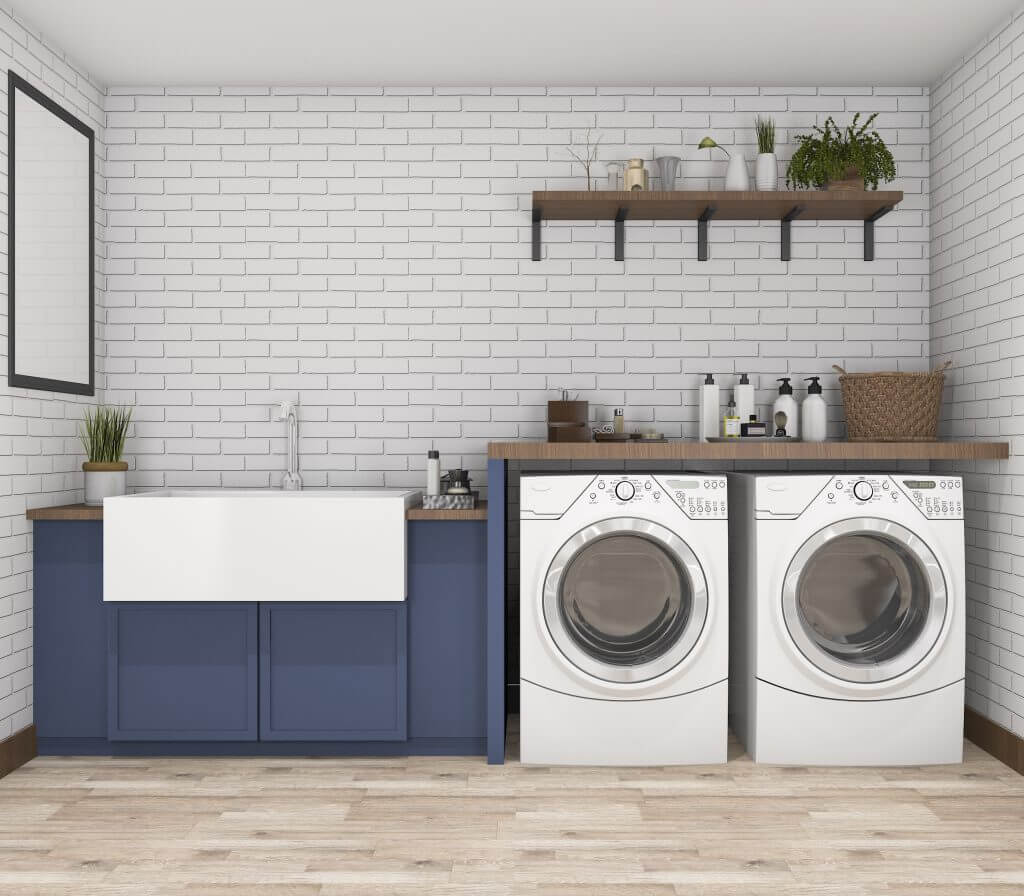
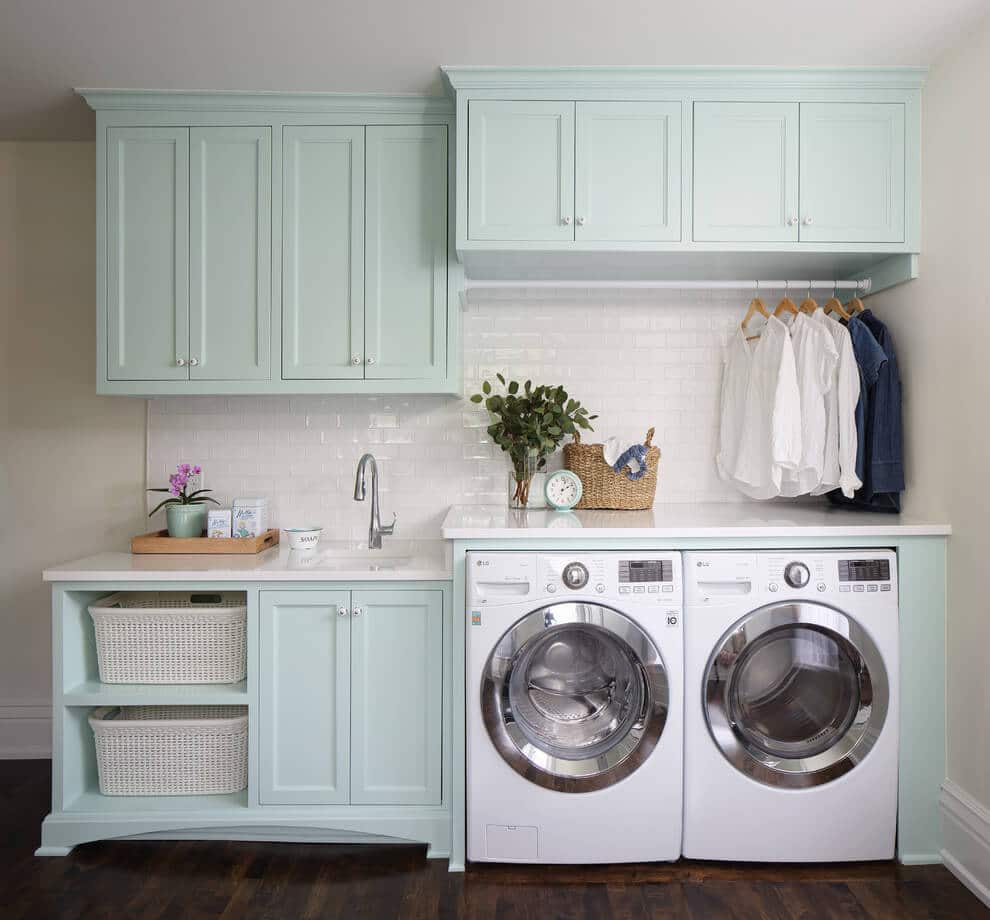
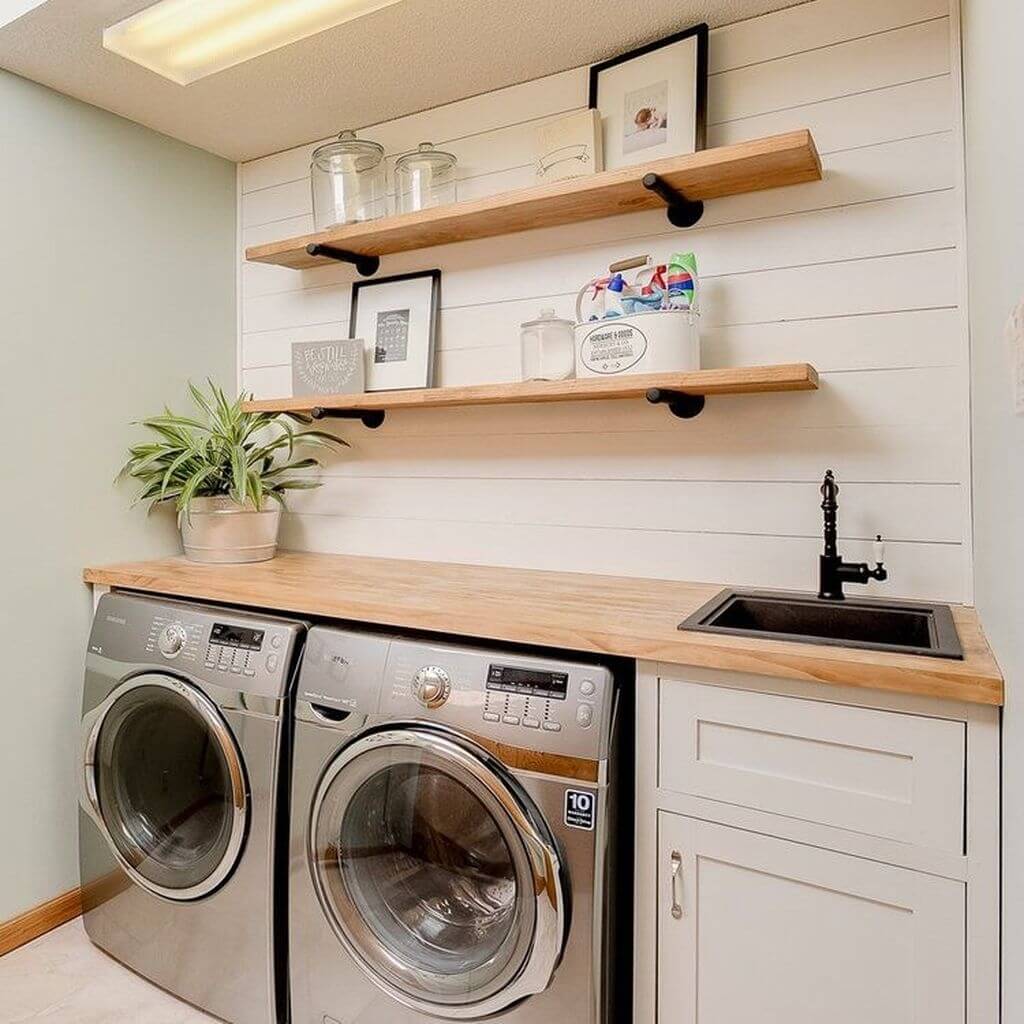
2. Single Walled Laundry Room

Single Walled Laundry Room

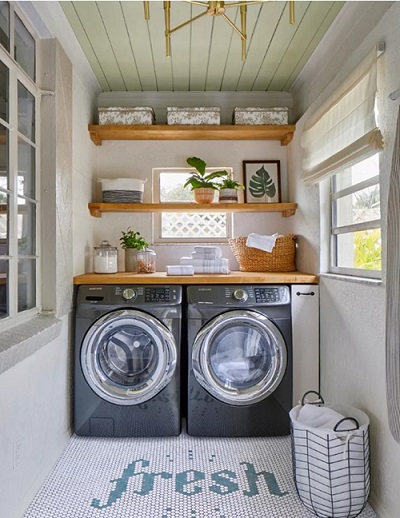
With only one wall, you can transform a cramped laundry room into a multipurpose haven with these laundry room shelving ideas. Build your own butcher block countertop, put open shelves above the front-loading washing and dryer, and conceal additional storage with a slim rolling unit next to one machine. 

Make a playful statement on the floor with penny tiles, and add a splash of color to the ceiling with sage green paint.

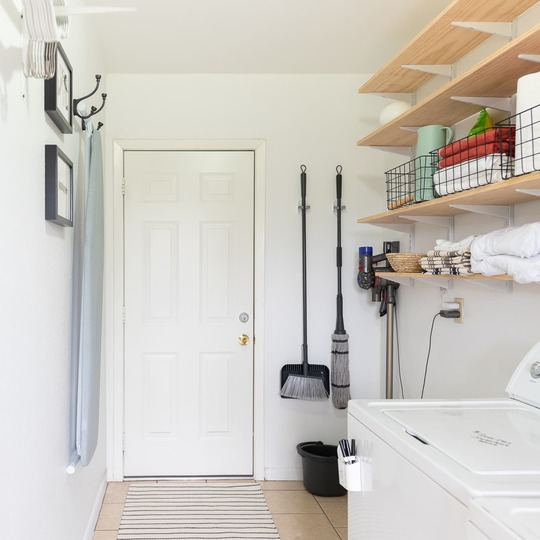
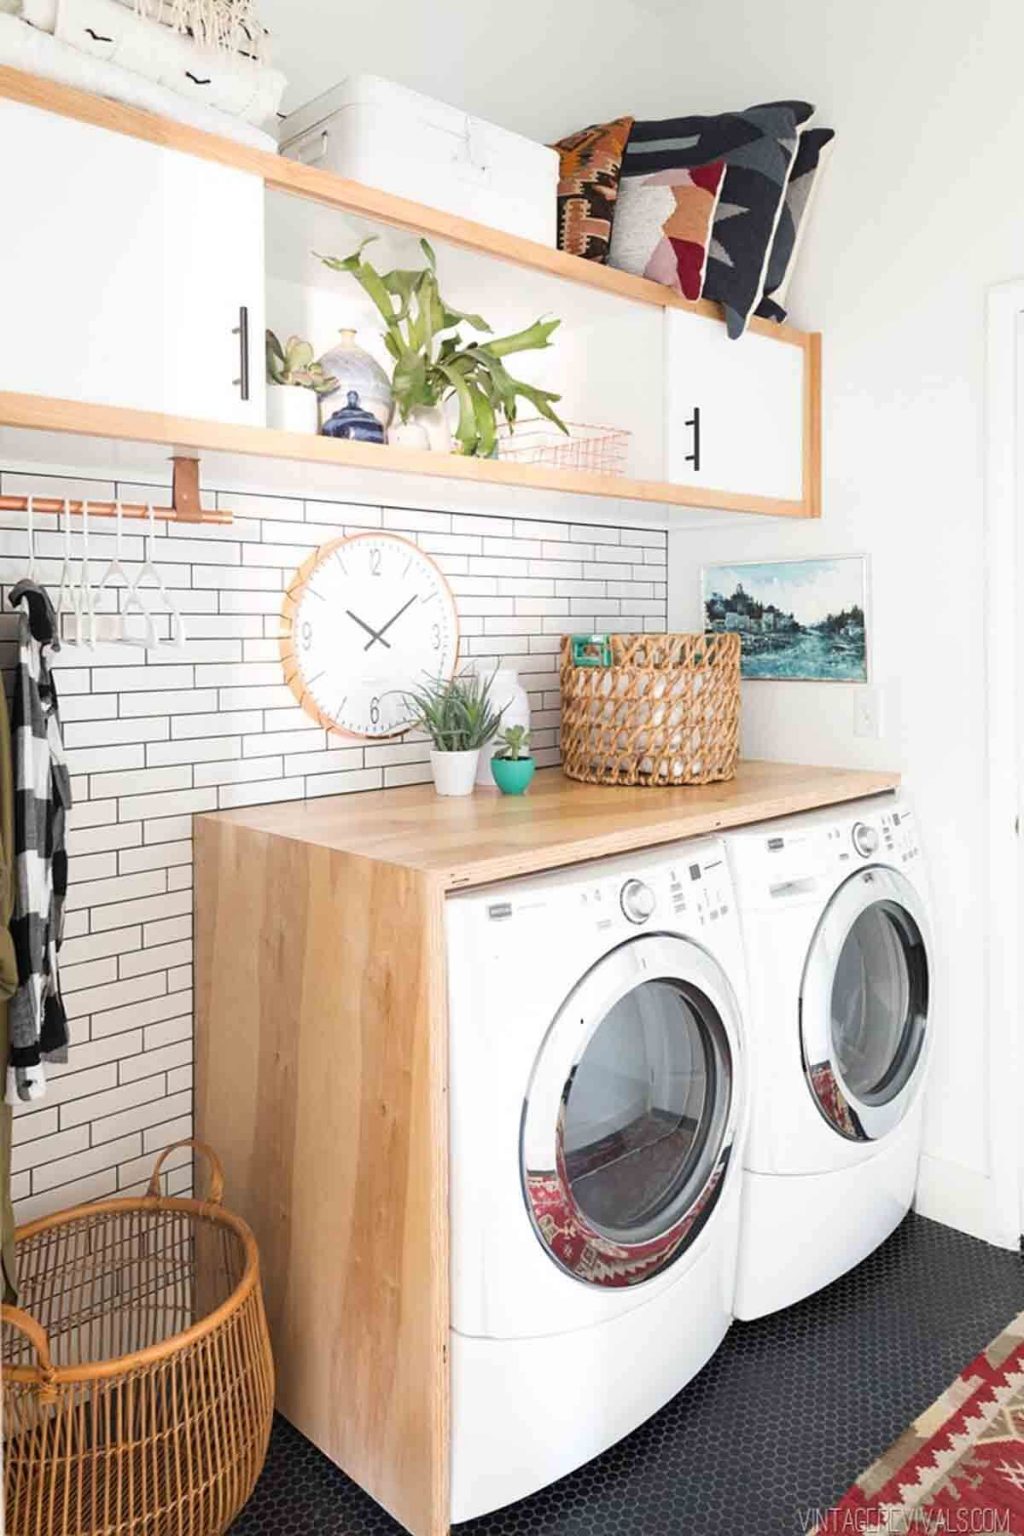
3. Organized Laundry Closet

Organized Laundry Closet

Convert an unused closet into a practical laundry space. Make the most of the space by positioning appliances side by side, and put in a raised countertop for easy surface storage of everyday necessities. 

Put baskets beneath the furniture to hold dirty laundry. Rather than using cumbersome laundry baskets, which take up too much room, try using woven containers that slip into the washer and dryer. This way, you can store many loads of clean clothing at once. 

A simple hanging rod lets clothing air dry without taking up too much room, while upper cupboards hide seldom-used items. Subtle patterned wallpaper may provide flair to a tiny area.

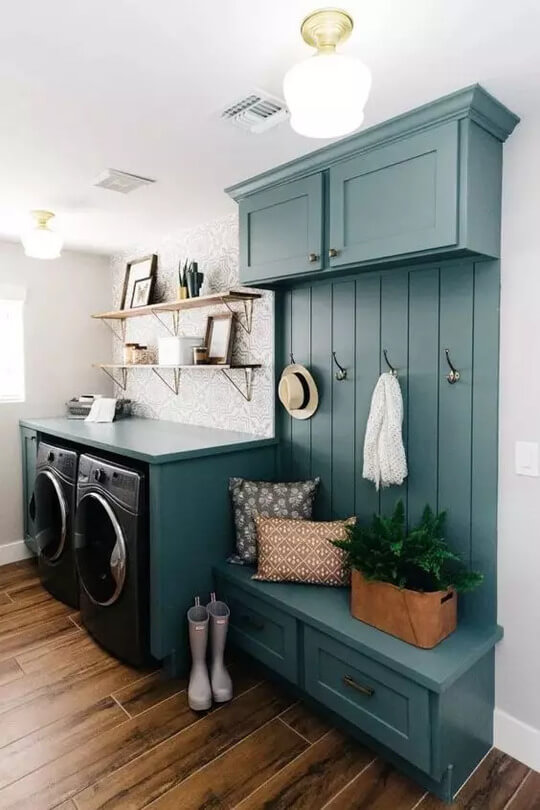
4. Mudroom And Laundry Room Combo

Mudroom And Laundry Room Combo

If you don’t have enough room for a dedicated laundry room and mudroom, combine both of these features to create a multipurpose area. Locate an accessible area in your house where you may install a utility sink and a small laundry room ideas. Floating shelves for supplies and countertops above the folding machines will keep things simple.

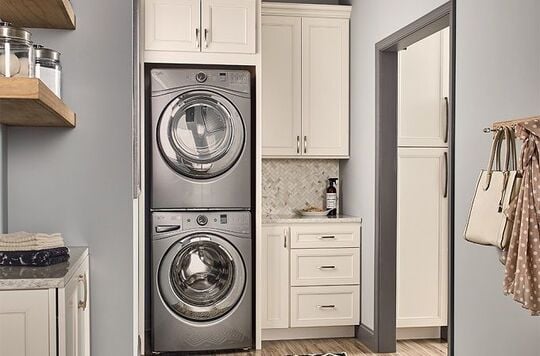
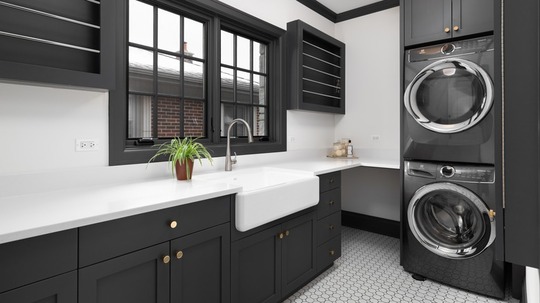
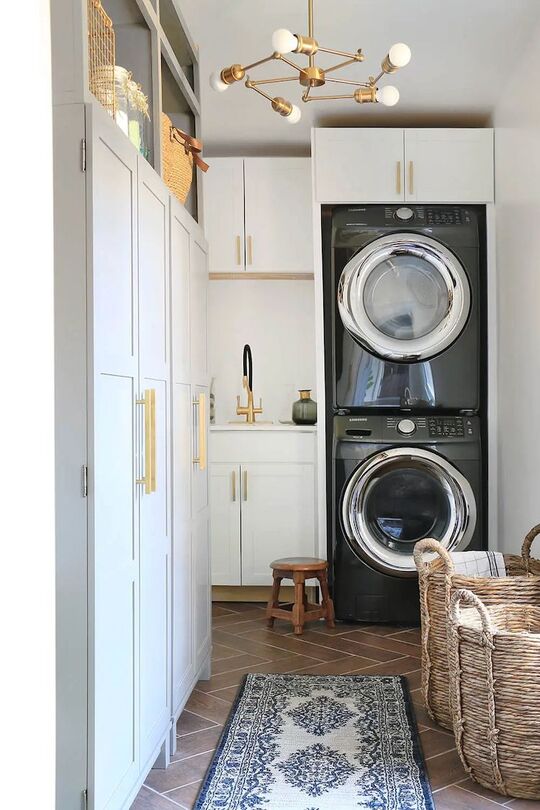
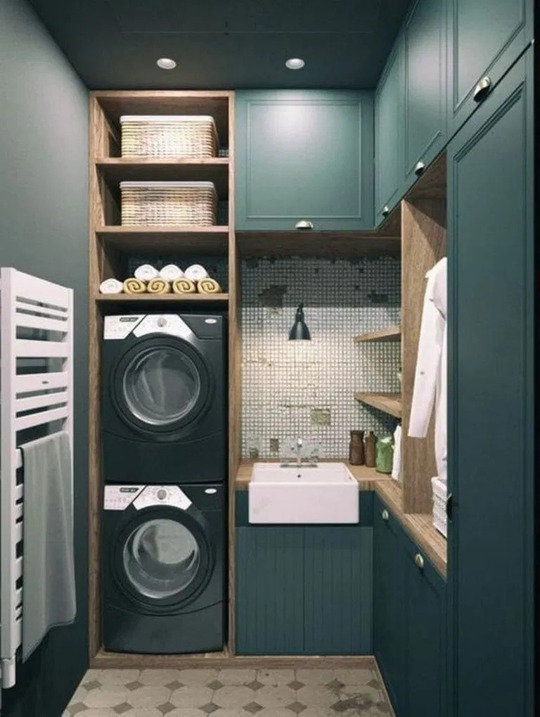
5. Stack The Washer And Dryer

Stack The Washer And Dryer

If you’ve ever tried to plan or organize a little room, you know that height is key. Have floor-to-ceiling cabinets installed, and use a stackable washer and dryer. Maximize your storage space and conceal the majority of your possessions in this manner.

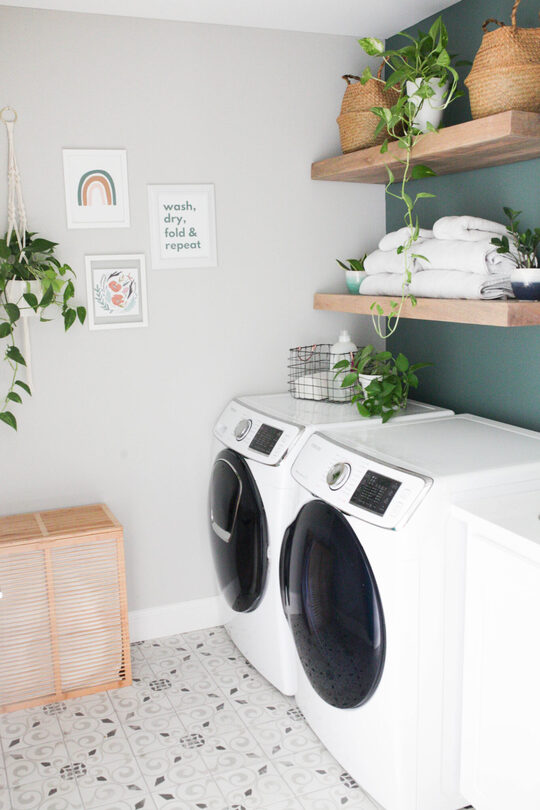
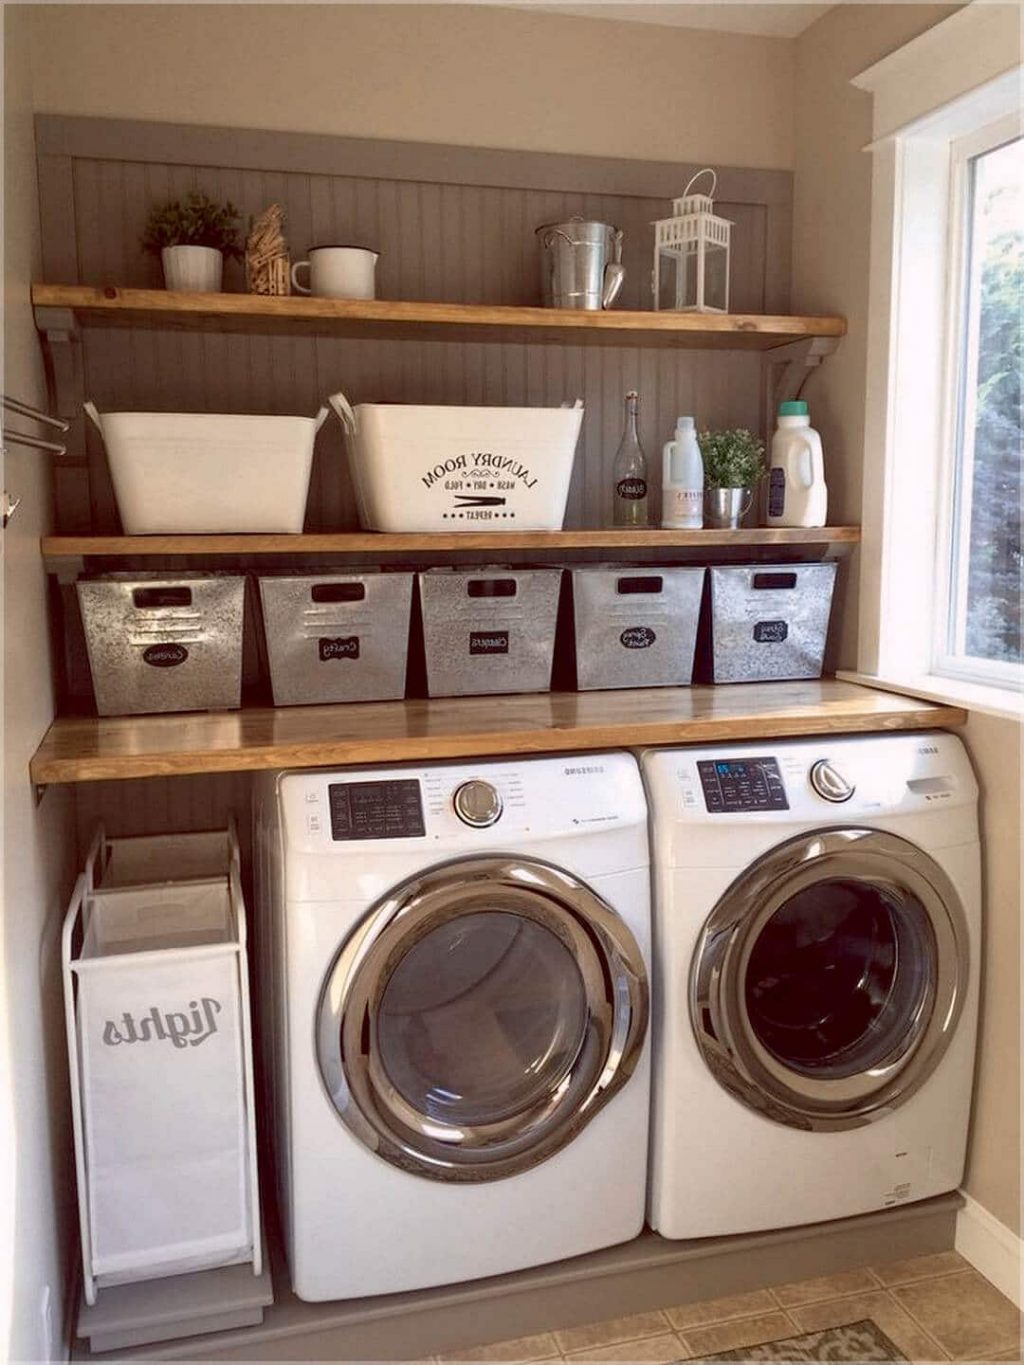
6. Floating Shelves Laundry Room

Floating Shelves Laundry Room

With the right connections, you can install a laundry room in any room in your home. Put a sheet of plywood over the dryer and washer to make folding easier, and attach some floating shelves to the wall to keep laundry supplies organized. Add a wallpapered accent wall to define the space, and don’t forget to include some warm decor pieces.

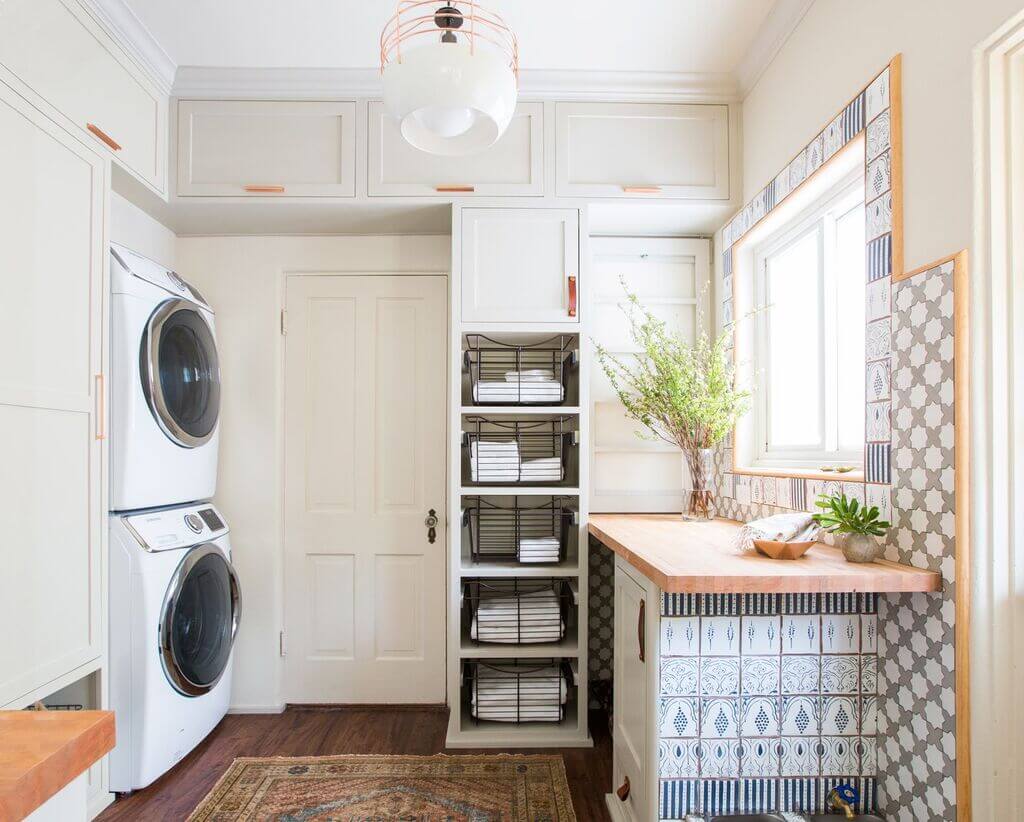
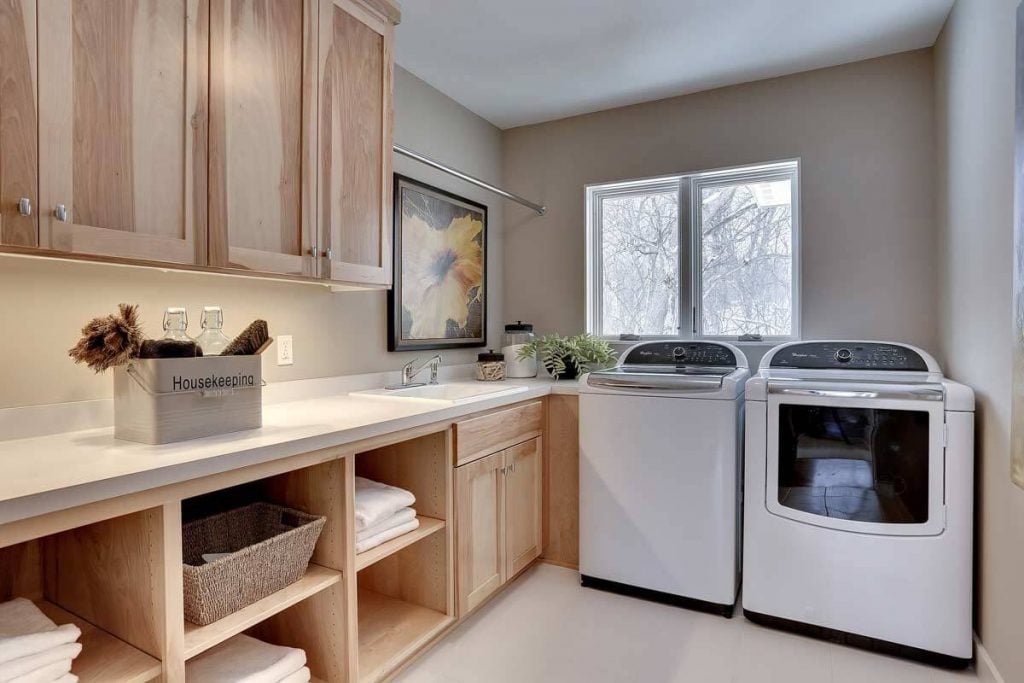
7. Invest In Custom Cabinetry

Custom Cabinetry laundry room

Although investing in custom cabinets could be a little pricey, it’s well worth it if you intend to revamp your cramped laundry room completely. Improving the aesthetics and practicality of your laundry room is as easy as making some storage solutions that match your area with the help of these laundry room cabinet ideas.

Having a specific place for everything makes organizing much easier. Also, you can hide any indications of mess so your work area remains neat and organized.

8. Be Mindful Of Your Space

small laundry room cafe curtain painted tile floor

Examine your laundry room’s dimensions and layout thoroughly before bringing in the heavy equipment. Instead of having the washing and dryer side by side, this area makes great use of the available space by stacking them. Without making the area seem claustrophobic, this option gives plenty of room along the side wall to fold, sort, and hang clothes.

Wood countertops and a framed landscape provide an enchanting touch, transporting you to the French countryside as you accomplish your household tasks.

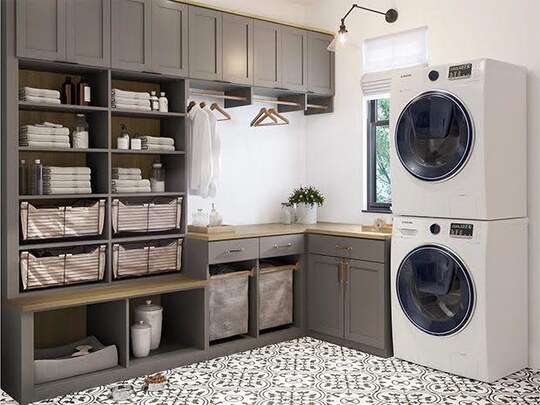
9. Mix Up Your Storage Solutions

baskets in laundry room

Diversify your storage options if you’re in serious need of more than one. Cabinets, shelving, and counter space are all artfully combined, creating an attractive and practical area via these laundry room storage ideas. A more tastefully designed or aesthetically pleasing laundry room area would be hard for us to envision.

“Put cleaning supplies, linens, and other heavy items in a cabinet. Make advantage of the space on the shelves for things you use often, and put the counter space to good use by folding and organizing clothing.”

10. Dress It Up

small space laundry room

We are huge fans of amazing wallpaper. No matter how small or monotonous a room is, a bright print has the power to transform it into a picture-perfect backdrop. The nice part is that peel-and-stick options are also renter-friendly.

In this laundry room, which has dark wood on the counter and flooring and dark floral wallpaper to set the atmosphere, the abundance of natural light is the ideal match. A bright and airy color palette could work well in a basement or other area without many windows.

11. DIY Hanging Rod

Hanging Rod in laundry room

Add a slender hanging rod to your laundry room to make it more attractive for drying clothing. Without the need for a drying rack, this integrated metallic rod easily saves precious floor space by fitting into the area.

12. Make It Pretty And Practical

bottles jars soaps and detergents in laundry room

Laundry rooms can accumulate an assortment of items, ranging from soaps and detergents to misplaced socks and excess bedding. Make use of the clutter as a styling opportunity rather than allowing it to overwhelm you. Pour liquids from tubs and jugs into stylish bottles and jars. Invest in matching baskets and a drawer unit for stuff you don’t use as frequently to create a neat, coordinated design that conceals your laundry secrets.

13. Go Incognito

attractive laundry room organization ideas

This little laundry room is a real example of how one’s perspective affects one’s square footage—or lack thereof. We love how a whole laundry room can fit into this little closet without sacrificing beauty. This little hidden treasure has so much charm, thanks to the wallpaper. You may be hesitant to lock those closet doors since it’s so attractive laundry room organization ideas.

14. Give It A Vibe

laundry room idea

Naturally, the laundry room should have a distinct personality that blends in with the rest of your house. Why not carry over the rustic farmhouse style from your kitchen and living room into this area?

Featuring black grout and white subway tiling, as well as a reclaimed wood door, mason jar decanters, and floating shelves made of wood, this laundry room is more than just a place to do laundry—it seems like an extension of your house.
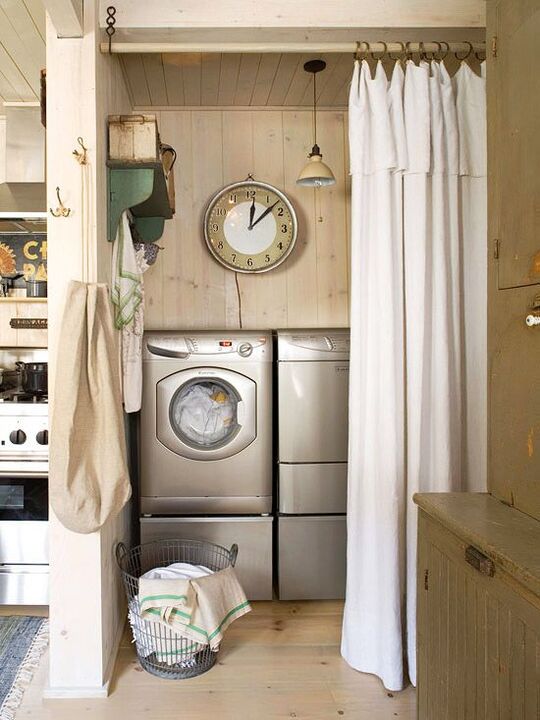
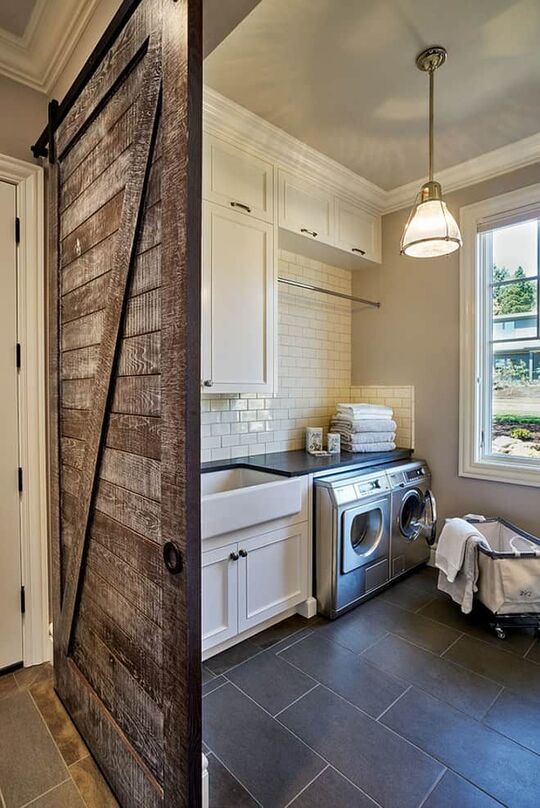
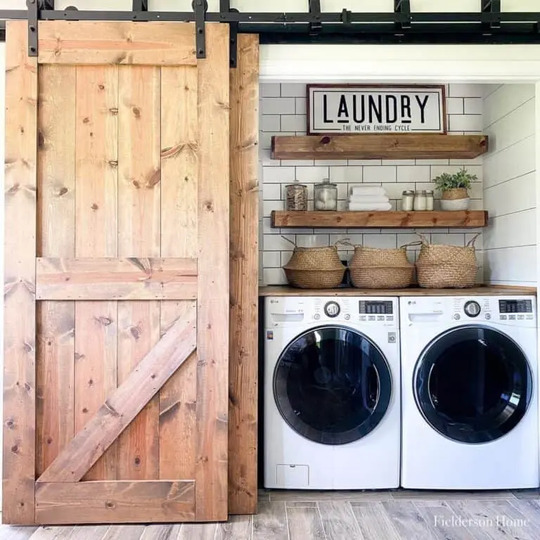
15. Tuck It Away

Laundry Closet with Sliding Barn Door

Use a barn door to create the perfect washing place if you don’t have a separate laundry room. Install a barn door to conceal your washing and dryer, so they’re not visible.

“If you need some place to store your laundry, utilize the space in your kitchen pantry to create some concealed storage.”

16. Light It Up

laundry room lighting island

As laundry rooms are often located in tiny, inconvenient spaces like garages or basements, they do not have enough illumination. When you start remodeling, pay attention to the lighting so that your workstation doesn’t seem gloomy and dark.

Simply add pendant lights to the ceiling lighting for a sleek and reasonably priced option. What excellent lighting can do for such a little area will astound you.

17. Maximize Your Space

laundry room organization idea

Make sure every piece of furniture in your house has a function when you’re short on space. Even though it’s designated as a washing room, it can also serve as an emergency room with basic first aid supplies, a greenhouse, or a pet hotel.

18. Add A Window

window in laundry room

Even in the biggest settings, a room devoid of windows might seem constrained. If it fits within your budget, think about installing one or more windows to provide some natural light into your cramped laundry room.

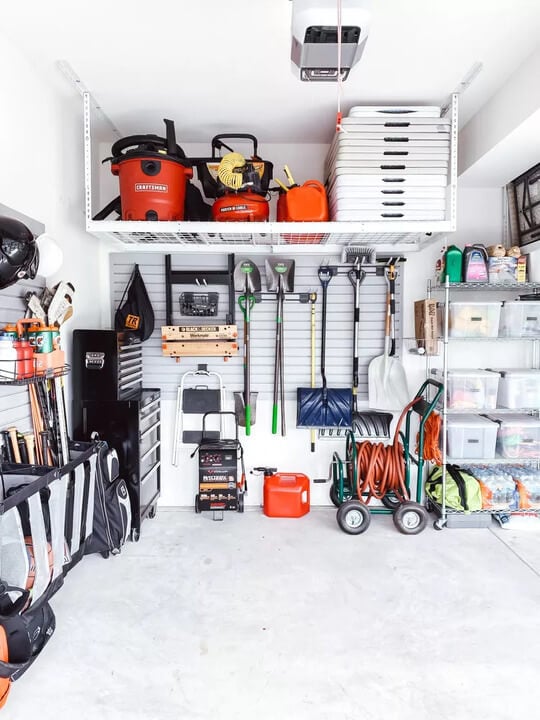
19. Utilize Overhead Space

Laundry Room Makeover idea

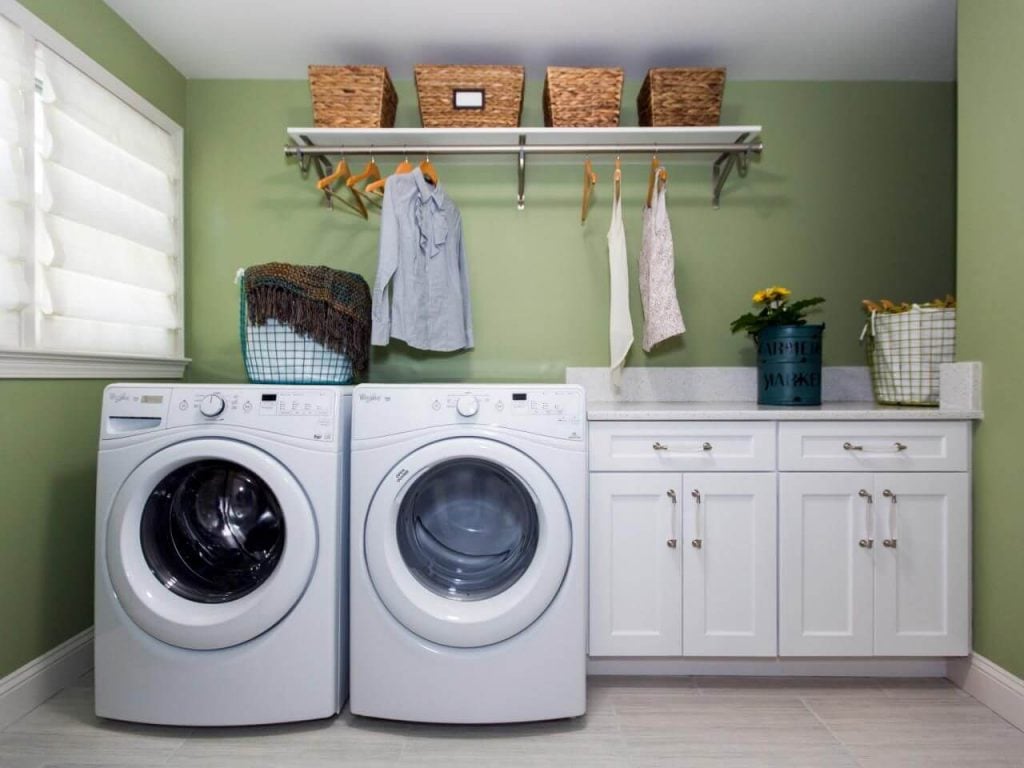
While it’s important to keep your most-used items within reach, don’t forget about the overhead space. Although the ceiling is sometimes disregarded, you can make this underused space seem useful without sacrificing any essential space in your little laundry room by installing a hanging rack for clean and wet clothing.

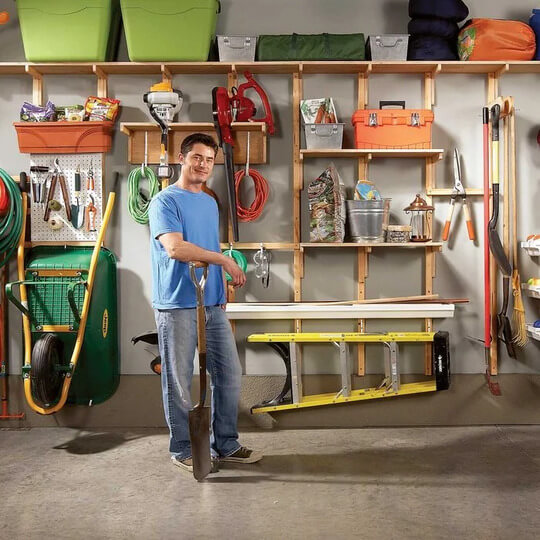
20. Utilize The Space Above Your Door

laundry room storage idea

Organize everything you need above the door rather than hiding junk behind it. An overhead cabinet system is a much more clever use of your space rather than ignoring it. 

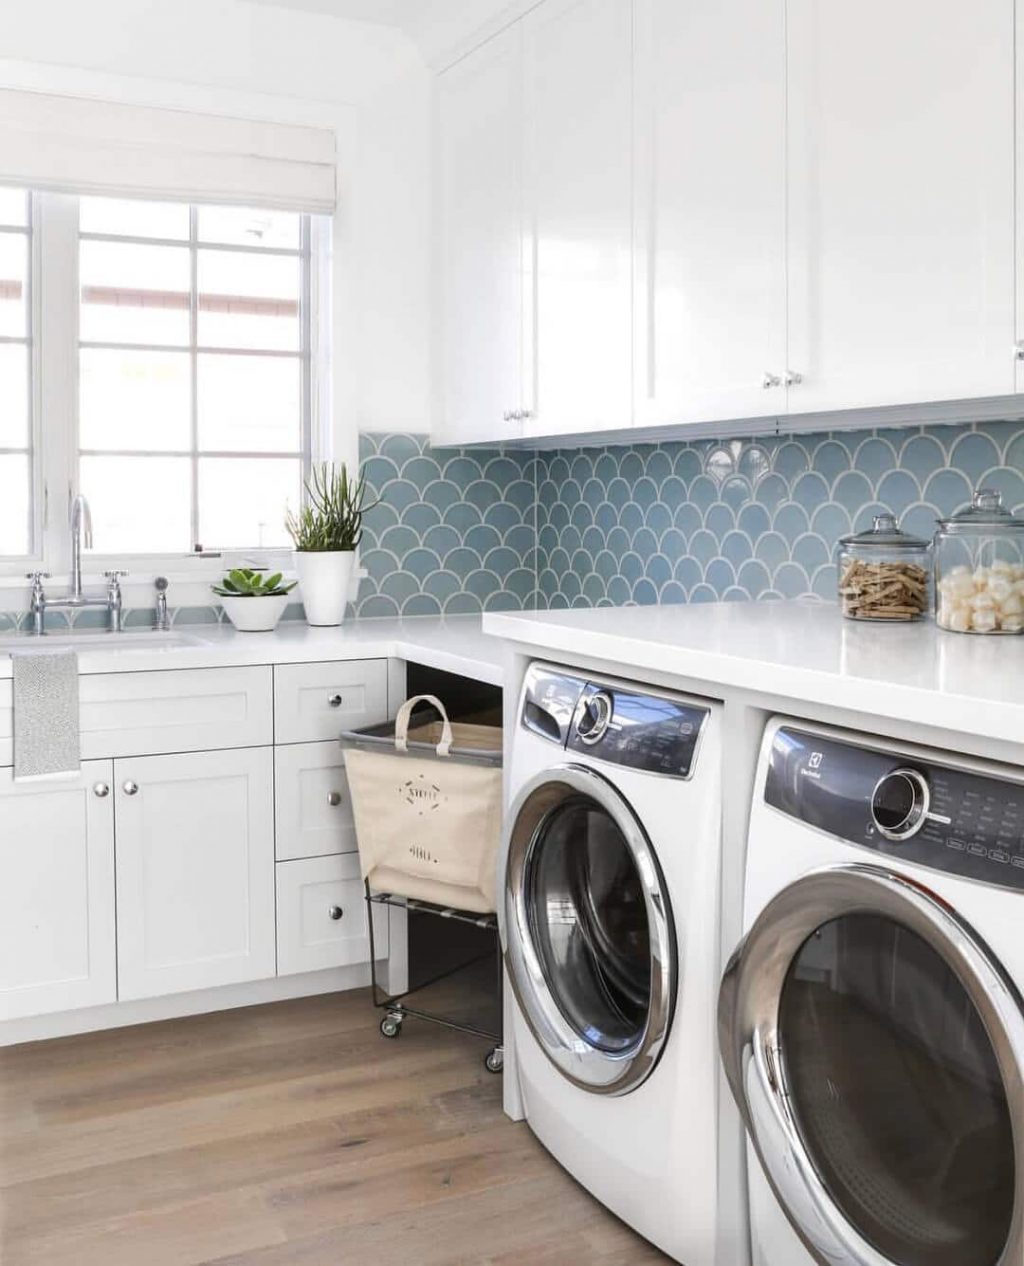
21. Hide It In Plain View

washer and dryer in laundry room

A laundry room is a mindset. You may set up a laundry area wherever there’s space for a washer and dryer. The secret is to create ultra-chic surroundings. For example, the open washing and dryer are hardly noticeable in this chic kitchen and mudroom space.

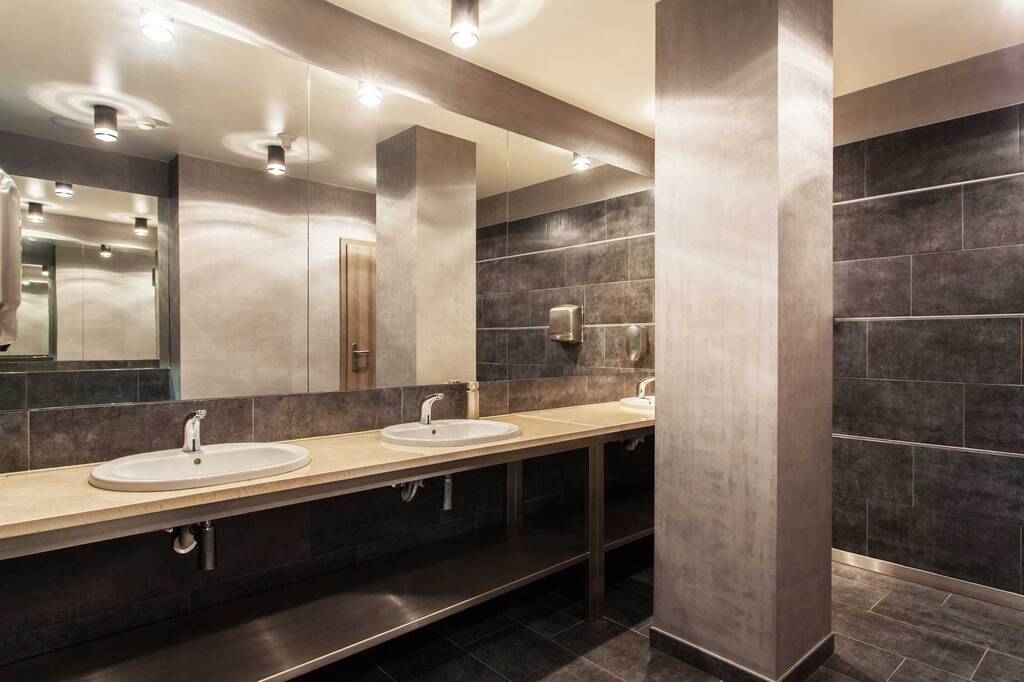
22. Hang Your Hamper

Hang Your Hamper in laundry room

A hamper is essential in every laundry room, but they’re generally big and ugly. We like how this little bathroom organizes dirty clothing by making use of empty wall space. The nicest thing is that you can keep colors apart from whites and darks without giving up any useful floor space.

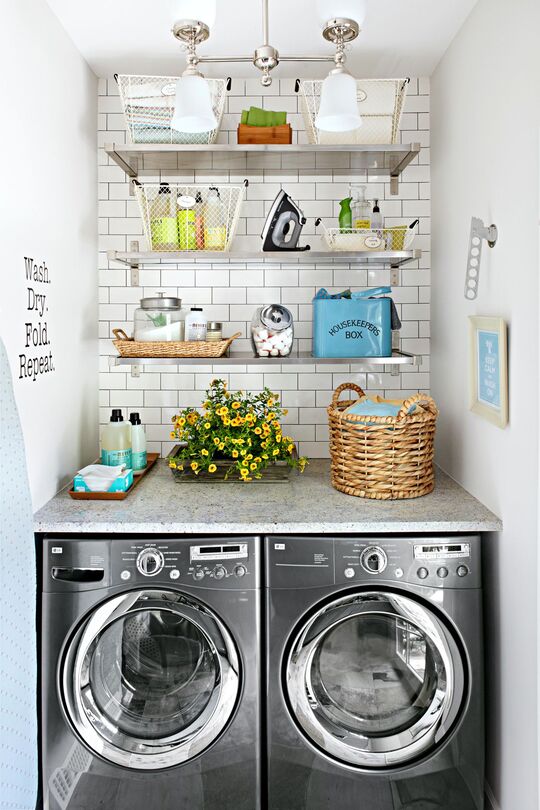
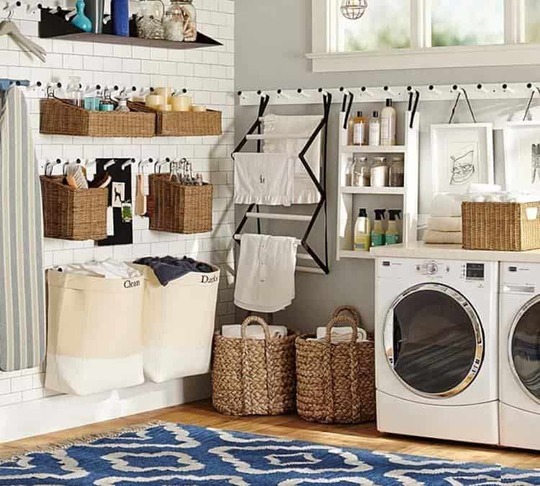
23. Hang Your Supplies

best laundry room

Even though we love a well-arranged supply shelf, there are instances when room is limited. Hanging a rod over your workstation to store your often-used washing items is the best option. Hang objects such as cleansing brushes, scissors, and even decor on S hooks to make sure you always have what you need close at hand.

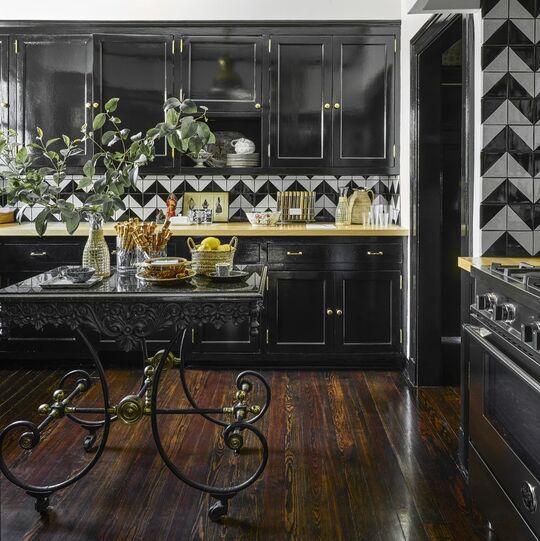
24. Go For A Dark Color

dark color laundry room

It’s a common misconception that painting a room with a darker color makes it seem smaller, but that’s wrong. In fact, painting your cupboards black may open up a room, giving it a feeling of grandeur and spaciousness. And in a laundry room, who wouldn’t want that?

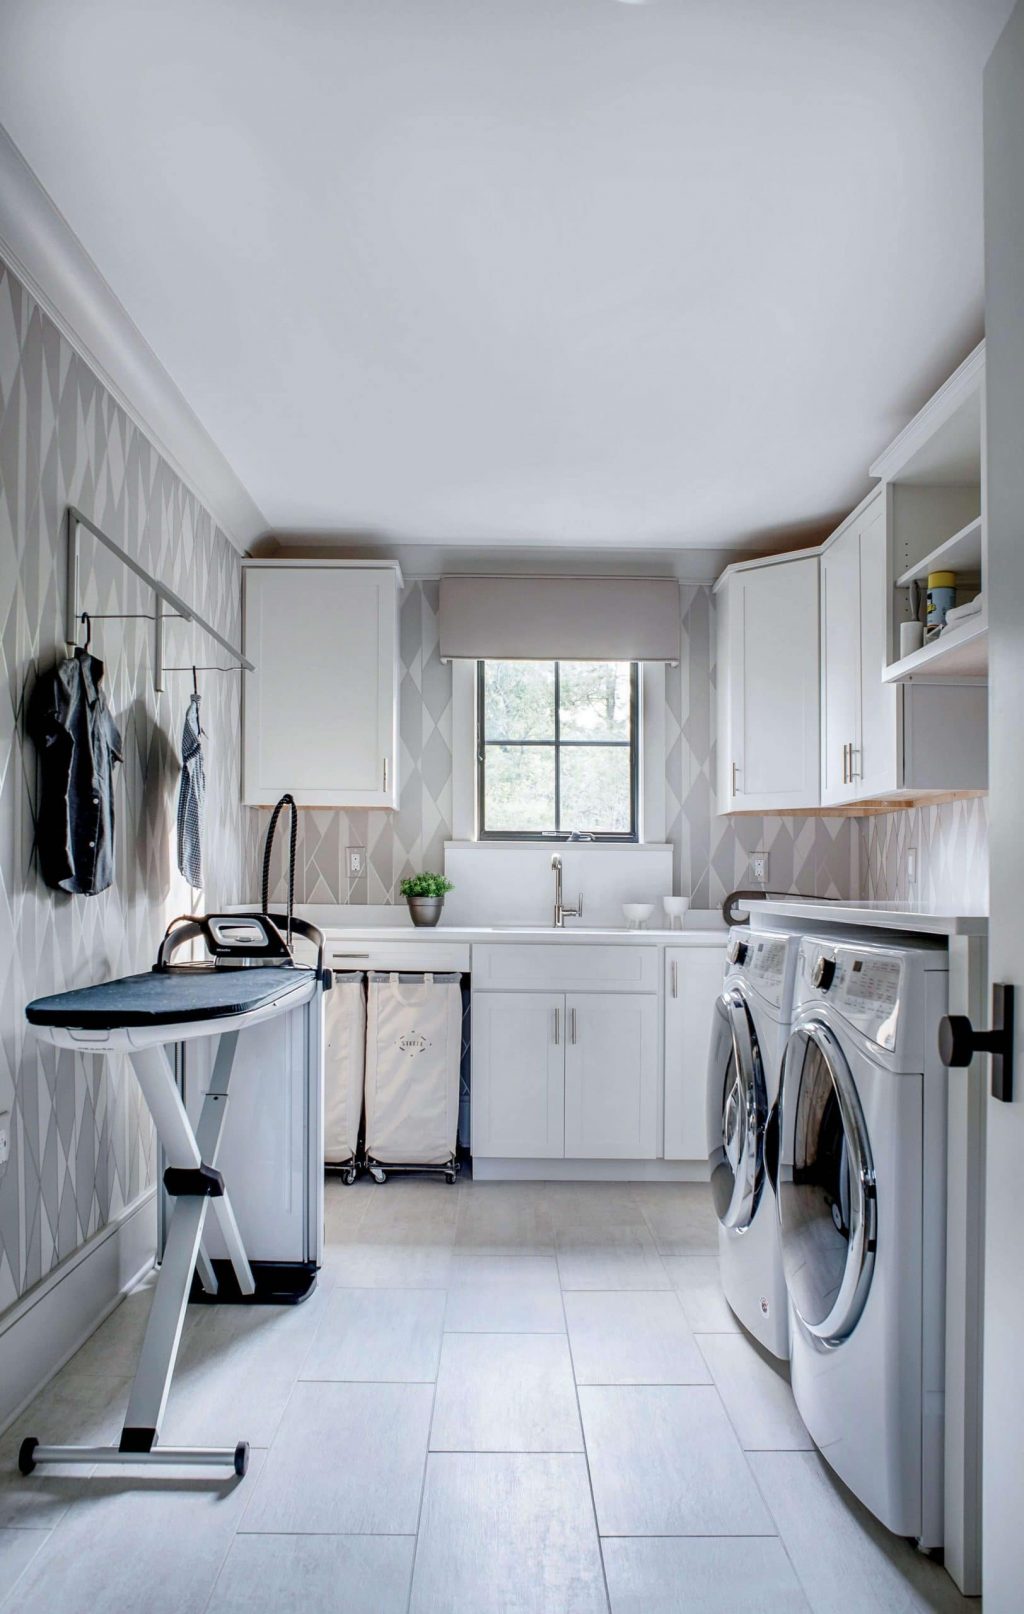
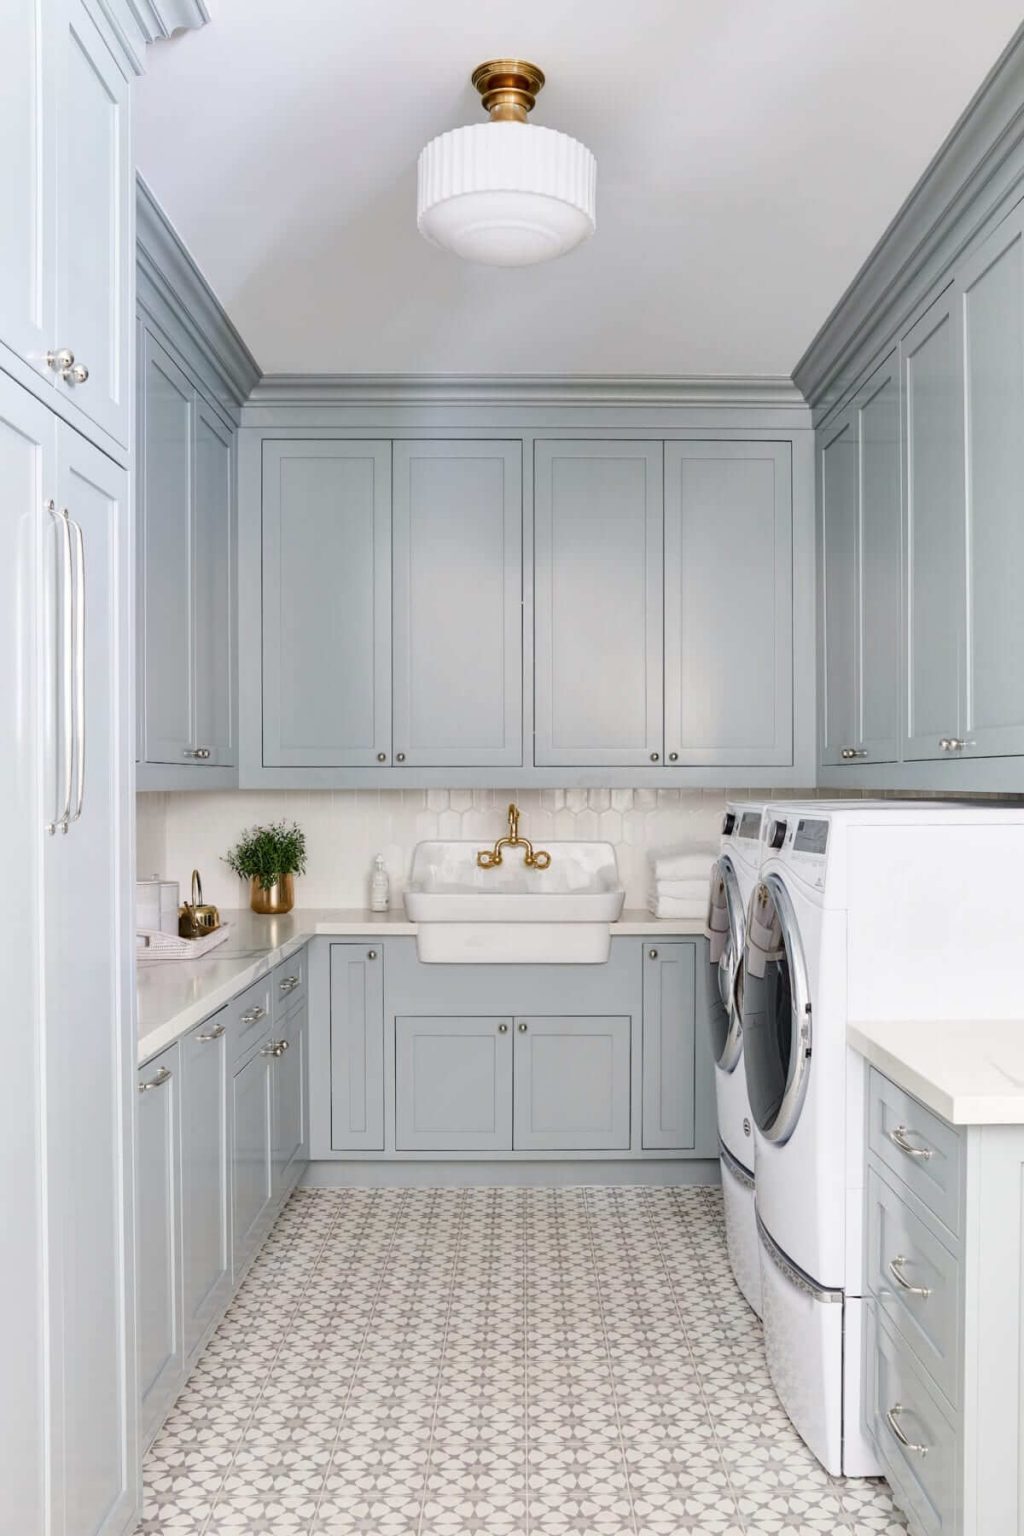
25. Patterned Tile Flooring

Patterned Tile Flooring in laundry room

Incorporating a patterned window blind and vivid graphic tile flooring in this laundry room with a galley layout helps deflect attention from the equipment.
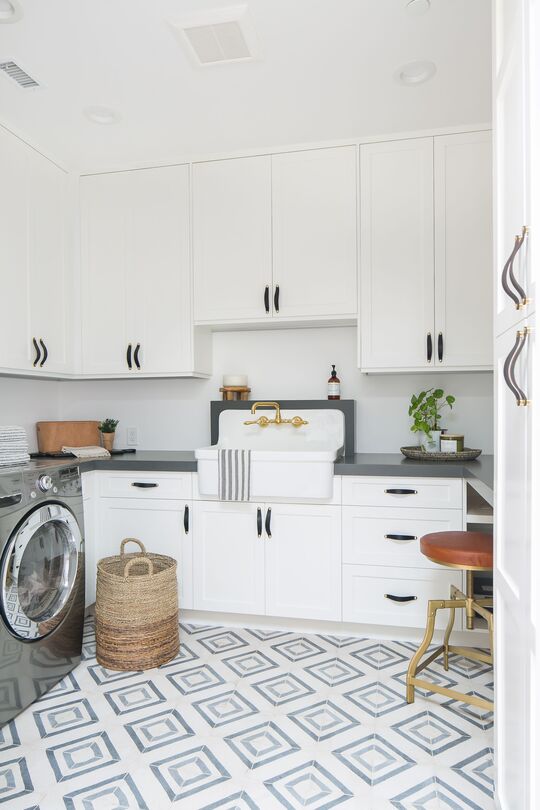
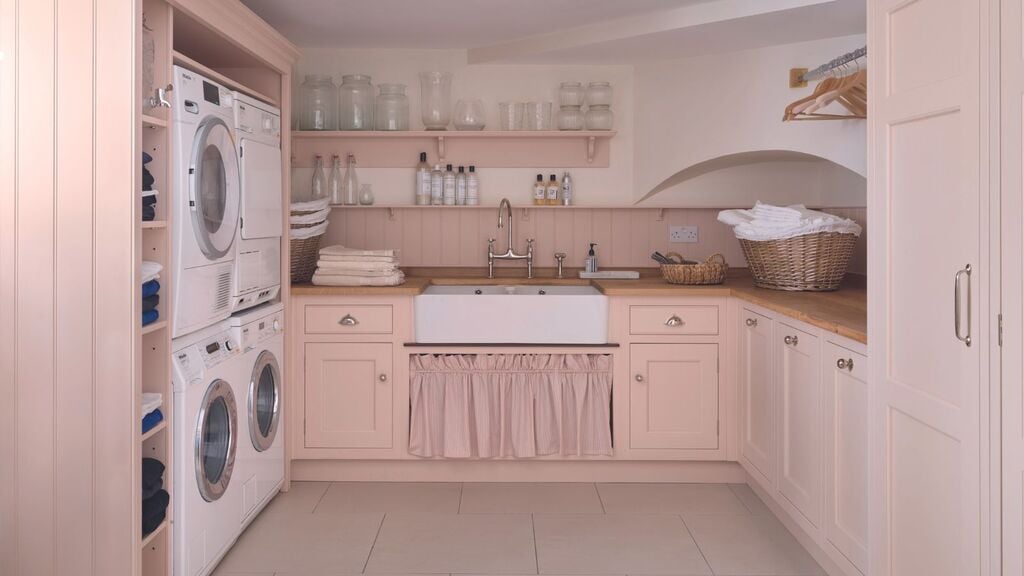
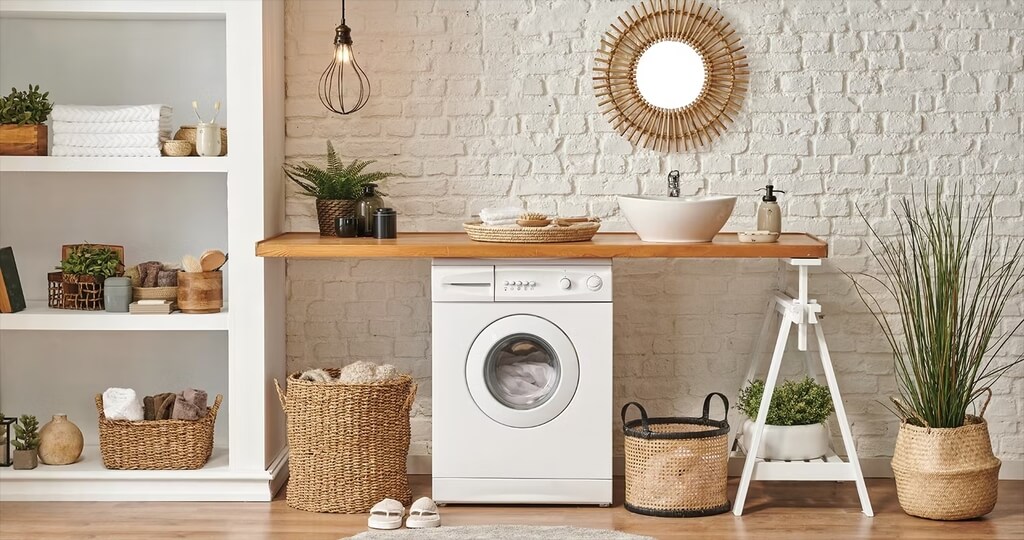
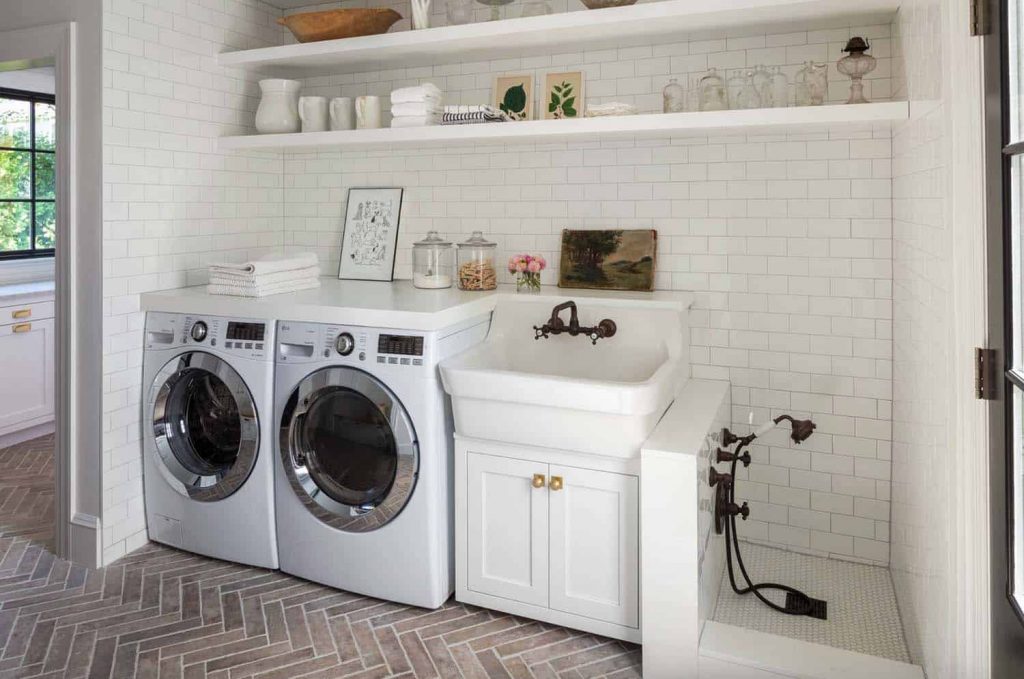
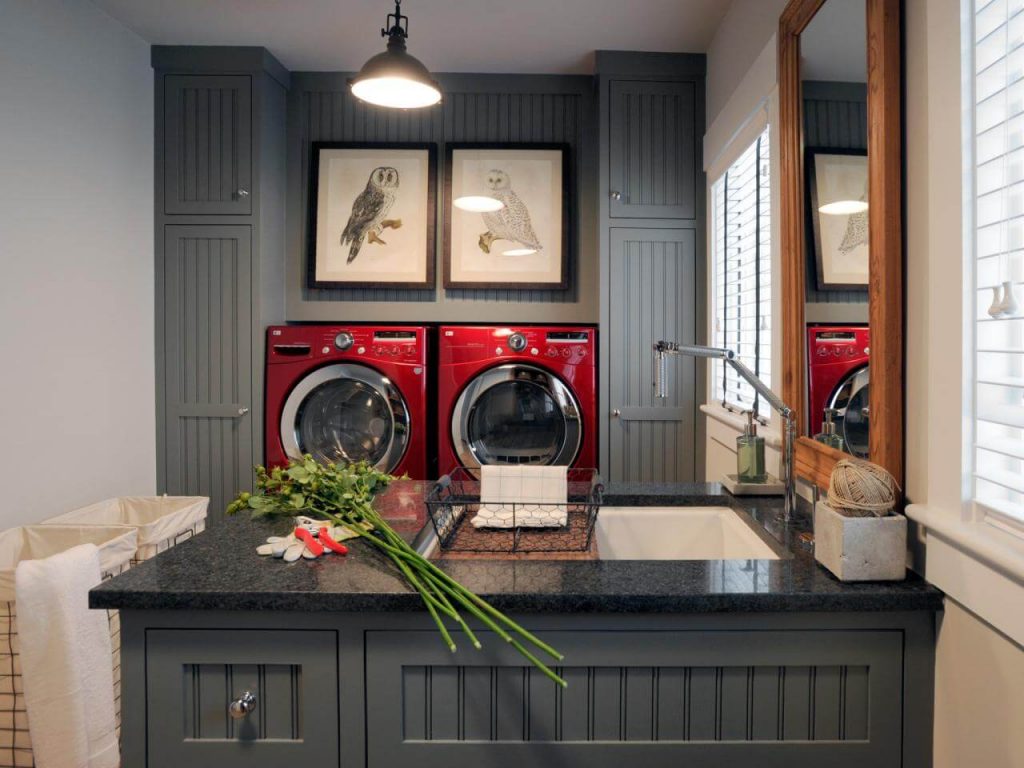
26. Farmhouse Sink

Laundry Room Sink

You can create a warm focal point in a large laundry room with a farmhouse sink. A little old artwork adds elegance to this fresh laundry room decor ideas.

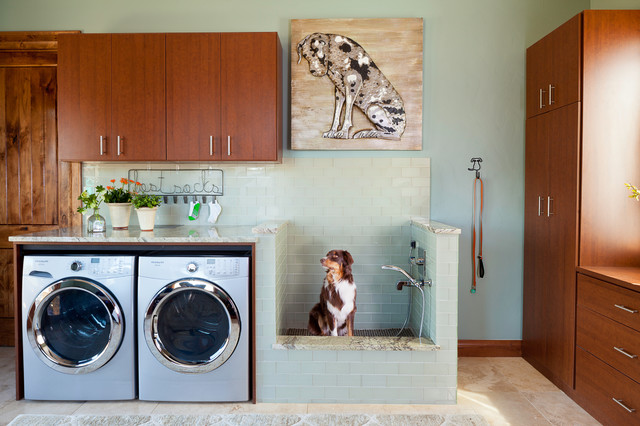
27. Add A Pet-Washing Tub

Pet Washing Tub in laundry room

Remember your furry friends! Set aside a space to clean your pets, ensuring the tub’s dimensions suit their size. Install a hanging rod on the wall for a drip-dry area between washes.

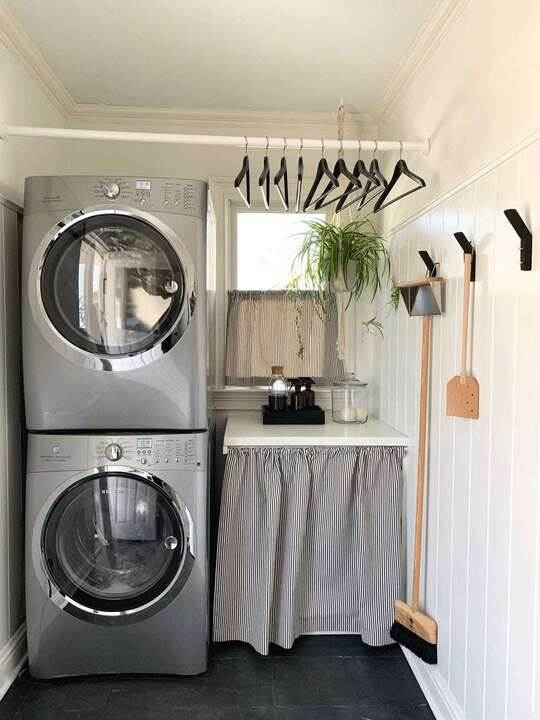
28. Hide Supplies Under A Skirt

Skirt in laundry room

Use your storage space wisely in a tiny area by keeping extra laundry materials beneath your sink. Use a cloth skirt to hide the mess and then draw it back so you can quickly locate what you’re searching for.

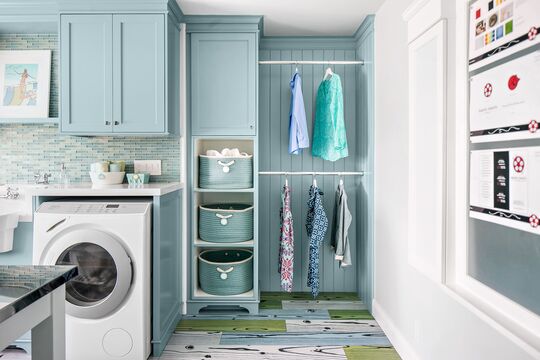
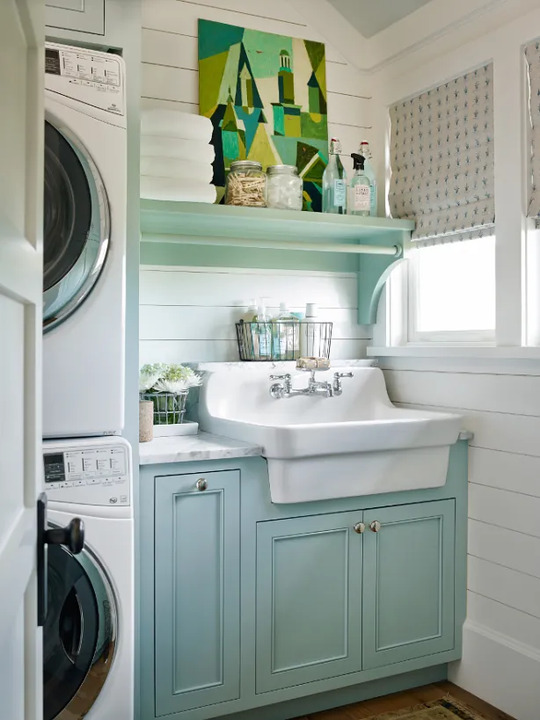
29. Go For Cool Blue

blue laundry room

Choose cabinetry in a subdued blue shade to enhance the design of any laundry room of any size. Selecting a paint color with a glossy finish can further improve the aesthetic appeal.

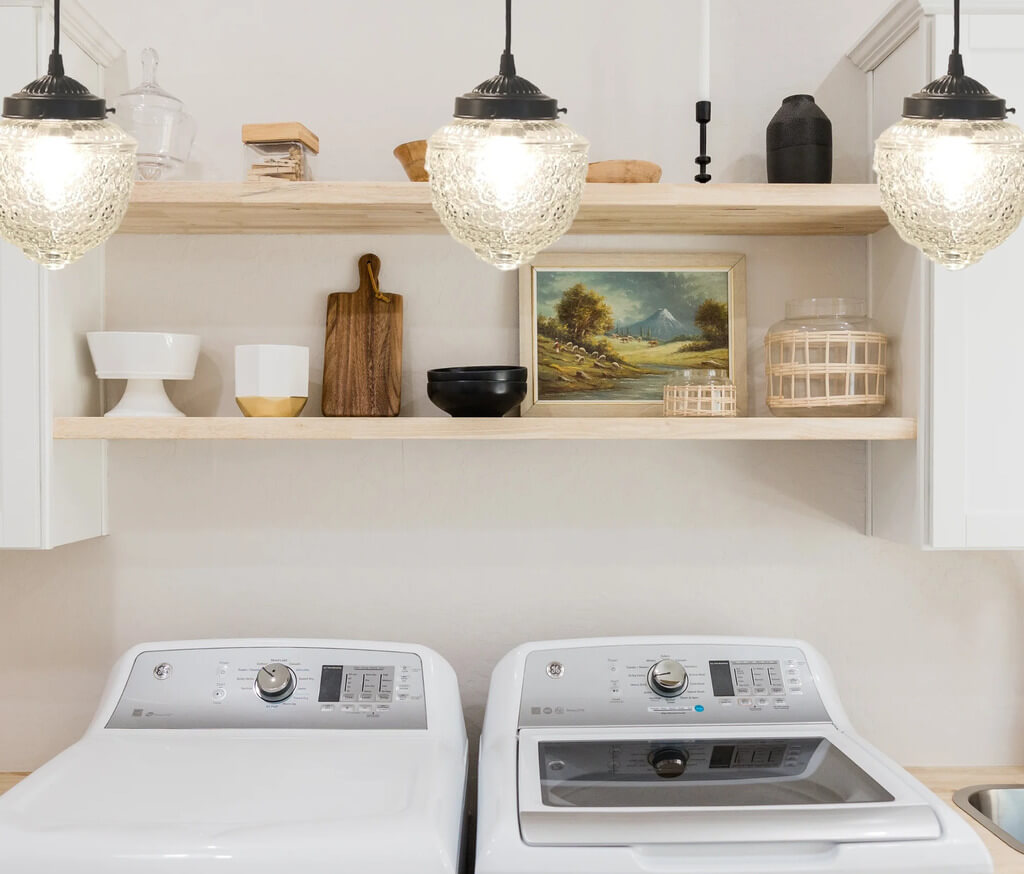
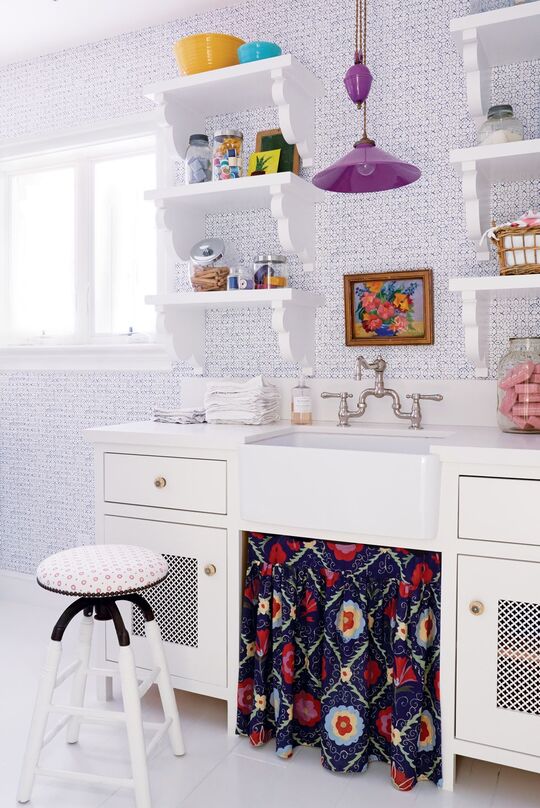
30. Add Mini Shelves

Mini Shelves in laundry room

Put a pair of small floating shelves on each side of the sink to make your laundry area seem breezy. They’re perfect for organizing a variety of objects, such as little pieces of art, canisters, and vibrant bowls full of clothespins and thread.

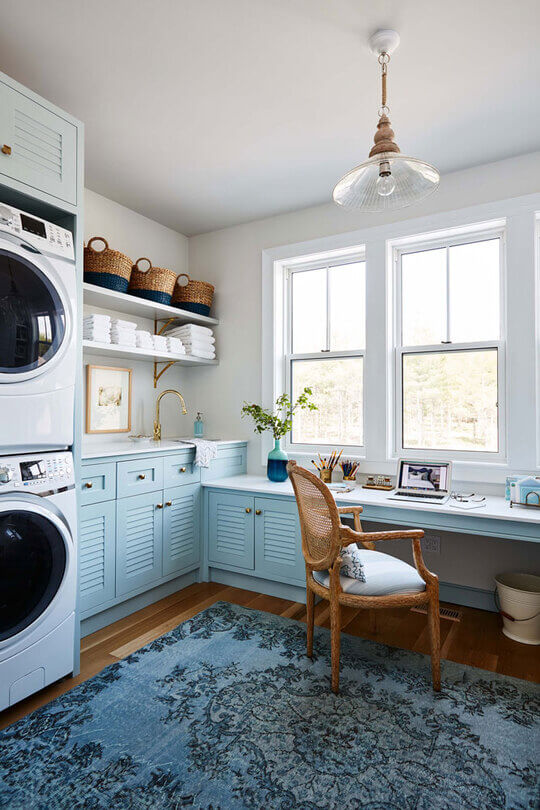
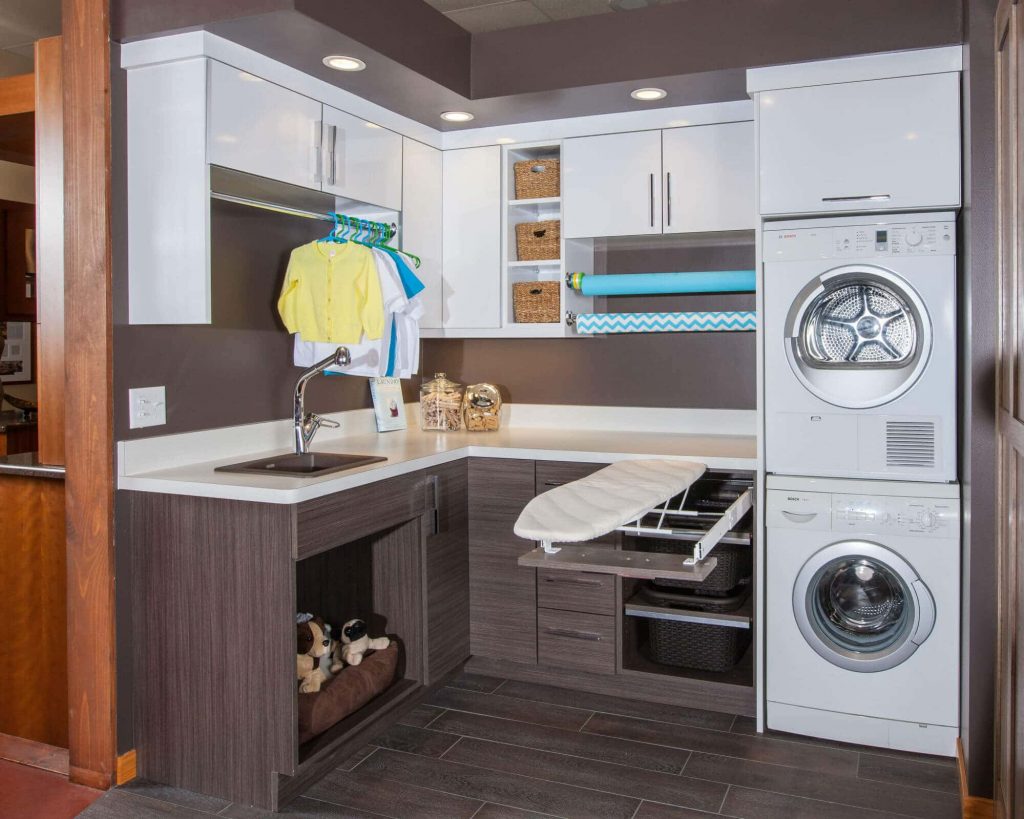
31. Incorporate A Work Station

Combine laundry and office space

Combine your laundry and office spaces into one if you don’t think your house can accommodate them separately. Use bright wallpaper and pale blue cabinetry to give the space a dynamic feel.

32. Decorate A Shelf

Decorate A Shelf in laundry room

Admire the beauty of your well-arranged mantel in the living room. In your laundry room, try creating a similar arrangement by propping artwork up against the wall and adding plants to a little ornamental jar. It’s a convenient place to keep extra washing supplies.

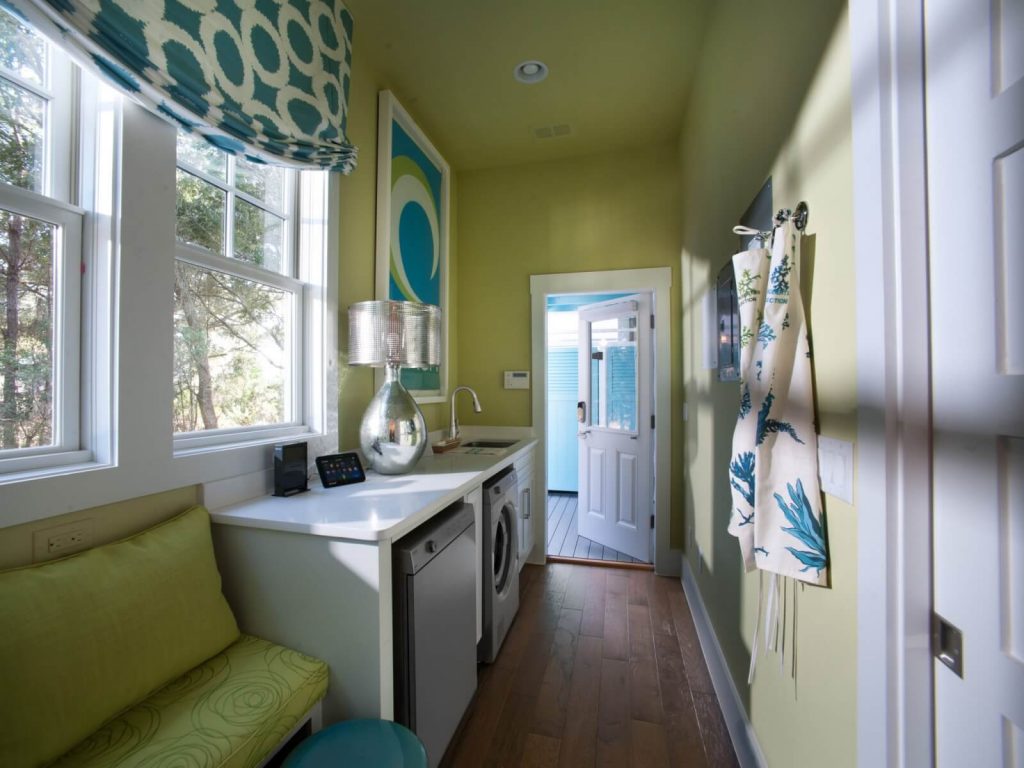
33. Bring In Bold Colors

bright color laundry room

Use bright colors to breathe life into a laundry room that lacks windows. As the patterned wallpaper takes center stage, arrange the cabinets and flooring to accentuate it.

34. Add A Free-Standing Shelving System

stand alone shelf laundry room

Without interfering with your washing routine, a stand-alone shelf system can hold all of your materials. Store small appliances below, cleaning supplies and extra hangers above, and detergents at waist level.

FAQs

What is necessary in a laundry room?

Make sure you have enough storage space, such as walk-in pantries, shelves, and vertical closets, to create a functional laundry room. Cabinets are useful, particularly if you have small children in your house and need a safe place to keep laundry detergent and bleach pods.

How do I organize my laundry room without cabinets?

If your laundry room is disorganized, make your own wall of cubbies. Use inexpensive plastic crates from a discount shop in place of laundry cupboards or shelves. For extra strength, use a fender washer in the top corner of each crate. Secure them to the wall studs while building DIY laundry room shelves.

What kind of cabinets to use in laundry room?

Wall cabinets are a common choice for laundry rooms. They utilize the unused wall space above the washer and dryer and don’t take up any floor space.

How do I maximize my laundry space?

Utilize vertical storage bins, wall-mounted drying racks, and hanging storage options to make the most of the space on your walls. Add drawer storage, a foldable countertop, and small appliances to maximize space. Use rolling carts, bins, baskets, and tension rod organizers to create unique additional storage.

Key Takeaways

Paint, wallpaper, vivid or textured tiles, artwork, plants, accent lighting, or accessories may all help turn your ordinary laundry room into a chic and welcoming area. Laundry rooms are often small and isolated from other living areas, so you may match them to your current décor or go wild with unusual design options. Regardless of the room’s size, you may transform your laundry room from a strictly utilitarian place into a beautiful and useful location that will make your everyday tasks more joyful.

Explore Further