Home Blog Page 125

Most Popular House Interior Design Styles in 2025

0
House Interior Design Styles

Interior designing can be done with the combination of multiple formats and designing something entirely unique. Each design, style, and format has its own charm and elegance. Many interior designers create exclusively inspiring designs that set standards for others. musedesign.ae, have done a number of high-tech designs which are rated high. A team of highly skilled interior designers in muse designs create outstanding designs. In this article, we’ll discuss the most inspiring styles on house interior design styles in current year. Let’s have a look!

Latest House Interior Design Styles

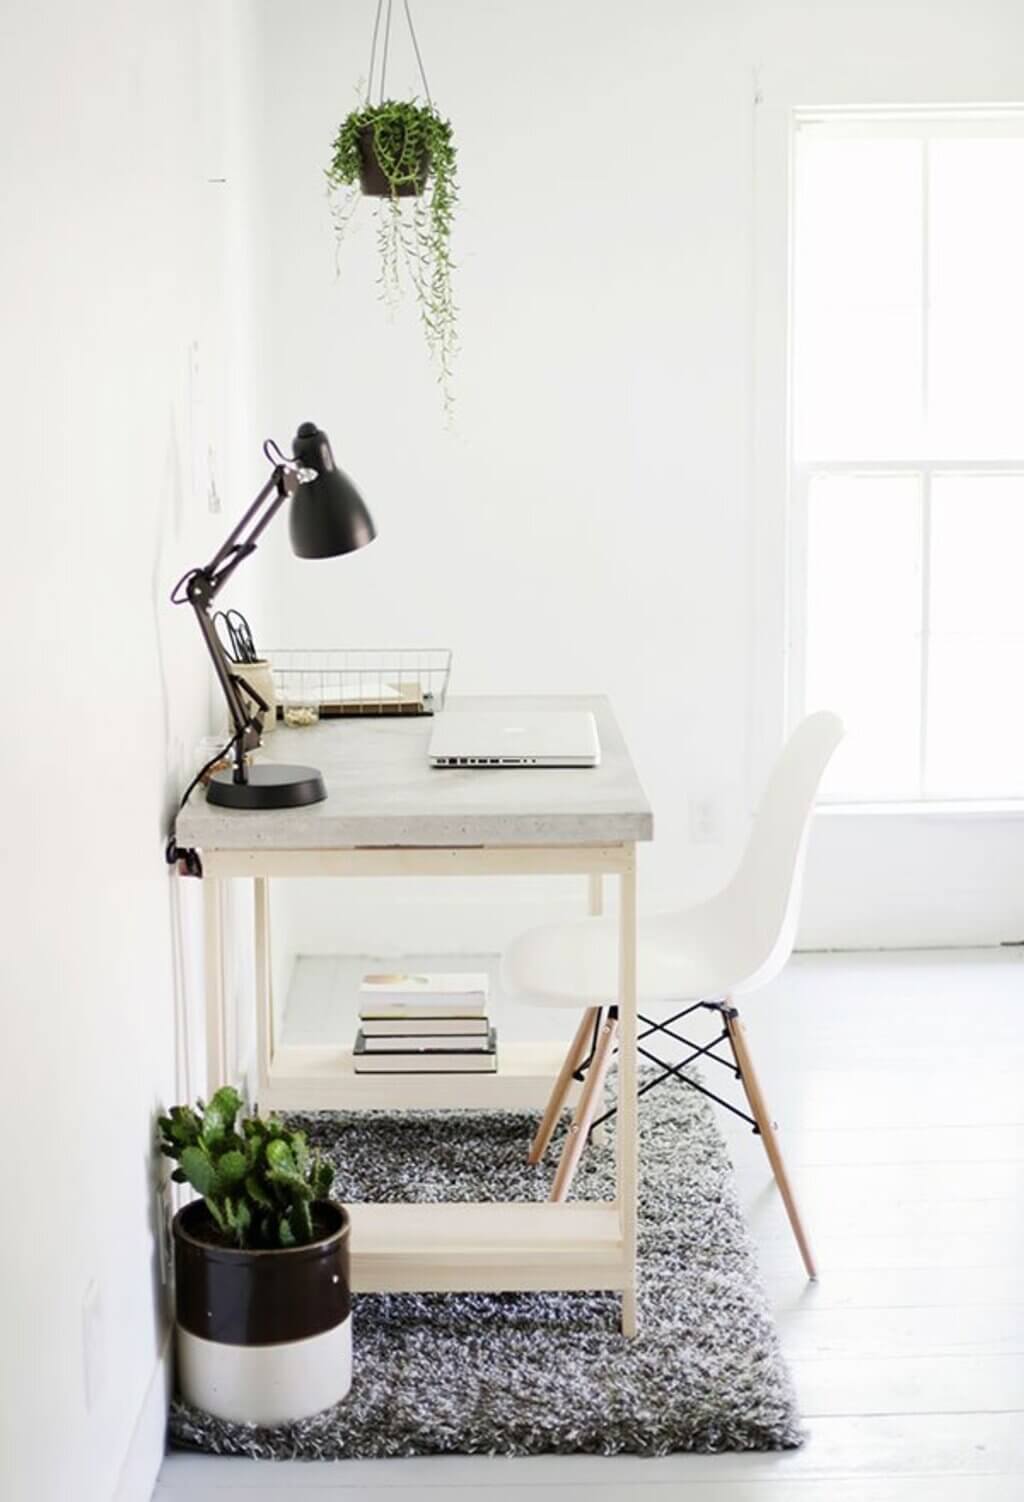
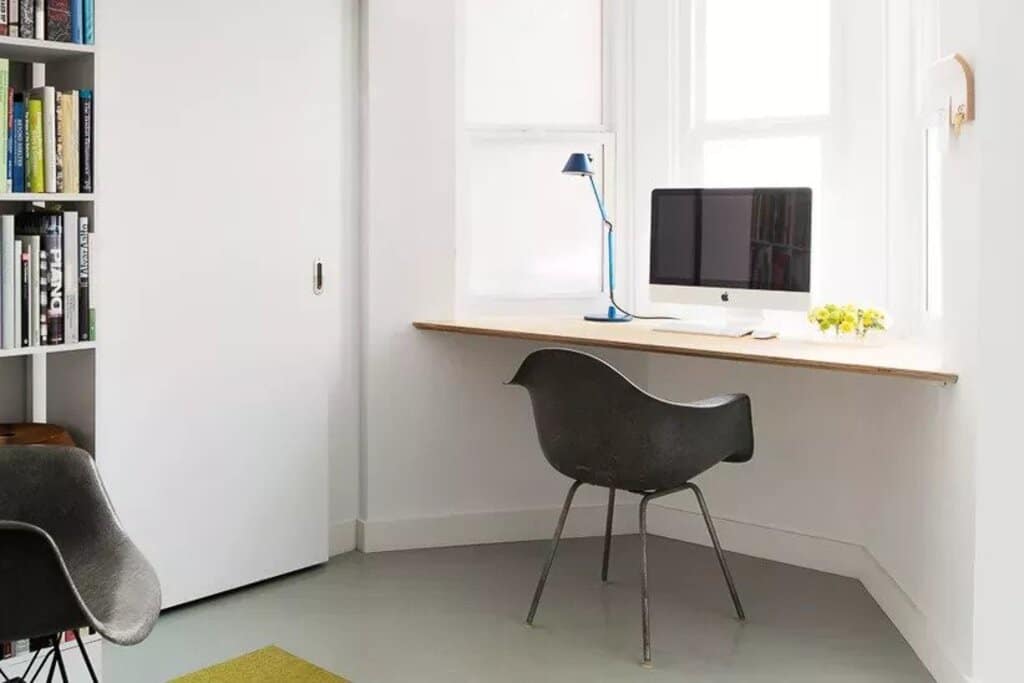
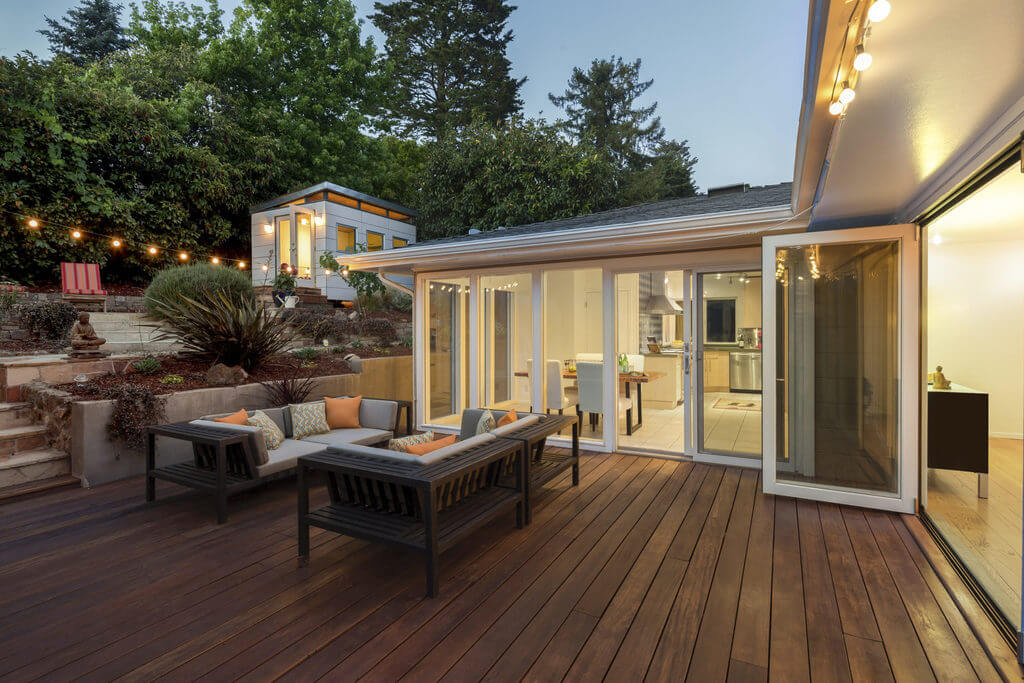
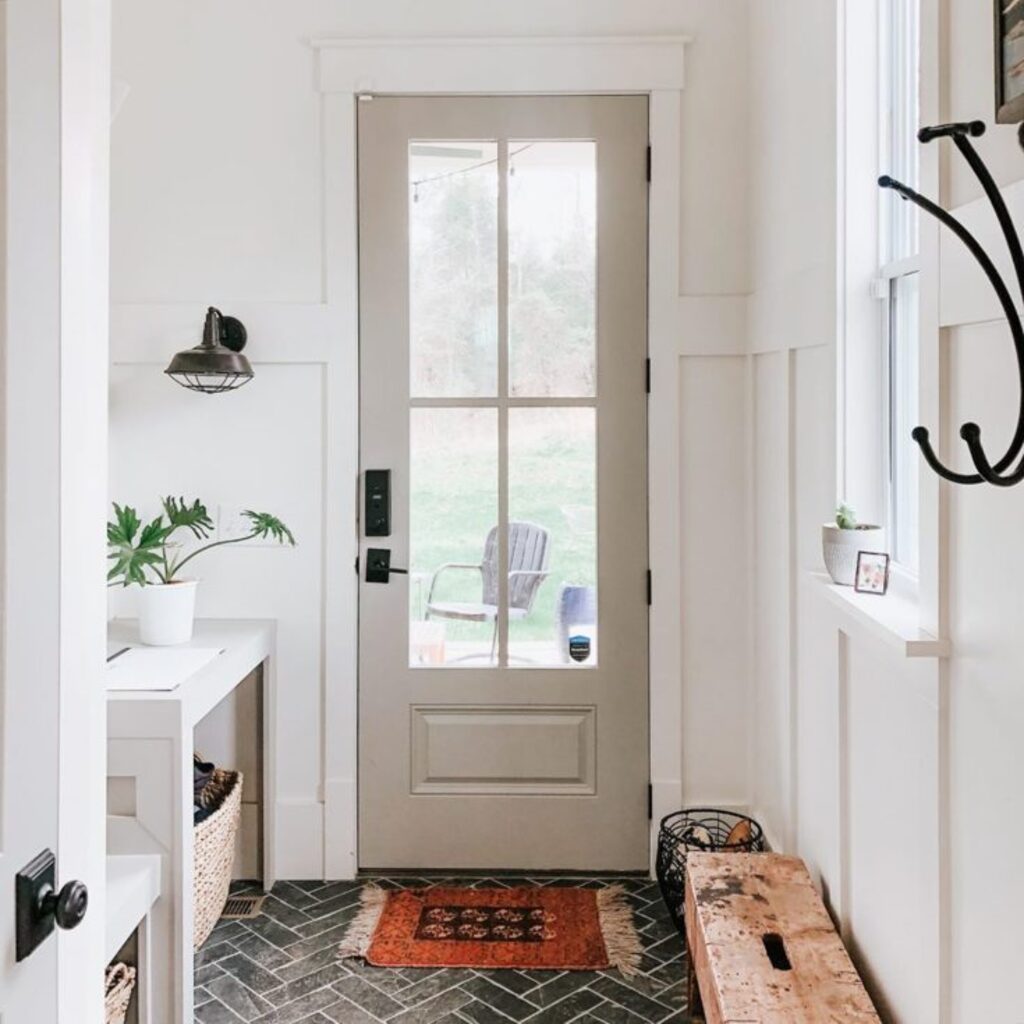
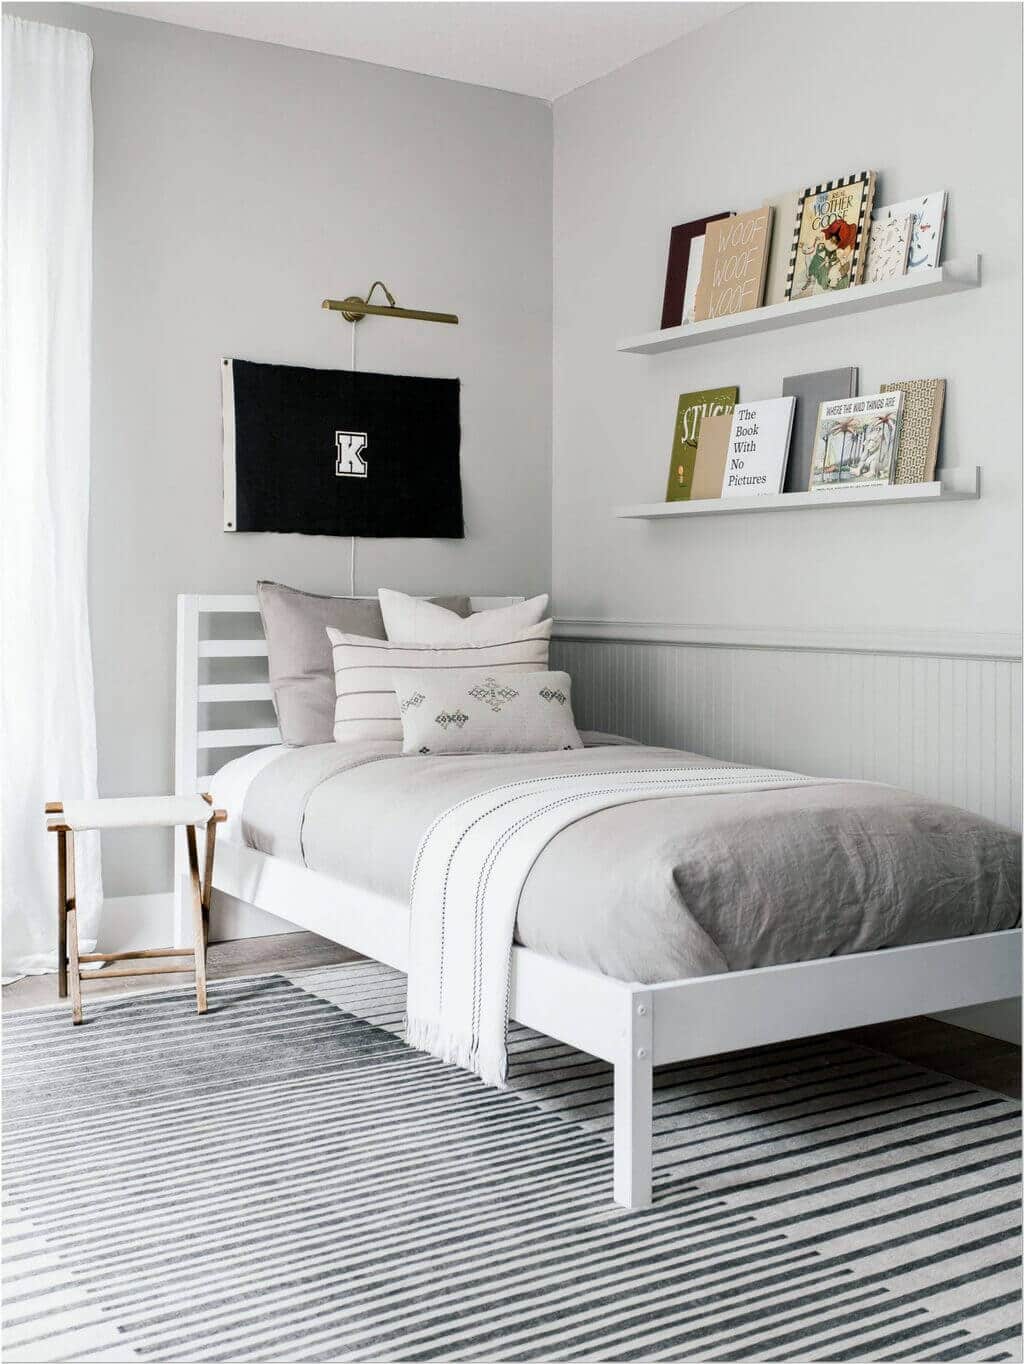
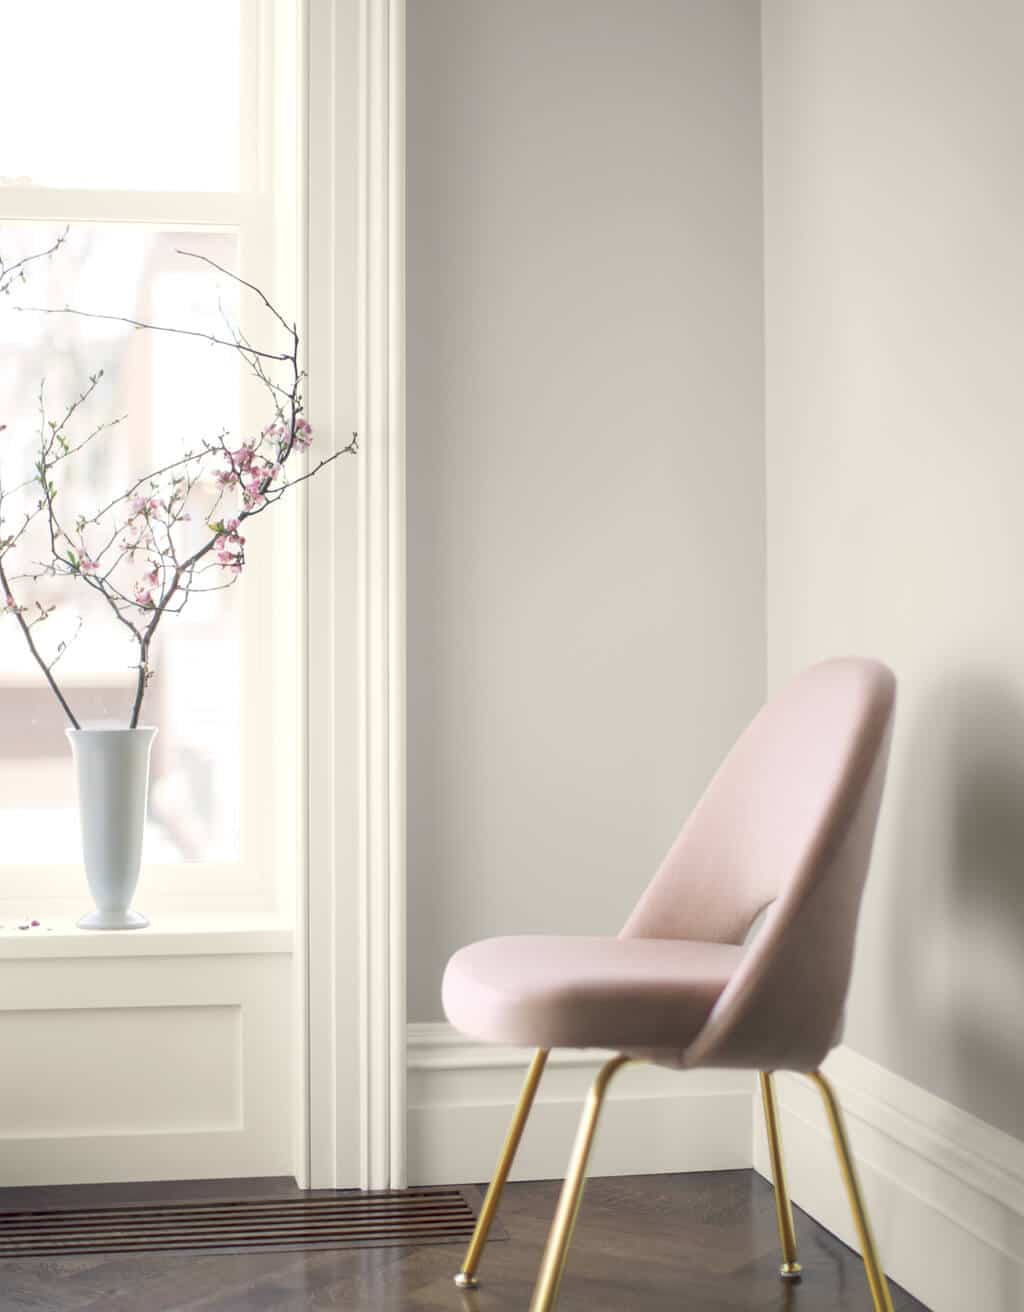
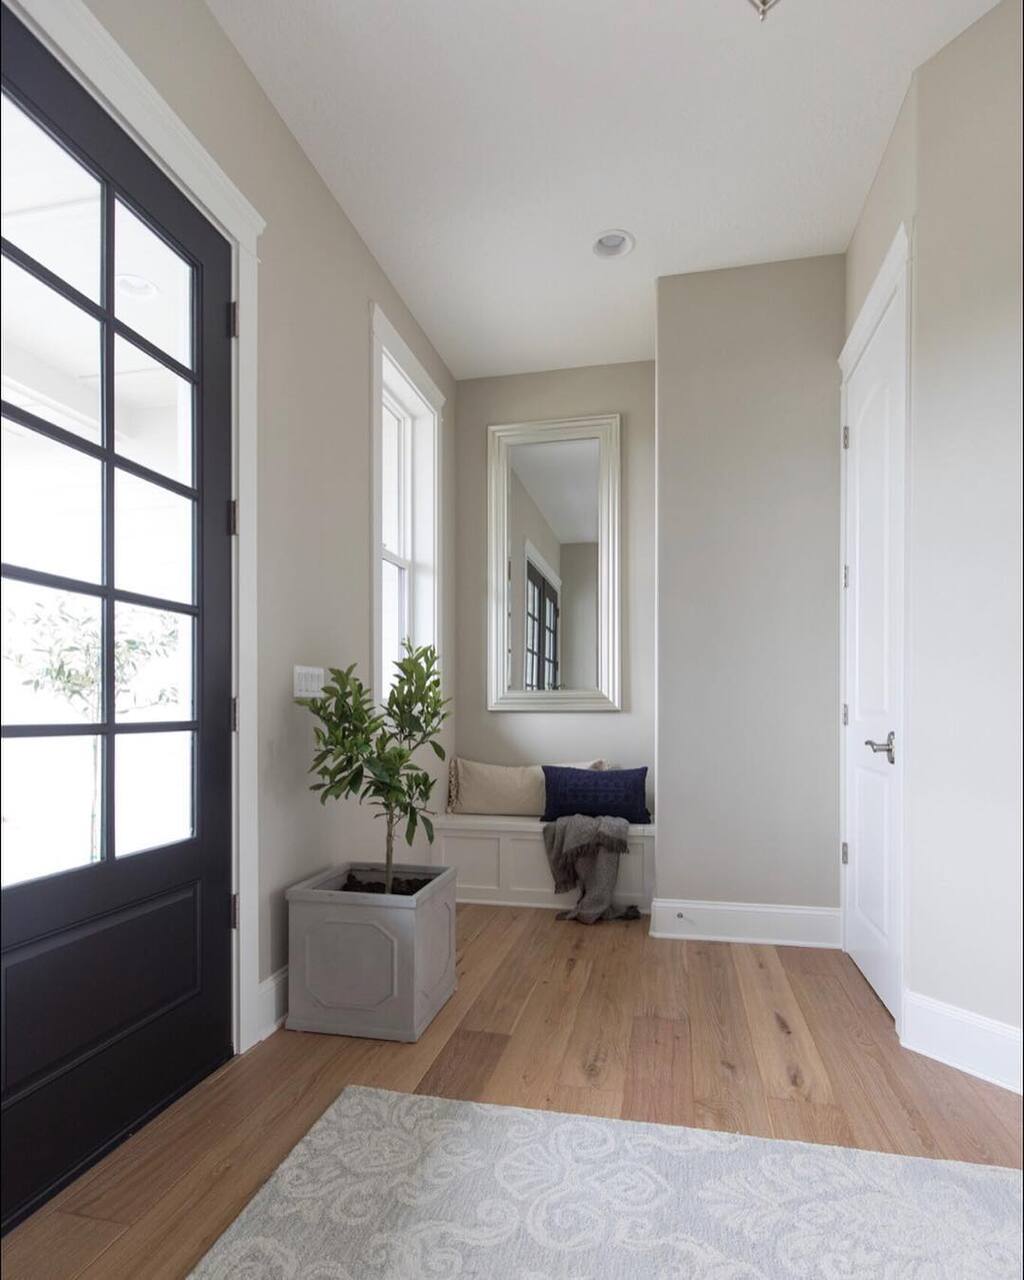
1. Contemporary Interior Design

Contemporary Interior Design

This exclusive interior designing trend incorporates the simplest collection of colors and textures. With a deliberate and sophisticated look, this interior designing trend looks incredibly appealing. These styles showcase a great area for space. This is the style that adapts and blends the latest designing trends at any time.

Designing your home with a contemporary theme can be tricky. It also merges the essence of the modern theme. The use of the main black and white color is the basic rule.

Among the most basic elements of this interior designing theme are sleek lines. The basic outlook for this style is not too formal or not too cool. It offers coziness and a warm effect. You can feel the fluidity in the arrangement and collection of different interior assortments.

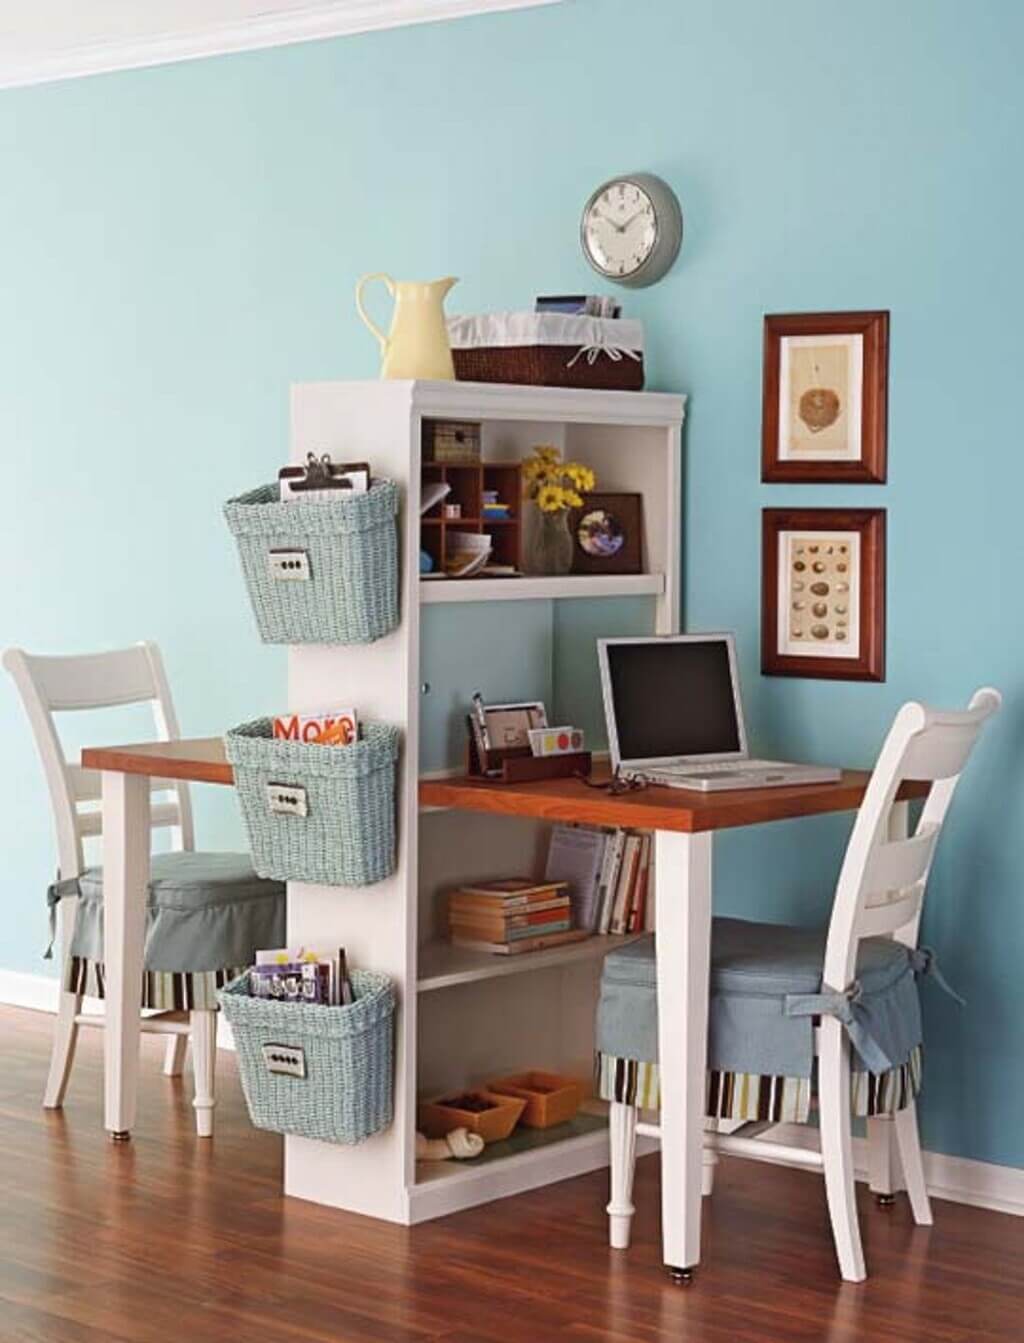
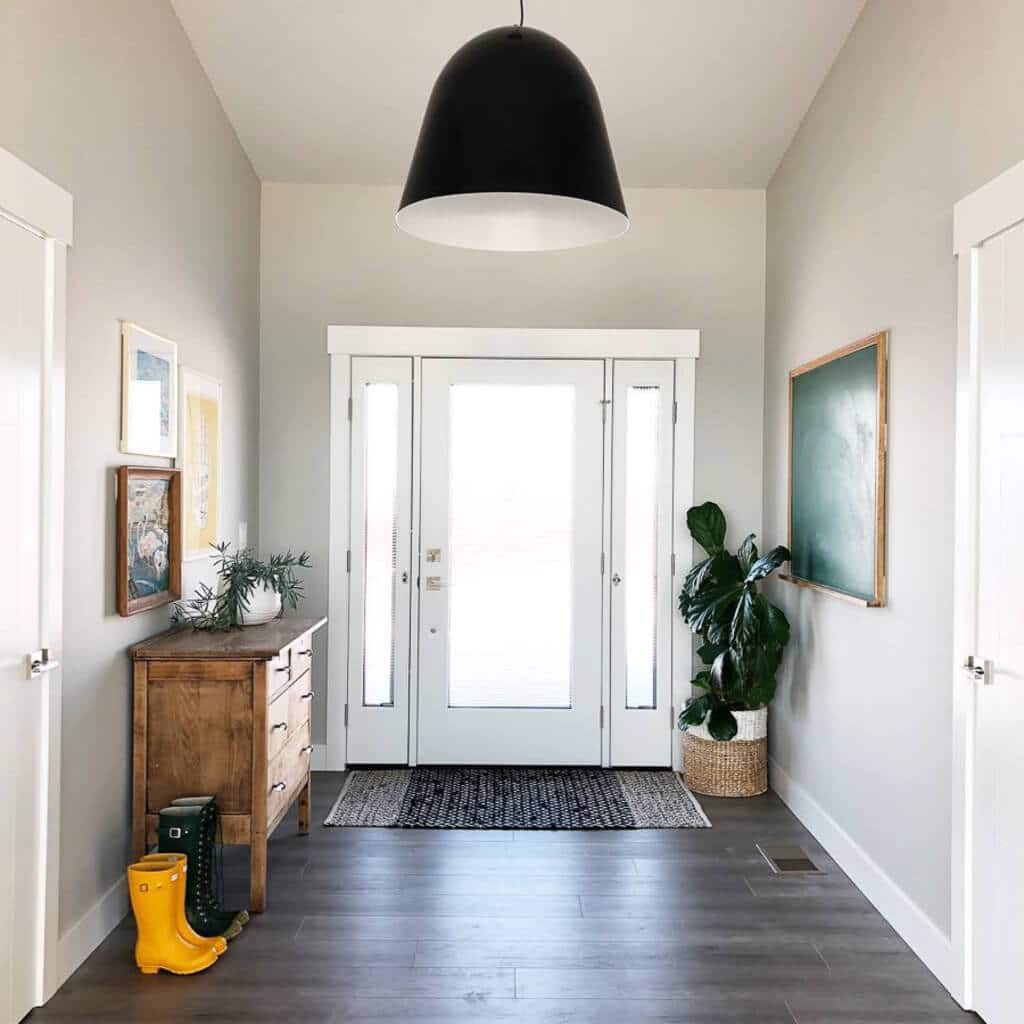
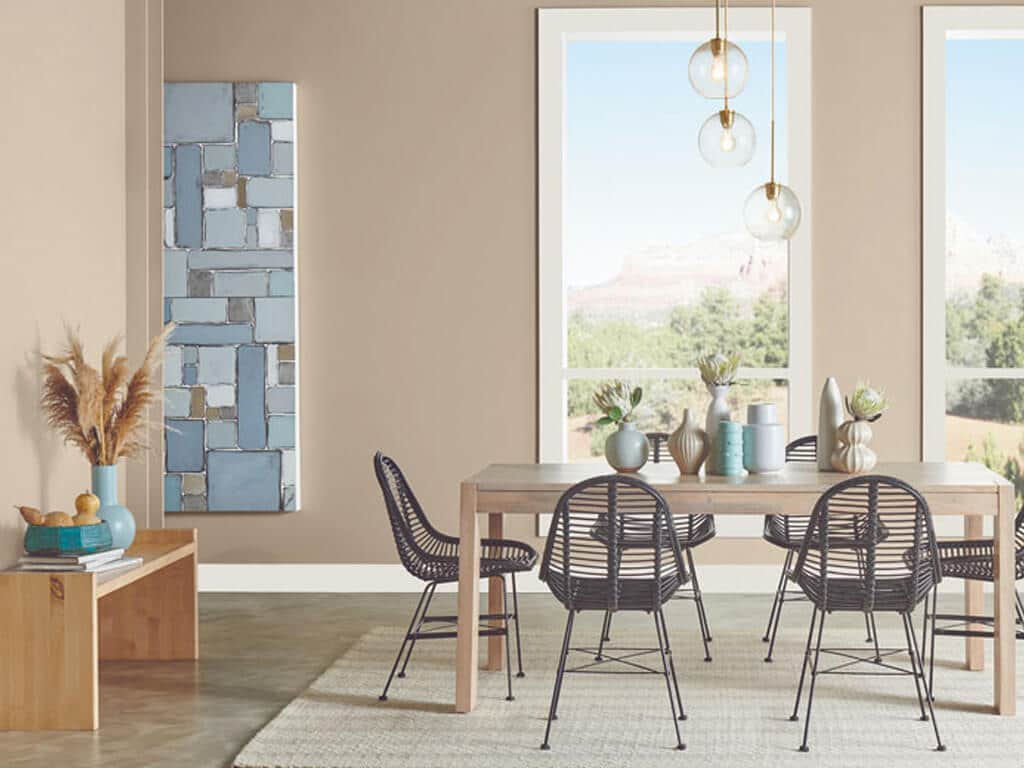
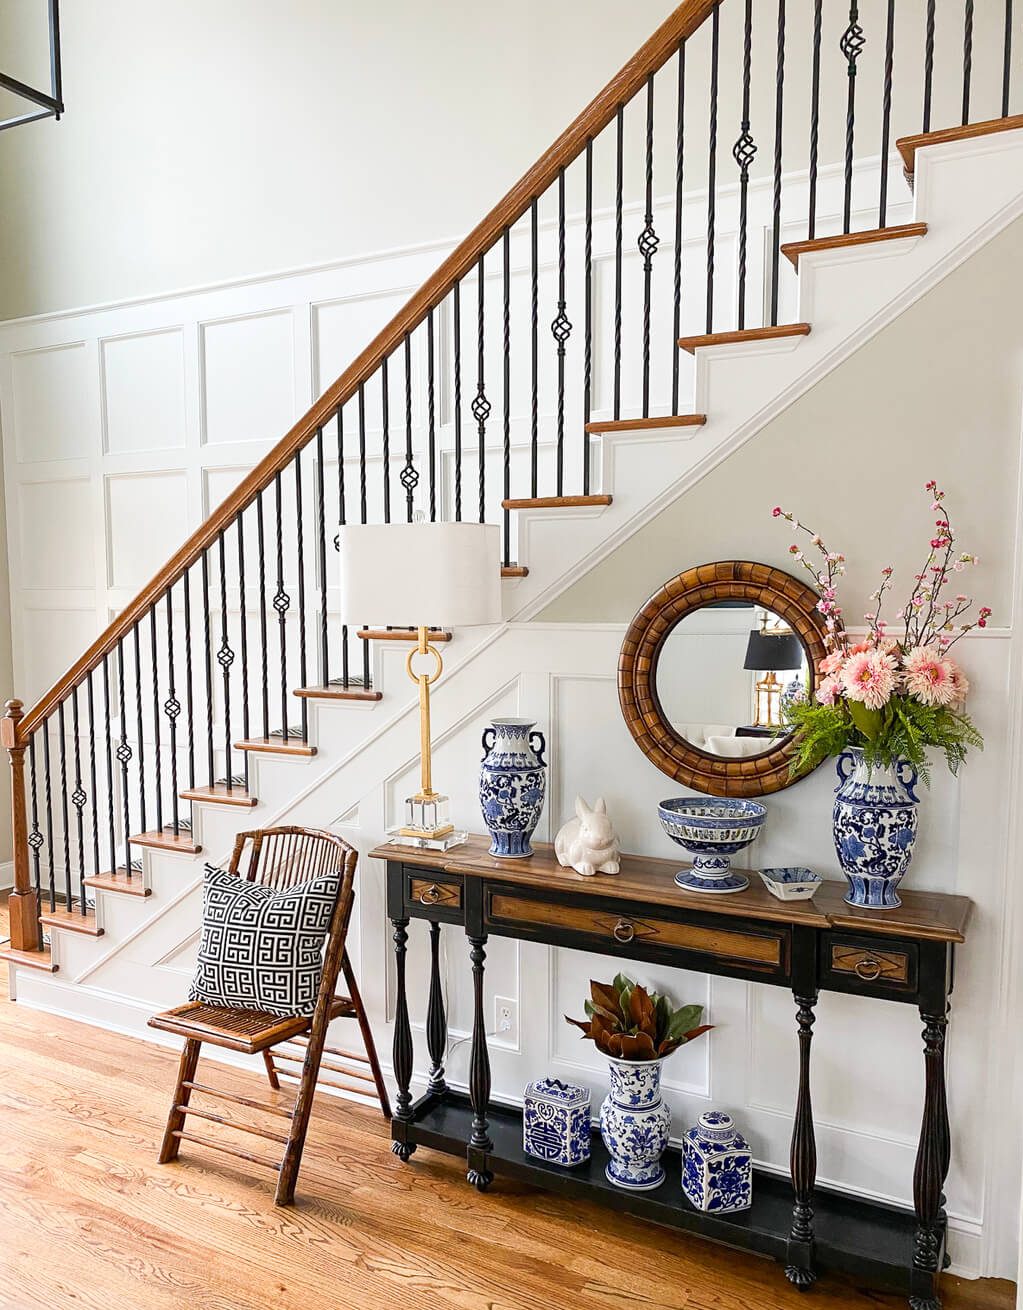
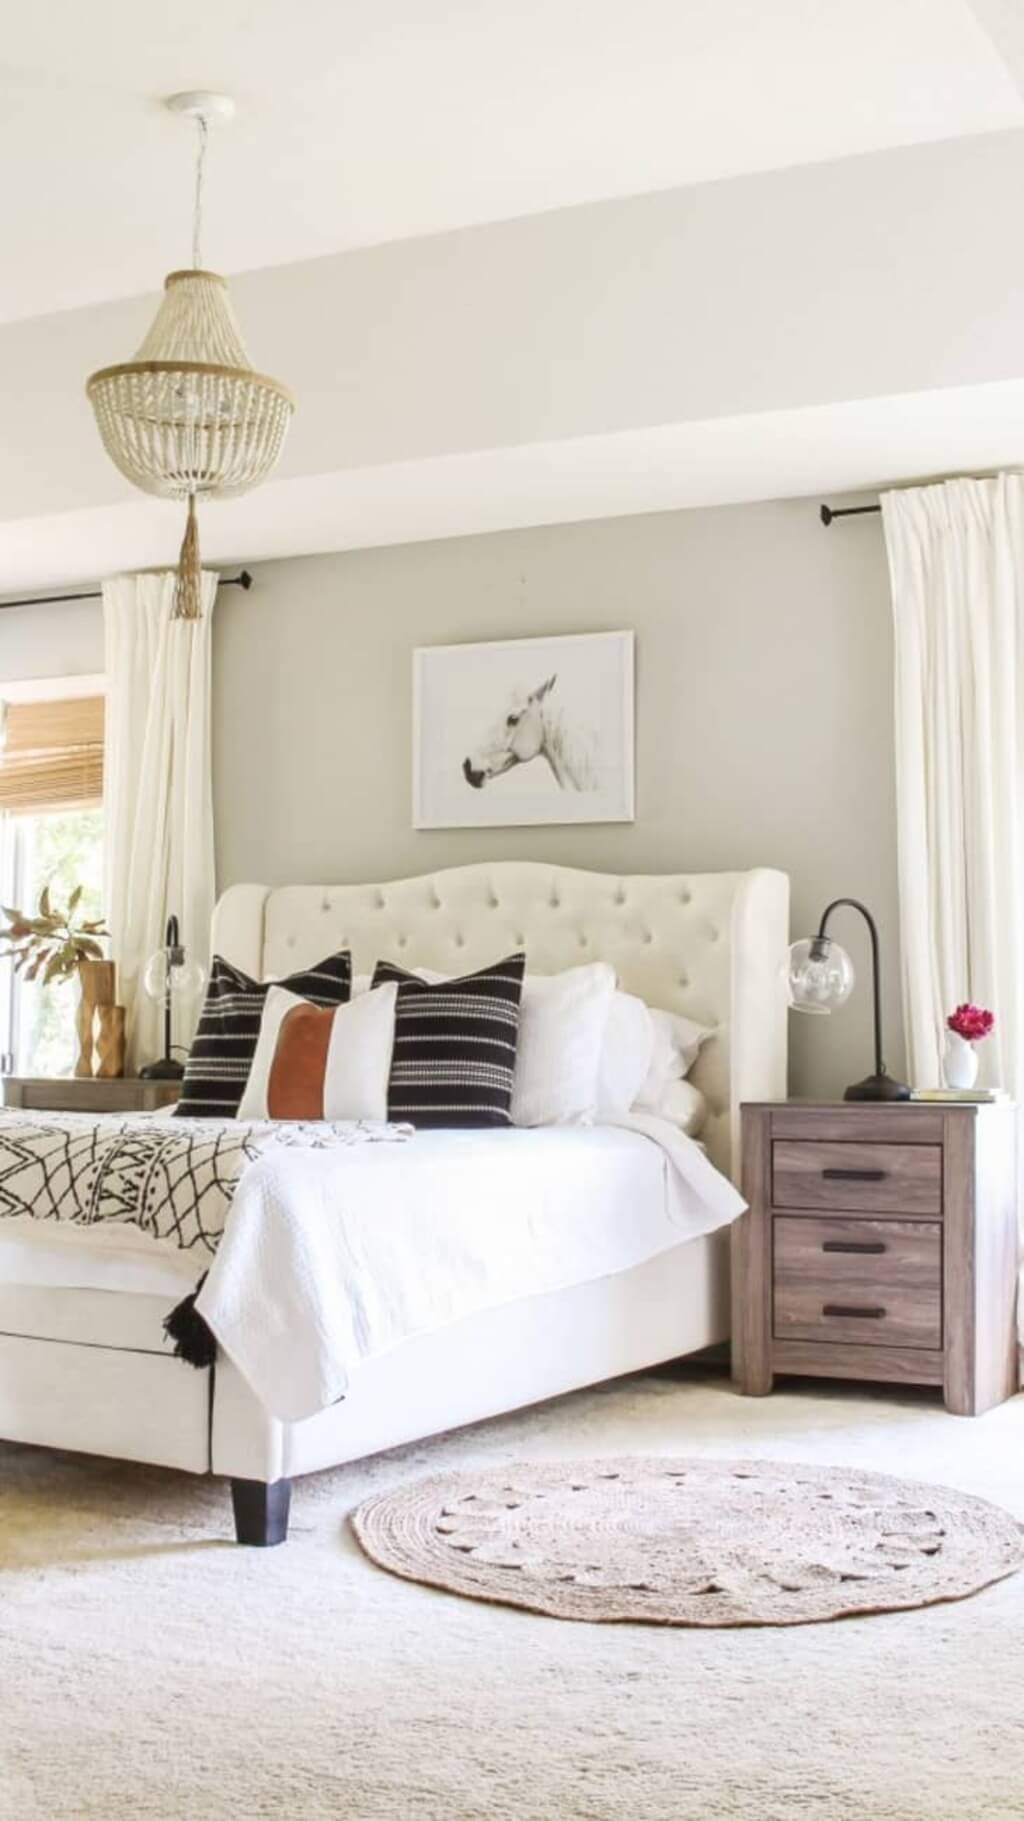
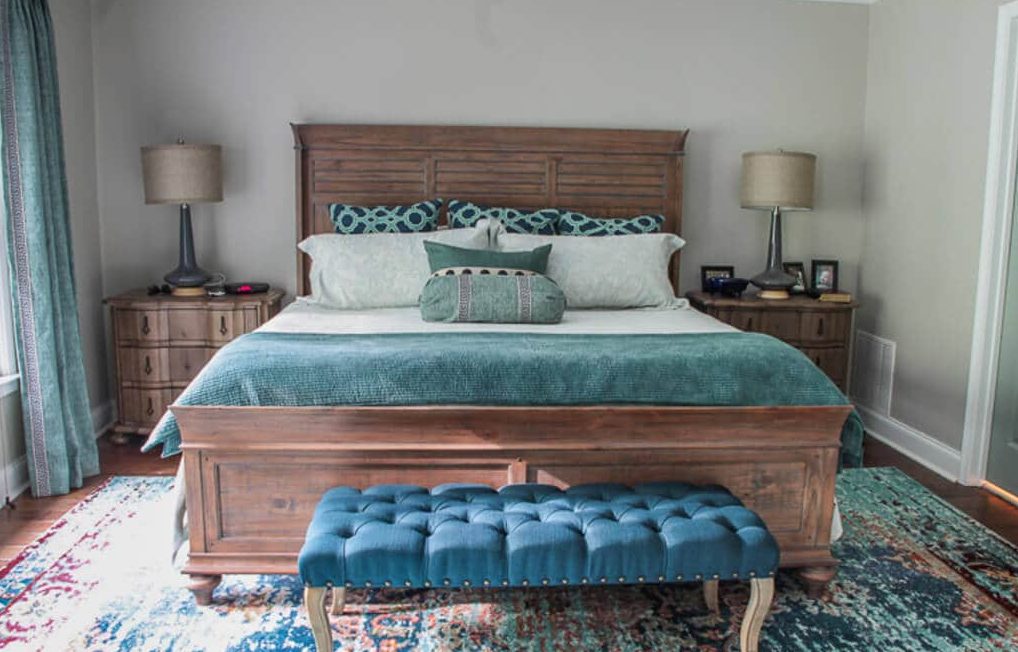
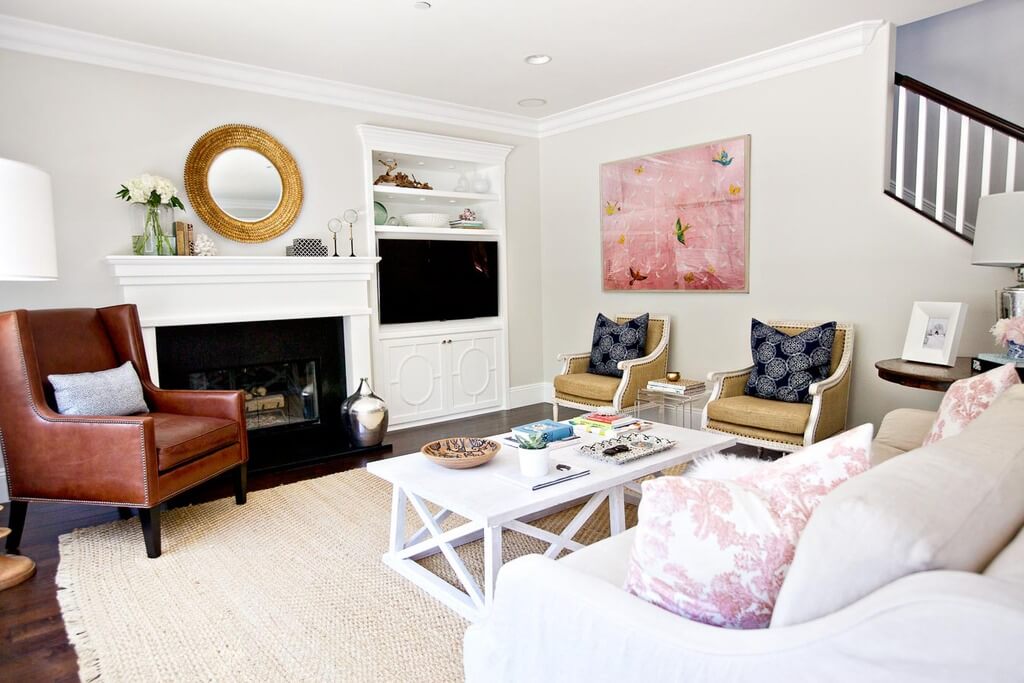
2. Traditional Interior Designing Trend

 Traditional Interior Designing Trend

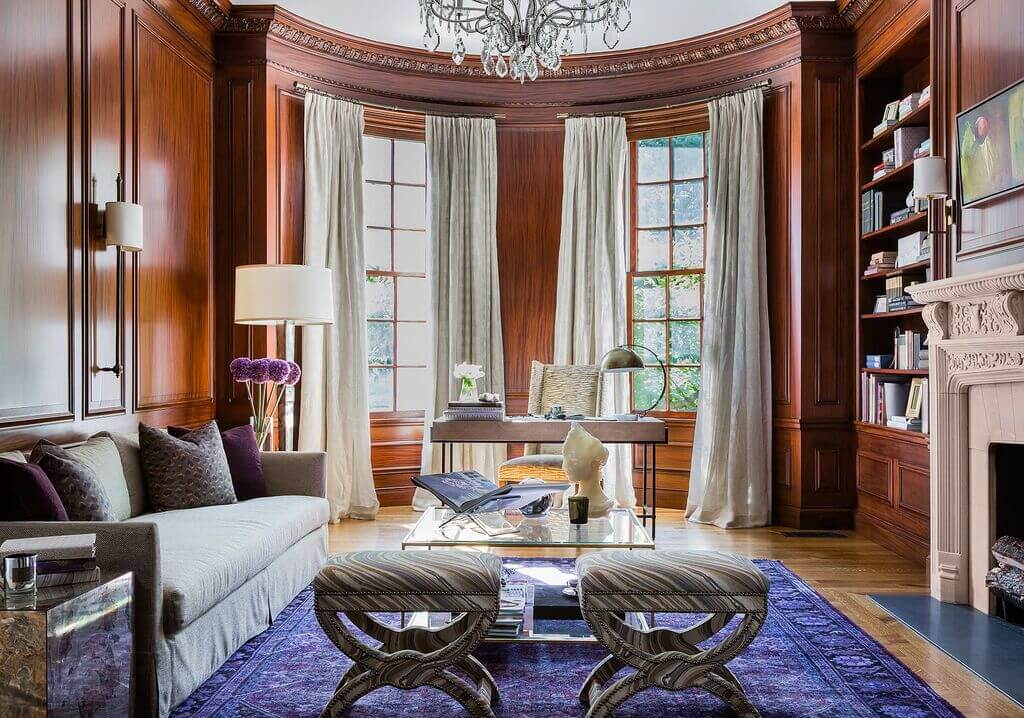
Many people in this modern era love to have traditional scenes around them. Keeping the need of a huge number of people for having classic and traditional home decor, interior designers have innovated a blending theme to mix the modern styles with traditional themes while maintaining the grace of past trends.

This approach has become very much popular among a huge number of customers. Everyone loved the essence of old times with the latest motifs and designing themes to make a traditionally modern lifestyle.

Although, if you look back to the late 70s, the back chairs, wide furniture pieces, unique tables, and shutters are not the trends. But now interior designers made these things fit the traditional interior with a modern look.

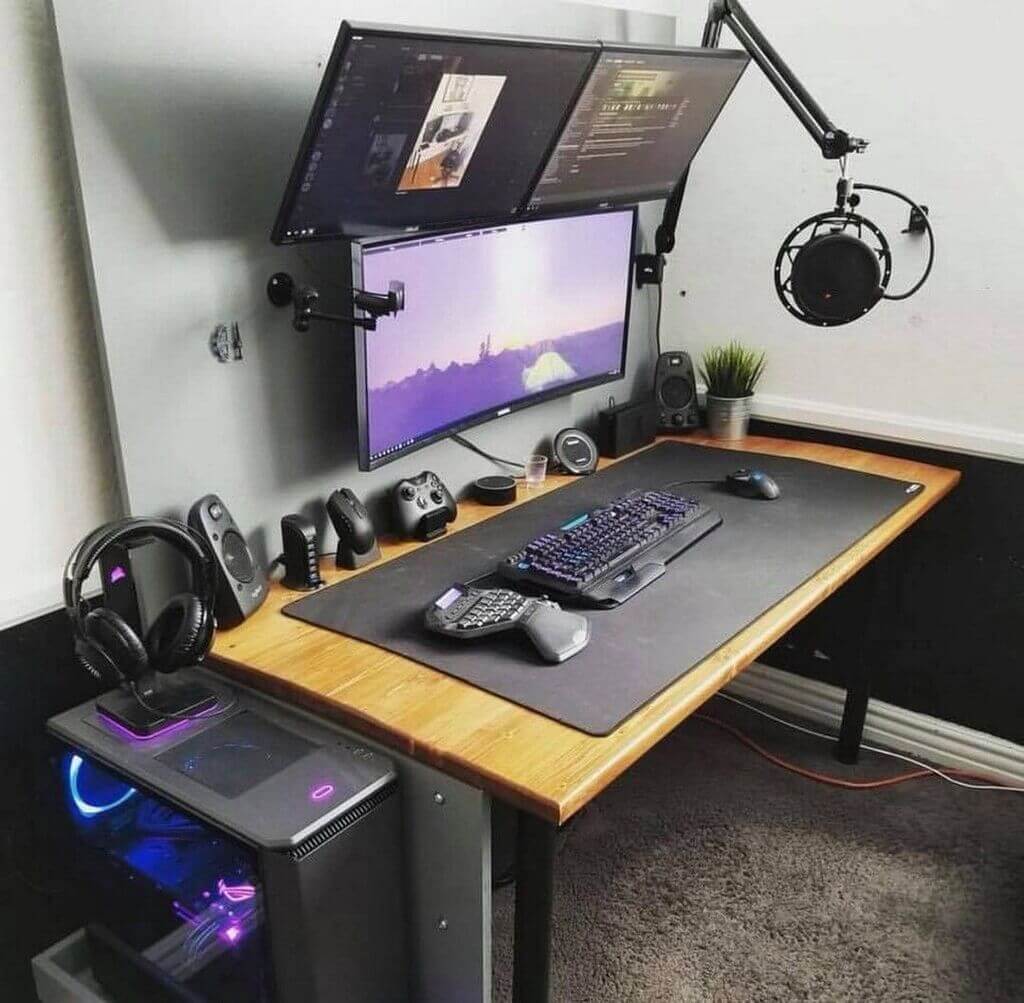
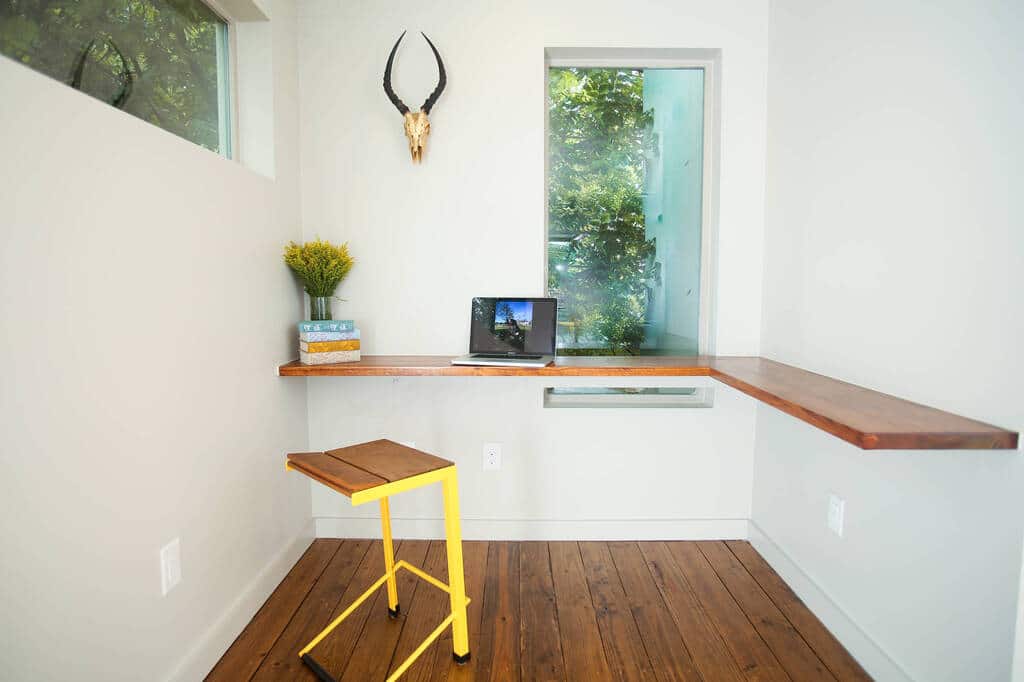
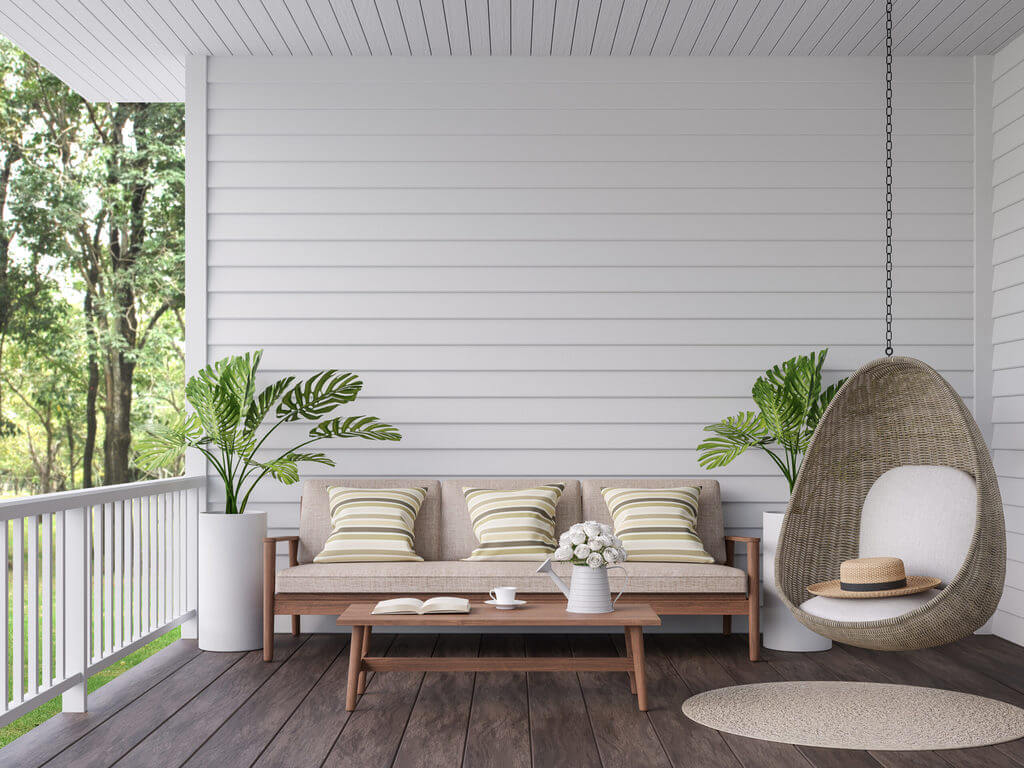
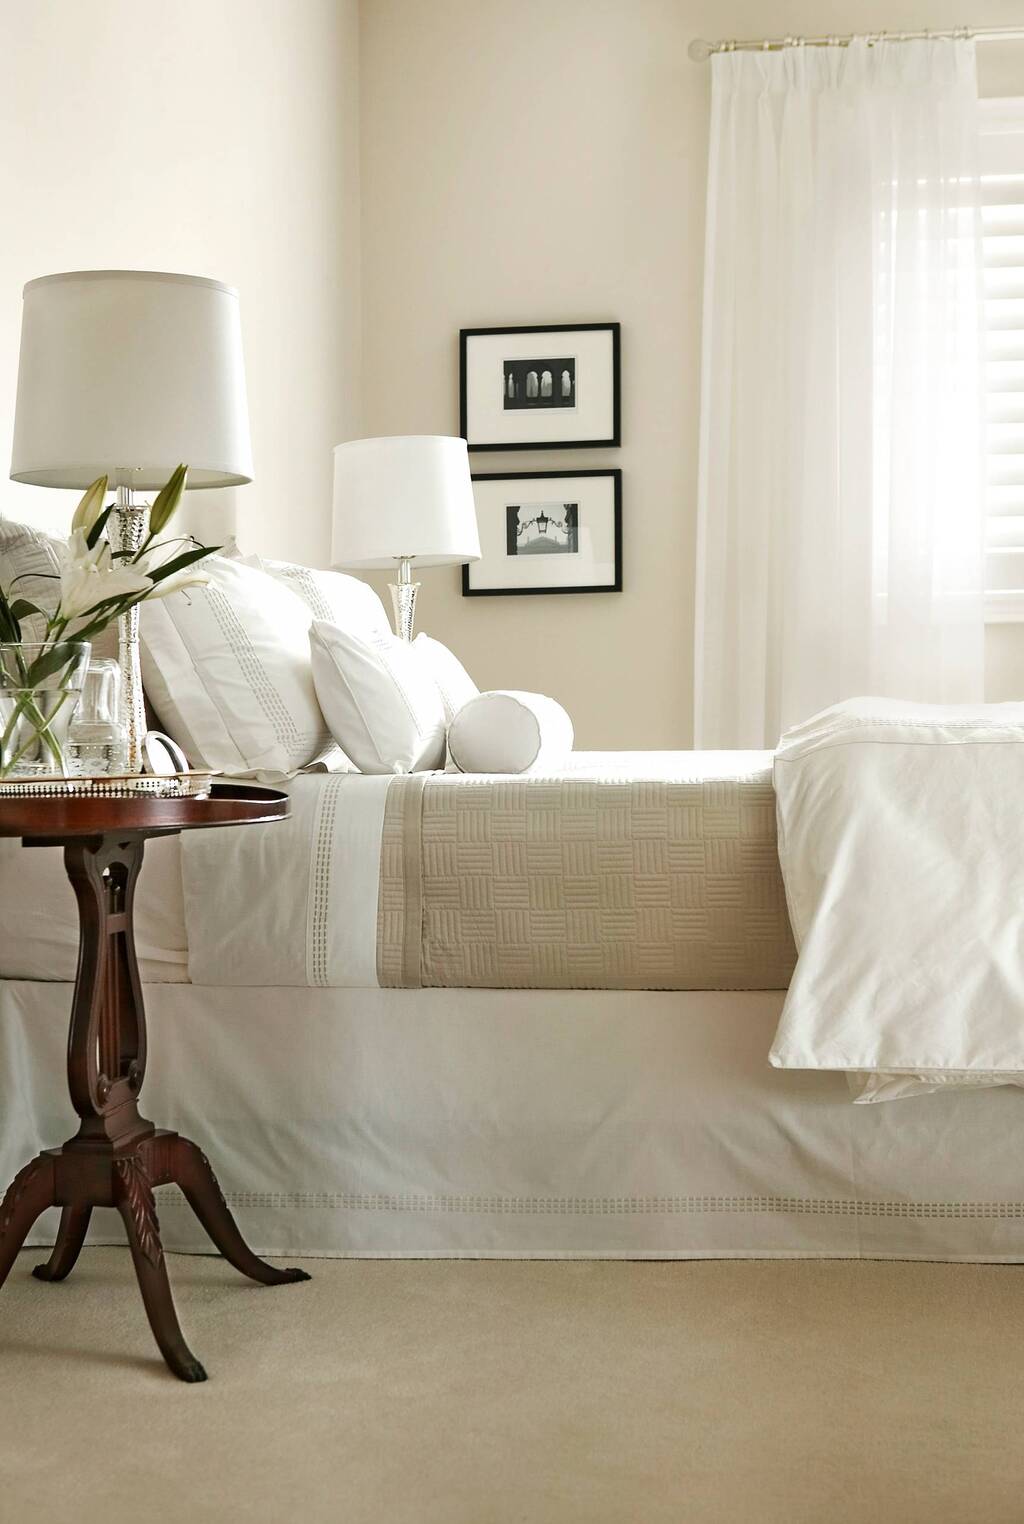
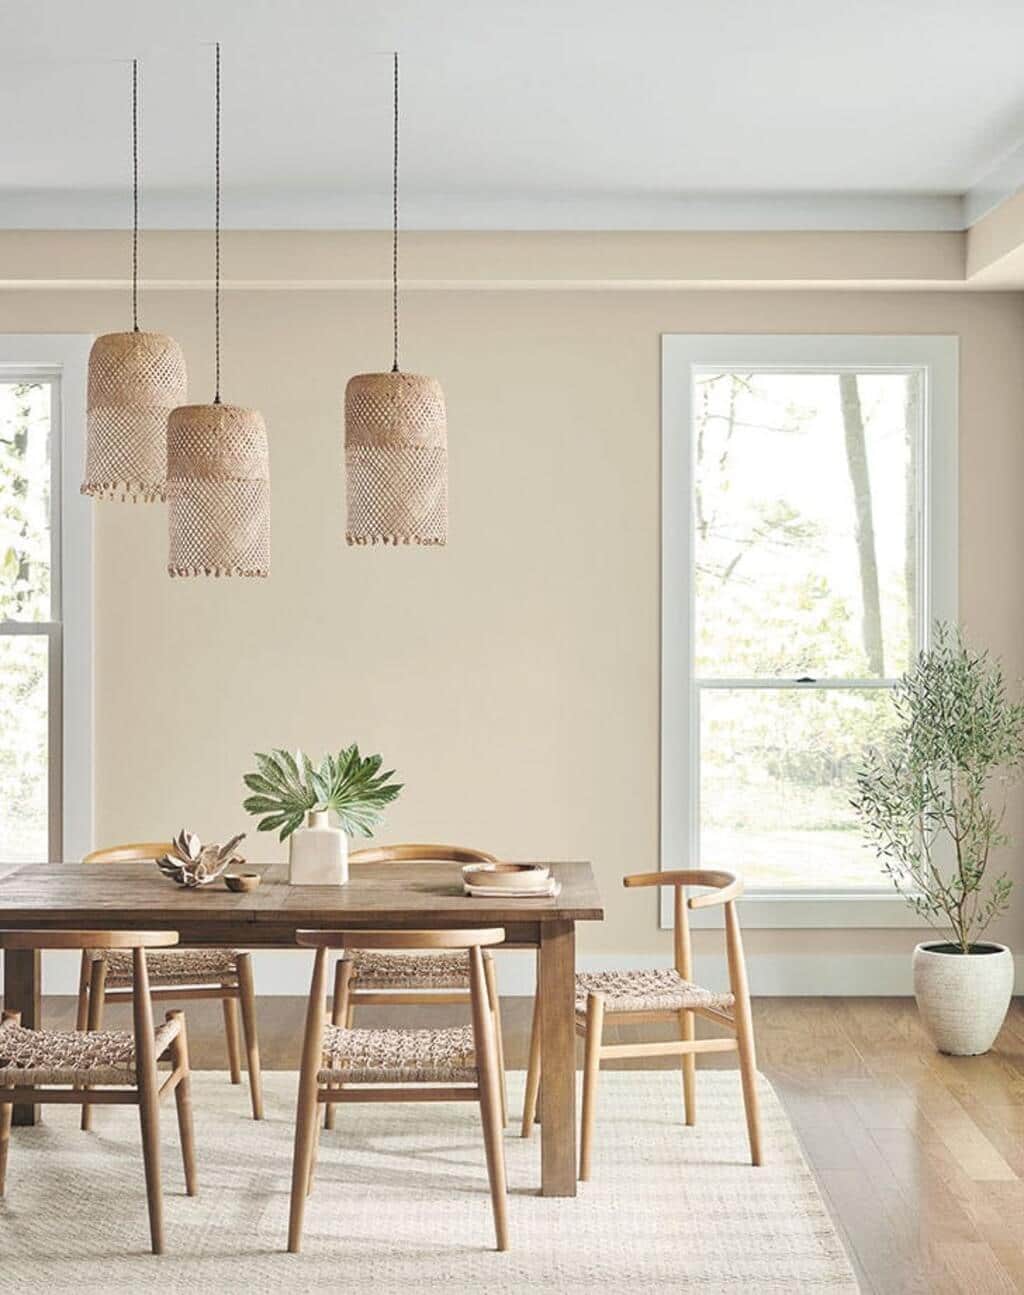
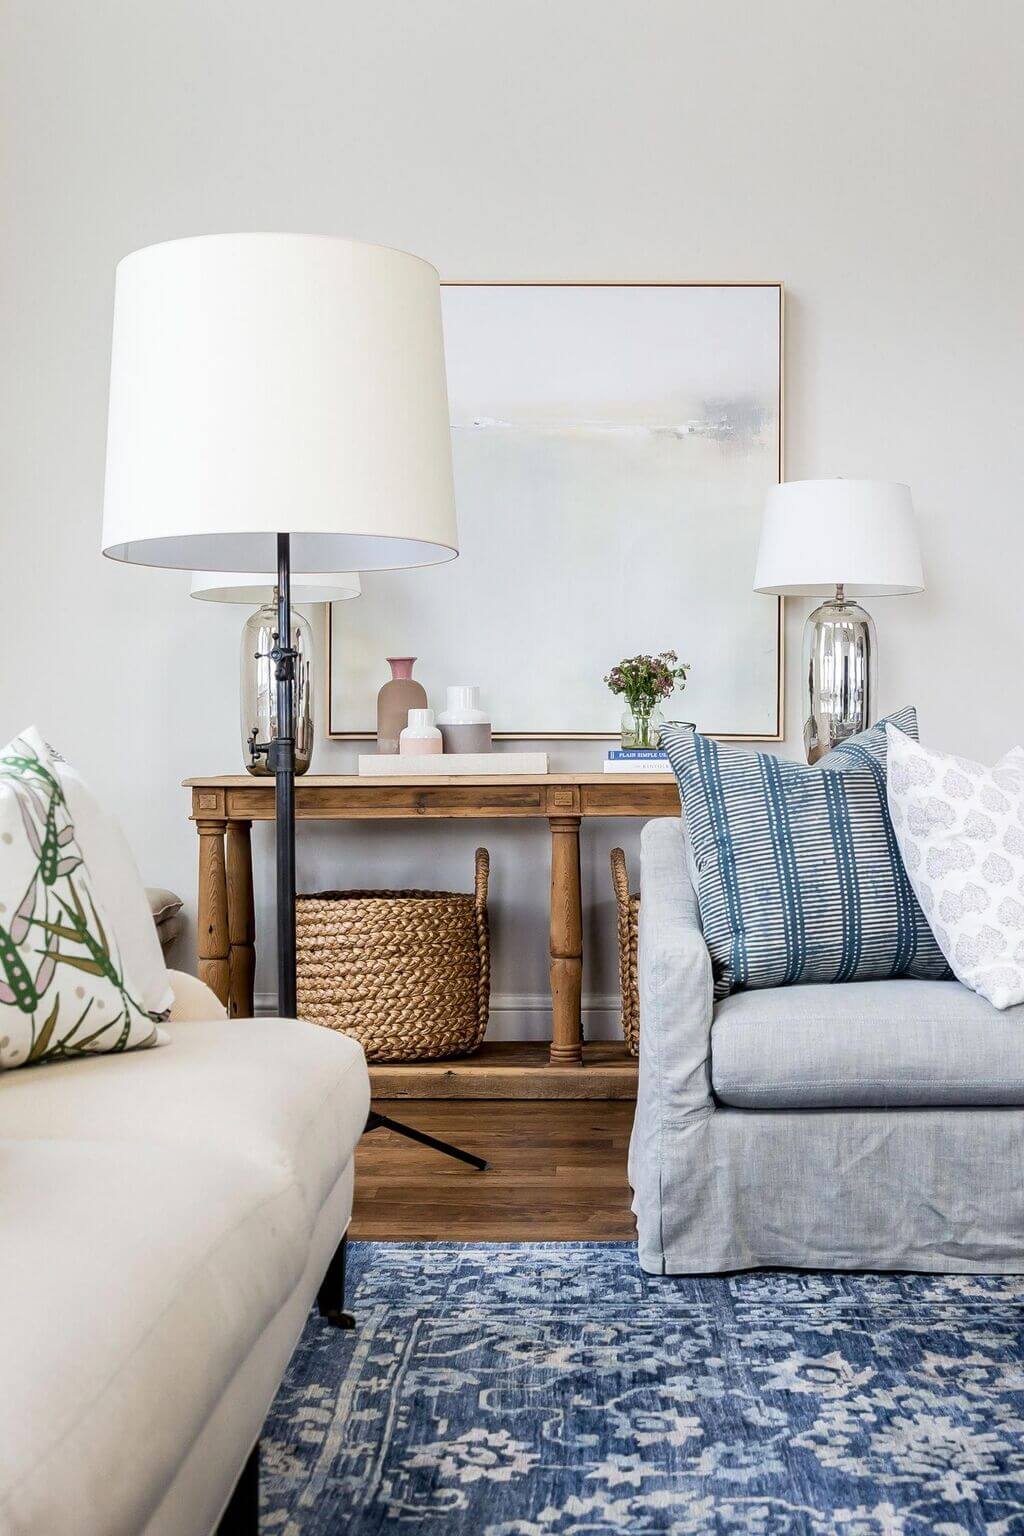
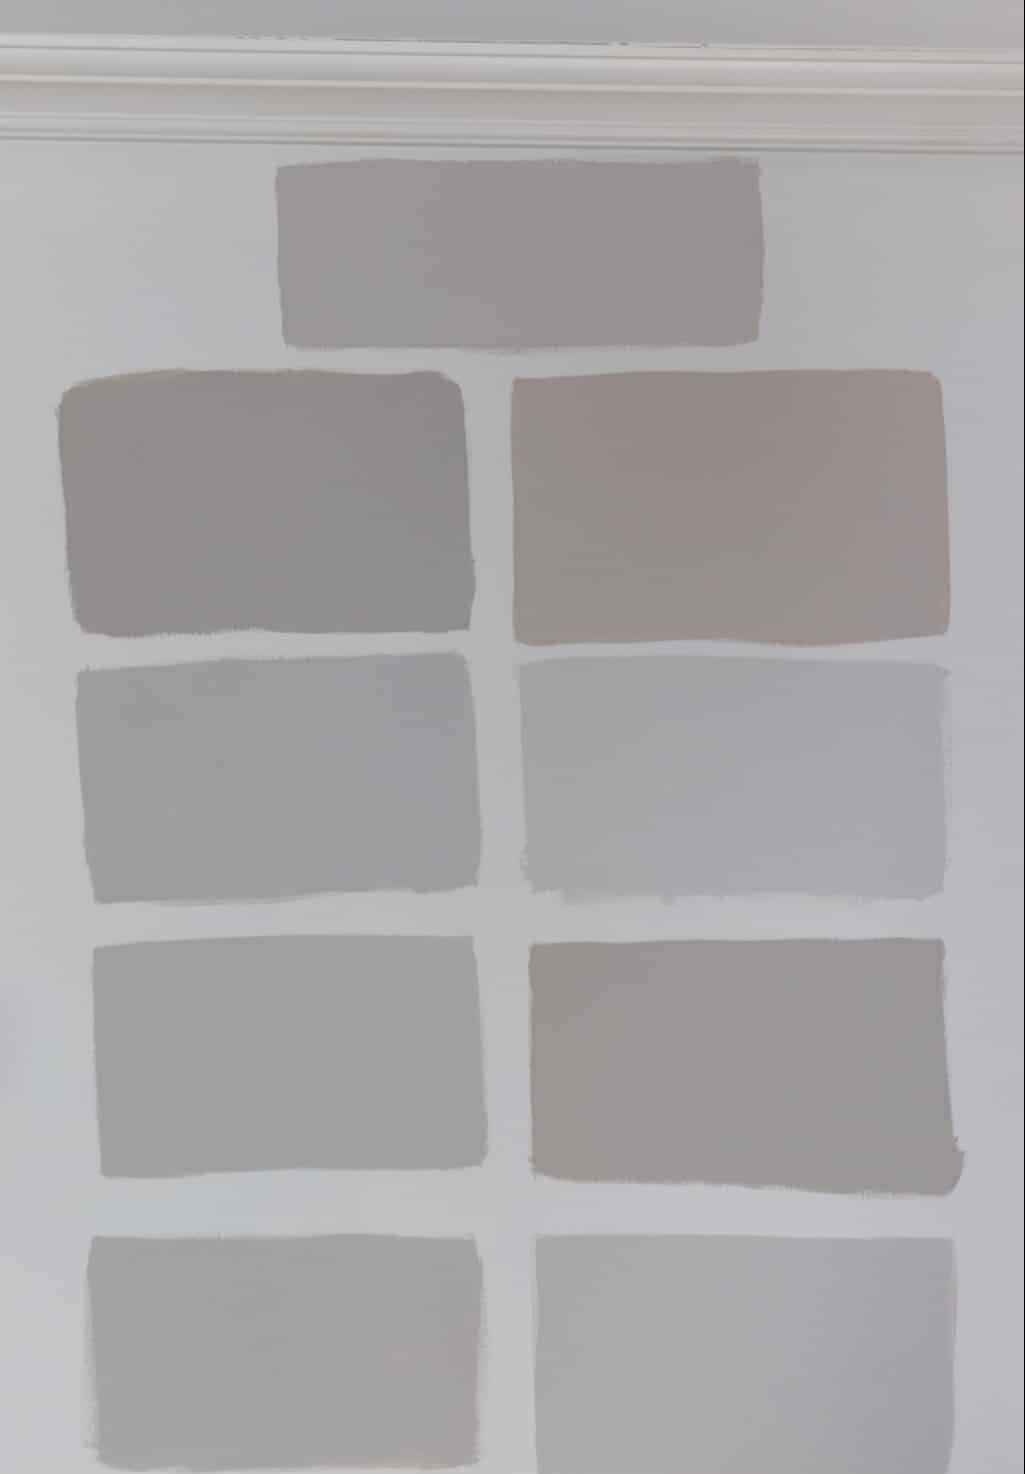
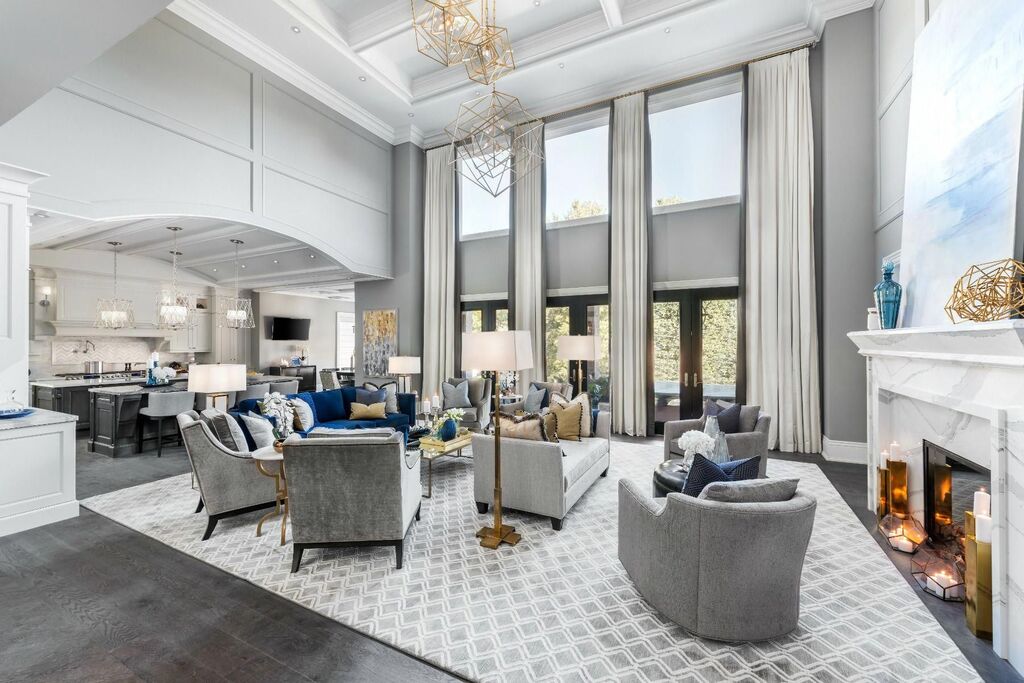
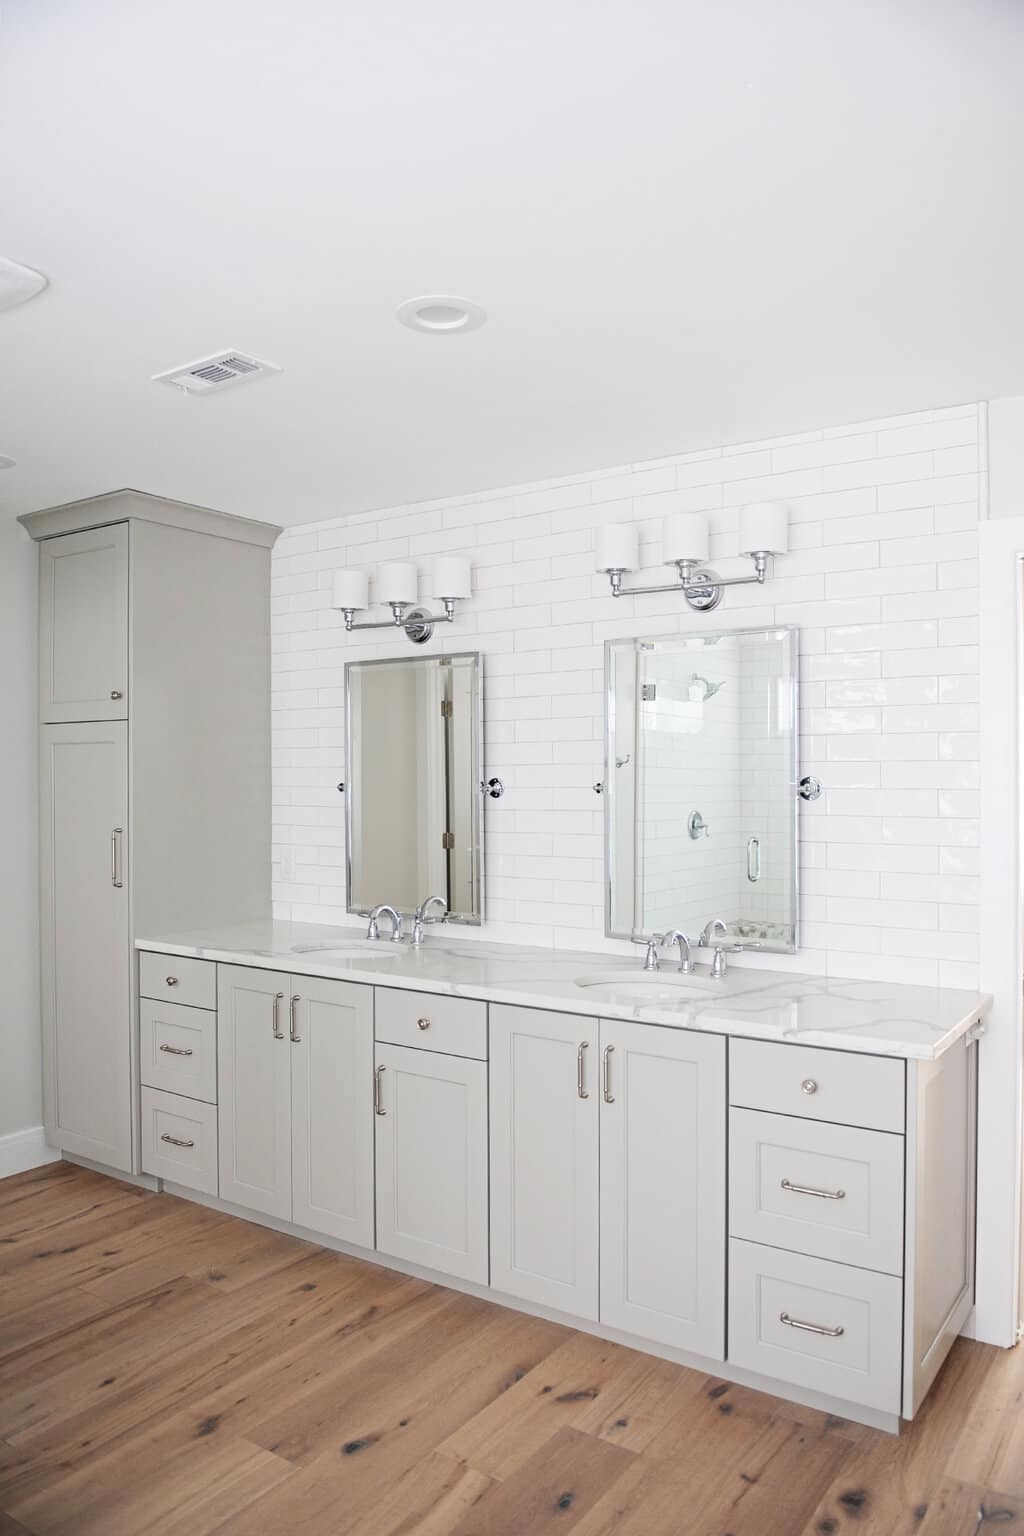
3. Transitional Style

Transitional Style

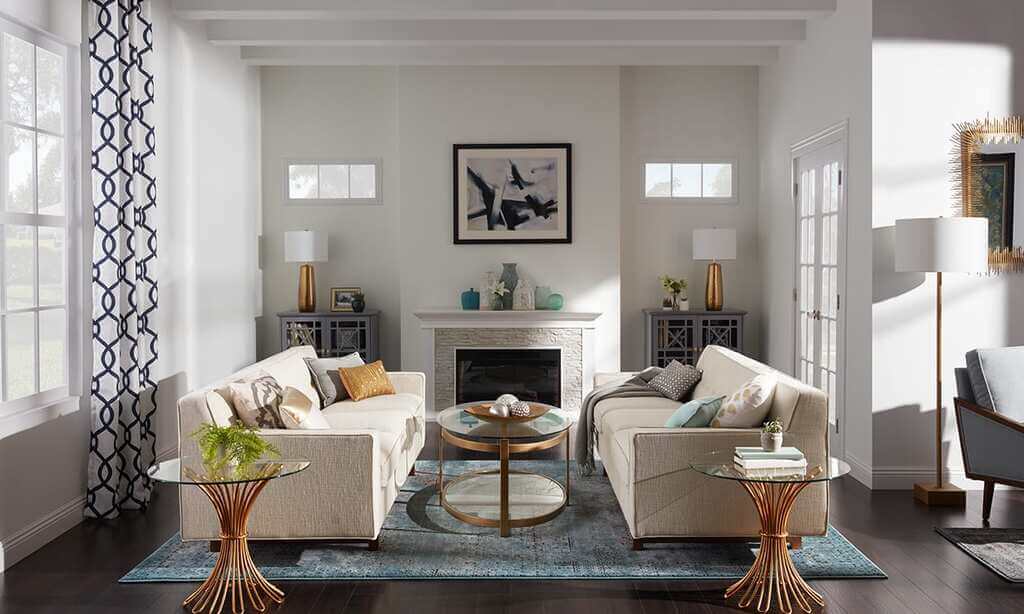
The fusion of different classic and contemporary designs has innovated this new interior design known as a transitional style. Mixing up two interior designing trends with unique looks has made this style popular among many homeowners.

The two different styles may be completely different, but it looks much more appealing to the eyes with the classic transformation. Designers innovate these exclusive designing trends with the latest 3D rendering Interior designing.

They design the layout using the latest trending digital technology for design. Blending the traditional & modern style makes things hot and cold at the same while maintaining the frequency at a comfortable level.

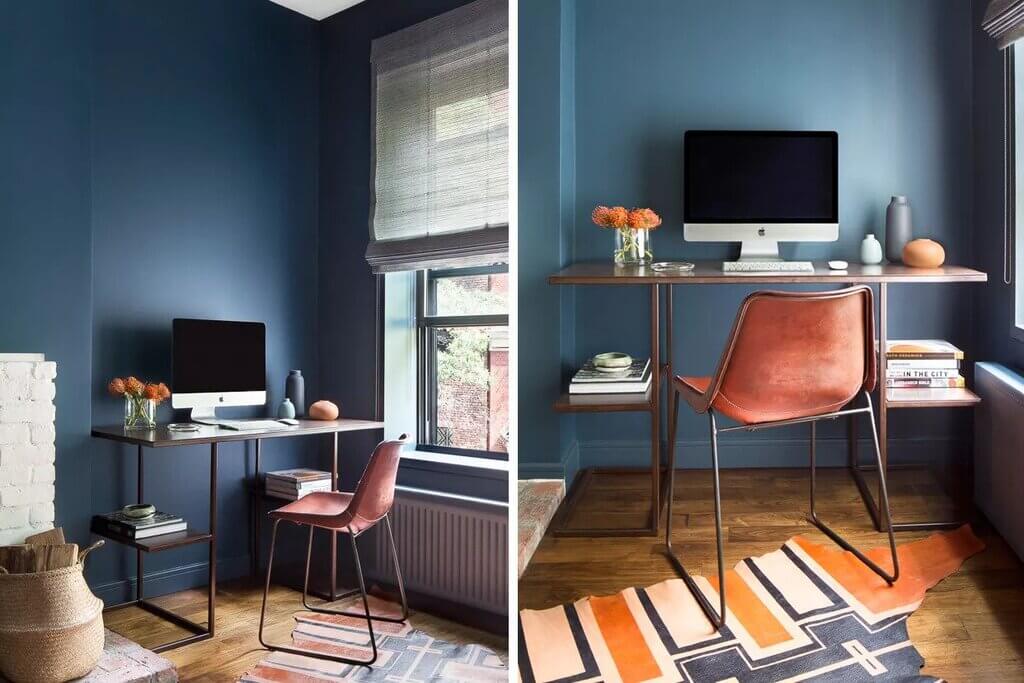
Interior designers smartly blend these two uniquely standing interior designing themes. This innovative blending style incorporates sturdier furniture assortments. These furniture pieces are a bit larger in size. It focuses more on comfort. It is simply plain with no accessories and multiple color combinations which adds a touch of contemporary style.

But the overall look of the interior is lavishly stunning giving your home a modernist look and sophisticated look. It focuses more on neutral and monochromatic color themes. Considering the flooring, walls, upholstery, and other things, it forms a minimalist look.

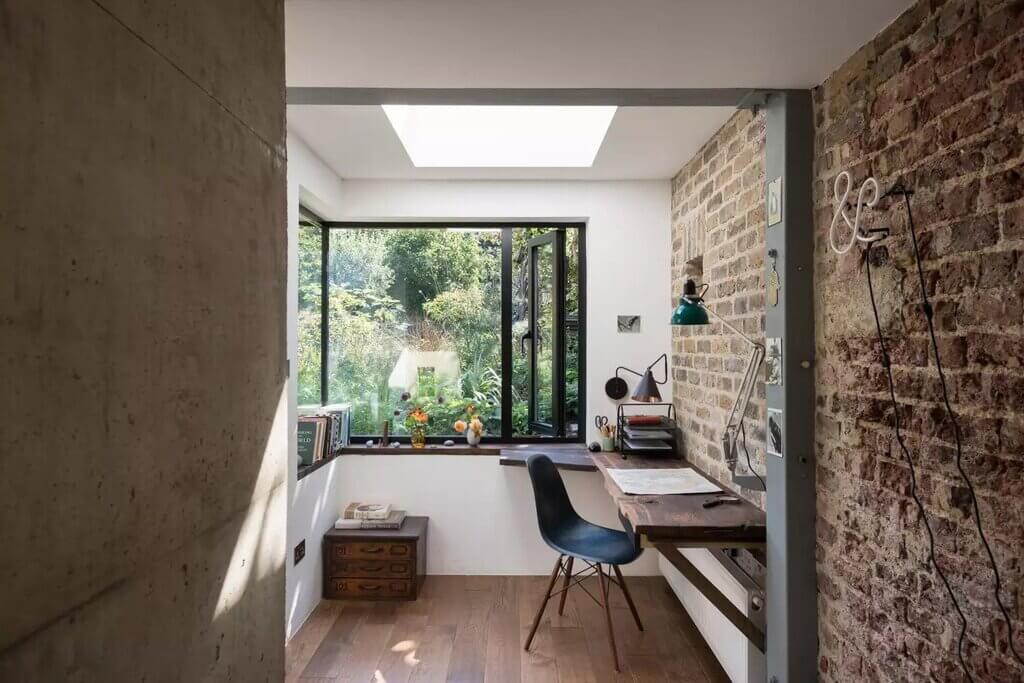
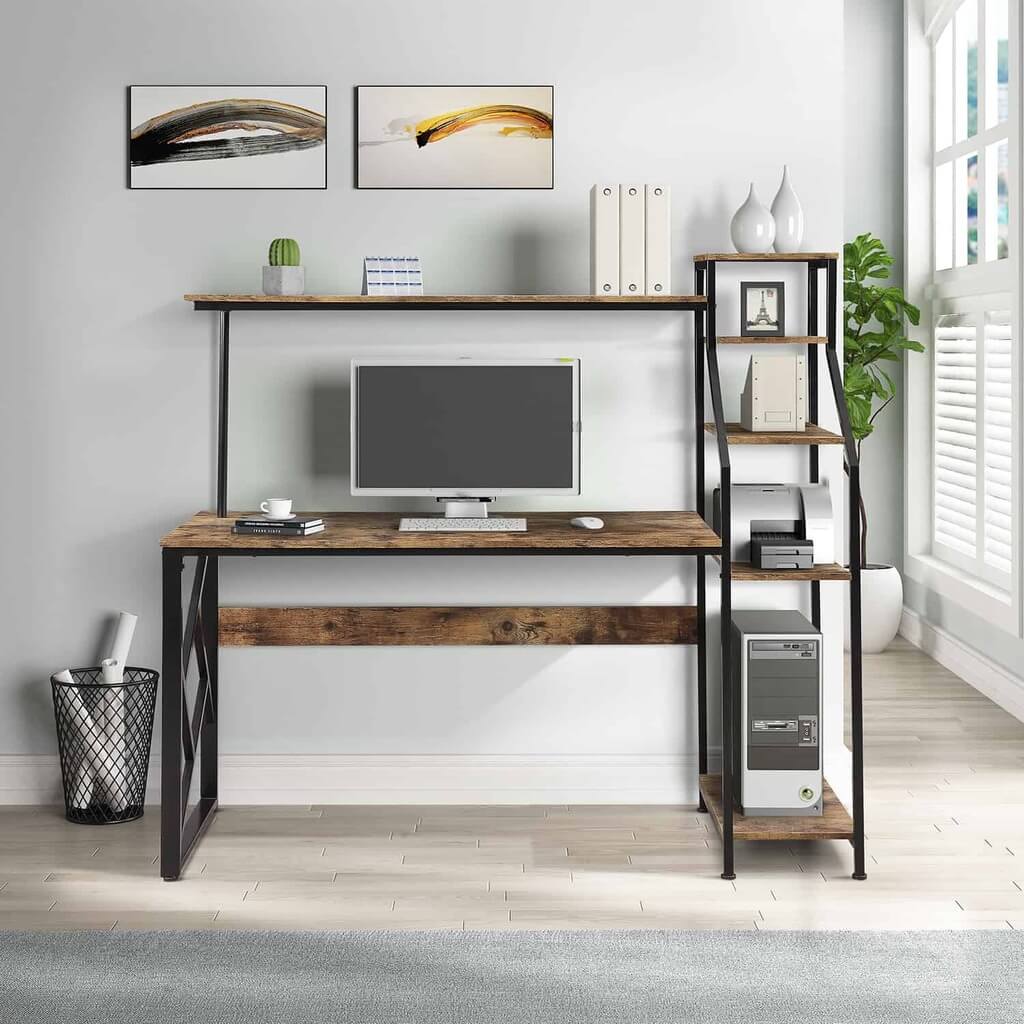
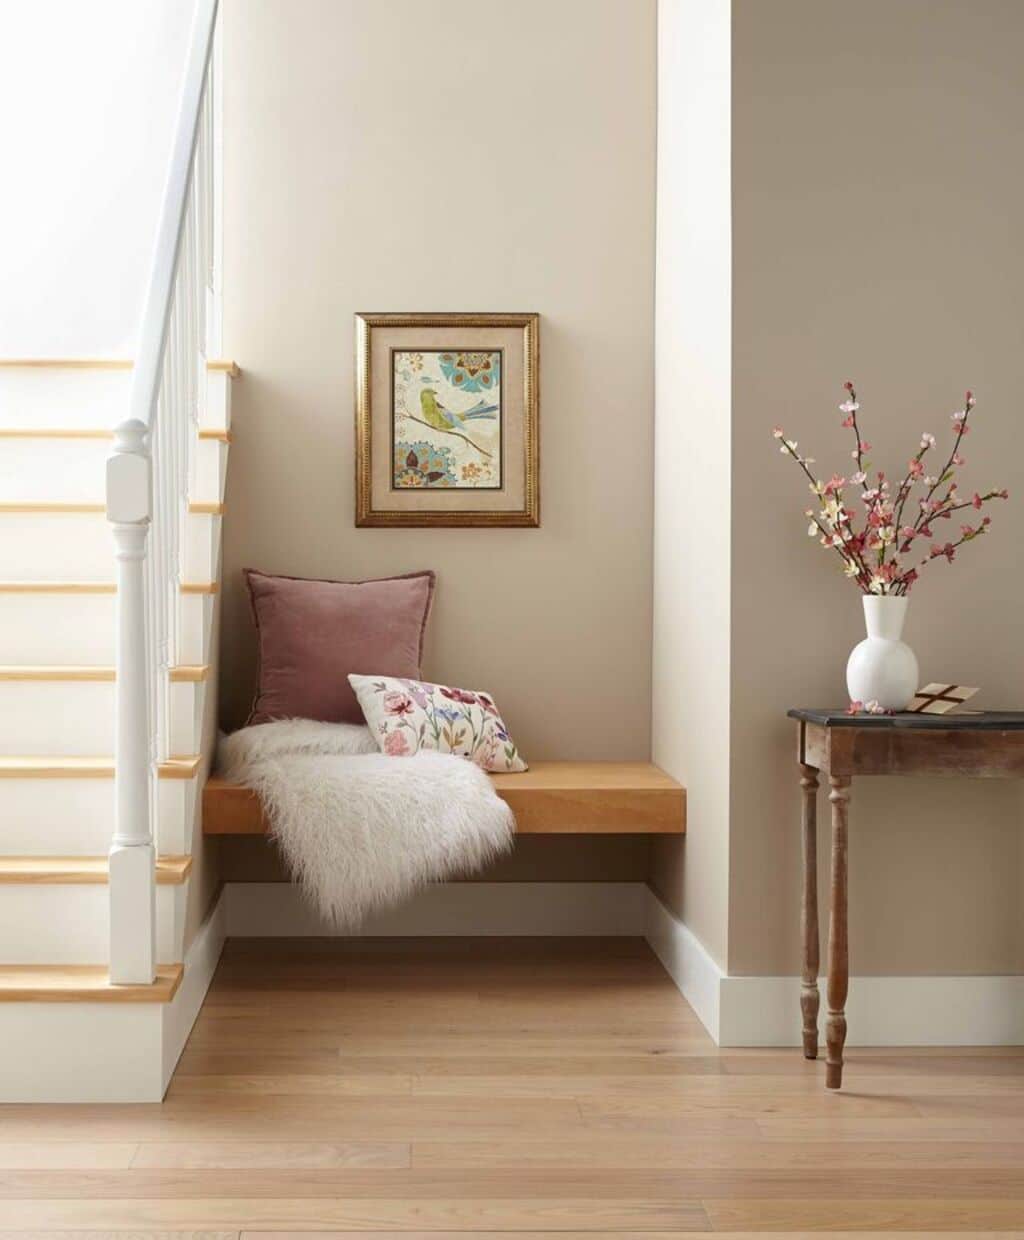
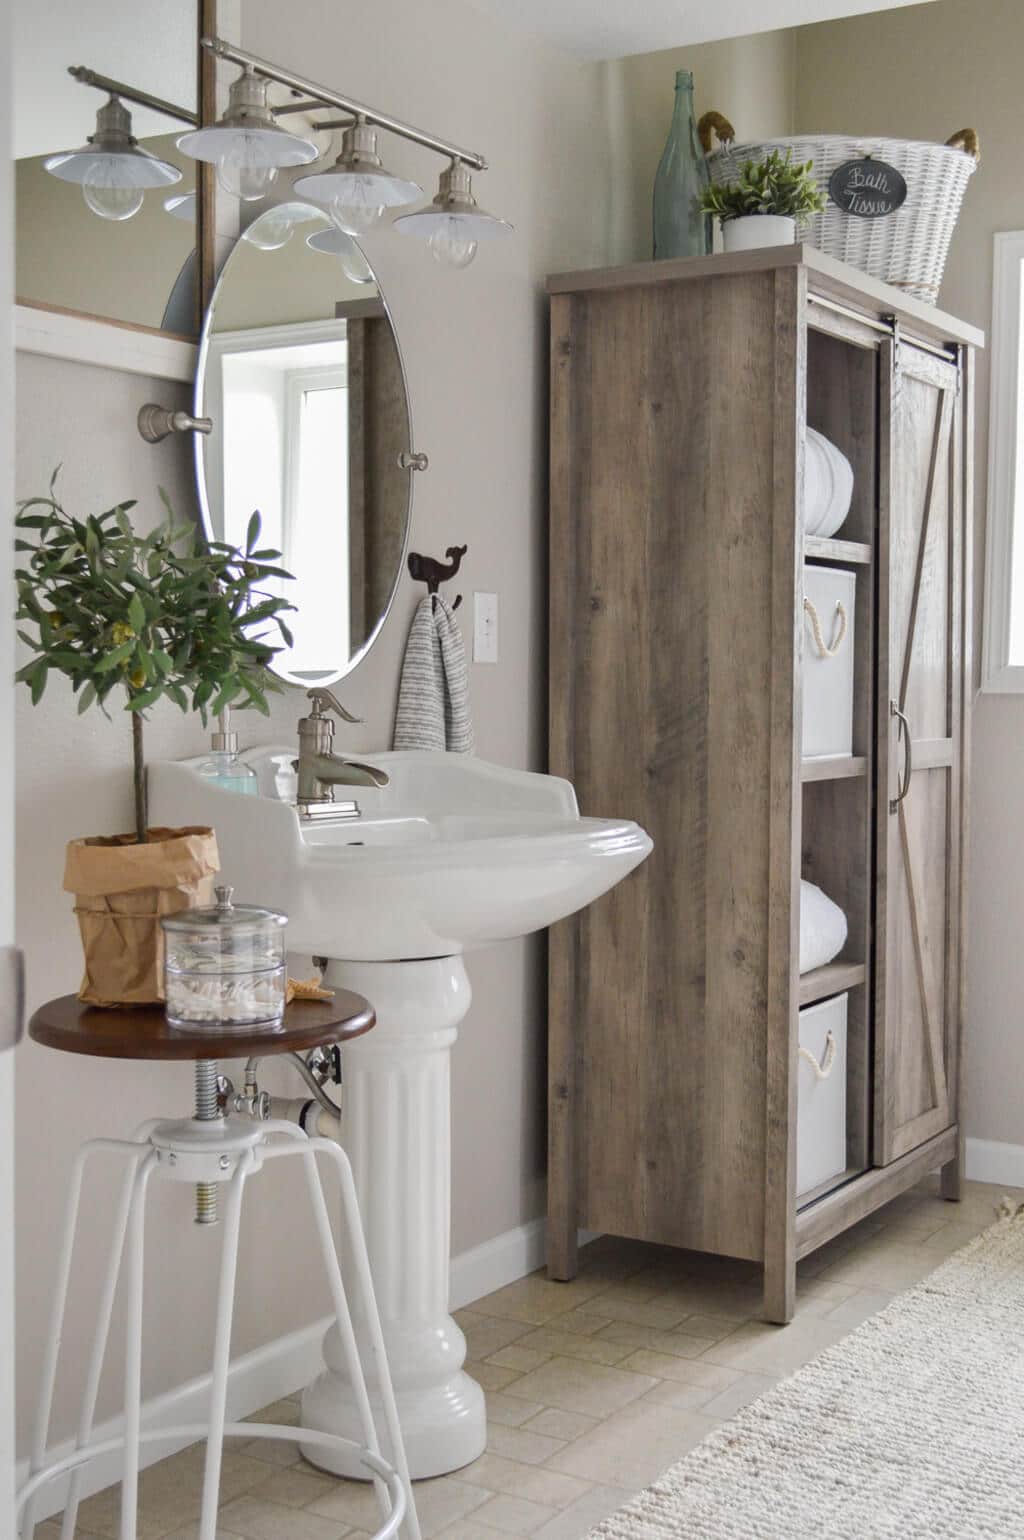
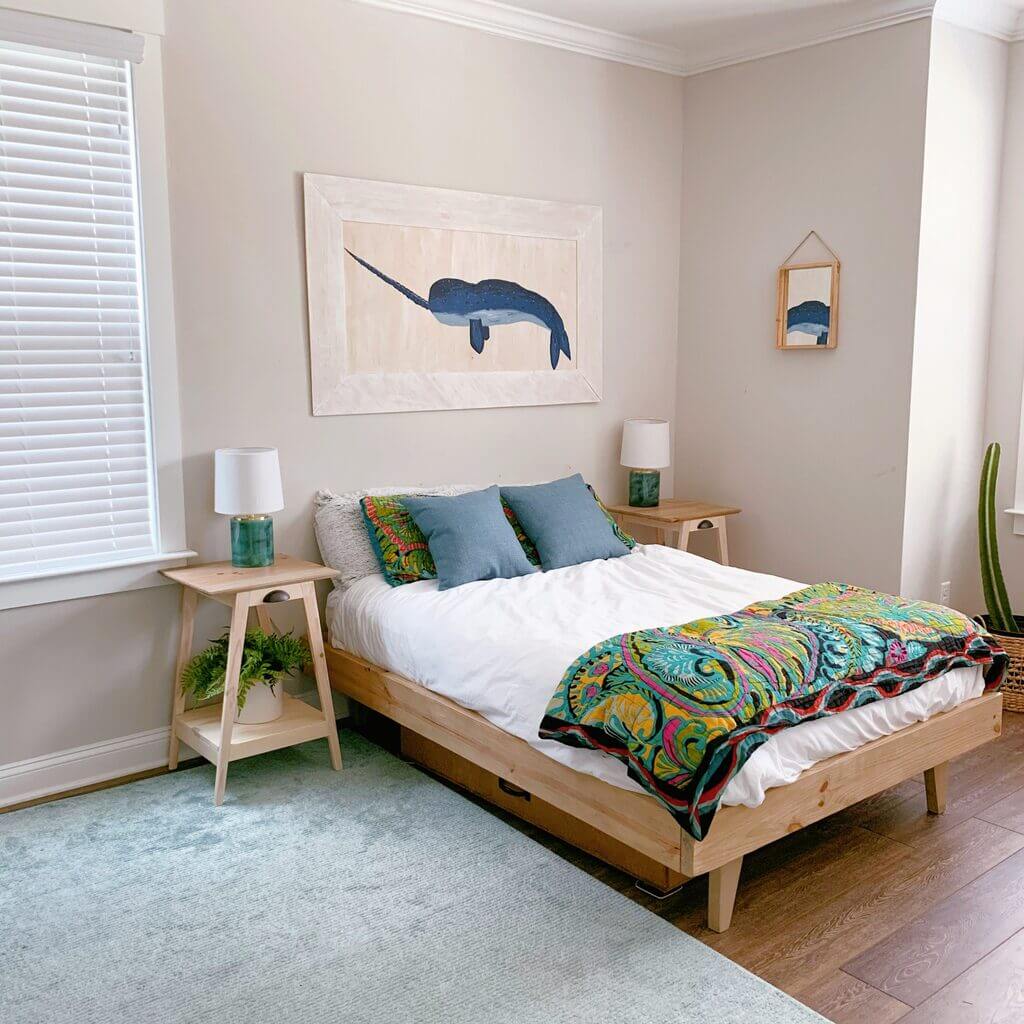
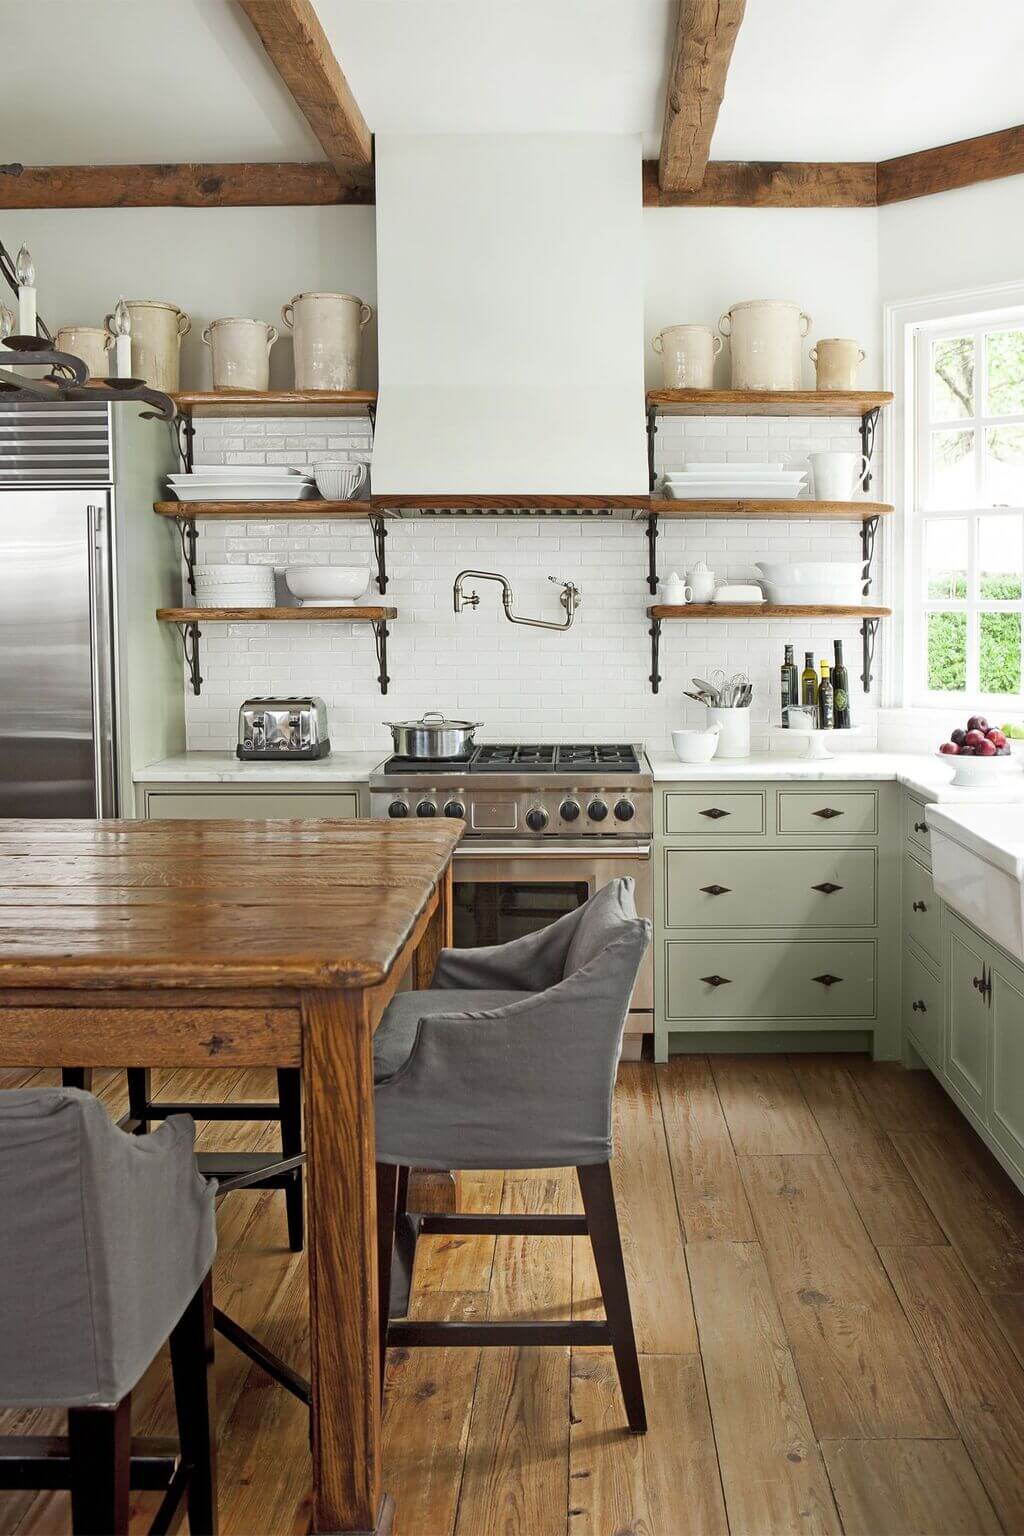
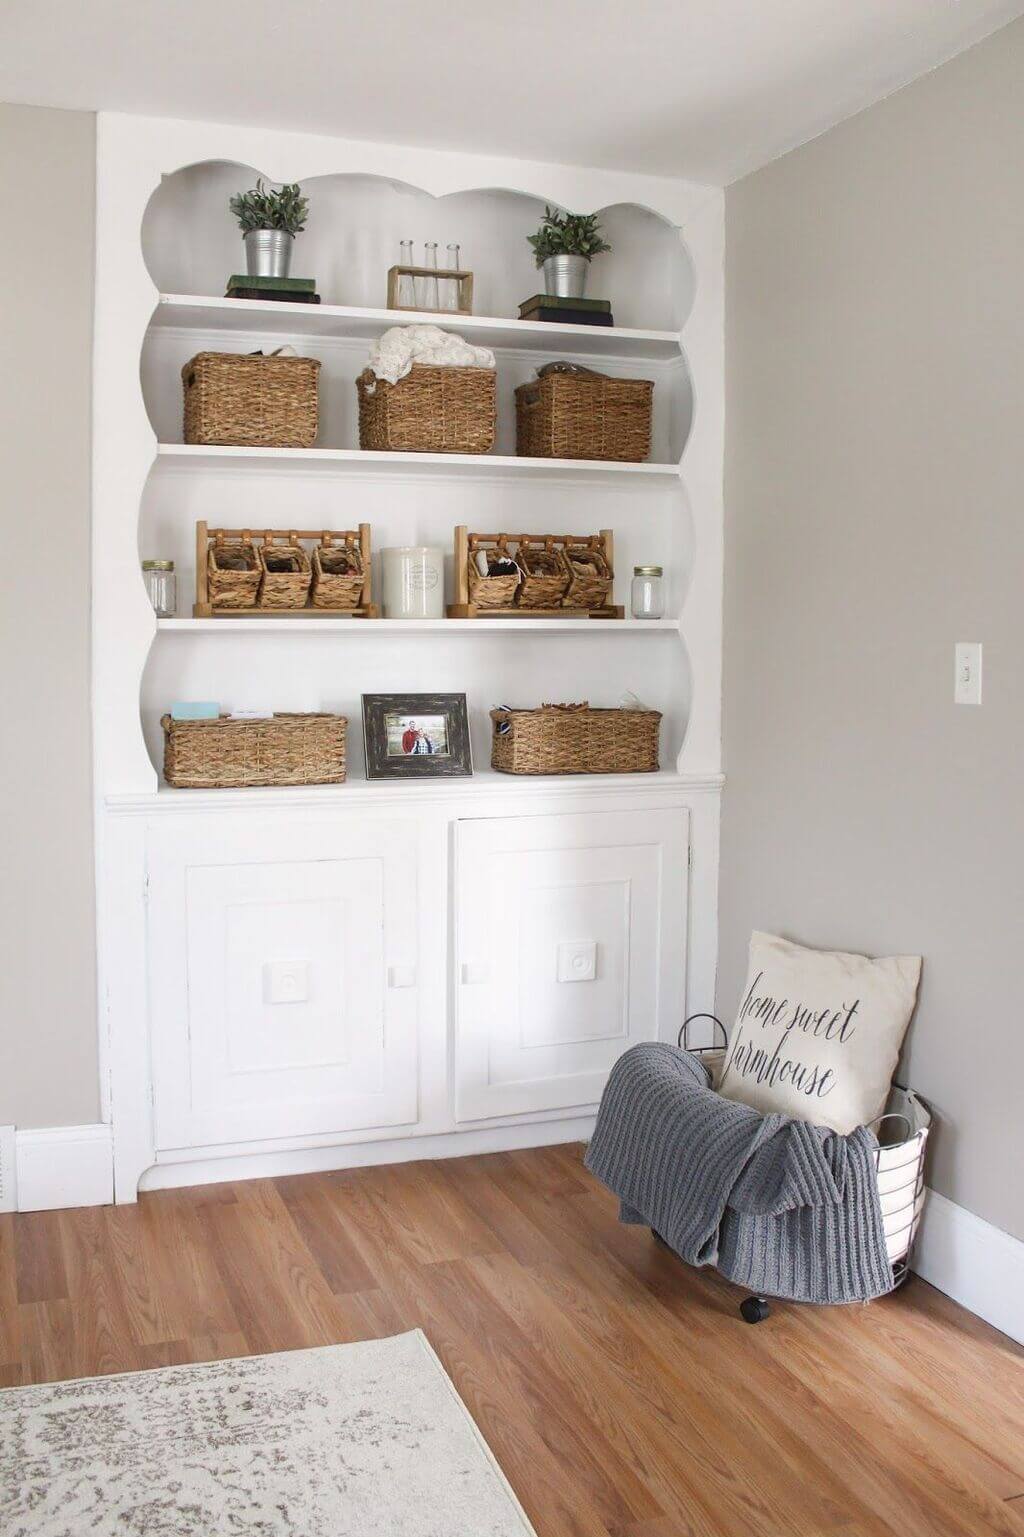
4. Rustic Interior Style

Rustic Interior Style

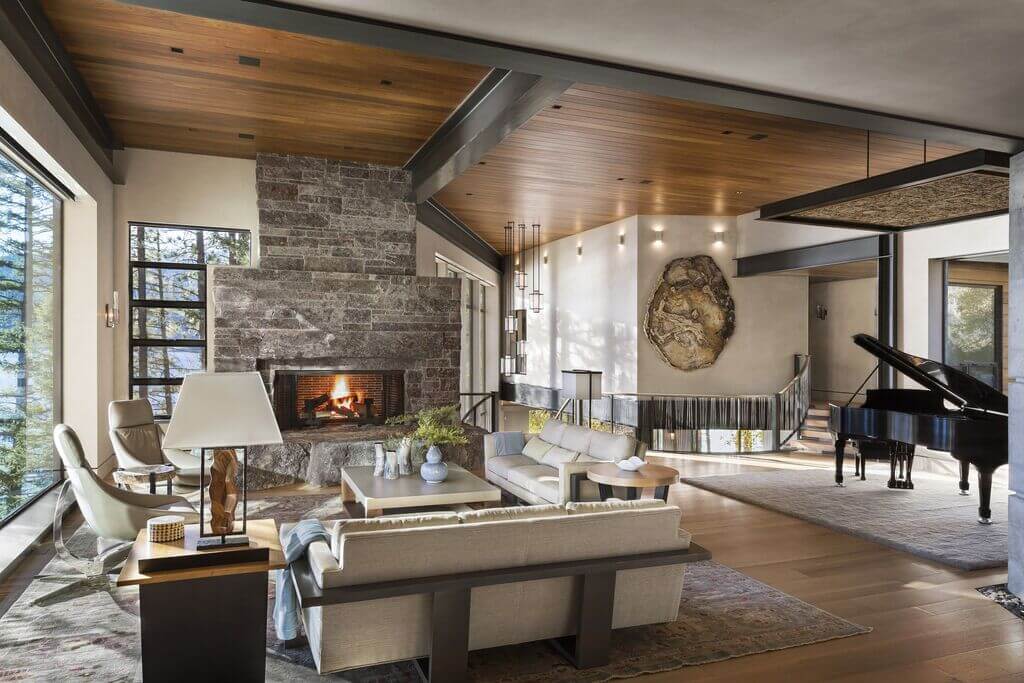
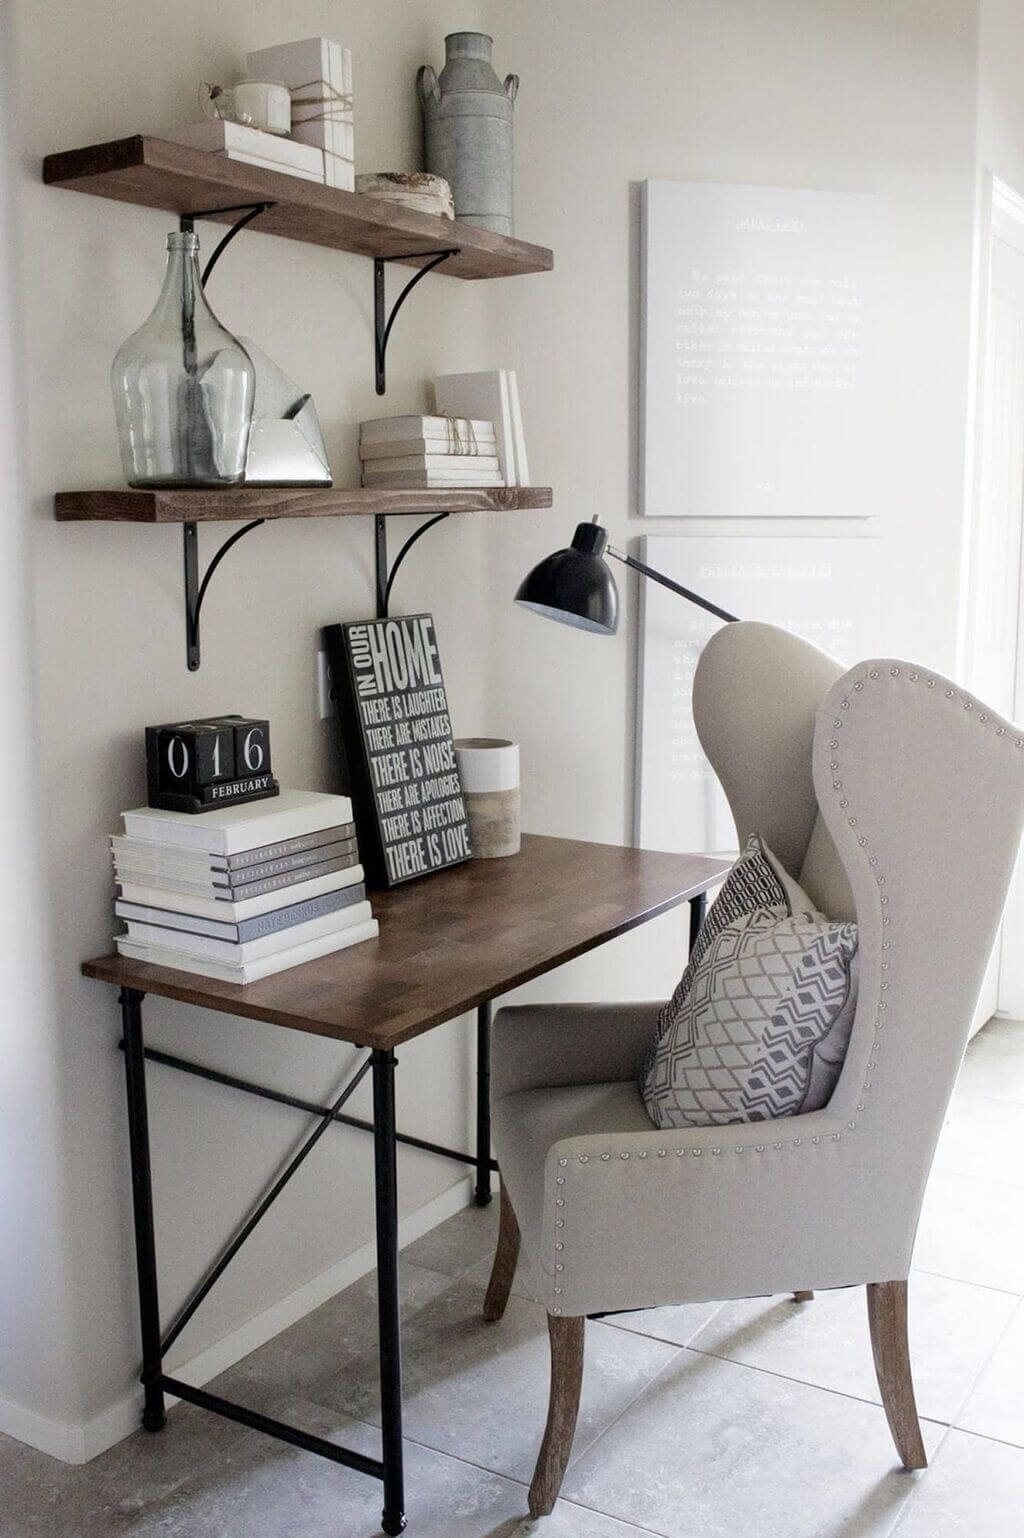
Classical & Simple styles look appealing to the eyes. It is one of the most popular interior designing themes. It looks to be a stand-alone designing trend with the most irresistible designs.

The charming look of every single home interior trend will make it the top choice interior theme. Many homeowners have adopted this theme for the last few years. You can easily find one rustic-style interior home.

This interior chooses the darker shades & makes them look amazing with the neutral color tones. It also features a lot of contemporary designed furniture items, hand-crafted. It focuses mainly on items made of leather, wicker, or wrought iron.

All the furniture items are stylish and appealing. It is the best theme for those who are looking for solid, dark, and sturdier-looking home decorations.

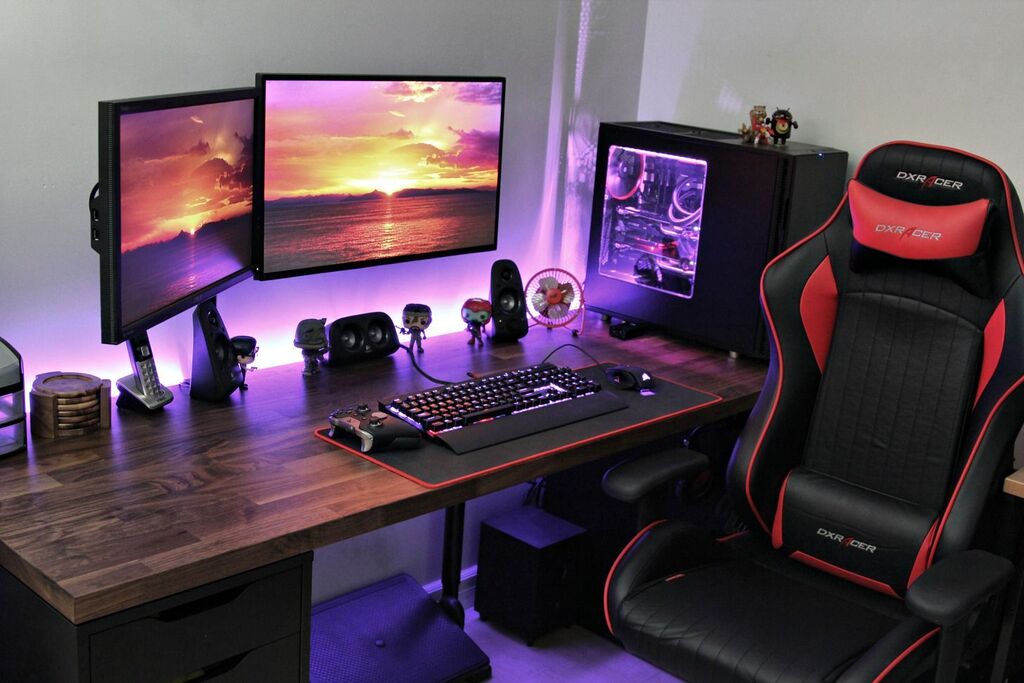
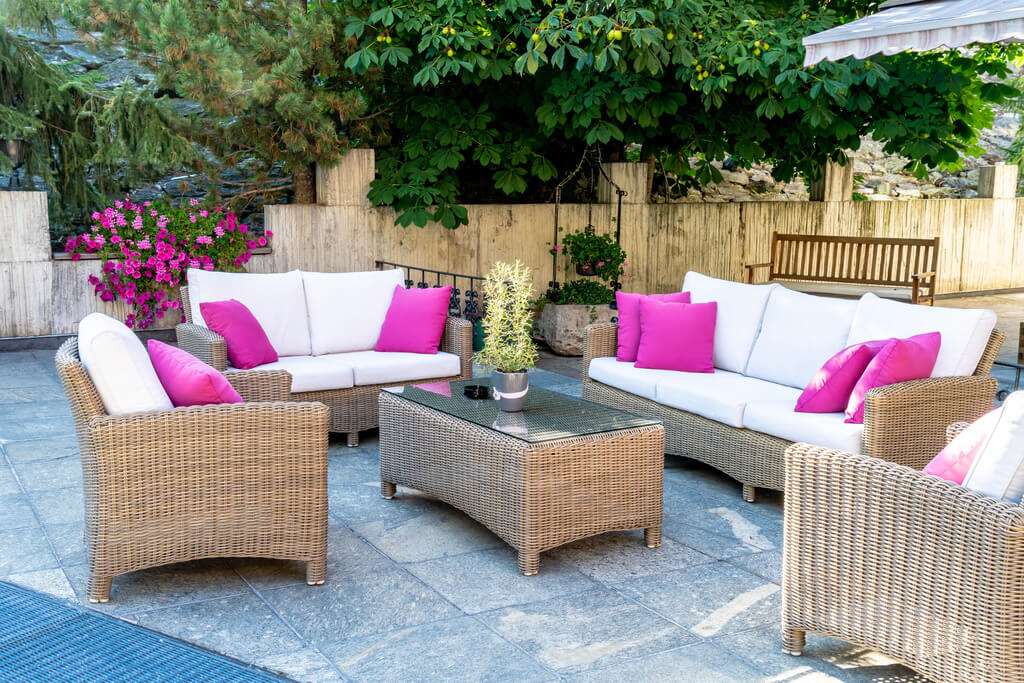
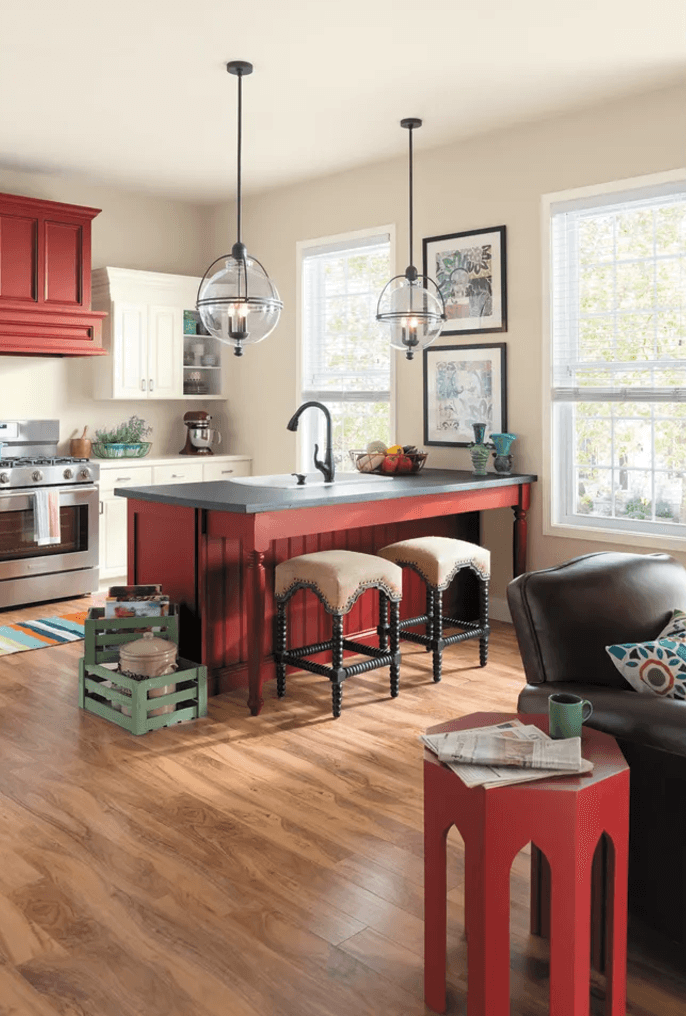
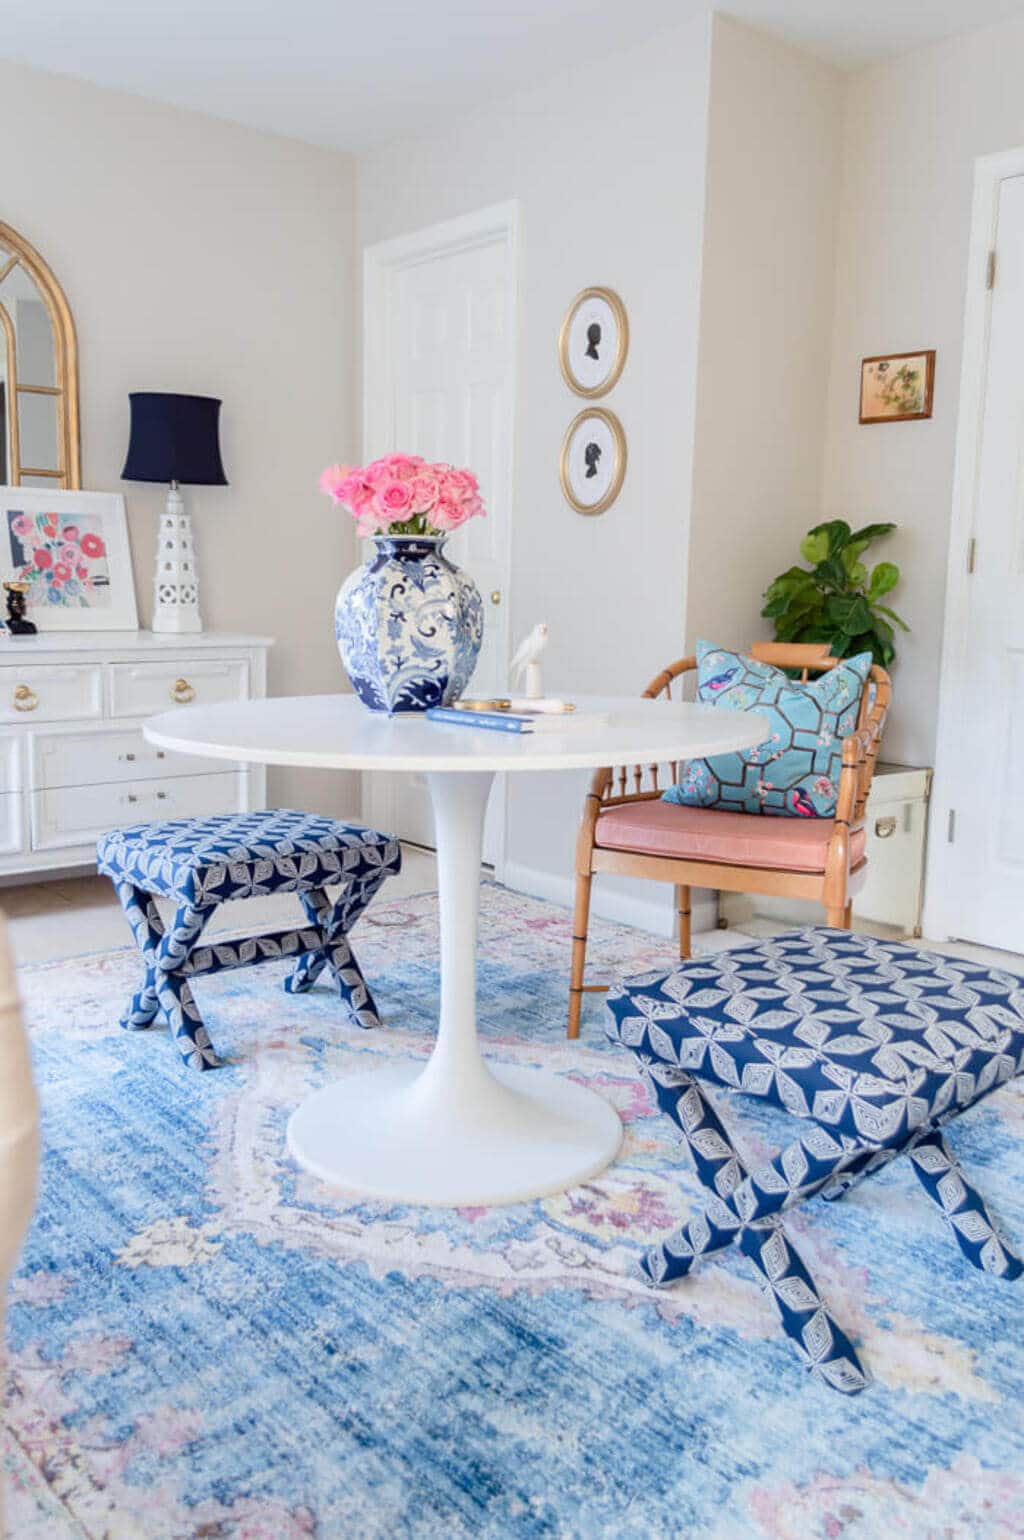
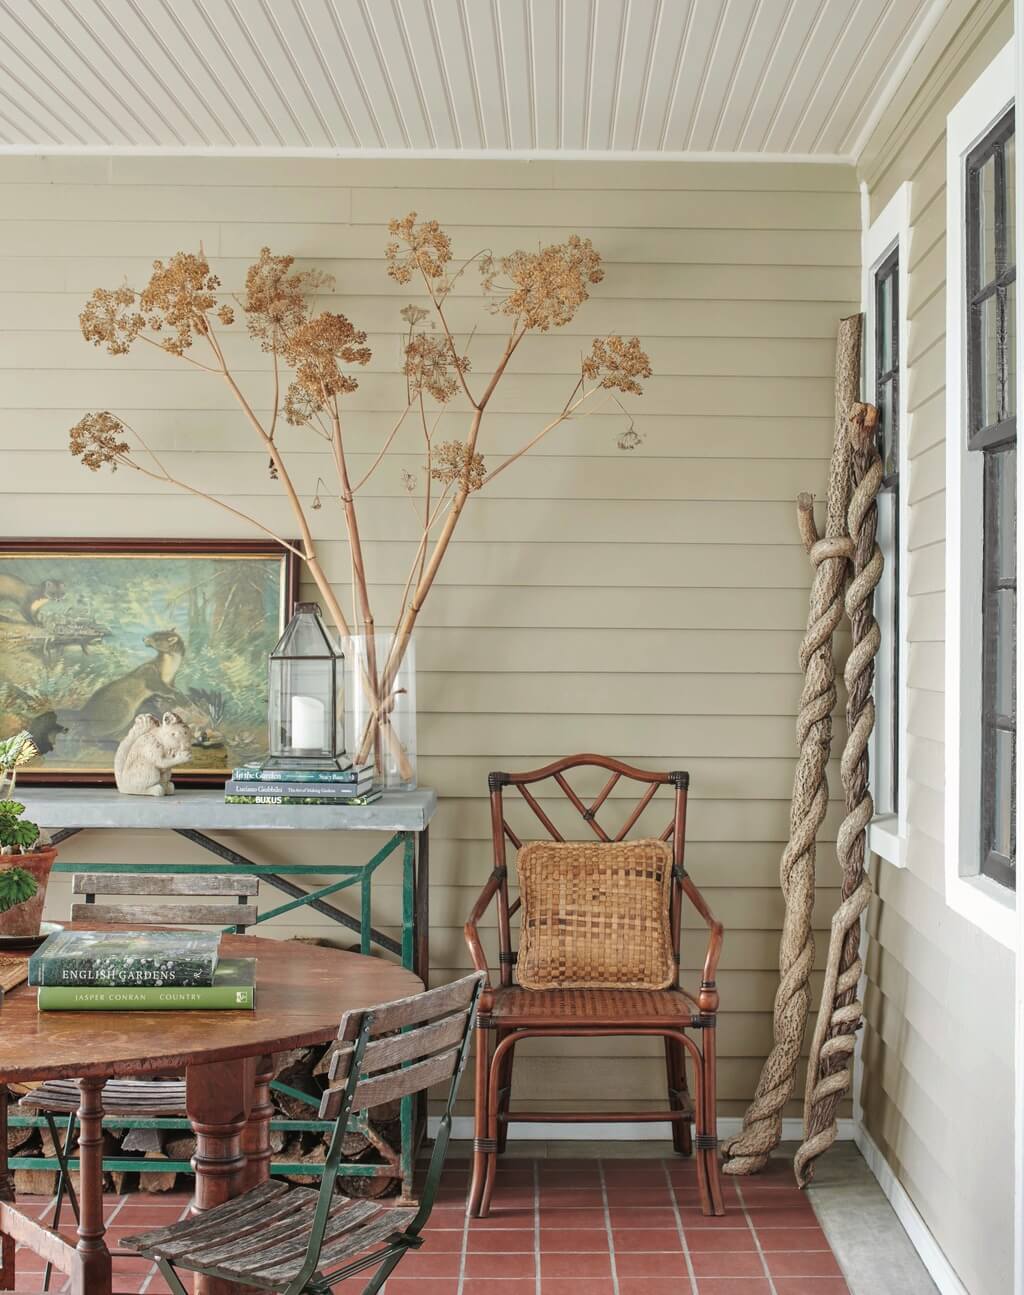
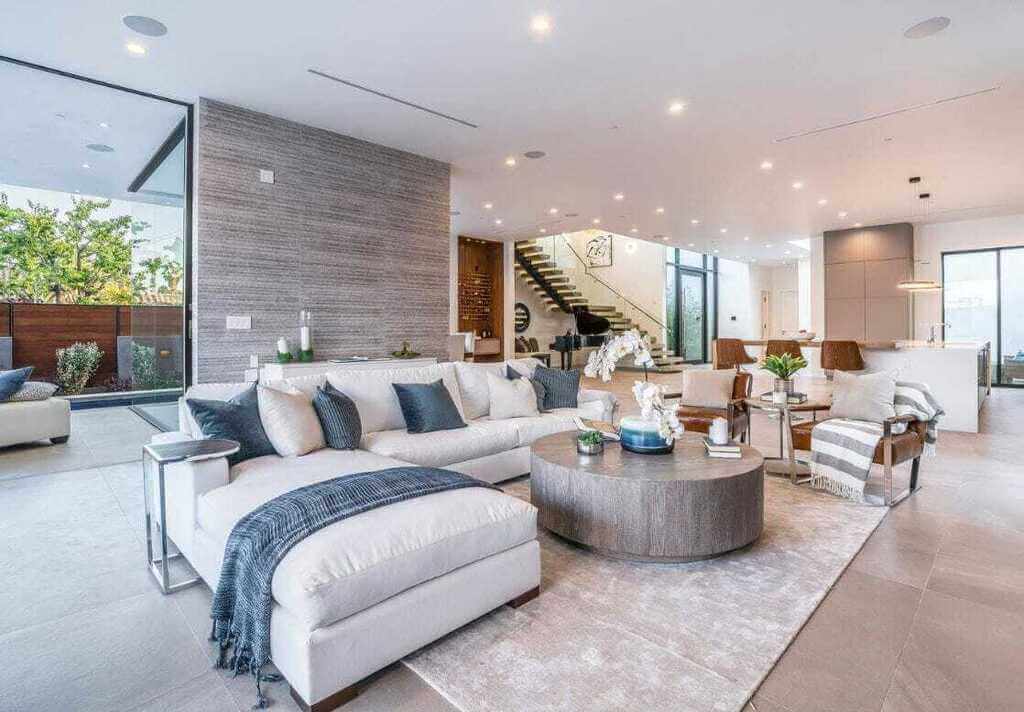
5. Bohemian Interior Design

 Bohemian Interior Design

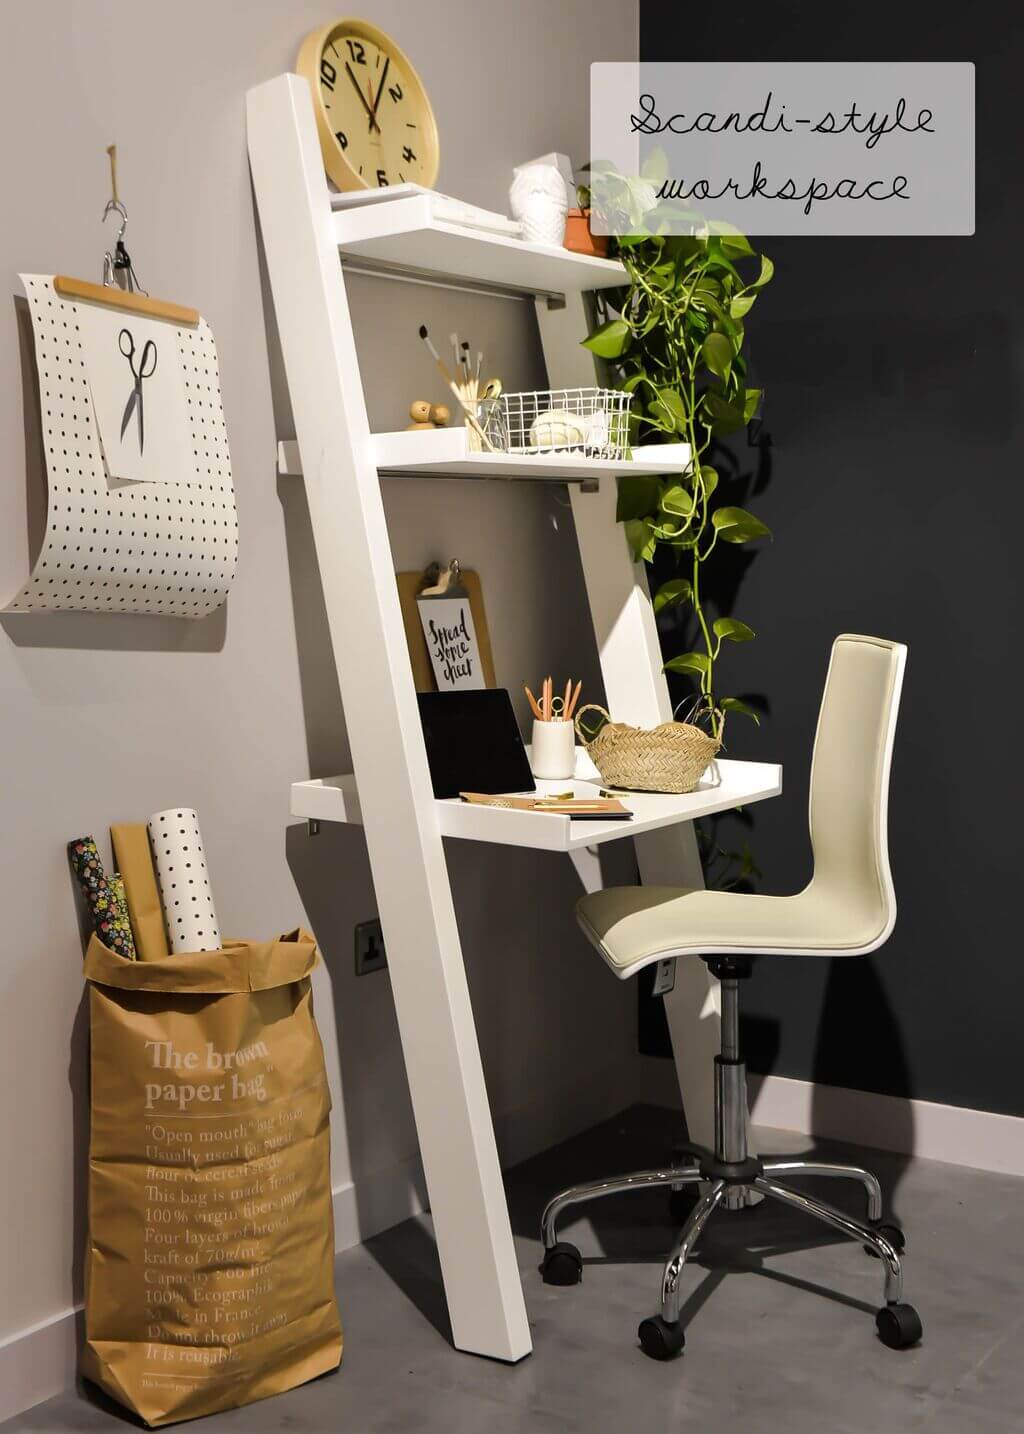
This interior designing theme is the most widespread among modern homeowners. Keeping the limitations aside, this style focuses more on expressing the internal art of people. This style includes the theme and ideas of people according to their philosophy of living their life.

The individual nature and personal preferences on how they want to live and look at the things around is shown in this style. This style is known as the “Boho” or “Boho-Chic”. This style has earned the highest popularity and has been owned by many homeowners.

This interior theme focused on expressing the personal choices and taste for designing an entirely personalized space for anyone who feels comfortable living with it. This also includes areas with cheerful decorative assortments or some areas with a plain & simple outlook.

It occupies almost maximum given space filled with the related designing & decorating items. The furniture in this interior theme is a mix of old and contemporary furniture. The other interior assortment is designed to form an ambient look with a broad designing spirit.

Conclusion

Whether you are redecorating an old home or designing a new one, choosing the best interior theme is a key thing to keep in sight. You must check out the best home interior theme designs that fit your personal taste and look appealing to those who visit you.

We have listed the most widely used home interior design styles in this year. You can choose the one for you!

Discover More:

ADA Bathroom Layout: Public Restrooms Requirements & Plans

0
ADA Bathroom Layout

Persons with disabilities face a lot of problems when it comes to architectural design elements. Whether it be building premises, stairs, or bathrooms, disabled people mostly have difficulty in using these places. Let’s see ADA bathroom layout.

That’s why the Americans with Disabilities Act (ADA) has established minimum requirements and guidelines for public restrooms and commercial bathrooms with proper ADA bathroom layouts. These guidelines apply to all government, state, local, parks, institutes, and commercial businesses for new and renovated construction sites.

Today in this blog, we will tell you about all the regulations and guidelines that come under the ADA regarding bathrooms. They are specifically designed to ease out the experiences of people with disabilities in public places. They make sure that every public restroom has appropriate and comfortable space for the disabled. 

Whether you’re constructing public restrooms or private bathrooms, you have to follow a set of rules and standards. The latest ADA law was passed in 2010 which is applicable to a variety of public places such as restaurants, shopping malls, city councils, schools, universities, stations, and business facilities, or any commercial place that has restrooms. 

What are ADA Regulations & Guidelines?

ADA Regulations & Guidelines

ADA is a civil rights law established at the federal level that deals with discrimination against people with disabilities in public areas. 

First appeared in 1990, this law is followed by the entire country now. The best thing is that these regulations and standards are making the lives of people with disabilities a bit more comfortable and practical.

Though ADA is a Federal law yet it is always good for you to check with the local government for any further specificity. Sometimes there are added details and regulations to it, such as regarding the dimensions and required equipment for ADA bathrooms.

To fulfill all the required ADA criteria, you need to follow all types of rules regarding all the accessories inside the ADA bathroom as well as the entrance. You may have already seen these types of public bathrooms in hotels, motels, and dormitories. 

If you are the owner of one of these facilities or planning to build, it is essential to know about each and every law and regulation regarding ADA bathrooms.

We will tell you in-depth about everything section by section : 

  • ADA Bathroom Layouts & Regulations Regarding Area
  • ADA Bathroom Door Requirements
  • Toilet Seat Requirements
  • ADA Bathroom Sink Requirements
  • ADA Bathroom Faucet Requirements
  • Mirror Requirements
  • ADA Bathroom Bars Requirements

First, let’s start with the minimum clear area requirements. 

ADA Bathroom Layout & Regulations Regarding Area

ada bathroom layout

The first thing that you should always keep in mind is to build an ADA bathroom in a place that is easily accessible to people with disabilities, including people in wheelchairs. 

After this, there should be enough space inside so that they can use the toilets easily. Also, this space should be smartly designed so that wheelchairs can be moved freely inside the bathrooms. 

You have to carefully design the ADA bathroom layout, including toilet seats, showers, and sinks. There should be sufficient space near these things to grab the handles and bars so it can facilitate maneuvering or transfer movements.

Center of the Bathroom

According to ADA, you can mount the toilet and the sink on both the rear or opposite wall. However, there should be a minimum area of 60 inches (1.5 m) in diameter for maneuvering the wheelchair. 

If the door opens inside, it should have 12 inches (30 cm) for the swing area. Also, the opposite wall should be empty so that there will be enough free space in the center and no obstacles while rotating the wheelchair.

ADA Bathroom Layout & Regulations Regarding Area

Toilet Area

When it comes to the toilet area, there should be a minimum clear area around the toilet which is about 56 by 56 inches (1.4 m x 1.4 m). In addition to that, the space between the sidewall and the toilet needs to be 18 inches (46 cm). To move the wheelchair freely, the toilet should fit 60 inches (1.5 m) in diameter.  

Sink Area

Another vital part of the bathroom is the sink. So make sure that there is enough room around that, about 30 by 48 inches (76 cm x 1.2 m). It should be at least 48 inches (1.2 m) of distance from the center of the sink to the clear space, without any obstacles.

Place a sink that is 30 inches (76 cm) wide so that the user can freely use that with an ample amount of space around. Also, leave a free space of 18 inches (46 cm) between the center of the sink and the sidewall. 

ada bathroom layout idae

Bathtub & Shower Area

If you’re planning to put a bathtub in the restroom or public bathrooms, make sure to have a minimum clear area of 60 by 30 inches (1.5 m x 76 cm). Additionally, you have to install a seat inside in such a way that the user still gets at least 75 by 30 inches (1.9 m x 76 cm) of free area.

According to ADA bathroom Layout, there are two rules for minimum shower clear area. 

  1. If the shower size is 36 by 36 inches (91 x 91 cm), you have to provide at least 46 by 36 inches (1.2 m x 91 cm) as a clear area.
  2. If the shower size is 30 by 60 inches (76 cm x 1.5 m), you need to provide at least 36 by 60 inches (91 cm x 1.5 m) as a maneuvering area.

ADA Bathroom Door Requirements

ADA Bathroom Door Requirements
  • Like the standard bathroom doors, the ADA bathroom doors can also be opened both to the outside or inside. 
  • As per the ADA 2010 law, bathroom doors should be at least 32 inches (81 cm) wide with a clear maneuvering area of about 12 inches (30 cm) max.
  • There is no regulation about the height; however, the depth of the door shouldn’t exceed 24 inches (61 cm). 

ADA Bathroom Toilet Seat Requirements

ADA Bathroom Toilet Seat Requirements idea
  • The toilet should have proper dimensions from 17 to 19 inches (43 – 48 cm).
  • The flushing mechanism should also be easy to use or automated, if possible. 
  • The position of the flush handle should be on the broader side of the toilet space and that too on the maximum height of up to 44 inches (1.1 m).        

ADA Bathroom Sink Requirements

ADA Bathroom Sink Requirements
  • Whether the sink in the bath is built-in, on a pedestal, or a classic one, ensure that its height shouldn’t exceed 34 inches (86 cm) when measured from the floor.
  • If you want to install a built-in sink, the cabinet also needs to be 34 inches (86 cm) from the ground.
  • Whenever you plan to build an entirely new bathroom, always calculate the thickness of the tiles and floors before installing. After this, accordingly, you can measure the height of the sink from that floor surface.
  • There should be a clearance of at least 27 inches (69 cm) away from the floor underneath the sink.
  • You should also provide adequate insulation for the piping under the sink.
  • Make sure that there are no sharp parts and objects under the sink area. 

ADA Bathroom Faucets Requirements

ADA Bathroom Faucets Requirements
  • When you read the ADA guidelines, you’ll know it is clearly written that the faucets should be designed and installed in a way that any person with disabilities will be easily able to use them without applying strong force or wrist moves.
  • You can install any kind of lever, push-up, or electronic faucet with at least ten seconds of opening and closing time.

ADA Bathroom Mirror Requirements

ADA Bathroom Mirror Requirements
  • No bathroom setup gets completed without having at least one mirror. Whenever you’re mounting a mirror, instead of measuring the frame height, always calculate the visual height. 
  • As per ADA guidelines, a mirror should be positioned at 40 inches (1 m) above the ground.     
  • Not only people with disabilities in wheelchairs use the mirrors, but also people with other limitations use them as well. So, it is necessary to put another mirror at least 74 inches (1.9 m) away from the floor so that people who can stand straight can use the mirror comfortably.

ADA Bathroom Bars Requirements

ADA Bathroom Bars Requirements

Handles and Grab Bars

The grab bars and handles are a significant part of ADA bathrooms, and the regulations regarding them are strict. You have to install multiple bars near the toilet, sink, and bathing areas. These handles and bars should be made from suitable materials that can bear heavy loads and sudden agitations.

Toilet Bars

The toilet bars should be  33 to 36 inches (84 – 91 cm) from the floor or according to the ADA toilet height. Put at least two grab bars so that person in a wheelchair can easily use them.

Use the wall grab bars of at least 36 inches (91 cm) long and sidewall grab bars of 54 inches (1.4 m) long. They will help people with disabilities while transferring and positioning.  

Bath Area Bars

Like the toilet and sink grab bars, shower area bars are also vital. They are generally placed on the back or control wall and mounted 33 to 36 inches (84 – 91 cm) from the bottom of the bath. If you want to install them on the sidewall, place them at least 42 inches (1 m) long.

The basic guidelines regarding the grab bars height are 33 to 36 inches (84 – 91 cm). However, this is highly dependent on the size of the bathtub and shower area. 

Make sure to use grab bars with a diameter around 1.25 to 1.5 inches (3.2 – 3.8 cm), and also, don’t forget to leave a sufficient space of about 1.5 inches (3.8 cm) between the grab bar and the wall. 

Other Requirements Of ADA Restrooms

Other Requirements Of ADA Restrooms

Apart from the clear area, toilet, and shower area requirements, there are many other things that you should keep in mind while building an ADA bathroom. Here are some of them:

Floors

Bathroom floors usually get slippery due to moisture and water. However, there is no specific regulation regarding floors; still, try to select less slippery tiles or types of floors to avoid any possible hazards.

Curbs

Curbs are used to stop the water from spreading into the rest of the bathroom. So if your shower area is 36 by 36 inches (91 x 91 cm), the curb needs to be less than 0.5 inches (1.3 cm) high, and if the size of the shower area is 30 by 60 inches (76 cm x 1.5 m), there is no need to build a curb at all. 

Toilet Paper Dispensers

The position of the toilet paper dispensers should be 15 to 48 inches (38 cm – 1.2 m) from the floor. You can mount them on the sidewall under the rail. Ensure that they’re well placed at 7 to 9 inches (18 – 23 cm) from the top of the toilet.                        

Soap Dispensers

Counter soaps and Wall soaps should be on a height of 44 inches (1.1 m) and at least 15 inches (38 cm) from the floor, respectively. 

Also, mount them in such a way that they don’t protrude more than 4 inches (10 cm) from the wall. In short, soap dispensers should be in reach so that people can use them with one hand, and that too without using any type of complex wrist moves.                                                                                         

Paper Towel Dispensers

Similar to soap dispensers, paper towel dispensers should also be user-friendly and one-hand operable. Mount them at least 48 inches (1.2 m) from the floor. So that they should never become any type of obstacle during transfer and maneuvering in the bathroom. 

The Bottom Line

So these are all the ADA bathroom layout, guidelines, and regulations. Now as you know about all the laws and rules,  create a safe and user-friendly bathroom space. 

When you plan carefully and put all your efforts and time into the design. You will be able to create a space for disabled people which is not only easily accessible but also modern looking. 

Apart from the ADA bathroom 2010 federal regulation, it is advised to check the local guidelines too. With that,  you won’t miss any additional rules prescribed by the local government. You can also take advice and guidance from professionals to implement these safety measures safely and accurately. 

I hope you found this blog on ADA bathroom layout helpful and interesting, please share it with your friends or family or anyone who wants to know about the ADA bathroom guidelines. 

Keep reading:

Top 6 Best Roofing Contractors in Renova

0
Roofing Contractors in Renova

Our roof is a major investment that should be taken good care of to serve you for years to come. Not only does it protect your property from the harsh weather, but it also keeps you and your loved ones safe and comfortable. Sadly, dealing with damaged shingles, cracked flashing, or even worse, a leaking roof is not something any homeowner would expect from their perfectly working roof until it happens.  Maybe you pushed your roof far beyond its replacement date, or it took a gradual beating from the unforgiving wind, rain, and sun and couldn’t take any more. Whatever the cause, dealing with a damaged commercial or residential roof doesn’t have to be a complicated process. All you need is trustworthy roofers at Renova Roofing & Construction who get the job done right. Here’s a list of some of the best roofing contractor in Renova.

1. Renova Roofing and Construction

Roofing Contractor

Your roofing project begins with an honest contractor who genuinely cares about your safety and wellbeing. A company that never tries to sell you anything unless you need it. You also need someone who fully understands your options, the process, and works to deliver excellent services.

That’s where Renova Roofing and Construction steps in. As a leading roofing contractor in Renova, the company offers Residential Roofing, commercial roofing, roof repairs, tile, metal, and asphalt shingle roofing.

With Renova Roofing and Construction, you can expect a ton of benefits, including insurance claims assistance and warranties on labor and materials topped with skilled expertise. For more information about the products and services, check out the official website or get in touch.

2. 99roofers – Top Rated Roofing Contractor

Finding a company that delivers top-quality services at a fair price is everyone’s dream come true. 99roofers is a licensed roofing company that offers a broad range of services, including emergency roofing, construction roofing, roof repair, and much more. Their technicians and contractors are certified and experienced in all kinds of roofing services.

According to customers, the company’s crew are professional in their dealings. So if you’re looking for quality roofing services on a tight budget, 99roofers is the right place to be. Feel free to check out the official website and learn what they can do for you.

3. Riverland Roofing – A Certified GAF Master Elite® Contractor

Are you planning to remodel your exterior or perhaps replace the entire roof? Riverland Roofing could help with that. The company provides its services to several areas, including  Arkansas, Alabama, Louisiana, Tennessee, and Mississippi.

Riverland Roofing uses high-quality materials and exceptional warranties for its customers. They focus more on long-term solutions. Through years of experience in the industry and trained and experienced staff, the company delivers quality work that satisfies your needs and exceeds your expectations. So, go ahead and visit the official website and check out more information on the services Riverland Roofing offers.

4. American Roofing and Construction Inc.

Roofing Contractor

American Roofing and Construction Inc. is a reliable, licensed, bonded, and insured roofing contractor leading in the provision of quality workmanship, customer service, and unmatched excellence. The company deals with roof repairs, shingles, modified, built up, and single-ply roofing.

The contractor also deals in other services, e.g. painting, carpentry, storm doors and windows, decks, and much more. So the next time you need a roofing company whose repair services are guaranteed to last, think about American Roofing and Construction Inc.

5. Watkins Construction and Roofing

Watkins Construction and Roofing is a family-owned and operated, fully insured, licensed commercial general contractor. They offer roof repair, roof replacement, metal roofing services, skylights, gutters, siding, and much more. 

Watkins Construction and Roofing offers its roofing services in a 7-step process for quality assurance. They take time to walk you through the entire process, explaining what you need to keep your roof in service for a long time. Such quality and customer satisfaction placed the company in the hearts of its customers and got them on the 2020 Inc. 5000 list of the fastest-growing, innovative companies.

6. Ready 2 Roof

Personalized solutions, unmatched warranties (on materials, work, and labor), free consultations, certifications, and trustworthy services are all terms that define Ready 2 Roof. For over three decades, the company has provided residential and commercial roofing solutions to the Mississippi community.

Ready 2 Roof continues to bring you residential roof repair and replacement services for the metal, slate, tile, clay, and architectural roofs. The company also offers TPO and  EPDM roofing solutions for commercial roofs. Whenever you need a contractor to finish the project fast and on a specified budget, get in touch with Ready 2 Roof via phone or email.

Contact a Roofing Contractor Today

Are you looking for a reliable roofing contractor for your project? Whether you need a roof replacement, repair, or installation for your new home, leaving the job to a much more experienced contractor is the right way to go. Get in touch with a leading company for the top-quality services you deserve.

Explore Further:-

The Health Benefits and Risks of Using a Humidifier

0
Benefits and Risk of Using a Humidifier

During the summer or warmer periods, the air becomes much more humid as it retains more moisture. However, as the weather gets colder the opposite is true. This may not seem such a big problem but too much of it can lead to health problems. So, here we will talk about the benefits and risks of using a humidifier.

One way to improve the overall air quality as far as moisture is concerned is to use a humidifier. As far as health goes, humidifier therapy has not only a strong following but also proven benefits in helping people with a number of symptoms, including those from colds and flu.

There are many humidifiers on the market and they come in different sizes and types to suit different needs. Here is a brief explanation of how a humidifier could help you and also a look to see if there are any dangers to these devices. 

What Are Humidifiers?

What Are Humidifiers benifits

If you are unaware of what a humidifier is then basically they are devices that turn water into steam which then adds moisture to dry air. Humidifiers can come in many types and these will produce moisture in different ways but the result is basically the same.

Some types are designed to work in large rooms, some can be wheeled from one area to another, and some are small, portable devices that are suitable for smaller areas. And, when you are looking at gadgets you can use on a daily basis then a humidifier may appear on that list. At least, when the weather is such that the air is drier than normal. 

What Are the Different Types of Humidifiers?

Some people only want to use a humidifier occasionally and in a small room, and others want to humidify their entire home. There are ones designed for children’s rooms, ones just for traveling and for use in hotels, and ones specifically designed to combat eczema and psoriasis.

If you wanted to humidify your home then a central humidifier would be the choice as these are installed as part of the general heating and air conditioning systems. Console humidifiers are large and can be wheeled from room to room and are also good for large areas.

When it comes to the different methods that humidifier manufacturers employ then there are a few types available:

  • Impeller humidifiers – use a rotating disk to emit a cooling mist
  • Evaporators – blow air through wet material such as a filter
  • Steam vaporizers – as the name implies, the water is vaporized to create steam
  • Ultrasonic humidifiers – these use ultrasonic vibration and are suitable for children

When it comes to deciding which type and size of humidifier to buy you have to consider the size of your room and the humidity levels. The Environmental Protection Agency recommends humidity levels remain at 30 to 60% indoors. While adding moisture can help alleviate various symptoms from human ailments, it can help to grow mold in the house causing other problems. 

What Are the Health Benefits of Using a Humidifier?

What Are the Health Benefits of Using a Humidifier

If your home has low levels then this can lead to dry throats, dry skin, nasal and sinus irritation, itchy eyes, cracked lips, and headaches.

Humidifiers can help to improve all of the above symptoms and can also help with touches of flu and the common cold. Sore and dry throats along with nose irritation are symptoms of colds and humidifying a room can help ease these. They can also help with psoriasis and other skin conditions.

Eczema and psoriasis symptoms affect millions of individuals across the states alone with many more suffering from these skin conditions around the world. Treatment for these conditions includes moisturizing the skin and that is why humidifiers can help.

When looking at some of the top rated humidifiers on the internet, the one manufactured by Dyson may be high on the list. This humidifier has received the Seal of Recognition from the National Psoriasis Foundation. This particular humidifier has had some visible effects on patients with moderate to severe symptoms.

Unfortunately, not everything with humidifiers is great. 

What Are the Risks of Using Humidifiers?

The first risk of using a humidifier isn’t so much to yourself but to the machine itself. If you use tap water then you might be shortening the life of your device. Tap water often contains particles and minerals not found in purified water. These minerals can trap inside the machine and eventually cause it to stop working.

The next concern is the level of humidity. If you raise the humidity levels too high then you can exacerbate existing health conditions. While humidifiers can help avoid colds and help with skin conditions they can also make allergies worse. Typical allergens found in the house including dust mites and mold-like damp conditions, and it is these allergens that can cause asthma to worsen.

The final risk of using a humidifier is from not cleaning the machine or changing the water regularly which can lead to sickness. 

Why Is Cleaning Your Humidifier Essential?

Why Is Cleaning Your Humidifier Essential

There is a condition linked to these machines called humidifier fever which is caused by breathing in bacteria and other deposits that can build up including calcium and magnesium.

A humidifier should be cleaned at least every three days according to the EPA but many experts believe the water should be changed every day and the machine has been given a clean to be sure. This isn’t to say humidifiers are bad at all. They just need to be properly maintained and used to bring the maximum benefit to your home. 

Should You Purchase a Humidifier?

More than 20 million humidifiers were sold in 2019 in the US alone, and the market is growing. Globally it is worth over $4 billion, meaning that there is great popularity for these machines. But, is it right for you?

If you have a home or live in an area that suffers from dry air in the winter or at other times, and this also leads you to some of the symptoms mentioned earlier, then you may benefit from a humidifier.

Humidifiers can help heat your home and when you are looking for a cost-effective heating system, a humidifier can be part of this. Used together with your heating you can help maintain a comfortable environment.

If you decide to buy a humidifier then your next problem will be which one to get. Travel humidifiers are ideal for people that need to control the air around them regularly, which leaves the impeller, steam, and ultrasonic, assuming you don’t need a central system.

The ultrasonic is probably the best all-around choice as steam evaporators are not suitable for youngsters as they can cause burns. Impellers can aggravate certain conditions such as asthma too. 

Summary

While there are some risks to using humidifiers these are largely based on the machine not being used correctly, overused, or not cleaned. Humidifier fever is a condition that mostly comes from a machine that isn’t being maintained rather than from the humidifying process itself.

When they are situated in a room properly and the right size is chosen, they can help moisturize and warm the air. This can lead to a healthier home environment, reduce the risk of cold germs being transmitted, and help alleviate several symptoms from dry throats to skin conditions.

Find Out More

15 Easy-to-Build DIY Computer Desk Ideas For Your Home

0
DIY Computer Desk Ideas

Whether you’re working from the office or home, one thing is extremely important: Desk! We do so many tasks on our computers and laptops, from doing our office work, checking emails to watching videos, and playing games. That’s why it’s necessary to have a proper and dedicated desk. Let’s see DIY computer desk.

We can’t do much about the office desks; however, if you’re working from home, you can actually set up a decent office space with the help of a DIY computer desk ideas and other things. 

Due to the existing pandemic, our office lives are now only limited to desks and we have to work day and night while sitting in a single place for long hours at our homes. Whether it be for work, study or leisure, these days most of us are spending more and more time on the computer. So if you don’t have a proper desk or table for work, it’s time to get one! 

When it comes to desks, there are countless options available in the market. From standing desks to lap tables and stands, you can almost get a table in any size or shape. We sit in front of a computer desk almost every day for a longer duration of time; that’s why it’s vital to pick the right desk.

However, if you’re one of those people who don’t like to buy a table because either they’re too expensive or not according to your specifications, here is the perfect solution for you: build your own table! Yes, DIY tables and desks are easy to make. You can create your own custom computer desk design right at home.

Today in this blog, we’ve listed some of the best DIY computer desk ideas and gaming desk ideas for you.

15 Creative DIY Computer & Gaming Desk Ideas 

From web surfing, paying bills to scanning emails, and studying, you can do all these things comfortably when you have a proper desk system. Of course, you can take your laptop and work anywhere, but if you care about ergonomics and the right posture, it’s best to have a table.

One of the best reasons for DIY computer desks or any kind of custom-built desk is that you can totally customize them according to your requirements. You can select the design, colors, and materials from scratch and build a table that fits your needs. 

Here are fifteen great DIY desk ideas for you. From floating furniture to standing risers, here is a desk for everyone. So, select the right one and start working on your dream project!    

1. Simple and Open Furniture

Simple and Open Furniture

Build this type of simple and functional desk for your computer. This type of open and airy furniture is best for small rooms. Instead of a chunky and heavy table, go for a light table with a simple design. 

This desk has some height, and the chair is also leggy, which is creating a visual effect in the room. There is also some extra storage space under the table, where you can put your books or office papers. When you’re living in compact spaces, try to use as minimal furniture as possible.

2. Iron Desk with Floating Shelves

Iron Desk with Floating Shelves

Here is another DIY computer table with a simple design with high functionality. If you feel you have many things to store related to your work or study, you can build some floating shelves above the table.

Here, the shelves have been made from the same wood that has been used to make the top of the table. This table will become a comfy, working spot. You can also add a long padded armchair for more comfort.    

3. DIY Ladder Desk

DIY Ladder Desk

Do you want a work table with a twist? Build this really cute and functional three-leveled ladder table. This will work as both your work or study table and storage space. With the white colors, a wooden clock, and a minimalist chair, this whole setup gives Scandinavian vibes to the room.

Another great thing about this table is that it has a lot of storage space. So you can store books, plants, or decor pieces without taking much floor space. With effective space management, this table will provide a functional working area that does not take much space.

4. DIY Wood Countertop

DIY Wood Countertop

Do you have a small or weirdly shaped room in your apartment? It is super complicated and challenging to design these kinds of spaces. If you also have a spare room, convert it into your fantastic working place.

Instead of building a regular table, use a live-edge woodwork surface. You can use a slab of wood with holes to create a narrow and rugged wall-mounted desk. Don’t forget to attach it securely with angled wood braces. 

5. DIY Gaming Desk Plans

DIY Gaming Desk Plans

This type of monitor setup is mostly used by heavy gamers and YouTubers. If you’re one of them, you can try to use this unique table setup. These types of modular tables are designed to fit multiple screens, compact audio systems, keyboards, mics, and other necessary tools. 

Here three monitors are wall-mounted so that you can get enough space on the table. When you’re building a gaming table or YouTuber Desk, don’t forget to add extra storage space for your speakers and other tools. 

6. Desk with Concrete Countertop

Desk with Concrete Countertop

Why get a regular computer desk when you can have a modern table with a concrete top? Yes, switch your standard tabletop with a concrete top for a rough and edgy look. 

Are you wondering how to build a computer desk like this? Use concrete as the basic material and use a shaper to create a rectangular or square shape according to your table. You can also experiment with its shape, thickness, size, or even color or just leave it simple and minimal. 

However, a concrete slab can be quite heavy, so to provide extra support, replace the wooden frame with a steel one.

7. Modern Gaming Desk Ideas

Modern Gaming Desk Ideas

For those people who love to play online games, this type of desk is necessary. This is not an ordinary table or working desk; it’s a gaming desk. This means it has special compartments and space for storing speakers, subwoofer, keyboard and mouse, gaming headset, and many more. 

You can also put LED lighting that will glow and lighten the place. You can even remodel your old desk and convert it into a gaming table.

8. Floating Window Desk

Floating Window Desk

Another interesting DIY computer desk plans for you is this floating table. If your room has bay windows at an angle that creates an odd nook, instead of leaving that space empty, you can actually turn it into a fantastic functional work area. 

9. Double-Sided Computer Desk Design Ideas

Double-Sided Computer Desk Design Ideas

Do you work with a team? No problem, just build this type of multifunctional double-sided desk. Here you’ll get two types of two-person desks: side-to-side desk and back-to-back desk.

Now you can easily collaborate with your partner, and also, you’ll get enough space for storing your books, storage box, small framed photos, and flower vases.

The best thing about this desk is that the bookshelf also functions as a separator between the two desks and hence it provides some privacy to each person. Brilliant, right? 

10. Multipurpose Minimal Computer Desk

Multipurpose Minimal Computer Desk

Look at this stylish minimal working table. You can use this desk in multiple ways, such as a working or study table, a decorative shelf, and a storage space. 

You can place your computer accessories on the top shelf and the system on the bottom shelf. You can also use it for eating, writing, as a cup holder, and as a bedside table.

11. L-Shaped Wooden Table

 L-Shaped Wooden Table

When you have a tiny workspace, the traditional desks and storage will not work there. You have to think creatively and have to efficiently use the space. Instead of trying to squeeze a conventional desk, install a wrap-around, hanging wood counter.

This way, you can get more space which you can later use for storage units and floating shelves. The open floor space beneath a free-hanging desk or counter will allow you to move your chairs freely. It also provides places to tuck file cabinets and storage boxes.

12. DIY Desk Riser

DIY Desk Riser

Working for long durations while sitting can be harmful to your health. So use this kind of desk riser which allows you to work in a standing position. This riser is pretty simple to make and use.

All you need is to grab some metal pipes and connectors and then finish it off with a wooden top. Fix everything with a copper pipe cutter and screwdriver. All these supplies are easily available at any home center. 

13. Bar-Height Corner Desk Idea

Bar-Height Corner Desk Idea

Optimize and transform any corner of your home with the help of these corner desks. To build this beautiful table, you’ll need plywood and some shelving bracelets. 

You can also install some floating shelves above the work table for some extra storage space. 

14. Office in Closet

Office in Closet

This is probably one of the unique desks that you would have never seen in your life. Yes, it’s a closet office. Perfect for those who want to work without any interference or disturbance. 

No matter how you’ll design it, one thing is sure that you’ll get so much storage space. After all, it’s a closet, right! You can either use curtains or doors to cover the area. 

15. Small Floating PC Desk Ideas

Small Floating PC Desk Ideas

Do you want a simple desk with minimal design elements? Go with this type of floating desk. It will give you enough space to put your laptop. To make the area more interesting, you can add LED strip lights between the wall and socket. 

The Bottom Line

Before you start building your desk, first you have to measure the size of the room and then decide the size of the table. After this, make a budget and buy the materials accordingly. If you’re a beginner and don’t know much about woodworking skills, then it’s good to start with a simple design.     

So these are some of the best DIY computer desk plans for you. If you find this blog helpful and interesting, share it with your friends or family.

To get more information:

Tennis Court Construction – Can I Build One In My Backyard?

0
Tennis Court Construction

Playing tennis is a great way to exercise and release some frustrations. Memberships for playing tennis are quite expensive, but also, with the fact that everywhere is going through a pandemic at the moment, most of these courts are closed. If you have the extra space in your backyard, maybe you have been thinking about building your own tennis court or getting a professional in to build one. It is convenient as you can enjoy the sport at any time you like with no restrictions.

How Much Space Will I Need for a Tennis Court?

Tennis Court design idea

Realistically speaking, tennis courts are large, so you need to make sure you have enough space for this if you are thinking of building one. The standard size is roughly 7,200 square feet. Domestic courts average at about 33.53m by 16.48m.

Anything below this is going to be a bit awkward if you want to play properly. Space is essential for this as you need to be able to run around and have enough room for the ball to fly around.

How Are Tennis Courts Built?

A man standing on top of a tennis court holding a machine

Planning permission is essential before deciding to build a tennis court. You do not want to be in a situation where you start building but do have the permission to do so. It will be a waste of your time and money. Make sure to research and have everything in place before buying all the material or hiring someone to build it for you.

Once this is done, the land is checked in regard to the levelness of the ground. Level ground is better for building a tennis court than building one on a hill. It is also easier for construction. The area also needs to be cleared of trees, bushes, and anything else which can obstruct construction.

The soil is checked before building also as this will determine the type of drainage available. Topsoil will have to be removed before construction. It is also essential to check for pipes and anything else which is under the soil. You do not want any leakage. 

Other minor details will be established as well such as the positioning of the court, the layout of the court, fencing, and any other designs or features that may need to be added.

Can I DIY a Tennis Court?

A woman and a little girl playing tennis on a court

Yes, you can build a tennis court yourself. With building one yourself, it is vital to carry out proper research before begging the building process. As already mentioned, planning permission needs to be in place. Apart from this, you need to find out whether there are any pipes on the land where you are planning to build this tennis court.

Building a court yourself may take much longer than what professionals can do for you. This is because there is a lot of pre-planning to do before you can start doing anything. By giving details to a company, they will gather all the necessary information themselves, as well as advise you on whether the area on which you want to build the court is suitable for construction.

You can build one yourself but be prepared for the time, effort, and work that you will have to put into this. 

How Much Does It Cost to Build a Tennis Court?

Building a tennis court is definitely not cheap. You will be spending between $60,000 to $120,000. There are various courts you can opt in to buy and construct. The different types vary in price. Grass court is by far the most expensive as the installation costs a lot more than others. For these, you could easily spend up to $160,000. 

The cheapest is a clay court with a maximum payout of $75,000. Even though it is much cheaper, it requires an awful lot of maintenance. Your best option is to get the concrete court as it requires minimal maintenance and costs up to $110,000.

How Long Does It Take to Build a Tennis Court?

If professionals are building it then you are looking at about six to eight weeks of construction. This is if there are no complications or delays. The construction can be delayed due to bad weather or a delay in receiving materials.

If you are building it yourself, it could take you a significantly longer time as you are learning what to do along the way, unless you have built a tennis court before. There could also be delays in checking the levels of the ground, measuring out space, getting the materials delivered, getting planning permission, making sure there are no obstructions under the soil, and much more. 

The average time to construct one is roughly 2 months. Within this time, you should be able to get your desired tennis court built.

Why Are There Restrictions on Building a Tennis Court?

A group of people playing on a tennis court

Different countries have various laws that apply to building tennis courts in a residential area. It is vital to make sure you measure your land and not go over to your neighbor by accident because this could cause a lot of issues for you.

If there is a danger of erosion in your area, construction will be forbidden. If your house is located in an area of natural beauty, planning permission may be declined. If the tennis court takes up more than 50% of the garden, this could be an issue also.

Before building a tennis court, it is important to do some research into the area where you live. You need to make sure you are aware of the laws regarding the construction of tennis courts in your residential area. Apart from this, you need to ask yourself about how committed you are to playing tennis.

It is very costly and may come with a lot of problems along the way. Make sure to do your research and pick the best surface for your tennis court to minimize maintenance for yourself in the long run.  

Keep Reading: 

How to Makeover an Overgrown Garden

0
Overgrown Garden

An overgrown garden can easily alter a visitor’s perception of the occupants, regardless of how neat and clean the house’s interiors are. Additionally, dense vegetation can provide a habitat for insects, rodents, and even reptiles, so it’s critical to keep your garden healthy.

Transforming Your Garden

This article would guide you in reclaiming your garden, assisting you in developing a plan regarding where to begin, and providing you with a thorough understanding of the critical aspects of cleaning.

1. Catalog Your Plants

Catalog Your Plants

The first step is to identify any plants that are rogue. Mow and edge the lawn as needed to assist you in determining which areas require the most attention. Finally, to prevent regrowth, dig out all of the roots. You may need to hire a professional like Plateau Trees and other reputable companies if you have large plants or trees to remove. 

After you’ve pulled out unwanted plants, it’s time to assess the remainder of the garden. In the spring when all plants have flushed, overgrown landscape beds are frequently the most critical to investigate. If an area contains many distinct components, it’s preferable to begin in one place and work your way outward to alleviate the sense of being overwhelmed.

2. Place Plants in Right Location

Getting the right plant in its appropriate place is one of the most challenging elements of maintaining a landscape. Each type, whether a ground cover, flower, shrub, or tree, must be planted in an area suitable to attain sun and moisture requirements. The most frequent error is done in large plants is they’re placed too close in a building.

Your slender sapling will grow into a strong tree. Even though the hydrangea began small, it’ll eventually take over a corner of its yard. The ground cover thriving in the shady spot could spill over the lawn and into the nearby flower beds. Underestimating the size and growth rate of plants is a frequent blunder. And the problem is exacerbated when plants outgrow their expectations, particularly when situated near a structure.

3. Clean the Edges

Clean the Edges

When you’re drawing as a kid, the instructor most likely insisted on coloring the borders first rather than using the paint to fill in the interiors. A garden operates on the same principle as well. When attempting to turn an overgrown area, it’s far more prudent to start with the edges. You’ll notice a good deal of the mess would appear to have been cleaned up after it.

4. Use Mulch

Weeds unchecked would cause your garden to become overrun by undesirable plants. These can be trimmed, removed, or even burned, but they’ll reappear. As a result, some additives will be required to prevent regrowth.

Mulching is the most critical of these precautions because it inhibits the development of weeds while also aiding in water conservation. Mulch is available in various colors and shades, enhancing the appearance of the plants and flowers in your garden.

5. Follow the Color Wheel

Complementary shades, or those on the color wheel directly opposite one another, are a possible combination you could try. For example, consider the colors red and green during the Christmas season. 

Gardeners adore the colors blue and yellow. Blue flowers tend to fade into the background or become lost in a garden with vibrant hues. Yellow intensifies the shade of blue flowers while blue softens the harshness of yellow flowers.

6. Do Landscape Work

 Do Landscape Work

Regardless of how overgrown certain areas have become, there are still other features in your landscape worth maintaining. They must, however, be supplemented to achieve a unified look that’ll last a decade or longer without a significant overhaul.

Consider adding new elements such as ground covers uniformly placed throughout the yard, perhaps in front of existing beds to increase their size and to tie the overall look together. It’s a good idea to begin your preparations with an emphasis on simplicity and cohesion.

You may discover some adjustments are necessary or your landscape has reached the end of its usefulness. In this case, modernizing and rejuvenating your area will require new plant selections, unique design elements, and an extensive landscape maintenance program.

The key to success is, to begin with, a systematic design unifying all of your landscaping activities and ensuring their sustainability. Additionally, select a landscape gardener with horticultural experience and an eye for a plan to provide ongoing treatment and guidance.

Takeaway

While there’s additional work to be done, doing a makeover for your garden would be worth the effort. In addition, using a planner to keep track of your planting, watering, and pruning schedule will help you avoid confusion and overgrowth. Consider the ideas mentioned here as you start refining your area.

Explore Further:

5 Essential Things to Know About PVC Duct Pipes and Fittings

0
PVC Duct Pipes

A PVC duct pipe is an ultimate product for a range of systems. Therefore, before you start purchasing pipes for an upcoming project, learn more about these five essential things you need to know about PVC duct pipes and fittings to ensure you find the right products for your needs. 

1. PVC Offers a Wide Range of Benefits

As a pipe material, PVC has long been appreciated for its durability and ease of use. Due to it being significantly lighter than other materials that are used for producing pipes, PVC is much safer to transport and install and requires far less time and manpower to handle. When they are in operation, PVC pipes are proven to be efficient as they render better drainage and rarely become clogged.

PVC pipes require less energy as well as fewer resources to manufacture compared to other material types, and they are easily recyclable, which serves to protect natural resources and satisfy environment-conscious consumers.

Despite all of these benefits, PVC pipes are still much more cost-effective than other materials, making them suitable for a range of projects. When considering all these benefits, it is not surprising that other industrial and consumer products are now being produced from this versatile material.

2. PVC Duct Pipes Are Excellent for Specific Projects 

PVC Duct Pipes Are Excellent for Specific Projects 

PVC duct pipes are a thin-walled version of traditional PVC pipes that are often utilized by contractors and builders. As a result of its thinner walls, PVC duct pipes are even lighter than standard PVC pipes, making them fitting for low-pressure gas transport. They are also regularly used in projects that involve light drainage, fume, and exhaust applications.

Similar to regular PVC pipes, PVC duct pipes are incredibly strong and also have features such as low thermal conductivity and chemical and corrosion resistance. For chemical and temperature resistance, PVC ducts have the same properties as standard PVC pipes, and they resist numerous chemicals that rust metal pipes. PVC and PVC duct pipes both are able to handle temperatures up to 140F (60C).

In other words, the only difference between PVC pipes and PVC duct pipes is their wall thickness and cost. 

3. PVC Duct Pipes Come in a Range of Sizes for All Projects

No matter what kind of project you are working on, you will be able to find the right PVC duct pipe and fitting for you. Currently, there is a comprehensive array of PVC duct pipes on the market. In fact, you can find these pipes in a range of sizes from two inches up to 60 inches. Usually, the smaller-sized PVC duct pipes are produced by extrusion while the larger sizes are created by rolling a PVC sheet.

One of the most common uses of PVC duct pipes is in exhaust systems as this inexpensive and lightweight material is ideal for moving unwanted fumes and the material’s high chemical tolerance means it can withstand corrosive gases.

In other instances, PVC duct pipes can be used in DIY construction as their low cost makes them accessible for both small and large projects. What’s more, the thin walls of the PVC duct ensure that the piping is relatively straightforward to cut and bend, making them easier to use than other piping materials which often require expert knowledge and tools.

Other applications for PVC duct include chemical processing, water and wastewater treatment, ventilation, and corrosive fume transfer. 

4. PVC Duct Fittings Need to Be Selected Carefully

PVC Duct Fittings Need to Be Selected Carefully

PVC duct fittings attach PVC duct pipes to each other to increase the length or adjust the direction of a plumbing system. Specific fittings can also connect or reduce the flow within the system. The size of the PVC duct fitting that is required depends on the dimensions of the pipes that it needs to connect.

Some of the most commonly used PVC duct fittings include 45° elbows, 90° elbows, PVC pipe hangers, duct tees, rigid and flexible duct couplers, duct caps, duct wyes, duct flanges, exhaust hoods, rain caps, and PVC flexible duct. Generally, you can find PVC duct fittings available with diameters ranging from 2″ up to 24″.

When selecting PVC duct fittings for your project, it is crucial that you understand how the sizing works. PVC duct fittings use the nominal system which means that parts are compatible with each other if they are the same size, so a 2″ duct fitting will operate with a 2″ pipe.

That being said, it is essential to note that the outer diameter (OD) of the actual pipe is bigger than its nominal size. For example, that 2″ PVC duct pipe will have a greater OD than 2″. This is something to keep in mind when selecting your PVC duct fittings.

To ensure that your fittings work with your pipes, it is recommended that you always use a PVC duct fitting with a PVC duct pipe. While PVC fittings can be used with other pipe materials because they don’t have the same nominal size, it can be challenging to find the right ones.

5. Always Purchase High-Quality PVC Duct Pipes and Fittings

Always Purchase High-Quality PVC Duct Pipes and Fittings

In order to reap all of the potential benefits of PVC duct pipes and fittings, it is essential that you ensure you are purchasing high-quality products from a reputable seller. Before you buy any item, make sure you find a company that carries an extensive line of PVC duct pipes and fittings so that you can be assured they have the appropriate option for you.

As there is a large selection of fittings for duct pipes, it is crucial that you work with a seller that has a broad range of products on offer and who is highly knowledgeable about which parts and pieces fit together best and are appropriate for your project.

Furthermore, you want to ensure that all PVC duct pipes and fittings are sourced from a top-quality manufacturer; otherwise, you can’t be guaranteed that the products are going to be as robust and effective as you want them to be.

Conclusion

Have you ever used PVC duct pipes and fittings before? If so, what was your experience with them? If not, are you considering using them for an upcoming project? Which aspects of PVC duct pipes and fittings do you think are the most beneficial? Let us know your thoughts and any relevant insights in the comments below! 

Continue reading:-

Sustainable Solutions for Outdoor Living Spaces

0
Sustainable Solutions

With climate change and other environmental problems that the Earth is facing in the 21st century, it’s everybody’s responsibility to think about sustainability when building or renovating their homes. This is especially true for outdoor living spaces where people get closer to nature while spending time with family and friends. If you plan to upgrade your front yard, patio, backyard, or any other outdoor area in your home, you want to make the most negligible impact on the environment. You can achieve this goal by following these sustainable solutions for outdoor living areas.

1. Select Eco-Friendly Outdoor Decors and Furniture

Select Eco-Friendly Outdoor Decors and Furniture

For your decors to have a low impact on the environment, you may want to consider using things that you can easily find in nature, such as wreaths made from dried flowers, twigs and leaves from your garden, or floral arrangements that you’ve used inside your home.

You can also make wind chimes, mosaic tables, birdhouses, and other decors from scrap materials. Transform glass, broken plates, old wood, metal from old ad displays, or other naturally occurring materials you can find into fixtures for your garden and patio.

If you need to buy new furniture for your outdoor living area, you may want to buy from brands that use sustainable raw materials. For example, if you check out Neighbor’s outdoor furniture collection, you’ll discover products that use responsibly sourced materials from FSC-certified forests. This certification signifies that a product or brand does not contribute to the denudation of rainforests.

2. Try Solar-Powered Lights

Try Solar-Powered Lights

Many households have converted to energy-efficient light fixtures to save money on electricity and help protect the environment. However, you can go a step further in helping Mother Earth by using 100% solar-powered lights in your patio, yard, poolside, or fences.

If you have money to spare and available space, you can even go solar to power up your entire home. Aside from being a sustainable energy source, solar power has many benefits, including cutting your electrical costs and providing a backup power source when there’s an outage.

3. Go Native with Garden and Landscape Plants

Without a doubt, using exotic plants will make your garden or landscape look desirable and unique. But using foreign plants isn’t that good for the environment. Since they aren’t indigenous to where you live, you need more fertilizer and other unique materials to ensure that your exotic plants will thrive.

A better alternative that’s more sustainable and can also help promote a healthy environment for the local species of birds, insects, and wildlife is to use native plants in your garden and landscape. There’s a new growing focus on using native, habitat-supporting plants to support local biodiversity. Who knows, maybe this small step will significantly boost the butterfly and bee population in your area which, in turn, will enhance plant pollination.

4. Build Using Green Materials

Build Using Green Materials

One of the important trends is to design outdoor areas that appear like an extension of indoor spaces. Since people were cooped up in their homes due to the 2020 pandemic, many decided to renovate their yards to spend more time outdoors.

If you intend to build a new deck, gazebo, children’s play area, or a more extensive space to entertain guests, it’ll help to be more mindful of the building materials you’ll use. You can recycle and reuse tiles, old wood, soil, and rocks for your new outdoor space for more sustainable construction. However, if you need to buy new construction materials, try your best to source them locally to minimize your carbon footprint or find eco-friendly materials that are sourced responsibly.

5. Incorporate Trees in Your Landscape

Incorporate Trees in Your Landscape

Trees are vital in a sustainable home. So, remember to include them in your landscape or garden design. The more trees, the better because they can suppress strong wind during winter, provide shade during summer, provide shelter for local insects and wildlife, and improve the air you breathe.

6. Think Sustainable Even with the Upkeep

To truly make an outdoor living space environmentally friendly, you may also want to think about sustainability when maintaining your home’s outdoor areas. Here are some upkeep tips you can follow:

  • Conserve water by collecting rainwater you can use to clean outdoor areas of your home.
  • Minimize water waste by using brooms or mops to clean your garden or deck.
  • Use compost to fertilize your plants.
  • Do not over-mow your lawn. Permit the grass to grow a little bit taller to minimize the need for mowing.
  • Try using pesticides and herbicides that are natural and chemical-free.

The Bottom Line

Making your outdoor living sustainable is not hard. Sometimes, even the most straightforward changes, such as planting trees or using solar lights, can already have a tremendous impact on the environment. Remember, you can enjoy your outdoor space better if you also help nature to flourish.

Continue reading:

Top 7 Best Greige Paint Colors Ideas in 2025!

0
Best Greige Paint Colors Ideas

Are you planning to paint your room walls? One of the hottest and popular trends is the neutral colors, especially Greige! I know the name might sound confusing; however, it is the top paint colors right now. Let’s see best greige paint colors.

Gray + Beige = Greige! Yes, it is made from two colors. It’s like the traditional beige from the ’90s, and modern grey got married and had a baby, named, greige. In simpler words, when you mix gray (a cool tone) with beige (a warm shade), you’ll get this charming and the best greige paint colors.                    

It is a perfect color option if you’re confused or can’t decide between cool or warm neutral paint colors for your home. You’ll get a surface that strikes a balance between two extreme color temperatures with the greige color! 

They’ll seamlessly and gracefully blend with most decor and color schemes, and even you can make it the focal point of the room. You can select the cool and warm greige option according to your interiors or style. 

A hallway with a black light hanging from the ceiling

The cool hue will be an excellent choice for small and compact spaces as it will make the area look more open and spacious. In comparison, the warm greige shade will add a luster and will look lovely with pictures hanging on the walls, indoor plants, and other decor pieces. 

Today in this blog, we’ve gathered up seven trendy and popular greige color options for you. You can try these options in your kitchen, bathroom, bedroom, or other parts of your home.

7 Stylish & Best Greige Paint Colors

A room with a bench and a vase with flowers

The best part or you can say the beauty of this color is that it looks good with all types of warm, neutral, and cool tones. You can use it with your modern farmhouse-style design or traditional theme. You can freely experiment with creative color combinations and bold pops of color. 

Here are the top 7 best greige paint colors ideas for you in 2023: 

1. Benjamin Moore Gray Mist OC 30  

A bedroom with a bed and a table with a vase of flowers on it

If you want a subtle tone that looks not too dull, not too crazy, then pick this one. This greige tone will give you the illusion of a bigger space. So it is a perfect and versatile choice for small rooms or any compact space in your house. This gray mist paint color is neutral and soft, so you can add a pop of colors or colorful accents if you want. 

You can use this shade in a place where there is less natural light because it will reflect light and make the room look spacious. You can decorate your place with decors with similar shades and tones. 

2. Sherwin-Williams Shiitake SW 9173

A dining room with a table and chairs

Another famous greige color is the Shiitake from the paint company Sherwin Williams. If you ask why it is so common among people? Just take a look at the above picture. Doesn’t it look beautiful? It will look gorgeous in modern spaces because it creates a meditative, calming ambiance.   

Homeowners of the above home have used this color in their modern dining room. Here space is decorated with light blue accents and light wood tones. As it is a cooler tone of greige paint, you can play with decors with similar shades. This will help to bring out the undertones beautifully. 

Additionally, you can include blues with wood accents as they will enhance the grey shades.  

3. Sherwin Williams Mindful Gray SW 7016

A white door with a bench in front of it

The next paint option on our list is also from Sherwin Williams, and it is a pretty unique shade. We’re saying this is because when more natural light will come into your space, the more you will see the pretty beige shade. 

This happens almost opposite with the other paints. So as the day goes by the natural light increases and decreases and with that, you’ll see variations in the shade. Wouldn’t it be amazing?

You can use this shade in your dining area, balcony or entryway. Keep the decor simple and clean, and your space is ready to impress your guests and visitors! 

4. Light French Gray 

A bedroom with a white bed and a gray and white striped rug

If you like the paints with more gray tones, you should try light french gray. It will look absolutely mind-blowing in kids’ rooms or bedrooms. Just coat the walls with a single layer of this shade and leave it for drying for a few hours or overnight.

You can decorate the space with a small bed, some curtains and of course a rug. Take inspiration from the above room. Here white and various shades of gray have been used to amplify the wall color. 

You can also use the same trick and include decor items with matching shades with some kind of pattern. Hang some shelves and art pieces, and your space is ready to rock! Your children will love this new space which is full of inspiration! 

5. Sherwin Williams Worldly Gray (7043) LRV: 57

A white sink sitting under a bathroom mirror

Are you planning to renovate your bathrooms? Or are you looking for some bath paint ideas? Your search ends here! Just try this shade of greige paint known as worldly gray from Sherwin Williams. 

This tone of gray is not too warm, not too cold, and also not too dark, not too light. In short, it is ideal for any place but looks extremely good in spaces like bathrooms. So, create a fabulous farmhouse bathroom with a relaxing atmosphere with this incredible paint. 

6. Sherwin Williams Accessible Beige SW 7036

A dining room with a table and chairs

Love minimalism and neutral color palette? If yes, then this shade of greige paint will be best for you. It is called Accessible Beige SW 7036 from Sherwin Williams. This warmer neutral shade of paint will instantly create a cozier environment and a space that feels like a sanctuary. 

A kitchen with red cabinets and a center island

From its name Accessible Beige, many people think that it has more beige in it. However, it has just the right amount of gray mixed in!  That’s why it will make your room warm and inviting. 

You can decorate your space in a cocooning, relaxing space with some soft textures and organic decors. This shade works well in open-concept areas and spaces. 

7. Sherwin Williams Agreeable Gray (7029) LRV: 60

Sherwin Williams Agreeable Gray (7029) LRV: 60

Agreeable Gray is a color that has been in and out in the interior designing trends for many years. In 2023, it has again become one of the top paint color ideas. Many people love it because it works perfectly with a variety of spaces. 

A bed sitting in a bedroom next to a window

This shade is fairly light but still fairly dark to give a seamless depth. It will surely make your space interesting and welcoming. As its name says, Agreeable Gray, it will work from the bedroom, kitchen to bathroom, and entryways. 

Styling Guide: What Colors Go With Greige?

A table with vases and a mirror on top of it

Now many of you are curious to know about how to style the greige color or shade. As we already told you, greige is both a cool and warm neutral, which means it can really go with everything. 

A living room filled with furniture and a lamp

You can add neutrals, decors with a similar shade of the paint color, or even a pop of colors like green and purple. You can add literally any undertone shades to give a hint of color.  

A kitchen with a wooden table and chairs

This also depends on the shade of greige paint you select. Based on that, you can go with warm tones like rusts and yellow or cooler tones like blues and greys. 

A white wall with a bunch of gray paint swatches

To get you started, here are some more greige color options for you. So, take inspiration from these perfect neutrals and undertone colors. We’ve divided the greige paint into three categories: warm, cool, and dark color. You can select the one according to your home interiors and style. 

Warm Greige Paint Colors

A pink chair sitting in front of a window
  • Snowed In (Valspar)
  • Silky White (Behr Ultra)
  • Stone White (Glidden Essentials)
  • Alabaster (HGTV Home by Sherwin-Williams)

Cool Greige Paint Colors

Cool Greige Paint Colors idea
  • Skimming Stone (Farrow & Ball)
  • Blanched (Magnolia Home)
  • Soft Linen (Magnolia Home)
  • Cotton Knit (Behr Ultra)

Dark Greige Paint Colors

A bedroom with a bed and a bench in it
  • Cornforth White (Farrow & Ball)
  • Stone Harbor (Glidden Premium)
  • Yarn (Magnolia Home)
  • Greige (Behr Premium Plus)

You can use this in your bedroom, living area, bathrooms, and even porch and outdoor areas. Below are some more greige color inspirations for you:

A living room filled with furniture and a fire place
A room with a table, chairs and a painting on the wall
A room with a door and a mirror
A bathroom with two sinks and two mirrors
A living room filled with furniture and a fire place

The Bottom Line   

So, which greige paint color do you like the most? There are many variants of greige color options available in the market as well as online. You can even get a customized greige paint of your choice. 

So, grab a brush and start painting your place in these stunning greige paint shades. Finally, decorate your room with some decors and furniture, and you’re ready to get in on this trend.  

So these are some of the best greige paint colors options for you. I hope this blog helped you to select the right on-trend color for your home. If you like this blog, share it with your family and friends and help them in creating a welcoming and trendy space. 

Learn more: