Home Blog Page 38

How to Install Shiplap? Step-By-Step Guide

0
How to Install Shiplap

We have put together a comprehensive guide for your next project on how to install shiplap in your home.

Shiplap, a timeless interior design element, has gained remarkable popularity over the years for its rustic charm and versatility. This distinctive wall covering, characterized by its overlapping wooden boards, not only adds a touch of elegance to any space but also provides a sense of warmth and character.

Shiplap’s journey dates back to centuries ago when it was first utilized in shipbuilding, hence the name. Fast forward to today, and shiplap has seamlessly transitioned from maritime use to becoming a cherished interior design element.

Shiplap’s Integration Across Design Styles

Shiplap’s charm shines in its capacity to seamlessly complement diverse interior designs, ranging from coastal and farmhouse aesthetics to contemporary and industrial themes.

Beyond being a guide for installing shiplap wall, this blog aims to shed light on the myriad creative possibilities it offers for home transformations.

Whether you’re a DIY aficionado or a newcomer eager to tackle your inaugural home project, this comprehensive guide is sure to provide valuable insights.

What is Shiplap?

Shiplap – a distinctive form of wooden paneling, renowned for its indigenous use in safeguarding ships against extreme weather conditions and frigid temperatures.

Unlike conventional rectangular planks, the original shiplap boasts a unique design, featuring alternating recesses known as rabbets along its sides. These rabbets interlock seamlessly, creating a formidable barrier when the panels are stacked together.

So, delve into the realm of shiplap installation and discover how to infuse your rooms with an authentic sense of charm.

5 Primary Reasons for Installing a Shiplap

1. Room Enhancement

Shiplap isn’t confined to a specific room. It can revamp living rooms, bedrooms, kitchens, bathrooms, and more. Its ability to add texture, depth, and character to walls transforms any space into a welcoming environment.

2. Design Flexibility

Shiplap’s clean lines and understated elegance make it suitable for a wide range of interior design styles. Whatever the style of your home, shiplap can easily be incorporated into any design scheme.

3. Ease of Installation

Whether you’re a seasoned DIYer or a complete beginner, shiplap’s easy installation will appeal to both. With a bit of guidance on how to install shiplap, you can embark on a transformative home improvement project.

4. Longevity and Timelessness

There is something timeless about shiplap. It has maintained its charm for centuries, proving that it’s not just a fleeting trend but a timeless choice for enhancing your living spaces.

5. Paint and Stain Options

Shiplap’s surface is perfect for experimentation. You can paint it in various colors to match your interior scheme or stain it to bring out the natural wood grain. This adaptability ensures it complements your desired atmosphere.

10 Easy Steps for Installing Shiplap:-

1. Prepare Walls

Prepare Walls

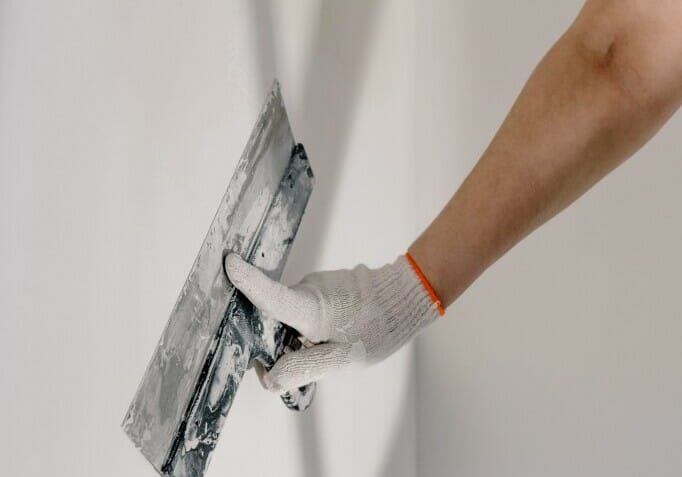
Preparing your wall before installing shiplap is a critical step that lays the foundation for a successful and flawless installation. Any existing imperfections or protrusions on the wall can result in uneven gaps between the shiplap boards, compromising the clean, cohesive look you’re aiming for.

Addressing moisture concerns before installation can prevent potential problems down the line. Prepping the wall helps create a moisture barrier, safeguarding your investment.

Investing time in prepping your wall contributes to the long-term durability and appearance of your shiplap installation.

2. Paint

Paint your wall

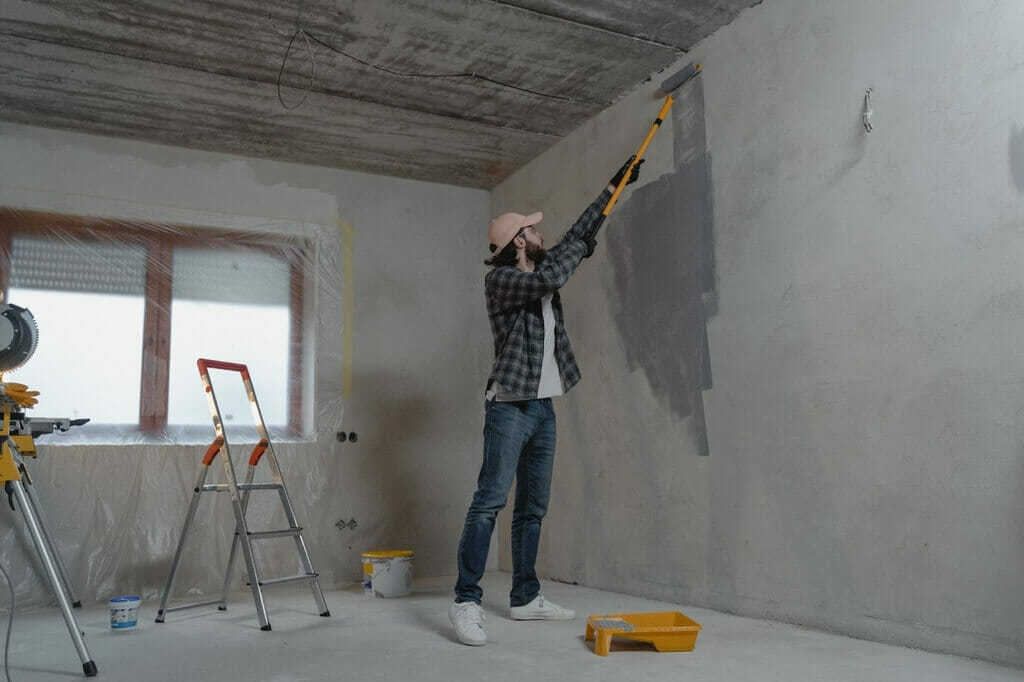
Once your surface is ready, apply a primer to create an optimal base for the paint. This is especially crucial if you’re transitioning from a darker color or working with raw wood. Choose a paint designed for wood surfaces and opt for semi-gloss or satin finishes for their durability and moisture resistance.

Allow sufficient drying time between coats, adhering to the manufacturer’s guidelines to avoid uneven textures. for this reason Maintain proper ventilation in the painting area to expedite drying and reduce fumes.

3. Measure Wall

Measure a Wall

Measuring the wall is a foundational and crucial step in the process of installing shiplap. Accurate measurements ensure that the shiplap boards fit perfectly within the available space.

The process allows you to establish a proper starting point and maintain symmetry throughout the installation. Precise measurements help you determine the exact amount of shiplap material you need. 

Proper measurements contribute to the overall visual appeal of the shiplap installation. As a result, by measuring carefully, you’ll ensure that every shiplap board fits perfectly, resulting in a stunning transformation.

4. Mark Vertical Studs

Mark Vertical Studs

Marking the vertical studs on your wall is a pivotal starting point in shiplap installation. These studs serve as the secure anchor points for your shiplap boards. 

Using accurate markings and locations will ensure that the shiplap is properly affixed to a stable foundation, ensuring the installation’s strength and longevity.

5. Make a Guideline

Make a Guideline

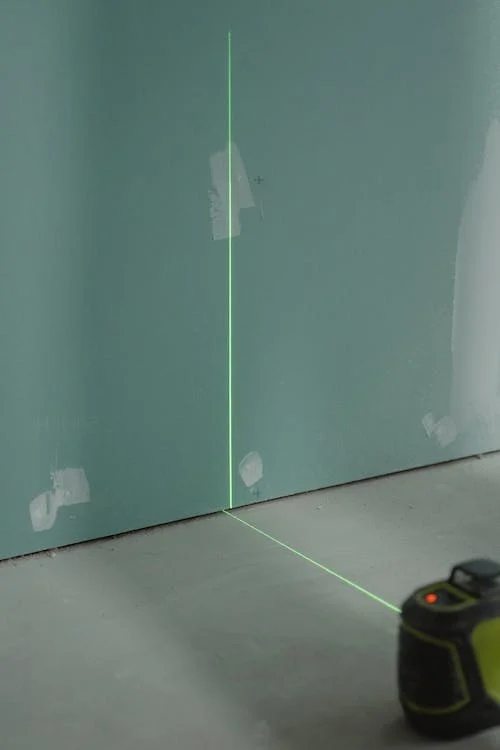
Creating a guideline is the next step in your shiplap journey. Use a level and a pencil to draw a straight, level line along the wall where you want the first row of shiplap to be.

This guideline acts as a reference point, ensuring that your shiplap installation starts off level and aligned.

6. Follow Guidelines

shiplap boards

Following the guideline you’ve marked, lay out your shiplap boards accordingly.

The alignment of each board in accordance with the guideline ensures an attractive and uniform installation.

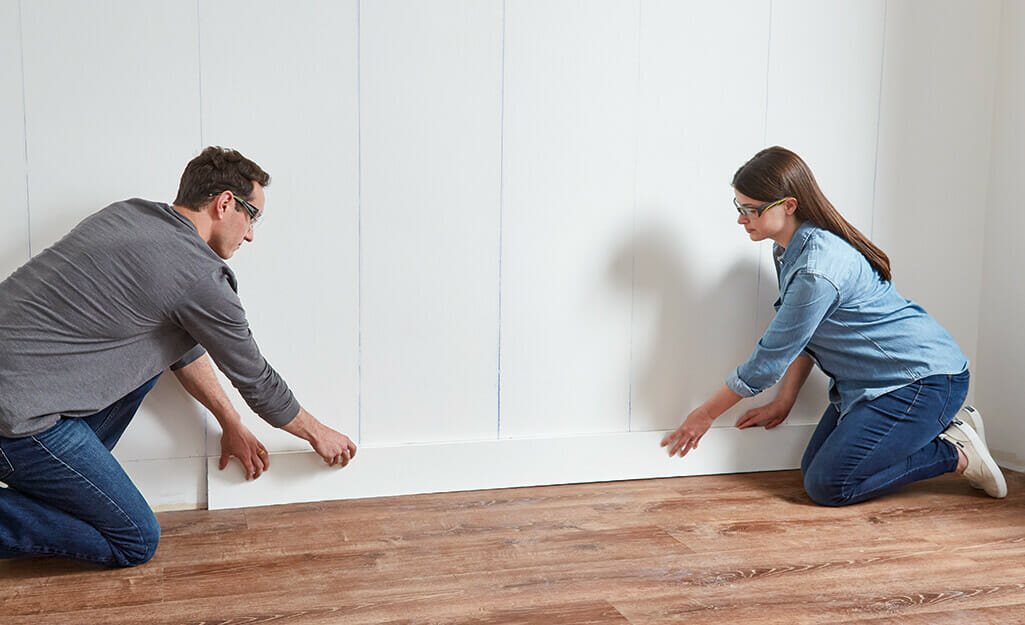
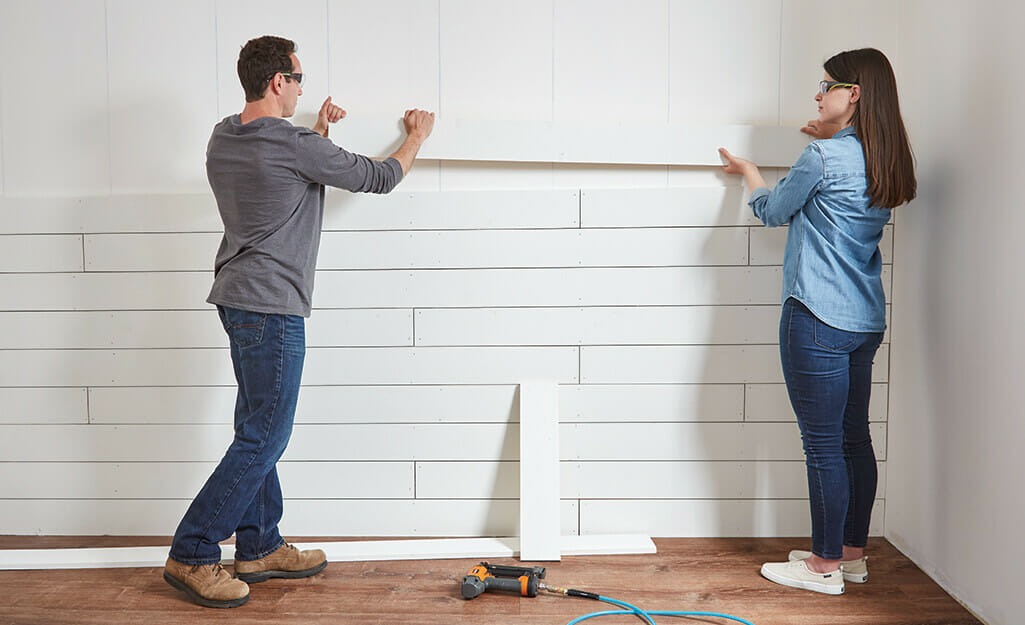
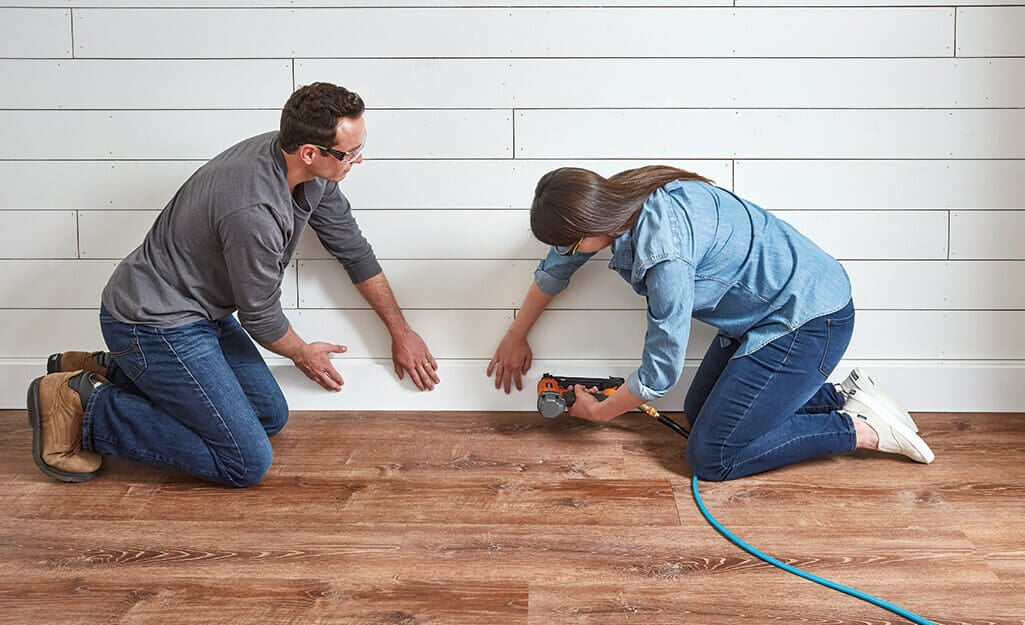
7. Attach First Row of Shiplap

Attach First Row of Shiplap

Now, it’s time to attach the first row of shiplap boards to the wall. Use nails or screws to secure the boards to the vertical studs you marked earlier.

This first row sets the tone for the entire installation, so make sure it’s level and well-affixed to the wall.

8. Place Nickel Spacers

Place Nickel Spacers

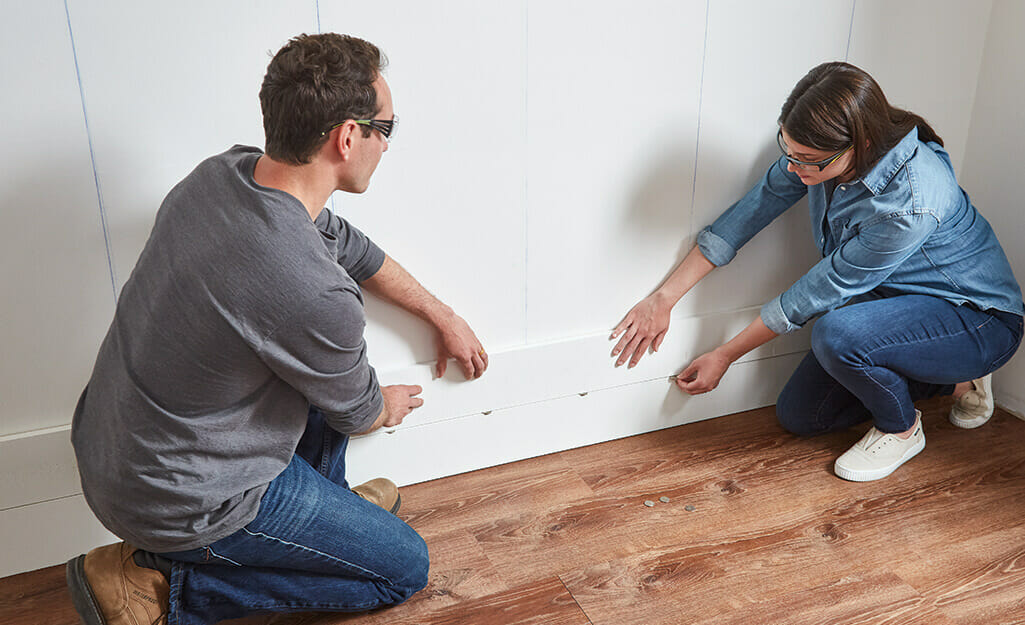
To ensure consistent spacing between each shiplap board, use nickel spacers as you install subsequent rows.

In addition to maintaining a uniform gap, these spacers allow for expansion and contraction due to changes in temperature.

9. Stagger Cuts

Stagger Cuts

As you progress up the wall, you may need to cut shiplap boards to fit around corners or obstacles. Stagger these cuts to create a more natural and visually appealing pattern.

Staggered cuts minimize the appearance of seams and create a smoother transition between boards.

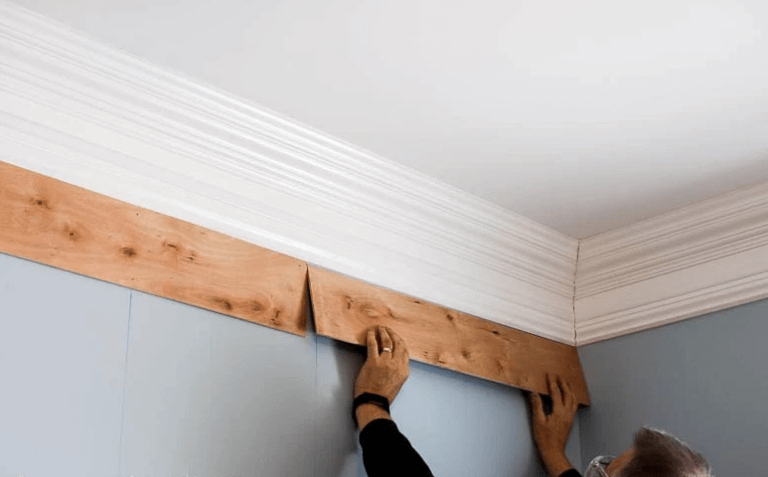
10. Attach Matching Baseboards

Attach Matching Baseboards

Once you’ve completed the shiplap installation on the wall, attach matching baseboards at the bottom.

Above all this finishing touch adds a polished look to the installation, concealing any gaps between the bottom row of shiplap and the floor.

Top 5 Methods for Mastering Shiplap Application

In each of these spaces, shiplap wall goes beyond being a mere wall covering. In other words it becomes an integral part of the room’s narrative, enhancing the ambiance and setting the stage for experiences that go beyond the visual realm.

1. Chic Farmhouse Kitchen

Chic Farmhouse Kitchen

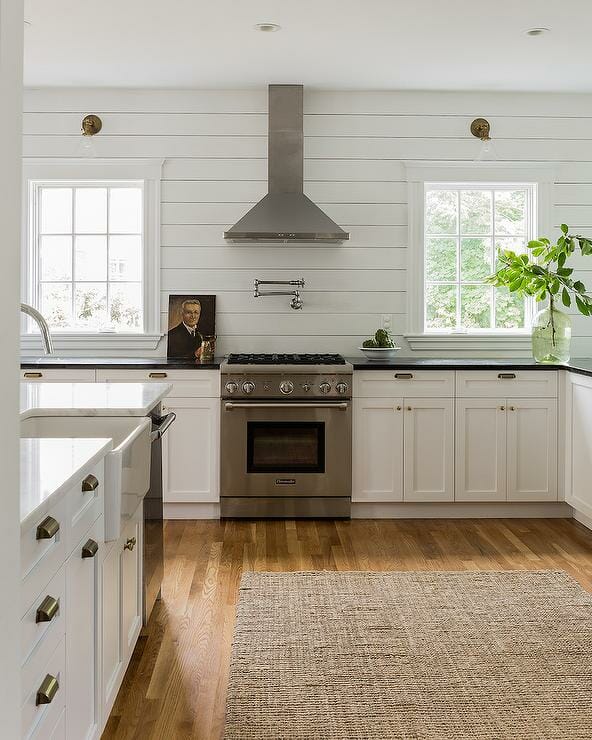
Enhance your kitchen’s rustic charm by installing shiplap on the lower half of your walls. This classic wainscoting style lends a touch of nostalgia while serving as a functional backsplash. The shiplap’s wooden texture complements open shelving and vintage accents, adding to the farmhouse vibe.

It’s not just a wall covering; it’s a statement piece that captures the essence of a modern-day farmhouse kitchen.

2. Elegant Dining Room Accent

Elegant Dining Room Accent

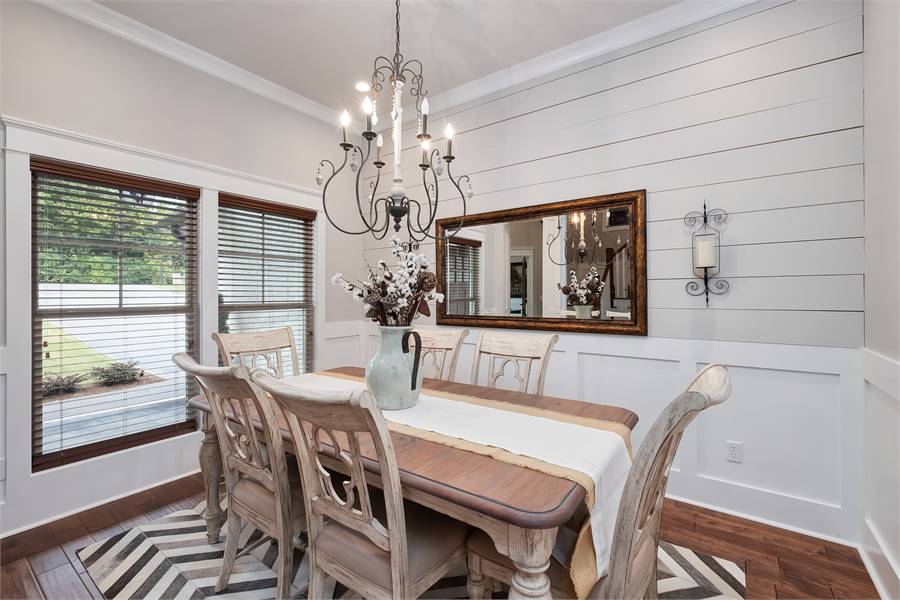
Elevate your dining experience by installing shiplap horizontally as a feature wall. A dark-stained shiplap wall can act as a dramatic backdrop to your dining table, creating an intimate ambiance reminiscent of a luxurious restaurant.

The interplay of light and shadow on the shiplap’s surface adds depth to your space, fostering conversations and shared moments.

3. Inviting Entryway Foyer

Inviting Entryway Foyer

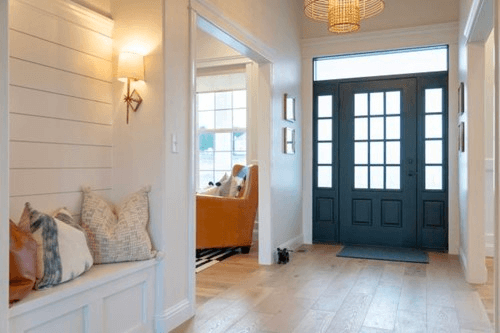
Make a lasting impression with a shiplap-adorned entryway that exudes warmth and hospitality. Installing shiplap on the foyer wall introduces an element of surprise as guests step inside. The unique texture beckons them to touch and feel, setting the tone for an inviting atmosphere.

You welcome people into a space that’s both comfortable and stylish as your front door swings open.

4. Soothing Bathroom Oasis

Soothing Bathroom Oasis

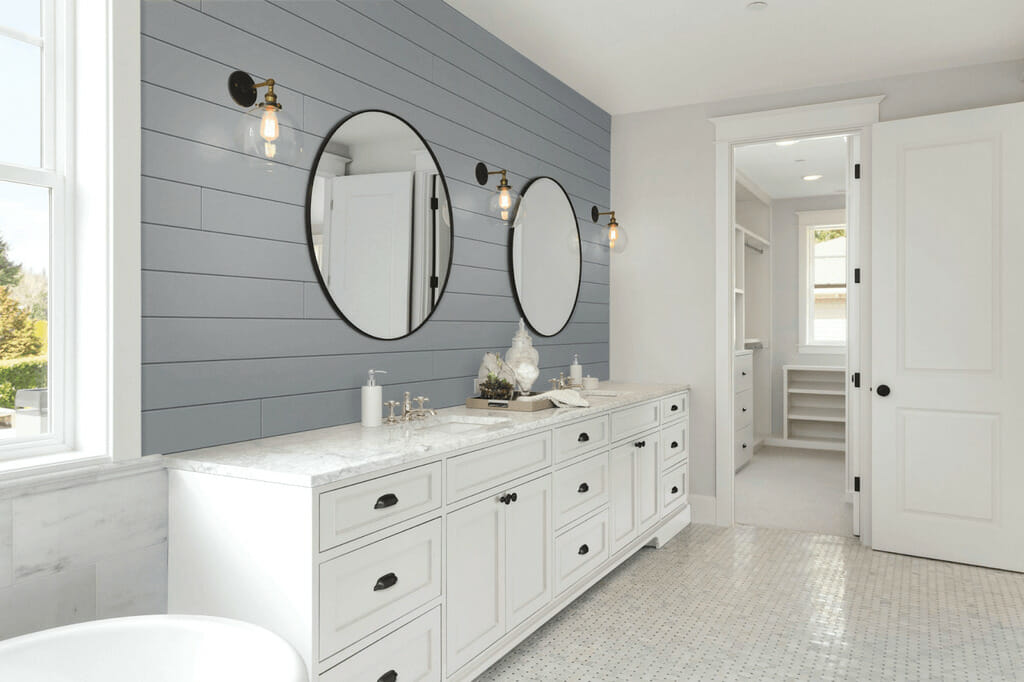
Turn your bathroom into a soothing oasis by enveloping the space with shiplap. Install shiplap vertically from floor to ceiling, creating an illusion of height and airiness. The wood’s natural warmth offsets the coolness of bathroom fixtures, establishing a harmonious balance.

As you soak in the tub, the shiplap walls provide a visual escape, evoking thoughts of coastal cottages and relaxation by the sea.

5. Serene Bedroom Retreat

Serene Bedroom Retreat

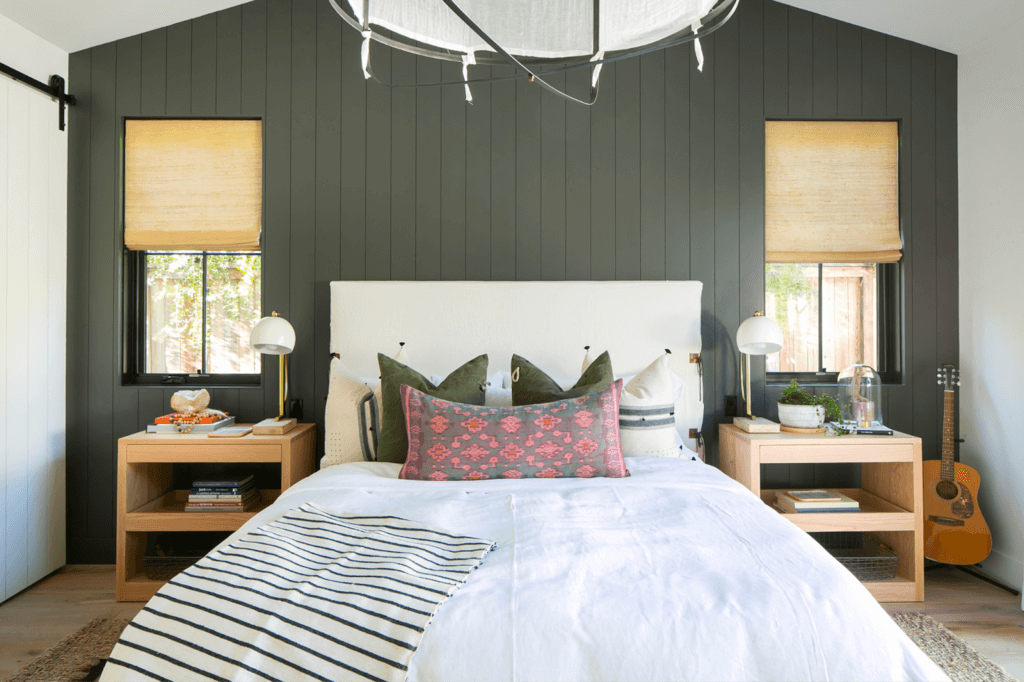
Shiplap can transform your bedroom into a serene retreat by adorning the wall behind your bed. Install shiplap vertically for an illusion of heightened ceilings and an elongated space. The tactile texture of shiplap provides a backdrop that’s both visually appealing and calming.

Similarly with the shiplap wrapping around your bed, the soft shadows create a tranquil atmosphere reminiscent of a cozy cabin.

FAQs

1. What’s the ideal approach for starters to tackle shiplap installation?

Well, beginners can set themselves up for success by taking things step by step, making sure to measure precisely, employing a level guideline, and beginning with a smaller project to get the hang of it.

2. Why shouldn’t shiplap be used?

Shiplap may not be suitable for areas with high humidity or moisture, as it can warp or deteriorate over time in such conditions.

3. How are shiplap seams concealed?

Shiplap seams can be concealed using wood filler or caulk to create a smooth, seamless surface before painting or finishing.

4. Is it necessary to remove existing wallpaper or paint before installing shiplap?

Yes, it’s advisable to remove wallpaper or paint from the wall before installing shiplap. A clean and even surface ensures better adhesion and prevents bumps or uneven gaps between the shiplap boards.

5. Can shiplap be installed over drywall or plaster?

Yes, shiplap can be installed over drywall or plaster. It’s important to ensure that the wall is structurally sound and free from damage. Installing shiplap over a solid backing creates a sturdy foundation for your installation.

Kick Off Your First Shiplap Wall:-

Above all as we conclude this journey through the meticulous steps of shiplap installation, one thing becomes clear – shiplap isn’t merely wooden boards on a wall; it’s an expression of your dedication to crafting a space that resonates with charm and sophistication.

But beyond the technicalities, how to install shiplap is a testament to patience, care, and creativity. So, as you embark on your shiplap journey, remember that every nail, every cut, and every decision contributes to the holistic narrative of your space.

Read More:-

11 Different Types of Fences for Home

0
Types of Fences for Home

The selection of the correct fence for your home can be a task. However, it is crucial because it impacts not only how it looks but also the safety and privacy of your property. There are various options available for fences, each having advantages and disadvantages of its own. Let’s examine each potential types of fences for home, to assist you in making a well-informed choice. Whether it’s the enduring charm of a picket fence, the toughness of a wooden fence, the attractiveness of vinyl’s low maintenance, or the safety of a chain-link fence. 

Learn more about fences as we explore them below to make sure the one you select perfectly satisfies your needs, your home’s specifications, and your preferences.

11 Types of Fences for Home

1. Brick Wall Fence

Brick Wall Fence idea

A brick wall fence should be built on a sturdy base to keep it maintenance-free. Additionally, it works well for soundproofing and reducing noise in yards or buildings.

Here’s how to DIY a brick wall fence:

  • Lay a strong foundation of concrete footings before installing the brick for the fence. 
  • Keep in mind level alignment and strong adhesion while using mortar for arranging the bricks. 
  • For an increased tensile strength, add reinforcing rods. 
  • To create a brick wall fence that will last and look good, maintain the thickness of the mortar.

Pro tip: Always choose a proper length of studding and, after drilling the holes, blow air to clear the dust before pouring in the epoxy glue.

PROS
  • Offers significant security and privacy.
  • Excellent durability and lifespan.
  • Low maintenance.
  • Weather and pest resistance.
CONS
  • Expensive initial installation.
  • Requires professionals for construction and repair.
  • Limited design flexibility compared to other materials.

2. Stone Wall with Iron Fence

Stone Wall with Iron Fence idea

A clever design that gives the impression of a fort, is a stone wall with an iron fence. It is visually appealing, strong, and eco-friendly. However it resembles a precast stone wall and is the best type of fence for backyard.

According to the experts, to seamlessly integrate the stone wall with an iron fence, select a stone kind that blends well with the pattern and color of the iron. 

Consider matching the heights of the iron fence and the stone wall to enhance the aesthetics.

Pro tip: To smooth the transition and create a harmonious and alluring barrier, add plants to the base.

PROS
  • Enhances privacy while maintaining a semi-transparent aspect.
  • Innovatively blends industrial and natural aesthetics.
  • Weather resistant.
  • Customizable designs, patterns, and colours.
CONS
  • Time-consuming installation.
  • High initial outlay of funds.
  • Iron components may rust over time.

3. Precast Concrete Fence

Precast Concrete Fence idea

Concrete fences are incredibly robust and long-lasting. They outperform all other types of fences for homes due to their resistance to the elements and debris. However Precast concrete fencing is just as resilient as thick bricks or concrete walls.

PROS
  • Very durable.
  • Has versatile design options, including textures and colours.
  • Low maintenance
  • Resistant to weather and pests.
  • Provides a high level of privacy and security.
CONS
  • Initial cost can be relatively high.
  • Requires proper installation for stability.

4. Wood Fence

Wood Fence idea

A wood fence has an enduringly classic look. Privacy, picket, and rail designs are the types of wood fences. Other options include redwood, pine, and hem/fir. However, cedar is the most popular types of fences for yards as it is rot-resistant. It’s the best types of fences for home.

PROS
  • Provides an aesthetic that is cozy and natural.
  • A variety of styles and designs are available.
  • Easy installation for some models for do-it-yourselfers.
  • Simple to alter, paint, or stain.
CONS
  • Susceptible to deterioration and weathering over time.
  • Require routine care, such as staining and sealing.
  • May not offer the maximum level of security.

5. Chain-Linked Fence

Chain-Linked Fence idea

Chain-link fencing is one of the strongest, long-lasting fencing materials available and is made of interlocking coated steel wire. However it is the best types of fences for the backyard.

To maximize functionality consider the following points:

  • To increase rust resistance, use a galvanized or vinyl-coated alternative. 
  • Based on your security requirements, choose a gauge thickness; thicker gauges give more strength. 
  •  To avoid sagging, make sure the installation is properly tensioned.
  • To increase privacy, attach slats or growing climbers.
PROS
  • Economical and budget-friendly choice.
  • Low maintenance as it doesn’t need painting or staining.
  • Provides visibility while also offering a certain amount of security.
  • Installation is quick and simple.
CONS
  • It might not be the greatest option for homes with architectural characteristics that demand a more aesthetic fence.

6. Barbed Wire Fence

Barbed Wire Fence idea

A barbed wire fence offers a distinct rustic charm to any landscape. Its weathered appearance blends seamlessly with rural surroundings, evoking a timeless aesthetic. 

To enhance longevity, regularly inspect the wire for signs of corrosion and promptly replace any compromised sections. To maintain effectiveness, ensure the wire is properly stretched.

Pro tip: To prevent climbing, install the fence at a minimum height of 4 to 5 feet.

PROS
  • Effective shield against intruders and animals.
  • Low maintenance.
  • Relatively low cost.
CONS
  • Has a rough appearance.
  • Safety issues, particularly if installed incorrectly. 
  • Not recommended for families with kids or pets.

7. Uncut Boulders Fence

Uncut Boulders Fence idea

Uncut rock fencing provides a distinctive and natural fence option. 

Follow these instructions to use uncut rocks to build a secure and beautiful fence:

  1. Make a strategy for the arrangement, making sure the boulders are positioned with stability in mind. 
  2. Make sure the trenches you dig for each boulder are deep enough to serve as a stable base.
  3. Place the rocks in the trenches, adjusting their placement for a level and visually acceptable alignment. 
  4. To hold the stones in place, backfill the trenches with gravel or concrete.

Pro tip: For a more natural appearanced, leave spaces between the rocks; otherwise, fill them with smaller stones or cement.

PROS
  • Natural and rustic look. 
  • Excellent resistance to weather and wear. 
  • Requires minimum maintenance.
CONS
  • Limited supply and expensive transportation.
  • Time-consuming installation.
  • May not offer complete security or privacy.

8. Aluminium Fence

Aluminium Fence idea

This Aluminium fences offer the maximum amount of security as,

  • It is difficult to climb on.
  • Impossible to cut through.
  • Their spear pickets help avoid trespassers and animals.

Aluminium fencing is one of the least susceptible alternatives, yet the danger of corrosion on a metal fence depends just as much on the finish material as it does on the underlying material.

PROS
  • Wide variety of styles and coatings are available.
  • Rust and corrosion-resistant. 
  • Lightweight and easy to install.
  • Low maintenance.
CONS
  • Less durable than other materials.
  • Might not provide the greatest degree of security.

9. Vinyl Fence or PVC Fence

Vinyl Fence or PVC Fence idea

Vinyl fencing is a versatile alternative to traditional wood or metal options. Its synthetic composition helps in resisting rot, corrosion, and weathering, which in turn requires minimal maintenance over the years. 

This low-maintenance attribute saves you time and money, as it doesn’t demand regular painting, sealing, or rust treatment. Vinyl fencing offers an array of styles and colours that mimic wood grains and metal finishes, granting you the freedom to achieve the desired aesthetics. Unlike wood, vinyl doesn’t splinter or warp, ensuring a smooth and safe surface.

PROS
  • Easy to maintain, with no need for painting or staining.
  • Resistant to decay, insects, and weathering.
  • Available in various styles and colours.
CONS
  • Initial pricing may be higher.
  • Less durable than wood or metal and more susceptible to damage from impacts.

10. Bamboo Fence

Bamboo Fence

A bamboo fence is a fence constructed by vertically installing bamboo in a line. It is also referred to as bamboo screening. After that it provides a means of maintaining privacy around the backyard, pool, or hot tub. The fence is extremely simple to construct and has an appealing look.

Pro tip: Make shallow ditches for the bamboo poles and pack the soil tightly around them to increase stability.

PROS
  • Visually appealing and versatile.
  • Bamboo is a sustainable material choice due to its quick growth.
  • Provides privacy while allowing airflow.
CONS
  • Might not offer the highest degree of security.
  • Requires regular maintenance to prevent weathering.
  • If not effectively maintained, it is prone to insect damage.

11. Living Fence

Living Fence

A living fence is a fence made up of trees or bushes. It goes by other names like a hedge or “green” fence.

PROS
  • Eco-friendly and aesthetically pleasing
  • Provides habitat for birds and insects.
  • It lessens noise and helps to enhance air quality.
CONS
  • It doesn’t offer the same level of security as other types of house fences. 
  • Regular maintenance and pruning are necessary.

Key Considerations for Selecting the Right Fence

Aesthetics, security, privacy, and upkeep are vital considerations to take into account while selecting the ideal fence for your house.

In conclusion each type of fence has benefits and drawbacks. Similarly there are several alternatives to choose from, ranging from the timeless beauty of brick walls to the nature of living barriers.

To ensure that your selected fence not only enhances your property but also satisfies your needs, it is essential to examine the benefits and drawbacks of various types of fence for your home.

Whether you value durability, beauty, or sustainability, therefore is a styles of fencing for you that can help you build a beautiful and practical living environment that is personalized to your needs.

FAQs on Types of Fences for Home

1. What is the best fence for a home?

The best option for a house relies on variables such as the desired level of security, privacy needs, aesthetic choices, and financial constraints. Before selecting a choice, it is essential to weigh the advantages of each type of fence against your demands.

2. Which fence style is often more economical?

Fences made of vinyl or metal are often more costly than those made of wood. Pine fences are often cheaper than rot-resistant woods like cedar among the wood choices available today.

3. What kind of fencing needs the least maintenance?

Unlike other materials, vinyl fence is renowned for requiring less upkeep. While still giving toughness and endurance, it offers an easy-to-care-for alternative.

4. How can I keep my fence looking good?

Make any necessary repairs after regularly inspecting your fence for wear and tear or damage. The fence enhances the beauty of the home with regular cleaning and upkeep, such as painting or staining, which makes it endure longer and seem more attractive.

5. What can I do to make my fence more secure?

Consider including elements like locks, electronic access controls, or security cameras in the design of your fence for increased security. Potential burglars can be discouraged by selecting a fence with few gaps and robust materials, such as metal or composite.

Explore Further:-

How to Choose the Right Adjustable Bed Frame for Your Needs?

0
Adjustable Bed Frame

The popularity of adjustable beds has risen a lot in the current years. These beds can provide you with better sleep, relieve pain, and give you the best comfort. 

If we talk about an adjustable bed frame, it is a type of bed base that allows to customize the positioning of the mattress, which results in increasing comfort and health benefits. 

When choosing an adjustable bed frame, there are many aspects that you need to consider. We will be talking about those aspects later in this blog.

This guide will tell you everything about adjustable bed frames. 

Different Types of Adjustable Bed Frames

1. Drift Classic – Adjustable Bed Frame

A man and a woman laying on top of a Drift Classic - Adjustable Bed Frame

This is a very useful bed frame that provides many advantages at a cost-effective price. 

The price of this bed frame is only CAD 929. 

Here are some of the amazing features of this bed frame:

  • Head Adjustment
  • Leg Adjustment
  • Wireless Remote
  • Zero Clearance
  • Adjustable Legs: 3″, 6″, 9″
  • Mattress Retainer Bar
  • Headboard Mounting (Optional)
  • Bed Slat Mounting (Optional)
  • Bluetooth Dongle for Smartphone App ( optional)

2. Drift Pro – Adjustable Bed Frame

Drift Pro - Adjustable Bed Frame idea

This bed frame is a very good addition to your bedroom. It is available in multiple sizes – Twin XL, Queen, and Split king; you can choose the one as per your requirement. 

This bed frame will cost you CAD 1103. 

Here are some of the features of this bed frame:

  • Head Adjustment
  • Leg Adjustment
  • Programmable Positions: 2
  • One Touch Flat
  • Anti-Snore
  • Zero Gravity
  • Back and Leg Massage
  • Wireless Remote
  • Underbed Lighting
  • USB Charger: 2
  • Zero Clearance
  • Adjustable Legs: 3″, 6″, 9″
  • Mattress Retainer Bar
  • Headboard Mounting (Optional)
  • Bed Slat Mounting (Optional)
  • Bluetooth Dongle for Smartphone App (Optional)

3. Drift Elite – Adjustable Bed Frame

Drift Elite - Adjustable Bed Frame idea

Drift Elite is the most luxurious bed frame providing a range of basic and premium features. This bed frame is also available in different sizes. 

The price of the Drift Elite is CAD 1485. 

Here are the amazing features of the Drift Elite bed frame:

  • Head Adjustment
  • Neck Adjustment
  • Leg Adjustment
  • Wall Hugger
  • Programmable Positions: 2
  • One Touch Flat
  • Anti-Snore
  • Zero Gravity
  • Back & Leg Massage
  • Wireless Remote
  • Underbed Lighting
  • USB Charger: Twin XL (1)/ Queen (2)
  • Adjustable Legs: 3″, 6″, 9″
  • Mattress Retainer Bar
  • Headboard Mounting (Optional)
  • Bluetooth Dongle for Smartphone App (Optional)

4. Casper Adjustable Base Max

casper adjustable max idea

This is a very good bed frame available for $2195. There are many amazing features of this frame that you are definitely going to love. Here are some of them:

  • Neck Tilt
  • Head Tilt
  • Foot Tilt
  • All The Way Flat
  • 2 Programmable Memory Buttons
  • Wireless Remote
  • 3 Leg-Height Options
  • Zero Gravity Feature — Promotes muscle recuperation
  • USB Port
  • 4-Zone Massage
  • Underbed Lighting
  • Wall-aligning

5. Lucid L300

Lucid L 300 adjustable bed frame idea

If you have ever assembled furniture with only an Allen wrench, you will appreciate how quickly the Lucif L300 adjustable bed base can be assembled. 

Here are the features of this bed frame:

  • Provides exceptional back support that relieves nerve and joint pressure all night.
  • Independent head and foot incline improves sleep apnea, eases congestion, lessens acid reflux, and decreases snoring.
  • It has a remote flashlight, memory position, and head- and foot-inclining options.

Tips to Choose the Right Adjustable Bed Frame

Adjustable bed frame idea

Today, there are a lot of adjustable bed frames in the market; thus, selecting the right adjustable bed frame can be challenging.

Follow the below-mentioned tips to buy a perfect bed frame:

  • Match the frame size with your mattress. 
  • Choose durable and quiet motors. 
  • Supports your weight. 
  • Select frames having a wide angle range. 
  • Go for friendly remotes or app control. 
  • Check for easy DIY assembly or professional setup.
  • Select the one that keeps the mattress in place. 
  • Select the ones having warranties that cover the frame and motor. 
  • Do check the reviews online, and select the one with the most positive reviews. 

How to Care for Your Adjustable Bed Frame?

A couple of people laying on top of a Adjustable Bed Frame

Here are the important points to care for your adjustable bed frame:

Regular Cleaning

Over time, dust and other particles may gather, which may affect the mechanism of the frame. You need to wipe the frame regularly with a cloth. 

Mattress Rotation

To even out wear, rotate the mattress every few months. It will help distribute the pressure evenly and prolong the life of the mattress and the frame. 

Mechanism Lubrication

Use a lubricant for the moving parts of the adjustable mechanism. It will ensure smooth & quiet adjustments and prevent strains on the components of the frame. 

Check Bolts

Check all the bolts and screws that keep the frame together. Over time, they can become loose due to movement. You need to tighten them to maintain the stability of the frame. 

Weight Limit

You need to be mindful of the weight limit specified by the manufacturer. Exceeding this limit can lead to premature wear & tear or even damage to the frame.

Benefits of Sleeping on An Adjustable Bed Frame

A Adjustable Bed Frame with a blue and white mattress on top of it

Helps in back pain

Many people experience back pain due to improper spinal support while they sleep. Due to this, one can feel the pressure on the sciatic nerve. An adjustable bed frame can reduce the pain in the back by allowing the mattress to adjust both head & foot to match the body’s natural position. 

Improve Digestion

The body digest and processes foods at the time of sleeping. You can elevate the head of your bed to the suggested 6 to 8 inches to improve healthy digestion by combining your mattress with an adjustable bed. 

Enhance circulation throughout the body.

Elevating your legs can enhance blood flow, reducing swelling and discomfort in the lower extremities. 

Offers versatility

The adjustable beds are amazing for various activities, whether you want to read a book, watching television, and many other activities. 

Enhance relaxation & sleep.

It allows for healthier body positioning. You can customize the settings until you find the most comfortable sleeping position. 

Final Thoughts

So, this is all about the adjustable bed frames. We have mentioned all the details regarding the bed frames, so if you are thinking of buying the bed frames for yourself, then this guide will be beneficial for you. Investing in a good adjustable bed frame is very fruitful for your body, sleep, and overall health. 

In case you missed it!

Top 10 Areas for Identifying Asbestos in Your Home in 2025

0
Asbestos in your Home

Asbestos was once one of the most common materials to construct buildings for decades. Because it is naturally occurring and incredibly affordable, the mineral was heavily embraced in construction for its affordability, resistance to heat, fire resistance, and electrical conductivity. Due to these insulating properties, asbestos was used in the production and manufacturing of attic insulation, drywall, and other essential building materials.

If you live in a house constructed before the late 1980s that contains asbestos and don’t know where to find asbestos in your home and remove it, keep reading.

What is Asbestos?

Asbestos is composed of six different types of natural fibers: chrysotile, amosite, crocidolite, tremolite, anthophyllite, and actinolite. Due to its exceptional resistance to heat, fire, and electrical conductivity, it was widely incorporated into a variety of building materials, such as insulation, drywall, joint compound, and vinyl products, to enhance their strength and fire resistance.

Nevertheless, it is crucial to recognize that asbestos is also a known carcinogen, and inhalation of its fibers can cause severe health issues, including asbestosis, lung cancer, mesothelioma, and other respiratory conditions.

Identifying Asbestos in Your Home

If you reside in a house constructed before the late 1980s, there is a possibility that it contains asbestos-containing materials (ACMs). Although modern building materials no longer contain asbestos, homes built in the past may still pose risks due to their presence in various areas.

1. Loose-Fill Insulation

Loose-Fill Insulation

Insulation is a common area where asbestos might be present. Older properties frequently used insulation that could be contaminated with asbestos. Loose-fill attic insulation is a significant concern, as it can release asbestos fibers into the air, leading to potential health risks.

2. Vermiculite Insulation 

The presence of asbestos contamination in Vermiculite mines led to the unintentional introduction of the mineral into numerous commercial and residential properties. Although offered enhanced insulating properties, the potential for fibers to end up airborne makes the material a risk. 

3. Flooring Materials

Flooring materials in homes built before 1981 might contain asbestos. Vinyl tiles, sheet flooring, and adhesive materials were commonly manufactured with asbestos for added strength and durability. Damaged flooring can release asbestos particles, making it essential to handle such materials with care.

4. Popcorn or Stucco Ceilings:

Textured or popcorn ceilings, popular in homes from the late 1960s to the 1980s, often contained asbestos to provide fire resistance and texture. When renovating or repairing these ceilings, testing, and removal by certified professionals are recommended.

5. Drywall and Joint Compound:

Drywall and Joint Compound

Asbestos was frequently used in drywall and plaster applications in the past due to its fire-resistant properties. Sanding, scraping, or drilling on surfaces containing asbestos can release harmful fibers into the air, necessitating the expertise of asbestos removal services for safe removal.

6. Basements:

Basements

Older properties with basements may have used asbestos-containing materials to insulate furnaces and stoves. Cement sheets, millboards, and paper were commonly employed for insulation purposes, and if these materials are damaged, they should be removed by professionals.

7. Exterior Facade:

Some exterior parts of older houses, such as stucco and siding, might contain asbestos. These materials should be handled with caution during any renovation or repair work.

8. Cement & Textured Coatings

Cement & Textured Coatings

The inclusion of asbestos fibers added durability to the cement, enhancing its structural integrity and making it suitable for construction in high-temperature environments. Textured coatings containing asbestos provided buildings with fire-resistant surfaces that could withstand intense heat and contribute to overall fire safety. 

9. Pipe & Duct Wrap 

Asbestos has a fibrous nature that makes it ideal for insulating pipes and ducts in industrial settings because it effectively retains heat. The mineral’s resistance to fire further contributed to its suitability for these applications. The potential contamination should be considered prior to plumbing and HVAC work. 

10. Rope Seals & Gaskets 

Asbestos rope seals were effective at containing heat and preventing leaks in high-temperature environments, while asbestos gaskets ensured reliable sealing between heat-sensitive components.

In spite of asbestos’ practical utility, health risks related to asbestos exposure led to the development of alternative materials to improve workplace safety and environmental health.

Conclusion:

Exposure to asbestos fibers can lead to severe respiratory diseases, including mesothelioma, lung cancer, and asbestosis. Older homes, constructed before the late 1980s, may still contain asbestos-containing materials, and it is essential for homeowners to be vigilant about potential risks.

If you suspect the presence of asbestos in your home, never attempt removal on your own. Engage licensed professionals with expertise in asbestos testing and removal to ensure a safe and controlled process.

By handling asbestos materials correctly and raising awareness about its risks, we can work towards creating safer living environments and protecting human health from the dangers of asbestos.

In case you missed it!

Top 10 Benefits of Artificial Grass Installation

0
Benefit of installing artificial turf

Artificial grass has become popular for its transformative capabilities. Turning struggling lawns and hard-to-maintain landscaping into lush oases that elevate aesthetics, improve functionality, and enhance the outdoor experience.

Without the hassle of constant maintenance, updating surfaces and landscaping with artificial grass installation has given homeowners, businesses, and commercial property owners the gift of time and convenience. With high-quality European-engineered synthetic turf, the possibilities are endless.

Here are some of the leading benefits of artificial grass installation for residential and commercial properties.

Easy-To-Attain Beautiful Landscaping

Easy-To-Attain Beautiful Landscaping artificial grass

One of the most common uses of artificial grass is for landscaping purposes. Whether you have a small backyard or a sprawling garden, create a stunning, year-round green space with artificial grass installation. Unlike natural grass, artificial grass remains green and vibrant throughout the seasons, providing an inviting ambiance to your outdoor area without any of the challenges of natural grass. With synthetic turf, you can count on year-round allure for decades.

Low Maintenance Option

The biggest challenge with traditional landscaping and grass is the substantial maintenance investment. From mowing and watering, which can dominate weekends and evenings, to fertilizing and aeration, which can result in a hefty bill, the challenges are prominent month after month.

Artificial grass, on the other hand, requires minimal maintenance. A one-time investment gives you beautiful aesthetics without strenuous labor or costly maintenance, allowing you more time to enjoy your property hassle-free.

Safe & Shock Absorbent Surfaces

Safe & Shock Absorbent Surfaces of artificial grass

Backyards can get slippery, whether it’s wet weather, family water fights, or playground fun. No matter how old you are, the occasional slip and fall is always possible. On hard surfaces, falling off a swing or tripping on a rock can be incredibly damaging, causing large scrapes, bruises, and sometimes even broken bones or concussions. At Echoing Green, fall-rated EchoPlay is installed below the artificial grass to create a safer surface reducing the impact of falls.

The high-quality underpadding can also minimize joint strain when exercising for more comfortable workouts in the home or commercial gyms. The cushioned surface helps reduce the risk of injuries during falls, making it an excellent choice for homes, schools, gyms, and daycare centers.

Erosion Control

If you have sloping areas on your property that are prone to erosion from wind and rain, artificial grass can be an effective erosion control solution. Erosion can wreak havoc on landscaping, making it difficult to install swimming pools, decks, and other outdoor features because of the changes in the grade of the land. Synthetic turf installation enables stability in the ground below, preventing erosion while maintaining a visually appealing landscape.

Water Conservation

Water Conservation affect of Artificial Grass

Water is a precious resource that is vital to protect. In some areas, access to clean water is limited. The upkeep of natural grass demands an immense amount of water, which only increases with the size of your property and the environmental conditions. When treated with chemical fertilizers and pesticides, these harmful substances can quickly leach into the ground contaminating groundwater and local ecosystems.

Synthetic turf installation doesn’t require regular watering, significantly reducing your overall water consumption and mitigating adverse effects on water supplies for a healthier environment.

Non-Toxic and Safe for Pets and Kids

Pets and young children are typically unassuming. Because they are unaware of the hidden dangers of harsh chemicals in natural lawns, they are vulnerable to the adverse effects of these contaminants. From pesticides and chemical fertilizers to toxic weeds and mold, many hidden hazards are embedded in natural lawns.

Physical contact or accidental ingestion of these contaminants can lead to illness or physical discomfort. Pet owners and parents can let their loved ones play with peace of mind by switching to artificial grass installation.

UV Resistant and Fade-Free

UV Resistant and Fade-Free benefit of artificial grass

The color and vibrancy are one of the most noticeable features of a healthy, lush lawn. Unfortunately, maintaining that color with natural grass is quite challenging; minor weather changes, missing a day of water, or over-fertilizing can cause burnt patches and yellowing in the lawn, which is hard to restore.

Luxury artificial grass is engineered with UV protection to stop the bleaching effects of UV rays and prevent color bleeding, making the surface immune to fading and sun damage, giving you years of beautiful vibrant landscaping.

Long-Lasting Installation

Unlike natural grass, which often needs to be restored with new rolls of sod or extra grass seeds annually, artificial grass from leading suppliers offers decades of high-level performance. When synthetic turf installation is executed carefully with high-quality materials, it will survive windstorms, heavy rain, snow, and ice for many years.

Weed-Resistant Landscaping

Weed-Resistant Landscaping of artificial grass

Most people agree that weeds are the most tedious and frustrating part of lawn care and maintenance. Many people spend hundreds of dollars on weed removal programs or lose hours of their summer to manual weed removal just for the pesky intruders to appear again in a few days.

Artificial grass offers inherent weed control. Installed with a high-density weed barrier and without organic materials to support their growth, you can free yourself of weeds once and for all.

Cost-Effective Investment

Artificial grass installation is a long-term investment that saves property owners. Traditional lawn care and installation costs add up quickly, primarily through the summer when more resources are required to maintain a healthy lawn. By eliminating watering, supplies, services, and time required to upkeep your landscaping, you can save on utility costs and maintenance expenses, which can add up to thousands of saved dollars over the lifespan of your turf.

Final Words

Whether you have a small backyard, a rooftop garden, a bar, a condo, or a gym, synthetic turf can be customized to fit any area. It’s a perfect solution for transforming unused or challenging spaces into attractive, functional, and green environments.

Leading companies offering artificial grass installation can help you design custom artificial grass putting greens; you can elevate your poolscape with advanced drainage and cooling surfaces, build kid-friendly play areas, and more. Perfect for interior or exterior spaces, the options are endless with luxury artificial grass.

In case you missed it!

Temporary Modular Buildings: The Future of Construction

0

Modular buildings are the future of construction. From their inception nearly 200 years ago, temporary modular buildings have risen in popularity and continue to do so. Many industries are turning to them over traditional construction methods due to their wide range of benefits.

However, despite their popularity, temporary buildings are not without their challenges. The industry will have to work together to overcome potential travel and regulatory issues in order to reach the potential heights that are predicted. Luckily, widespread changes in company sustainability policy and key advances in technology ensure that the industry remains on track.  

History of Temporary Buildings

History of Temporary Buildings

Despite their recent popularity, modular buildings have in fact been around for close to 200 years. The first documented prefabricated building was constructed in 1837 in London. It was designed by a carpenter called Henry Manning for his son’s move to Australia. The building’s simple, straightforward design proved popular, and soon hundreds of similar buildings were transported out to Australia too.    

The history of modular buildings then stretched out across the Gold Rush era in America, the Crimean War, and beyond. In the UK, it was the end of WW2 that saw the biggest growth in temporary building usage. Many buildings were destroyed in bombings and temporary buildings gave governing bodies a quick, effective way to manage a growing housing crisis.

These buildings were only predicted to last a maximum of ten years but many outlasted their predicted lifespan. From here the modular buildings industry saw a wave of development and investment. It became apparent that the quick, simple, and cost-effective building process held a number of essential benefits to construction investors.   

Benefits of Modular Construction

The first and most obvious benefit is fast and simple construction. The majority of modular buildings are assembled off-site in controlled manufacturing facilities. This allows on-site workers to carry out essential groundwork at the same time, meaning the modular components can arrive and be assembled instantly.  

Following on from a faster construction process – one of the main beneficiaries of this is your construction budget. A quicker construction project is likely to cost less, and the simplicity of modular buildings means that there is less risk of unplanned and costly errors. 

Another key benefit is the increased flexibility that a modular building allows for. Buildings are often completely customizable and segments can be added or removed depending on requirements. This versatility is a valuable asset for businesses if they experience rapid growth or receive a large, one-off order.     

Due to the construction methods of modular buildings, they are heavily protected from the elements and any problems that may come as a result. Bad weather often spells disaster for construction projects and it’s not uncommon for damage to be caused by wind, rain, or cold. A higher level of quality control is therefore achievable as modular buildings are predominantly constructed indoors in controlled environments    

Challenges of  Temporary Modular Buildings

Challenges of  Temporary Modular Buildings

Modular and temporary buildings offer a number of advantages over traditional construction methods, such as faster build times, lower costs, and greater flexibility. However, there are also some challenges associated with these types of buildings, including:

  • Transportation costs and risk – Modular buildings are typically prefabricated in a factory and then transported to the construction site. This has the potential to be a costly and time-consuming process, and there is always the risk of damage during transportation. Still, overall build times are considerably less than regular building processes. 
  • Difficult financing – Modular construction projects often require larger upfront investments than traditional construction projects. This can make it difficult to secure financing, especially for smaller businesses or projects. Modular buildings are generally still cheaper than regular building processes, however.   
  • Regulations – Modular buildings must comply with the same building codes and regulations as traditional buildings. This can add to the complexity and cost of modular construction projects.

Despite these challenges, modular and temporary buildings are fantastic options for a variety of projects across a range of industries. By carefully considering the specific needs of the project, it is possible to minimize the challenges and maximize the benefits of modular construction.

The Future of Temporary Modular Buildings

The Future of Temporary Modular Buildings

Modular buildings continue to rise in popularity and there are a number of interesting developments within the industry: 

Increased Pressure to Boost Business Sustainability 

Modular buildings are inherently more sustainable than traditional buildings as they are built in factories where materials can be used more efficiently. Waste is also reduced as buildings only use the materials they need. As the demand for sustainable construction increases, modular buildings are expected to become even more popular.

Worker Safety Forces Growth in Off-Site Construction

Modular construction is a type of off-site construction, which is the process of building structures in a factory and then transporting them to the construction site. The off-site construction industry is growing rapidly, and modular buildings are expected to be a major driver of this growth.

One key reason for this is the improved worker safety that comes as a result of using temporary housing. Construction work is carried out in safe, controlled environments as opposed to building sites where many non-fatal workplace injuries occur.

New Technological Advancements in the Temporary Building Industry 

New technologies are being developed that will make modular construction even more efficient and cost-effective. For example, 3D printing is being used to create modular buildings, and this technology is expected to become more widespread and accessible in the future. This would greatly reduce build times and streamline the process even more.

Conclusion

As covered above, modular buildings continue to grow in popularity. The future is bright for the industry and the benefits of utilising their unique building processes continue to drive growth. 

A greater focus on sustainability – especially within the construction industry – has allowed many businesses to consider using temporary buildings, and worker safety has pushed the industry forward further. When these demands are combined with rapid advancements in technology, it’s difficult to see the modular building industry slowing down at all.  

In case you missed it!

How You Can Place Your Sofa for Optimal Functionality

0
How You Can Place Your Sofas

Imagine a lazy day when you don’t want to do anything; just lie down and just enjoy peace & comfort. Sounds good, right? We probably all want to be like this on some days, lie down comfortably, and enjoy our time. A sofa is the perfect piece of furniture to pass your day like this. All couch potatoes know this!

The sofa is the most essential piece of furniture in your living room. The sofa is not only a place of comfort but also can decide the aesthetics of the room; ensure your sofa placement is done in the perfect spot for maximum comfort and style

Here, we will tell you how you can place your sofa in the right way. 

Arrangement 1: A Focal Point

A Focal Point for sofa replacement

One main rule of setting the room sofa is pointing your sofa towards the focal point. In most of the cases, the focal point is the television. So, make sure to style a leather sofa pointing at your TV. If you don’t have a TV in the living room, you have to create a focal point facing toward the balcony or room door. Now, point your sofa towards this point of the room. 

Arrangement 2: Symmetry

While setting the sofa, you need to think about the balance. If there are a lot of visually heavy things on a single side of the area, then the whole area will look unbalanced. As sofas are large in scale, they will need something of the same weight across the room to establish a balance. Thus, you will see many people keeping chairs across from a sofa. 

If your living room is balanced, it will look beautiful. If you have a TV in your living room, arrange a three-seater sofa opposite the television and two single-seaters on each side for perfect symmetry. 

You can also balance the heavy couch with two chairs facing this sofa. Also, you can arrange a sectional if you don’t want to place many chairs around. 

Arrangement 3: Movement & Flow

 Movement & Flow for  Place Your Sofa

The sofa should be arranged in a way that doesn’t affect the movement in the room. You need to avoid close-knit positions where people might face difficulty entering the seating area. Make sure to avoid keeping the sofa near the doors. The setting should be such that it looks welcoming, and thus, a free-flowing order is the best for you. 

Arrangement 4: Corners and Walls

The sofa appears heavy, and thus, our first instinct is to keep them in a corner or line them to the wall. The room will feel airy if you give some gap between the two. However, if you have a small room, you should push against the wall.

Arrangement 5: Dealing with Sectionals 

It is difficult to place the sectionals because you can’t have a symmetrical arrangement. However, the positive point of the sectional sofa is that it won’t require add-ons. You can keep these sofas in any way, and they balance two sides perfectly. They can act as dividers if you have a living-cum dining room. 

What Are the Ideal Types of Furniture to Use with the Sofa?

What Are the Ideal Types of Furniture to Use with the Sofa

You can use various types of furniture along with the sofa. Selecting the right type of furniture will enhance the appearance of your living room and create an atmosphere that is perfect for relaxing. 

Here are some of the ideal types of furniture:

Chairs

Chairs are the most common types of furniture that go along with the sofa. You can choose the upholstered ones or the ones with the wood legs and arms.

Coffee Table

You can use the coffee table for drinks and snacks. One of the great uses of the coffee table is serving snacks to the guests. Buy a coffee table that contrasts well with your sofa. 

Bookcase

The bookcase is an item on the shelf that is used for holding books with open fronts and backs. 

Side Tables

The side tables will provide an additional space for drinks & snacks. You can also keep the other decoration items on the side table.

Final Thoughts

At last, we would say that arranging the sofa in the right way can optimize the space of your living room and improve its aesthetics. Thus, you need to arrange the sofa in the best possible space; we have mentioned some of the best ways of arranging your sofa in your living room. You can take ideas from these arrangements and set up your sofa in the same way. 

In case you missed it!

An Ultimate Guide to Industrial Roller Shutter Doors

0
Industrial Roller Shutter Door

Do you want to improve your industrial, garage, or commercial property? If yes, there is an excellent option: roller shutter doors!

Roller shutters are strong, durable, and particularly designed for spaces like garages, warehouses, and manufacturing facilities. You can easily open or close them by raising or lowering the shutter doors either manually or automatically. Not only do these doors provide aesthetic looks to your space, but they also offer maximum security.

So, if you’re concerned about protecting your home or business from theft, vandalism, or harsh weather, industrial roller shutter doors are the best option!

These days roller shutters are quite popular due to their functionality and numerous benefits that other types of doors don’t offer. These doors are available in several materials, including wood, steel, and aluminum.

Industrial Roller Shutter Doors

This article explains everything about industrial roller shutter doors. We’ve covered all the important details, from the best materials for roller shutters to their benefits. So, whether you’re reading about roller shutter doors for the first time or you just want to replace the existing one, this guide will help you.

Let’s begin.

What Are Industrial Roller Shutter Doors?

Roller shutters are vertical rolling door systems consisting of horizontal slats. These doors are operated by rolling the slats directly up or down with the help of a spring and an electric motor.

These roller shutter doors are made with high-quality, durable materials like metal, steel, aluminum, and polycarbonate. They are mostly used in spaces like factories, workshops, garages, and warehouses. These doors are large but can be easily lifted without any noise. These shutter doors also offer high-end security and protection from rain, wind, and snow.

Applications of Industrial Roller Shutter Doors

Guide Industrial Roller Shutter Doors

Roller shutter doors can easily be installed both internally and externally. These doors are often used for security and protection at the entrance or exit points of a home or business building.

Industrial roller shutter doors are commonly used at the following places:

  • Warehouses
  • Manufacturing plants
  • Loading bays and docks
  • Agricultural buildings
  • Aircraft hangers
  • Supermarkets
  • Shopfronts
  • Factories
  • Parking lots
  • Storage facilities
  • Distribution centers
  • Industrial units
  • Construction sites

Best Materials for Roller Shutters

Best Materials for Roller Shutters

Today, roller shutter doors are available in a wide range of materials. Depending on the uses and application, you can select the one. These roller shutters can be made in various sizes and designs. The most popular materials for industrial roller shutter doors are steel and aluminum. Every material has its own benefits and functionality.

Here are common materials used for roller shutter doors:

Steel Roller Shutters

Steel is a widely used material to construct roller shutters. This material has great structural strength and durability, so it offers excellent safety and security. You can opt for a type of steel according to your building requirements and risk factors.

For example, if you live in an area with extreme weather conditions like heavy rain or snowfall, or if your business needs high levels of security, steel industrial roller shutter doors are a perfect option. Steel shutters are long-lasting and withstand any harsh climate conditions.

Steel is not only a strong material, but it also looks great. It will give an aesthetic look to your manufacturing unit, or storage space. These types of shutters are also easy to install. They are available in different sizes, designs, and finishes, so you can select the one according to your needs.

Steel roller shutter doors are fire-resistant and can maintain their pristine appearance without any major renovations or maintenance for many years. These things make steel roller shutters ideal for hospitals and chemical industries.

Aluminum Roller Shutters

You can elevate the appearance of your garage, manufacturing unit, or warehouse with aluminum roller shutter doors. These doors offer great looks and protect your property from all kinds of danger. These doors are ideal for industrial and commercial spaces.

These multi-purpose industrial roller shutter doors are made with durable, long-lasting aluminum. These roller shutters are great for areas with high temperatures. They have high heat reflectivity, which makes the area cool from the inside. This will reduce air conditioning requirements which will ultimately decrease your energy bills.

With these shutters, you do not have to worry about rust and corrosion as it does not affect aluminum. Due to this, they will remain beautiful and shiny for many years. Also, as compared to other roller shutter materials, this is a cost-effective option.

You can buy these roller shutters easily from the market or online. They’re also available in various sizes and designs. You can easily install and remove them without spending too much.

Benefits of Installing Industrial Roller Shutter Doors

Benefits of Installing Industrial Roller Shutter Doors

Roller shutter doors are cost-effective, multifunctional, durable, and have plenty of other benefits.

Here are some of the major benefits of installing roller shutters in your space:

Aesthetic Appeal

Industrial roller shutter doors are available in various sizes, designs, materials, and colors. You can get anything that fits your budget and requirements. These roller shutters instantly make your commercial space look more attractive and appealing.

Privacy

You can easily open and close your roller shutters either manually or automatically. This way, you will get appropriate privacy from people walking on the streets or your neighbors.

Security

Whether it’s your garage or manufacturing shop, security is vital. Industrial roller shutter doors provide great protection from theft and vandalism. Once the doors are closed, no one can see what’s inside, reducing the risk of theft.

Weather Protection

Roller shutters are made from strong and sturdy materials like steel and aluminum, which provides maximum protection in harsh weather. You can store all your products and goods in storage units or warehouses without worrying about damage from heavy rains or wind. These industrial roller shutter doors keep your space insulated in winter and cool in summer.

Easy Installation

Roller shutters are easy to install and use. These doors are made with sturdy but lightweight materials; hence anyone can access them. You can purchase roller shutter doors operated by a button or a hand-held remote.

Conclusion

Industrial roller shutter doors are a great way to protect your home or business. Whether you’re seeking extra security or protection from extreme weather conditions, these roller shutters are an excellent option. You can buy shutters in materials like steel or aluminum as they’re more durable and energy-efficient than others. So, buy your favorite industrial roller shutter doors and add more security and functionality to your property.

In case you missed it!

5 Small Things That’ll Make Your Garden Unique

0
unique garden idea

Imagine yourself sitting in a lawn chair in the middle of the most beautiful garden. Do you see the flowers blooming, the greenest grass, and the trees grow like crazy? Do you hear the wind passing by and water somewhere in the background? Now, open up your eyes. Think about the garden that you just saw and compare it to the one in your backyard. They don’t look the same, do they?

Fortunately, you can do something about it without breaking a sweat. A few simple steps should bring a breath of fresh air into your backyard. Create your dream garden in the real world. You deserve a peaceful, pretty place that is relaxing and unique at the same time, so let’s get to work.

Here are some of the best garden ideas you should try.

Start with a Wow Factor

Start with a Wow Factor

Every garden needs an eye-catcher. Having something that will keep your yard appealing all year round is a necessity. Something that is not seasonal and won’t require much work, yet is unforgettable. An exciting feature in your aspiring garden, exciting being a crucial word. And what you need is a small pond or water fountain. Why water? Because of its movement and sound.

It will renovate an illusion that your garden is living a life on its own. Also, the sounds of water are proven to be truly relaxing. It may seem that these things are a lot of maintenance work, but it is simply not true. Technology is also advancing within the gardening industry, and you should take advantage of that. You can easily find simple solutions for your garden, provided by, for example, Living Water Aeration, and have a new main attraction in your garden soon.

Plant a Rose

unique garden ideas: Plant a Rose

To be more specific, plant a huge rose bush. There is not a person that won’t appreciate the subtle beauty of this gorgeous flower. Roses are one of the most popular flowers purchased in the world, but do you have any idea how many kinds of roses are there? At least 150. Choose the one that is most exciting and will last the longest in your local climate, and plant it right away.

The biggest advantage of having a rose bush is the little work it needs. All your responsibilities are as follows. Water it from time to time, shape it once a year, and cover it for the winter. Forget about those simple flowers that everyone has in their garden and have to change a few times a year. Instead, amaze your family and friends with a bed of roses.

Herbs for a More Tasteful Place

unique garden ideas: Herbs for a More Tasteful Place

Herbs are great contributors to a unique garden. Having a few herbs in your garden has three basic advantages. You have great eco products for your kitchen. It is a clear message that your garden is not only here for the looks, but is as practical as a garden can be. And of course, the smell. You can also prepare something more special. Instead of having basic basil and mint, plant lemongrass or leek. Stand out even in the herb section of your garden. Herbs like parsley, sage, rosemary, and thyme are too common for your exquisite backyard.

Get Your Garden Crowded

unique garden ideas: Get Your Garden Crowded

Fill your garden with outdoor furniture. This step will require some more research because you can only imagine how many types, shapes, and colors of garden furniture there is. What you should do is dive into the web and look for those most outstanding and surprising pieces. Don’t bother with simple lawn chairs. Look for furniture that may seem a little strange, but once paired with that rose, you just planted, breath-taking. These could be secondhand pieces of furniture. Choosing older stuff would make your garden even more uncommon, and you will save some money on the way. Also, a helpful tip is to look for easy DIY hammock tutorials. Have some fun by yourself, creating your unique garden.

Lighting That will Make Your Garden Shine

unique garden ideas: Lighting That will Make Your Garden Shine

We talked about your garden being a star all year round, and nighttime counts as well. Late night dinners in the garden? Why not! Choose unique lighting and make your garden just a little bit more special. Look for different shapes like cubes or balls for your lighting and place them in strategic places all-around your garden. Sometimes one or two lights can make a huge difference. And don’t forget that you can get crazy with the color of the light. Use green for a peaceful evening, red and pink for a date and change them frequently during your garden party. Small and easily noticeable, just what you’re looking for.

unique garden ideas

Conclusion

Now that you know how to change your garden into a local attraction, make these ideas your own. Include your personality in the garden upgrade process. And don’t be afraid to get a little bit crazy. Remember what you envisioned before, and take some time to turn your dream into reality.

Read More:-

How to Optimize Air Conditioner Usage for Maximum Efficiency

0
How to Optimize Your Air Conditioner Usages

Air conditioning is a lifesaver during those sweltering hot days when the sun feels like it’s out to fry you up. But let’s face it, cranking up the AC can lead to jaw-dropping electricity bills and running costs that can bring tears to even the toughest Aussie’s eyes. So how do we keep our homes cool and our bank accounts happy? That’s where the art of balancing comfort and energy costs comes into play.

In this guide, we’ll dive into the ins and outs of air conditioning systems, discuss the factors that affect energy costs, and provide you with a treasure trove of tips on how to optimize your air conditioner usage for a comfortable and energy-efficent home. We’ve got you covered, from setting a new air conditioner to the right temperature to leveraging energy-saving features.

What are Air Conditioning Systems?

What are Air Conditioning Systems?

Picture this: It’s a scorching summer day, and the heat outside temperature already feels like a relentless wave crashing down on you. Enter air conditioning, your trusty ally against hot, sweaty discomfort. But what exactly is air conditioning?

In a nutshell, air conditioning alters the temperature, humidity, and overall air quality within a space to create a more comfortable environment. It’s like having your personal weather control system in your home or office. The magic of air conditioning lies in its ability to remove heat and moisture from the air and indoor humidity and leave you with cool, crisp, and refreshing air to breathe.

Best Air Conditioners For a Rental Property

Best Air Conditioners For a Rental Property

Regarding air conditioning options commonly used in rental properties, there are several types to choose from.

Let’s explore some of the most popular ones:

1. Ducted Air Conditioning

Ducted air conditioning systems are often preferred for larger rental properties or those with multiple rooms. These systems consist of a central unit that cools and distributes the air through a series of ducts, delivering cool air to each room through vents. Ducted air conditioning offers whole-house cooling with the ability to control individual room temperatures.

2. Split System Air Conditioning

Split-system air conditioners are popular for residential and rental properties. They consist of two main components: an indoor unit that blows cool air into the room and expels heat. Split systems are versatile and efficient. They are often installed on walls or mounted on the ceiling.

3. Window/wall Air Conditioner

Window or wall air conditioners are compact units typically installed in a window or an opening in an external wall. They are a cost-effective option for smaller rental properties or individual rooms. These units cool the air and expel heat through the back or sides. They offer easy installation and can be a convenient solution for localized cooling.

4. Portable Air Conditioner

Portable air conditioners are versatile units that can be moved around and placed in different rooms. They typically have a ceiling fan and a vent that exhausts hot air from a window or through a wall. Portable air conditioners offer flexibility and suit tenants who cannot permanently modify the property.

Each type of air conditioner has advantages and considerations depending on the property size, layout, and individual preferences.

What are the major factors affecting the cost of energy?

What are the major factors affecting the cost of energy?

Now that we’ve acquainted ourselves with the different air conditioning systems, it’s essential to understand the factors influencing energy costs. By being aware of these variables, we can make informed decisions to optimize our aircon usage and keep our energy bill in check.

1. Outdoor and Indoor Temperature

Outside and indoor temperatures significantly impact your air conditioning’s energy consumption. On scorching hot days, when the mercury rises, your aircon works harder to cool the air to your desired temperature. The greater the difference between outdoor and indoor temperatures, the more energy your air conditioner will consume.

2. Humidity Levels

Humidity levels can also affect how your air conditioning system operates. High humidity makes the air feel sticky and uncomfortable, prompting your aircon to work harder to remove heat and moisture from the air. This increased workload can lead to higher energy consumption and, subsequently, higher energy bills. Keeping humidity and consistent temperature levels in check can help optimize energy usage.

3. Energy Consumption and Power Bills

Unsurprisingly, the more energy your air conditioning unit consumes, the higher your power bills will be. Energy consumption depends on factors such as your unit’s cooling capacity, the system’s efficiency, and how long and frequently it is used. Being mindful of energy consumption and finding ways to reduce your AC bills and can lead to significant savings on electricity bills.

4. Impact of Heating and Cooling on Energy Bills

While air conditioning provides cool relief during hot days, heating your rental property during colder months can also affect energy costs. Heating systems, including reverse cycle air conditioners, consume energy to move warm air into your space. Balancing the usage of heating and cooling throughout the year and optimizing temperature settings can help manage energy bills.

5. Energy Efficiency of Air Conditioning Units

Your air conditioning unit’s energy efficiency is critical in determining how much energy it costs. High-efficiency units are designed to deliver optimal cooling while minimizing energy consumption. Look for units with a high Energy Efficiency Ratio (EER) or a good star rating to ensure you get the most out of your aircon without draining your wallet.

Tips To Use Air Conditioning Efficiently and lower you energy bills

Tips To Use Air Conditioning Efficiently and lower you energy bills

Now that we understand the factors that affect energy costs, it’s time to explore practical tips and strategies to optimize our aircon usage. By implementing these techniques, we can strike the perfect balance between staying comfortable and saving energy. Let’s dive right in!

1. Setting the Desired Temperature:

  • Balancing Comfort and Energy Costs: Finding the sweet spot between comfort and energy efficiency is crucial. Avoid setting your air conditioner to extremely low temperatures, as it significantly increases energy consumption. Instead, opt for a temperature that keeps you comfortable without overworking the aircon.

  • Recommended Temperature Ranges for Different Seasons: During the hot Aussie summer, aim for a temperature range between 23°C and 26°C (73°F and 79°F) to achieve a cool and comfortable indoor environment. In winter, adjust your reverse cycle air conditioner to a cozy temperature range of 18°C to 20°C (64°F to 68°F) for heating.

2. Using Energy-Saving Modes and Features:

  • Energy-Saving Mode on Air Conditioning Units: Most modern air conditioning units come equipped with an energy-saving mode. Activate this mode to optimize energy usage by adjusting the cooling output and fan speed based on the desired temperature. It helps maintain a comfortable environment while reducing energy consumption.

  • Utilizing Smart Thermostats and AC Controllers: Upgrade your aircon system experience with smart thermostats and AC controllers. These intelligent devices offer features like sleep mode and economy mode, which automatically adjust temperature settings and fan speeds to conserve energy without compromising comfort. Some even utilize human sensors and remote control functionalities to optimize energy usage based on occupancy.

3. Leveraging Natural Ventilation and Other Cooling Options:

  • Ceiling and Pedestal Fans: Supplement your air conditioning with ceiling or pedestal fans. These energy-efficient alternatives circulate cool air throughout the room, allowing you to raise the temperature on your aircon while maintaining comfort. Consider using fans alone during mild weather to keep the air flowing and reduce reliance on the aircon.

  • Managing Direct Sunlight and the Sun’s Rays: Direct sunlight can heat your space, making your air conditioner work harder. Utilise blinds, curtains, or shades to block out the sun’s rays during the hottest parts of the day. Reducing the heat load on your aircon can save energy and maintain a cooler environment.

  • Using a Combination of Cooling Methods for Efficiency: Instead of solely relying on your air conditioning, explore other cooling options like natural ventilation and cross-ventilation. Open windows and doors strategically to let in cool breezes during the cooler parts of the day. Combining different cooling methods can reduce the need for excessive aircon usage.

4. Regular Maintenance and Air Filter Cleaning:

  • Importance of Clean Air Filters for Energy Efficiency: Regularly clean and maintain your air filters to ensure optimal energy efficiency. Dirty filters restrict airflow, making your aircon work harder to cool the air. The experts suggest cleaning or replacing the filters. It will help in maintaining accurate airflow, which will then lessen the consumption of energy.

  • Dirty Filters Can Impact Energy Consumption: A dirty filter may require more energy consumption, it can go up by 15%. It will then impact the cooling efficiency of the aircon and strains the system and due to this, your energy bills may rise a lot. Try to keep the filters clean or replace the filters every few months so that the aircon keeps running smoothly & efficiently.

By using the aircon optimization strategies, you can enjoy a comfortable environment in the indoor environment and also reduce energy bills. 

Final Words

In conclusion, we would say that a small change in optimizing the use of aircon can impact energy consumption and costs a lot. It helps in saving money and also contributes to a sustainable future by reducing the consumption of power and carbon footprint.

The “Upise Down” recommends exploring energy-saving programs by the local government or the energy providers. These programs give you crucial information, incentives, and discounts on energy-efficient gadgets, including air conditioners.

Stay cool and continue to a good future where everyone can enjoy the perfect balance between convenience & affordability.

For additional insights: