Home Blog Page 144

4 Ways to Spruce Up Your Home

0
Spruce up your Home

Given how tough last year was and the extra amount of time that we’re all spending at home now, it’s a perfect time to spruce it up. Not only will it make the home feel more like a new place, but it will become one that you’ll feel happier to relax in too.

Here are 4 ways to spruce up your home. 

Put in a Deck

Spruce Up Your Home by Put in a Deck

A wooden deck at the back of the property is a lovely addition. Being able to step outside and relax on a deck is ideal in the warmer months, but it also gives us something to look forward to as spring comes into view too. 

Firms like Home Pro America can install a deck with the appropriate size and shape that will fit into your backyard. It can then be used to relax, cook a BBQ, or sit out and read during the warmer parts of the day. Getting more sunlight will surely help with any potential Vitamin D3 deficiency from being indoors a lot.

Add a Throw to the Sofa

Add a Throw to the Sofa to Spruce Up Your Home

When a sofa or armchair has become a little stale and boring, then adding a throw rug to them does the trick. It’s an inexpensive update (rather than changing the sofa itself) to bring fresh vibrant color, cozy warmth, and a different texture to the lounging experience. Watching Netflix or Amazon Prime Video and relaxing never felt so good now.

Also, add some table lamps so you can turn off the main lights and rest your eyes. A standing lamp is also good when you love to sit in an armchair and read a book. Make the lounge as comfortable as possible rather than remaining as an afterthought. 

Create a Zoom Room

Create a Zoom Room to Spruce Up Your Home

Just like a reading nook was a popular thing in some homes, now the Zoom Room is what it’s all about. Anyone who’s finding they’re increasingly connecting to multiple friends, family, or even business associates using the Zoom app needs a quiet place to do so.

Creating a room specifically to have private conversations is the best way unless you can guarantee that your office won’t be invaded by the kids or your partner. Preferably it should be in a quieter part of the home too. And rules should be established that when someone is on a Zoom call, they’re only to be disturbed in an emergency. Use an OPEN/CLOSED store sign to clarify when the room is in use. 

Update Your Entrance Way

Spruce Up Your Home by Update Your Entrance Way

Clean up the area to make it more inviting. Remove any clutter that’s built up like shoes or boots that rarely get used and can be stored elsewhere. Avoid the tendency to create a bottleneck when people first enter the home. 

For homes with a porch out front, then don’t forget this area too. It could likely do with a little TLC to bring it back up to a good standard. Consider adding standing or hanging plants to introduce extra color into space. 

If you have a bigger budget, consider upgrading your entrance door to a smart new one. As well as looking more attractive, it will also be more secure. 

Add a Garden Office

Add a Garden Office to Spruce Up Your Home

Homeworking is all the rage right now. Millions of people have started working from home since the pandemic began, but it can cause problems when you are forced to share your workspace with kids and partners. After all, trying to participate in a teleconference while the kids are asking you questions about their schoolwork is not desirable; nor is working at the kitchen table with people in and out in search of food. 

One solution is to build a new garden office. Timber buildings make ideal home offices. If you plan on using your office all year round, look for an insulated building with double-glazed windows. To save money, you can buy timber garden offices as self-build kits, but you will need to hire an electrician to add lights and power outlets.

One great reason to add a garden office is that it will pay for itself by increasing the value of your property. Since so many people are working from home these days, home offices are a highly desirable feature, and homes that have them tend to sell faster. 

Conclusion

Sprucing up your home doesn’t always require major changes to get a satisfactory result. Leave the bigger ones to the professionals to ensure everything goes as expected. 

Discover More

Best Way to Repair A Damage Sewer Line

0
Repair A Damage Sewer Line

One of the worst nightmares of homeowners is a broken or damaged sewer pipe. It’s because dealing with sewer line problems can be messy and troubling. From minor sewer issues like a clogged drain to major problems such as burst pipes, there are different ways sewer line problems can be repaired. 

In this article, get to learn the signs of major sewer pipe problems and the best way to repair a damaged sewer line. 

Signs Of A Broken Sewer Line

Professional plumbers always advise homeowners to invest in proactive maintenance than waiting for major plumbing issues to occur. However, many homeowners fail to do this and end up needing emergency repairs. 

When you observe the warning signs below, it means you need to contact a professional plumber to perform emergency sewer repairs in Lorton.

  • Strong Sewer Odor: One of the first signs of a damaged sewer line is a strong, unusual smell that must be seriously taken care of. A crack in the sewer line may cause this problem.
  • Gurgling Toilet: A toilet that makes unusual noise after flushing could be an indication of a damaged sewer line. The gurgling sound happens because the trapped air is released abruptly. A leakage allows air to go into the sewer line. 
  • Slow And Clogged Drain: An isolated drain involves one drain that takes a long to clear, which is a minor plumbing problem. However, if all drains are affected, and you’re having a hard time clearing them, it indicates a major sewer line problem.
  • Mold And Mildew Formation: Mold growth means high moisture content is present. High humidity levels can aggravate the problem, causing the spread of mold and mildew on ceilings and walls. If this growth is accompanied by sewer odor, then it’s likely a damaged sewer line that’s causing the problem.
  • Regular Sewage Backup: If you notice regular sewage backup in the tub or toilet, then something is wrong. A tree root intrusion, crack, channeling, and a misaligned pipe connection are just some of the possible causes of this plumbing problem.
  • Other Signs: Also, walls that start cracking, pest invasion, greener lawn patches than usual, indentions on pavers or the lawn, and sewage pooling on the lawn are also possible signs of sewage line damage.

Different Ways To Repair And Replace Sewer Lines

A man with a hose attached to a pipe

Sewer lines suffer inevitable damage over time, such as corrosion of pipe materials, underground pipe disturbance due to trees and other vegetation, and physical damage. For this reason, prioritizing your plumbing during renovation is an important step whether you’re dealing with an existing plumbing problem or not.

Take a look at the different ways of repairing and replacing damaged sewer lines:

Spot Sewer Repair 

This method is a cost-effective way to repair damaged sewer lines, requiring less digging. It’s less invasive and it’s the appropriate solution for common minor sewage line issues. It involves repairing just the damaged part without having to replace the entire sewer line.

Trenchless Sewer Repair

Trenchless sewer repair or traditional trenching includes directional drilling and bursting. This repair method doesn’t require excavation to reach the pipes. Hence, trenchless sewer repairs leave the yard intact. The common sewer problems corrected with the trenchless method include the following:

  • Cracked pipes
  • Sewage backups
  • Broken pipes
  • Minor pipe misalignment
  • Corrosion due to rust
  • Tree roots

Pipe Bursting

This trenchless pipe repair technique allows sewer line replacement without causing damage to the landscaping. It’s a trenchless method that can replace existing pipes without wreaking havoc on the ground.

Here’s how pipe bursting is done:

  • A hole is created in the yard to reach the sewer pipes
  • The old pipe is broken down into pieces.  
  • A new pipe replaces the old pipe on the same exact space once.

Directional Drilling

Directional drilling or boring involves using a high-powered drill to create a path for a sewer pipe. Unlike bursting, this method has a low ground impact which reduces the need for steep restoration.

Best Way to Repair A Damaged Sewer Line

A man in blue gloves and blue gloves is working on a pipe

New plumbing technology techniques can fix or replace sewer lines faster than ever, and one of the most recommended methods is CIPP lining which is a form of trenchless sewer repair. A cured-in-place pipe or CIPP seamlessly repairs older pipes through a fiberglass or polyester liner inserted into a damaged pipe, creating or reinforcing a new piping system. 

Conclusion

As you can see, there are many ways to repair a damaged sewer line. When it comes to choosing the method to repair or replace your damaged sewer line, the answer depends on different factors. While CIPP pipe trenchless lining is a great solution, there are times when a complete pipe replacement method is the best solution. For an extensive sewer line problem, it’s best to talk to a professional plumber with experience in performing all the above methods.

Explor further :

5 Tips to Reduce the Cost of Owning a House

0
Reduce the cost of house

Various recurring costs are involved in homeownership—before and after buying your dream home. These costs could make your purchase expensive and might keep you from buying a property. Luckily, you can reduce some of the expenses. Here is how:

Cut Home Maintenance Expenses

It is advisable to set 1% of your home’s value for maintenance. These expenses vary, depending on your house’s condition. If your house is old and has several improvements, try easy DIY projects instead of hiring a professional. Activities that require limited knowledge include landscaping, basic floor installation, cabinet installation, painting, drywall repair, and drain cleaning. Additionally, get a house inspection to establish costly repairs. Use the inspection report to renegotiate with your seller and address substantial improvements.

For new houses, there might be few maintenance costs during the first years. Make sure your constructor guarantees a warranty for structural defects. You can also do simple fixes without hiring a contractor.

Cut Home Maintenance Expenses

Deal With Your Credit Score on Time

You need to address your credit score if you intend to buy your home on loan. According to the Consumer Financial Protection Bureau, reducing your mortgage interest rate by even a small percentage could save you thousands of dollars.

Having a credit score of 740 or higher lets you enjoy the best interest rates. Thus, it’s advisable to check your credit reports at least months or even years before buying a home. This approach saves you the hassle of addressing credit reports while you’re actively seeking a home to buy or mortgage approval. So, think and act ahead to get the best deal on your house purchase.

Check Out if Uncle Sam Could Help

Don’t forget that Uncle Sam could help you scale down the cost of owning a house. The US Department of Housing (HUD) offers several homeownership programs for buyers meeting specific income or location requirements. The Department may assist you in settling your down payment and closing costs.

HUD also gives some professionals special discounts. For instance, you qualify for these discounts if you are a law enforcer or firefighter buying in a “revitalization area.”

Do Thorough Home Inspection

You can save yourself ownership costs by thoroughly inspecting the home before buying it. It opens your eyes to bigger hidden problems in the home that could cost you more money. For instance, some hidden problems require costly structural overhauls to fix. Therefore, inspect the home before paying for it.

Moreover, use refinancing to swap an existing loan for a new one. For instance, you can do an Mt. Pleasant refinance plan for a $200,000 loan at a 5% interest rate with a 4% interest rate to save $120 monthly.

Manage Mortgage Payments

A significant amount of homeownership is mortgage payments. Your monthly expenses depend on the sale price, amount of down payment, and mortgage interest rate. You can reduce this recurring expense by negotiating for a low-interest rate and making a higher upfront payment.

Moreover, use refinancing to swap an existing loan for a new one. For instance, you can refinance a $200,000 loan at a 5% interest rate with a 4% interest rate to save $120 monthly.

Manage Mortgage Payments in cost of house

Remember Unexpected Costs and Repairs

Emergency expenses are almost unavoidable. A storm might blow up your roof, appliances might reach the end of a product life cycle, or fire might damage your structure. Your mortgage company should have insurance cover for your house. However, you might need a supplemental policy for damages caused by natural disasters.

You can also handle easy DIY projects to reduce contractor expenses. Utilize internet resources for tutorials.

Reduce Utility Costs

The American Housing Survey estimates average utility costs at $202 per month. Reduce these costs by cutting down on electricity, water, and gas. Turning off the tap, switching off unnecessary lights, and reducing fuel can save you money.

Consider investing in smart lighting and LED bulbs to minimize electricity bills. Additionally, replace old air filters with high energy requirements.

Invest in the modern kitchen and bath fixtures that reduce water usage. For instance, new water faucets and showerheads save nearly half the water old ones use. 

Smart thermostats are better than manual or programmable ones. They heat individual rooms rather than the whole house. You can also program them to go on and off whenever necessary.

Secure Your Home

Vandalism and fires are a threat to any home. So, install smart smoke and carbon monoxide detectors to alert you of fire accidents. Also, consider smart locks and a video door opener. These devices help you monitor your house from anywhere and help to keep off intruders.

Home buying costs do not stop when you make upfront payments. The recurring fees can drain your savings or thwart your homeownership dreams. Cut the expenses with these smart tips.

Discover More

7 Tips for the Perfect DIY Move

0
DIY Moves

From gathering packing supplies to loading up your belongings, there is never a dull moment when it comes to moving—especially if you’re planning on doing it without professional movers. However, while it is true that a DIY move requires more planning and elbow grease, that doesn’t mean it has to be filled with unexpected mishaps and stress.

If you want the perfect DIY move, don’t skip these 7 tips. 

Get the Right Boxes

While all cardboard boxes may look the same, the truth is they differ and it is essential to know which moving boxes you need for your move. A book box can hold up to 50 pounds and is suitable for the majority of items. Though, for dishes, you are better off going with a double corrugated china box. There are also boxes for wardrobes, televisions, mirrors, art, and linens. What about used boxes? While used boxes are fine for lighter items, skip them for anything heavy and fragile—even after one use, they lose some of their strength. 

Alternatively, if you don’t want to deal with a sea of cardboard, you can always rent environmentally-friendly, reusable totes. Unlike their cardboard counterparts, they won’t get soggy in the rain or snow and can be used hundreds of times before needing to be recycled. Better yet, many companies manufacture these boxes from recycled plastic in the first place. These sustainable and durable totes are available from Frogbox, U-Haul, and other moving companies. 

DIY Move with right boxes

Declutter Your Old Home

From junk drawers packed with odds and ends to kitchen accessories that never get used, every home can benefit from a decluttering session before a move. Not only will this cut down on the amount of stuff you have to transport, but it can help your new home look cleaner and more organized from the get-go. 

If you don’t know where to start, look at tossing old and expired items from the pantry, medicine cabinet, and bathroom. From there, go through the rest of your home room by room and take stock of everything. If you don’t need it and haven’t used it in the past 2 years, you are probably safe to donate, toss, or sell.  

Make a Packing Plan

You’ve got your boxes and you’ve pared down your possessions, but don’t start packing just yet! First plan which orders you are going to box up your home. An ideal system to follow is FILO (First In, Last Out). Therefore, start packing areas in your home rarely used and finish with rooms used daily. For example, you may want to start packing the storage room with all your holiday decorations first and pack the kitchen last. Then, once you are in your new home, start unpacking in reverse order. 

The priority of rooms will change from home to home, but generally, the top 3 places to unpack first are kitchen, bathroom, and nursery. It is also highly recommended to pack an essentials box. This box has everything you need for the first few days in the new home, such as changes of clothes, medications, chargers, snacks, toiletries, etc. By bundling these items together, you can avoid the stress of digging in multiple boxes to find what you need. 

Label Boxes Diligently

Speaking of searching in boxes, you can avoid a lot of frustration when it comes to locating items in your new home with detailed labels. Most people label boxes with the name of a room but try going one step further by taking inventory. There are two easy ways to do this.

Use a Number System: Assign each box a number and scrawl it directly on the box. Then on a master inventory list write down what each numbered box contains. Just be sure to make multiple copies of the list.

Write Key Items on Boxes: Write key items the box contains directly on the cardboard or a piece of paper taped to the box. Even if you don’t write down everything, adding at least 5 items should jog your memory as to what the rest of the contents are. 

Label Boxes Diligently for move

Rent a Moving Container

Most people consider moving trucks for DIY moves, but they often skip over moving containers. Moving containers an especially suitable method for those wanting a DIY move but who don’t want to drive a moving truck. Here’s how it works: The container gets dropped off by a company such as U-Haul, U-Pack, or PODS, and you load it with your belongings. Once you’re done, it is picked back up and towed to your new location. From there, you empty it and it gets hauled off once again. 

Thinking of making multiple car trips instead? You may want to reconsider if the reason is to save money. Multiple car trips will not only take more time, but they will also consume much more gas. Often renting a moving container or truck is more economical and easier on the environment. 

Involve Your Kids

Trying to wrangle up childcare for a move can be stressful, so instead, why not involve the kids? By giving them tasks to do on moving day, you can help ease their stress and create a fun and memorable day for the whole family. 

If you want the kids out of the house, consider having them deliver cookies or handmade goodbye cards to well-known neighbors while the truck gets loaded. Alternatively, you can also make them an “official moving day photographer”. Just hand them an old phone or disposable camera and let them capture the experience. You may also want them to take photos of cables behind the TV if you think you’ll forget where everything gets plugged in.

Call in Reinforcements

You may be forgoing professional movers, but that doesn’t mean you have to power through the entire move yourself. Ask friends and family if they are willing to lend a hand for either packing or unpacking. A few helpers will go a long way in making your move faster and less taxing. 

Have large items like a grand piano or hot tub? You may want to hire movers just for those items. Professionals have the equipment and experience to lug heavy and bulky items to their destination safely and efficiently. 

Conclusion

With a little bit of planning, some know-how, and patience, your DIY move can be a huge success. But if you hit a few bumps along the way, don’t fret. Remember, moving is temporary and it will be over before you know it. Plus, moving mishaps make for some pretty funny stories down the road. Happy trails!

Explore More

How to Choose the Right Work Desk? – 4 Quick Tips for You

0
Choose the Right Work Desk

Are you looking for tips on how to choose the right work desk? Well, if yes, you are alone in this. Many employees faced the same situation. Amidst this WFH (work from home) culture, everyone has made their different peaceful space in the corner of the room for work. Well, it is not necessary that everyone have the right computer table or a desk to start off immediately. 

Whether you plan to set up a freelancing work desk or the work from home space, you will get all the information and ideas for the same. By the way, we just came across an online store named, Room Service 360, it has so many office desk options, from compact tables to large cubicle style ones. The quality is supreme as well.

However, before we jump into the solution, you should know the answers to the following question: Why is it necessary to choose the right work desk? How will it make a difference? Does the room and shape of the desk correlate? 

To start with, the necessities of choosing the right work desk are comfort and maintaining productivity. Imagine an unbearable back pain kicking in between your work or meeting, won’t that distract you? To help you cope with the situation in the best possible way, it is necessary to get the ideal work desk ideal.

It will definitely make a difference in many ways like an increase in productivity, staying more focused, no back pains or headaches, and last but not least organized space to keep office things together and in place.

The shape of the room and desk must correlate in order to have a spacious feeling in the room. The desk must not cover half of the empty space making it feel cluttered. Let’s move towards the tips on choosing the right work desk!

Tips on How to Choose the Right Work Desk?

Choose the Right Work Desk

The pointers mentioned in the article are the basic ones, you can add your own preference to the list before checking out the office table.

1. Right Desk Size to Maintain Body Posture

When you select the work desk make sure it won’t harm your body posture. Your hands should be parallel to the floor while typing and the foot should properly rest on the floor.  You can go for the table with adjustable legs and it will solve all the situations. This way, you won’t have to suffer from back pain and numbness in the legs as well.

2. Choose Desk Size According to the Room

There are hundreds and thousands of options in the office desk to select from, but the challenge is to get the one that will fit into the room without occupying more than required. The very first step from your side is to decide the room and the place you want to cover.

If you have a large room with extra space you can go for the bigger work desk with the storage shelves and vice-versa. Try to get your hands on the foldable desk, that you can dismantle and fix again, whenever you decide to move.

Choose the Right Work Desk

3. Material of the Office Desk

You might have not anticipated this one as the necessary things to look at, but it is! Most of the office desks are made of wood, but with god’s grace, we have many options in wood as well. So check which wood is used to manufacture that table.

You would want a table with sturdiness, comfortability, and durability. The woods like birch and pine are comfortable but not durable. However, other options like oak, maple, teak, and rosewood are hardwood but very durable and sturdy.

Nowadays, office desks are manufactured from MDF and plywood that clears all the preferences of users. Hence, it is the most popular one among them all.

4. Surface Area of the Work Desk

Do you have a habit of noting things done in a diary? Or need at least one little plant on the desk? Or the task board for pinning-up the necessary tasks to be done before EOD (End of the Day)? If the answer is yes to any one of these, or has any other requirements, you will need a desk with a bigger surface area.

If you have a smaller space, consider getting an extendable desk. You can pull out the surface when in need of extra workspace and tuck it in if the situation gets cramped. Alternatively, you could also opt for a 1, which typically fits neatly into corners while still offering sufficient surface area for your work essentials.

Other small yet most important things to consider

  • Make sure you have a proper place to hide out all the wires. You won’t want to get tangled in the wires or spend time detangling them. Right?
  • Ample storage space to store files, office supplies, and all the other necessary and décor things. For the minimal outlook go for the shelved office work desk.
  • Consider getting a comfortable and adjustable chair to reduce back pain.
  • Don’t place your desk near the direct sunlight. It will cause your eyes to strain. The monitor should be in a direction where the screen is perfectly lit and you don’t have to frown to look at it.
  • This one is optional! Decorate the desk with travel memories or something that motivates you. Why? It will make you stay productive.

Have a Cozy and Productive Work Desk

Selecting a work desk to set-up at home is a challenging task, but it should not be stressful. Considering this thing we had curated this article. We hope you got all the information on how to choose the right work desk.

Continue reading:-

How Long Should a Furnace Run During a Typical Heating Cycle?

0
Home furance

Is Your Furnace Running at Peak Efficiency? 

Your home furnace is designed to fit your home as perfectly as possible. The amount of heat it puts out and how long that takes is what determines a good fit. A properly fitted furnace will run predictably so long as all other aspects of the system are maintained properly.

Listen To Your Furnace

Your furnace should run its heating cycle for between 10 to 15 minutes, and do so up to 3 times an hour. If your furnace is running outside of those parameters, discounting the first time you increase the household temperature, there is a problem somewhere in the system. Be sure to run through the potential problems and possible fixes listed below. Please don’t wait for it to stop working entirely.

Listen To Your Furnace

Running Too Long

In most instances, a furnace running abnormally long may be an indication of extremely cold weather rather than a problem with the heating system. If it keeps happening and the weather is within normal levels, take a look at your ducting. You could have a popped seam or a piece of ducting that has fallen free, causing much of the heated air to escape into your basement.

It seems Like it is Always Turning On

When your furnace runs for a short time but restarts just a few minutes later, it is said to be short-cycling. This is a certain indication of trouble in your heating system, one that can have many potential causes. Luckily, several of these issues can be handled by a homeowner.

  • Excess Heating Capacity – Your furnace is intended to put out a certain amount of heat in a certain amount of time. If some of that heat goes unused, it can overheat and shut down early, then start up again as soon as it has cooled. If you have too many of your vents turned off or covered up, this problem can crop up. Make sure that most, if not all, of your vents, are clear of obstructions and opened at least slightly.
  • Dirty Furnace Filter – All of your forced air travels through your furnace filter. If it isn’t changed as often as required by your heating system, it can become clogged and limit the system’s air movement. This will cause your heating unit to overheat and start short-cycling. To prevent this, replace your air filter as per manufacturer guidelines.
  • Bad Thermostat – thermostats have become much more complicated than the simple spring-mounted, mercury switches of the old days. You can set heating schedules, shut off particular rooms, and even control them from across the world with your smartphone. All of this functionality means numerous opportunities to fail. You can use a heat sensor, the laser kind, to verify the temperature around your thermostat matches what the Thermostat is reading. You can also try opening up all of the zones in your system to see if that will stop the short-cycling. If it does, then that is an indication that your heat system is unaware when zones are shut off, which can cause a problem. Try replacing your Thermostat to see if the problem is then solved.
  • Blocked Ducting: While much more common with dryer ducting, small animals can find heat ducting to be a perfect home, especially when the weather turns cold. To check for this, make sure your furnace is running, then verify that every duct is pushing warm air into the house. If you find a duct with little or no airflow, you just might have an uninvited guest in there. Follow the vent’s path until you find a spot that doesn’t ring hollow and you will have found your problem. The safest bet is to use a pest service to remove your new friend. 

When the Luck Runs Out

When the Luck Runs Out

If none of the above fixes have panned out, your problems most likely run deeper than your HVAC skills. Short-cycling can also be caused by the following issues.

  • Poorly Designed Ducts – if your ductwork was installed with tight turns or with ducting that is simply too small, your system will tend to overheat. Fixing this is best left to HVAC professionals and could involve opening up walls to get to the bad ducting.
  • Bad Heat Exchanger – the heat exchanger is the plate that the burners heat up in order to warm the air that passes over the heat exchanger. These can crack over time, becoming less efficient at best and downright deadly at worst. Unfortunately, heat exchangers can rarely be replaced, meaning that the fix is installing a new unit. 
  • Blocked Exhaust Pipes – A blocked exhaust pipe means that not only is your system running poorly, but the poisonous gases the exhaust pipe is supposed to remove are instead being vented into your home. This is an extremely serious issue that must be resolved by a professional.
  • Wrong Sized Furnace – A terrible answer that is less rare than it should be. A too-large furnace will overheat and short-cycle constantly, reducing its functional lifetime by years. One that is too small will also fail to run properly and quit long before its expected life has been approached. Often the fault is with the installer failing to calculate your home’s heating needs properly. Hopefully, you’ll be able to use a warranty on their work to get a properly sized unit installed. 

Final Thought

Homeowners need to be aware of the effect of adding or removing space in their homes. Putting on a large enough addition will affect the efficiency of your home’s heating system. Pulling an old addition down could do the same. If you notice cycling issues in your furnace after making major changes, get an HVAC expert to inspect your system to make sure it is still appropriate for your home’s new configuration.

Lastly, too many homeowners limit their focus to whether their heat comes out when the house gets cold. They don’t notice anything is wrong until there is no heat at all, and that can make for countless other problems when deep into cold weather. So, do yourself a favor and think about and verify your furnace’s efficiency before the cold months come, so you can catch the small problems before they turn into something truly ugly.

Discover More:-

9 Sturdy & Stylish Shoe Storage Bench to Keep the Footwears Organized!

0
Shoe Storage Bench

An entryway is an integral part of the home as it’s where your guests get their first & last impression of your home. Also, it’s the last place where you visit before you leave for the day. So, it should be well organized and welcoming. But if your sandals, stilettos, and sneakers are laying here and there, it will be the worst case ever. Due to this disorganized situation, it is not only difficult to find the right pair of shoes when needed, but your visitors will also get the wrong impression. The best solution to keep your footwear safe and easy-to-get is a shoe storage bench!  

An entryway shoe storage bench can create the best possible impression of your home by keeping your shoes and other accessories organized. Plus, they also provide seating while looking stylish and inviting. Isn’t that great? Today we’ve compiled up the nine best shoe storage benches from Amazon that will make your life easy and convenient. So whether you want storage for your thousand pairs of shoes or just a stylish, trendy looking organizer, you’ll find the perfect one in this list.  

Best 9 Shoe Storage Bench On Amazon

Below are the top 9 most popular shoe storage bench options that are worth your money!

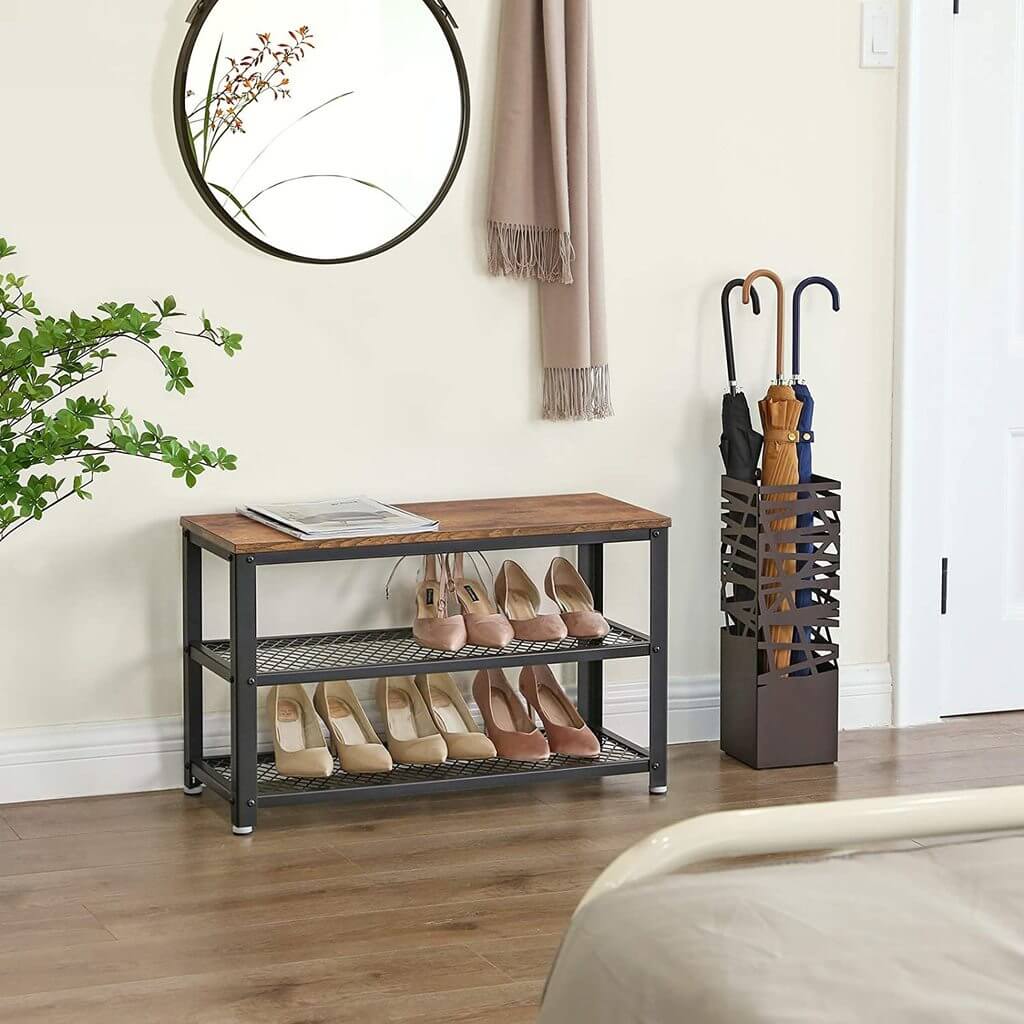
1. VASAGLE Shoe Rack Bench

VASAGLE Shoe Rack Bench

Features:

  • Made from high-end, engineered industrial metal and wood
  • Can be used as indoor and outdoor furniture
  • Easy assembly and usage
  • Can withstand 198 pounds of weight
  • Can hold up to 6-8 pairs of shoes

This Valuable Shoe Bench and Store Organizer shoe rack are crafted from engineered wood, which is more moisture-resistant than solid wood. The rustic wooden shoe bench can be used to hold your dirty shoes and you can also use it as an entryway bench. 

It is cordially designed as a modest rack by combining a metal framework and an engineered wooden plank on top. Apart from shoes, you can also use this as a rack to place your bag, books, and keys, and other things. It is pretty strong as it can hold up to 198 pounds. Plus, it has non-slip adjustable feet. All you need to do is tighten the screws that come along with the package to assemble this, and this will hardly take 10 minutes! 

PROS
  • Minimal yet modernistic furniture
  • It has adjustable feet
  • It is both shoe rack and bench
CONS
  • Don’t have wheels
  • Not water-resistant.

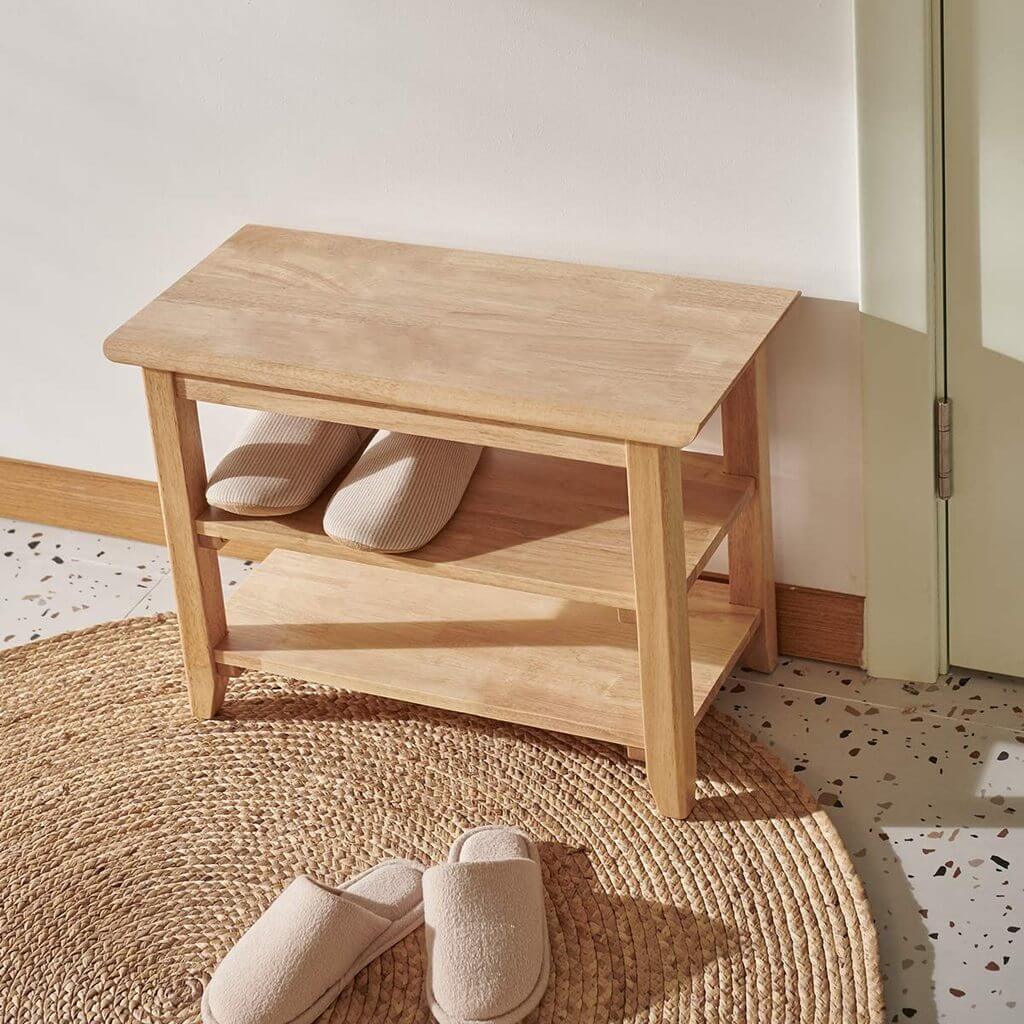
2. ACRO Wooden Shoe Bench

ACRO Wooden Shoe Bench

Features:

  • Made of 100% rubberwood.
  • Stable, durable, and eco-friendly.
  • Suitable for your hallway, living room, bedroom, patio, or kitchen.

Are you looking for a small but sturdy shoe rack? Bring home the ACRO Wooden Shoe Bench. It measures 23.6 x 11.8 x 16.5 inches, which is ideal for storing your slippers, sandals, shoes, and more. Don’t think that it is not sturdy; actually, it has an impressive weight capacity of 500-plus pounds. So, it is pretty strong and stable to sit on. 

As its size is small, its capacity is also less. You can only keep about four pairs (depending on the size and type) stored in this shoe bench. You can put this compact bench in your tight entryways or busy areas of the home.  

PROS
  • It has two shelves to store the shoes
  • Multi-functional
  • Has a sturdy and finishing outlook
CONS
  • Shoe rack space is a little less
  • Can hold up only 6 shoes

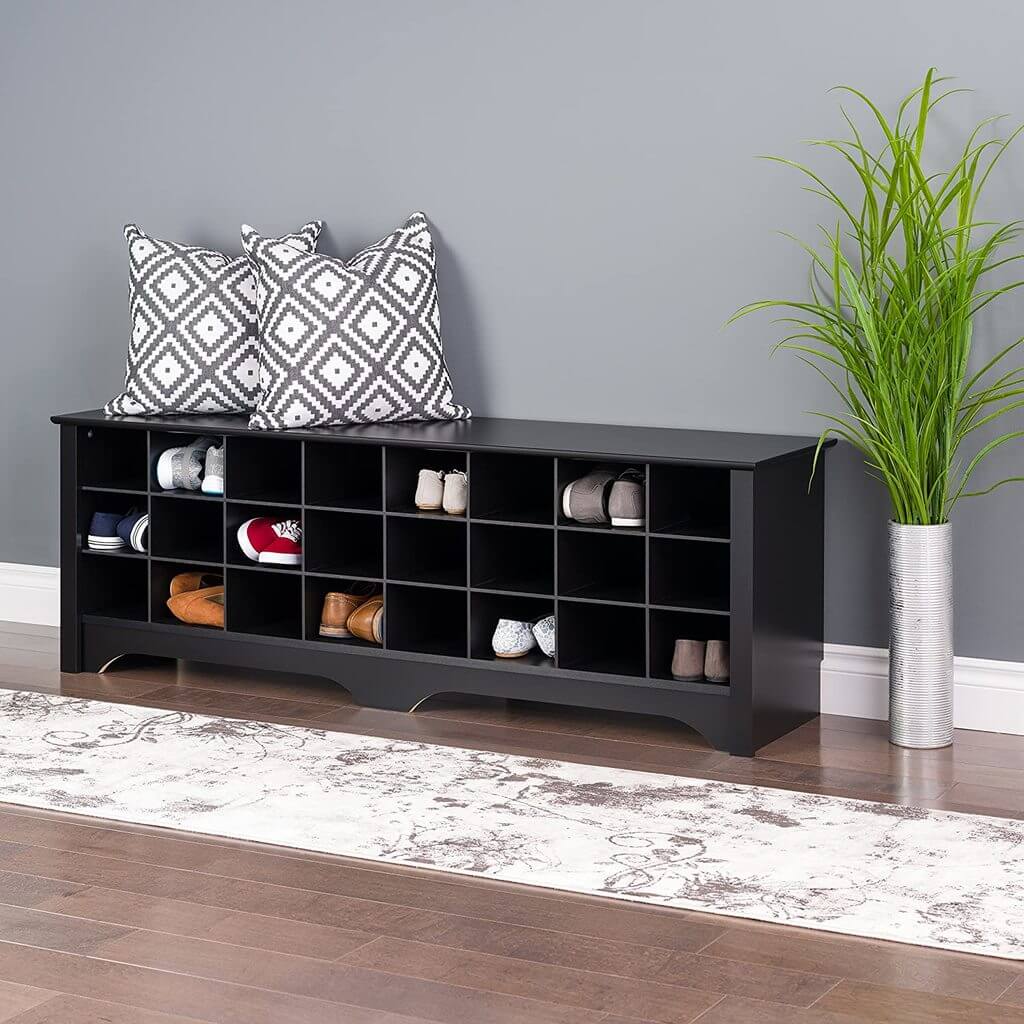
3. Prepac 24 Pair Shoe Storage Cubby Bench

 Prepac 24 Pair Shoe Storage Cubby Bench

Features:

  • Can store 24 pair of shoes or accessories
  • Comes with a 5-year warranty
  • Composed of non-toxic, composite wood
  • Has Weight Capacity of 66 pounds
  • Remarkably easy and simple to assemble

Do you have a large family, and no shoe rack is enough for them to store their shoes properly? If yes, then get this one; this Shoe Storage Cubby Bench by Prepac can accommodate up to 24 footwears. Yes, you read it right, TWENTY FOUR. 

This shoe storage unit comes in four colors, including espresso, drifted gray, black, and white. With the 24 deep compartmentalized and widely spaced cubicles, now you can store all your and your family’s shoes together in it. Not only this, but it also comes with a 5-year warranty! It will be a great addition to your porch or patio and good for places that hold events, occasions, or parties quite often.

PROS
  • Comes in four colors
  • Weather-resistant
  • Highly durable & versatile
  • Comes with a 5-year warranty
CONS
  • Dimensions are too wide
  • Looks good only in utility rooms or corridors

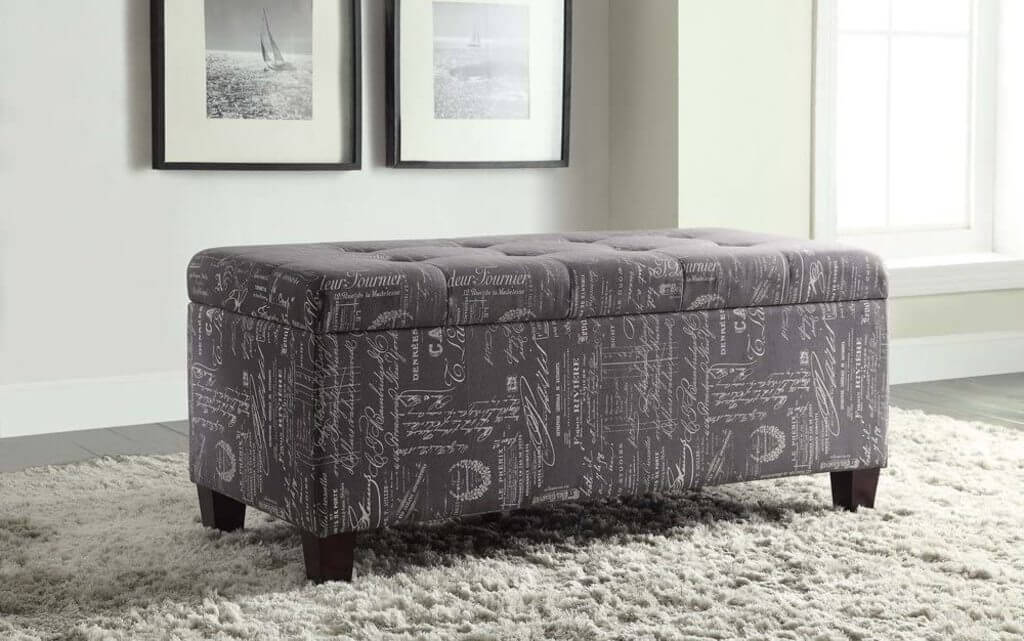
4. Linon Carmen Shoe Storage Bench

Linon Carmen Shoe Storage Bench

Features:

  • It has pre-installed shoe compartments.
  • It comes with a beautiful script patterned upholstery
  • Ample interior storage space
  • Has a comfortable plush cushioned top

If you’re searching for a stylish bench with great storage, Linon Carmen Shoe Bench is a brilliant option for you. You can place it in your walk-in closet, entry, or at the foot of a bed. It has not only a trendy design but also has plenty of storage space. With 18 storage slots, it is perfect for fitting shoes for men and women. 

You can also put various things and other items in the slots. This script upholstered shoe storage bench is capable of holding a maximum weight of 200 lbs. This piece will easily complement and go with any decor style and color scheme. So sit on the seat top and wear your shoes comfortably. 

PROS
  • Provides sitting area.
  • Comes with a Safety hinge on lid
  • Side storage pockets provide Extra storage
CONS
  • It isn’t scratch resistant.

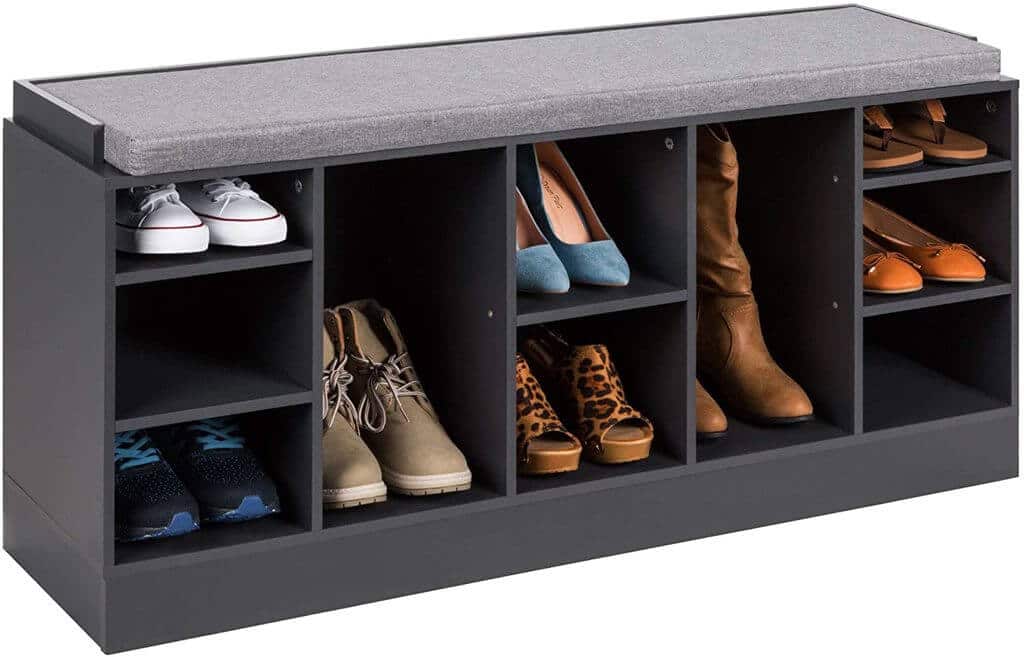
5. Best Choice Products Shoe Storage Bench

Best Choice Products Shoe Storage Bench

Features:

  • Versatile storage furniture with 10 cubbies
  • Ideal for boots
  • Has a sleek and modern design. 

Most shoe organizers are designed for everyday footwear, so you will not be able to store other types of shoes such as boots. Worry not, as this Shoe Storage Bench from Bestchoiceproducts is brilliantly designed for every type of shoe. It has 10 spacious cubbies, which can fit everything from ankle boots to tall winter footwear.

There are four 6-inch sized cubbies, two shorter 3.5-inch cubbies, and two 15.75-inch cubbies in this rack, where you can store your boots without folding them. With a 400-pound weight capacity and high-density foam cushion, this organizer is an easy spot to sit and wear your favorite pair.

PROS
  • has a high-density foam cushion atop
  • It can also serve as a bench
CONS
  • A little complicated process of assembling

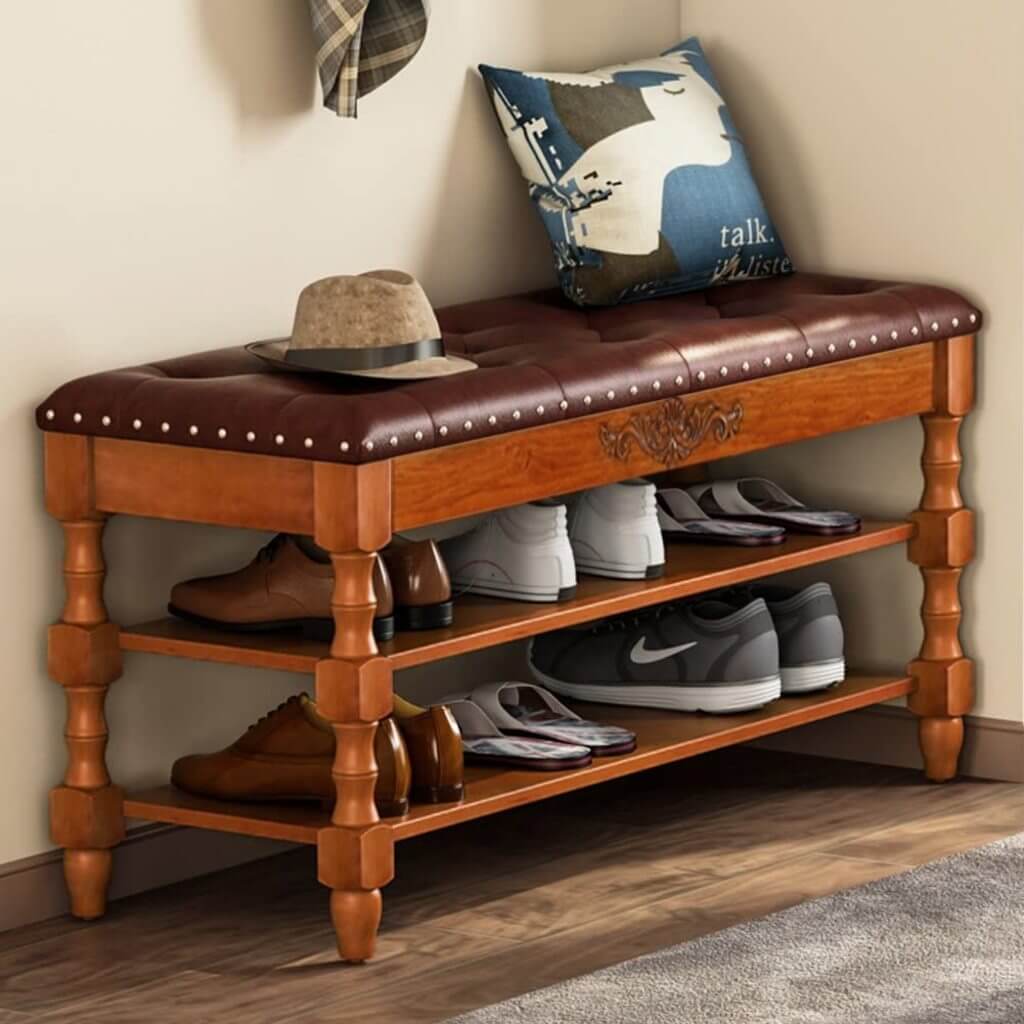
6. Tribesigns Entryway Shoe Bench

Tribesigns Entryway Shoe Bench

Features:

  • Can provide entry to a maximum of 10 shoes
  • Comprises of a leather tufted cushion along with cortical buckles
  • Composed of solid wood and has an antique look
  • It has a gorgeous leather cushion design
  • Has a glossy polished look with round edges
  • Has 90 Days Money-Back Guarantee,   

This hand-carved Tribesigns vintage Roman stool will be a great addition to your house. It not only looks beautiful as a decor piece but also it is the best storage bench for shoes. This shoe organizer has a tufted leather cushion, where you can sit down and fix your shoelaces or your heels. 

Apart from this, this is a pretty sturdy stool that is also resistant to wear & tear dents, and scratches. It is polished, so even after many years of usage, you’ll never see any chipped corners. All the edges are also round, which makes it safe for kids. 

PROS
  • Sturdy & Resilient to wear and tear
  • Comes with18-Months Warranty
  • Space-saving design.
CONS
  • Needs effort while assembling
  • Lacks compartmentalization or cubicles
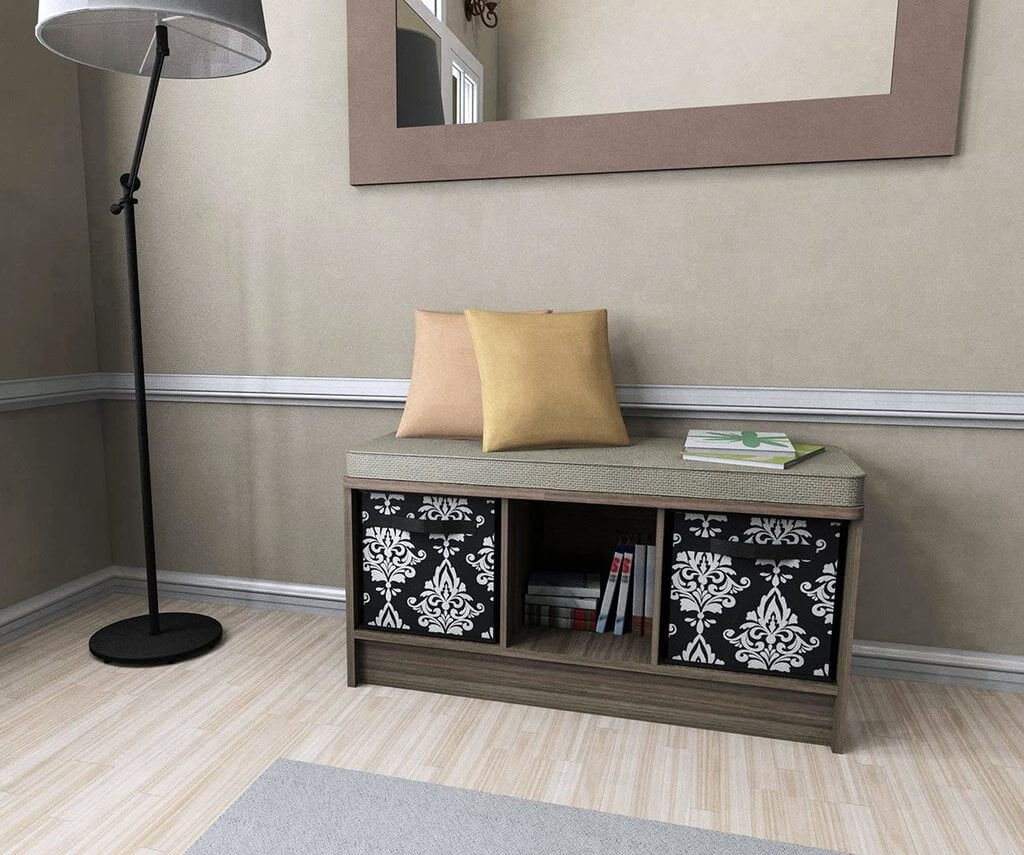
7.

 ClosetMaid Shoe Storage 

Features: 

  • No additional hardware is required to assemble it.
  • Can be used as a seating option
  • Takes less floor space
  • Made of laminated wood

Another great shoe organizer for you is from the brand ClosetMaid. Composed of engineered wood, this has a cubical storage design. You can put your shoes, decorative items, hobbies, toys, media, and office supplies in the three cubes. You can also use them with or without drawer baskets. 

Another best thing is that you can order it in that color which complements your interiors perfectly as it comes in four different options including natural gray, dark cherry, white, and espresso. Because of these qualities, this is one of the top-rated storage benches on Amazon. 

PROS
  • Seating Available
  • Comes with back panels
  • Has sturdy and finishing outlook
CONS
  • Can hold a limited number of shoes

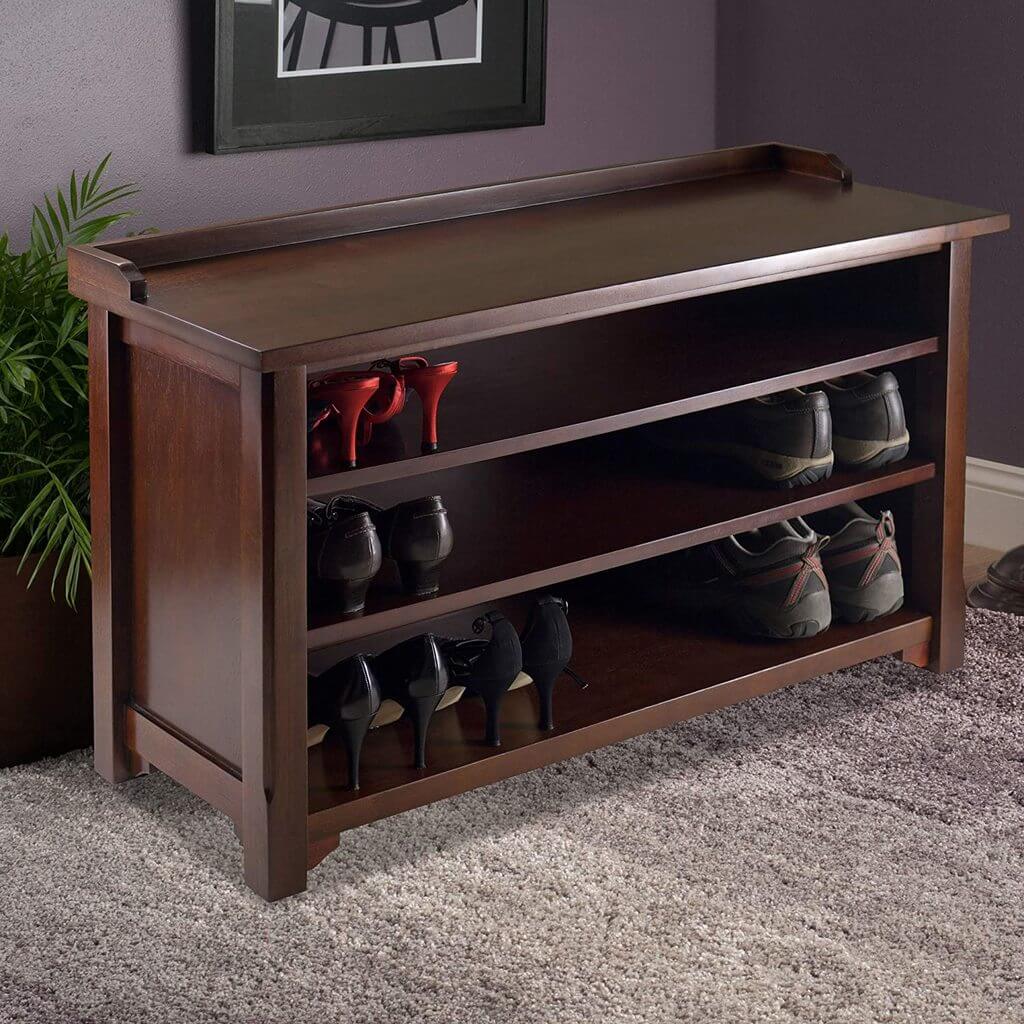
8. Winsome 94841 Dayton Bench

Winsome 94841 Dayton Bench

Features:

  • Looks good indoors as well as outdoors decorations
  • Composed of composite wood
  • Can support anything within a 250-pound weight capacity
  • Has a rich walnut appearance 
  • will only take up to 25 – 45 minutes for assembly

The Dayton Shoe Bench has an elegant transitional style, so it will be an excellent entryway bench with storage for your house. With the cumbersome design and shiny walnut upholstery, the Winsome Dayton Bench has the huge capacity to hold three times more shoes compared to any other shoe storage.  

Sit comfortably on this bench & put on your shoe, and it can also be cleaned without any extra effort. Thanks to its 250-pound weight capacity, you can even put your TV on the top. Apart from shoe storage, you can also use it to place books, VHS cassettes, DVDs, etc.

PROS
  • Easy to assemble and put together
  • Sturdy, durable, and weather-resistant
  • Has a sleek & simple design
CONS
  • Comes in only one color
  • Doesn’t look good with funky, or retro furniture

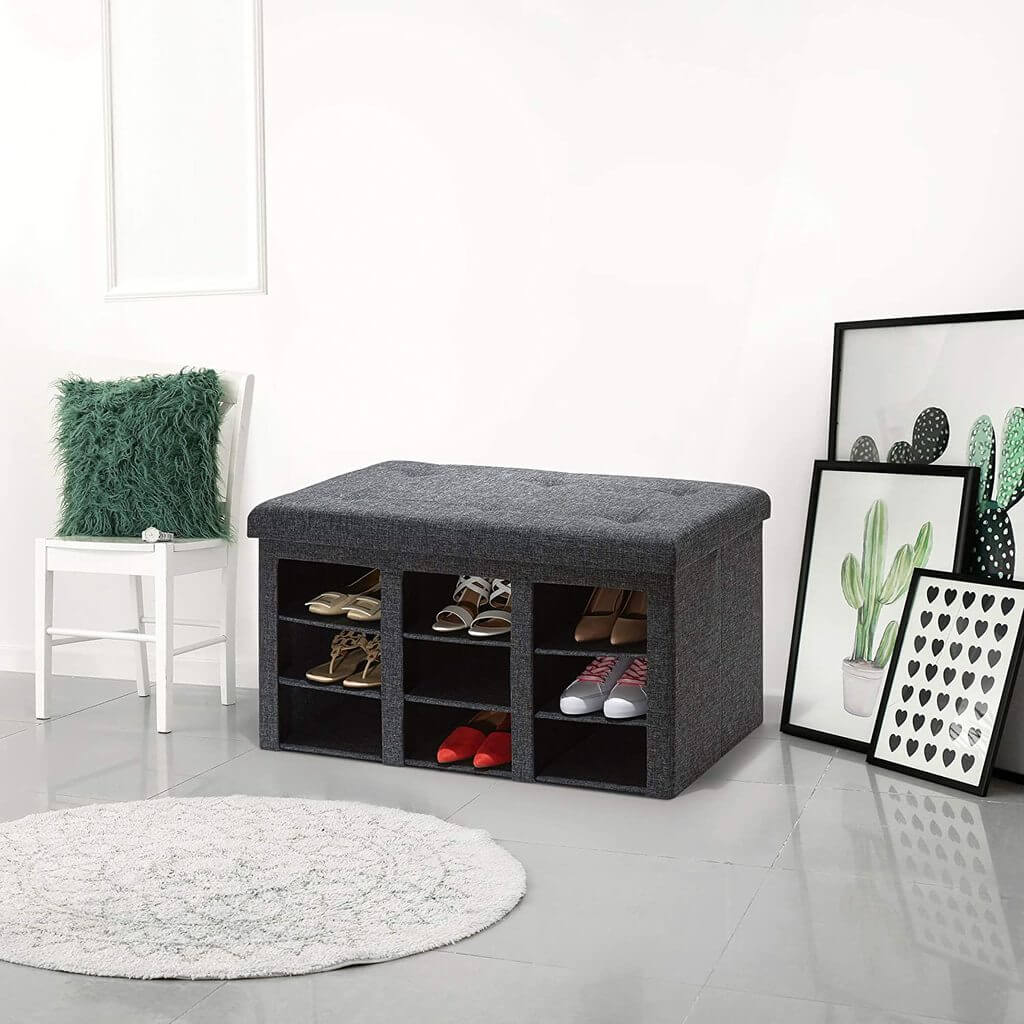
9. Seville Classics Tufted Shoe Storage Bench

Seville Classics Tufted Shoe Storage Bench

Features: 

  • Elegant design with dual-purpose nature
  • It can endure a weight capacity of 440 pounds
  • Ideal for placing in the bedroom and living room
  • Its synthetic, non-woven fabric is resilient to wear and tear

This shoe storage is probably the most unique one. Why? Because it comprises two styles – the cube style and the end-of-bed bench style. Seville Classics Tufted Shoe storage bench with cushion is comfortable yet functional. There are a total of nine roomy cubbies for shoes of all sizes, and you can also adjust the size as the dividers are removable. 

There is also a top-hinged lid or a button-tufted padded cushion on the top, where you can again store more stuff such as sunglasses, hats, scarves, and gloves. Made from polyester fabric, this organizer can be easily cleaned. 

PROS
  • Gives a clutter-free appearance
  • Gives a clutter-free appearance
  • Comes in six other fabrics
  • Quite sturdy and resilient to weight
CONS
  • Not ideal for placing outdoors
  • Can only house 9 pairs of shoes at a time

Final Words! 

So these are all the best shoe storage benches from Amazon. Now you don’t have to waste your time finding a shoe. So, put your shoes and accessories in a more organized manner with the help of these organizers. So what are you waiting for, go ahead and get the one you like.

Read more:-

7 Tips On Using An Airless Paint Sprayer For A Perfect Job

0
Airless Paint Sprayer tool

If a painting project has been swirling around your mind for a long time now and if you have come to the conclusion that it is time to finally get it over with, then I have a question for you. Have you thought about the methods or the tools that you would be using in the process and have you found a way to make the whole project easier and a lot less messy than it usually is? If you haven’t, then you really should, because making things easier will definitely be to your liking.

Am I right in assuming that you already know which tool I am talking about? Oh, okay, okay, I shouldn’t be assuming anything. Instead, I should be making things clear and that’s exactly what I intend to do. So, I am talking about a paint sprayer. That’s not all, though.

I’m actually talking about an airless paint sprayer tool reviews guy, which is known for being better than any traditional painting options. That basically means that you will be able to complete the whole project in a much shorter time frame than you might have expected it. Plus, it works amazingly on any surface you can imagine, which is definitely a huge advantage, since you won’t need to worry about poorly done painting jobs on uneven surfaces.

This sounds like the perfect tool for you, doesn’t it? Well, that’s probably because it is, but there’s one thing that you certainly need to think about before you grab the sprayer and start the painting project. Let me put it this way. Do you even know the first thing about actually using this tool the right way? If not, then you ought to learn.

I’m sorry if I have offended your ego or something, but this is simply the question that needs to be posed. After all, you wouldn’t like to start using something without knowing how to do it properly and then end up with a poorly painted home, or any other property. Trust me, that question is for your own good. Of course, we won’t stop at simply posing the question. We will also provide you with an answer.

No, I’m not going to try and guess whether you know how to use anyone from those airless paint sprayers listed here or found anywhere else. Instead, I’m going to assume that you are here because you do need some tips on how to use those the right way and I’ll immediately jump to giving you those tips. So, without further ado, let us cut to the chase and show you how airless paint sprayers are used.

Airless Paint Sprayer tools

1. Preparation Comes First

It goes without saying that this specific tool needs to be properly prepared before you start using it. And yet, you might not know what the preparation part actually entails. Don’t worry, everyone’s been there at some point because nobody is born ready to use a sprayer. This is something that needs to be learned and, luckily, it’s not a difficult learning process.

The preparation process consists of getting the right tip, thinning and straying the paint, setting up the hose, and priming the pump. Choosing the right tip is tremendously important. Narrower ones are perfect for work that requires extreme precision, while larger tips can cover much more ground effectively and in much less time. The larger ones, however, usually require more pressure.

After picking the tip, you will need to thin your paint, so that it can flow through the nozzle more easily. Usually, you should add a ¼ cup of either water or a chemical thinner to every single gallon of paint that you are using. Even when you do your best to mix the pain evenly, there might be some clumps left, which is why you need to use a strainer and a bucket to catch and discard the solid bits. This will prevent the nozzle from clogging.

As you already know, an airless sprayer actually draws the paint from a hose, which you need to attach to the back and place the other end into your paint bucket. When you do that, all that’s left is to prime the pump, which is usually done by pressing a button on your device. That is your last preparation step, at least when it comes to the sprayer.

2. Prepping The Surface Also Matters

I suppose that you have already learned a few basics about paint sprayers and that you now know how to prepare them for use. Yet, you should also learn how to prepare the surface, unless you want to make a mess out of things. This includes covering all the surfaces that you don’t wish to have painted and laying something on the ground so as to prevent any drips from getting on your floor. This is a pretty straightforward process that doesn’t require further explanation.

3. Hold The Trigger

It’s time to start painting. Now, if this is your first time using this tool, you might want to start by practicing on a throwaway surface first. This is just for a minute or two until you have gotten the hang of it and learned how to start and stop spraying whenever you want. If you feel more comfortable, you can do your test spraying with water. The whole procedure is not that difficult, so you will get the hang of it rather quickly.

4. Adjust The Pressure

Once you learn how to start and stop spraying, you will need to think about the pressure that is being applied and adjust it accordingly. Basically, if the paint isn’t being sprayed evenly or thickly, then you should increase the pressure. There will be a dial on your sprayer that will allow you to measure this. Don’t forget that you shouldn’t keep the pressure too high unnecessarily.

presser of Airless Paint Sprayer

5. Keep Your Distance

One of the most important things to remember is that you should maintain a steady distance while doing the spraying, in order to get an evenly and amazingly done painting job. Generally, the tool should be around 10 or 12 inches away from the surface you are painting. That way, the paint will be applied effectively, while the range will be perfect for covering a wider surface. So, don’t forget to maintain a steady distance during the whole project.

6. Keep Moving Your Hand

The worst thing you can do during this project is to hold the aim at one place for far too long because that might result in a poorly done job. Instead, do your best to keep your hand and your aim moving and keep the speed steady and consistent. In case it seems that the paint isn’t being applied evenly, you should think about slowing down your movements.

7. Release To Stop

I suppose you already know these, but it is still worth mentioning. When you want to take a break or when your whole job is done, all you have to do is release the trigger and your tool will stop spraying. It’s as simple as that. I hope these tips were enough to turn you into a pro when it comes to using airless sprayers.

Discover More

Types of Garden Sheds You Can Choose for Your Outdoor Space

0
Types of Garden Sheds

A garden shed can be an extension of your storage space at home. Most homes today do not come with attics or basements. Yet, there are so many knick-knacks that we have to stow away.

There are tools used in gardens and around the house for various odd jobs as well, and a garden shed is a great way to keep them without cluttering your home. Companies like SteelChief will make you a shed according to the available space in your garden or in keeping with the kind of look you want for your backyard.

Here are some ideas for various types of garden sheds.

Cabin-style Garden Shed

A Cabin-style Garden Shed with double doors and windows

A cabin-style shed is a classic choice. It is a look most family homes prefer, especially if the main house has a vintage look to it. A cabin styled shed is also quite spacious, so you could use it not just to stow away your tools and equipment but you turn it into a work area as well if you want to. You can make it out of metal or wood, or a combination of both for both style and substance.

Storage Shed

A small wooden storage shed with windows and a door

You can opt for this type of shed entirely for practical purposes. If you want a shed to take care of the essentials and you want it to be rigid and sturdy, without carrying much if it looks pretty or not, then this is the shed for you. Storage sheds come with strong walls, a sound locking system, and lots of internal storage like shelves, hooks, and built-in cabinets. If you have too many tools, equipment, or garage stuff to store away, this would be the ideal choice.

Small Tool Shed

A Small Tool Shed shed with gardening tools in it

This type of shed is meant for small homes with a small backyard. The tool shed might not be large enough for you to sit and work inside, but it is still spacious enough to store away all your goods. Moreover, tool sheds are usually squat and sturdy, so you do not have to worry about your equipment’s safety.

Barn-style Shed

A small Barn-style Shedin the middle of a field

If you live in the suburbs or have a country home, this barn-style shed will blend well with its surroundings. You can lend a rustic look to your backyard with this style of shed. Have it painted in pretty colors, or design it in a country chic way. These sheds could double up as a play area for the kids if they plan to have a garden party, or you could use them for DIY projects at home. If you are genuinely into this design, you can have it painted as a red barn in an authentic rustic style.

Romantic Farmhouse Shed

A Romantic Farmhouse Shed with flowers and a bicycle parked in front of it

If you want a charming look to your garden shed, with a dash of romance, then this kind of shed will meet your needs. The look of the shed can depend on how quaint and romantic you want it to be. From bright colors to cozy nooks, these sheds can double up as a spot when you are in the mood for a date but want to go out. Besides, you can fit it up with shelves, drawers, and cabinets to store all your essentials in it, as any other garden shed. This kind of shed also blends well with the surroundings if you have lots of greenery in your backyard or around the property.

Backyard Studio Shed

A garden with flowers and a Studio Shed in the background

If you are an artist and want your workspace and a separate area to store all your equipment and tools related to your craft, this is the shed for you. You can customize the studio shed in any way you want, creating personalized spaces to store your tools. The studio shed keeps distractions away while you concentrate on your work, at the same time, without having to pay for premises elsewhere and without leaving the comfort and safety of your home.

Chic Greenhouse Shed

A garden with flowers and a shed in the background

This kind of shed is ideal for those passionate about gardening and have quite a few tools related to it. You can store all your tools here and also plan a little nursery in the corner. You can grow plants here that need to grow in the shelter, away from harsh sunlight, and you can also store away fertilizers and seeds nearby, ready to use just when you need them. This kind of shed can be made in an eco-friendly way and enhances your home’s look and appeal. You can also use the roof of this shed for some additional planting.

Deck Shed

A small shed with a deck and chairs

This kind of shed can be made to suit any of your functions, but it comes with a deck in front. And this makes all the difference. The deck in the front can provide you with a cozy nook to hang out and relax while you enjoy a few drinks with your friends, and you do not want to disturb the people inside your main house.

You can sit around on cane chairs and enjoy the outdoor views and when it’s time to go, store it away neatly inside the shed, along with the rest of your tools. You can also go a step forward and use it as a bar shed, which would help keep away liquor from your main house if you have children inside. No matter what type of garden shed you choose, it should be easy to maintain and secure enough to keep all your things safe.

The aesthetic beauty of the shed will lend character to your garden or backyard. It will be a good investment if you frequently take care of odd jobs around the home, if you practice gardening, or you need some space for all your biking or camping gear. You can design it as a whimsical toy land or double it up as an extra workspace. You are sure to find many different uses for it once you have it made. Companies like SteelChief will design and build garden sheds for you according to your specifications so that you have ample storage space at your disposal.

Continue reading:

Best Roofing Materials For Your House

0
roofing materials

It is hardly necessary to explain, but just a reminder: the choice of material for the roof — it’s not just an aesthetic decision. The range of available materials is determined primarily by the nature of the building. How do we usually choose roofing materials? At what point should you pay attention when choosing?

The Choice — It’s Always a Compromise

There is no perfect roofing material: each has pros and cons, and absolutely all roofing materials can serve well. Only you can decide what and for what to sacrifice. Save money but make a different shape of a roof or even change the style of the house as a whole. In some cases, quiet is more important to someone (people have different levels of loyalty to noise). All of this will affect the choice of roofing material. A few universal tips that will be useful to you in choosing any material for the roof of your home.

roofing materials

Walk Around Your Town

So, start by inspecting the roofs of houses in your city. Consider roofs that have served for 10 to 15 years. It is better to do that in the suburbs. Do not spare time — you will save money by figuring out already the appearance of the roof, which purchase of roofing materials will be a serious mistake, and what is worth paying attention to.

Study the Available Information

Study the varieties of roofing materials, and then choose. Roofing materials can be metal, ceramic, natural stone, bitumen, or asbestos. How to make a decision on which material to choose?

Calculate the Full Cost of the Roof

At first, it is worth considering that the price of the material itself will not be an objective indicator. Compare the cost of roofing in full. For example, for the price of asphalt shingles, you need to add the cost of OSB-plate, as well as a lining material. For metal, shingles should be considered at least 8-10% of the roof area on the overlap. For the slate need to keep at least 20% on the defect, and for natural clay tile – not less than 7%.

Ask for a price for the whole roofing kit together with all the components. Only that price will be correct. This will prevent a situation in which the dealer provides a low cost for the roofing material yet sells very expensive components. Do not forget to add the price of each roofing installation, because the cost of installation will be different for various materials. You need to consult professionals, and after that, make a comparison.

roofing materials

What Material to Choose If the Budget Is Limited?

Natural ceramic tiles or copper – expensive materials. Therefore, they are often used only in some parts of the roof or in the canopies over the windows. If the budget can not afford a significant expense, it is better to consider the soft tile, metal roof tiles, online, and other more money-saving options.

Metal is chosen not only for the cost but, for example, for rapid installation, but noise insulation is among the disadvantages. Metal is a good combination of price/quality, a large palette of colors RAL and RR, strength, and durability (10-50 years). High fire resistance (266 °F) compared with the online. Disadvantages of metal — it is noisy, the need for installation by nice specialists, and mandatory planning system of snow retention.

The Main Thing Is Choosing a Contractor

The golden rule of any renovation is relevant in the installation of the roof. Regardless of the material you choose, it is important to follow the rules of installation and carefully select a Local Roofing Company that will do it. People must understand what they are doing, and be able to work with a particular coating.

Final Advice

To check the durability of the roofing material, refer to the text of the warranty. Be sure to demand the original warranty, which will be given to you after the purchase. Do not be lazy to elementary read it carefully. Pay attention to phrases such as “warranty cannot be transferred to third parties” (since you are that particular third party), “warranty on through-corrosion”, “warranty on not to leak” and other such phrases.

Also, read carefully the additional terms of the warranty and the documents to submit a claim. If you don’t have any mandatory documents, that’s a reason to deny the warranty. After all, the supplier will act as it is written in the warranty. And who knows, in a few years the warranty may be very useful!

Find out more: