Cross-country moving and relocations have been all the rage over the past two years, spurred by COVID-19 lockdowns, and work-from-home, millions of Americans continue to move 1,000s of miles in search of their new paradise. This, however, is anything but easy, and millions more put up with their unsatisfactory lives, merely because of how stressful moving can be.
While honing your new residence is all about location, location, and location, moving your entire house to the said location is all about planning, planning, and planning.
In this article, we list some tried and tested tips to ensure your long-distance moving goes smoothly, and all of your essentials and valuables arrive in one piece, all the while keeping your sanity, and not getting overwhelmed.
1. Start Well Ahead of Time
The biggest mistake people make when uprooting their lives is by starting to plan when there are just a few weeks left. Ideally, you must be well into the planning phase at least one or two months before the actual move and start executing at least 15 days ahead of schedule.
No matter how well you plan, there will always be shortcomings, and things you completely missed out on, which can only be dealt with if you have sufficient time on hand.
It is recommended to create an extensive checklist, or to-do list as soon as you know you are going to move, and start populating the list as and when tasks arise, and challenges have to be dealt with, preferably with a calendar and timeline.
2. Declutter, Downsize & Dispose
Most houses are filled with objects, toys, and knick-knacks that are rarely used, and this is an ideal opportunity to get rid of such things and clutter-free your home when heading for a fresh start.
It is imprudent to bring everything in your house along with you while moving across the country, especially since most such items cost more to move than buy afresh in your destination.
A good rule of thumb in this regard is, if you haven’t used something in over a year, it’s time to get rid of it. There are of course a number of ways to effectively do this, valuables can be given away to charity, and homeowners can also hold garage sales to sell unwanted items, all the while raising sufficient funds for the move.
3. Choose an Experienced State-To-State Moving Company
Moving and relocation services are dime a dozen these days, but not all of them are cut from the same cloth. There are a few experienced service providers, who’ve been in this business for a few decades and can add substantial value in terms of providing advice, tips, and strategies for a smooth move.
It is a mistake to choose a moving company based on price alone, especially when handing over and trusting them with the safekeeping of household goods that can be many times over their moving charges.
If you’re planning a move, and money is no object, consider one of the top 10 state-to-state movers in the USA with a strong reputation, and hassle-free experience.
4. Update Documents, Addresses & More
This is where moving gets complicated. If you’ve spent more than a few years at a particular house, your very existence is tied to the location, with all mails, correspondence, and other essential documents reflecting the same.
When relocating, getting all your emails forwarded, and updating contact details at essential accounts and documents can be quite arduous, often involving multiple points of contact, and numerous in-person visits.
This, however, cannot be skimped on if you want a stress-free move to your new house. Here again, the solution is early planning, so that you don’t miss out on anything that could cause trouble once you move across the country.
5. Buy Quality Packing Materials in the Right Quantity
If you want your move to be hassle-free and would like to keep all of your valuables safe and sound at your destination, it is absolutely essential that you don’t skimp on packaging materials.
Here again, there are plenty of options, with boxes of different sizes, quality, and sturdiness, along with packing tape, bubble wrap, shrink wraps, and more.
Ideally, your boxes should neither be too heavy nor too light and should be easily manageable by one or two individuals. Heavy boxes often lead to accidental falls, damaging whatever is inside, and light boxes are often a waste of space, and tend to be less sturdy, making them prone to damage during transit.
Final Words
Uprooting your house, family, and belongings to move across the country will never be a walk in the park, but with the right planning and preparation, you can ensure the move is at least a success, and you’re not stressed even days and weeks after moving to your destination.
Home renovation projects now cost nearly 50% more than they did two years ago. Although this is in part because of the economy having quite the wobble or five, part of the reason is that simply everyone wants to improve their home post-pandemic. Loft conversions are particularly popular with homeowners who have a house without a garden, or with homeowners who don’t want to eat into their outdoor space with an extension.
For the price, homeowners also understand that the overall rise in house prices over time on balance means that even though construction costs more, it still enhances the house value and provides an incredible return both functionally and financially.
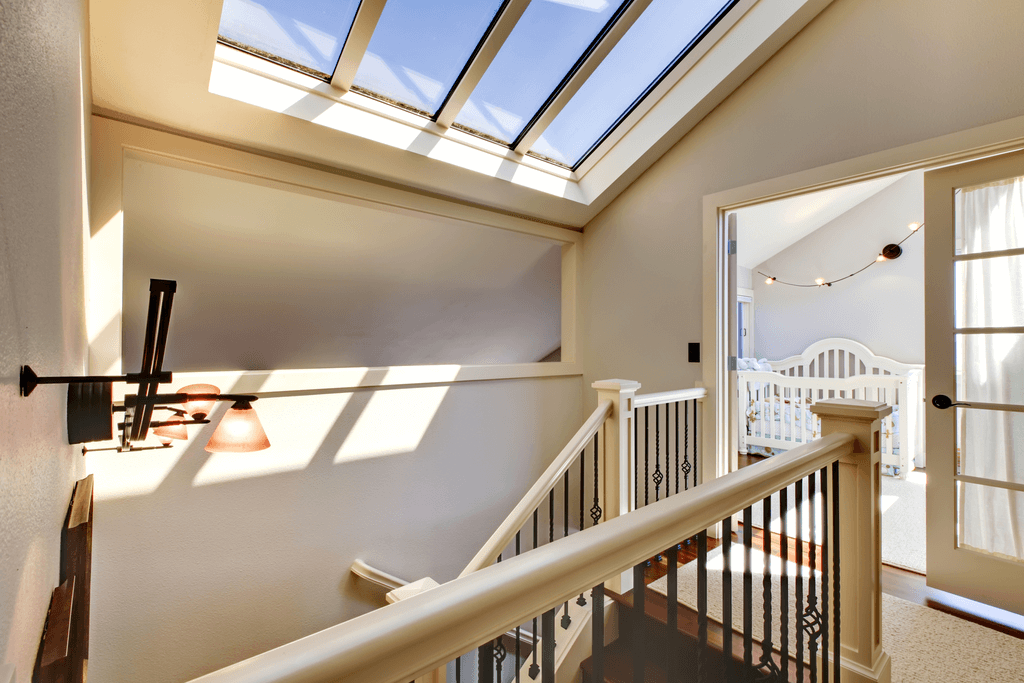
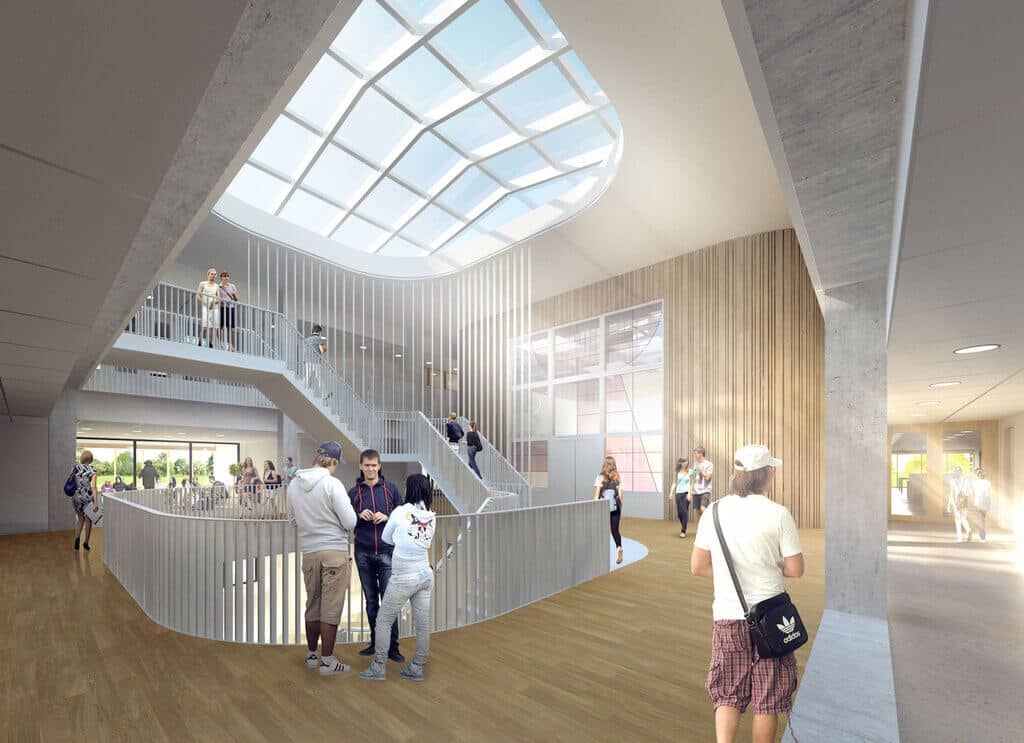
Whilst most people know loft extensions create more beautiful, functional space in a home, many are unaware that there are certain adjustments that can be made to a loft conversion to further enhance how it feels, looks, and functions. Skylights are a really good example of such an adjustment and are so beneficial, they absolutely have to be included in your design plans.
What Are Skylights?
Skylights are also known as roof windows or roof lights, and they are glazed openings placed on a pitched or flat roof. There are some differences between the different products available, ranging from smaller windows used on pitched roofs, to more ample bespoke options to flood an entire flat-roofed portion of a loft conversion with natural light.
As a general rule, skylights can be fixed shut, but usually, they do open to allow ventilation of the space. They can also have remote blind/ screen systems attached to allow for light-level control.
Three Reasons Skylights Are a Loft Conversion Must-Have
If you’re not sure why skylights have to be included in your loft design, these three reasons should give you a good indication as to why beautiful, functional roof lights for a loft conversion just make good sense:
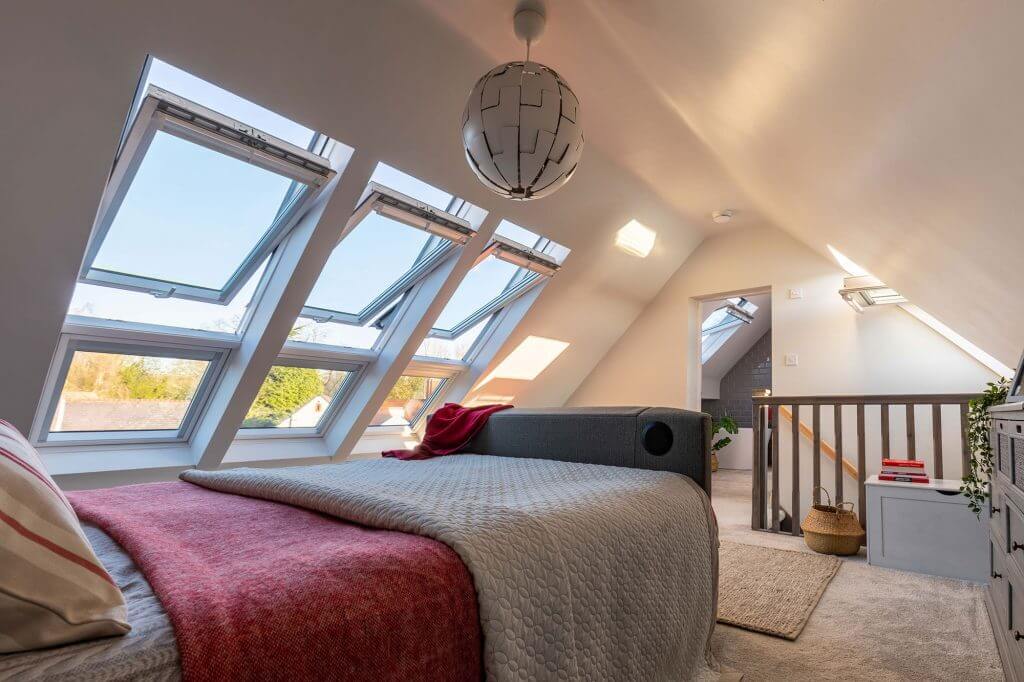
Ventilation
Ventilation is incredibly important for any space in the home, particularly for loft spaces, which can be otherwise structurally separate from the airflow and ventilation available in lower floor levels.
Ventilation primarily helps to boost the air quality of the loft space. Air pollution contributes to up to 36000 deaths in the UK annually, and whilst we know 25% of UK homes are surrounded by air pollution that exceeds safety limits, we spend on average 90% of our time indoors, and so poor air quality in our living environment can actually be much more dangerous.
With skylights that open, the loft environment is more able to be ventilated, aiding and allowing the escape of moisture, bad smells, indoor pollutants (such as paint fumes), and smoke (if your loft conversion includes a cooking space). Moisture escape is particularly important as it helps avoid problems like mold and dampness, which is a further risk to air quality, as well as having the potential to destroy soft furnishings and certain surfaces, aesthetically causing unattractive black, white and green spots to plague an otherwise beautiful area.
Key Benefits of Good Ventilation in a Loft Space:
Removal of condensation
Improvement of indoor air quality
Removal of bad smells
Control over allergen spread/ movement
Allow escape of harmful fumes like VOCs
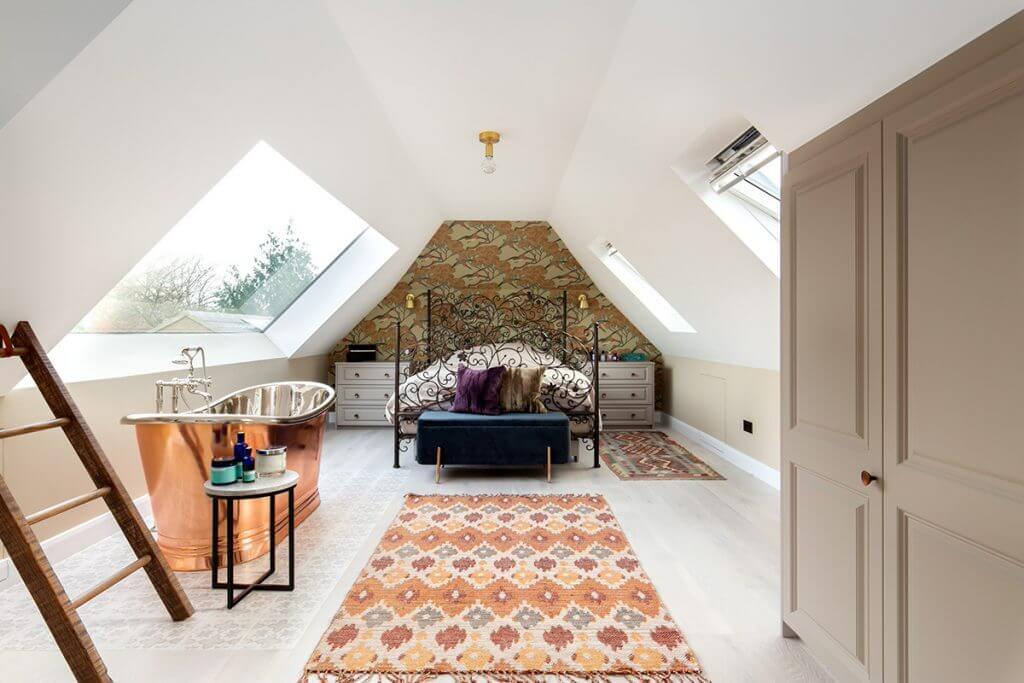
Natural Light
When you have a skylight loft conversion you allow natural light to flood in. Aesthetically, this is highly beneficial as it flows across furnishings and the cute and quirky look of the conversion, enhancing its overall visual appeal. It’s especially useful in loft conversions where there might be corners that are oddly shaped, or slanted walls – the kind of areas that might make it challenging to light.
Recessed lighting, lamps, and other illumination options are possible, of course, but having natural lighting is always a helpful foundation for lighting a space.
The natural light that will flood in through your skylights has more benefits than looks alone, including a role in how you feel, physically. Although you cannot create Vitamin D when sunlight flows through a window, the light does still contribute to helping you feel good. It does this by helping you connect with your natural circadian rhythms relating to the sun.
These are the body’s internal clock systems that regulate your sleep-wake cycle and that are regulated with natural light. With good blue light control on board, the natural light coming in during the morning helps your body know to start to wake up, and as it darkens outside and the light reduces, your body knows to start to wind down.
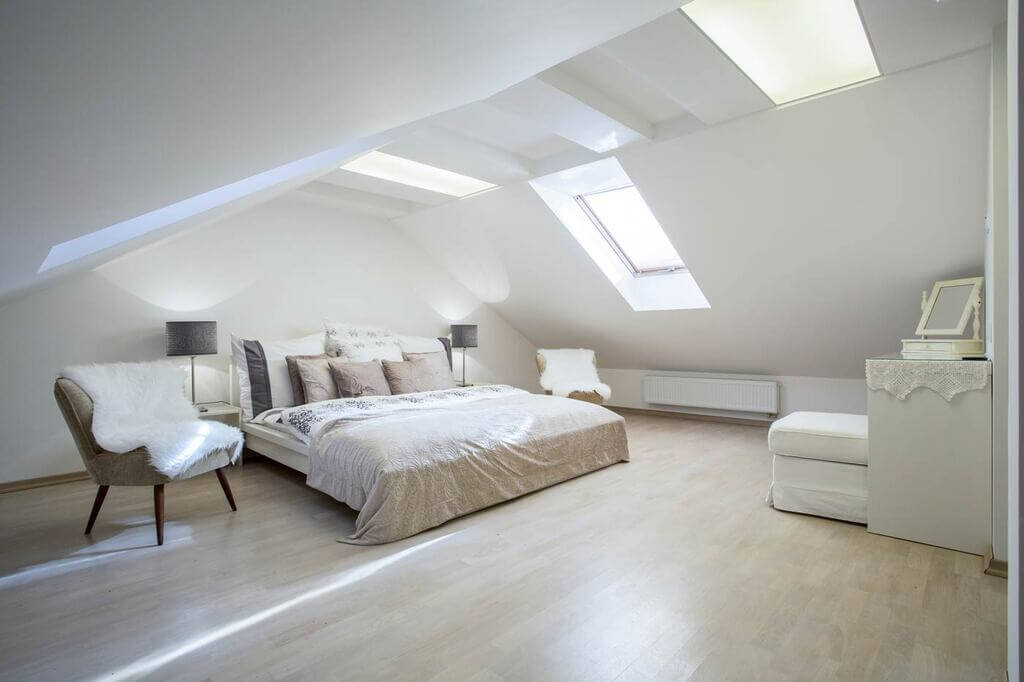
Temperature Control
Cost-wise, with skylights, natural light is able to warm the loft (to some degree) and allows electric lights to stay off for much of the daytime – both of which are of real benefit at a time when energy is incredibly costly and shows no sign of falling in the near future.
Add this to the natural heating of the space from rising heat from lower levels and the loft can be incredibly economical as a functional room.
In summer, the loft will get warm and skylights help to control that rising temperature by ventilating the space and allowing air to flow through. Instead of the room feeling a little stuffy and warm, the air allowed in through the skylights will cool things down and allow a fresher, more comfortable feeling throughout the space.
Why Not Speak to a Loft Construction Company Today to Find Out More About Skylights
Conclusion
To find out what the true design potential of your loft space is, including skylight fitting potential, you’ll want to speak to a professional loft construction service.
They can let you know how many skylights you can have in your new home improvement, and if other window options could work for you, such as floor-to-ceiling windows – a popular choice with modern loft conversion designs.
Why not speak to Clapham Construction Service today to unlock the true potential of your loft space, for more functional square footage added to your home – and with the addition of skylights – more ventilation, natural light, and temperature control, too?
When you are ready to sell your home, you will need to engage the services of a professional conveyancer. A conveyancer is a specialist lawyer who manages the legal aspects of buying and selling property. The role of the conveyancer is to:
-prepare and review the contract of sale
-advise on any special conditions that may be included in the contract
-conduct searches on the property title to check for any encumbrances or easements
-prepare transfer documents
-liaise with the buyer’s solicitor or conveyancer to exchange contracts and coordinate settlement
-attend settlement and organize for you to receive the keys to your new home!
At a minimum, your conveyancer will need to know:
-the full names, addresses, and contact details (including email addresses) of both the buyer and seller
-a copy of the signed contract of sale
-the deposit paid by the buyer (usually 10% of the purchase price)
Your conveyancer will also need certain information from you in order to do their job properly.
This includes:
-identification documents such as your driver’s license or passport
-information about any mortgages or other loans secured against the property
What Is Checked During Conveyancing?
Conveyancing of property is the legal process of transferring ownership of property from one person to another. It is a complex process that involves many different aspects, including title searches, contracts, inspections, and more.
One of the most important aspects of conveyancing is the contract itself. This document outlines all of the terms and conditions of the sale, including the price, date of possession, and any special conditions that may apply.
Conveyancing Process for Buyers
The conveyancing process for buyers can be a daunting task, but with the help of a professional, it is possible to make the process go smoothly. Here is a detailed look at what you can expect when going through the conveyancing process as a buyer. The first step in this process is to find a property that you are interested in purchasing.
Once you have found a property, you will need to make an offer on the property and have it accepted by the seller. Once your offer has been accepted, you will need to instruct a solicitor or conveyancer to act on your behalf.
With the help of a conveyancer, you can ensure that the buying property conveyancing coverage is carried out smoothly and efficiently. Your solicitor or conveyancer will then carry out some initial checks on the property including checking that there are no planning permission issues that could affect your purchase.
They will also request copy deeds from the seller so that they can check that there are no legal problems with the title of the property. Your solicitor or conveyancer will also check that there are no outstanding mortgage payments owed on the property. Once all of these initial checks have been carried out, your solicitor or conveyancer will then begin to draft the contract of sale.
This contract will set out all of the terms and conditions of your purchase including information on any fixtures and fittings that may be included in the sale price. Once you have agreed to the terms of sale, both you and the seller will sign this contract and it will be sent off to be registered at HM Land Registry.
At this point, your deposit (usually 10% of the purchase price) will be paid over to your solicitors so that they can hold it in their client account until completion day.
Completion day is when ownership of the property will finally be switched from the seller to you and you will be the legal owner of the property!
Conveyancing Process for Sellers
The conveyancing process for sellers can be a daunting task, but it doesn’t have to be. Here’s what you need to know about the process for sellers.
The first step in the conveyancing process is to instruct a conveyancer when you place your property for sale. You’ll need to provide them with your personal details, as well as information about the property you’re selling. Once you’ve done this, your conveyancer will carry out some initial checks on the property and on you.
The next step is for your conveyancer to write the contract of sale. So that when an offer is made from the Buyer and accepted the sale of the contract can be forwarded to the buyer’s solicitor.
This document will outline all of the terms and conditions of sale, as well as any special conditions that may apply to your property. Once your conveyancer has sent this contract, the Buyers Solicitor will check it over to make sure that everything is in order.
At this stage, the buyers’ Solicitor will ask inquiries. Your Solicitor will hopefully be able to answer those promptly.
Once all of the checks have been carried out and both parties are happy with the contract, the process can move to the exchange of contracts, it’s time to sign it! Your signature will signify that you agree to sell your property under those specific terms and conditions set out in the contract. Then a completion date is agreed upon.
The buyer’s Solicitor will send details to the registered HM Land Registry. This ensures that there’s a public record of who owns which properties in England and Wales. The whole process usually takes around 8-10 weeks from start to finish. So, if you’re thinking of selling up soon, bear this timeframe in mind.
Styling a room is often a challenging endure, more so when the space available is limited. For such spaces, large king or queen-sized beds are hardly an option. Twin bed becomes an efficient space-saving solution for such tight spaces.
Twin beds are essentially single beds that are often used in pairs in a room to create a portable space-saving setup. It not only functions as a sleeping space but can also act as a storage unit. There are myriad different twin bed frame designs out there. Here, we’ve curated a comprehensive list of 20 stylish space-saving twin bed frame ideas.
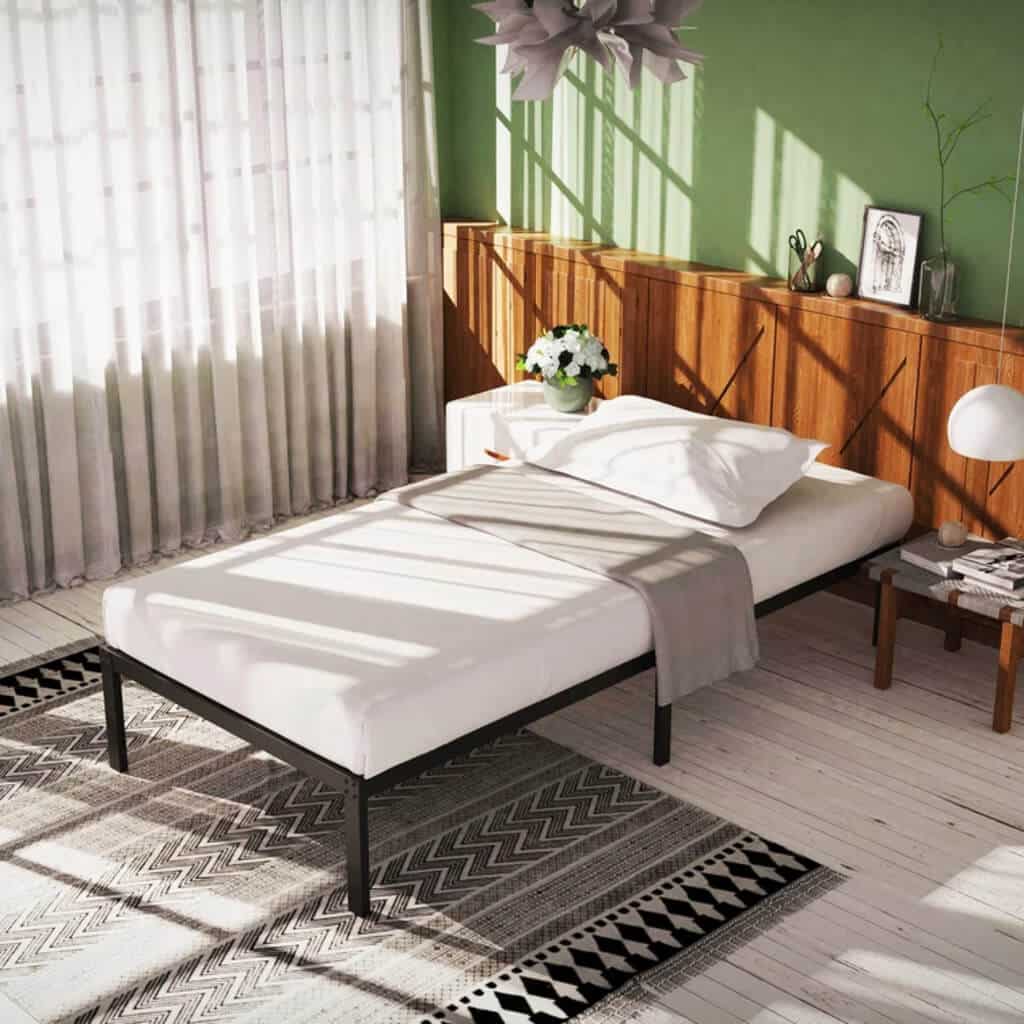
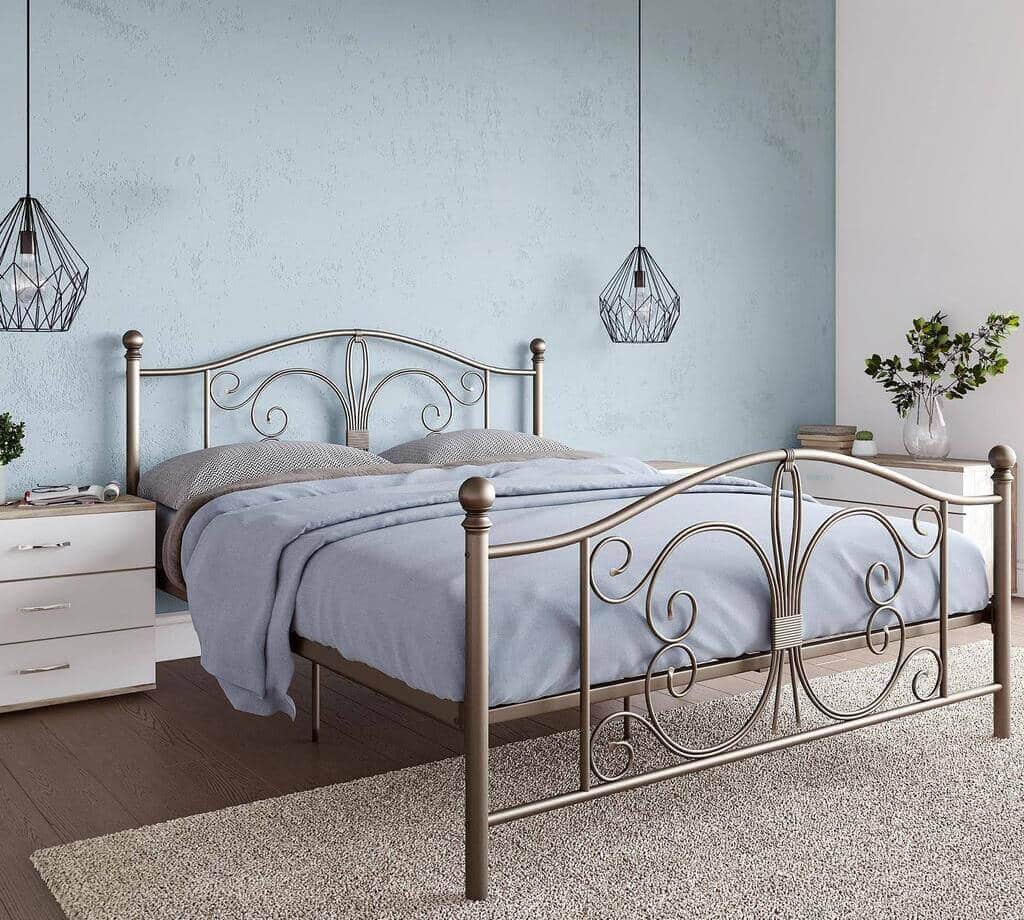
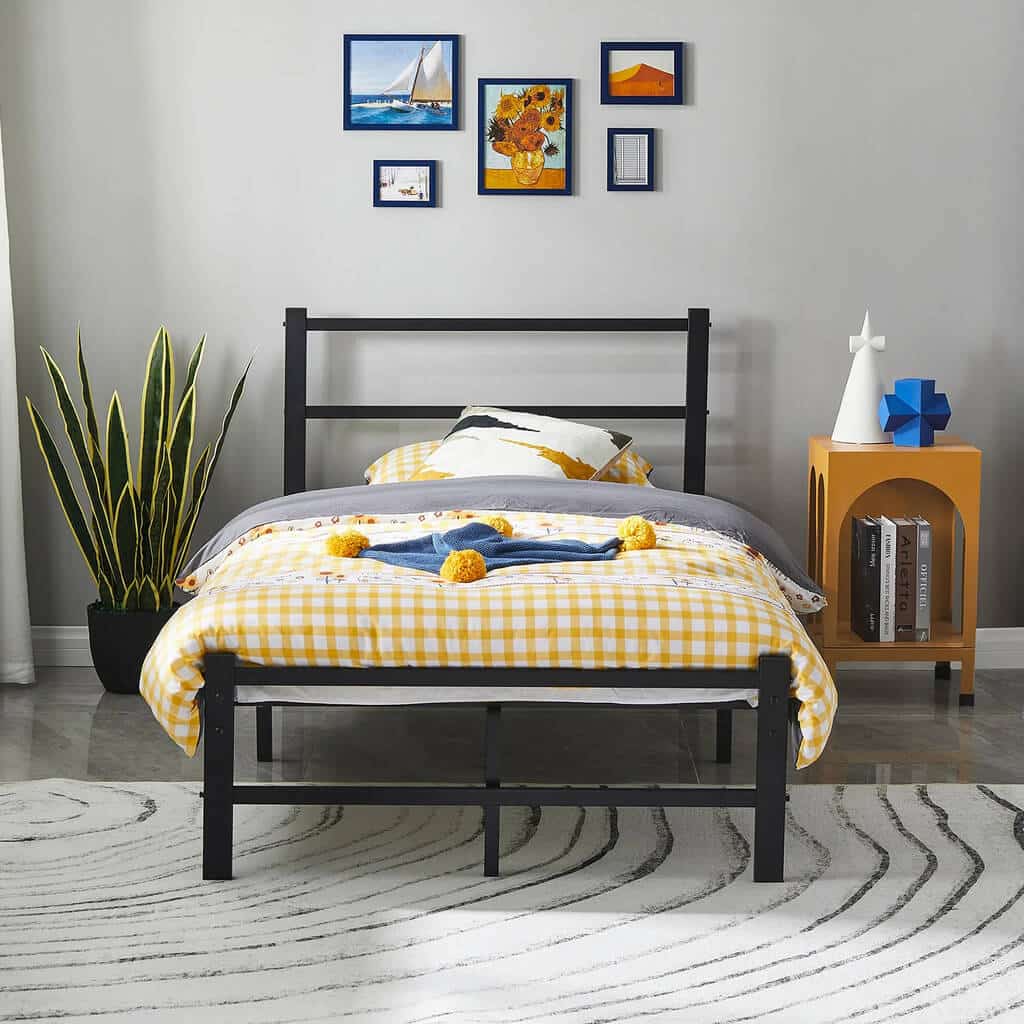
1. Basic Metal Twin Bed Frame
A basic metal twin bed frame is a classic piece of furniture that is ideal for small spaces. Its sleek and light look makes the space appear bigger and gives it a minimal aesthetic. The heavy metal frames make a sturdy bed frame twin design ideal for the kids’ room.
Complement the minimal style of the bed with similar style furnishings. The streamlined silhouette of this twin bed can aid in the creation of both a sophisticated and casual ambiance. Customize a headboard if you wish to get creative and amp up the look of your space further.
Quick Tip:-
Add a comfortable mattress and lush furnishings to complement the twin bed. Minimal twin bed frames like this make the room seem spacious and are thus ideal for small rooms.
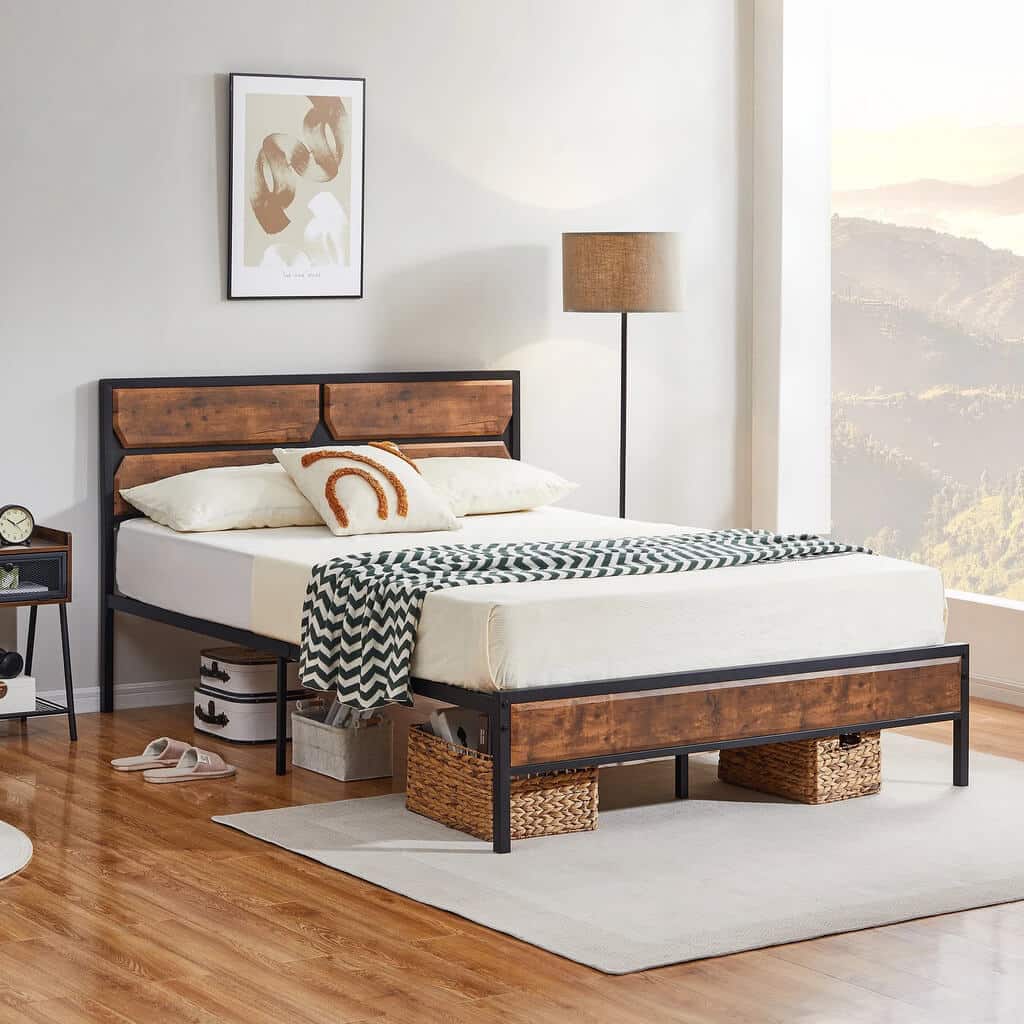
2. Industrial Twin Bed
Give a stylish makeover to your room with this rustic industrial-style twin bed. The sleek and streamlined form of the bed is elegantly functional. While the wooden footboard and headboard make it appear stylish.
The design epitomizes the uber-chic vibe and can be a statement-making piece in your space. Adorn the space in mid-century modern or industrial aesthetics to complement the bed. Use warmer tones in your space that’ll bring out the essence of the twin bed frame.
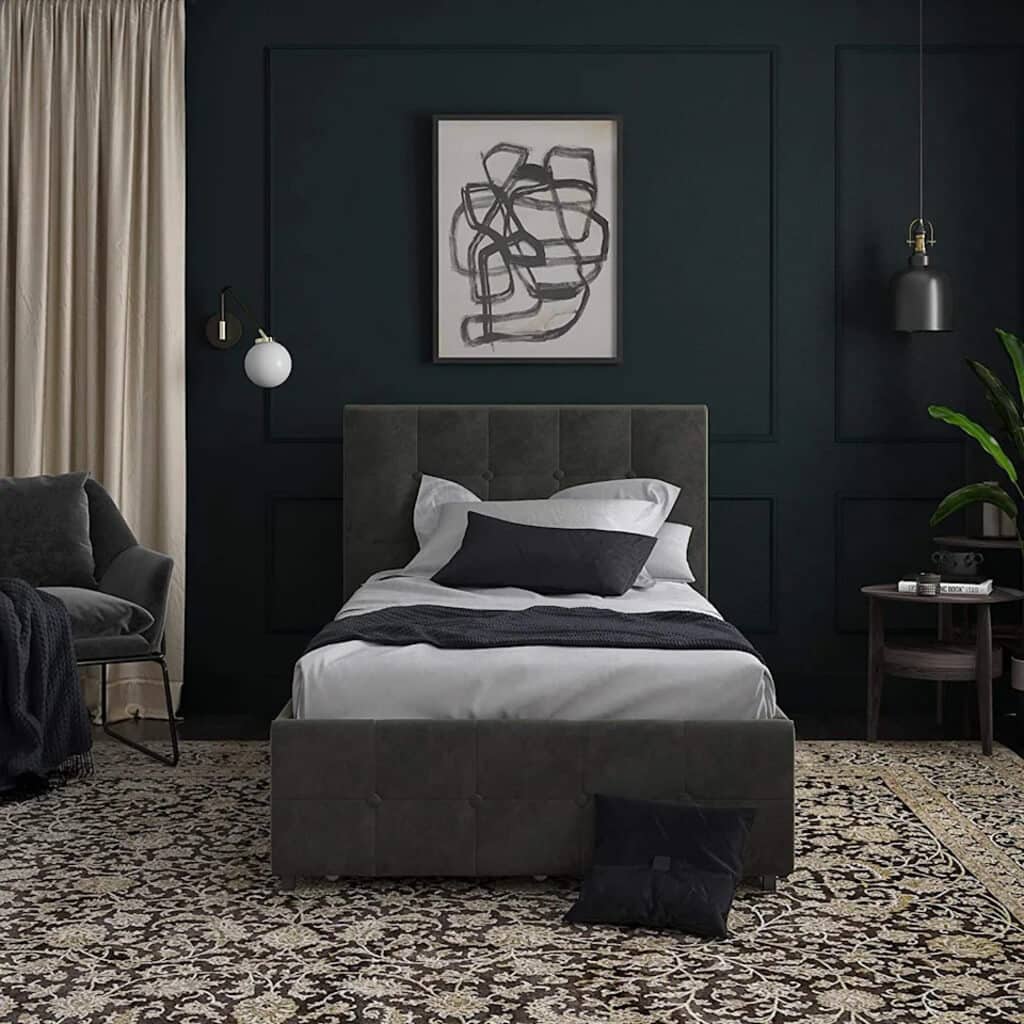
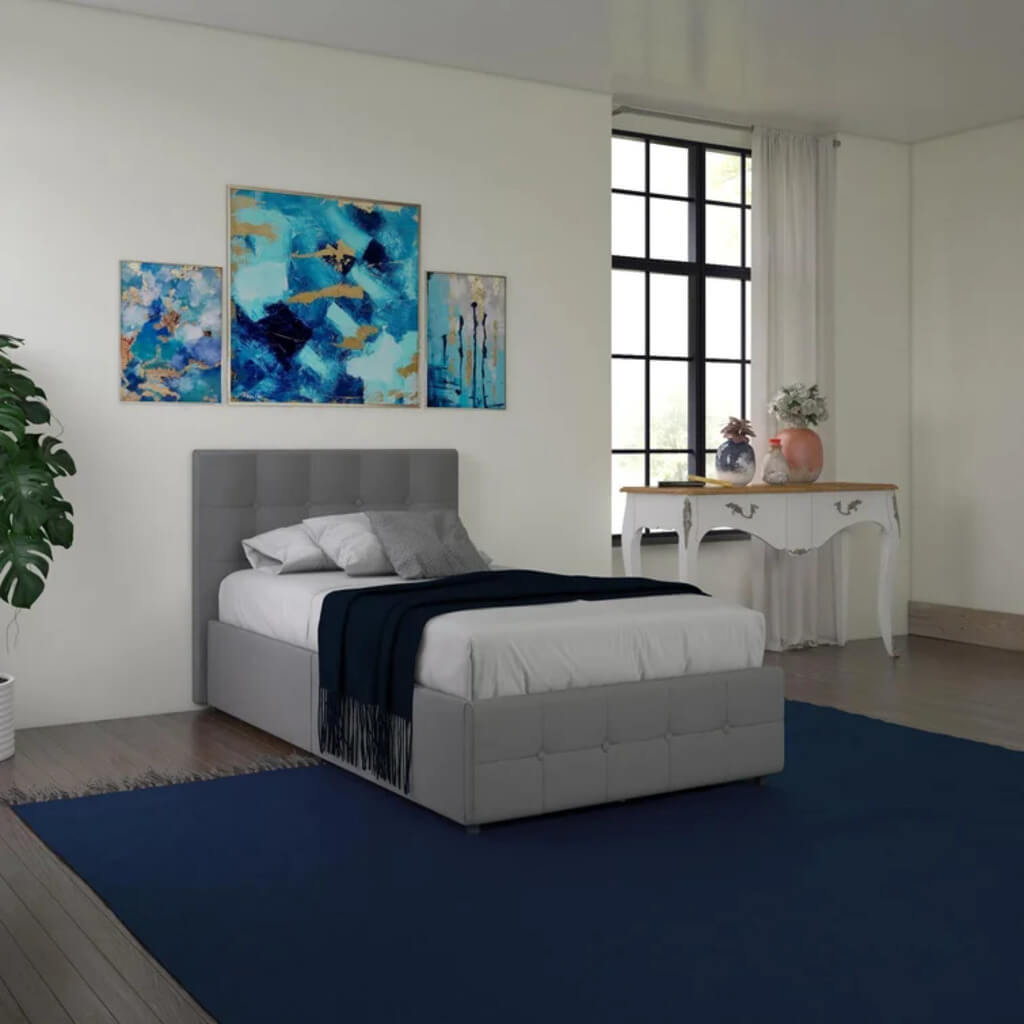
3. Luxe Twin Bed
If you’re looking to add twin beds to your luxe-style space, you must consider an elaborate twin bed frame like this. The superior upholstered bed with tufted headboard in the chic velvety fabric is simply sumptuous. It will not just blend well in your moody dramatic space, it will make it enticing.
Choose rich-looking furnishings that includes plush comforter, cushions, and bedding to make the piece shine. Bring home this graceful twin bed and watch your space transform into a luxurious relaxing oasis.
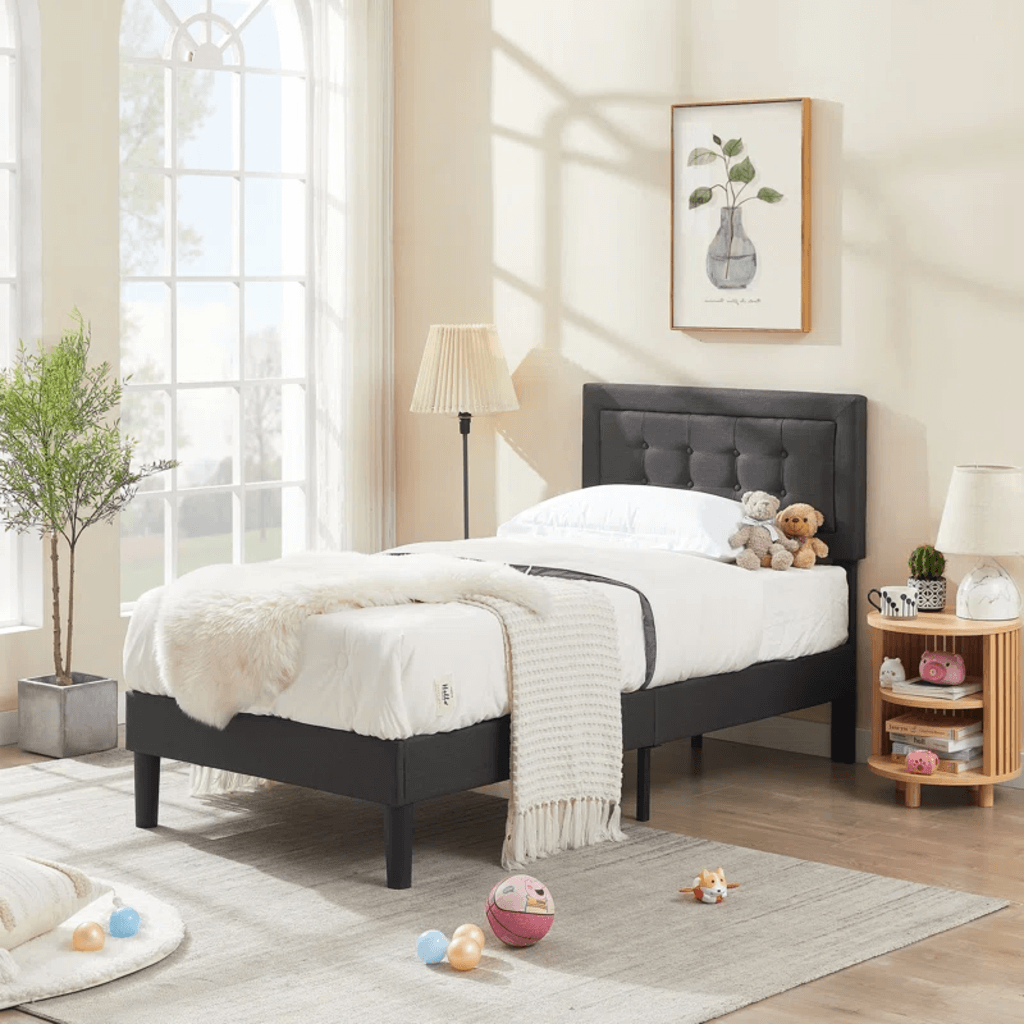
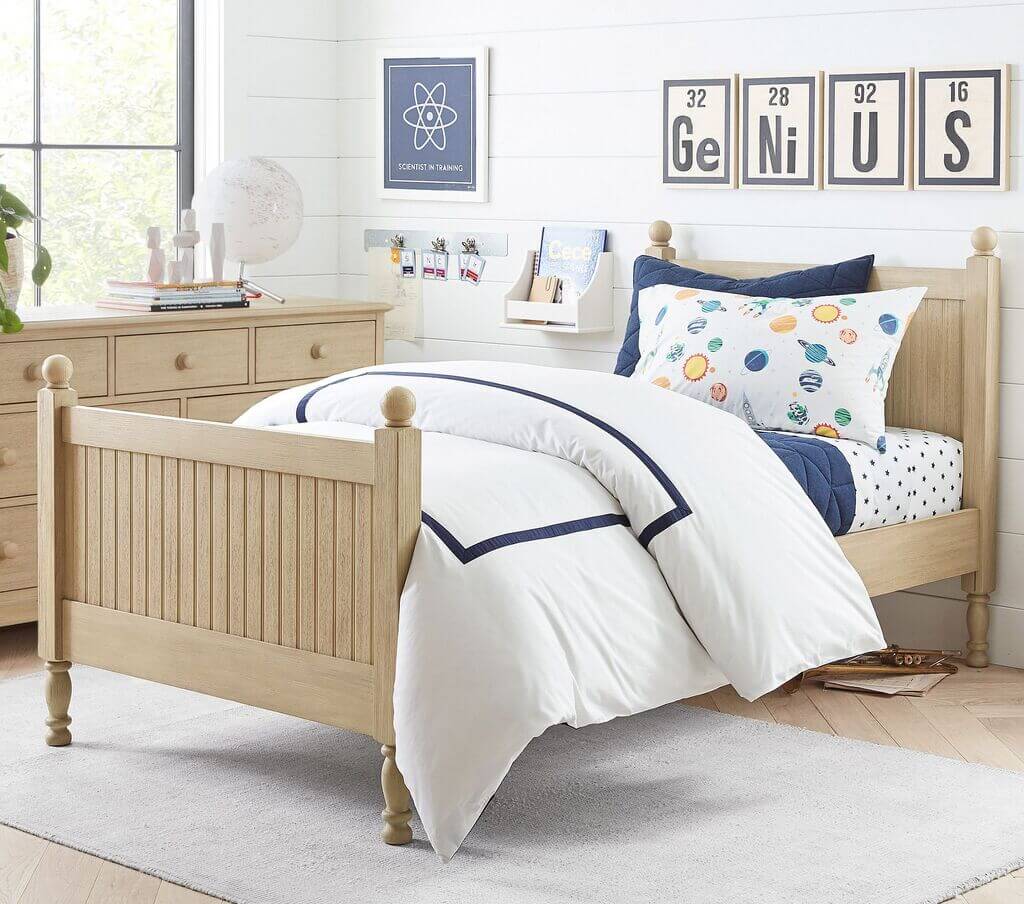
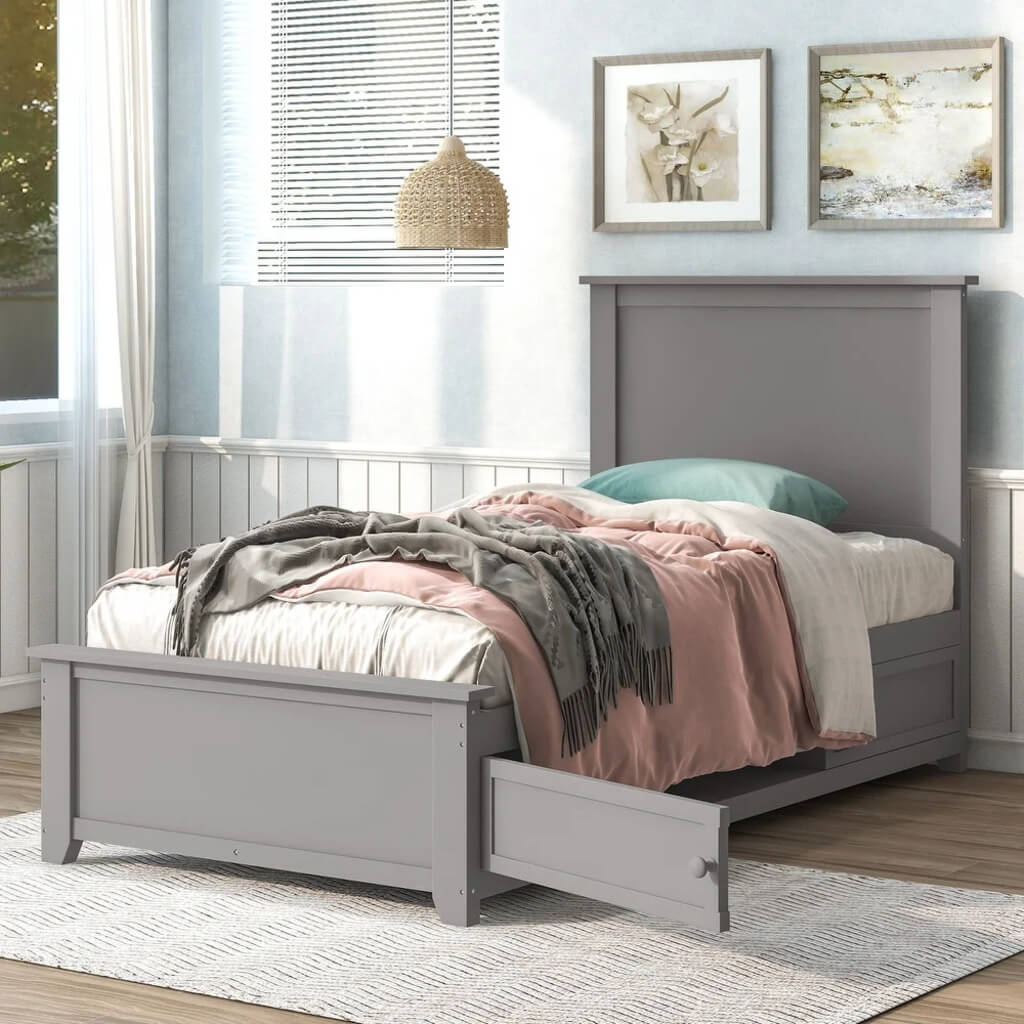
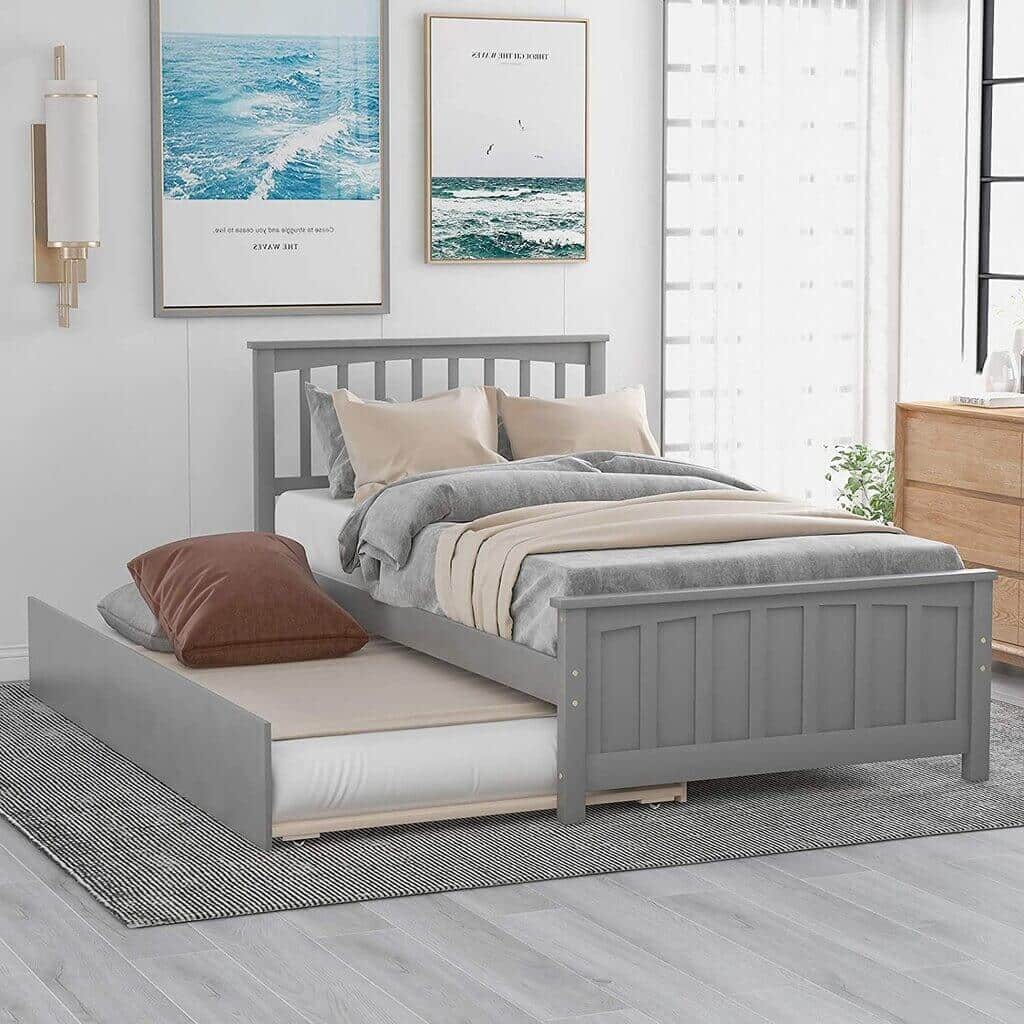
4. Traditional Twin Bed Frame with Headboard
It’s always a good idea to go back to the classics. Want to import a timeless look into your space, go for a traditional twin bed with a headboard like this. The button-tufted headboard is an elegant addition to the simple wooden twin bed frame.
The solid platform defines the comfortable structure of the bed. Add a plush mattress and simple bedding for creating a comfortable setup. This bed works well as a twin bed for adults and is apt for the master bedroom or the guest bedroom alike.
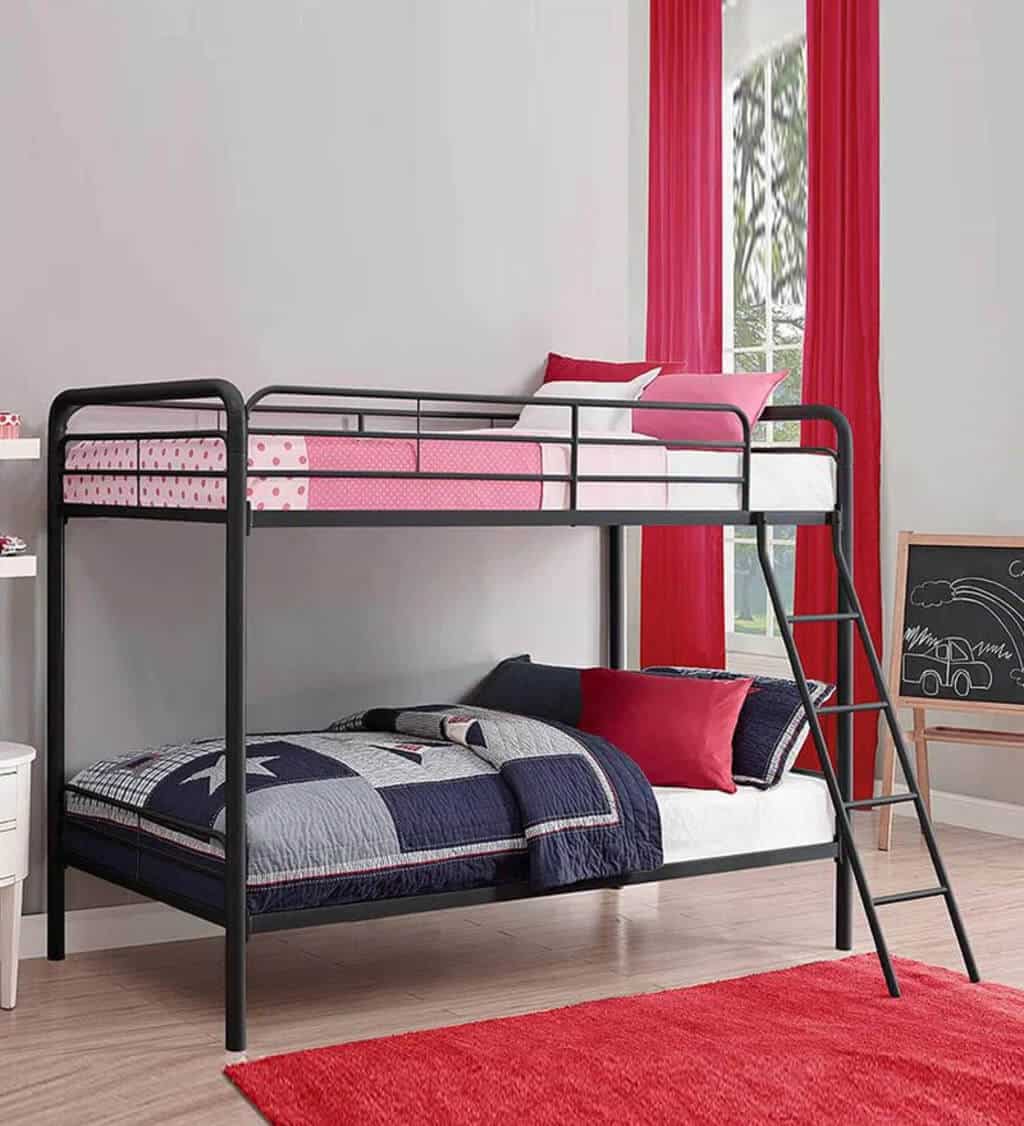
5. Bunk Twin Bed Frame
Are you a little too tight on space, why not go for twin bunk beds? This will not only meet your functional needs but will also act as a quirky multifunctional addition to the space. The sleek and streamlined metal twin bed frame makes the space look light and spacious.
It features rails along the top tier that ensures safety and better functionality. Ideal for the kids’ room, this twin bed is simply elegant. Style the bed with themed bedding to make the two tiers pop in unique character.
6. Chic Upholstered Twin Bed
If you want the grace of a king-sized bed to translate into a twin bed, consider opting for the type shown here. The classic silhouette of the bed personifies grace. A simple tufted headboard and platform designed in elegant-looking upholstery define this chic twin bed frame.
The details on the headboard make are well-tailored and collectively the piece has a finely crafted aesthetic. Adorn this elegant twin bed with lush furnishings for an uplifted and lively ambiance in your bedrooms.
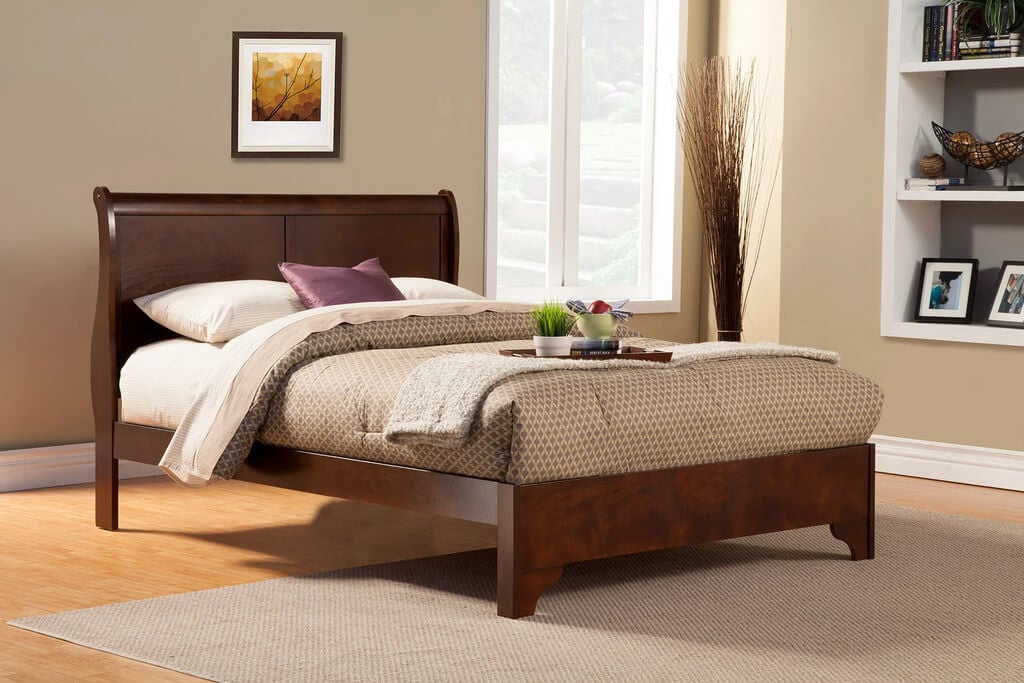
7. Sleigh Style Twin Bed Frame
Yet another traditional style graceful twin bed option is this sleigh-style bed. The stylish silhouette of the bed can amp up your space with a classic timeless look. Being skillfully crafted in wood, the polished veneer twin bed frame looks lavish.
Set a classic tone for the space, and incorporate matching lush furnishings to tie the space together. This twin bed is a perfect fit for the master suite or the guest bedroom.
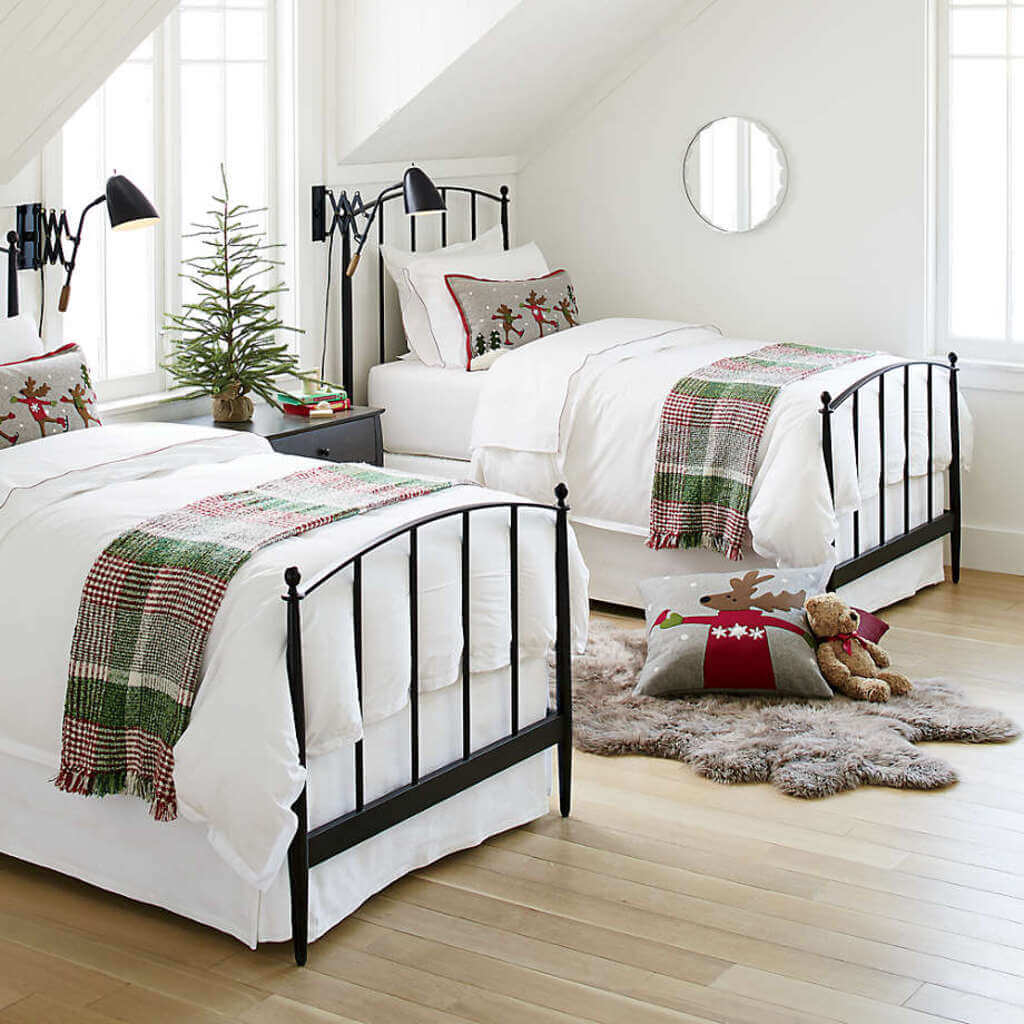
8. Simple Twin Bed Frame
The true charm of twin beds is personified in this elegant design. Simple metallic bed frame with rails on the top and bottom replicate traditional style beds. The sleek and sculptural elements of the frame create a subtly ornate appeal to the bed.
This twin bed frame can pair up equally well in contemporary or traditional style spaces. Complement this versatile piece with the soft comfy furnishing to curate an enticing aesthetic for your room.
9. Twin Platform Frame Bed
This chic wooden twin platform bed frame is anything but basic. Its subtle color palette and stylish form perfectly fit in with any theme. The articulate silhouette makes a statement in any space, rendering it an alluring aesthetic.
Curate the desired theme centered around this striking twin bed frame. The carvings and details on the headboard and tail make the piece stand out further oozing a sense of playfulness.
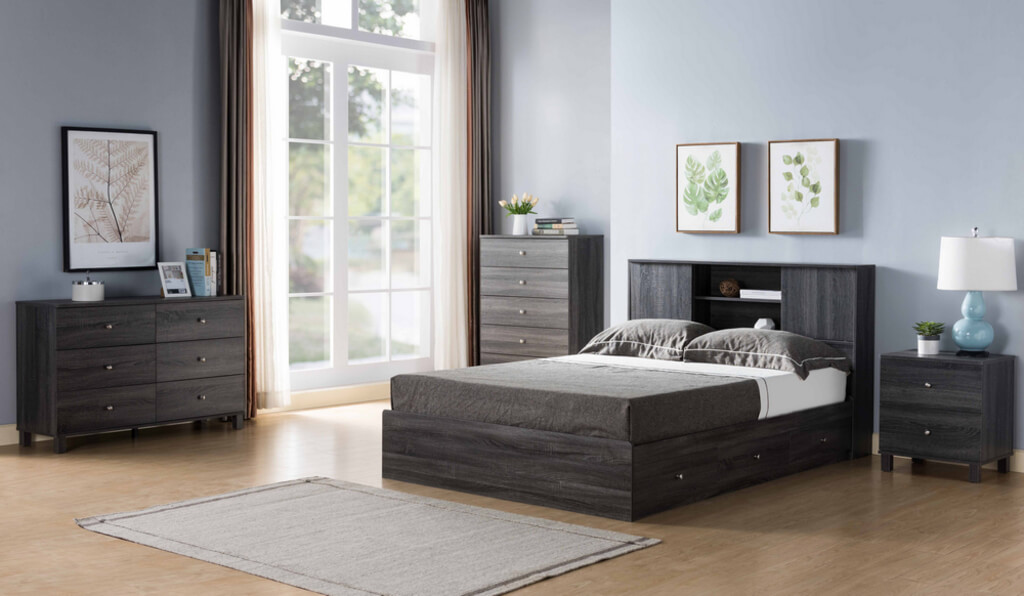
10. Low-Lying Twin Platform Frame Bed
A low-lying platform twin bed like the one here is as functional as it is aesthetic. The drawers along the platform and the storage in the headboard make this piece a perfect addition to spaces with limited square footage.
Its simple and elegant form makes fits perfectly well in both traditional and contemporary style spaces. The twin bed with drawers in wood can become a staple piece in guestrooms, bedrooms, and kids’ rooms alike.
11. Foldable Twin Bed Frame
If you’re looking for a flexible twin bed to add to the guestroom, you must consider opting for a foldable twin bed like the one here. Its simple metal twin bed frame can change as per need, it expands to become a twin bed for adults and can be folded back when the need subsides.
This flexible piece is highly functional and aesthetic. Its metal frame hints towards creating modern or industrial-style bedroom interiors to complement the look of the twin bed frame.
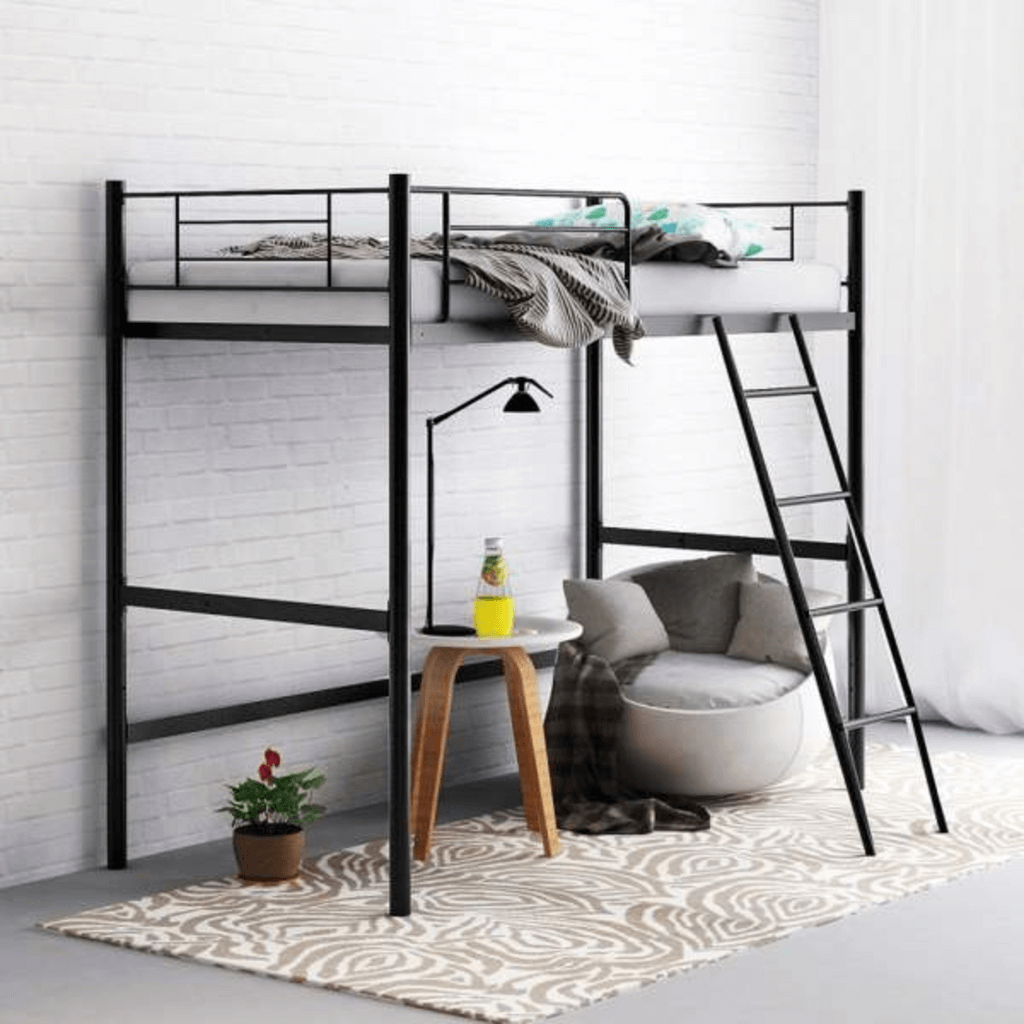
12. Loft Twin Bed
A quirky twin bed option for tight spaces is this loft twin bed frame. Similar to the bunk bed in structure, the bottom tier of the bed is replaced to make space for storage and alternate seating. The simple metallic frame of the bed makes the space look airy and spacious.
Its design leaves the ground level empty thereby maximizing the floor space. It is perfect for kids’ rooms or micro apartments where space is a major constraint. Add comfortable seating like the bean bag here and a complementary coffee table to make a cozy nook.
13. Themed Twin Bed Frame
Twin beds are the right fit for kids, so why not customize them as per their favorite theme? Like the one shown here, the spiderman themed twin bed frame is almost every kid’s dream.
You can customize the bed according to a custom theme as you like. Choose a basic metal frame and add the headboard and tail panel featuring your favorite character. Maintain the same color scheme throughout the room to create an assorted dreamy look.
14. Twin Storage Bed
Does your room look excessively cluttered? Well, it’s time to invest in a twin bed with storage, like the one here has large drawers as hidden storage. A combination of a graceful form and thoughtful functionality, this twin bed oozes elegance.
The tufted pattern on the platform and the headboard give it the classic collected look. It fits well in all kinds of spaces, the best being the master suite. Pair the bed with some lavish furnishings and you are good to go.
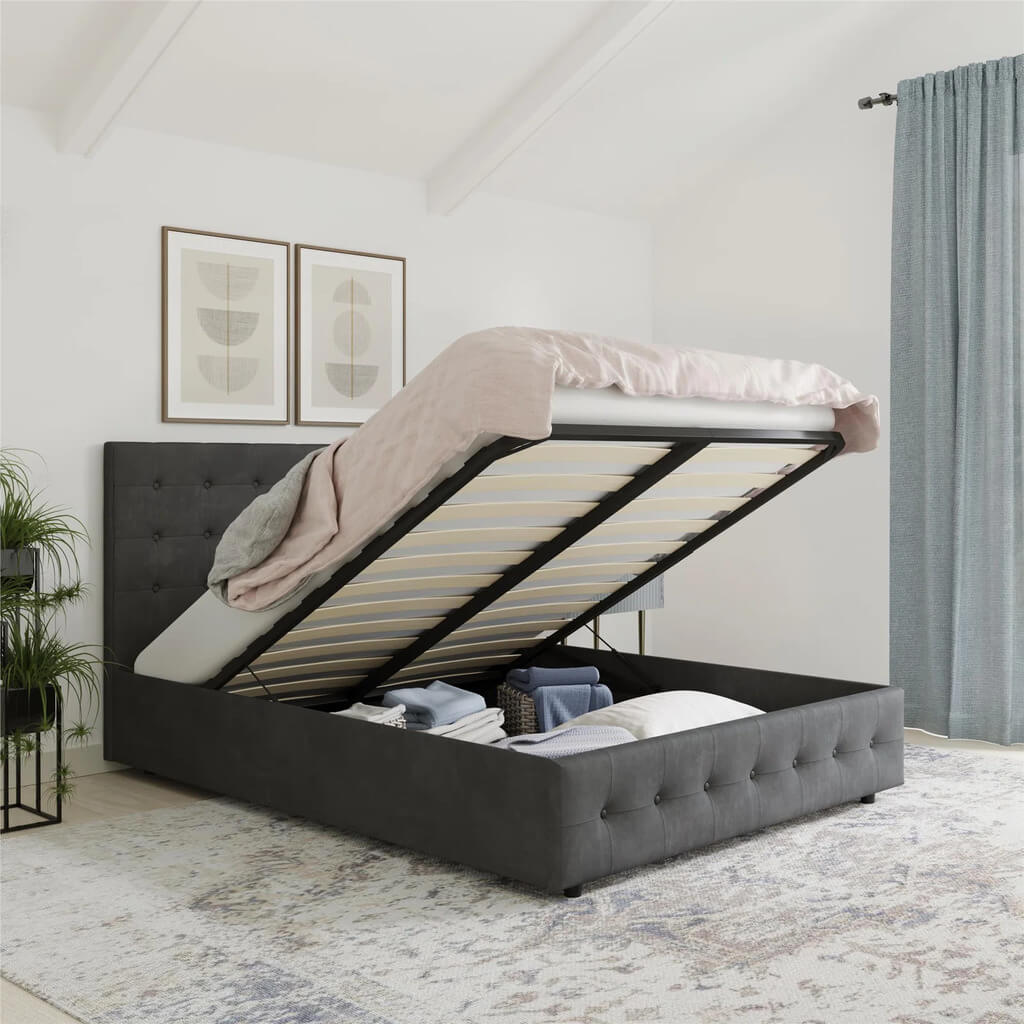
15. Hydraulic Twin Bed
If you’re looking for storage options to dump your off-seasonal clothes or furnishings, get a hydraulic twin bed like the one here. This helps you keep your space organized while adding a chic touch to it and is thus multifunctional.
Like the many classic twin bed frames listed above, this too oozes grace and enlivens any space it is situated in. This twin bed for adults might just become the most loved statement-making piece in your home.
16. Colonial Style Twin Bed Frame
A state-of-the-art ornate twin bed frame brings a sense of charm to any space. The organic patterned frame has a royal look that is balanced by the sleek pipes used to create it.
This fine piece can make a space enticing, be functional and curate a refined assorted aesthetic. Pair it up with fine furnishings and decorate your room in a matching ornate style featuring organic forms.
17. Solid Wood Platform Twin Bed
A simple solid wood platform twin bed frame like this one can elevate the look of your modern space. Its low-lying solid form conjures the space in a sleek and structured aesthetic.
The twin bed frame sets the tone for the space and works best when complemented with industrial or modern elements. Contrasting the look with the addition of patterned furnishings might also help curate an assimilated look for the space.
18. Royal Twin Bed Frame
A bed must be comfortable, but it should also be a statement of your style. A sculptural royal twin bed frame like the one here can be the perfect addition to the kids’ room or adults’ room. The soft form of the bed coupled with its fine upholstery defines this dreamy twin bed.
The design is simply charming and the experience is luxurious. Complement the sumptuous look of the bed with plush furnishings and decorate the room in a chic elegant aesthetic.
Quick Tip:-
Make your space stylish with explicit twin bed frames. You don’t always need a king-sized bed to import a royal look into your space.
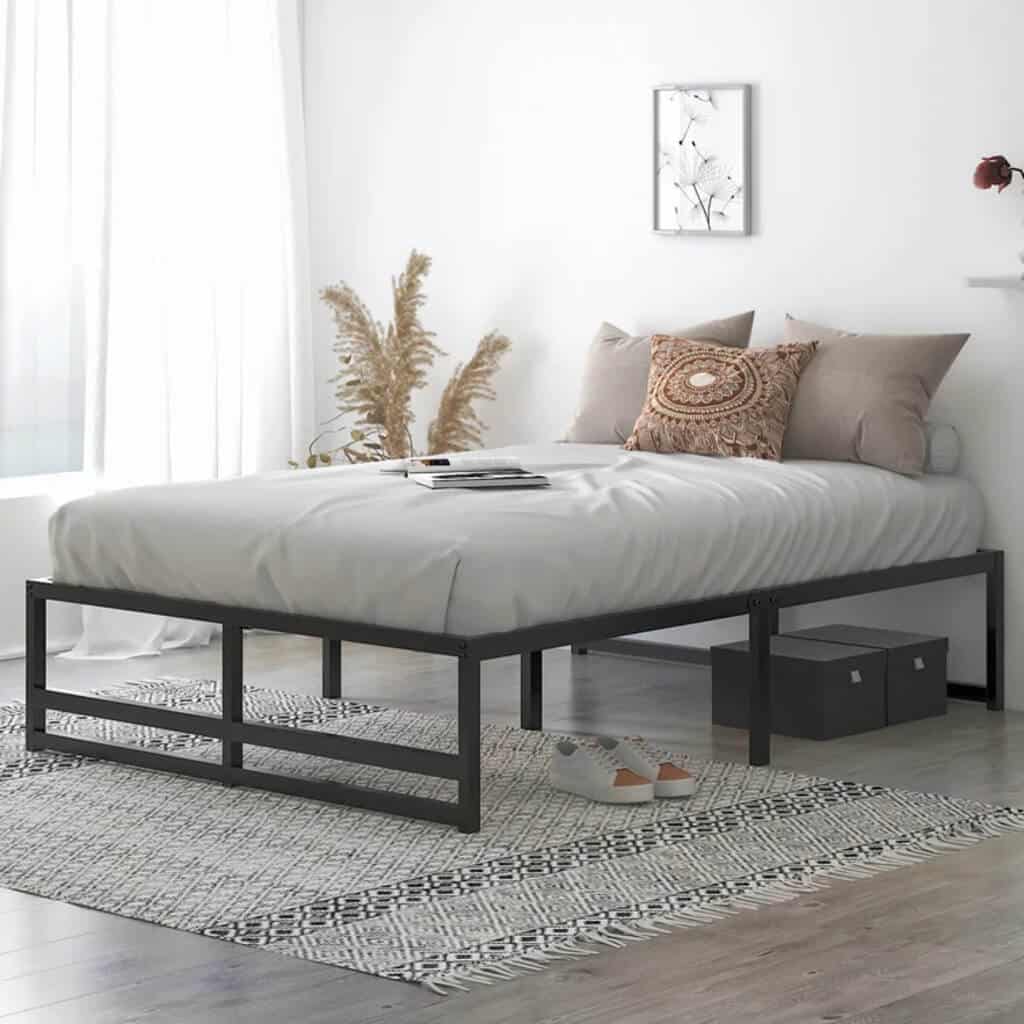
19. Modern Steel Twin Bed Frame
A modern steel twin bed frame like this simply fits in every space perfectly well. Its sleek structured form is defined by the heavy metal sections that make the twin bed frame sturdy. The absence of a headboard or footboard makes the design minimal and thus must be complemented with the supplementary theme.
Its height is higher, thereby maximizing the floor space that can then be used for storage. This simple elegant twin bed frame is suitable for kids, and adults alike.
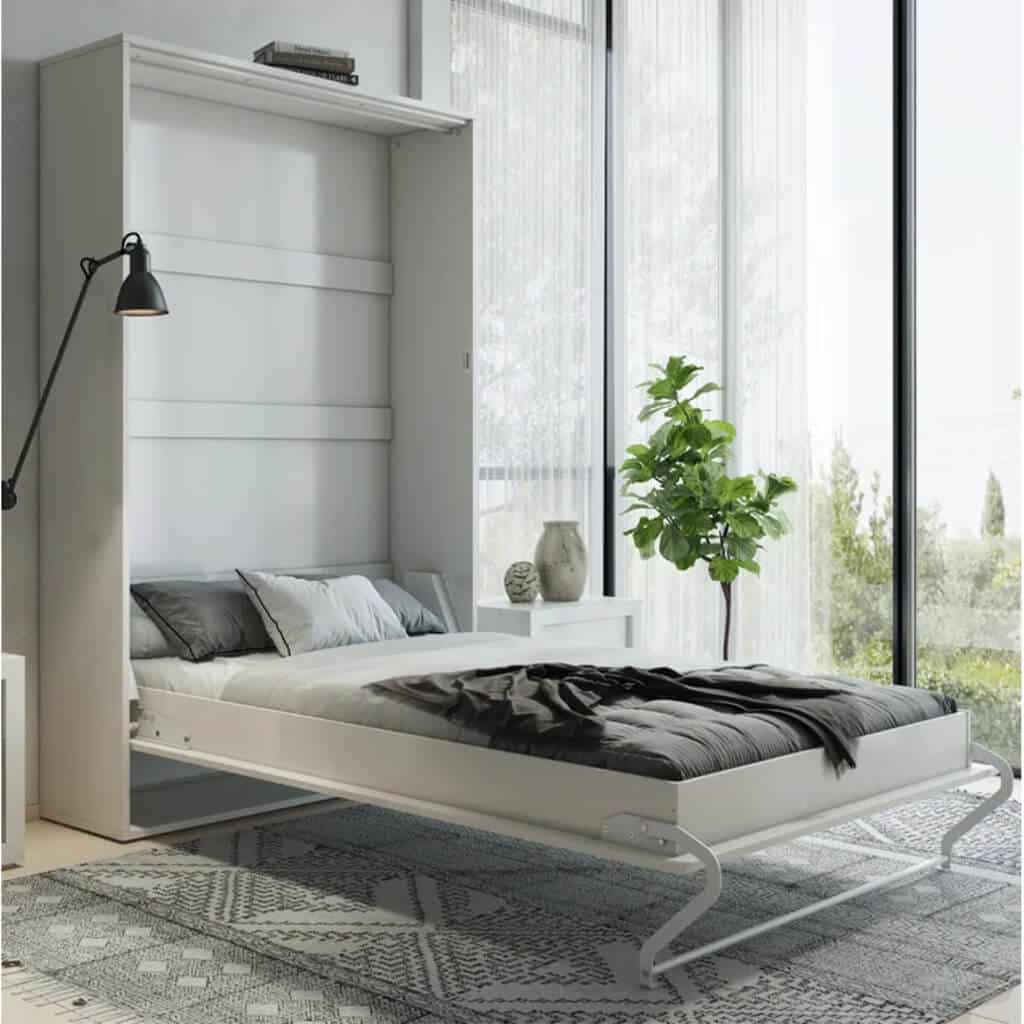
20. Murphy Twin Bed
If you do not have nearly enough space to accommodate all the required furniture in your room, consider going for a murphy twin bed. This dynamic type of bed when opened acts like a normal bed and when closed, flushes with the wall clearing the space around to be used for other functions. Its chic and elegant bed frame looks like a fine piece of furniture both when it is shut or open.
Twin Bed Frames Are Available in an Array of Different Types…
Choose a twin bed as per your spatial, and functional requirements. The tightest spaces can incorporate space-saving twin bed frames like murphy bed or loft twin bed frames. Spacious rooms can feature elaborate twin beds of royal or traditional design styles.
FAQs:–
How Do You Make a Twin Bed Luxurious?
You can make a twin bed luxurious by pairing it with the right kind of furnishings. Coordinating the theme or contrasting it also helps in creating a dramatic luxe appeal.
What Size Frame Do I Need for a Twin Bed?
Twin bed frames are generally 40-45 by 75-80 inches in size.
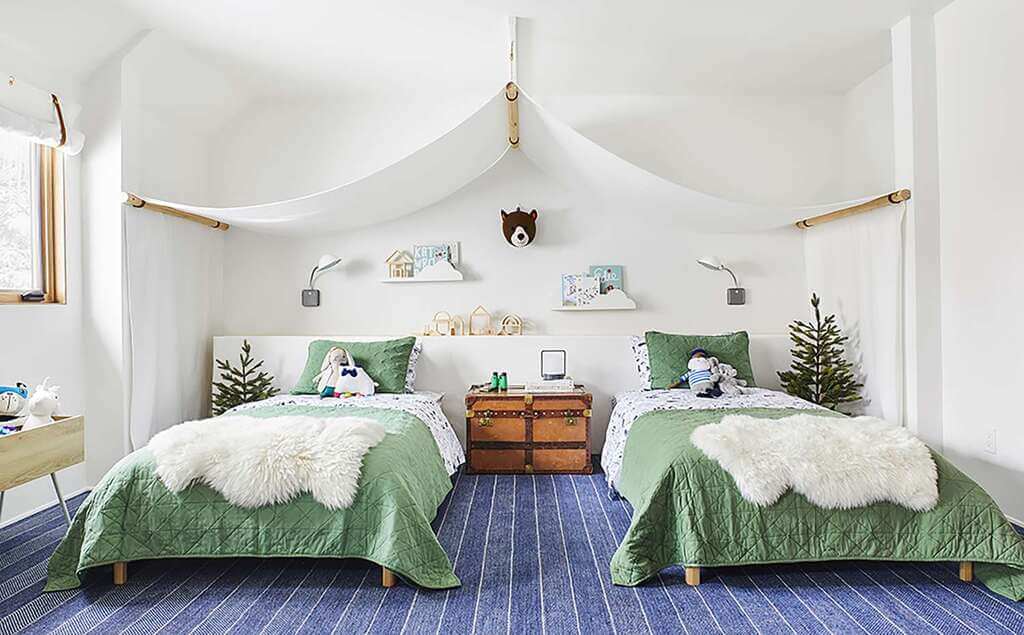
How Do You Fill the Gap Between Two Twin Beds?
You can fill the gap between the two twin beds by adding a side table and a plush rug.
Is It Better to Have a Higher or Lower Bed Frame?
Higher beds look more cohesive in a room, especially when they’re designed in a traditional style or classic style. Low-lying bed frames make the room seem larger, thus working well in smaller rooms and in modern or contemporary styles.
What Is the Difference Between a Twin Bed and a Full Bed?
A twin bed is typically a single bed having roughly 45 x 80 inches in dimensions. A full bed is a double bed that is ideal for two people having dimensions 54 x 80 inches roughly.
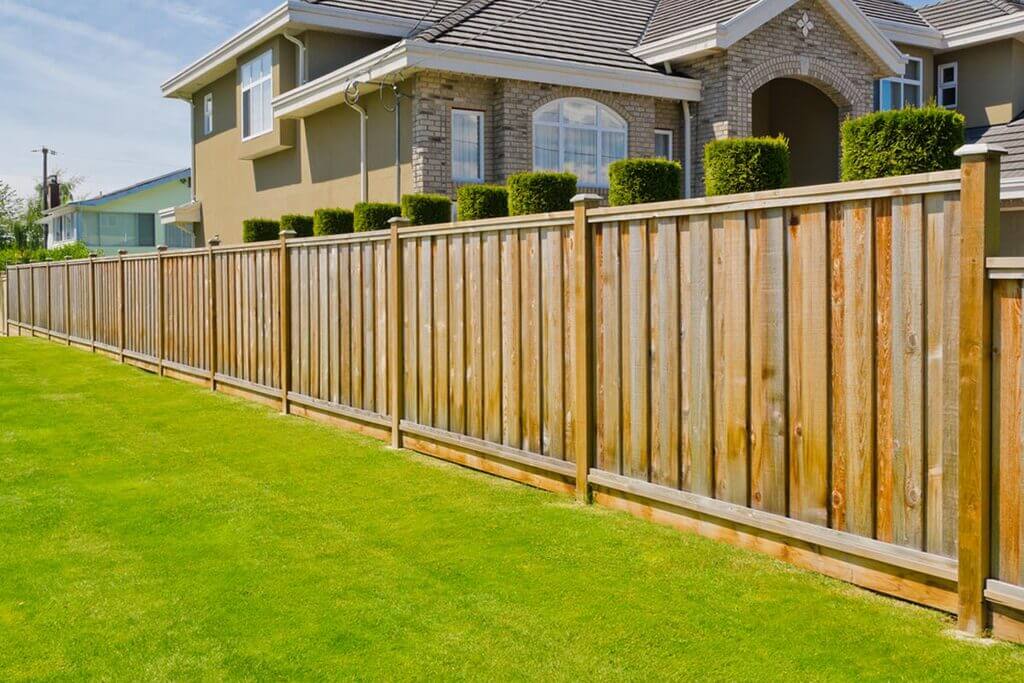
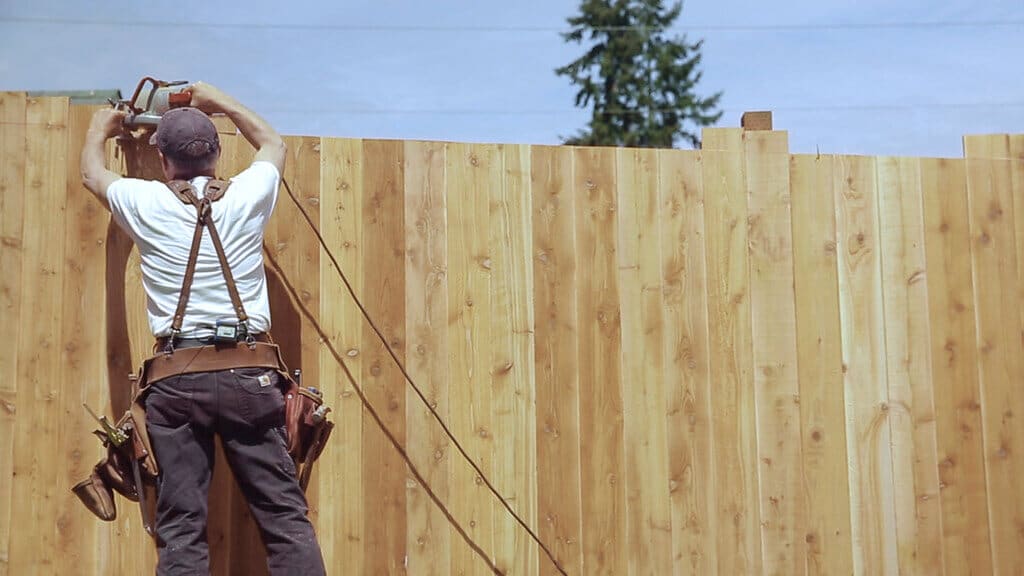
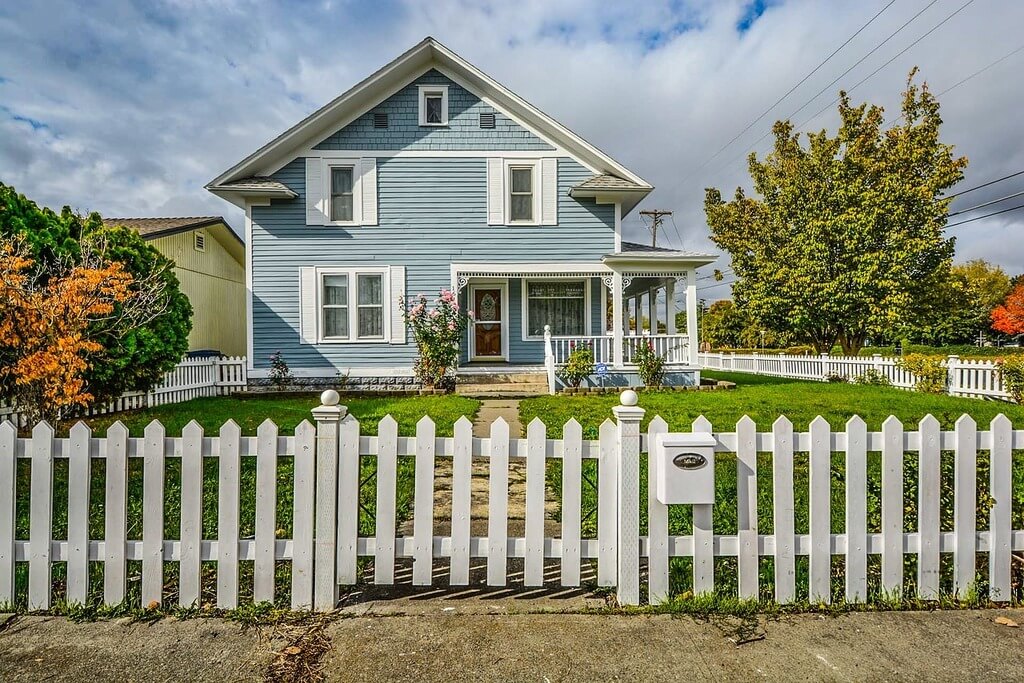
Installing a fence in your front yard is never an easy task. And this activity is best handled by professionals as it’ll save you time and effort. A fence can effortlessly jazz up the front look of the house while promising safety and security. From wooden to metallic, vertical to horizontal, and simple to patterned, there are endless options to choose from in the case of fencing design.
However, the bigger question is how to hire a qualified fence installer in San Antonio, Texas. Here are a few tips to look for the best and most highly-experienced fence installers for this job.
Experience Speaks!
You wouldn’t want to give the job to an inexperienced person as it can ruin the entire look of the house. While hunting for a skilled fence installer, make sure that you have a look into their experience. The more the experience, the better services will be offered.
Get It in Written
From the discussions to the final contract, make sure to get everything in writing. Before the commencement of work, a written contract will lay all the rules on paper and it can be signed by both parties in order to keep the work fair.
Negotiate the Rates
Best Fences surely accentuate the aesthetics of a property but the installation shouldn’t be too hard on your pockets. Ensure to go with a professional company that fits your budget and doesn’t compromise on the quality of their work. Compare different bids from several contractors before finalizing one.
The Work Timeline
Timelines play a crucial role in finalizing the contractor. If you’re aiming to install the fence on short notice, make sure that the chosen company is ready for the job. Evaluate different work timelines and pick the one that suits your set of requirements.
The Word of Mouth
In the end, the client’s feedback matters a lot. Talk to people who have availed of the services before and get to know about their personal experiences. Getting feedback can make the process of shortlisting a particular contractor easy.
Avail the Warranty Services
When it comes to fence installation, don’t ignore the warranty offered by the company. Keep a note of the warranty period and what all services are covered under it. A homeowner wants the fence to stay till the end thus making sure that the offered warranty is long-term.
Payment Terms
The terms of payment must be discussed prior to the execution of work. Have clarity on the company’s payment policy and if or not they need token money before executing. Make sure to sign a deal with a well-known company when it comes to advance payment.
Premium Quality
You must go ahead with a contractor that promises high-quality fencing. The product must be long-lasting and extremely sturdy in its place.
Make sure to discuss the material choice before proceeding further with the work. Because installing a fence will add value to your home and will help to sell your house faster.
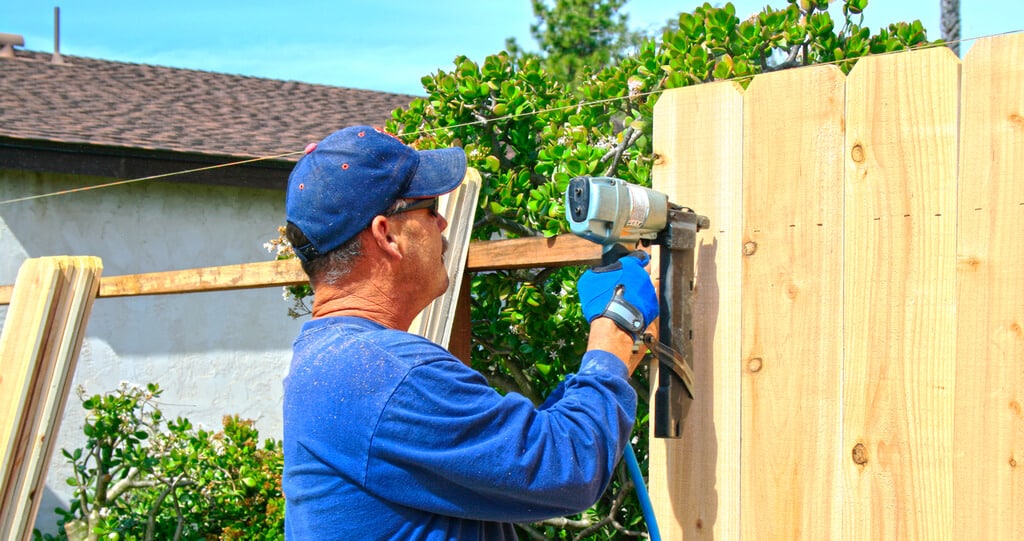
What Are the Qualifications of a Good Fencing Contractor?
While many people take up fence installation as a DIY project, it’s always better to seek professional help. A good fence installer in San Antonio will take up the entire project from its handling to getting the necessary permissions.
As such, there isn’t a formal course to step into the profession of fencing contractor but it needs a basic skillset of construction, maintenance, and carpentry. The rules followed by a fencing contractor are more or less the same as that of a general contractor.
When hiring a fencing installer for your project, make sure that the company is insured. In case the contractor doesn’t have valid insurance, any mishap or accident on-site becomes your liability which adds to the hassle. With general liability insurance issued to the company, any accidental damage to your property will be taken care of by the team.
Difference Between a General Contractor and Fencing Contractor
While a general contractor supervises and handles all the construction-related activities on site, a fencing contractor is only responsible for the job of installing a fence.
A general contractor needs to have a valid license in order to practice in several regions, whereas, fence installers can work without a license in most states. From installation to repair and management, the fencing contractor is responsible for each stage of this job.
A Quick and Easy Search
These pro tips are sure to make the task of hunting the best fence installer a breeze. Keep into consideration these points and rest assured that you’ll get your job done efficiently without any errors.
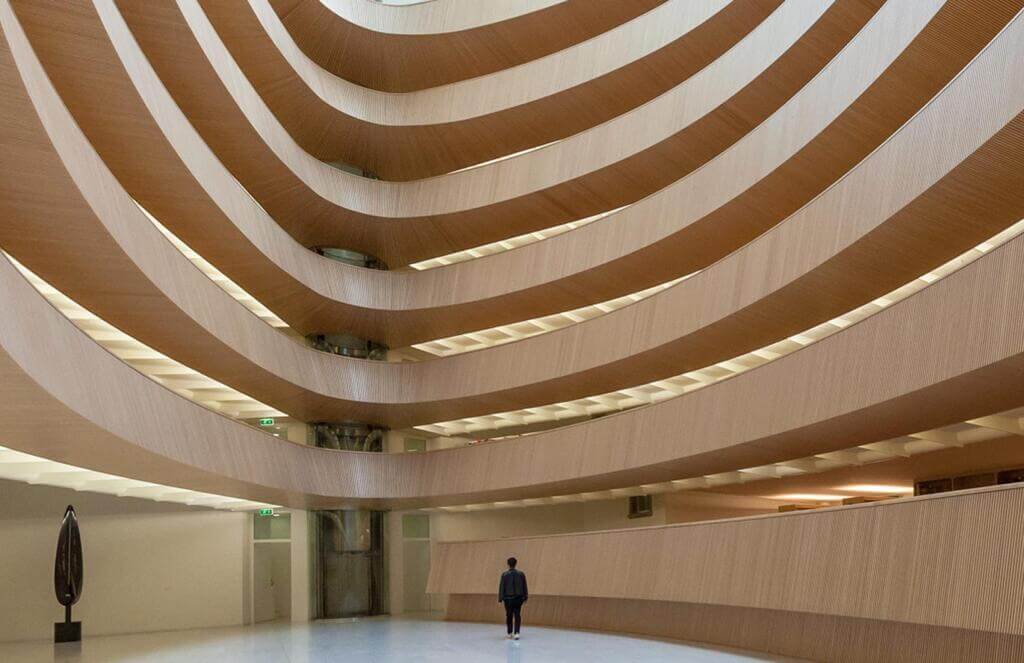
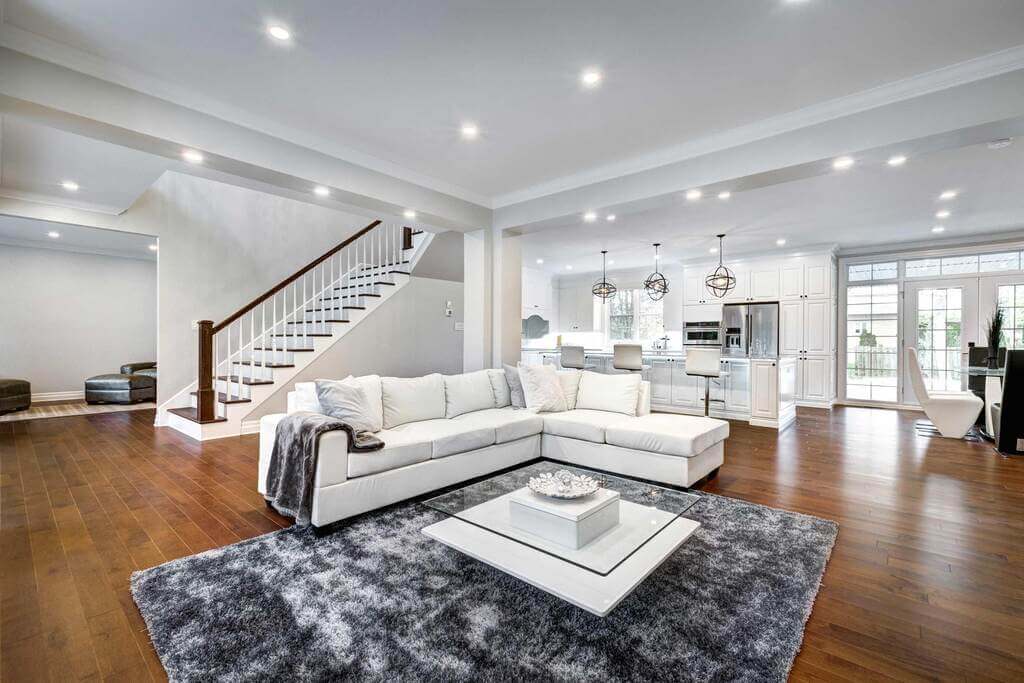
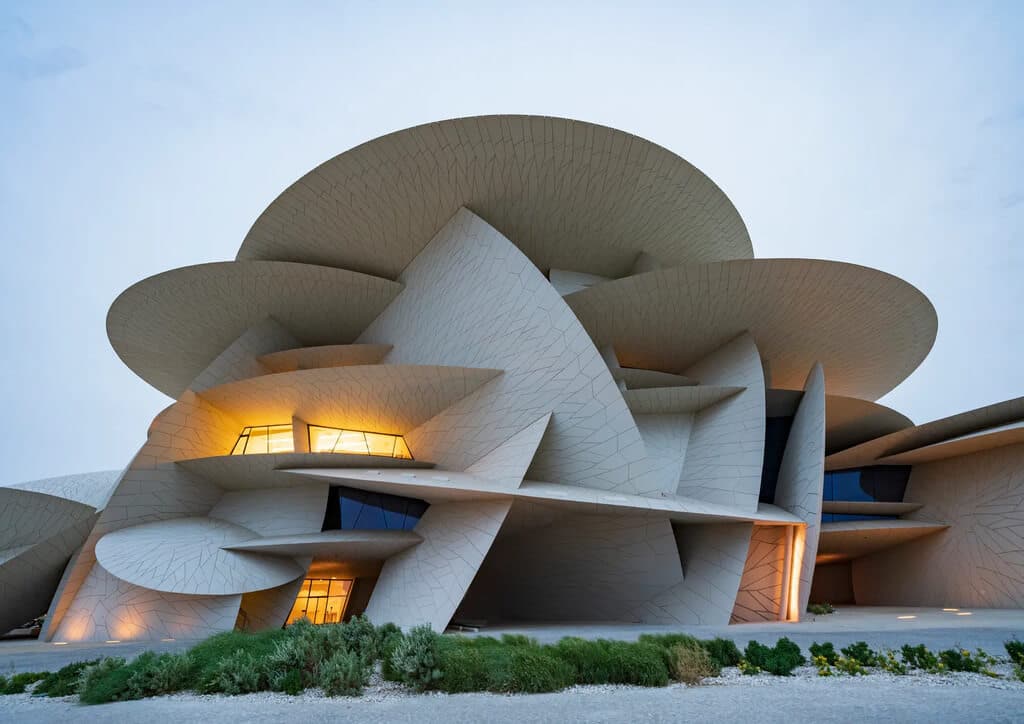
Architectural photography is used to record features of buildings and structures. Unlike other genres of photography, it requires more than just the skills to capture beautiful imagery. Rather, it seeks to address both practical and aesthetic needs, translating them into something one can grasp visually.
Due to this unique aspect, many see architectural photography as useful in many fields. Here are the many ways people find it beneficial and important.
It Helps Clients Visualize Your Work and Brand
The primary reason why architectural photography is important is that it helps clients understand the designs offered by architectural firms along with their brands.
The ideal architectural photography helps designers stand out from their competition. If you’re in the building design industry, you would know that most clients reach out to you for the designs you offer.
They may request a portfolio of your work or a sample of a specific project that emulates the specifications they’re looking for. Also, they may want to get a feel of how your firm works and whether it fits what they need.
In an exchange like this, you can’t rely on mere verbal affirmations. These potential stakeholders want to gauge the quality of your work with actual evidence. So, you provide them with photographs. Depending on how much it impresses them and suits their needs, you can establish relationships that lead to your growth in the industry.
Suppose you plan to display your architectural work with the utmost quality. In that case, you need to work with a partner that can help you highlight your projects visually for your clients. Horizon Imaging’s service and others like it are good places to start searching for options.
It Plays a Big Role in Maintaining Interest in Communities
Architectural photography has an impact on both tourism and economics. Feature photos on websites and magazines prove to be particularly helpful in generating interest in communities, many of which wouldn’t have been known through any other means.
Both travelers and inhabitants alike benefit from having architectural features immortalized in print and digital format. A single photo of a market street can say a lot about a people’s history, culture, struggles, and triumphs at a single glance.
From this, people also derive inspiration for works of architecture in their own communities. Aesthetic-specific styles have been making a comeback recently, most of them emulating older eras of design. In a way, architectural photography provides a way into both the past and the future.
It Helps Display Architectural Work as Art
While models do an excellent job of portraying a design, there are times when scaled recreations can’t do justice to the level of detail and practical or aesthetic value in a work of architecture. In that case, viewers need to “see the thing from the inside out.”
Since you can’t always take interested viewers to the location of your work, architectural photography takes what they want to see and provides it to them in a quick, comprehensible format. They get an immediate glimpse of what makes a building unique, admirable, and worthy of being invested in.
In most cases, architectural photographers and designers work together to present projects through photos before an audience. This way, they take viewers through a visual tour of what an architectural work offers both as a practical space and as a form of art.
It Helps Sell Real Estate and Working Spaces
Space grows scarcer every day. That’s why many people look for ideal homes and workspaces to invest in. Unfortunately, not all of them have the luxury to drive around prospective properties. So, they go online to see what’s currently available in the market.
Here, architectural photography plays a big role. If produced well, architectural photographs can capture the apartment design, layout, and surroundings of a particular property in the most idealized ways.
These leave good impressions on potential clients, making them interested in reaching out to the owners or managers of properties for sale, rent, or lease.
Essentially, architectural photography encapsulates everything that makes a space worthwhile so people can decide whether to invest in them or not.
It Portrays Vital Information for Businesses from Afar
Following the previous point, stakeholders don’t have the time and energy to speculate on the value of a property. They’ll need a quick way to understand its features, advantages, and potential for being sustainable in the future.
Fortunately, architects use architectural photography to make it easy to convey all that information visually. In a few glimpses, they can make key decisions for how they plan to invest in a property.
Conclusion
It’s fair to say that architectural photography is quite valuable in a practical, artistic, commercial, and sentimental sense. Using it can be a powerful way to express ideas about what a place has to offer. Done right, it can always lead you to good results.
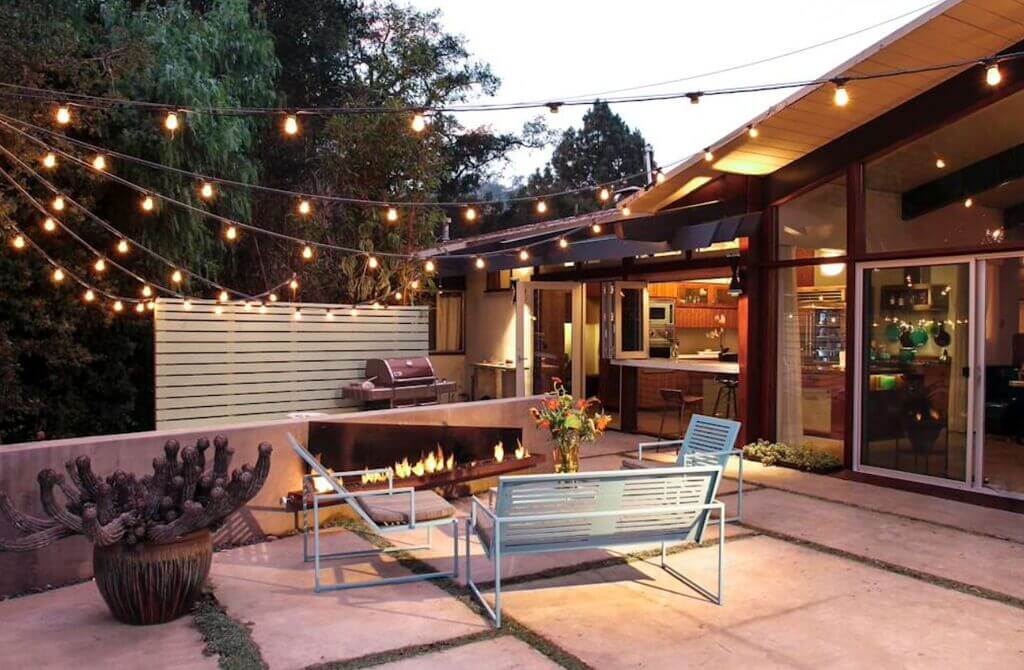
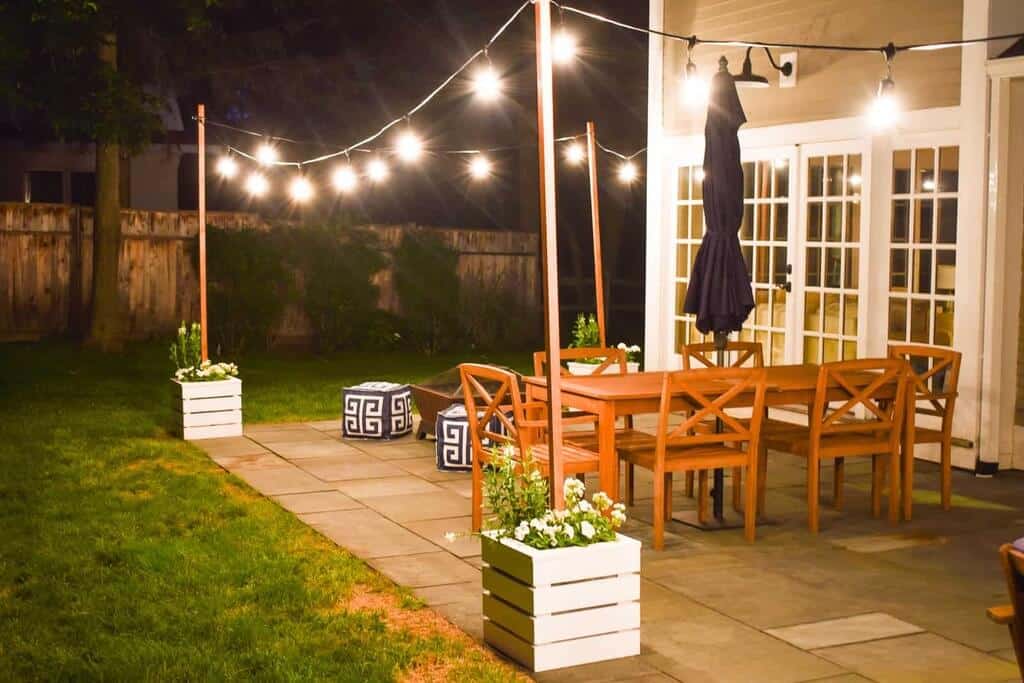
Would you like to add some light and interest to your garden landscape? You can do this easily by making DIY string light poles with concrete stands. These poles will not only provide beautiful light, but they will also add a touch of elegance to your outdoor space. Best of all, they are easy and inexpensive to make! Read on for instructions on how to create your own string light poles.
Gather Your Supplies
You’ll be the envy of your neighborhood with these stately string light poles decorating your gardenLandscape Styles. Not only are they lovely to look at, but they’re easy and inexpensive to make yourself. You’ll need a few supplies before you get started, though.
Most importantly, you’ll need a concrete mix, rebar, and string lights. You can find these items at any hardware store. Once you have your supplies, simply follow the instructions below to create your own beautiful string light poles.
Drill a Hole in the Centre of Each Concrete Block
To drill a hole in the center of each concrete block, use a power drill with a masonry bit. First, mark the spot where you want to drill the hole. Next, put on safety goggles and gloves to protect yourself from flying debris. Then, position the drill bit on the mark and start drilling. Apply steady pressure as you drill, and try to keep the drill perpendicular to the surface of the block.
Once you’ve drilled through the block, lift the drill out of the hole and brush away any loose debris. Finally, vacuum up any dust that remains before moving on to the next block. With a little practice, you’ll be able to quickly and easily drill holes in concrete blocks.
Insert the Metal Pole into the Hole
A metal pole inserted into a hole is more likely to stay straight if extra care is taken during the insertion process. It’s important to make sure that the hole is wide enough and deep enough to accommodate the entire pole. The depth of the hole should be at least equal to the length of the pole, and the width should be slightly larger than the diameter of the pole.
It’s also important to make sure that the hole is lined up with where you want the pole to go; otherwise, you’ll have a difficult time getting it straight.
Once you’ve double-checked the position of the hole, slowly lower the pole into it. Start by aligning one end of the pole with the edge of the hole, then lower it straight down. If you find that the pole isn’t going in straight, gently wiggle it until it’s aligned, then continue lowering it down.
Be careful not to let the pole bend as you’re lowering it; otherwise, you’ll have a harder time getting it straight later on. Once the metal pole is inserted into the hole, stop and check that it’s still straight before continuing.
Pour Concrete Mix into Each Block, Filling to the Top
Before you begin, it’s important to have all of your materials gathered and Ready. You will need a concrete Mix, water, and a trowel. Once you have everything, you’re ready to Start filling your block.
Simply pour the concrete mix into each block, filling it to The top. Then, use your trowel to smooth it out. After that, all you need to Do is add water and wait for the concrete to set. That’s all there is to it! With just a little bit of effort, you can create strong, durable blocks that will last for years to come.
Allow the Concrete to Dry Completely Before Using
Concrete is a reliable and durable building material that can be used for a variety of applications such as concrete bases for light poles. However, it is important to allow the concrete to dry completely before using it. Otherwise, the concrete may not be as strong as it should be and could crack or crumble over time. In addition, concrete that has not been allowed to dry properly can be more susceptible to water damage.
As a result, it is essential to be patient and wait for the concrete to fully dry before putting it to use. Doing so will ensure that your concrete structure will be able to withstand the elements and last for many years to come.
Hang Your String Lights from the Metal Poles
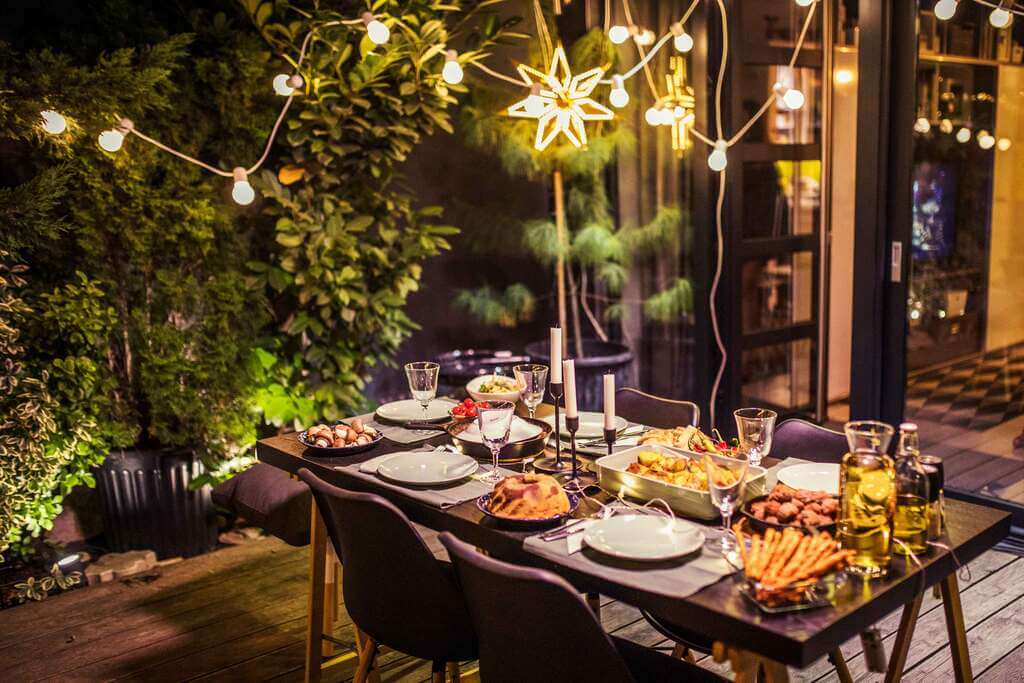
Hang your string lights from the metal poles in your backyard to add a touch of class to your outdoor space. String lights are a great way to highlight your landscaping or add a bit of ambiance to your next outdoor party. And while you can always just prop them up on the ground or drape them over a fence, hanging them from metal poles gives your yard a polished look.
Plus, it’s easy to do! Just use metal hooks or zip ties to attach the lights to the poles. Then, plug in the lights and enjoy their glow!
In Summary
Hang your globe string lights year-round by following these simple steps! Now that you know how to make your own concrete light poles, you can customize them to match any outdoor décor. Get creative and have fun with it – the possibilities are endless!
Spending outdoor time with family and friends is great fun in the summertime! Outdoor television boosts entertainment options. You can catch up on all your favorite shows while being outside on the outdoor tv.
Bright backlighting and waterproof design enable outdoor TV to resist the elements, especially in colder and more humid climates.
The outdoor TVs are not like the normal TVs. The outdoors Tv’s come with a portable projector, screen, and permanent fixture in your backyard.
Be with us to learn our top 5 picks for outdoor TVs and to know more about the same.
Top 5 Best Outdoor TVs
1. Aurora Outdoor TV
Aurora Outdoor Tv is a 43-inch television most suited for small outdoor spaces like a balcony. It is a 4k tv capable of providing the best quality picture.
It is the television when it comes to water resistance. Television has the best ratings when it comes to water resistance. The outdoor soundbar is also included, so you don’t have to consider costly audio upgrades.
It has a compact size and has the best connectivity options. Along with other features, it contains two 5-volt USB ports and three HDMI ports.
Specifications:
Maximum brightness: 400 nits
HDR compatibility: Yes (HDR10)
Durability: IP54 water – and dust-resistant
Other: Auto-brightness control, waterproof remote
PROS
Elegant Design
Amazing picture quality
Outdoor soundbar
CONS
Less bright screen
2. Full Sun Series 4k Outdoor TV (85 Inches)
With 85 inches diagonally, this Seura offering is the largest outdoor Tv on the list. The 4K display panel of the Full Sun Series is very bright. Even in direct sunshine, the peak luminance and anti-glare coating enable it to deliver a high-quality viewing experience.
The TV’s tough housing has a compartment for a streaming player. It has in-built fans to keep it cool. The TV comes in a cost-effective price range which is one more advantage of this tv.
Specifications:
Maximum brightness: 2000 nits
HDR compatibility: Yes (HDR10)
Durability: IP56 water-and-dust-resistant
Other: Water-resistant remote
PROS
Bright and vibrant screen
Integrated compartment for a streaming player
Built-in cooling fans
CONS
Costly
Miss built-in-speakers
3. Sunbrite Veranda 3 Series Outdoor Smart TV (55-Inch)
The greatest outdoor TV under $3000 is, without a doubt, the Veranda Series. A brilliant display panel with local dimming provides next-level contrast. Even in brightly lit open spaces, these features enable the device to deliver a quality viewing experience
The 20-watt speakers of this series are reliable for use outdoors.
Specifications:
Maximum brightness: 1000 nits
HDR compatibility: Yes (HDR10)
Durability: IP55 water- and dust-resistant
Other: Android TV, 20-watt speakers
PROS
Amazing picture quality
Top-tier smart platform
More connectivity features
CONS
Bad quality speaker
4. Element Partial Sun Outdoor Roku Smart TV
This television is the people’s top choice and offers a strong body and a bright display panel.
You will have immediate access to all streaming services because the Wi-Fi-enabled TV runs the feature-rich platform of the streaming juggernaut out of the box.
Specifications:
Maximum brightness: 700 nits
HDR compatibility: Yes (HDR10)
Durability: IP55 water-and-dust resistant
Other: Roku platform and remote, 8-watt speakers
PROS
Bright & Vibrant Screen
Suitable price
Feature-rich smart platform
CONS
Available with a 55-inch screen
5. The Terrace Smart Outdoor TV
This tv from Samsung is one of the best outdoor TVs. It is a bright 4k QLED display panel having the best quality picture, and one can see even in the sunlight. It has a refresh rate of 120Hz, and the screen is also amazing for watching sports.
The Terrace is currently the smartest outdoor TV, featuring built-in Wi-Fi, Bluetooth, Apple AirPlay 2 connectivity, Samsung’s Tizen platform, and support for Alexa and Google Assistant commands.
Specifications:
Maximum brightness: 2000 nits
HDR Compatibility: Yes
Durability: IP55 water-and-dust resistant
Other: Wi-Fi, Tizen smart platform
PROS
Best picture quality
Feature-packed smart platform
Excellent remote
CONS
Expensive
What Should You Take into Account While Purchasing an Outdoor TV?
Sound
Some televisions come equipped with a top-notch soundbar, while others fall short. Some outdoor TVs don’t include speakers, so you’ll need an outdoor soundbar.
Playback Device
Do inspect the media compartment before you purchase the TV. Few people have access to streaming services or Wi-Fi.
Before purchasing a TV, make sure to measure the media compartment.
Brightness
It is one of the most crucial things you should take into account while looking for outdoor television. You must seek a brighter display panel if you intend to keep the television in direct sunlight. Lower brightness display panels, on the other hand, are good for areas that are shadowed.
Final Thoughts
At last, we would say that outdoor TVs are the best way to entertain yourself and your family, especially in the summer. We have mentioned the best Outdoor Entertainment Area you can buy for you and your family.
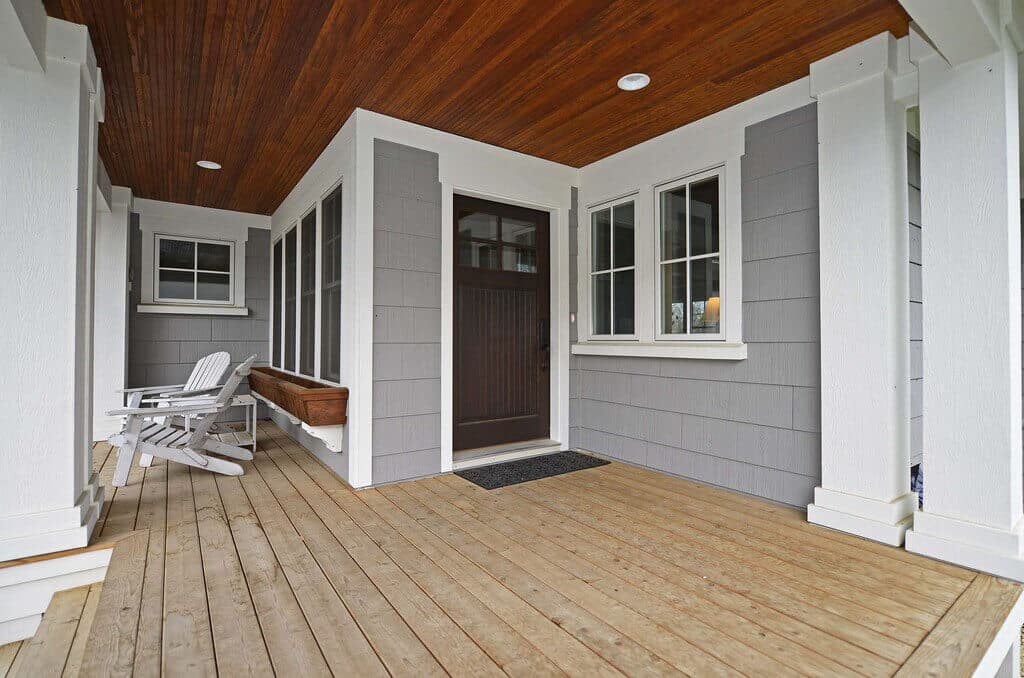
The exterior of the house is the first impression of you and your style. It ought to be a memorable one. The easiest way of creating a stylish and memorable impression is by choosing the right exterior house color schemes.
There is a myriad array of colors available out there, so many that it can get overwhelming at times. Bold blues, striking reds, or basic neutrals, all of them work differently for different architectural styles.
Choosing which one would be the right exterior house color scheme for your house may seem like a daunting task. Thus, we’ve curated a comprehensive list of all the colors that go well together and that can create the desired curb appeal for your house.
30+ Spectacular Exterior House Color Schemes for an Inviting Appeal
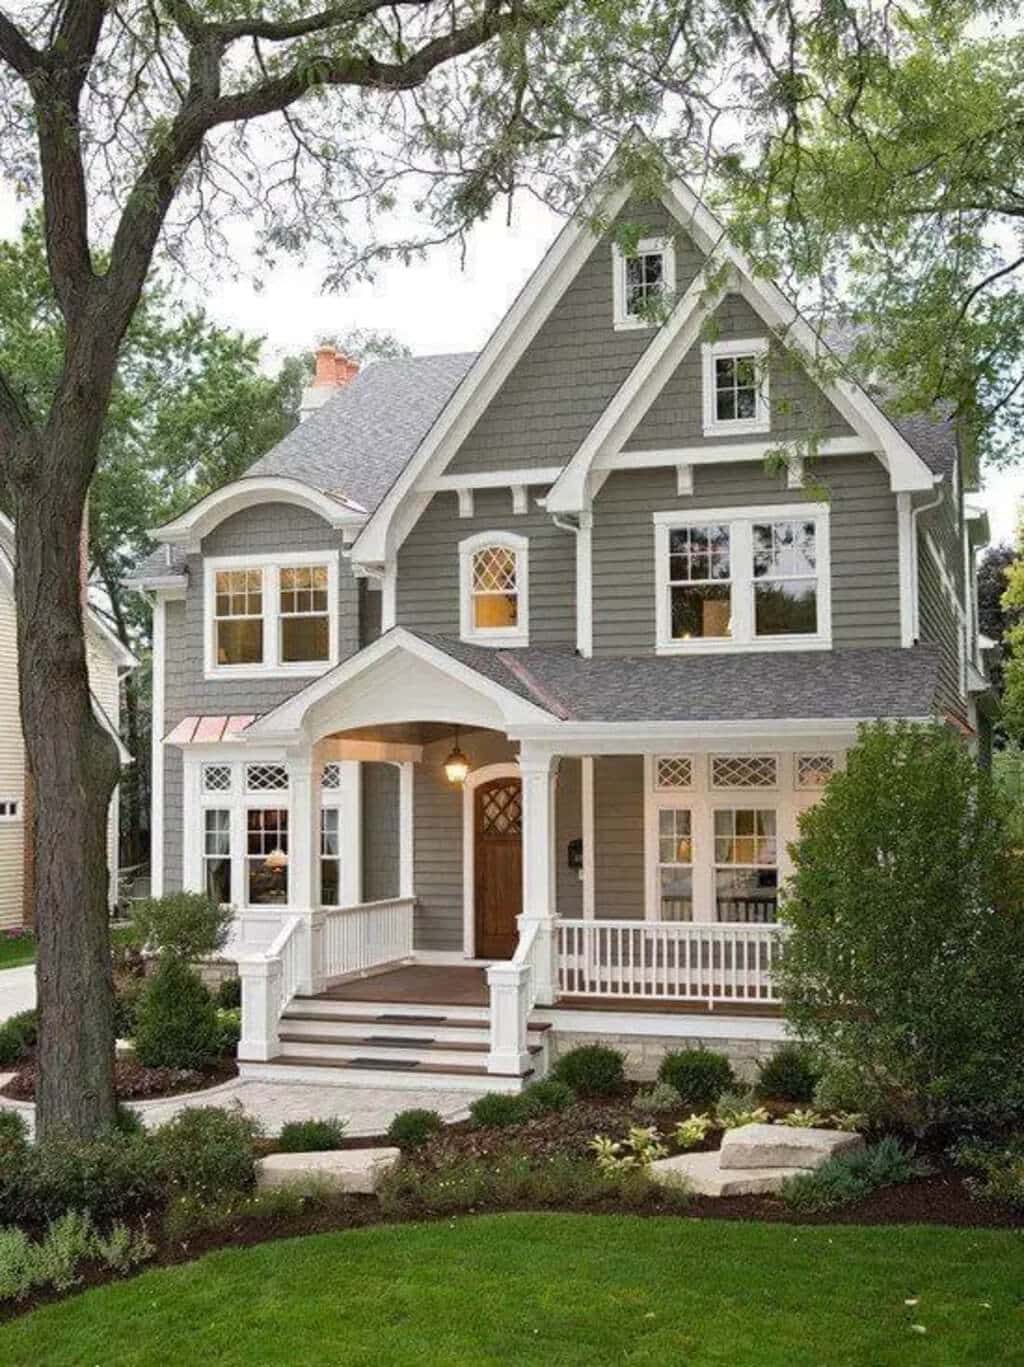
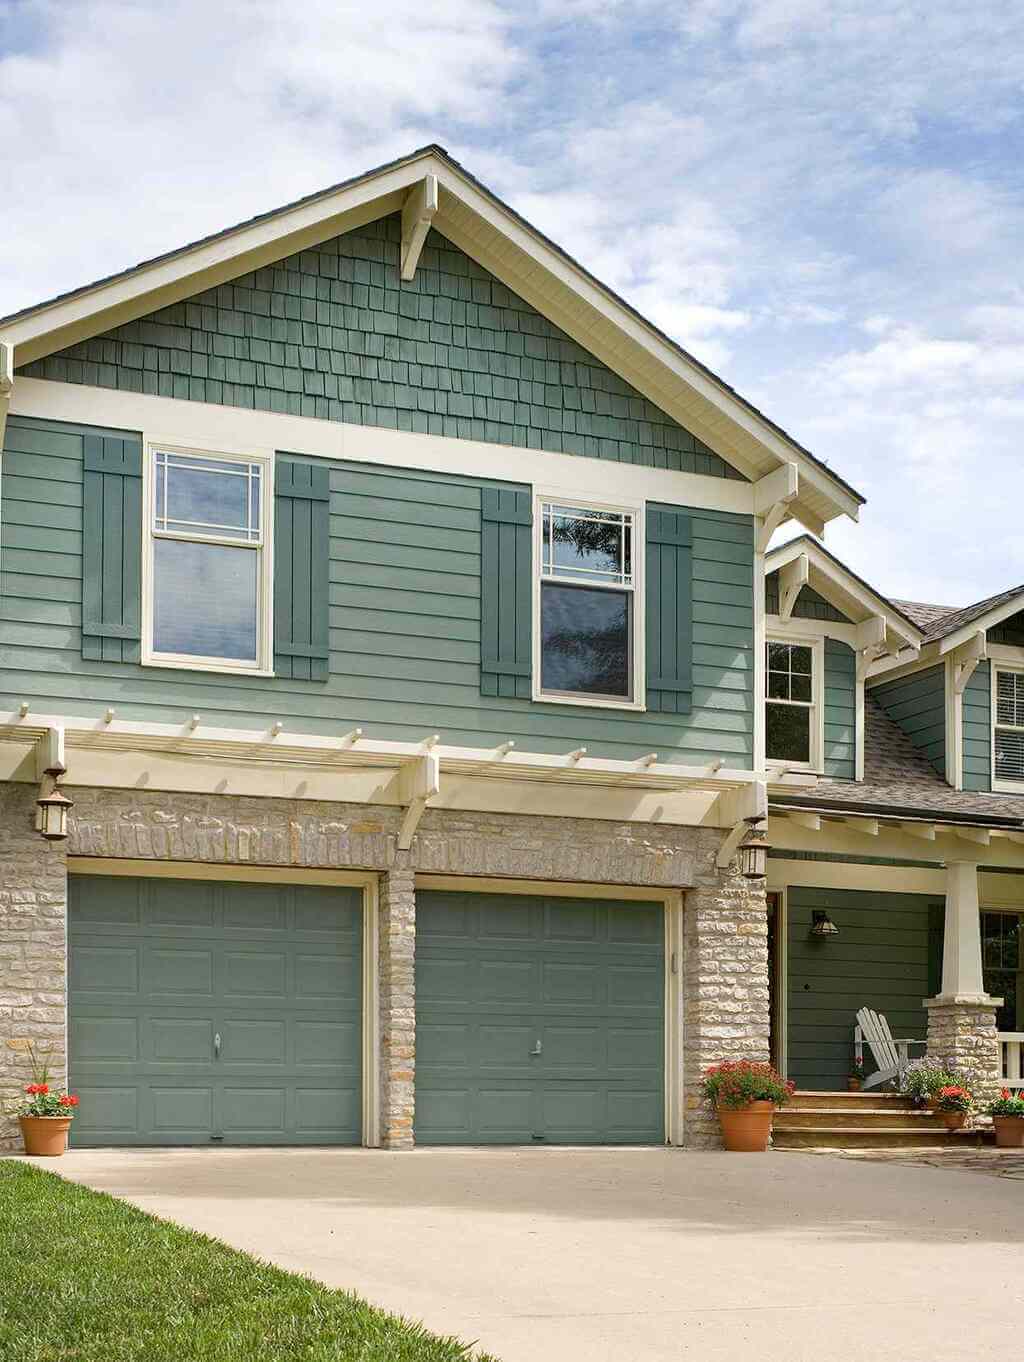
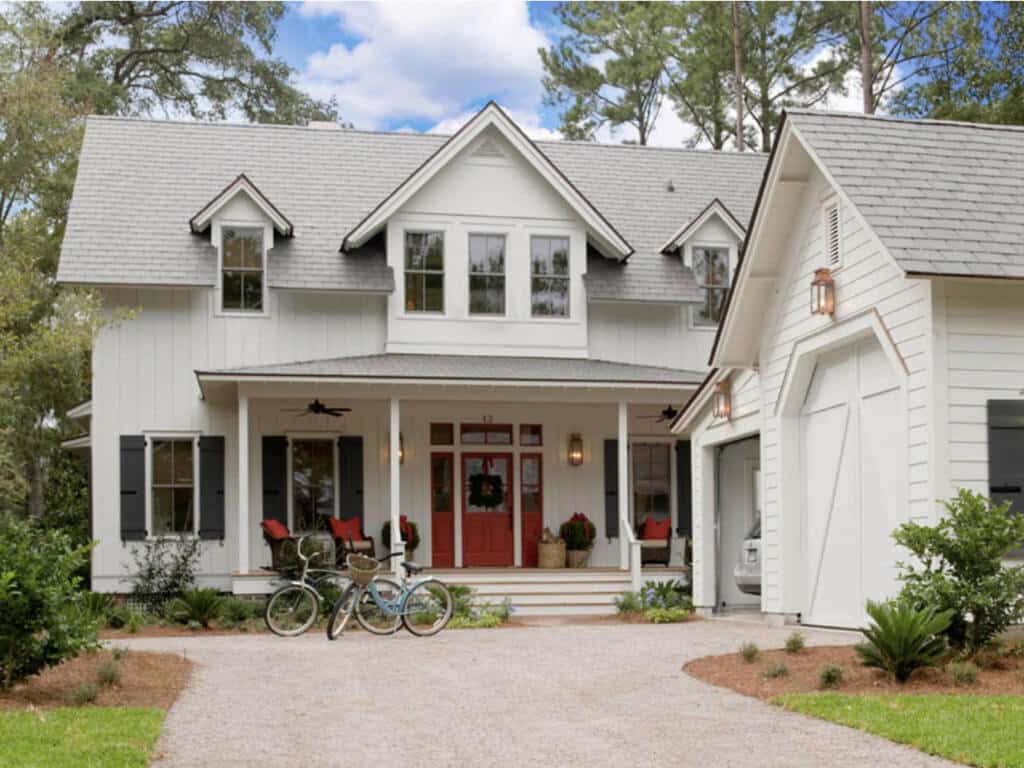
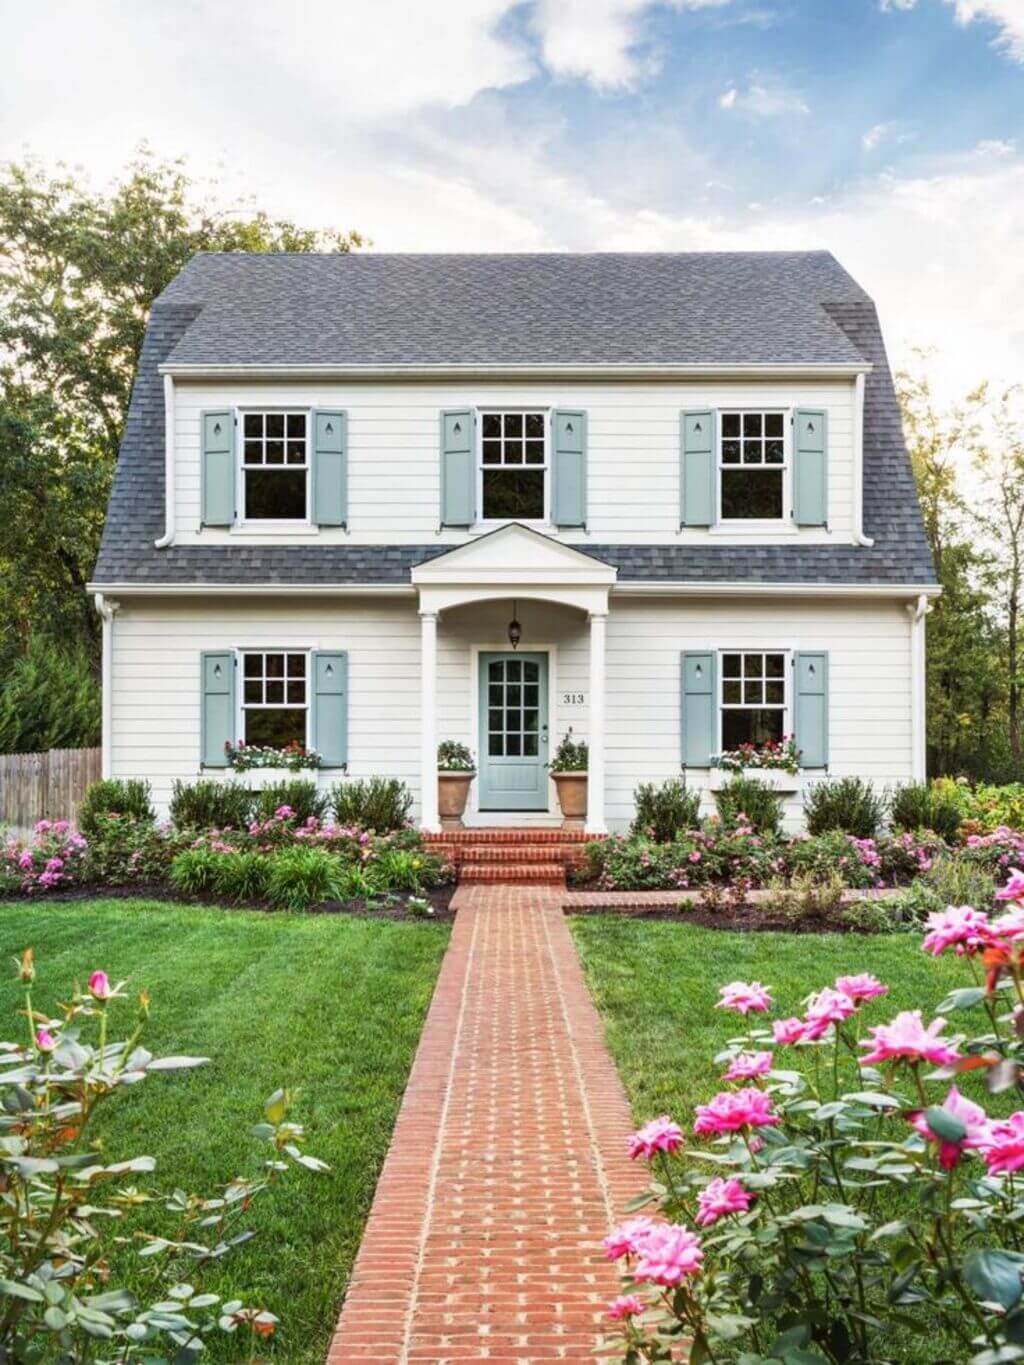
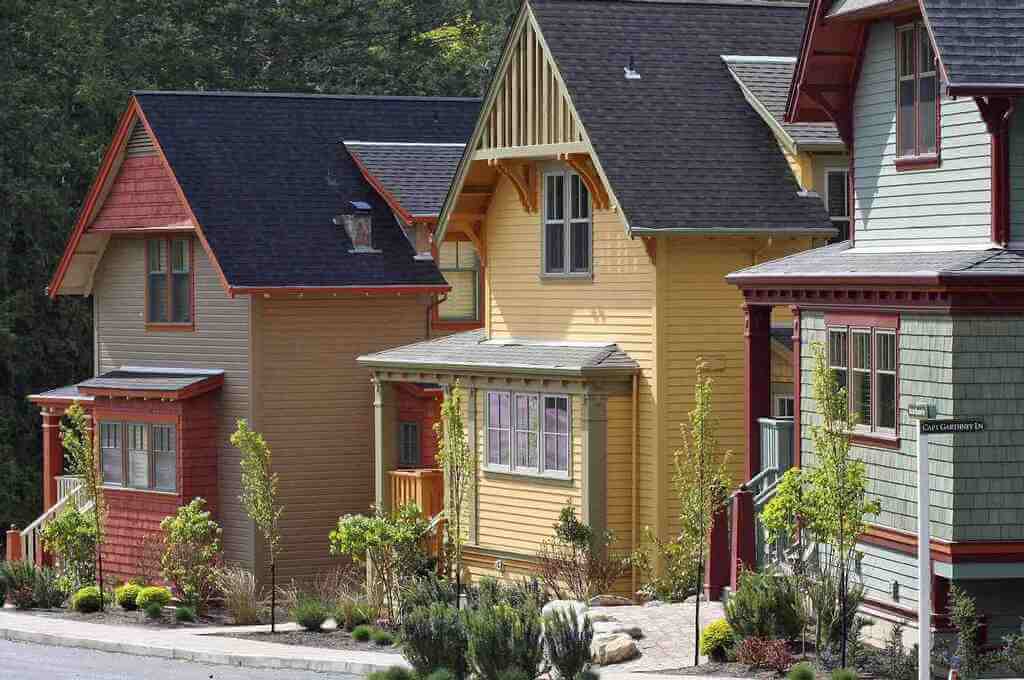
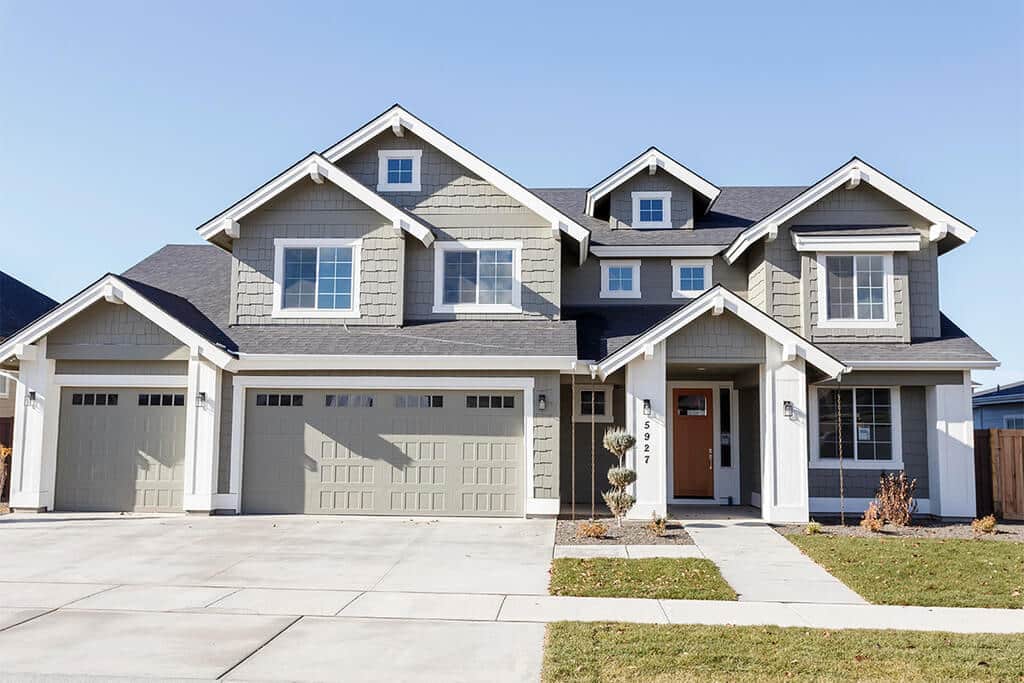
1. Navy + White + Turquoise
Make every element of exterior elevation stand out! A dark color scheme creates a sense of depth and sophisticated appeal in the exterior design. The different types of shingles are united by the dark navy color and framed by the white trim of the facade.
The pop of turquoise-colored doors brightens this high-contrasting exterior house color scheme. The change of color of the window frames creates a focal point in the design.
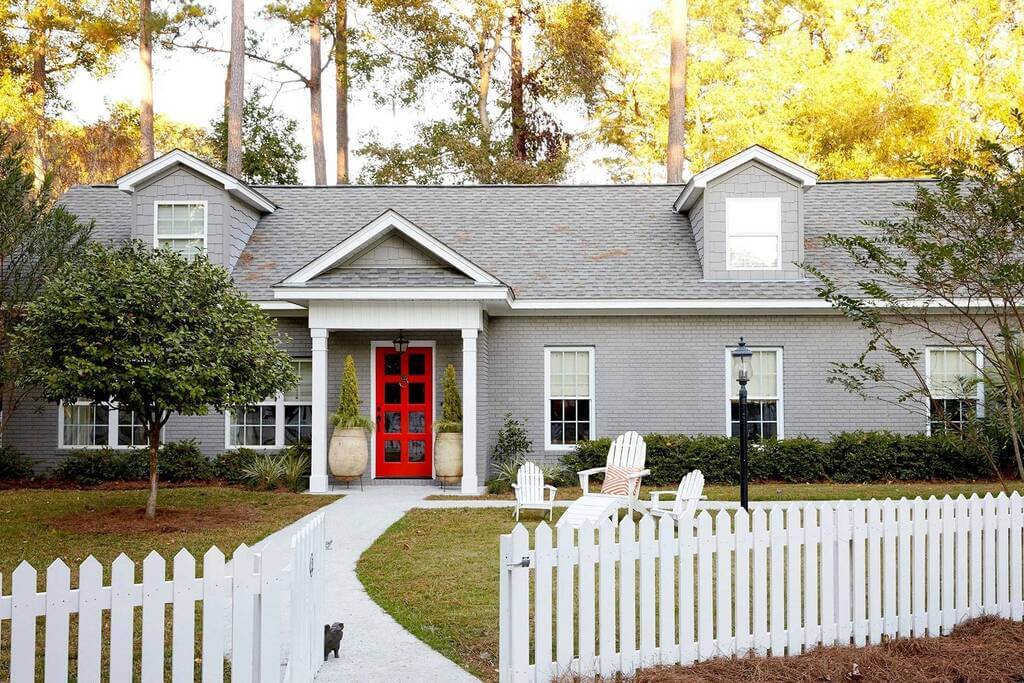
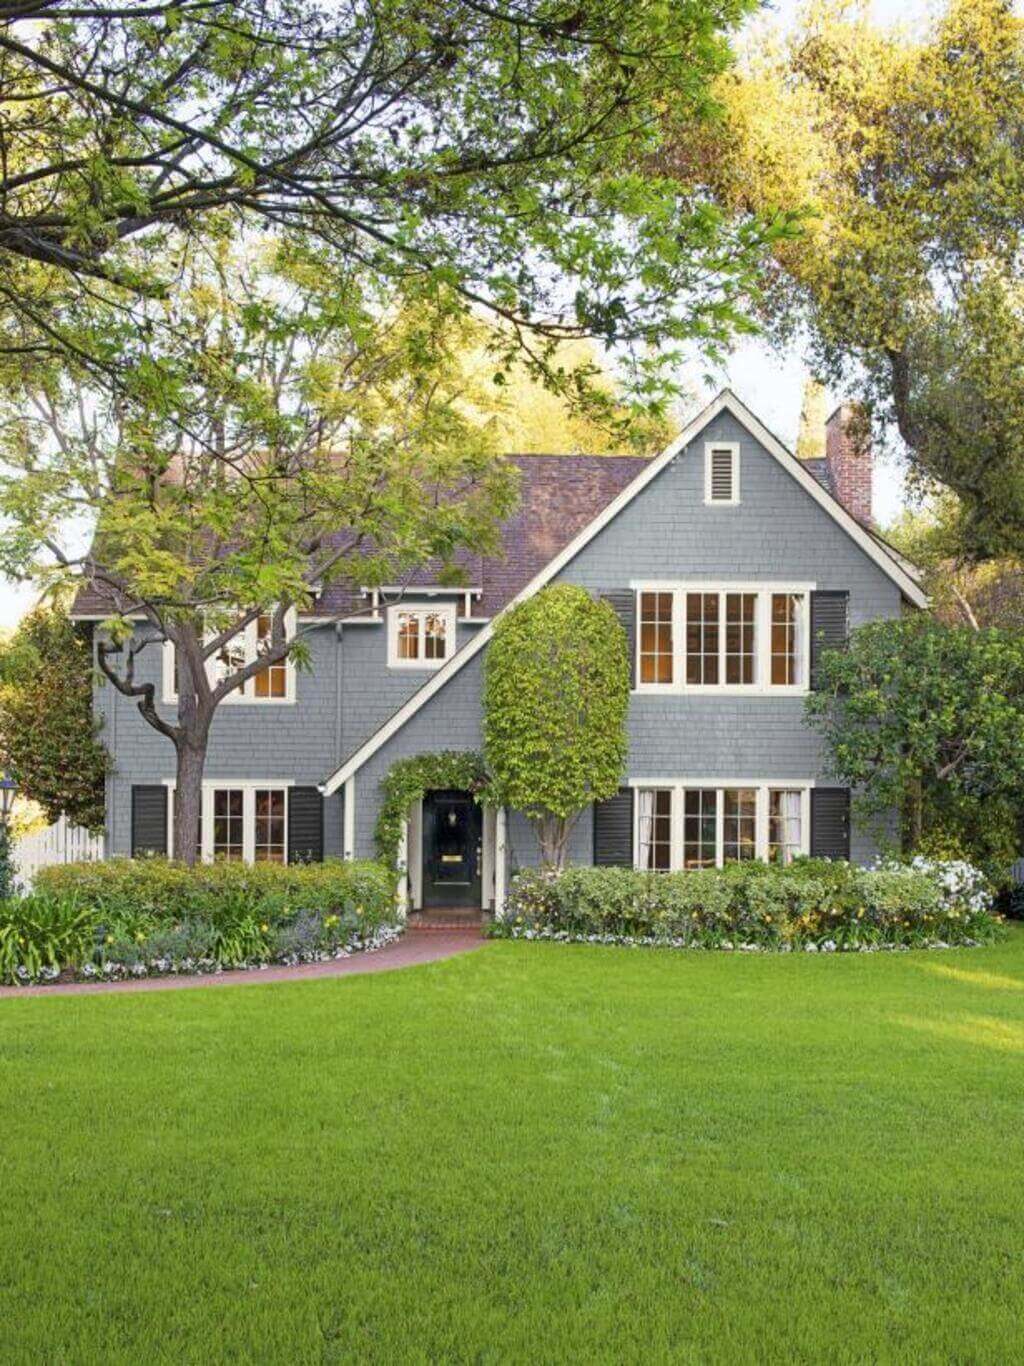
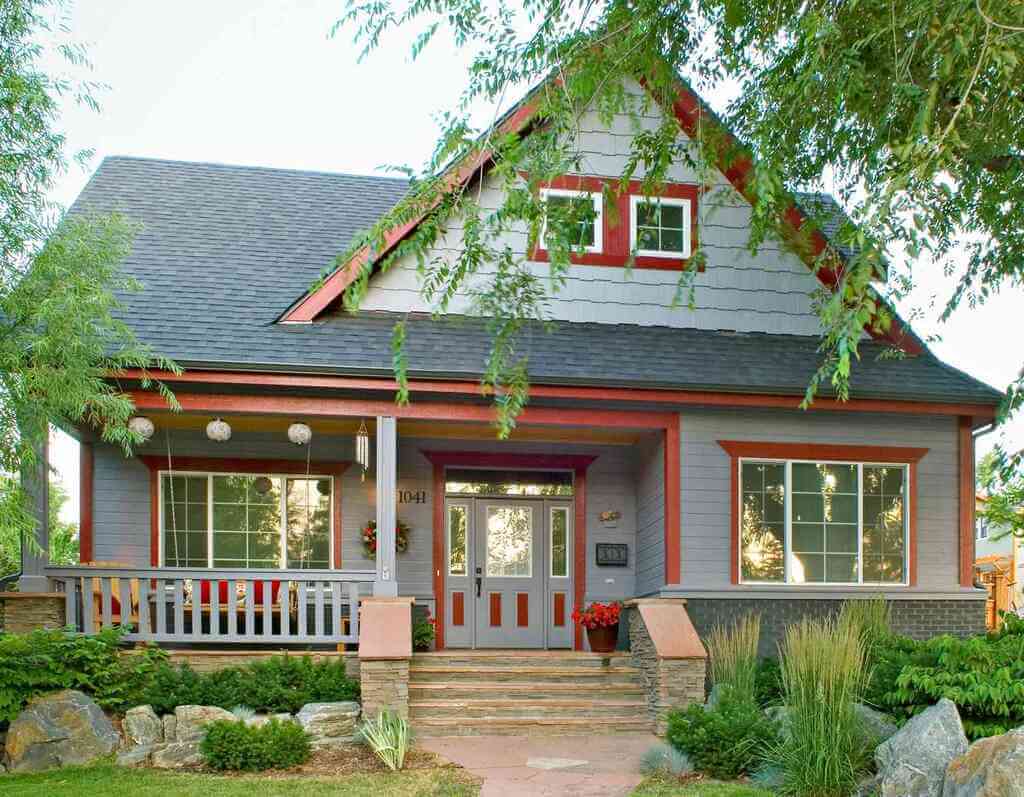
2. Grey + White + Red
One can never go wrong with a subtle muted palette! The one here uses grey as a primary overall color. White accentuates the lines and edges of the house.
This exterior house color scheme renders the house with a classic timeless aesthetic. The bright red door adds a much-needed pop of color against the muted tones of the house.
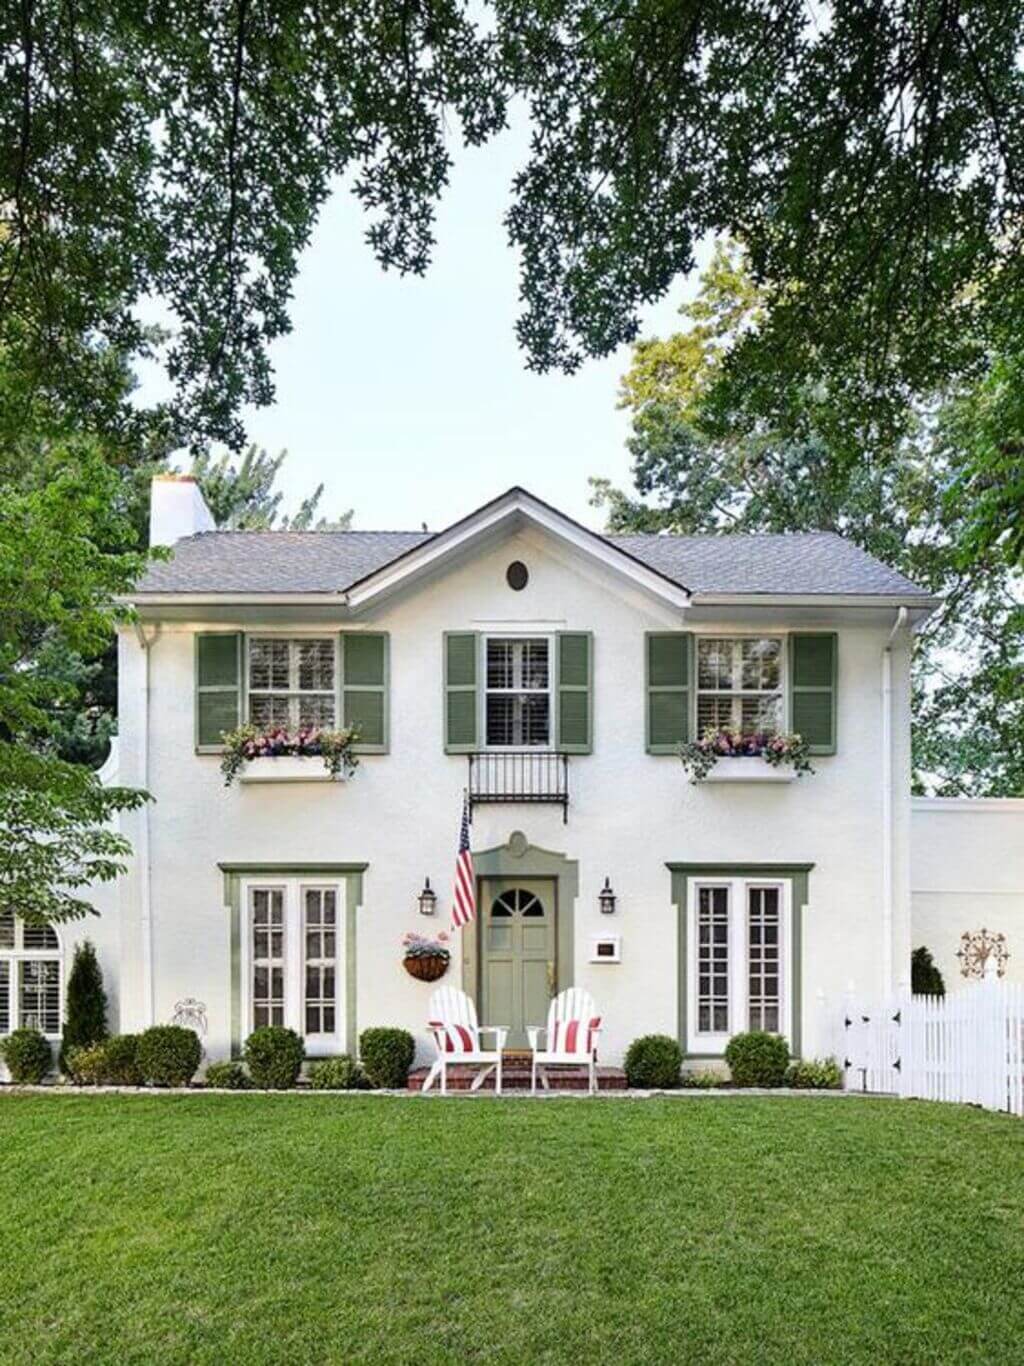
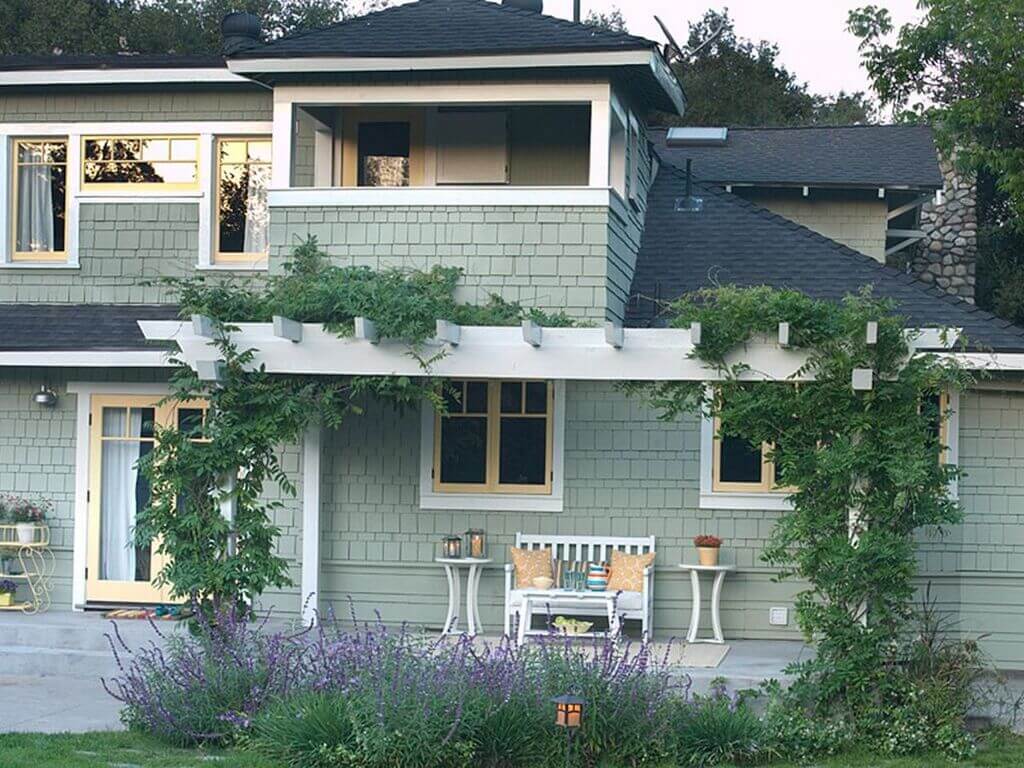
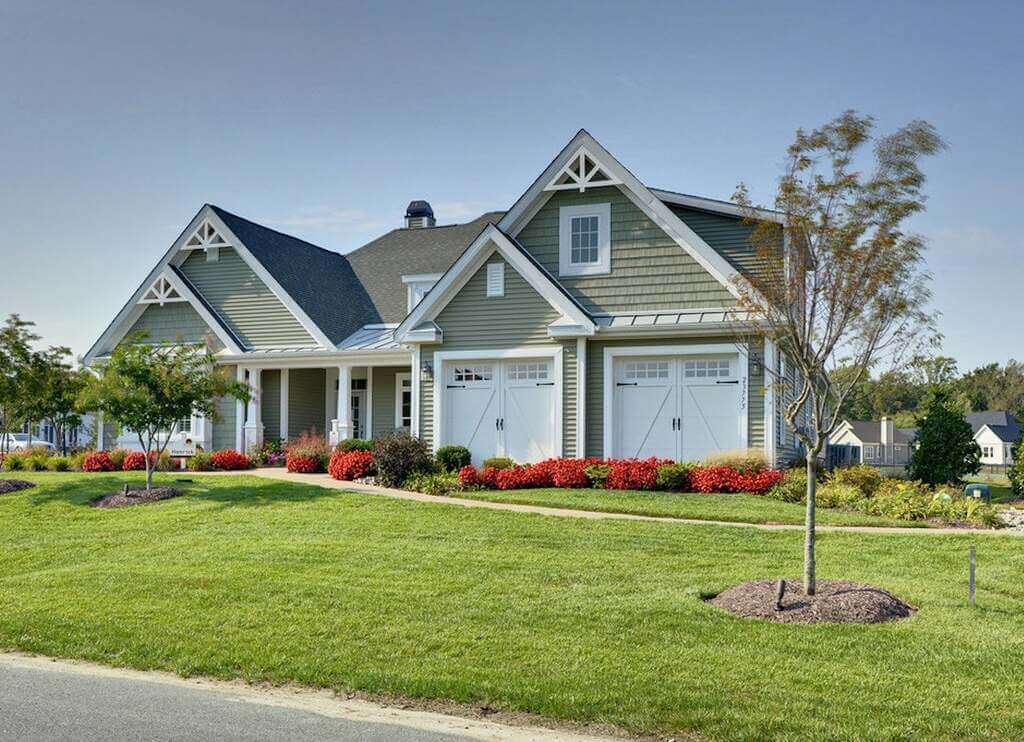
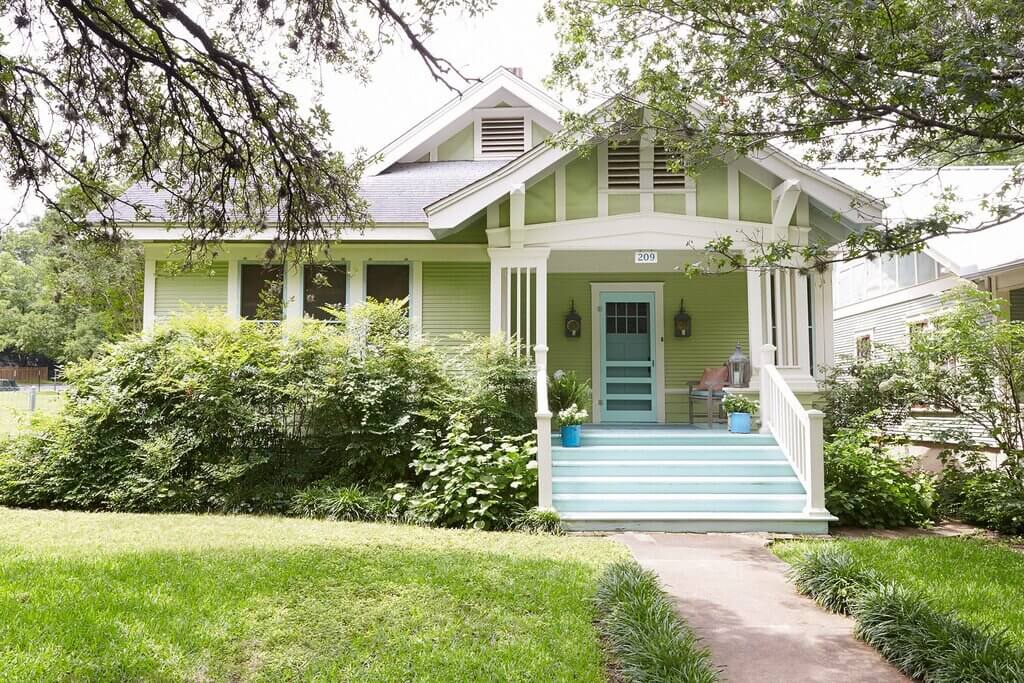
3. Muted Green + White + Grey
A subtle exterior house color scheme that blurs the edge of the built and the unbuilt includes muted tones of green, stone-like grey, and staple white. Muted green set the tone for the exterior as the base color. White defines and brings the elements into focus.
Grey roof blends with the primary base color while accentuating the form of the house. Brown color blends with the surrounding, directing and inviting people into the house. This exterior color scheme gives an enticing appeal to the house.
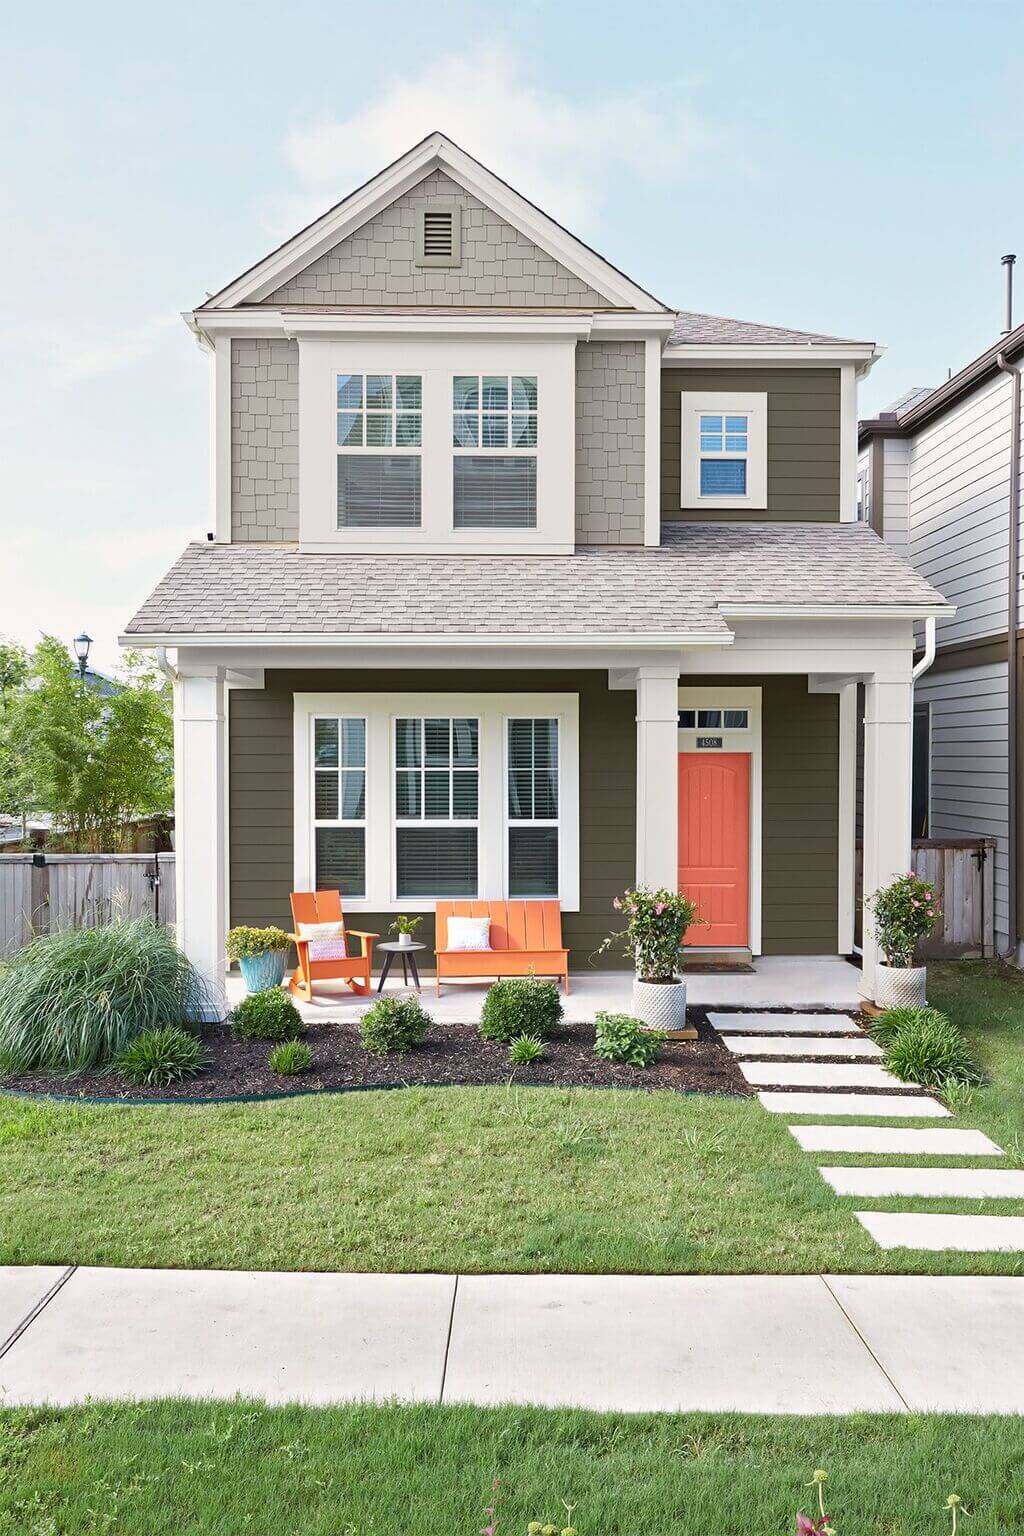
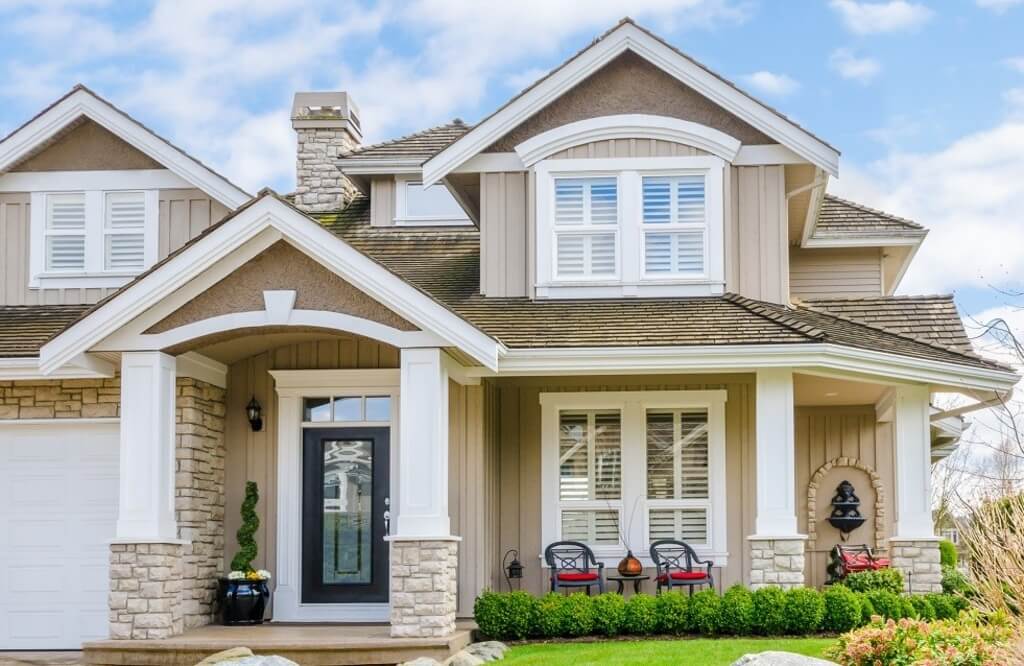
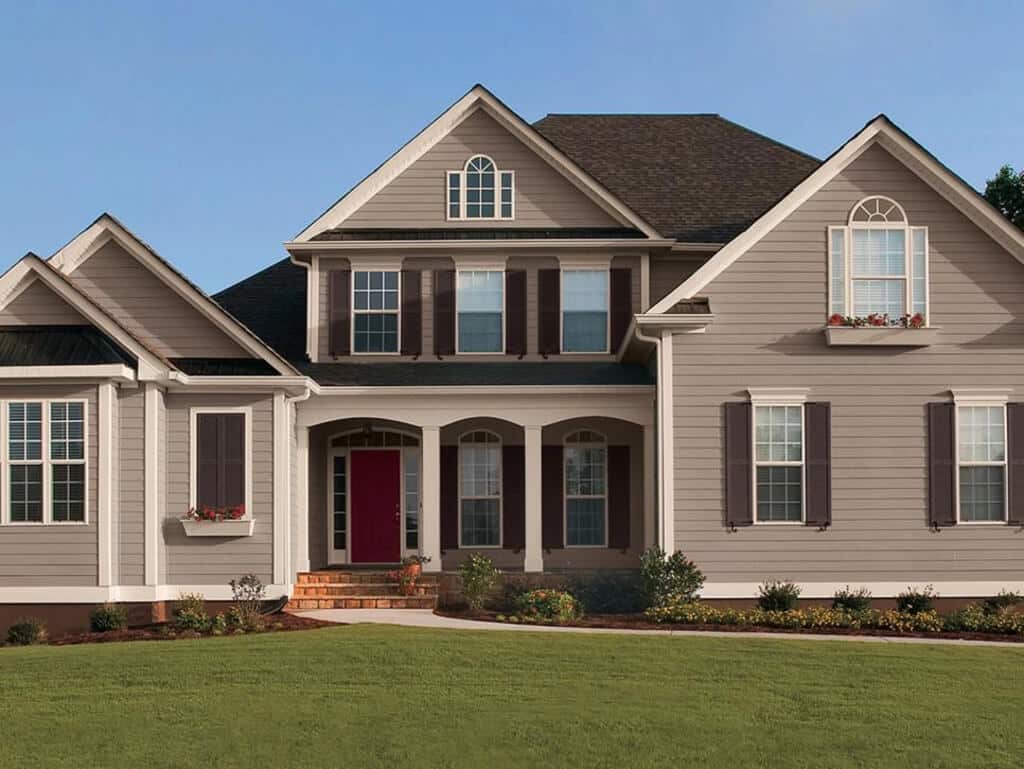
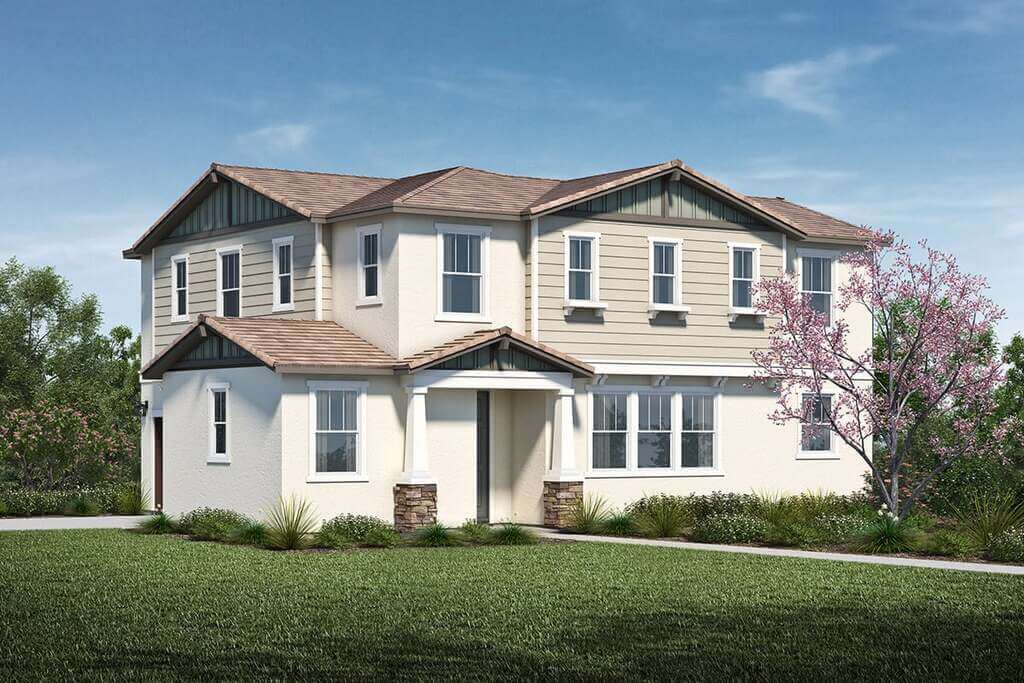
4. Brown + Beige + White
Another great exterior house color scheme to make your house seem at par with the landscape is a brown and beige combination. The earthy tones of browns and beiges help camouflage the house with the natural landscape.
Go for darker tones of brown as the primary color. Use lighter accent colors like beige or white to highlight the elements of the facade. You can even opt for hues of brown as the color scheme to create a neutral monochromatic color scheme.
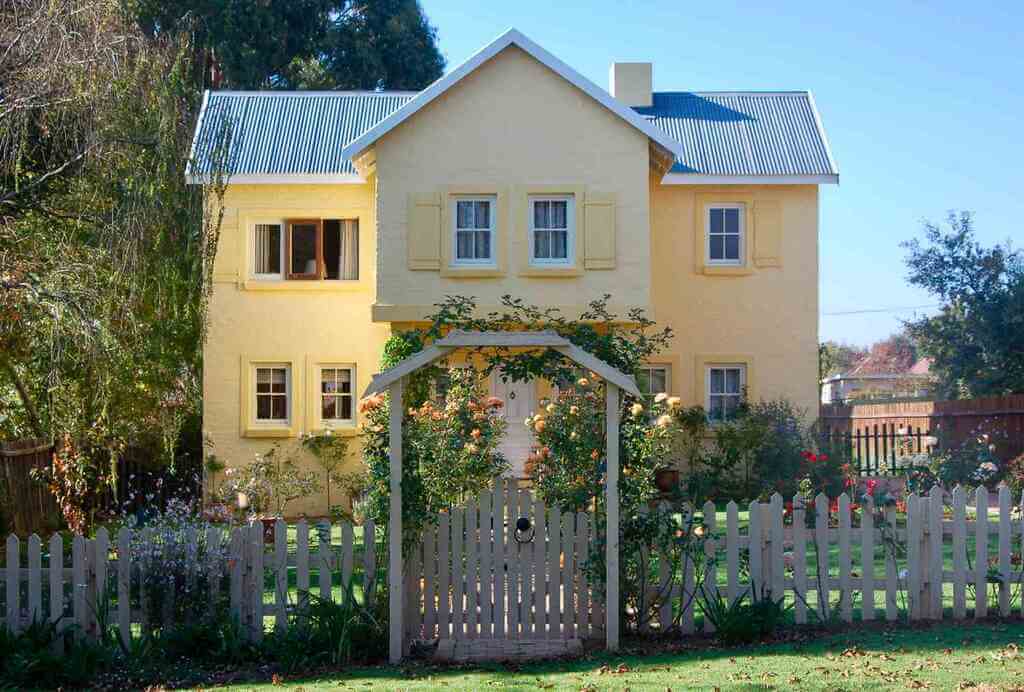
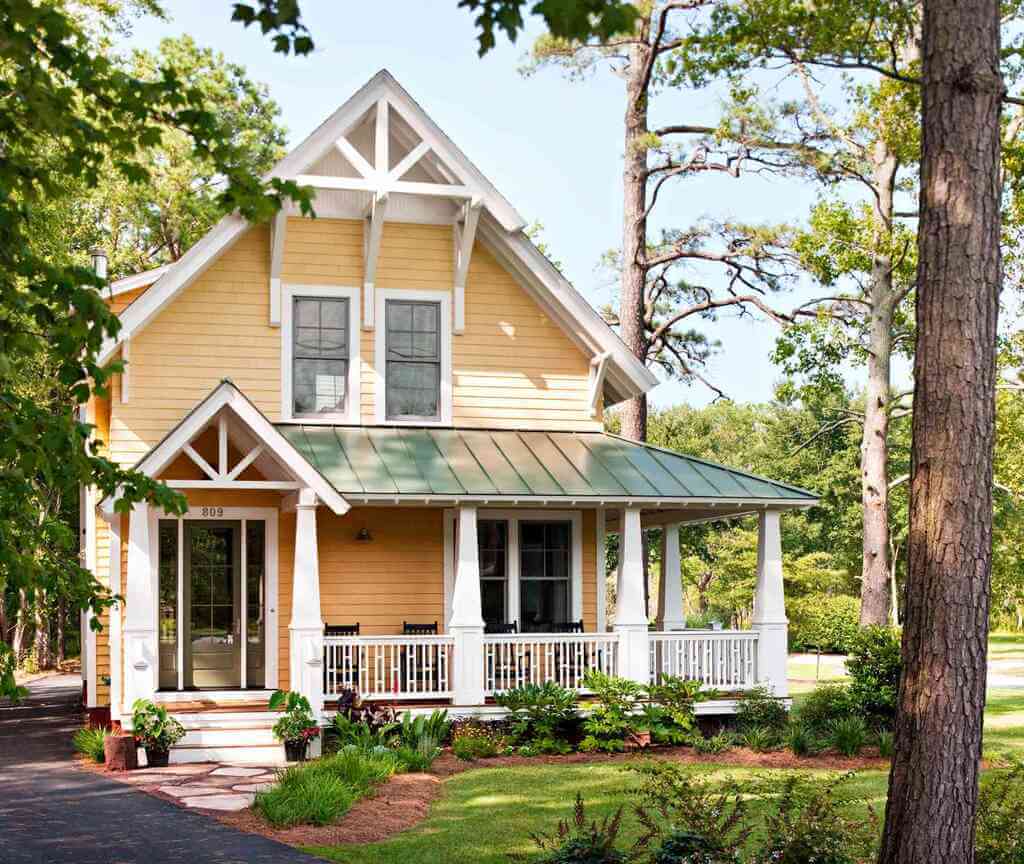
5. Bright Yellow + Cherry Yellow + Blue
A cottage-inspired exterior house color scheme entails the use of a combination of subtle and bright yellows. The warm and inviting appeal of a yellow facade gives the house a quaint look.
Creating a slight contrast against the warm-toned yellows is the blue roof. It is the perfect crown for a solid facade. The minimalist details on the facade add to the charm created by house exterior paints.
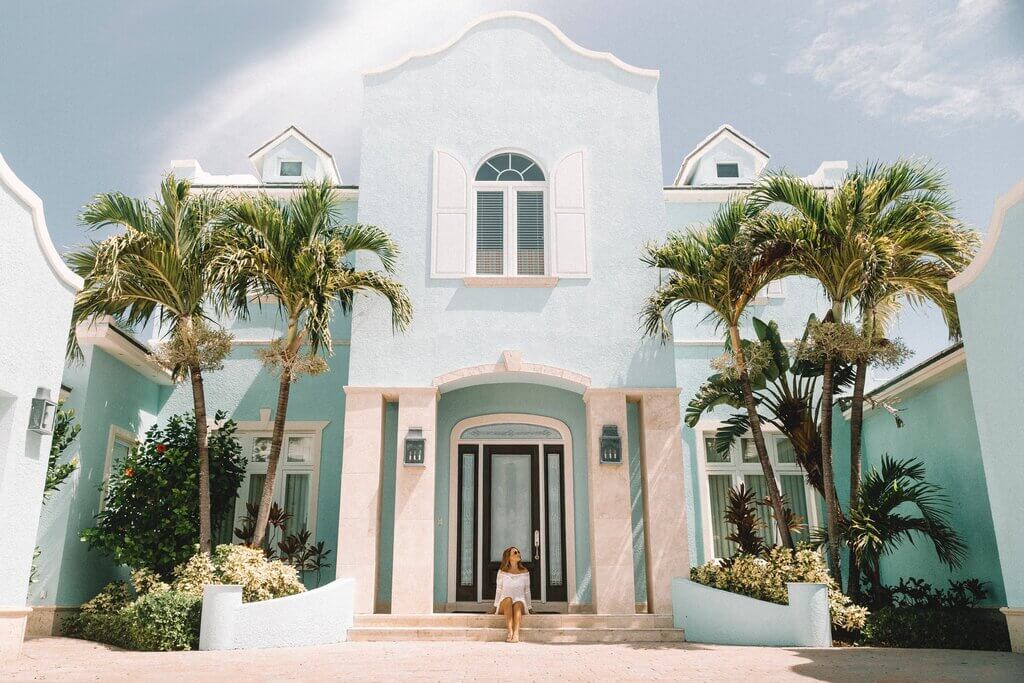
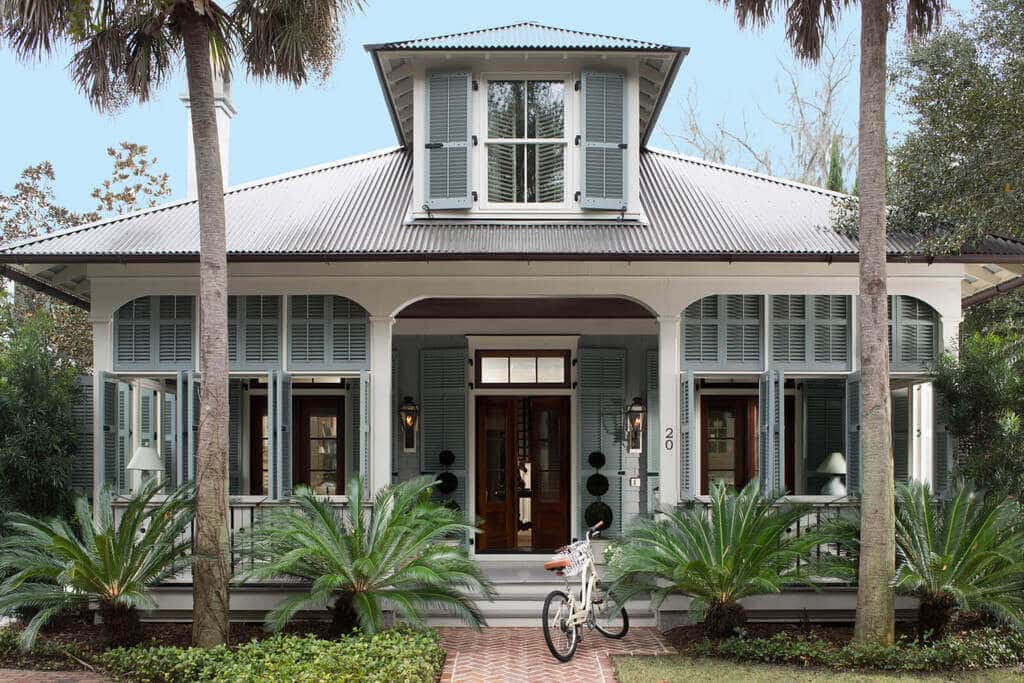
6. Aqua Blue + White + Black
The color scheme for creating a charming exterior must include subtle colors like aqua blue and white. One of the best exterior house color schemes for vacation homes and country homes, these colors adorn the house in spectacular glory.
The black door frame brings attention to the entrance of the house which welcomes guests within. White color highlights the features of the house while blending with the dominant supple aqua color.
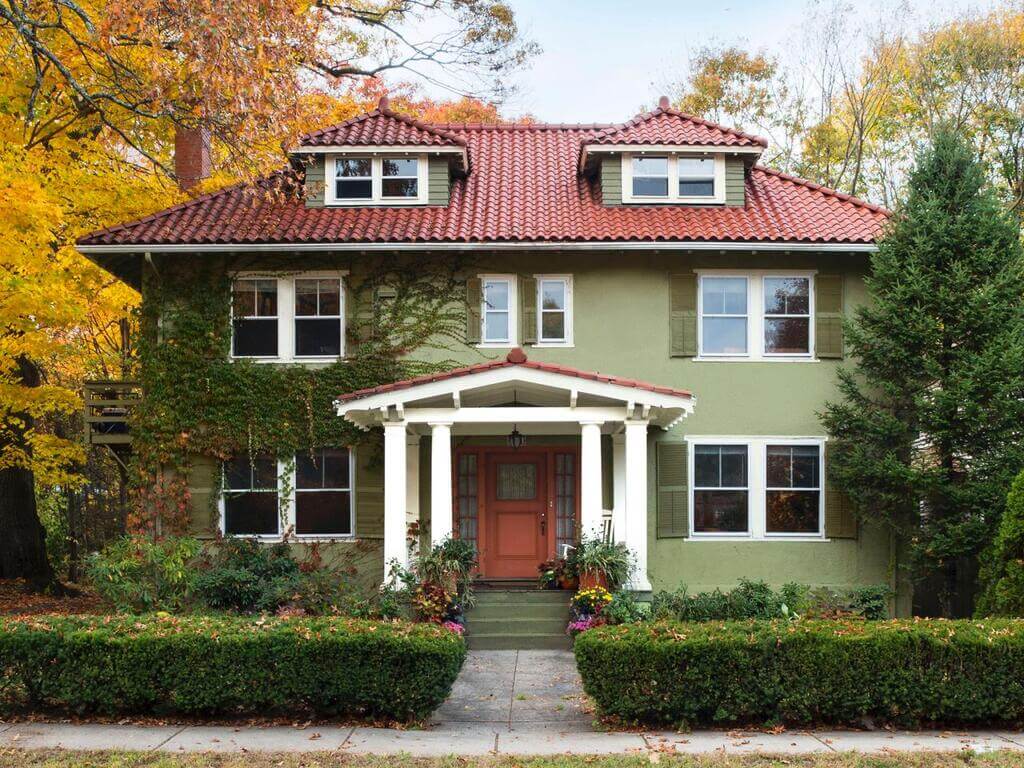
7. Hunter Green + Beige + Off-White
A stylish nature-inspired house color scheme includes warm tones of green and is balanced by white and beige. The sage green sidings and garage door set the theme for the exterior.
This is accentuated by hunter-green shingles that being a deeper tone of green, add a sense of depth and sophistication. Beige and off-white colored stone cladding frames the facade.
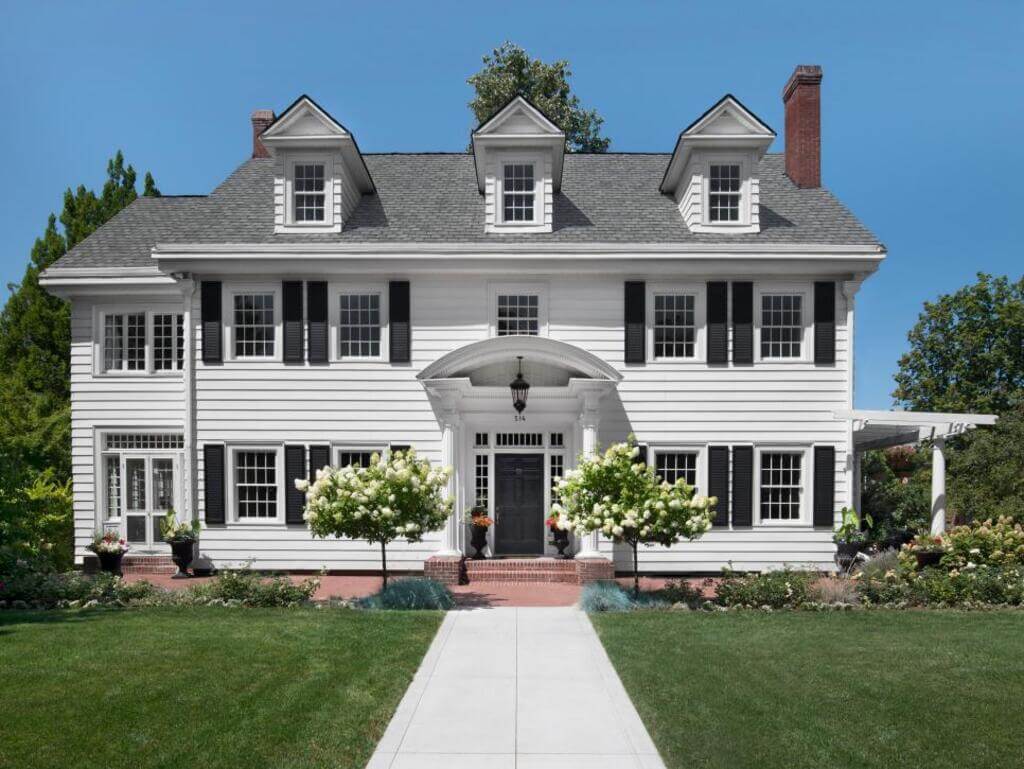
8. White + Brown + Black
Black and white exemplify high contrast. In-home exteriors, these colors make an edgy exterior. The house here uses white as a base color and black as an accent. This exterior house color scheme makes the house seem edgy and sophisticated.
The terracotta on the base gives the house an elevated appearance. It is also complemented by the surrounding landscape that adds to the elegance of the house.
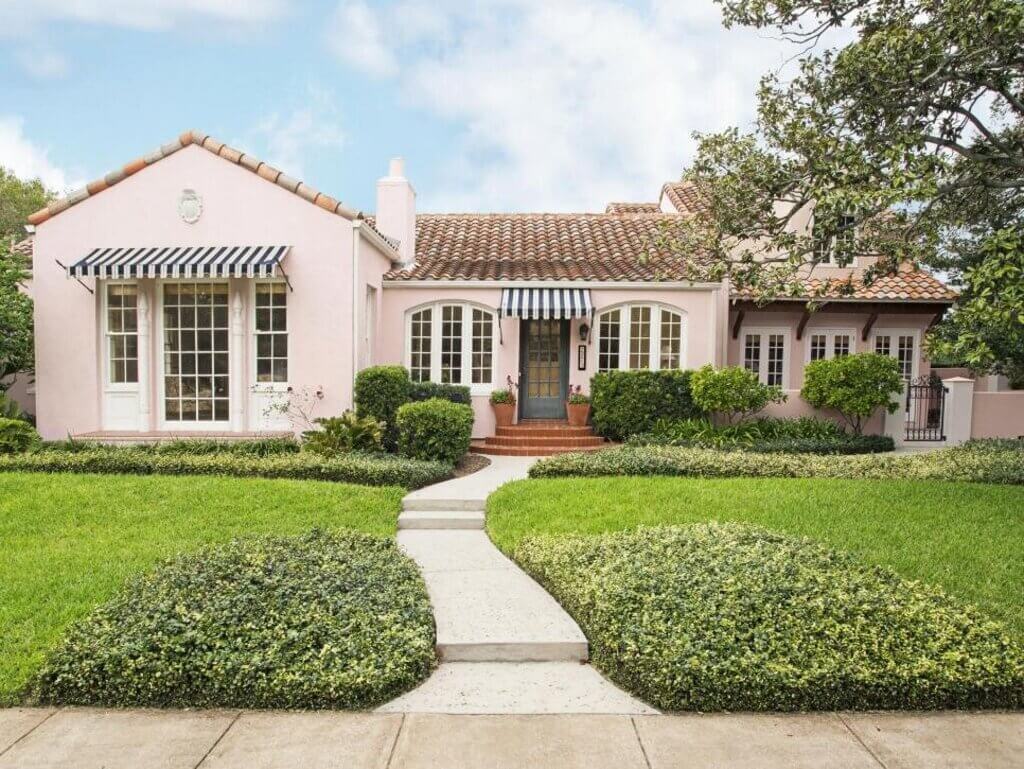
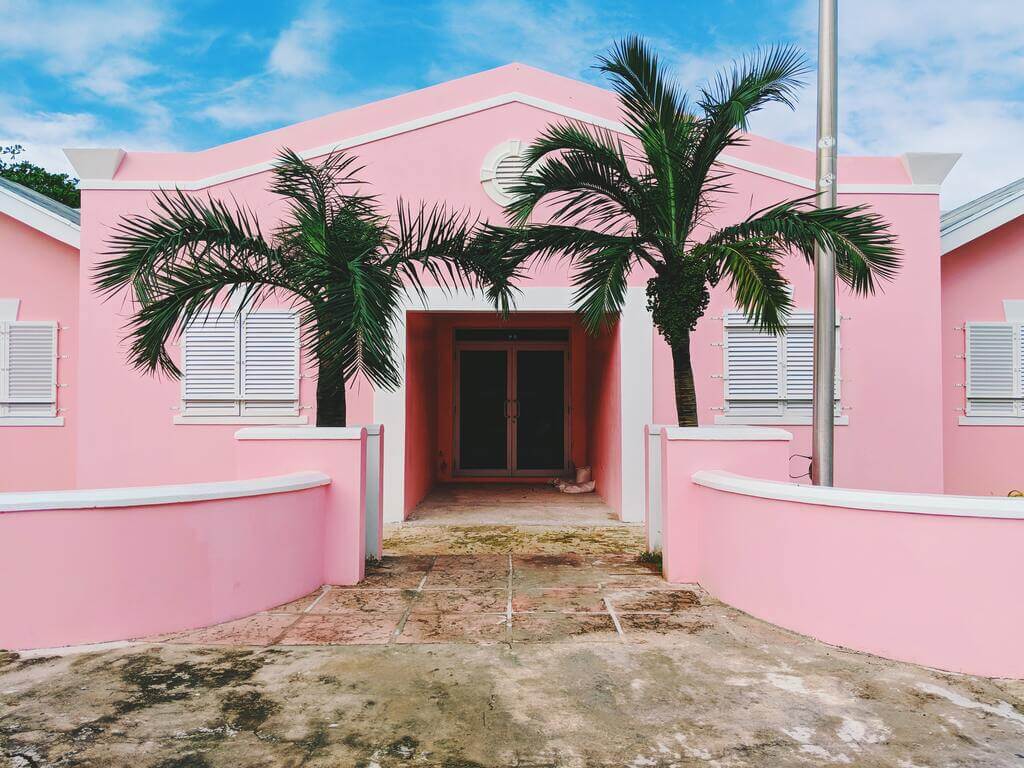
9. Pale Pink + Azure
A dainty and quaint home with simplistic architectural elements must use a soft pastel exterior house color scheme. The one here uses a pale pink color as the base that is complemented by the light terracotta roof tiles.
Pink gives an elegant and soft-looking appearance to the home. Brown gives a natural warm earthy touch to the house. The combination of both creates a graceful house exterior that has the nautical flair brought by the awning.
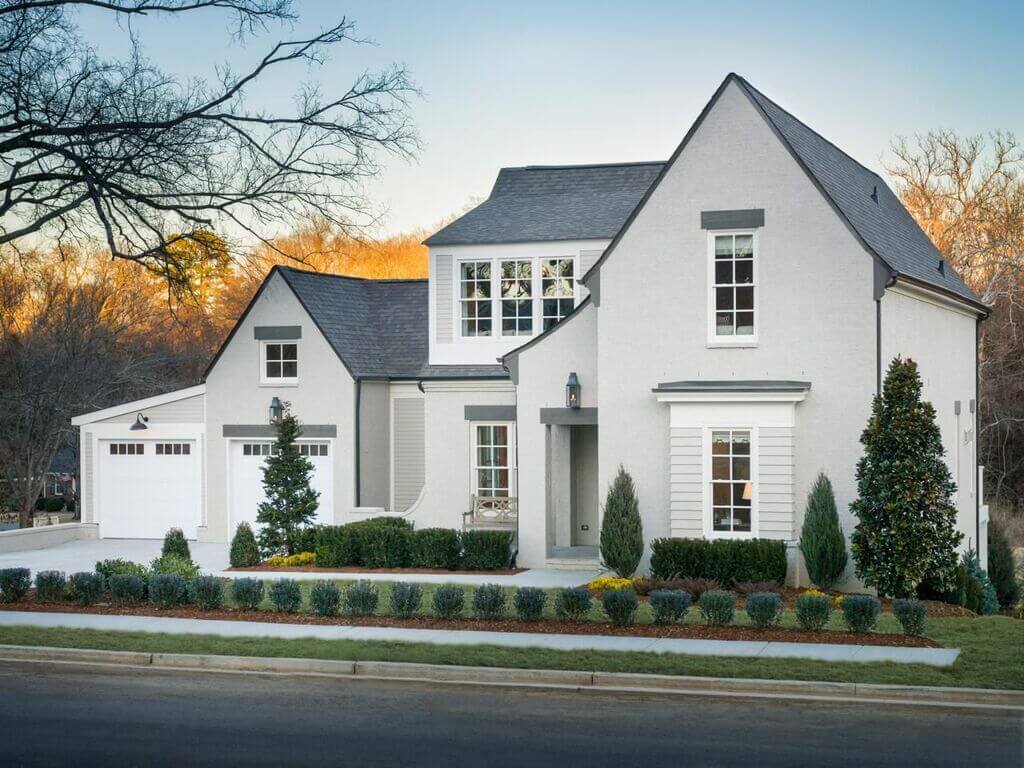
10. Grey Monochrome
Neutral house exterior colors look simply spectacular. While most houses use a combination of three colors for the exterior, the colors don’t need to be vividly different. One can go for simple hues of grey to create a sophisticated elegant looking house exterior.
Generally, the lighter color is used for the walls, the middle tone is the trim color and the darker hue is the crowning roof color. This gives the house a timeless appeal. The perfectly pruned surrounding landscape adds to the charm of the exterior.
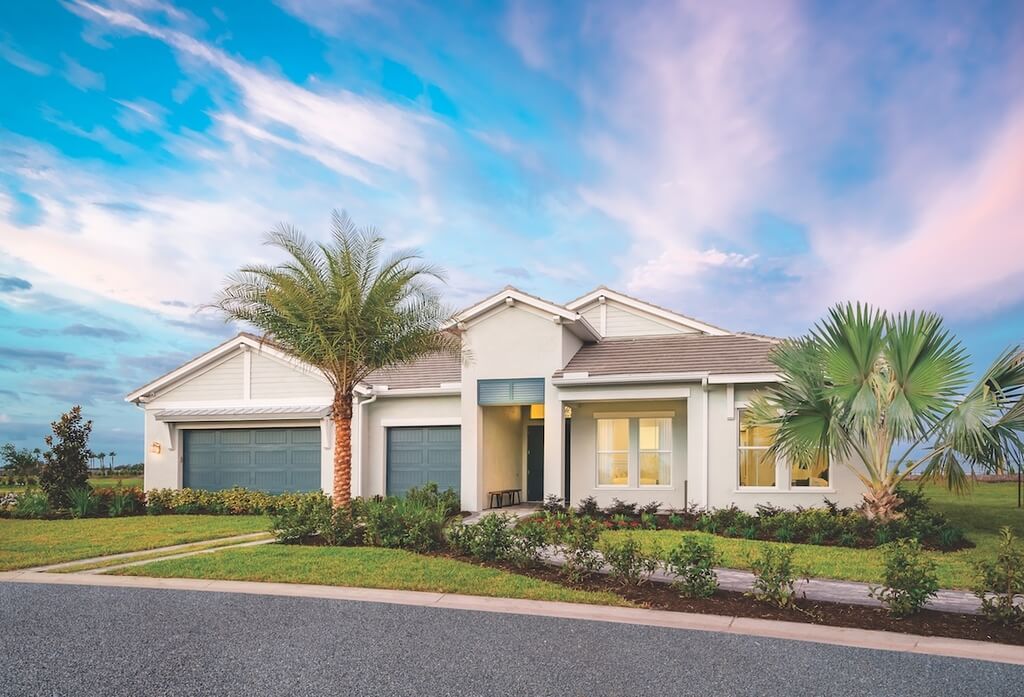
11. All-White
Want to make a minimalist statement with your exterior house color scheme? Go for all whites! This simple house exterior uses white walls that unify the dual-textured shingles and sidings on the facade. The same color running along the trim and window frames superimposes the subtle qualities of the minimalist palette.
The house thus appears like a white monolith and is characterized by its classic charm. This color scheme is one of the top exterior house color trends that never go out of style.
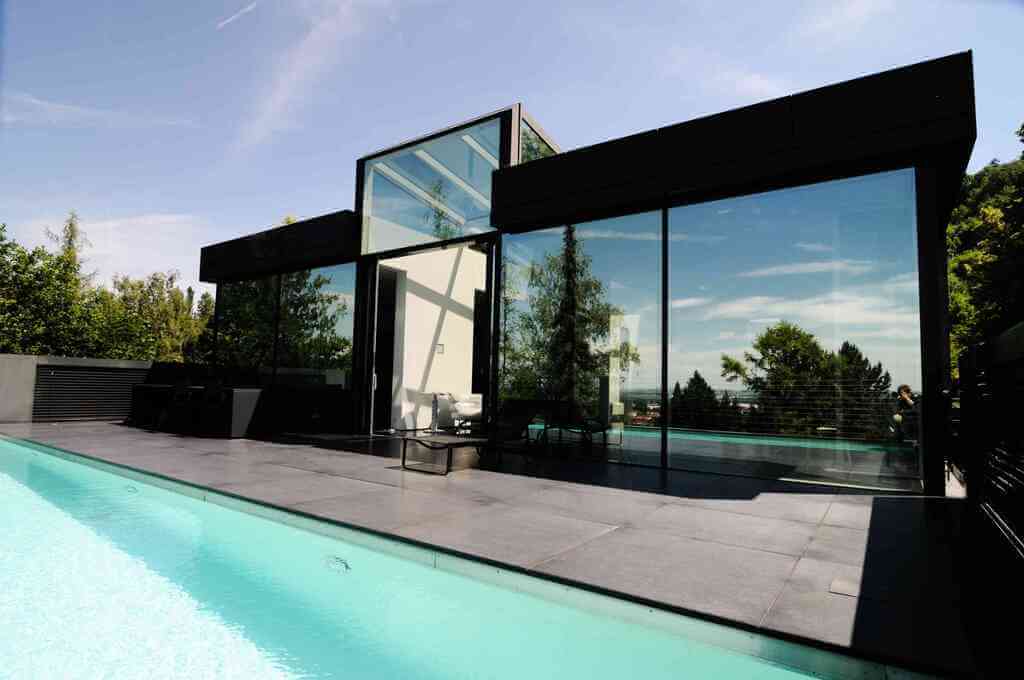
12. Bold Black
An unconventional and bold exterior house color scheme that you can opt for to create a statement with your house exterior is an all-black color scheme. The dark matte black color makes a remarkably bold house exterior.
Its sophisticated appeal is simply unmatched. To break the monotony of the heavy mass, large glazings are used as an integral part of the facade.
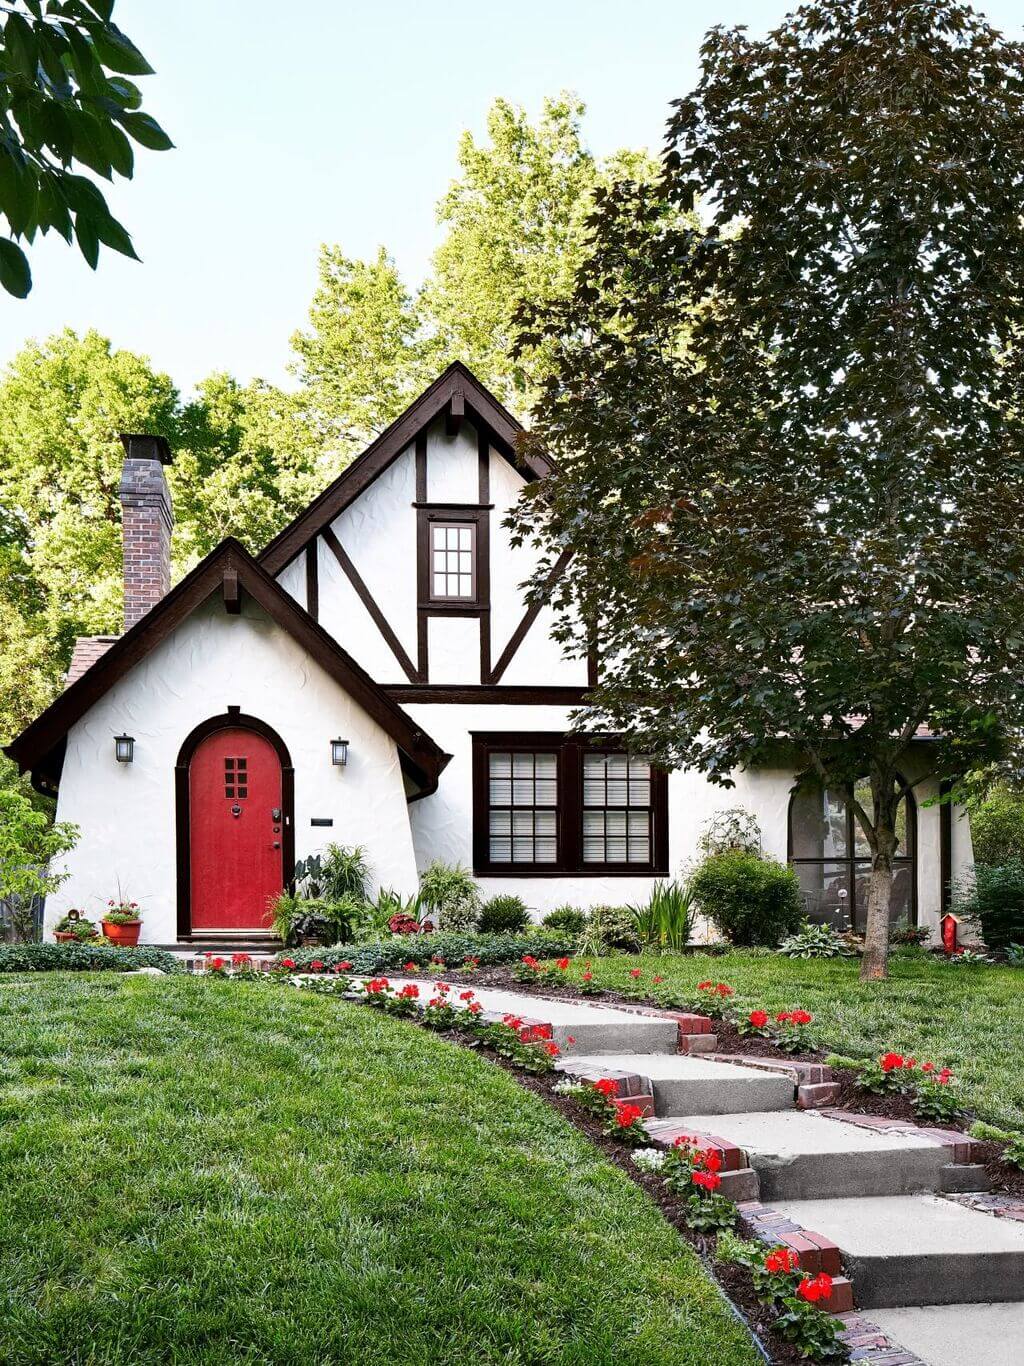
13. Black + White + Ruby Red
A contrasting color scheme is bound to make a statement. The classic black-and-white color scheme looks spectacular on its own. Yet, if one has to add an artistic pop to it, one can add a dash of red to create an edgy look.
The cozy cottage here does precisely that. White textured walls set a calming tone for the house, while black adds room and structural members add drama to the exterior. A red entrance door adds a splash of color creating this artistically stylized home exterior.
14. White + Clay + Mossy Green
The best exterior house color schemes for houses that blend within the natural landscape includes greens and browns. The lush mossy green color sits well against the surrounding, making the house merge with the landscape.
Highlighting the features of the house is the white trim that brings a focus on the elements. Earthy tones of brown crown the monolithic volume and invite visitors to come into the house.
15. Yellow + White + Brown
A warm-toned, sun-inspired exterior house color scheme curates charming exterior designs. The chic home here uses sunshine yellow as the base color. These warm tones are continued on the roof, as chocolate brown elevates its appearance.
White color is used to define the edges and curves of the exterior. The sparing use of black contrasts with and thus brings the entrance into focus.
16. Gray + White + Dove
An exterior house color scheme color that suits both modern and traditional architectural color schemes alike is often composed of grey and white as base colors. This simple yet chic house exterior exemplifies how beautiful this color house color combination looks on the exterior.
The striking combination is further accentuated by the accent color dove. It adds character to the design while keeping it simple and charming. Terracotta paving is warm contrast that directs the eye toward the dainty porch.
17. White + Green
This house oozes elegance and charming grace with its simplistic house exterior colours. The classic house features white as the base color along with soothing green as the accent color. Its simplistic approach highlights the refined architectural style while creating an alluring aesthetic.
Complementing the enticing look of the facade is the subtle grey roof that crowns the house. The well-structured landscape curates the country delight experience of the exterior space.
18. Taupe + Beige + Brown + Red
Does your house exterior seem overwhelming and you cannot seem to figure out the apt house outside colour scheme? Neutral is the answer! Going for neutral tones helps in creating an assorted look of the exterior. Tones of brown work perfectly well in defining the architecture and also making it look like a part of the landscape.
Here, middle tones of beiges and browns are used as the base color while taupe is used for the trim. Lighter tones are great color options for defining the trim and frames. Whereas, darker tones look when used as accents making the facade look great.
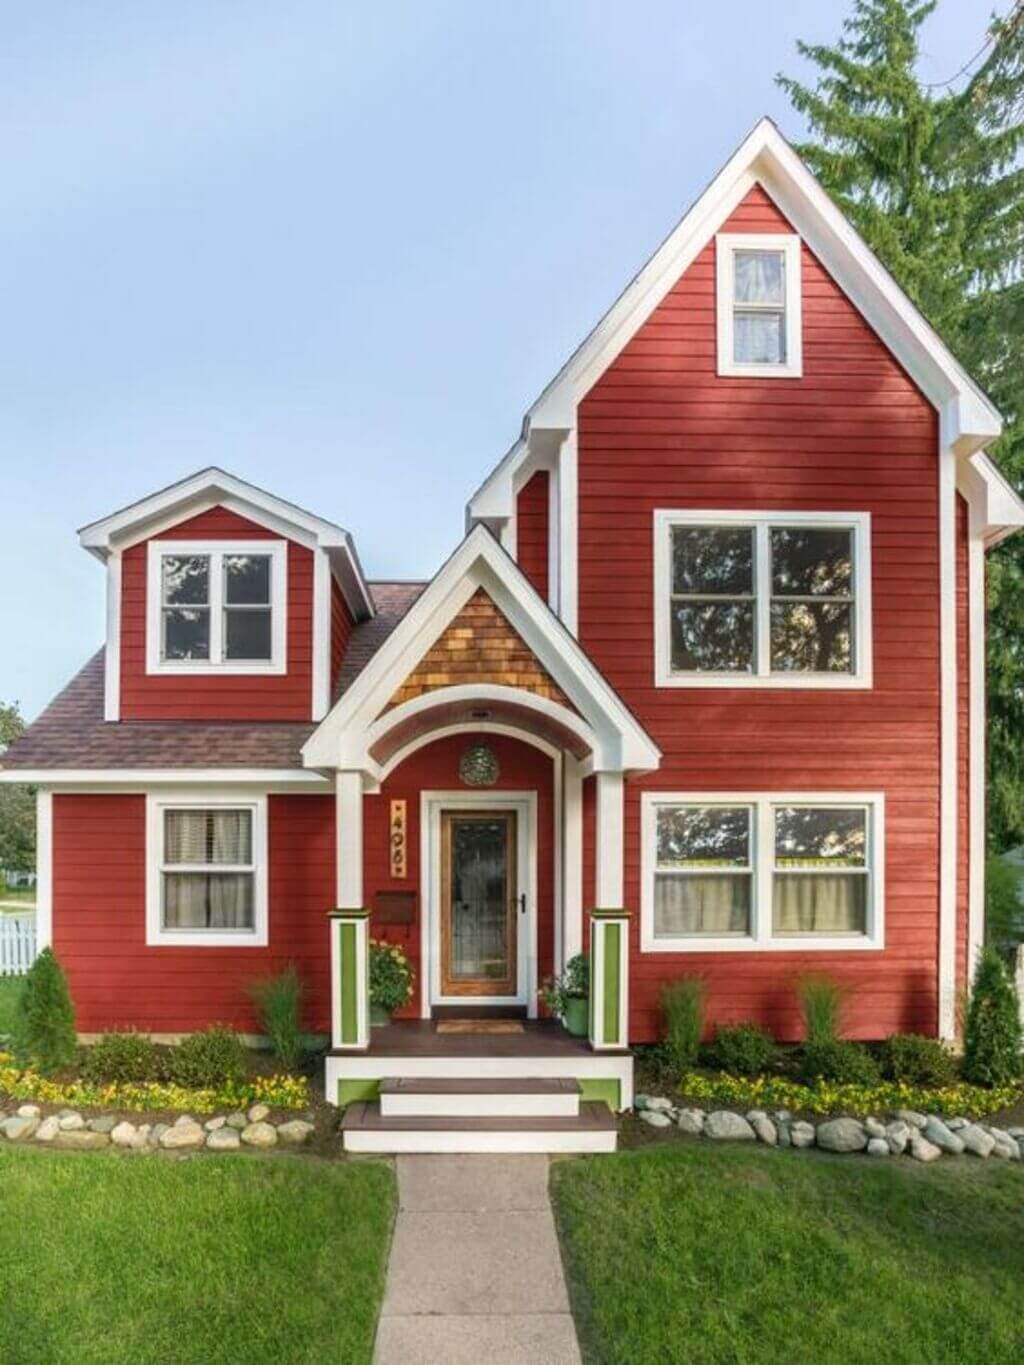
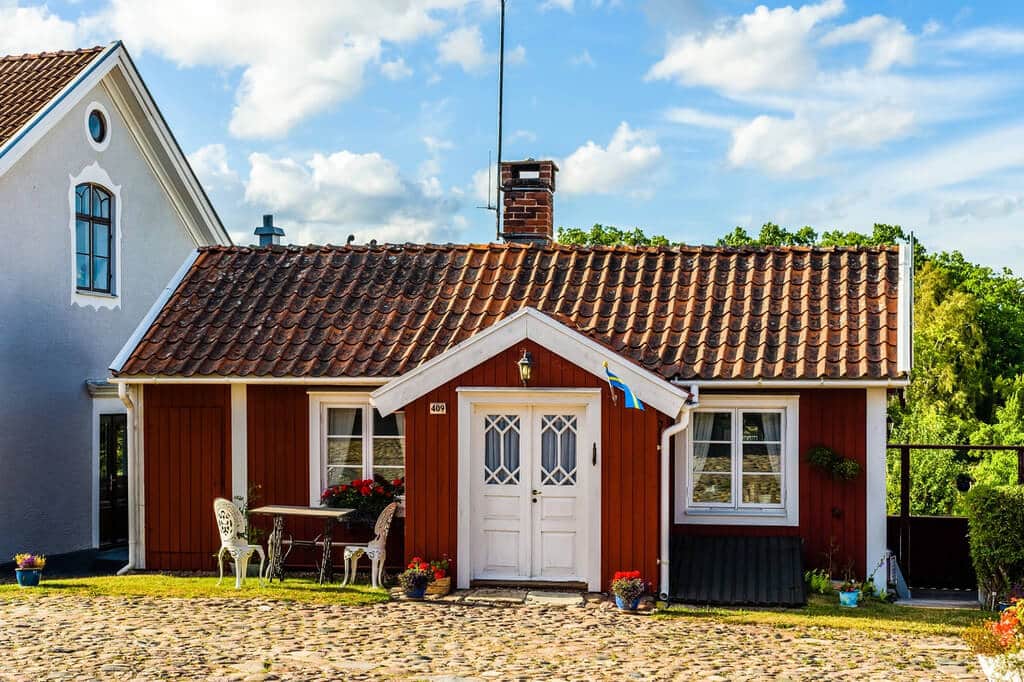
19. Red + White + Brown
If neutral colors don’t excite you, this vibrant color scheme for houses is the one for your house. Vivacious cherry red can become a base color for your house exterior. It will certainly make a cold statement that leaves everyone in awe.
The wild-spirited house exterior is defined by its warm energetic color scheme and cottage-like architectural style. The white trim against vivid red shingles and brown roof and porch assembles this holiday home.
20. Cool Green + Butter Yellow + Pure White
An example of house color combinations for the exterior that are both warm and cool-toned uses a diverse unconventional palette. Cool muted sage green being the base color sets an appealing tone for the house. Dark-toned blue further accentuates the appealing tone and adds a sophisticated edge to the exterior.
This is contrasted by the pale yellow frames and white trim on the house. The resulting assorted look of the house oozes a refined sense of drama and charm.
21. Gray + Pale Aqua
A slightly modern grey house exterior color schemes create a blend of pale aqua and white colors for a sophisticated curb appeal. The cool-toned exterior colors curate a startling appeal for this eclectic home decor.
Uniquely stylized architectural elements of the home that ooze grace are further accentuated by the superior color palette. The structure stands as an attention-grabbing monolith that seems to belong on the set landscape.
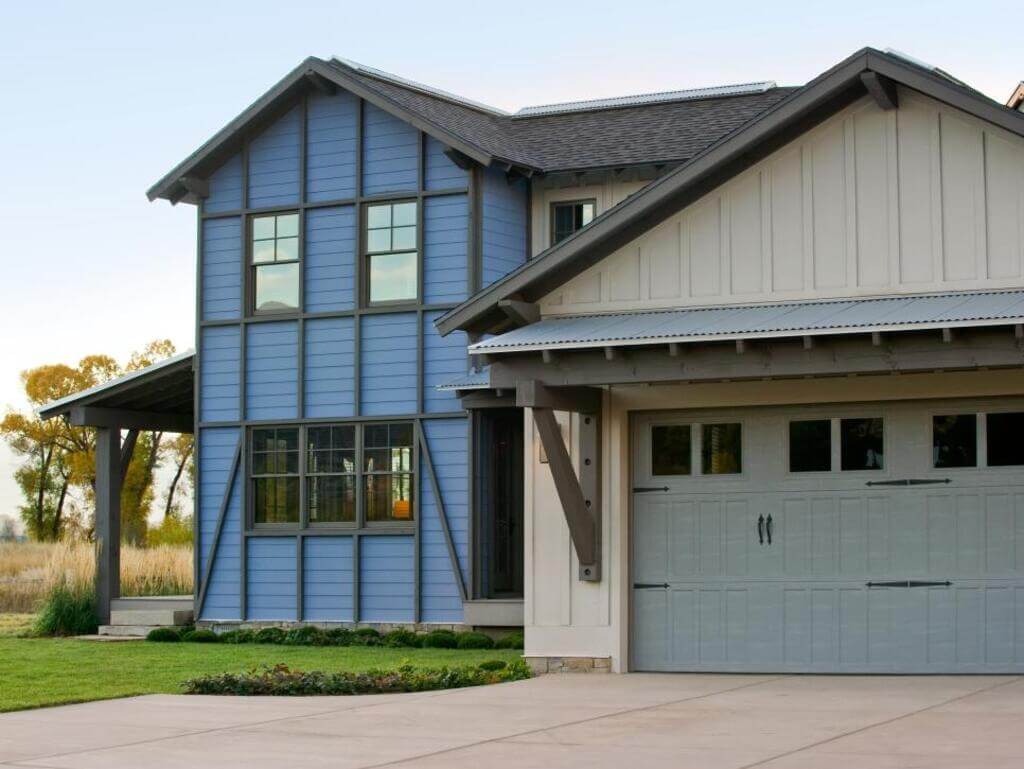
22. Pale Blue + Natural Wood
It’s often difficult to choose from the plethora of house color ideas that would blend with natural materials like wood. While white is the safest option to use against warm-toned wood, it may not be enough if you’re looking to create an edgy exterior design. Pale blue is a great alternative in that case.
This cool-toned color contrasts and complements the warm-toned wooden browns. It may seem like an unconventional color scheme for houses, yet it goes well with both traditional and modern styles of homes.
23. Light Chocolate + Dark Gray
Want to go for neutral but don’t want to stick to monochromes? Mix and match tones of brown, grey, and white to create a striking exterior design that is edgy without the jargon of bright colors.
This exterior house color scheme curates simply sophisticated exteriors for homes. A neutral beige base with contrasting white trim and frames define the facades of the house. The dark grey color gives a sophisticated edge to the lavish country-style mansion.
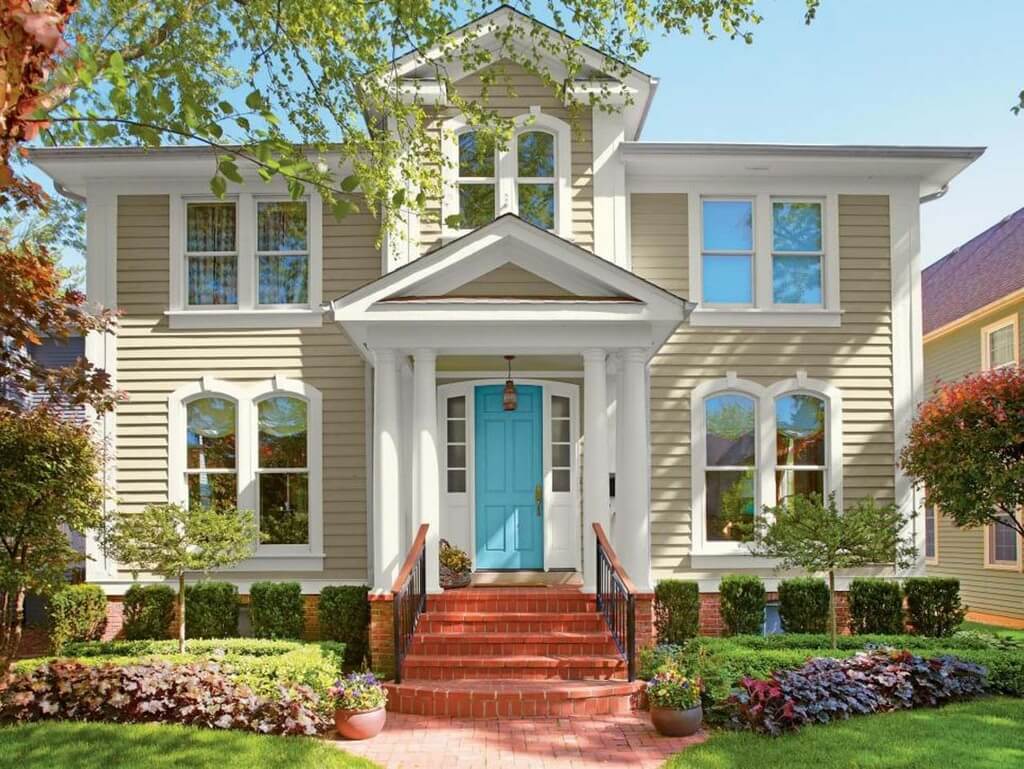
24. Yellow + White + Red
Move away from the basics, go for vibrant exterior house color schemes. The one here uses bright yellow as the base color which sets a warm and inviting tone for the house. The white trim subtly defines the architectural features of the house.
The black color on the roof adds drama and depth to the exterior, making it visually interesting. A pop of red, used for the main entrance is the cherry on the cake of this stylish home. The elements together create a spectacular visual aesthetic for the grand mansion-like home.
25. River Blue + Light Mocha + Dark Grey
A surprising color scheme for houses such as this creates an enthralling exterior design. The deep river blue color as the base alongside black makes a sophisticated exterior.
Contrasting the former wing of the house, the adjacent garage uses subtle pale aqua and white color scheme. The black-colored roof and its members are the binding elements of the two striking and contrasting parts of the house.
26. Agate Green + Brown + White
A subtle nature-centric exterior house color scheme uses muted tones of green and brown as the primary color scheme. Sage green coving the shingles of this striking home camouflage the house within its landscape.
The remarkable architectural form of the house seems like it belongs to the place because of the wondrous color scheme. Subdued brown tones used on the roof add to this natural aesthetic of the home. The white trim draws the silhouette of the home making it a head-turner.
27. Tuscan Pink + White
Want to make a stylish statement with your beach home? Try the Tuscan pink and white color combination for the exteriors. This color scheme makes a graceful one-of-a-kind statement with its supple palette.
This is an effective way to spice up a minimal cottage-like or vacation beach home. It creates a soft alluring aesthetic for the home. The pink color gives a stylish edge to the rather plain facades, whereas the white highlights the architectural features of the exterior.
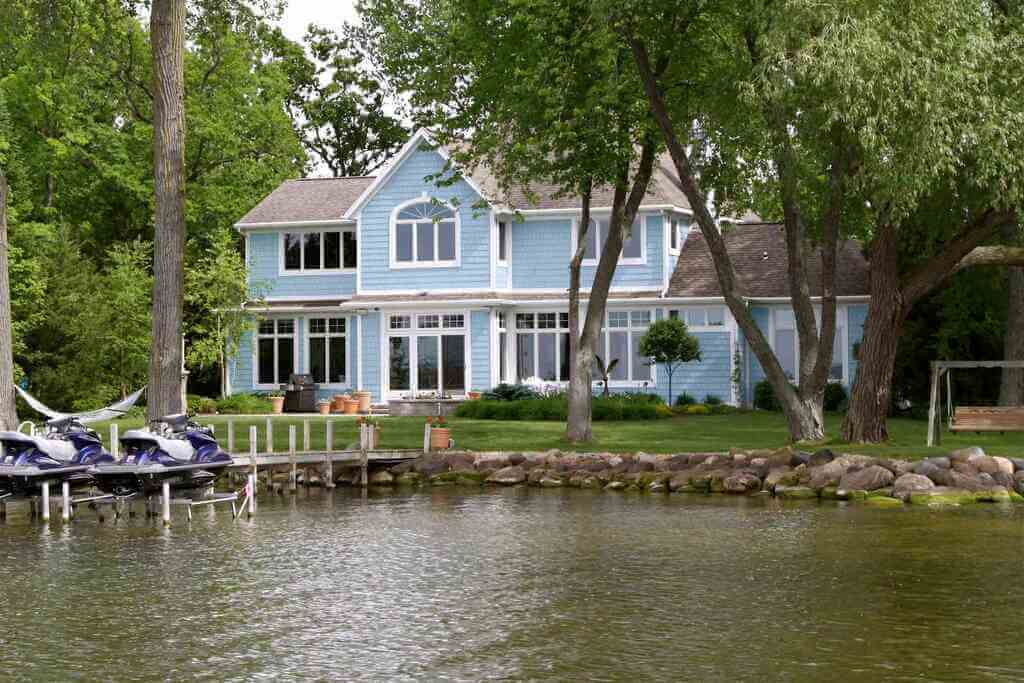
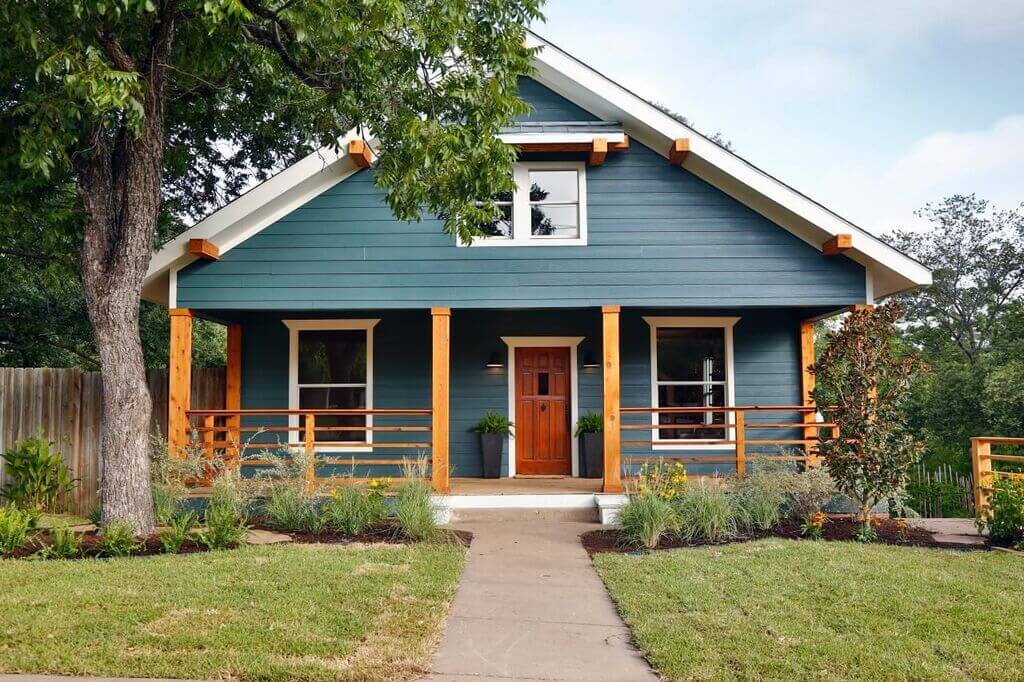
28. Powder Blue + White + Brown
Taking the trail of context-specific homes ahead, a lake home ought to mirror its spectacular location. The best exterior house color schemes for a lake home would comprise shades of blue and white.
The one here uses pale blue as the base color and brown as the secondary color. Blue is soothing and refreshing, whereas the muted brown is earthy and in sync with the surrounding. As usual, white breaks the monotony of blue and characterizes the facade elements.
29. Teal+ Navy + Rustic Brown
If you’re fond of the coastal aesthetic, this exterior house color scheme is for you. It uses a combination of shades of dark-toned blues with a surprising pop of rustic brown color.
Dark teal color adorns the shingles of this home. The roof is made of navy-colored tiles that give it an edge. The teal against navy makes a bold statement for this simple house. The steps leading to the porch are effectively stylized with a dash of vibrant brown color.
30. Ivory + White + Aqua
Traditional homes often look striking in lighter-toned colors. As their graceful form is justified and not overpowered by contrasting colors. Neutral base colors like ivory and white look phenomenal on this home.
The shingles in ivory are framed by white-colored elements, defining the facade of this mansion. Its symmetrical form and perfectly balanced scale of the house need little in terms of color scheme. A surprising pop of color is the front door which is adorned is vibrant turquoise color becoming the center of attention.
31. Apricot + White + Smoky Gray
A vintage house exterior color scheme entails the use of bright yellows and white. This quaint cottage is defined by its explicit architectural style and its stunning color scheme. Yellow being the base color makes the house look welcoming. White accentuated the architectural features, highlighting the repeating and symmetrical elements of design.
The green roof is a surprising touch to the effectively stylish home. This punctuates the look of the house giving it an eclectic edge. The assorted look of the house is simply charming and graceful.
Choose an Exterior House Color Scheme That Resonates with Your Style…
There is a plethora of different exterior house color schemes that go well with different architectural styles. Make an authentic statement of your style with your house exteriors by choosing the best-suited color scheme for your home.
FAQs:-
1. What Are the Top Trends for Exterior House Colors?
Pastel colors are trending exterior house colors. Apart from that, neutrals and whites never go out of style and are always in trend.
2. What Paint Colors Help Sell Homes?
Basic and timeless colors like whites, beiges, and neutral tones help sell homes.
3. What Exterior Colors Make Your House Look Bigger?
Lighter colors generally make a house look bigger, as they reflect light creating an illusion. Off-white, beige, and faint hues of blue, and yellow can also make a house look bigger.
4. Which Colors Look Good on Country-Style Homes?
White is a staple exterior color of country-style homes. However, one can also use blues, greens, and yellows to go along with white as accents or base colors.
5. What Exterior Colors Work Well with Wood?
The exterior house color schemes that work well with wood include white, yellow, and some shades of muted blues and greens.
When things go wrong at home, calling a repairman is probably the first thing on your mind. However, repair services can be incredibly expensive and you may have to wait a number of weeks before someone is available to come and take a look.
Until then, you’ll have to put up with whatever problem is making your home a less comfortable place to be in.
To save both time and money, you might want to think about learning some new skills and having a go at some basic repairs yourself. While it’s best to leave major leaks and electrical issues to the professionals, here’s a list of common DIY Home repairs that are easy to fix.
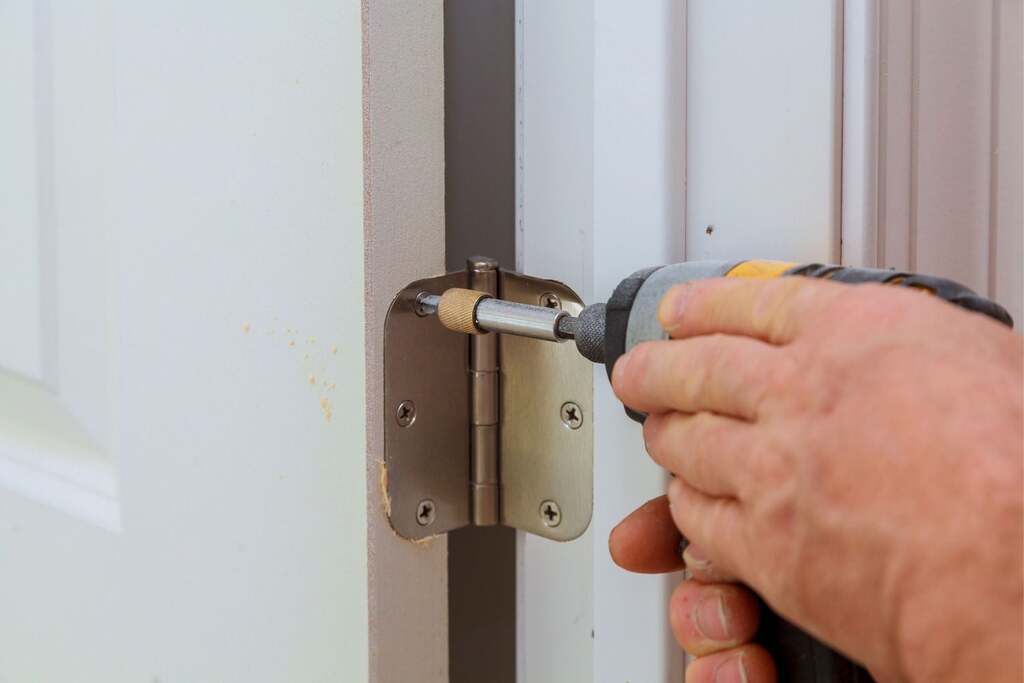
1. Securing a Scraping Door
If your door is dragging as you open it, it might need rehanging. This will make it easier to open and also save your floors from scratches. When it comes to how to adjust uPVC doors, it’s quick and simple to do yourself. Bear in mind, you might need an extra pair of hands to help with the weight of the door. Why not invite over a friend or family member and reward their efforts with a cup of tea?
2. Stopping Draughts
When the weather turns, you’ll be thinking about how to save energy and heat your home. Blocking draughts is a simple way to do this. Go around your doors and windows and feel for air.
Where you find an issue, block the gaps either with tape or expanding foam – if in the frame – or a draught stopper – if below the door. Bear in mind that if the drought continues through your window, you may need to upgrade your glass to double-glazing.
This isn’t something you’ll be able to do yourself, so it’s best to get a quote from a professional.
3. Fixing a Clogged Drain
Clogged drains are a common problem and are super easy to resolve without a repairman. In the first instance, try a plunger to force out any debris. If this doesn’t work, you can purchase an unblocking solution from most supermarkets or hardware stores.
And if the problem still occurs, simply head under the sink and loosen the P-trap – have a bucket handy for excess water – and clear the blockage manually.
To try and prevent blockages of the drain in the future, do everything you can to stop hair and bits of food from escaping down the drain.
4. Stopping a Leaky Sink
Similarly to unblocking your sink, stopping a leak requires you to go underneath and play with the P-trap. Make sure the fitting is as tight as possible. If the leak continues, you can try to replace the slip nut for a tighter fit.
5. Repairing a Running Toilet
Not only is the noise of a running toilet annoying, it could also be running up your water bill. In the first instance, turn the water off by the cistern. Then, use a readily available DIY kit to repair the flush system. If you’re confused by the mechanism, there are plenty of videos on YouTube.
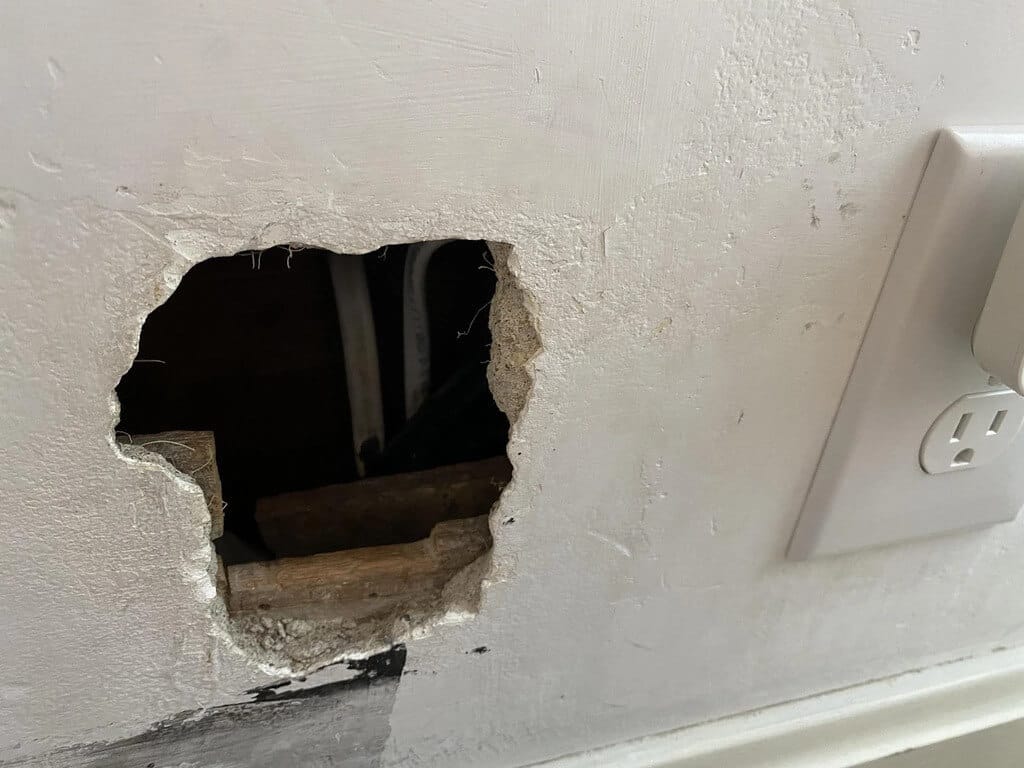
6. Patching a Hole
Whether it’s from an accident or from hanging a picture, it’s easy to patch up small holes and dents in walls without needing to fully resurface them. Simply invest in a tub of filler and use a flat spatula to smooth the solution over the hole. Let dry and then sand until smooth. Finally, cover the patch with paint.
7. Regrouting Tiles
If you’re looking to refresh your home, regrouting tiles is a quick and simple way to personalize your kitchen or bathroom to appear sparkling clean. You can use a tub of grout and go over the cracks, wait until it’s dried, and then clean off the excess. Alternatively, you can use a grouting pen to go over the gaps between tiles.
8. Fixing a Sticking Window
Securing your windows doesn’t have to be a hassle. The culprit behind any sticking or jamming is usually a quick fix. Open the window wide and check for any debris that might be stopping it from closing, you can use a brush or hoover to remove any excess.
If the window won’t open and the paint is the cause, use a chisel and hammer to carefully crack the paint. You can then sand and repaint the surface.
DIY doesn’t come easily to everyone but, with a bit of work, you’ll feel a lot more comfortable performing easy home repairs around your home. Hopefully, this will make you feel empowered, independent, and more capable than ever before.