Home Blog Page 72

How to Safeguard Industrial Light Fittings

0
Safeguard Industrial Light Fittings

Proper lighting is crucial in every work environment. Most work environments, especially warehouses and factories, require optimal lighting to enable employees to work efficiently and make the space safe to work in. Considering logistics and warehousing may operate 24 hours a day, you need to invest in proper lighting and ensure they are well protected. 

A well-lit warehouse, for example, eliminates several risks, such as misjudging steps, tripping, or even knocking items unknowingly. Slip, and fall accidents will be significantly reduced, too. Employers and facility managers need to ensure all lighting fixtures are working correctly and the entire space is well-illuminated. 

With the market flooded with many different types of lighting fittings to choose from, finding a suitable fitting should be a breeze. If you’re looking for an excellent choice then try CDM2 Lightworks – they have a broad range. 

You only need to identify the most practical, strong, and durable fitting to use for industrial applications. Although most light fittings are designed to be strong and durable, they, too, are vulnerable to various external and internal factors, including corrosion, harsh environment, and power surges, to name but a few.

In addition to investing in the best light fixtures, you must ensure they are protected from most of these elements. Below are a few tips and tricks on how to safeguard industrial light fitting from such. 

1. Install Surge Protectors

A man in a blue shirt is working on an electrical panel

LED lighting is one of the most preferred options for industrial and residential lighting today. This is because LED lighting is durable and uses a fraction of the energy, translating to immense cost savings. Unlike incandescent and fluorescent bulbs, LED light fittings are more than just a light source but a device. They, thus, are more susceptible to common issues, including electrical surges.

Although most of these devices come with built-in surge protection, there are times when they will fail, causing the LEDs to burn out. Additional surge protection may thus be required to help safeguard your LED lights from damage. 

One way to protect your LED drivers is by installing a surge protector. While installing a surge protector in front of every LED driver might seem fast and effective, it might not be economical, especially if there are dozens of such to be protected.

Consider investing in a system-wide surge protector to cover everything under it. You can choose to have a surge protector installed for each floor or warehouse, depending on how many LED drivers it holds. 

2. Consider Recessed Fittings

A set of stairs leading up to a building

Choosing the right/appropriate light fitting can be enough to protect your fixtures from specific risks as well as extend their lifespan with minimal maintenance. Low-profile or recessed light fittings can contribute to increased lifespan and cost savings in the long run.

Their compact design reduces the risk of such getting knocked over and minimizes exposure to external weather elements. Unbeknownst to many, recessed light fixtures provide excellent illumination while taking up less space and reducing energy wastage. 

The best thing with recessed emergency light fittings is that they can be installed into the ceiling, giving it additional structural protection. The reduced exposure to the surrounding environment also means the fixtures won’t be exposed to dust, debris, and moisture as much as non-recessed ones are.

Recessed fixtures thus have a longer lifespan and are more dependable, especially in emergencies. Most managers add recessed emergency lighting to help keep the warehouse or building illuminated during a power interruption or other emergencies. 

Recessed light fittings are readily available, with a wide range of options to choose from. You can thus choose between halogen walkover lights, downlights, or LED tubes to serve the purpose quite beautifully. A low-profile cavity is all you need to have these installed.

Recessed lighting would be an excellent option for warehouse settings or low ceilings, with the fixture sitting flush with the ceiling. Their minimal footprint reduces the risk of getting knocked off, especially when machines are equipment are in operation within the warehouse.

This is unlike hanging fixtures that will often get in the way of high-running machines and equipment. The reduced risk of damage means a longer service life and improved safety.

3. Invest in Protective Products

A conference room with a long table and chairs

Keeping your light fittings clean protects them from external elements, including dust, grime, and moisture. While wiping them off with a soft, damp microfiber cloth may help, some of the fixtures will still rust or be corroded. Rust stains can be tricky to clean, if not impossible, to remove.

You can however protect your light fixtures/fittings from rusting (or excess moisture, dirt, etc.) by applying a protecting film around it. The film helps keep water and other elements out, limiting the rate of decay and corrosion on the fixture.

Protective films are quite affordable, will go a long way in keeping industrial light fittings protected, and will save you lots of money in the long run. 

Extreme humidity levels can also be a major issue for your light fittings and other equipment in the warehouse. Keeping moisture levels to the minimum can however save you lots of money in replacement and repair.

Investing in a capable dehumidifier can help eliminate this problem, safeguarding your equipment and fittings from excess moisture.

A dehumidifier works by extracting moisture from the air, with the collected water stored in a tank. One will thus need to empty these tanks when full to enable the device to continue functioning properly.

A dehumidifier is essential in most industrial applications, primarily industrial laundries, food production settings, and office workspaces. 

4. Keep Outdoor Industrial Lighting Protected

A truck is parked in front of a building

Industrial outdoor lighting is as important as indoor lighting. It helps keep the workplace safe for workers inside and drivers and loaders outside. That said, it would be advisable to ensure all floodlights and security lights are working correctly through regular maintenance.

Outdoor lighting fittings are exposed to all manner of harsh elements, including dust, dirt, moisture, and direct sunlight. It would thus be advisable to look for a way to keep them protected from these elements. Applying a protective film around the fixtures can help keep moisture out.

You will also need to ensure they are adjusted to beam light in the desired direction. Fixtures that aren’t working will also need to be replaced immediately to prevent dark spots at night.

Read more:

Top 20 Types of Wood Paneling You Should Consider

0
types of Wood Paneling

Wood is a versatile material that brings a harming and cozy vibe into a space. It has always been a part of house interiors, be it in the form of furniture or full-length accent walls featuring different types of wood paneling.

Available in a myriad of different types, wood panels are known to make a space sophisticated and stylish. They add depth and drama to a space. The rich wooden texture makes the space visually rich. Plus, the sumptuous natural texture of the wood makes one feel close to nature.

But, how can one import this natural rustic wooden look in a simple space? The answer is, by incorporating wood paneling into the interiors. There are numerous types of wood paneling to choose from. We’ve curated a comprehensive list of the top 20 wood paneling types that can make your spaces edgy.

What is Wood Paneling?

Wood Paneling

Wood paneling is used as a wall treatment that accentuates the surface of the wall. It comprises wooden panels that are arranged to create patterns that make a space visually striking. These panels can be of different sizes and can be arranged differently. 

They, many times have grooves in between that create a sense of direction for the design of the accent wall. Different types of wood paneling have been in trend and several modern adaptations of them are now making a comeback in the interior decor scene. The wood panels are not necessarily made of authentic wood. Today, cdx plywood, MDF, and blockboards are extensively used to create wood panels that look like classics. 

Our Top 20 Types of Wood Paneling  

1. Shiplap

Shiplap

Shiplap is a great type of wood paneling for a classic look. Inspired by the farmhouse aesthetic, shiplap is known for its snug fit and timeless appearance. Originally used as an exterior cladding material, it is making its way into modern interiors thanks to Joanna Gaines who made it popular through the show. Shiplap is identified by its L-shaped notch that forms the groove between two planks. 

One part of this panel has a rabbet on the front and the other side is at the back. Two planks when placed adjacent to one another, the rear rabbet overlaps with the front rabbet creating a notch that runs along the length of the shiplap. The tight fit of the planks creates an opaque surface that prevents the elements from passing through the paneling. 

2. Chevron-Style Wood Paneling

Chevron-Style Wood Paneling

Thick or thin wood panels laid in a chevron pattern look simply spectacular. The dynamic pattern creates a stylish statement with its chic and dramatic look. Different colored panels can be arranged in an artistic collage-like chevron pattern to make an artistic statement with wood paneling.

This is an unconventional type of wood paneling that is becoming trending because of its alluring appeal. Many different patterns and types of wood can be used to accentuate chevron-style wood paneling. This wood paneling type looks great on the wall and the floor, alike.  

3. Beadboard Wood Paneling

Beadboard Wood Paneling

Beadboard wood paneling is a type of wood paneling that is front-patterned. It looks sleek and aesthetic and gives a sophisticated appearance to the surface. Wood planks are placed adjacent to one another and have grooves in between. It is similar to the tongue and groove wood paneling, except that it is easier to assemble and curate. 

These panels are cut in a slightly different manner and can be used as panels or individual wood pieces that are collected to clad a surface. These wooden wall panels can also be used on ceilings giving a collected look and striking aesthetic. 

4. Board and Batten

Board and Batten

A board and batten wall is simply unbeatable! When it comes to styling a wall with unique wall cladding designs, this wood panel wall aces the game. Battens are arranged in a grid on board to create a framed wall. Traditionally, boards used to be adorned in thinner battens creating a wainscoting-like pattern. 

The modern adaptation of this wood paneling type uses thicker battens that change the grid as per the scale of the space. It renders the space looking charming and composed. The depth added by the wood panels makes the space visually interesting. This resulting grid formed by the battens can be either square or rectangular depending on the surface area.  

5. Barn Wood Herringbone Panels

Barn Wood Herringbone Panels

Similar to the chevron-style wood paneling, the herringbone pattern wall panels are also pretty chic. Their stunning look amps up the space with an elegant charming aesthetic. Broad wood panels arranged in a crisscrossed diagonal pattern to create the chevron style look can be of several different types. 

A painted herringbone patterned wall looks as good as this barn wood herringbone wall. This gives a rustic and charmingly stylized timeless appeal to the space. The wall acts as a perfect accent wall for the dining room and has been stylized in rough textured wood panels. 

6. Reclaimed Wood Planks

Reclaimed Wood Planks

Yet another rustic-looking accent wall is the one here, which uses reclaimed wood planks. Laid horizontally to create a flat wall, this sustainable idea repurposes salvaged wood from old furniture. The planks of varying textures and colors collectively create an assorted collage that becomes a highlighting feature in the living room. 

The simple yet stylish wall can be easily assembled as a weekend DIY project that’ll completely transform the space. It brings a warm, and cozy cabin vibe to the space. This type of wood paneling looks great on the ceiling and floors as well. Or, one can opt for lighter tones of wood paneling for floors, to create a complementing feature that makes the space look holistic.

7. Tongue and Groove Planks

Tongue and Groove Planks

One of the oldest and the most used joinery in traditional carpentry is the tongue and groove joinery. This can be used as wood paneling for interior walls. The planks are similar to the shiplap, however, on one end they have a protrusion and on the other, there is a groove. When placed together, these panels fit into one another creating a tight packing. 

This makes it an ideal choice for spaces that require a non-invasive enclosure. The panels fitting into one another look almost seamless with just a line that is visible between the two. Different types of wood can be used to make tongue and groove paneling.

This kind of wood paneling does however require skilled craftsmanship to create. Or, one can opt for prefabricated pieces that can be assembled to create simplistic and elegant wood paneling. 

8. Raised Wood Paneling

Raised Wood Paneling

Raised wood paneling is a type of wood paneling that is elevated from the floor level onwards. Typically, they’re around 3-4 feet high and comprise panels that are adorned with rails and moldings. It has been a staple of most country-style homes and thus, is known to give the space a classic and timeless look.

Elaborate molding patterns could be used to make decorative wood panels for walls, giving the space an extravagant royal look. Different custom patterns could be created on panels to match the established style of the space. This type of paneling is known to bind the space when used continuously throughout the space, making it appear holistic. 

9. Diagonal Slats Wood Paneling

Diagonal Slats Wood Paneling

Slats look chic on walls, more so when they’re stylized creatively. Diagonal slat wood paneling is a great way to beautify a space. Placing slats diagonally gives the space a playful edge, compared to straight streamlined paneling which makes a space look sophisticated. 

When painted and used holistically all over the walls, like it is here, the resulting aesthetic oozes grace. The white makes it appear soothing yet dynamic at the same time. Continuing the same patterned panels on the ceiling further accentuates the appearance and the relaxing feel of the space. 

10. Pallet Wood Panels

Pallet Wood Panels

If you’re looking at recreating the rustic charm of a Barnhouse or want to repurpose pieces of wood lying around, this wood paneling type is the ticket. Pallet wood paneling is a type of paneling that creates a collected collage accent wall. It uses several pieces of wood that are placed together to create a captivating wall feature. 

Different sizes, colors, and types of wood are welcome. The base of the wall could be painted in tones similar to the wood over which these pieces of wood are assembled. This wall panel option is best suited for artrooms or workshops to create an eclectic rugged aesthetic. 

11. Knotty Pine Cabin Panels

Knotty Pine Cabin Panels

The perfect way to spice up your home with a cozy-cabin aesthetic is by adding knotty pine wood paneling. This enticing type of wood paneling uses wood planks that are spaced with a grooved molding detail. 

They add a rich textural appeal to the space and are nostalgic and reminiscent of a classic lakehouse vacation. They make for spectacular accent walls that amp up the space in a charming cabin vibe. Warm-toned wood variants work best for creating this wood paneling type.

12. Natural Wood Panels

Natural Wood Panels

A slightly streamlined version of the pallet wood panels could be this natural wood block paneling. This type of wood paneling uses smaller panels of different types of wood that are used in conjunction to create a 3D mural wall. 

These diverse panels are alternatively recessing and protruding from the surface to give a sense of depth within the space. This piece of wood panel wall decor makes a space visually interesting and gives it a rugged look. The varied rich wooden textures create a rich rustic aesthetic for the space.

13. Seamless Natural Wood Panels

Seamless Natural Wood Panels

One of the simplest ways of adorning your space with a charming wooden aesthetic is by adding seamless natural wood panels. This type of wood paneling takes a minimalistic approach with its structure. The panel joints are skillfully flushed with one another creating a holistically stylized space. 

The classic wooden texture is displayed in its full glory, cutting all the unnecessary jazz. The mid-century modern style made this wood paneling popular. Its simple stylistic look is ideal for any and every space. It also suits well on the walls, floors, and ceiling alike. 

14. Sleek Vertical Wood Slat Panels

Sleek Vertical Wood Slat Panels

A contemporary trend that has become a rage is the use of sleek vertical wood panels. The thin and long strips of wood placed at a distance from one another create a groove that looks chic. They amp up the space giving it an enticing aesthetic. 

Numerous kinds of wood can be used to create this stylish wood paneling accent. Individual pieces can be cut to assemble manually as per the spatial requirements. Or, one could opt for panel sheets that have the pattern embedded. This wood panel wall is often used for media units or feature walls in all kinds of spaces. 

15. Flat Wood Panels

Flat Wood Panels

An alternative to the seamless natural wood wall paneling is this flat wood paneling. It retains the natural graphics and texture of the wood and breaks down the large panel into smaller ones. This adds to the visual composition of the space making it look sophisticated and charming. 

The panels can be of various sizes and shapes. The grid can be manipulated as desired, there are no rules here. These panels can be created using any type and color of wood desired. Flat wooden wall panels are apt for creating accent walls. 

16. Wainscoting

Wainscoting

A type of raised board wood paneling, wainscoting ideas includes a board over which moldings are carved or created. Starting from the floor, this type of paneling is generally elevated up to a height of 32 inches.

This is an age-old paneling type that is seeing a resurgence in interior design recently. The modern version does not necessarily stick to the norm of starting at the floor level. However, the principle of a panel and molding remains the same. 

The central panel is often adorned in thin strips or battens that create grid-like patterns on the surface. One can go wild with the patterns, but they must be angled at 90 degrees forming a square or rectangle. The molding can be ornate and used in conjunction with artworks to create a gallery-like uber-chic wall decor. 

17. Chair Rails

Chair Rails

Another type of cladding that is often used as raised board wood paneling is chair rails. This is typically done along the bottom third half of the wall, at the skirting level. A staple of classic architecture, its primary purpose was to protect walls from getting hampered due to nicks or dings while furniture shifting. 

The groove-like molding looks elaborate and ornate. It gives the space a timeless classic aesthetic. This is often used alongside wainscoting for a dramatic classic effect. Even without wainscoting, it serves as a stylish type of wooden skirting that binds the space as one. 

18. Vertical Grooved Wood Panels

Vertical Grooved Wood Panels

Similar to the contemporary sleek wood panels for walls, this type of paneling elongates the space making its height seem taller. The space ends up looking more spacious and attention is bought to its vertical dimension. 

Vertical wall panels could be of any width and height, and their joints can be either concealed or exposed to create grooves for added visual interest. This type of wood paneling is one of the most common and timelessly popular. Its simplistic appearance makes the space enticing and renders it an alluring aesthetic.  

19. Horizontal Wood Plank Wall

Horizontal Wood Plank Wall

Horizontal wood planks can become a striking feature in a space that adds visual interest and also makes it look spacious. Large light-toned wooden wall panels can make the space seem larger than it is and amp up its look. The uniform distribution of planks with groves creates visually composed accent walls that act as the focal element in design. 

Dark-toned wood or painted wood, on the other hand, creates a statement in a space. These are meant to set the tone of the space, where all the other elements in the room are in accordance with the theme set. 

20. Natural Rustic Wood Panels

Natural Rustic Wood Panels

A combination of different types of rustic wood panels can be used to create the perfect rustic cabin-like aesthetic. Here, the horizontal rustic wood panels are used as wall paneling, and extruding slat panels are used for the ceiling paneling. 

Both these panels have a rough rugged texture that creates a cozy cabin-like aesthetic. Different types and tones of wood panels can be used to create this assorted look. 

A Plethora of Types of Wood Paneling Can Be Used…

The choice of the right wood paneling for your space depends on the type of space, your design sense, and your available budget. One can opt for the extravagant wood panel having ornate moldings like chair rails or wainscoting. Or, for a simple natural look one can go with seamless flat panels.

A dining room table with chairs and a fireplace in the background
A desk with a chair and a lamp in a room
A living room with a staircase and a painting on the wall
A living room filled with furniture and a flat screen tv
A room with a table and chairs and a clock on the wall
A bedroom with a large window overlooking the ocean
A bedroom with a bed and a wooden wall
A kitchen with wooden walls and white cabinets
A blue chair sitting in a living room next to a window

FAQs

1. What Are the Different Types of Wood Paneling?

Shiplap, slat panels, beadboard, and flat panels are a few common examples of wood paneling. 

2. What Type of Wood Is Used for Wall Paneling?

Cedar and pine types of wood are commonly used for wall paneling. Nowadays, MDF is also commonly used to make wall paneling.

3. How Many Types of Paneling Are There?

There are over twenty types of wood wall paneling. A few of them include wainscoting, wood planks, slat panels, etc. 

4. Which Wall Panel Is Best?

A wood wall panel is the best to create a charming aesthetic accent wall. 

5. Is Wall Paneling Outdated?

Wall paneling has never gone out of style. It has changed its face, yet has continued to remain relevant over the centuries.

Keep reading:-

5 Easy Ways To Keep Your Garden Tidy

0
Ways to Keep Your Garden Tidy

Keeping your garden tidy may not be as easy as it seems. After all, if you spend a lot of time in your garden chances are you’ll use a variety of tools and equipment. 

It can be easy to leave the tools and equipment dotted around the garden, making it untidy. Other people can make your garden untidy and so can the weather. 

Let’s take a look at 5 easy ways to keep your garden tidy. 

1. Get Rid Of Your Garden Hose

Get Rid Of Your Garden Hose

Hoses can make gardens look untidy. It’s unlikely that you’re going to tidy a hose away after you’ve used it. This is where using the best drip irrigation system for raised beds can help. A system such as this can be much tidier than a hose. 

An irrigation system can be buried under the ground or simply covered in a bit of soil. As a result, your garden can look tidier. 

If you have to use a hose, be sure to tidy it away once you’ve used it. Not only can it help your garden to look tidier, it can help to prevent you from tripping over your hose. 

Collect rainwater in water butts and use a watering can to water your garden room. This can help to save water and keep your garden tidy. 

2. Tidy The Edges Of Your Pathways

Tidy The Edges Of Your Pathways

The edges of your pathways and your borders can look untidy. They can also make your garden look overgrown. Here’s what you can do to make a difference:

  • Use an edging tool to keep the edges of pathways tidy.
  • If you don’t have an edging tool consider using garden shears.
  • Cut away any grass that has made its way onto the pathways.
  • Cut the grass short enough so it’s not protruding onto the pathways.
  • Do the same for your borders.
  • Keep on top of the edges by tidying them every few weeks in the summer. 
  • Tidy the edges about once a month during the colder seasons.

As soon as you have tidied the edges of your pathways and borders your garden will look tidier. 

3. Tidy Garden Toys Away

Tidy Garden Toys Away

If your children leave toys in your garden they can make it look untidy. 

Help young children to tidy toys away when they’ve finished playing with them. 

This can help your garden to look tidier instantly.

If you want to keep your garden very tidy, ask your children to play in one area of your garden. 

Just make sure your little ones have plenty of space to play in.

4. Brush Up Any Leaves and Debris

Brush Up Any Leaves and Debris

Once the wind has died down, brush up any leaves and debris. If it’s still windy it might be worth waiting until things have settled a little. 

Brush up the leaves and place them all in a bag. Alternatively, you could place them on your compost heap. 

Leaves take a long time to break down. Therefore, it’s worth having a separate compost heap for them. 

Collect any debris that has been blown around your garden. Branches can usually be found in a garden after windy weather. These can be added to your compost heap. 

Be sure to wear gloves when you’re picking up any debris or leaves. This will help to prevent you from getting your hands dirty. 

Wearing gloves can also help to prevent you from hurting your hands. Some leaves and branches can be a little spiky. 

Debris can land in your garden even if it hasn’t been windy. Therefore, a quick check now and again can help it to stay tidy. 

5. Regularly Tidy Your Garden

One of the best ways to keep your garden tidy is to regularly tidy it. 

You don’t have to tidy your garden every day. Transform your garden with easy garden ideas.

  • Clean your garden each time you notice it’s a little untidy.
  • Tidy your garden at the weekend, should you need to.
  • Tidy your garden every few days, if it’s easier.
  • Pick up any debris, tidy toys away, and make the garden presentable.

Conclusion

Regularly tidying your garden can help it to look good. You don’t need to have the tidiest garden in the world. Rather, you can simply keep on top of any debris that’s hanging around. When you do, you’ll find that your garden is more likely to look tidy more often. 

Use the above tips to help you to keep your garden tidy. With a bit of effort, you too can have a garden that looks good.

Discover More

How to Soundproof a Room?

0
How to Soundproof a Room

If you want to find out how to soundproof a room in your house so that you can finally get some peace and quiet, then this blog post is for you. We will cover everything from the materials you need to use through to how you can reduce noise transmission. Follow these simple tips, and soon enough, you’ll be able to enjoy silence once again.

What is Soundproofing?

Soundproof a Room

Soundproofing is the process of adding materials to a room that will stop sound from entering or exiting. This can be done to either reduce noise coming into the room (to make it more peaceful) or to keep noise from escaping the room (so you don’t disturb others during band practice).

There are many different ways to soundproof a room, and the method you choose will depend on your specific needs. Some methods are more effective than others, and some are more expensive. But with a little bit of research, you should be able to find the perfect solution for your situation.

The following are some of the best ways to soundproof a room:

Add Mass to the Walls

Soundproof a Room : Add Mass to the Walls

One of the best ways to soundproof a room is to add mass to the walls. This can be done by hanging heavy curtains, attaching foam panels, using an acoustic sound insulation slab like Rockwool RWA45, or adding another layer of drywall.

The more mass you add to the walls, the more sound will be absorbed. You can even use this principle when designing the decor of the room. Hanging wall art or choosing a large bookshelf or dresser will also form a barrier between sound entering/exiting through your walls.

Use Sound Absorbing Materials

Soundproof a Room : Use Sound Absorbing Materials

Another way to soundproof a room is to use sound-absorbing materials. These can be anything from blankets and rugs to cushions and bean bags. Anything that will absorb sound will help to reduce the noise in a room.

Have you ever emptied a room in your home to redecorate and noticed how echoey it was? The difference in sound between a furnished room and a non-furnished room illustrates how sound can be absorbed by almost any object.

Seal Off Gaps and Cracks

Soundproof a Room : Seal Off Gaps and Cracks

One of the most common ways for sound to enter or exit a room is through gaps and cracks in the walls. To soundproof a room, you need to seal off these openings. This can be done with weatherstripping, door sweeps, and caulk. Look closely – the chances are you will find some small cracks in most rooms that will benefit from being resealed.

Install Soundproof Windows

Soundproof a Room : Install Soundproof Windows

If you live in a noisy area or your home is located near a busy street, then soundproof windows may be the best option for you. These windows are made with multiple layers of glass and are designed to block out noise. They also specifically use materials that absorb and reflect sound, such as acoustic glass.

Alternatively, some are designed to disrupt the soundwaves rather than absorb the sound. They do this by using two different thicknesses of glass close together. The technology is really quite impressive and definitely worth a look if you live in a noisy area.

Use Soundproofing Sealant

Soundproof a Room : Use Soundproofing Sealant

Soundproofing sealant is a specialized caulking compound that is designed for use in soundproofing applications. Unlike traditional caulks and sealants, soundproofing sealant is designed to reduce or eliminate the transmission of noise through gaps and cracks in walls, ceilings, and floors.

It can also be used to effectively seal around doors and windows. In order to be effective, soundproofing sealant must be properly applied. Once applied, it forms a barrier that helps to block the passage of sound waves. As a result, soundproofing sealant can play a vital role in reducing noise levels in both residential and commercial settings.

Install a Soundproof Door

Soundproof a Room : Install a Soundproof Door

In addition to sealing cracks and gaps, another way to soundproof a room is to install a soundproof door. These doors are made with special materials that block out noise. They are also heavier than regular doors, which helps to reduce sound transmission.

Soundproof doors can be expensive, but they are an effective way to reduce noise levels in a room. If you are interested in installing a soundproof door, be sure to consult with a professional to ensure that it is installed properly.

Summary

If you’re looking for ways to soundproof a room, then the tips in this blog post will help you get started. Remember, the key is to add mass to the walls, use sound-absorbing materials, and seal off any gaps and cracks. With a little bit of effort, you can make your room more peaceful and quiet.

Read more:-

An Apartment or a Villa in Dubai: Which Is Better?

0
An apartment or A villa in Dubai

Choosing a Property in Dubai

If you are considering whether to buy a house in Dubai, you may want to compare this option to purchasing an apartment in one of its numerous residential communities. Here are a few essential factors to take into account before you make the final decision

Price

Price of An apartment or a villa in Dubai

The value of the real estate in the UAE varies greatly depending on the floor area, the number of rooms, location, community, amenities, and so on. Understandably, villas are generally more expensive. Here are a few examples of such properties listed on the official website Emirates. Estate with an extensive catalog of offerings from developers and real estate agencies: 

There are, however, cheaper villa communities in Dubai, so it makes sense to check for budget-friendly options in Arabic real estate even if you are on a tight budget.

Prices of apartments, on the other hand, start at AED 240,000 (USD 65,300), although sumptuous properties in fashionable in-demand districts can be worth AED 5 million (USD 1.3 million) and more. 

Location and Lifestyle

Location and Lifestyle An apartment or a villa in Dubai

Another thing to consider when choosing a buy-to-rent or buy-to-live property in Dubai is your preferred lifestyle, which determines the choice of community. If you are after relaxed, serene seaside living with a white-sand beach on your doorstep, your viable options could be limited to high-end waterfront communities, such as Palm Jumeirah or Reem.

Some of them consist exclusively of villas. Other districts, such as Dubai Silicon Oasis or Jumeirah Village Circle, offer both snug studios or apartments and more spacious and expensive villas. 

If you enjoy driving, villa communities are a great choice because it usually takes a few minutes to reach all the necessary amenities, such as supermarkets, schools, hospitals, restaurants, and entertainment venues.

If, however, you would like to get around by public transit, apartment blocks are a safer bet, as most such communities are built near metro lines and bus stops. 

Families with children might opt for greater privacy and security in a gated community, in which case villas or other types of detached houses are the right options.

They also usually feature the best backyard, where playgrounds and other facilities for children can be equipped. Villa communities, such as Arabian Ranches, accommodate educational establishments – schools and kindergartens. 

High-rise apartment buildings, on the other hand, are usually located in central districts, closer to the buzzing nightlife and the beating heart of the city. Single professionals often prefer to have nightclubs and various entertainment venues close by.

However, districts like Silicon Oasis and Sports City have a combination of residential and commercial properties, with schools and other necessities nearby.

Surroundings

Surroundings An apartment or a villa in Dubai

Practical considerations are not the only factors that should drive the choice of residence. It is almost equally important to enjoy the views from your windows. More expensive apartments in Dubai skyscrapers offer staggering views of the Persian Gulf (in Jumeirah Beach Residence) or the iconic skyline (Dubai Downtown). 

Buyers of villas in high-end communities, on the other hand, might be able to take in the sweeping green lawns of golf clubs with lakes, hills, and landscaping, or parks in the middle of the desert. 

If having a supermarket, a café, a beauty parlor, and other such amenities on the ground floor of your home matters to you, you should opt for an apartment tower. Many of these also offer communal facilities, such as a swimming pool, children’s playgrounds, an equipped gym, etc. 

In a villa neighborhood, you usually have to drive a short distance to the nearest shop, but if you purchase a property in an affluent, high-end neighborhood, you can have the use of jogging tracks, footpaths laid across landscaped green areas, tennis, and basketball courts, and so on.

Maintenance

Maintenance of An apartment or a villa in Dubai

You should be prepared for the expenses of maintaining a villa and the grounds, which often include a beautiful private garden and a swimming pool that need cleaning. This is definitely higher than the cost of living in a flat in downtown Dubai. 

Your utility bills will also be higher if you own a villa, especially if you factor in the water required to water the plants in the garden and fill the pool. 

The costs of purchasing furniture, accessories, and décor elements are obviously lower in a smaller apartment. 

Buying a Villa in Dubai

Buying a Villa in Dubai

Final Talk

If, upon proper consideration, you decide to invest in a villa in Dubai and relocate for permanent residence, start looking for a suitable property today, as prices of real estate in the United Arab Emirates grow consistently.

Discover More

A Simple and Basic Way to Install Your Glass Stair Railing

0
Glass Stair Railings

Stair railings have been in fashion for several centuries now, but over the years, the aesthetics have changed. The new modern type of stair railings is glass stair railing. It has been in vogue for almost a decade and its stunning qualities would keep it in use for many years to come. Glass stair railings are visually attractive, and sophisticated, making a space feels bigger and generating the flow of light.

If you are looking for durability and sturdiness, then you should opt for a glass stair railing that is usually about 8mm to 10mm thick. Tempered or laminated glass is the recommended glass panel to be used for a glass stair railings installation. Do you want to know another positive fact about a glass stair railing?  You can install it all on your own and with little or no power tools!

Your first and easy step to installing your glass stair railing is by searching for a “glass railings near me” shop to purchase your pre-made glass railings. You would also need to purchase other tools such as; stainless steel screws, post brackets, base plate posts, foaming glass cleaner, handrail brackets, and or glass clamps.

Although other types of stair railings i.e. iron railings have their advantages, for a modern home, most building codes would recommend glass stair railings. That aside, glass stair railings can take on any design and they can either be supported with a wood frame (preferably oak wood) or a steel frame.

Glass Railing Installation

Glass Railing Installation

Glass railing installation can be classified into three and they are – standoff glass railing, clamped glass railing, and dadoed glass railing. The standoff glass railings don’t need any bottom railings before the glass panels can be held.

For this type of glass railing, the clamps are usually attached to the bottom part of the staircase. The Dadoed and clamped glass railings are quite similar because they both utilize newels to secure the glass frames.

However, this article would not focus much on these classifications but on the basic and simplest way that glass stair railings can be installed.

Step-By-Step Process to Install a Glass Stair Railing

Mark Your Spots

The first step to installing your glass stair railing is by carefully marking out the spots they would be placed. Figuring out the breadth of your railings is quite important, and chalk can do this job for you. You should also take into consideration, the height of your railing, and usually, a “34_38” inch is the recommended height.

Attach Your Railing Post

Attach Glass to Your Railing Post

Your railing post, usually in the form of a “34-38” inches long stick can either be made out of wood or steel. Many modern house owners would prefer steel posts because they are way easier to install. Once you get your railing posts, the first step you need to make is to trace out the spots where each railing post would be fixed.

Post railings shouldn’t be so far apart from each other. At most, the railings should be about 5 feet from one another. After marking out where each post rail would be fixed, you should then place the base plates on the ground and drill them into it with screws.

Next, attach the post to the base plate and screw them also. Then, attach caps to the top of each post.

Attach Bottom and Top Railings to the Post

The bottom and top rail of a stair glass panel are quite important because they are the materials to fix the glass in place. To attach the bottom and top railing, all that is needed is to screw the bottom railing to the post (should be about four inches away from the ground).

Do the same to the top railing too. Do not also forget to attach end plates to the sides of the rail ends. Leaving the top rail ends open can be hazardous in the long run.

Place Your Glass Panel Between the Top and Bottom Railing

Place Your Glass Panel Between the Top and Bottom Railing

This is the last and easiest step, but it could also be quite tricky if one isn’t careful. Measurement is a necessity, so you’d need your tape rule here to measure which breadth and length of glass would accommodate the space between the railings.

Then after this, you can now center your glass panel between the top and bottom railing by proceeding to attach the panel at the top first before it slides into the bottom. To make this easier, you can first coat the top and bottom rails with foaming glass cleaner before attaching the glass panel. Then, your installation is done.

You Could Make Use of Glass Clamps

Instead of inserting the glass panels between the top and bottom rails, why not replace the method with the glass clamp installation? Glass clamps are usually attached or screwed to the sides of the railing posts. A clamp would be attached at the top, and another at the bottom, and the same process would be repeated for the other end.

Then, you can now easily and carefully attach the sides of the glass panel to the glass clamps. Note that, if you would be doing the glass clamp installation method, the top and bottom rails would be fixed after and not before the glass panels are secured to the railing posts.

Conclusion

Modern glass railings are fun and easy to install because of their minimalist design features, and the fact that it has been pre-installed. Any homeowner can decide to start and finish the glass stair railing project all on their own, depending on the length and breadth of the glass stair railing.

Although some glass railings would require the assistance of more hands when glass panels need to be fixed between the railings, apart from this, the other steps can be handled perfectly by one individual.

There are some other detailed steps homeowners should know about the glass stair railings installation but, the simple steps highlighted above cover everything a beginner needs to know about it.

Find out more:

How To Keep Your Home Safe and Secure When Away

0
Keep Your Home Safe and Secure

Keeping your home safe and secure when you’re not there can be challenging. Even if you have a trusted neighbor or friend that can check in on your house, it’s important to have multiple layers of security so that no one accesses your home without your knowledge. In this article, we’ll cover the various ways you can keep your home safe and secure when you’re away with helpful tips and tricks.

Have Neighbors Watch Your Home While You’re Away

A couple of men standing next to each other

One of the easiest ways to keep your home safe while you’re away is to have your neighbors watch the house while you’re gone. This is a great option if you have neighbors who are reliable or work a regular nine-to-five job. You can simply ask your neighbors if they’d be willing to watch your house while you’re away.

If they agree, be sure to give them a key and let them know how often you’d like them to check in on your home. You can also ask them to keep an eye out for any mail that might be delivered while you’re away.

Install a Doorbell Camera

A hand is pressing a button on a door

If you’re hosting a party and want to keep an eye on what’s going on at your front door, you can install a doorbell camera. There are a number of different options available on the market, and many have different features, so you can find the perfect camera for your home.

Once you’ve installed the camera, you can view the feed from your phone or computer. This is a great way to keep tabs on who’s at your home, and you can even allow guests to chat with you via the feed if you don’t feel comfortable opening the door.

Add Automated Lighting

A person holding a smart phone in a living room

Another option you can use to keep an eye on your home while you’re away is to add automated lighting. This is a great way to make sure that your house remains well-lit while you’re away, and you don’t have to worry about forgetting to turn the lights on or off.

You can also use automatic lighting to set the mood for parties and special occasions, as well as for security. Be sure to choose outdoor lighting that’s bright enough to illuminate your front yard and paths; this will help to deter criminals from loitering on your property.

Lock Up and Hide Valuables

A person is pressing the button on a safe

When you’re away, it’s important to lock up and hide your valuables. If you find that you can’t lock up all of your valuables, you should at least hide them so that thieves don’t see them. If you have high-end electronics, jewelry, or other valuables, you should consider moving them to a different location or securing them in a safe.

Putting valuables in a drawer or under your bed is an easy way to hide them from would-be thieves. If you don’t have enough room in your drawers to store all of your valuables, you can purchase a safe that is designed to be hidden in plain sight. There are a number of different safes available that can be mounted on the wall behind a picture or a bookshelf.

Turn on Electronic Security

A person holding a smart phone in front of a camera

Another way to keep your home secure while you’re away is to turn on electronic security.

This is something most locksmiths can help you with. This is an excellent way to keep tabs on who is coming and going from your home, and you can even set timers to have the system shut off after a certain amount of time.

Some systems also allow you to remotely lock and unlock doors, which is a great way to ensure that your home is secure even when you’re inside. You can also set up alarms that will notify you when someone approaches your home while you’re away.

Don’t Forget the Basics

A large house with a driveway in front of it

Finally, don’t forget the basics. Make sure you keep your shrubs and bushes trimmed, and don’t leave your porch light on when you’re away. If possible, it’s a good idea to unplug electronics when you’re not using them to ensure that they don’t leave an energy footprint.

Finally, be sure to change the batteries in your smoke detector and CO sensors every year. This will ensure that your home is protected at the scene of a fire. These are just a few tips and tricks that you can use to keep your home secure when you’re away.

No matter what methods you choose, it’s important to protect your home from unwanted guests. Make sure to follow these tips so that you can have peace of mind even when you’re not home. 

Conclusion

Keeping your home safe and secure when you’re away can be challenging. Even if you have a trusted neighbor or friend that can check in on your house, it’s important to have multiple layers of security so that no one accesses your home without your knowledge.

There are a number of different techniques that you can use to keep your home safe while you’re away, including having neighbors watch your house while you’re away, installing a doorbell camera, adding automated lighting, locking up and hiding valuables, turning on electronic security, and don’t forget the basics.

Explore further:

How Can You Make Your Living Room Feel Cozy

0
Make Your Living Room Feels Cozy

The living room is an essential part of your house. This space is where the magic happens – where you spend your lazy days and feel the most comfortable, where you entertain guests during the holidays, and even where you get to hang around with your family. Naturally, you’ll want to make it look as good as possible.

For example, you could layer your pillows and blankets or improve temperature control to make your room cozier. Making improvements in your living room will help you create a more inviting environment for you and your family. Here are other ways to achieve a cozy living area.

Add an Air Conditioning Unit

Add an Air Conditioning Unit in living room

You would never feel pleasant and cozy if you sweat too much on your plush couch. Likewise, you won’t achieve your “lazy day” if you’re having a hard time in the heat and guests wouldn’t want to stay longer. Thus, it would help to prioritize temperature control with an air conditioner to rest easily in your space.

Moreover, you won’t have to worry when the weather gets too humid and hot since you’ll always have your trusty air conditioner to keep you comfortable. To keep your living room comfortable, you can opt to hire an air conditioner installation service for better indoor cooling and experience. 

Invest in Large Art Pieces

Invest in Large Art Pieces for living room feel cozy

You could always get a large art piece if you want a surefire way to entice your guests as soon as they walk through the door. Such a piece could be a painting, sculpture, or even furniture! No matter your pick, adding an accent piece will be the main attraction in your living room.

If your piece revolves around a specific color palette, you could add rugs, furniture, curtains, and pillows to match it. You could even add furniture that goes with the overall vibe of the art piece. For example, you could add bright summer colors for a summer-themed living room. 

Likewise, an oversized art piece sparks conversation whenever guests come in. They’ll always have questions about why you chose that specific art piece. With this in mind, you can add a piece that describes and shows your aesthetic side.

Use Decorative Molding

Make Your Living Room Feel Cozyby Use Decorative Molding

Decorative moldings give you a cheap way to make your space feel brand new. Covering the joints where the ceiling meets the walls allows you to create structural continuity in your walls and bring your whole living room together. You can even choose between multiple trims, depending on the style and tone of your living room.

In addition, decorative moldings are popular not only because of their decorative element but also because they’re practical. You could choose your molding depending on its purpose, which could be by protecting surfaces, covering walls to hang art pieces, or sealing frames to prevent window drafts. Overall, molding gives your living room an elegant finish and a touch of practicability.

Install Controllable Lighting

Install Controllable Lighting and Make Your Living Room Feel Cozy

Controllable lighting is a system that allows you to regulate light levels in any space in your house, saving you money and energy to reduce light levels when full lighting isn’t necessary. Moreover, this intelligent system includes touchscreens, relays, and fire alarms.

Installing controllable lighting is another way to make your living room feel cozy. By doing so, you get various lighting based on your mood and preference. You could always get dim lighting if you want to add depth to your room and if you’re looking to make it cozier. You could even get bright lighting while reading or working in your living room.

Dim lights make your room look cozy. You can also place DIY candles in your living room to make it feel more relaxing. Playing with your lighting brings a new luxurious vibe to your living room. 

On the other hand, a 2022 study found that bright lights can impact cognition and mood in varying age groups, especially older adults. 

Change Your Room’s Layout

Make Your Living Room Feel Cozy by Change Your Room's Layout

Lastly, if you want a change in your living room but don’t want to spend on anything, you could change your furniture’s layout. Doing so allows you to see your room and fixtures in a different light and create an elegant sense of space. You could even add decorative items or indoor plants to give your room a refreshing feel.

Additionally, changing your layout could be the best time to get rid of things you no longer need and dispose of them or sell them through a yard sale. You could even remove any decorative pieces that no longer fit the theme that you want to achieve. 

Final Thoughts

By adding in an air conditioning unit, one statement piece, or even altering your room placement, you could easily make your living room feel luxurious. Moreover, you should never overlook your comfort and ease in doing so. Thus, don’t forget to prioritize your comfort when you spice up your living room!

Explore More:-

Five Stylish Ways to Decorate Your Bathroom in 2025

0
decorate Your Bathroom

Should you have more people living in your home, or simply want a private place to use the facilities and get clean in peace, then you might have considered adding an en suite to your bathroom. This bathroom would be for your use only, attached to your room itself.

Whether you plan on building an entirely new room to serve this purpose or making adjustments to the size and space of your existing bedroom to fit one in, you might want to consider how to best decorate and make use of this space. Here are some great ways to decorate your bathroom.

Luxury Furnishings

Luxury Furnishings when decorate your bathroom

Some of the main features found in your en suite may be the bath, shower, basin, and toilet. Rather than opting for standard furnishings, you may instead want to head to to choose from some more luxurious options. This could include having a statement piece, such as a marble freestanding bathtub, to allow you to really relax and get clean in style.

You may also find that you can match pieces to each other, meaning that the room looks like it has been designed around the furnishings. When choosing, you may want to consider which materials and color patterns really pique your interest.

Decorating the Walls

decorate wall of  your bathroom

It can be difficult to choose between paint or bathroom tiles. You might have initially considered tiling only around the bath or shower to protect the walls from dampness.

While the use of paint can make it easier to change your color schemes at a later date, there is a potential that it could make the space cramped. In addition to this, there may still be the chance of water coming into contact with this surface, leaving unsightly marks.

Alternatively, you may want to think about the benefits of a fully tiled bathroom. This may not only make cleaning that much easier but also create the illusion of more space by giving additional surfaces for light to reflect off. Hanging mirrors, or using mirrored tiles, in places can also greatly assist with this.

Increasing the Amount of Natural Light

Increasing the Amount of Natural Light in bathroom

It might seem obvious to have a window in the bathroom, but the way you go about this may vary when compared to the rest of your home. A window in this room may exist not only to provide more light but also as a means of allowing steam to escape. Due to this, you may be interested in having a skylight installed in the bathroom.

This could negate the need for a ceiling fan, allowing you to gain more peace and relaxation in the room. In turn, that could cut down your electric bill. You may also find that it assists with keeping mold at bay, something which can be rather important in a room prone to lots of moisture in the air.

Add Some Plants

Add Some Plants to decorate your bathroom

Who doesn’t love a spot of greenery? Bringing plants into your en suite bathroom can really liven up your space and make it somewhere you enjoy spending time. However, not all plants will survive in your new bathroom, so make sure you choose ones that like humid environments.

Some plants may not even need watering and will soak up the moisture from the air – perfect for homeowners that don’t have much of a green thumb. Alternatively, if you know you won’t be able to keep your plants alive or are often away on business, consider adding some hanging plants to the bathroom.

This can still help the space to feel more natural without the added stress of watering and maintenance.

Upgrade Your Towels

Upgrade Your Towels while decorate your bathroom

If you’re going to all the trouble of installing an en suite, you might as well treat yourself to some luxurious towels, especially if yours have seen better days. Over time, towels won’t be as absorbent as they once were and they may even develop a musty smell that you just can’t get rid of in the washing machine.

Not only is this unpleasant for you and your family, but your guests probably won’t feel as comfortable as they could in your home. Egyptian cotton towels are some of the best towels around and will look amazing hung up in your en suite. Alternatively, you could stack your towels on a small shelving unit or even roll them up in a basket.

Conclusion

Building an en suite bathroom for your bedroom can make your home feel that much more luxurious. When doing so, you may want to think about how you decorate and use the space, to ensure that any choices you make are right for your needs.

Explore More

30 Best Colors That Go with Purple in 2025

0
Best Colors That Go with Purple

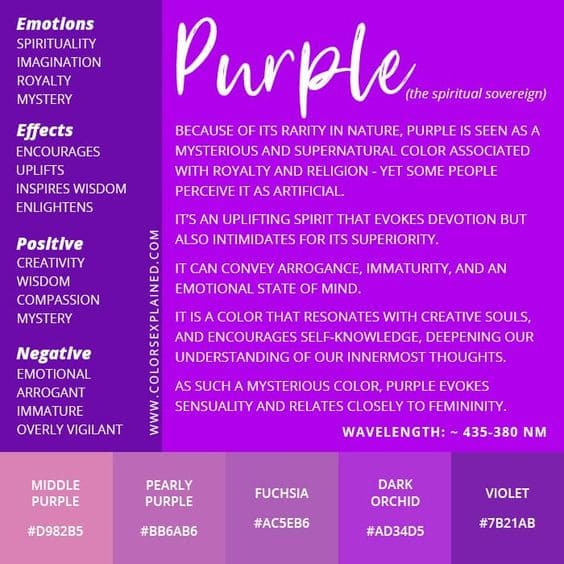
Purple is a color of luxury and royalty. Being a perplexing color it brings calmness and creativity as well. Both of its shades, warm and cool, are versatile enough to match various vibes – moody, modern, joyful, grand, earthy, etc.

When it comes to home decor, some find it intimidating to find colors that match purple. But in reality, there are a lot of options available to blend with a purple interior.

So, read along to learn all about purple and the colors that go with it.

Understand The Meaning And History Of Colors Purple

colors that go with purple

Before going into what colors go with purple, let’s understand its history. Pure purple is a secondary color produced when red and blue are mixed in equal proportions. It is not as common in nature as blue and green, but it appears in flowers and rocks. Warm purple has more red pigment, while cool purple has more blue pigment in it.

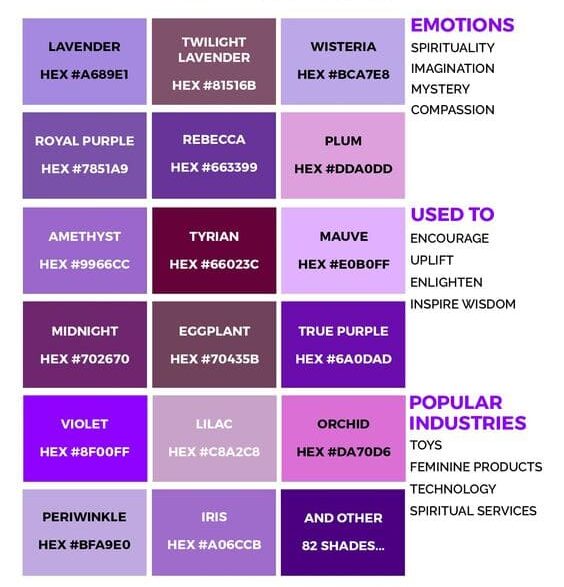
Purple has been classified as the color of spirituality and regal, because the purple pigment was scarce in earlier days, and thus expensive to mix.

What Is The Psychology of Colour Purple?

colors that go with purple

While purple is made using the color theory of the color wheel, they also have their color code for each hue and shade. And thus, each purple color tells its own story. But a true purple is a bright shade of purple that is neither cool nor warm in tone.

Purple creates a positive aura of calmness, security, and royalty. It is believed to bring confidence and good luck as well.

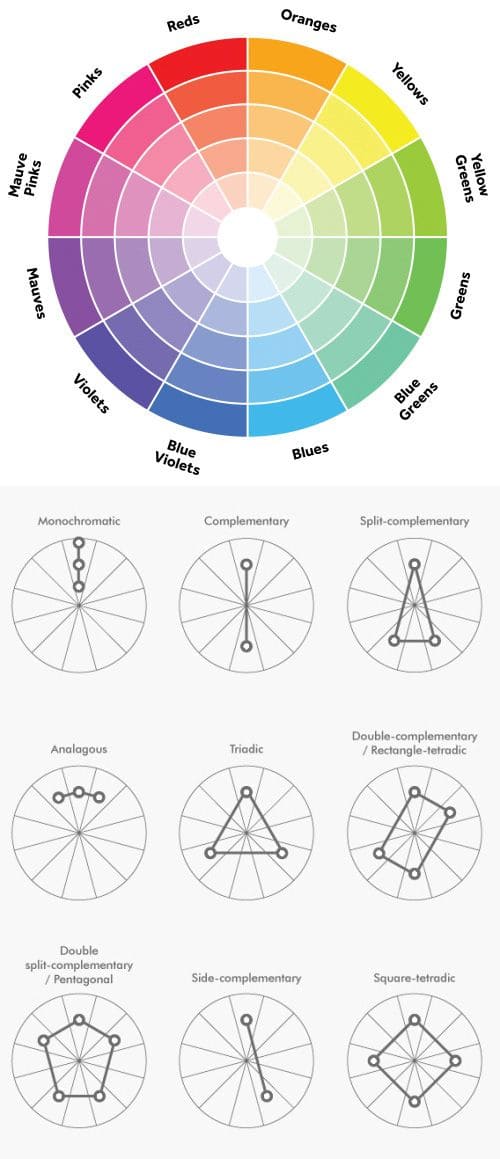
What Colors Go With Purple On Color Wheel?

colors that go with purple

1. Complementary Colors of Purple

The colors lying on the opposite side of the color wheel are the complementary colors. They contrast with each other, thus producing a visual balance. The complementing colors for purple are green and yellow.

2. Split Complementary Colors of Purple

The colors that sit beside the complementary colors are the split complementary colors. We know orange and green sit next to yellow, and yellow is the complementary color of purple, so orange and green becomes split complementary color with purple.

3. Analogous Colors of Purple

The colors that sit beside each other are the analogous colors, responsible for creating visual harmony. Analogous colors that match with purple are blue and pink.

4. Triadic Colors for Purple

When a triangle is formed on the color wheel, it creates a triadic color. They create a dynamic and eclectic ensemble in the interior. Green, purple, and orange are the triadic colors that go with purple. A beautiful color palette is also formed when four colors make a rectangle on the color wheel.

5. Monochromatic Color Scheme for Purple

In case you don’t know, monochromatic colors are the hues, tints, and shades of the same color. For purple, lavender, lilac, violet, periwinkle, etc. They create chic and luxe home decor.

6. Neutral Colors and Purple

While talking about purple, don’t forget black, white, brown, grey, and other neutral colors that are complementary color to purple.

Top 30 Colors That Go With Purple 

Now it’s the time to know what colors match purple, read along to get 30 colors that go with purple –

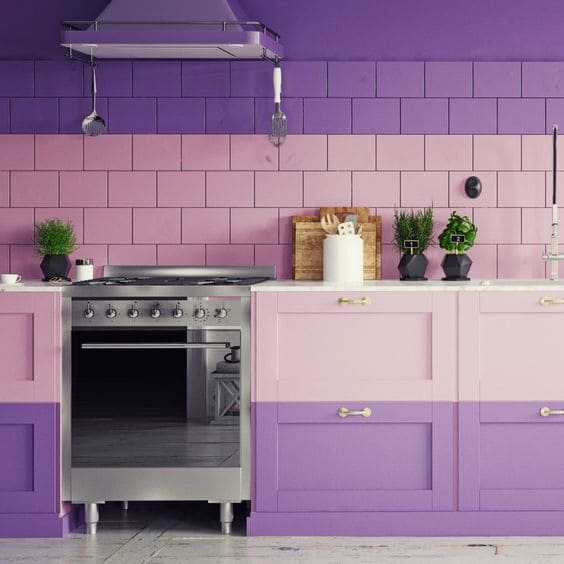
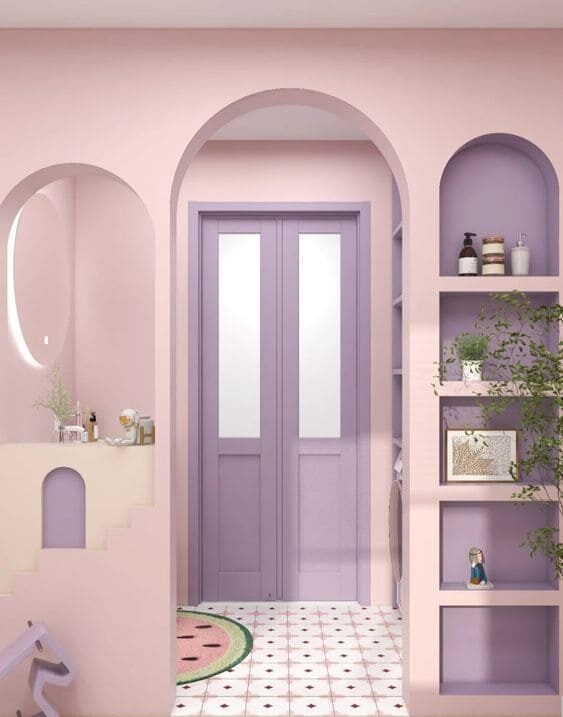
1. Pastel Pink with Light Purple

Pastel Pink with Light Purple

If you are worrying about what color matches purple, then think of light purple and pastel pink to create a divine combination in the space. Pink spreads a feminine aura and purple is the charm. Use this combination to make the space look soft and moody. They are better suited for private spaces such as bedrooms. Common space can also have this duo for creative and fun flair.

2. Purple with Green

Purple with Green interior color

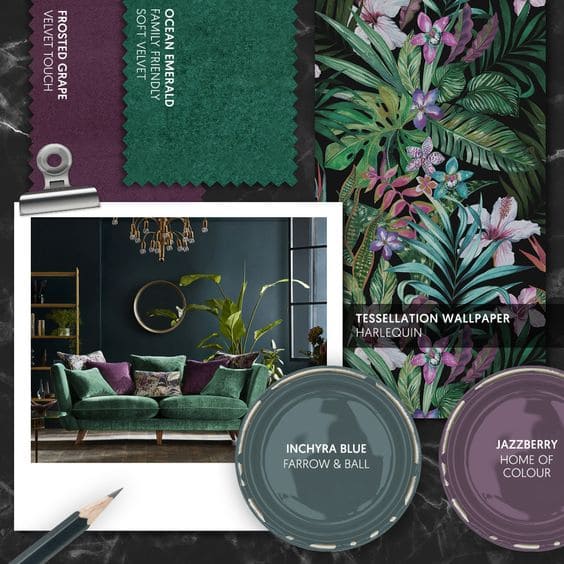
Create a natural appeal with purple and green in your room. This aubergine color palette is both sophisticated and stylish and is even supported by color theory. Being contrasting colors, green and purple develop a perfect harmony. Try dark green and dark purple to rejuvenate your living room.

3. Purple with Orange

Purple with Orange home interior

Try a modern and fun combo for your space with orange and purple. Orange is responsible for adding warmth to your space, while purple is for coolness. Thus, they form a perfect combination for your interior.

4. Cream with Purple

Cream with Purple home interior color

One of the fresh and tranquil palettes for the interior is cream with purple. Cream contrasts to counter the rich tone of purple. They form a popular duo for home decor. When the cream is paired with purple, they create a youthful vibe in your bedroom.

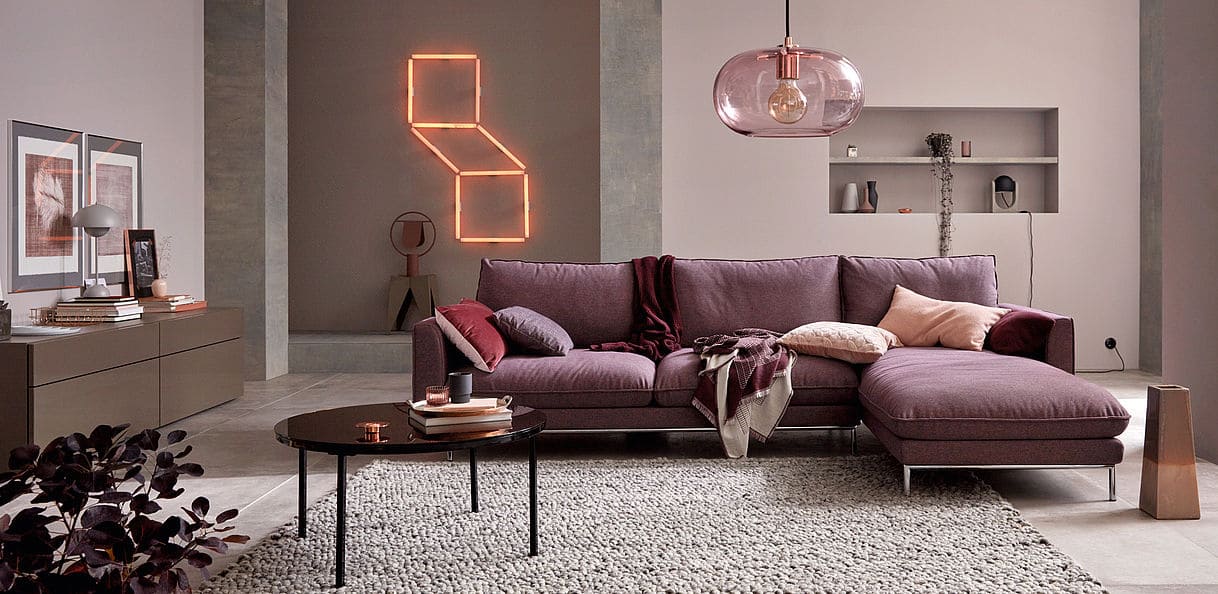
5. Purple with Chocolate Brown

Purple with Chocolate Brown home color

If you want to create a firm grounding color in your room, then go for chocolate brown. You can try having dark brown couches, tables, chairs, and other furniture in the backdrop of a purple wall. This duo creates a non-traditional and elegant look.

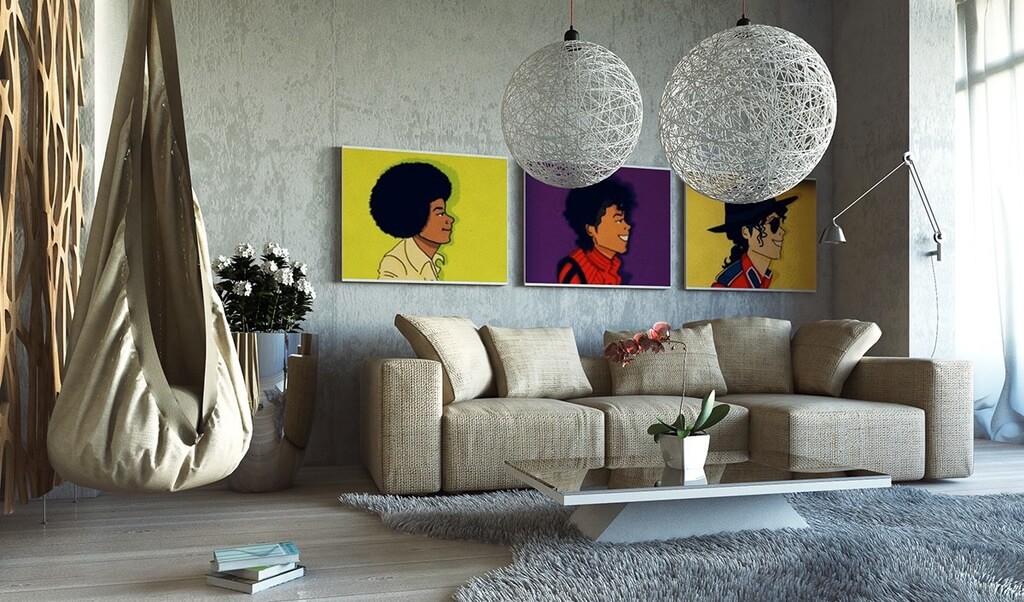
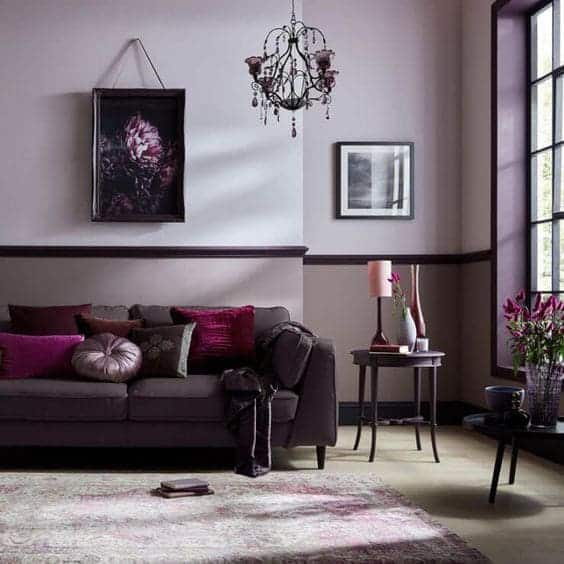
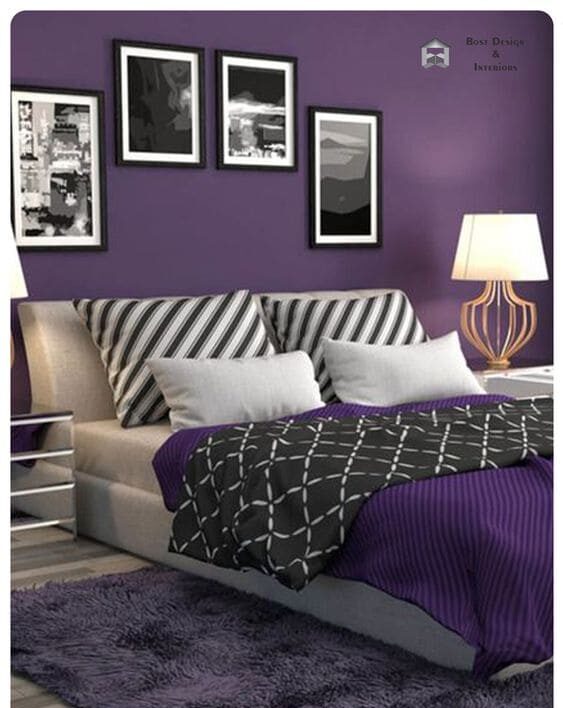
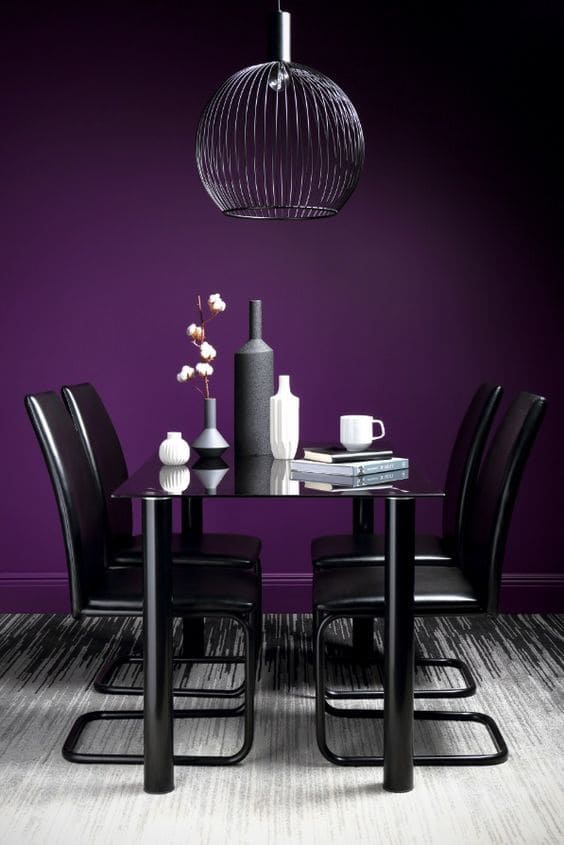
6. Black and White Room with Plum

Black and White Room with Plum Interior

Black and white is an evergreen combo, but blended with purple, especially plum, they create a classic look. The room appears chic, and stunning with purple furniture and, white and black walls. You can get a traditional vibe with a touch of modernity in this combination.

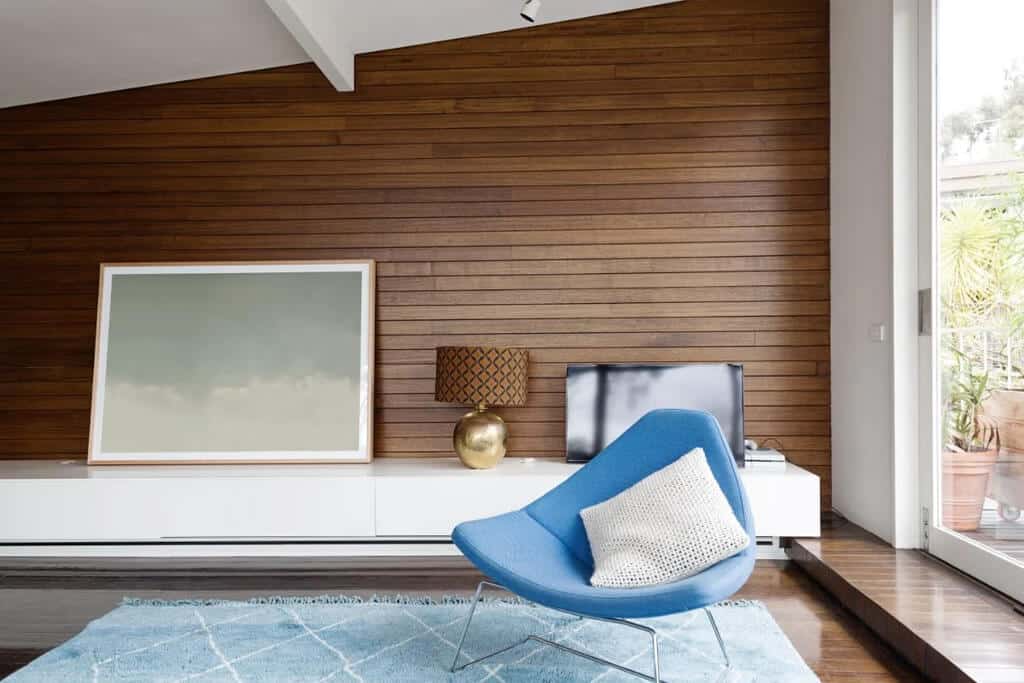
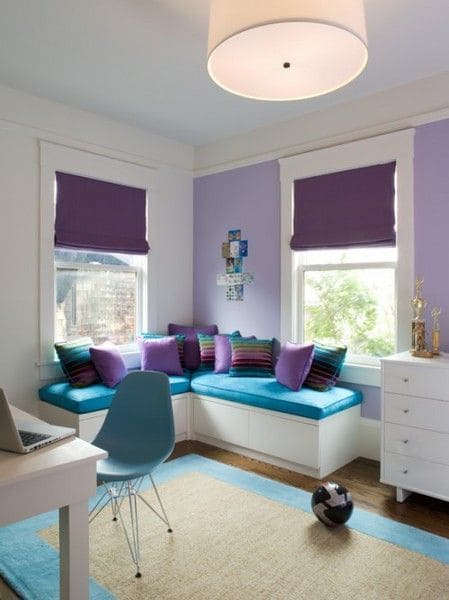
7. Purple with Pastel Blue

Purple with Pastel Blue interior color

Want to have a soothing yet elegant interior? Then try out pastel blue out of the colors that go with purple. Blue will bring calmness and purple will add luxe. This splendid combo is both still and graceful. When pastel purple is mixed with pastel blue they spark up the space with an essence of modern and contemporary vibe.
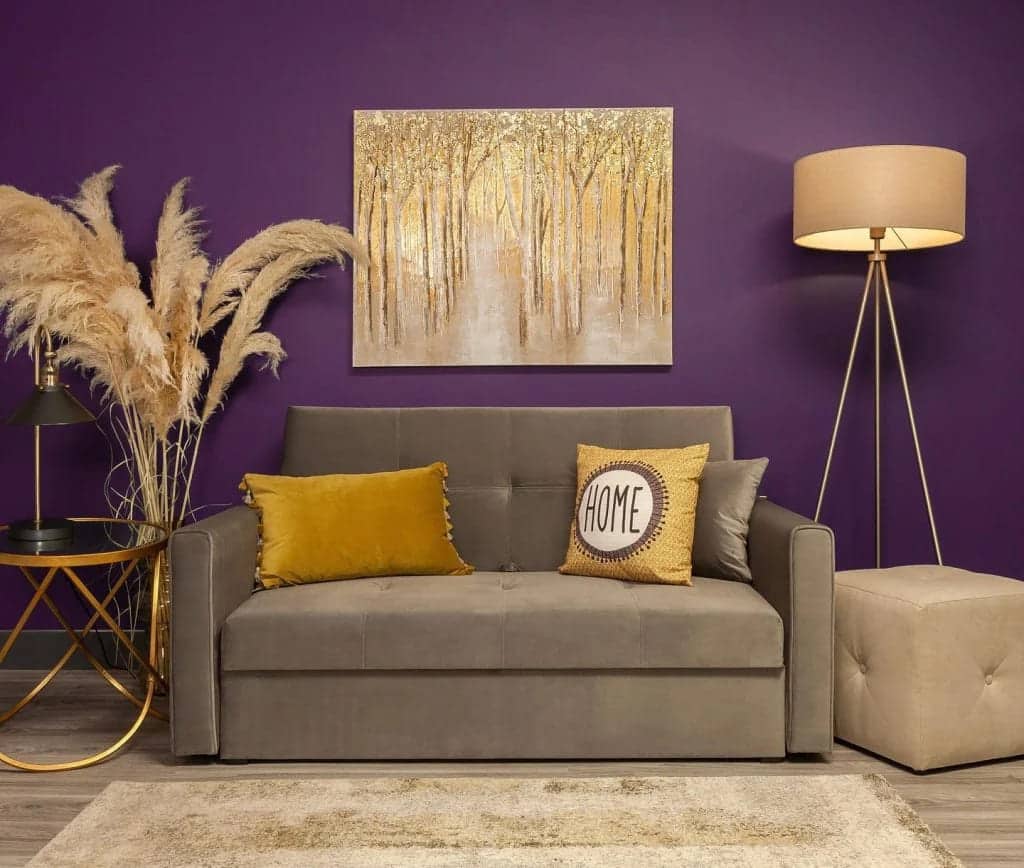
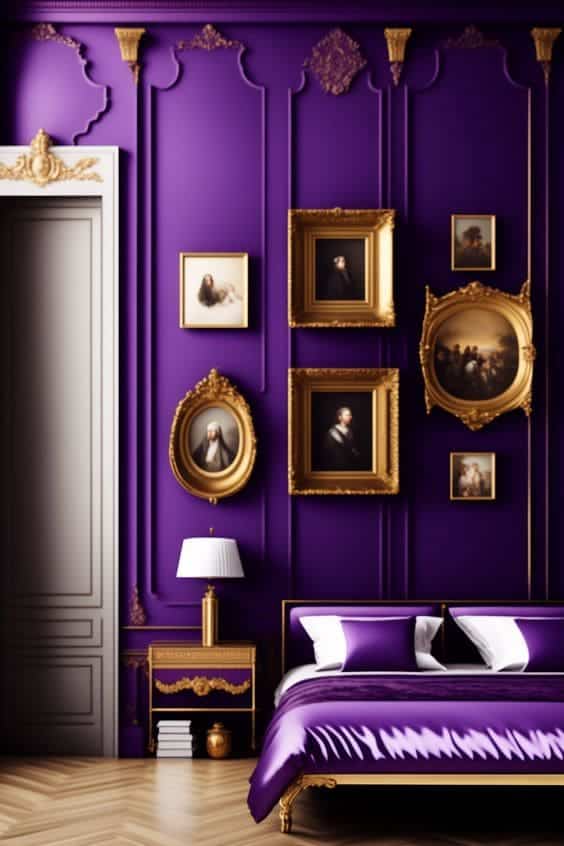
8. Gold with Purple

Gold with Purple bedroom interior

One of the spectacular combinations is gold and purple. It’s the most regal choice you can have in your home. The drama of purple when topped with the charismatic appearance of gold brings vivid effects in a well-balanced manner. It can flare its luxurious aesthetics with sculptural accents and comfortable furniture.

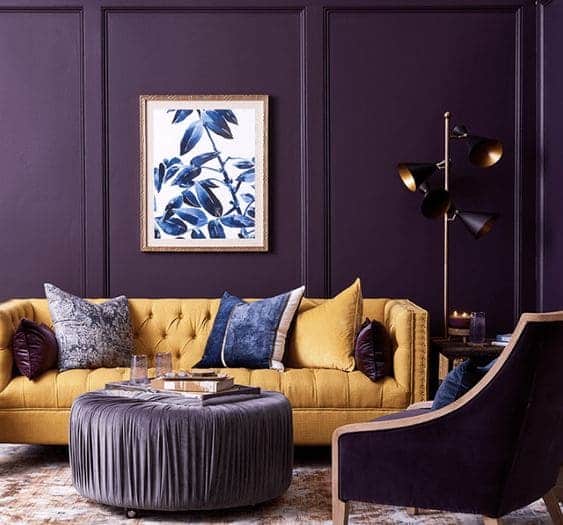
9. Purple with Mustard

Purple with Mustard interior color

Mustard and purple are a winning combination you can have in your room, especially in the wardrobe section. Their balance and royalty are beyond words. And if you add a pinch of reddish purple in this combo, it brings a more warm appeal.

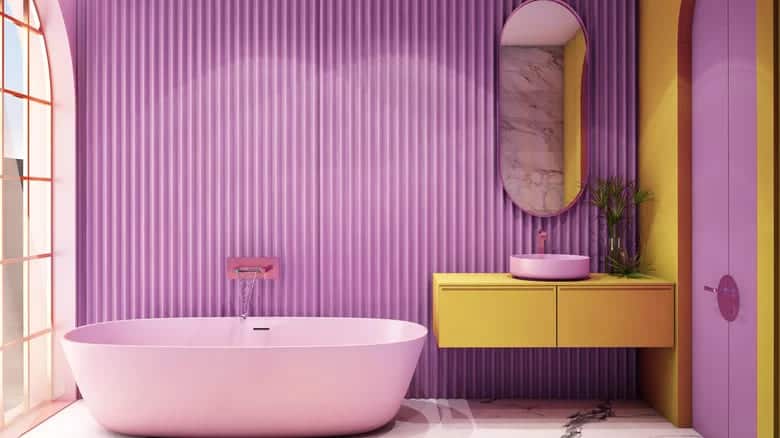
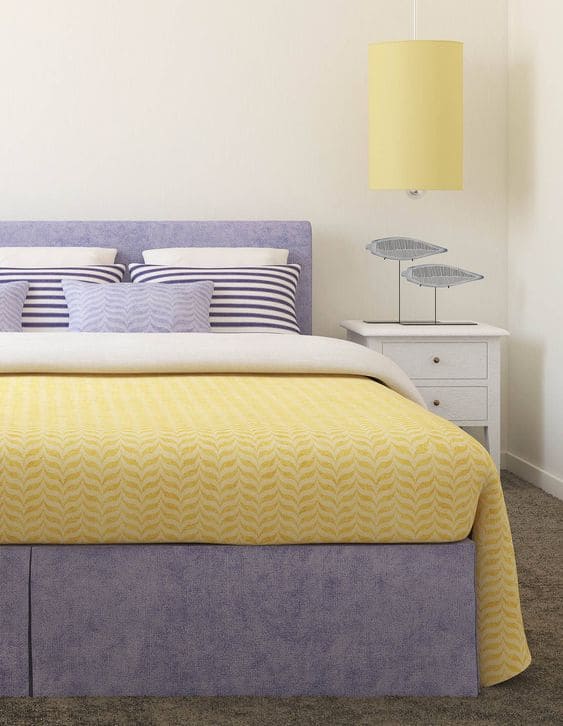
10. Yellow and Purple

Yellow and Purple color interior

The complementary color to purple is yellow, so yellow and purple go well with each other. They can create masterpiece home decor when used in the right shade and tone. Both of them are eye-catchy and rich colors, thus it is better to have a muted or darker tone of them.

11. Beige and Purple

Beige and Purple home interior

Tone down the shade of purple with beige and create a cozy, balanced, and earthy combination for your room. This combo has healing effects. But they also make your room modern, sophisticated, and clean. It is well suited to beige walls with dark purple furniture for bedrooms.

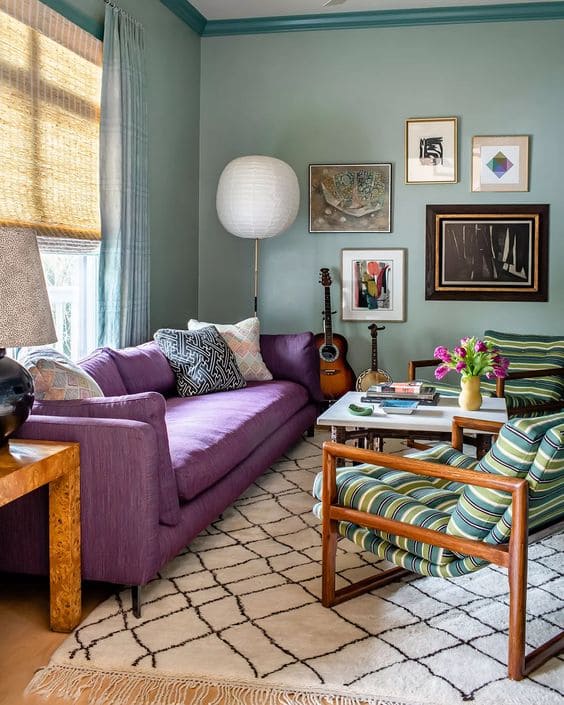
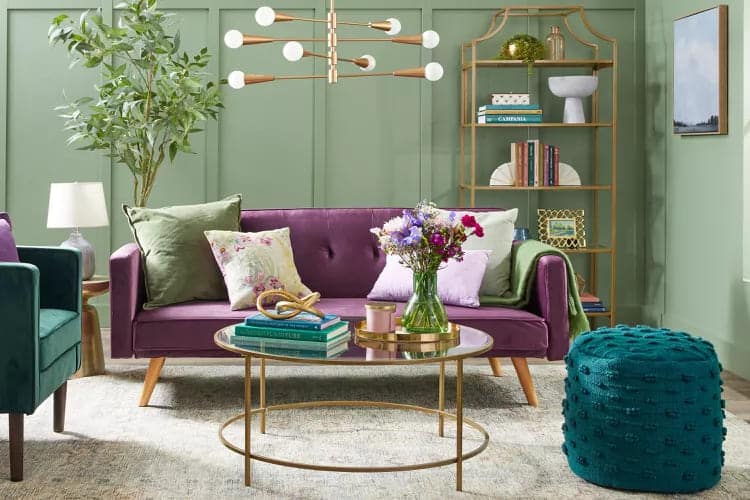
12. Purple with Mint

Purple with Mint interior color

Mint and its shades are the colors that go with purple. The subtle tone of mint complements purple perfectly. Since purple has a brighter shade, mint helps to balance with its neutral touch.

13. Purple with Turquoise

Purple with Turquoise interior color

Purple pops out when combined with turquoise. You can try having the saturated and bold shades of turquoise and purple for a dramatic appeal in your room. Another way is to have a deeper shade of one and a pale shade of the other.

14. Purple with Ash Blue

Purple with Ash Blue home interior

Purple and blue are a great combination. But what if you want both grey and blue to go with purple? Worry not! ash blue and its shades are colors that go with purple. Ash blue is a smoke-hued blue with a neutral tone. Try having a lighter shade of ash blue and a darker shade of purple for a decent appeal.

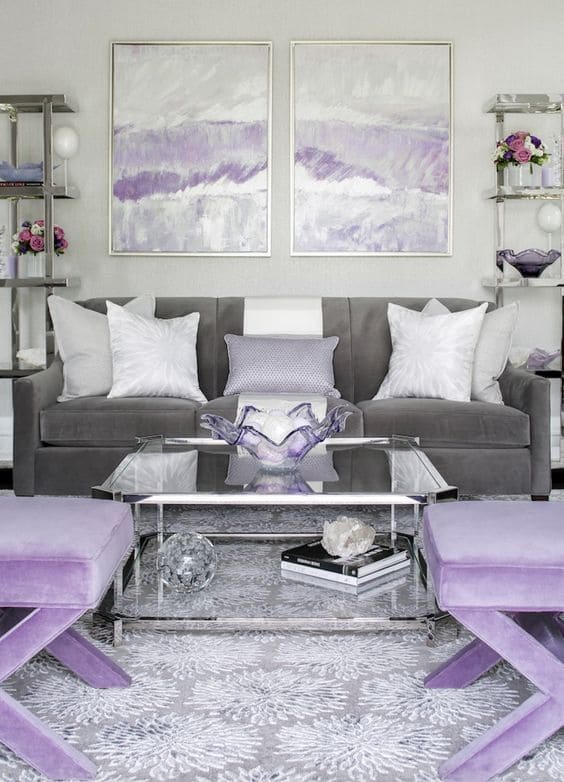
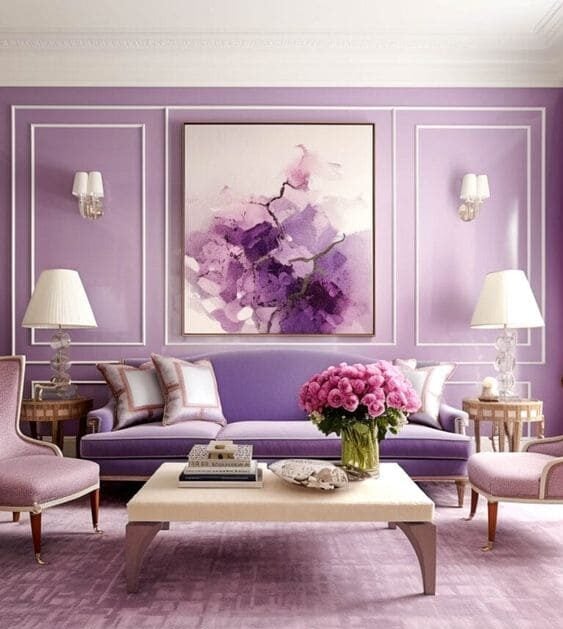
15. Silver with Lavender

Silver with Lavender interior color

When two beauties come together, they create a masterpiece. So is the case with purple and silver. Purple, already a royal color, when topped with the shine of silver, they give a modern and luxurious aura to your home. Use subtle shades of purple like lavender with silver for a calmer and divine space.

16. Purple, Green, and Rust

Purple, Green, and Rust home interior

Purple itself is enough to bring a bold statement into the room. But for an added charm, you can have a rust-hued grass-cloth wallpaper with an emerald sofa. Emerald green will add elegance while grass-cloth wallpaper will create an intriguing texture.

17. Champagne with Purple

Champagne with Purple home color

One of the striking colors that match purple is champagne. It is a classic combo that subtly defines the space. Pastel purple brings romance to the room while champagne brings warmth. Their combination suits well in the bedroom.

18. Sage and Purple

Sage and Purple interior color

Add fun to your room with the quirky shade of sage with purple. Sage goes well with darker shades of purple. This combo gives a soothing appeal throughout the space. Have more sage and little purple for a natural and neutral tone in the room.

19. Mauve and Purple

Mauve and Purple home color

Another color that mingles with purple is mauve. While creating moodiness, mauve also energizes the space. Aubergine and other darker shades of purple fuse well with mauve. When you have a dark purple wall with a black border, a touch of mauve will act as a classic finish.

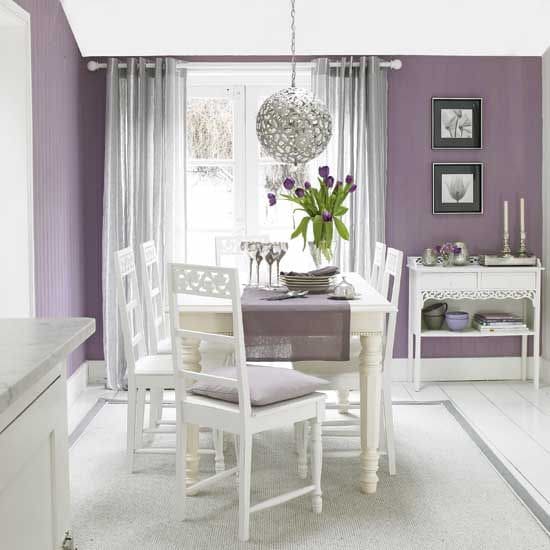
20. Warm White with Purple

Warm White with Purple interior color

While there are several options available to blend with purple, white tops the list. White adds warmth to the coolness of purple, thus balancing each other. It is a versatile combination to experiment with and have in your home.

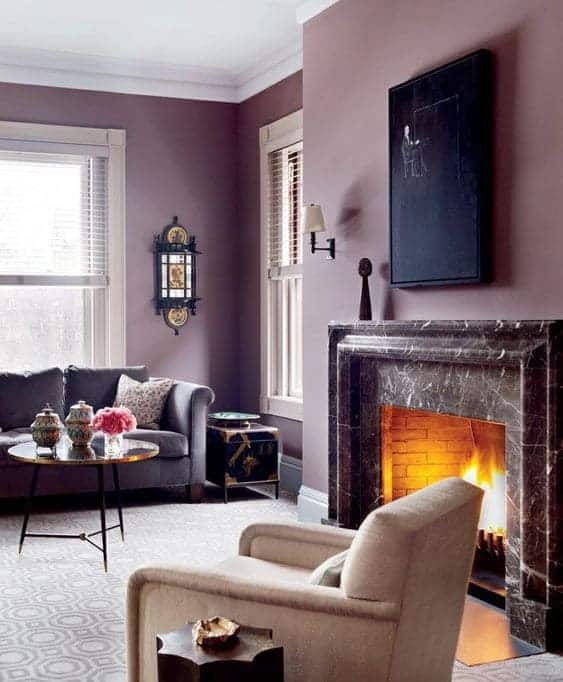
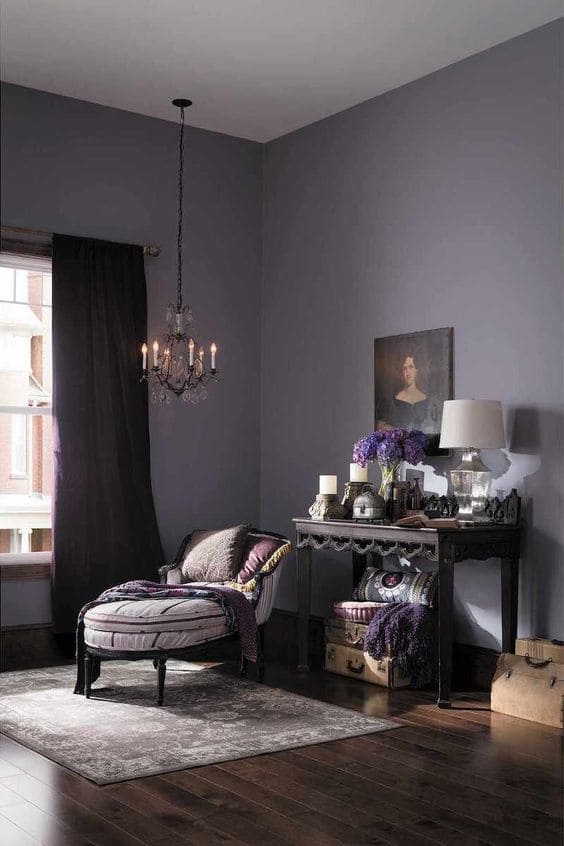
21. Charcoal with Purple

Charcoal with Purple home interior

One of the staples of interior decor is charcoal gray. Charcoal is a neutral, deep, and rich color that adds a divine personality to purple. The amalgam of purple and charcoal brings calmness, coolness, and sophistication to the room.

22. Purple with Light Wood Tones

Purple with Light Wood Tones home color

The dynamic yet safe choice that can be paired with purple is light wood tones. Use light wood floors to bring balance to the dark purple room. Even if your room doesn’t have a wooden floor, you can use this combination in walls, columns, beams, and furniture.

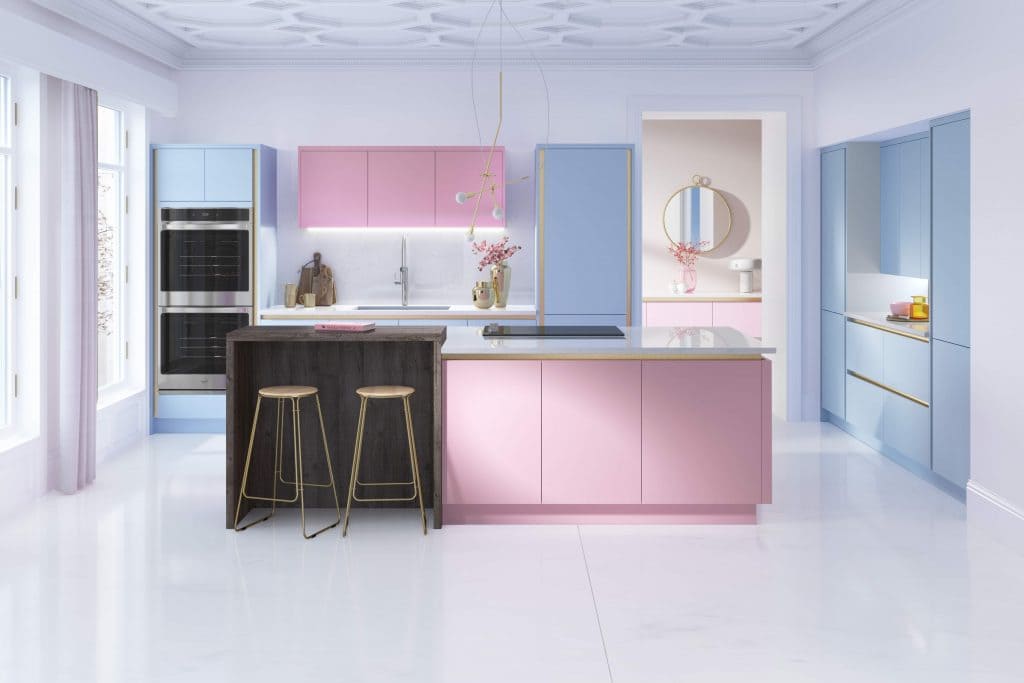
23. Lilac, Navy, and Dark Grey

Lilac, Navy, and Dark Grey interior color

If you want a dynamic, classic, and royal look in your home, then try pairing lilac, dark grey, and navy. For kitchen decor, you can have pale lavender walls, and dark grey cabinetry, with a kitchen island in navy shade.

24. Black with Eggplant

Black with Eggplant home interior

Black itself is a classic color, and when paired with purple, creates even more beautiful results. Create a charming result with a lavender and bold plum wall, black carpet, and black walnut bed with purple lining.

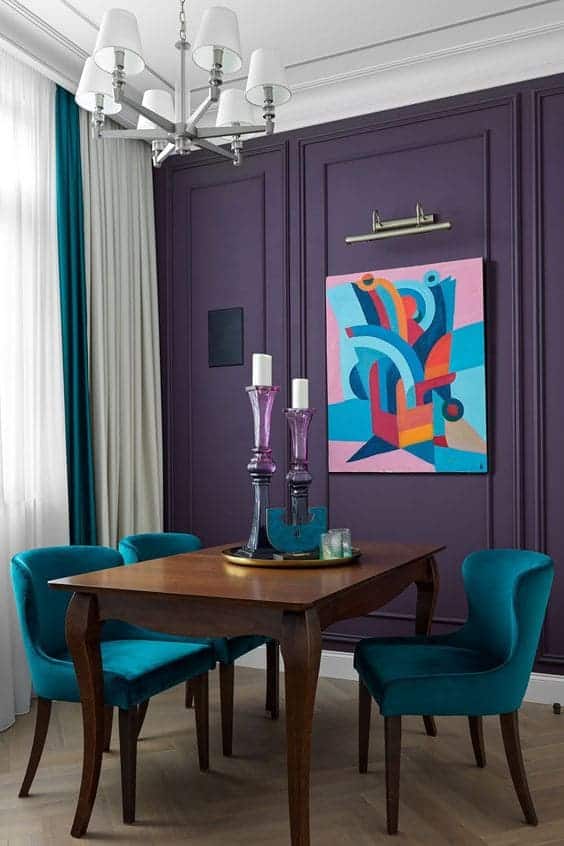
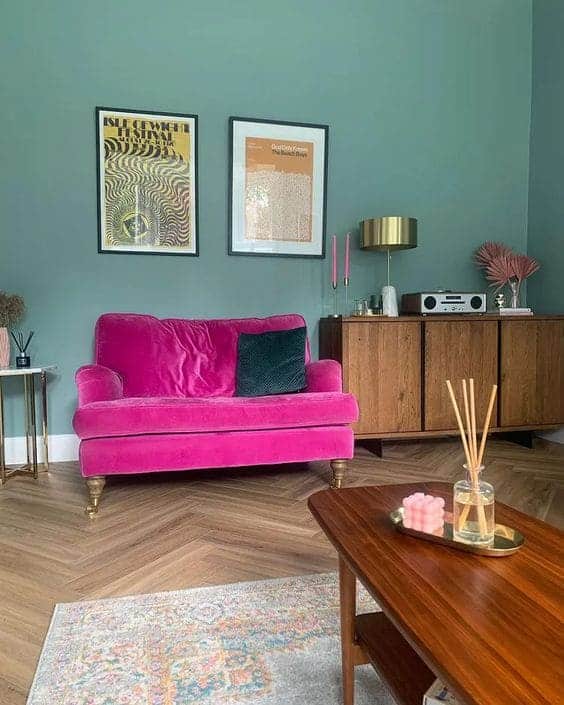
25. Teal with Purple

Teal with Purple interior color

This combination was famous during the ’90s. But even today teal & purple steal deal of home decor. You can have a teal wall with a purple-colored patterned wall hanging. An accent rug can also help add flair to this combination.

26. Purple with Taupe

Purple with Taupe home interior

Getting popular in recent days, taupe is an elegant yet neutral color. The gray-brown shade of taupe goes well with purple, especially for wooden areas. Use white or any other neutral colors with them to prevent the room from becoming too dark.

27. Forest Green and Purple

Forest Green and Purple home interior

Bring nature to your room with forest green and purple. They create a delightful aesthetic with utter calmness and soberness. If you want some drama, then go for dark purple furniture with green accents.

28. French Blue with Purple

French Blue with Purple home interior

Aubergine and other darker shades of purple also do great with muted and creamy French blue. While French blue creates a soft, calm, and moody space, the purple shades bring energy, thus complementing each other. They are also responsible for creating a youthful yet mature ambiance in the room.

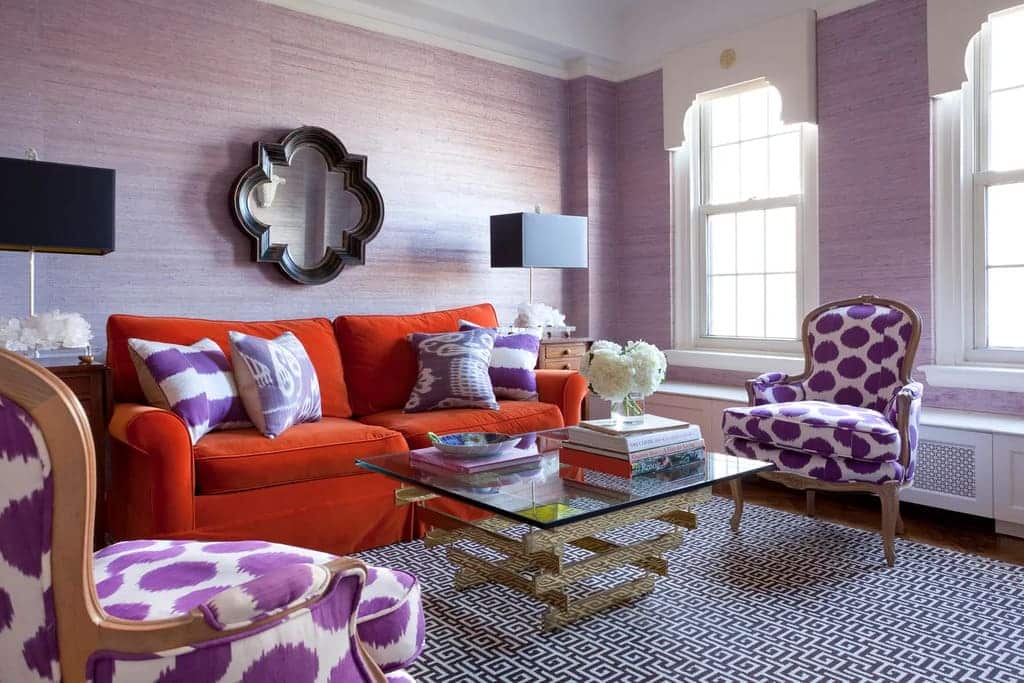
29. Purple with Tomato Red

Purple with Tomato Red interior color

One of the most astounding combinations is red with purple, but they go beautifully with each other when used in the right shade. They are a powerful combo with vibrance and energy. To get a better feel, have a lighter shade over tomato red.

30. Purple with Tangerine

Purple with Tangerine home interior

The fusion of purple and tangerine is odd but interesting. Tangerines with their shades are the colors that go with purple, but you should be extra careful while combining these two. Although they are contrasting colors, they create a calm vibe in the space and thus work well when sparingly used.

Now It’s Your Time To Add Colors That Go With Purple!

You will find diverse types of colors that go with purple. This article must have given you all the information required to start designing your purple room. Make sure you experiment a lot and use the fullest of this spectacular color, and give your home a soothing, regal, and luxurious appeal.

Subscribe to this page for more informative behoove pieces.

FAQs

Which Colors Don’t Do Well with Purple?

There are several colors that go with purple. But, you should not make the mistake of mixing bright orange and red with purple.

What Does Purple Symbolize in Home Decor?

Purple is a color of creativity, luxury, and royalty. When used in home decor, they bring abundance and spirituality.

Is Purple a Suitable Color for Vastu?

Purple is considered an auspicious color in Vastu. It symbolizes respect, dreams, compassion, the future, inspiration, pride, richness, and graciousness.

How Can Purple Benefit Interiors?

Purple is meant to bring creativity, foster focus, calmness, and self-introspection. It is also a symbol of dignity, wisdom, nobility, and ambition.

Can All Purple Shades Go Together?


Yes, different shades of purple can go together. But you need to be very sure that they are used in proper proportion, else it can go from glam to garish.

Conclusion

The possibilities are endless! When choosing colors to go with purple, the most important thing is to experiment and find a combination that you love. With so many different options to choose from, you’re sure to find the perfect colors to create a purple space that is both stylish and inviting.

Explore Further:-