Home Blog Page 45

15 Best Hidden Gun Concealment Furniture To Buy And Secure Your Weapons

0
Gun Concealment Furniture

We are living in violent times, and we daily hear many kinds of shocking news like robberies. There are many instances where police or government are unable to protect the people from such things. So it is our responsibility to protect ourselves and our family from the unwanted antisocial psychopaths, who are roaming around us like bees. Therefore it is extremely important to place these things in secret gun storage or gun concealment furniture.

When you own a gun or any kind of weapon, then it is your responsibility to store your licensed weapon in a safe place. After all, not everyone can afford a security guard, right? It should not be in the reach of pets and children because little carelessness can put you and your family in trouble.

From far away these concealment furniture pieces look like any regular furniture, but they have special hidden compartments where you can put your valuable things and guns. So, whether you want to hide your guns from kids or from thieves, there is nothing better than a gun concealment furniture.

So whenever there is an emergency, you can access them easily. They provide complete safety because only you know where they are stored. But some of us don’t know much about concealment furniture, so we will first tell you what it is and what are the benefits of concealment furniture at home.

A wooden cabinet with a gun inside of it

What is Gun Concealment Furniture?

It can be any piece of regular furniture but with some additional hidden compartments. It can be a sofa, table, drawer, or even decorative pieces with sliding shelves where you can store firearms safely. 

“In short, it is dual-purpose furniture which can be used as a piece of normal furniture and also for gun storage. You can securely place a weapon inside the easy-to-access chambers, and nobody will reach out to it without your permission and guidance.”

Benefits of Gun Concealment Furniture 

There are many benefits of having a hidden gun storage furniture in your office or home, such as:

1. Quick Access and Safe

They are specially designed to keep a weapon safe, and this type of furniture also ensures ease of access. For example, some furniture comes with a magnetic locking system or RFID locks that provide instant access to the gun. At the same time, they keep it safe and hidden from the public eye.

A couple of shelves that have guns on them

2. Contemporary Look

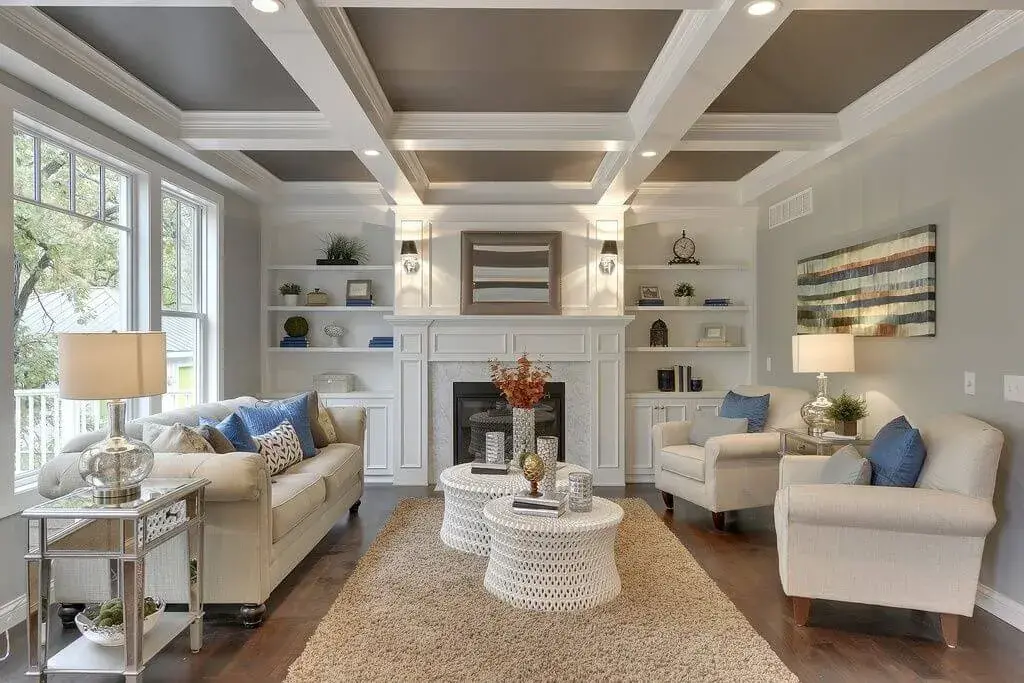
They are designed with the latest trends in minds. From small lamps to the big bookshelves, they come in various shapes, colors, and designs. You can purchase the one according to your home interior so that they’ll go well with the rest of your home furnishings.

3. More Secure than Any Locker 

Anybody can easily recognize a gun safer, but this gun concealing furniture is never noticed by anyone so easily. For example, nobody will ever guess that your working table or a table clock could be where you have hidden the weapon.

Concealment Furniture Types

So it’s time to understand what are the different types of concealment furniture that comes in the market. Here is the list of 9 unique gun concealment furniture.

1. RFID Concealment Shelf

A shelf with two vases and a vase with flowers on it
A kitchen stove top oven sitting on top of a wooden shelf

Normally when anyone sees this, they think that it is a beautiful wall shelf, but they don’t know that it is also a concealment shelf. It is made with solid pine wood and has a vibrant and finished look. It is specially designed with an RFID locking compartment. Inside of this, there is a motion light and foam where you can insert your gun. It’s overall dimensions are 48″×12″×4″ in which you’ll also get an Interior usable space of 41″×9″.

2. Gun Concealment Clock

A wooden clock with a gun inside of it

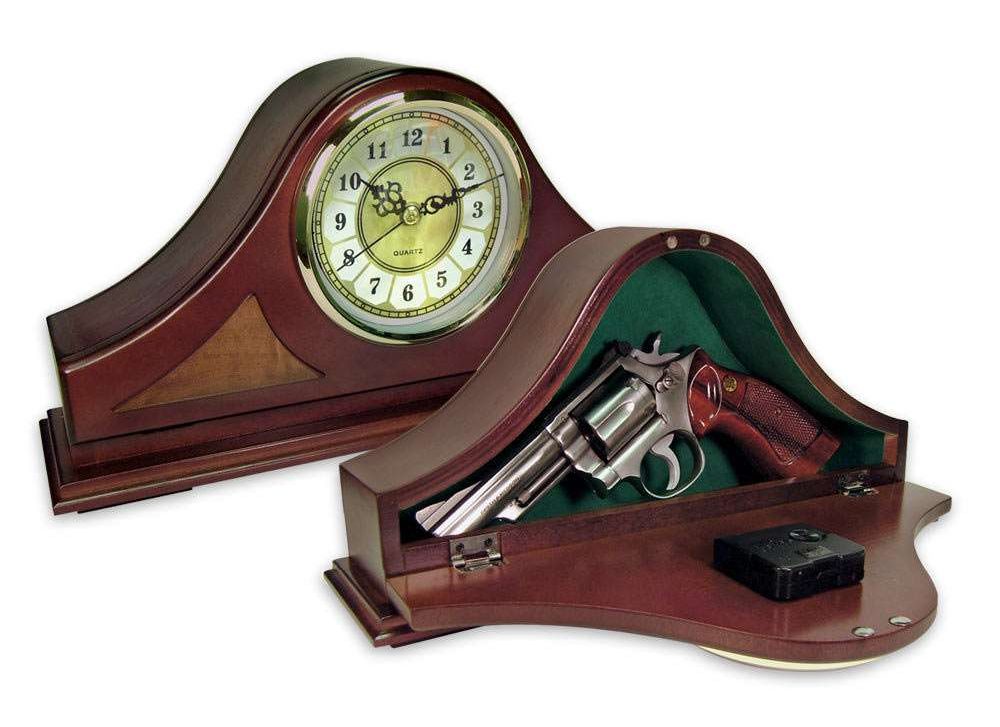
This is a cute clock with a concealment compartment. There is no appliance better than a clock to keep your gun safe. It is made of wood and is both functional and decorative. It has a secret compartment hidden behind the face of the clock, where you can easily conceal a pistol. Also, it has a magnetic clasp lock for easy operation. You can place this clock on the table, nightstand, or almost anywhere. So, if you’re looking for small gun concealment furniture, this is best for you.

3. Coffee Table with Lift Top

A living room with a coffee table and two end tables

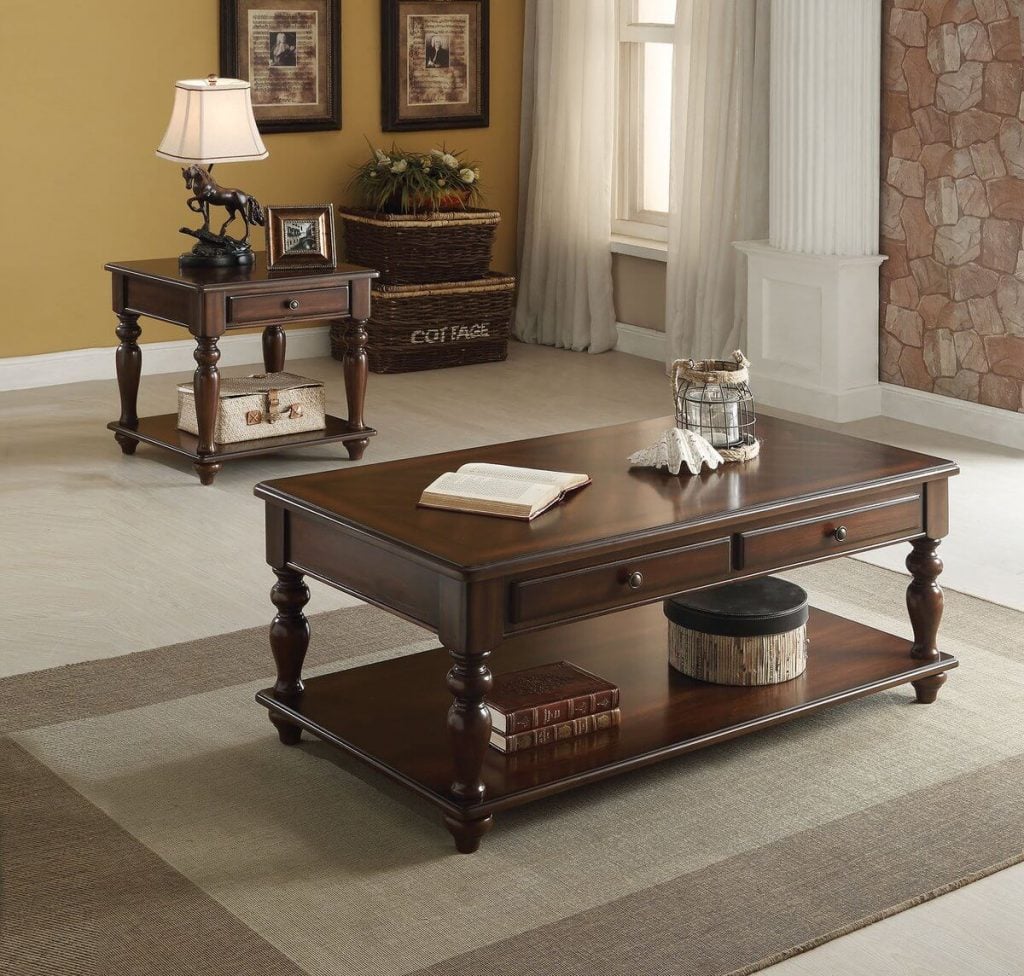
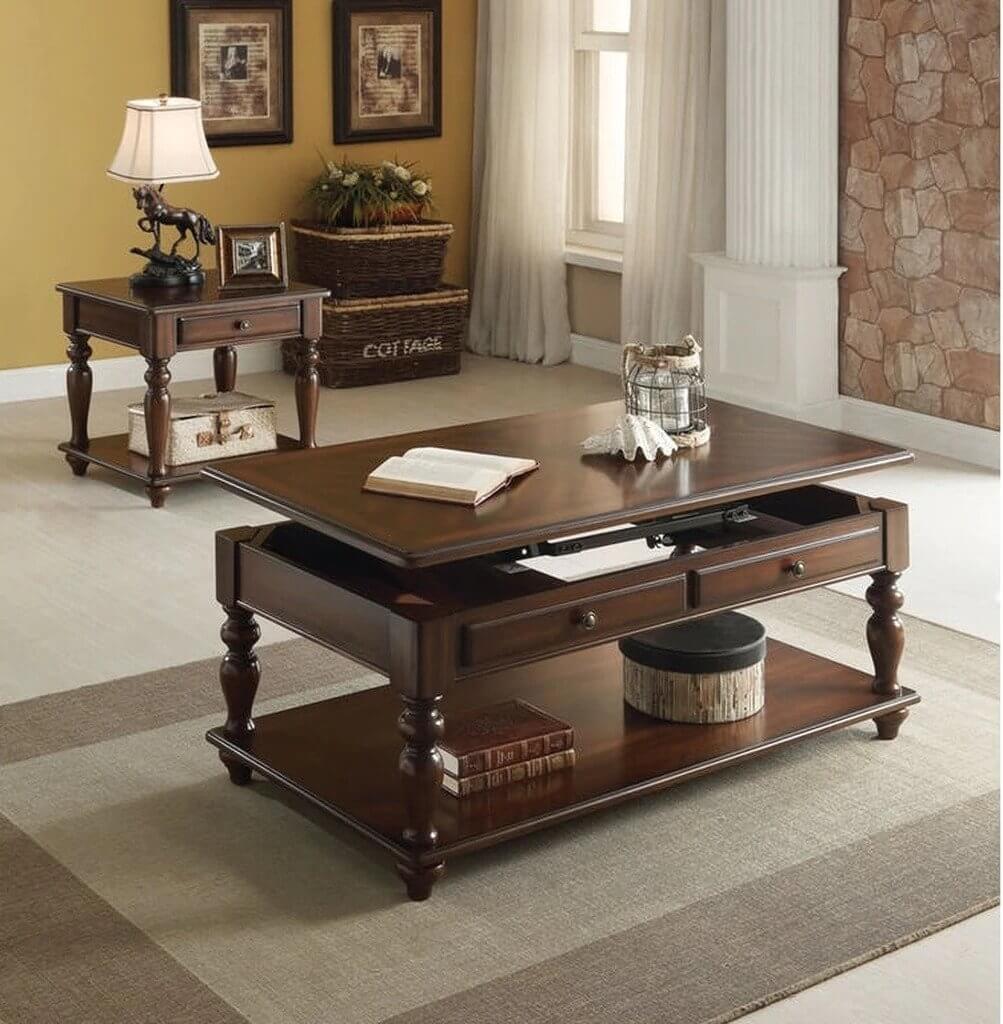
This is a beautiful, walnut rectangular coffee table. Don’t think it is regular furniture; it comes with a Lift-Top with two storage compartments. So you can easily put your safety things and weapons inside of the compartment. The overall dimension of the table is 53.0 x 29.0 x 9.0 inches.

4. Curio Slider Cabinet Combination

A wooden cabinet filled with guns and other items

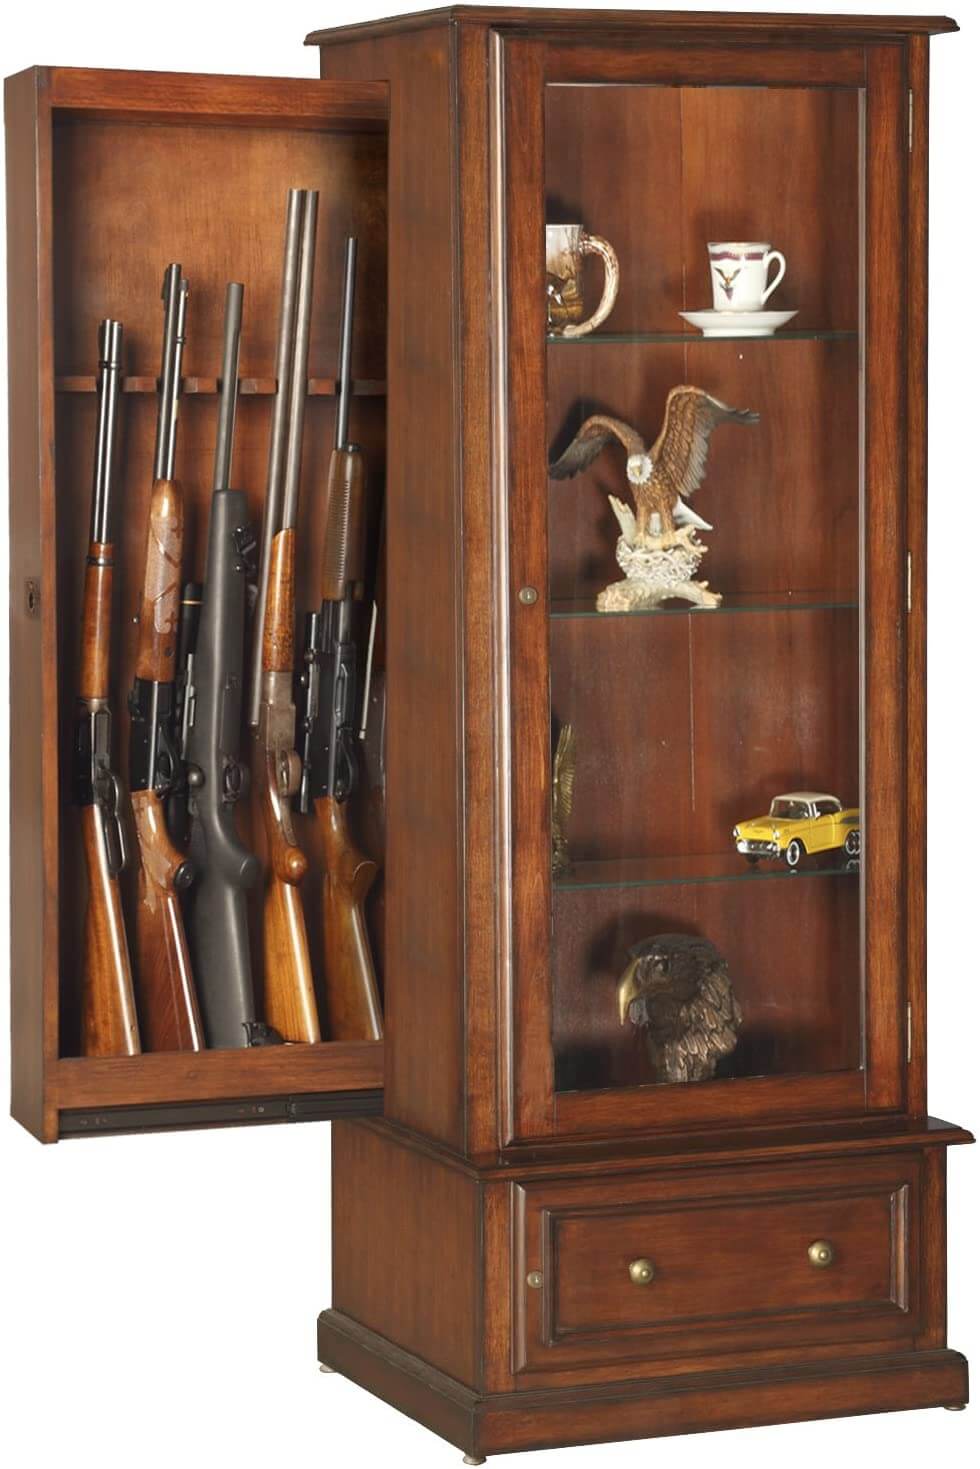
This is something unexpected, right? For others, this is a curio display or just a bookshelf. But for you, it is a gun concealment furniture. It has a lighted curio display area with glass shelves, and behind the tempered glass, there is a sliding cabinet. Where you can put your collection of rifles and shotguns. The dimensions of this furniture are 56.0 x 21.0 x 10.0 inches. It will look great in the dining room or living room.

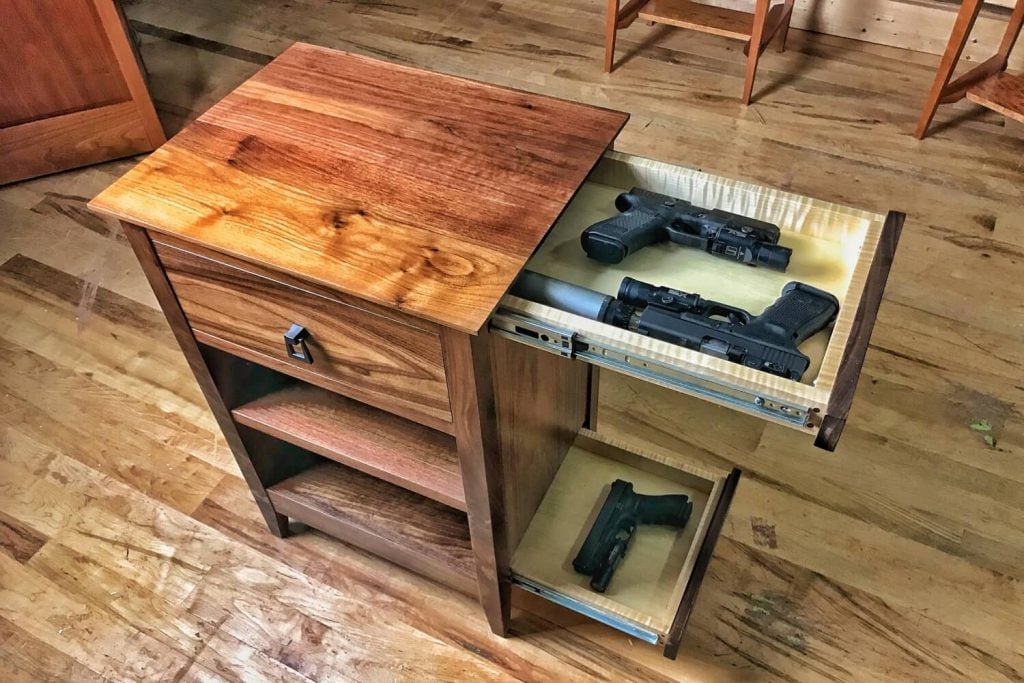
5. Gun Concealment Drawer

A living room with a couch and a coffee table

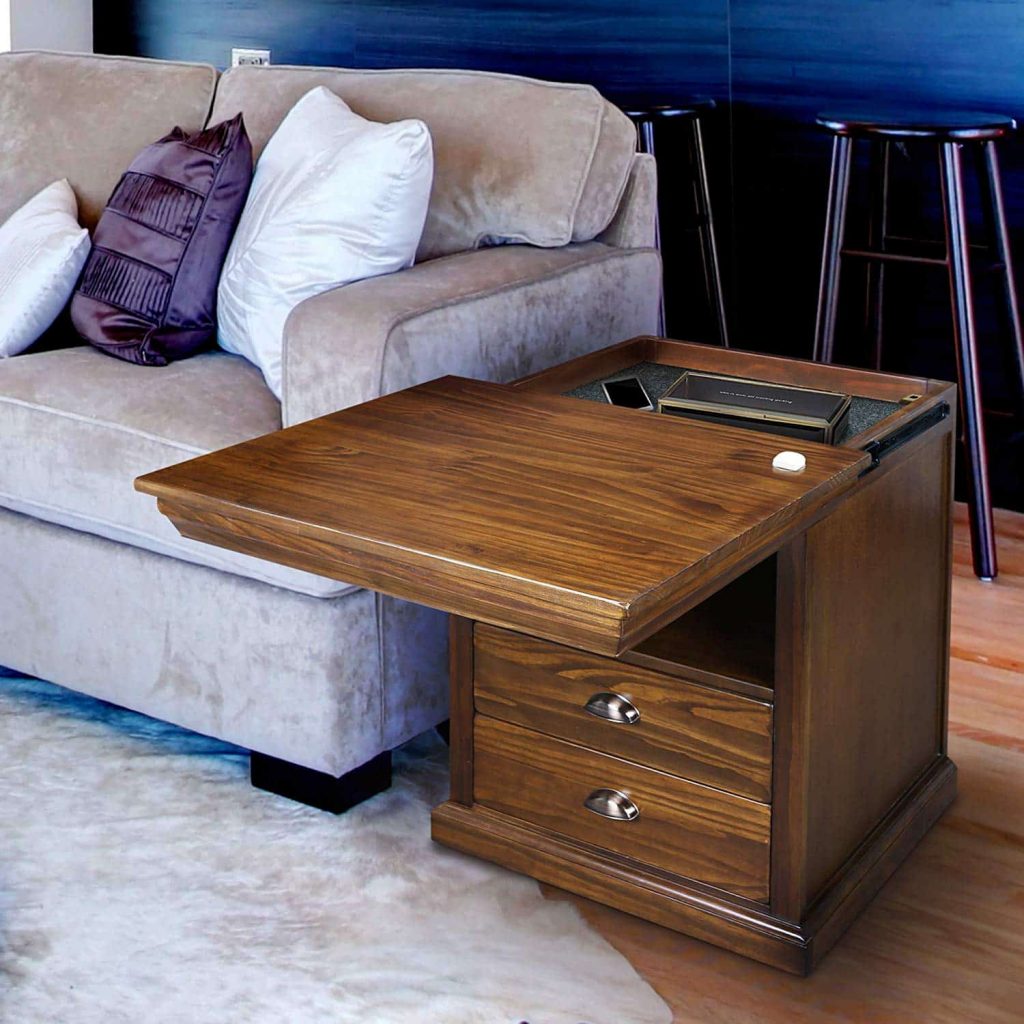
Another great way to keep your gun hidden and safe at the same time is to put them in a drawer like this. You can easily pullout inside of the drawer without the fear of getting noticed. Believe us, this drawer will work like magic for you.

6. Gun Concealment Book

Gun Concealment Book

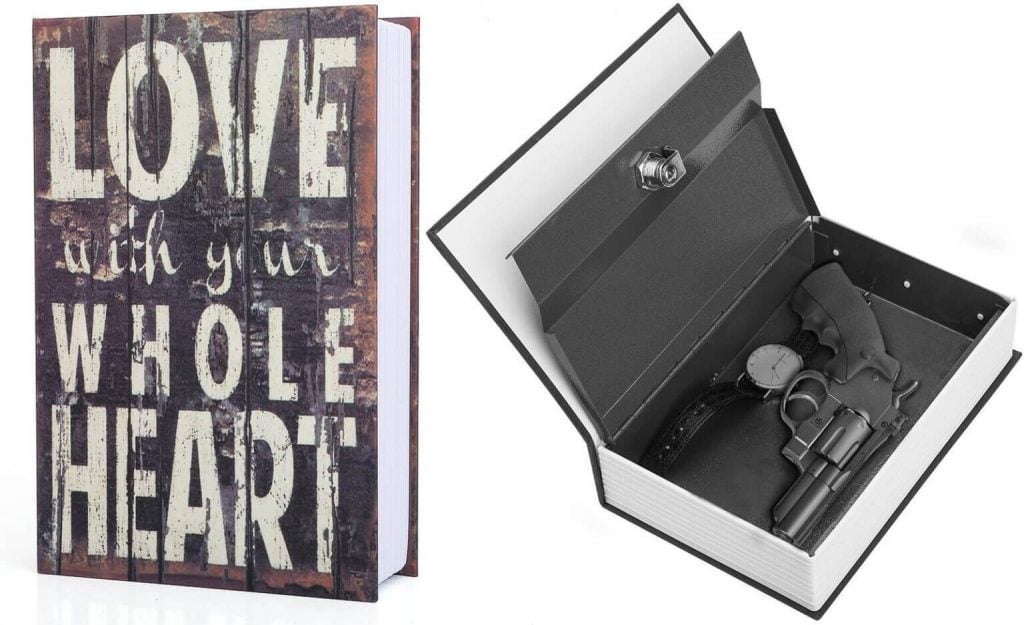
Totally unexpected and surprising for your enemy. Yes, you read it absolutely right. It is a gun concealment book, which can take a bullet for you! It is the best-hidden gun storage furniture in the market. This looks like an ordinary book, but in reality, it is a safety box that can hold a pistol. Isn’t it amazing?

7. Weapon Concealing Coat Rack

Weapon Concealing Coat Rack

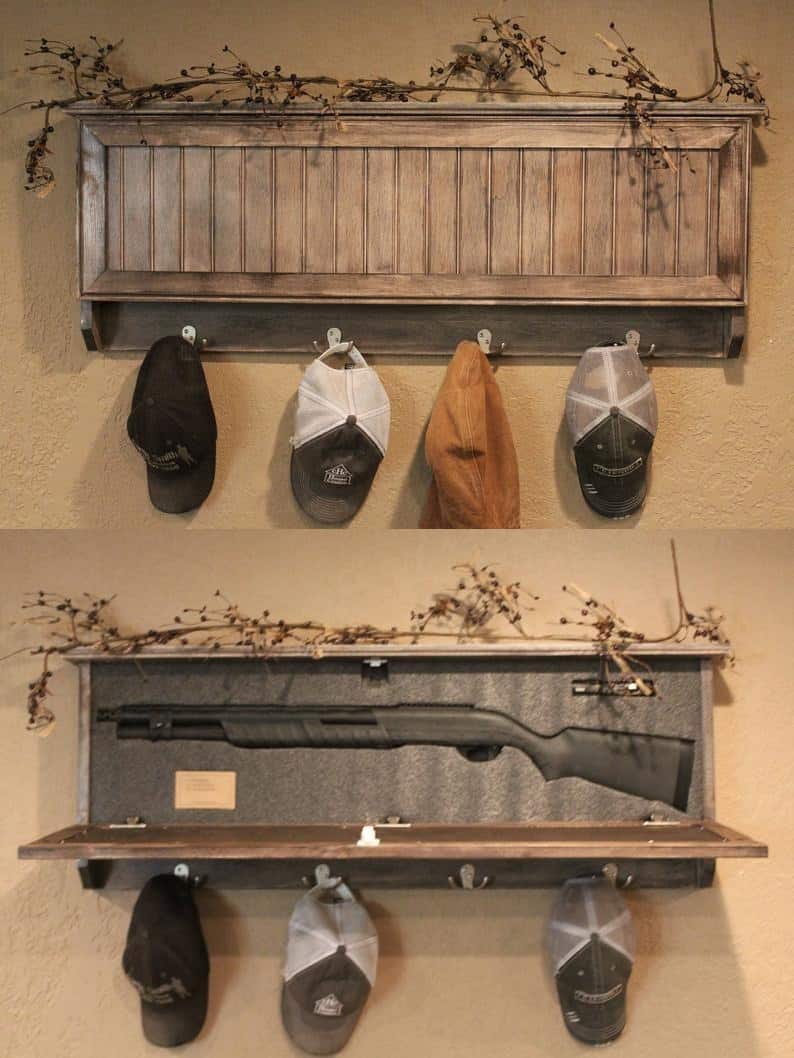
It is a gun concealing furniture which is the best of both worlds. It keeps your coat and guns safe at the same time. The best thing about this is that it looks more like a coat/hat rack than a gun storage furniture. It can easily be blended with the other home furnishings, and almost nobody could ever think that it could be the place of gun storage.

8. Gun Concealing Lamp

Gun Concealing Lamp

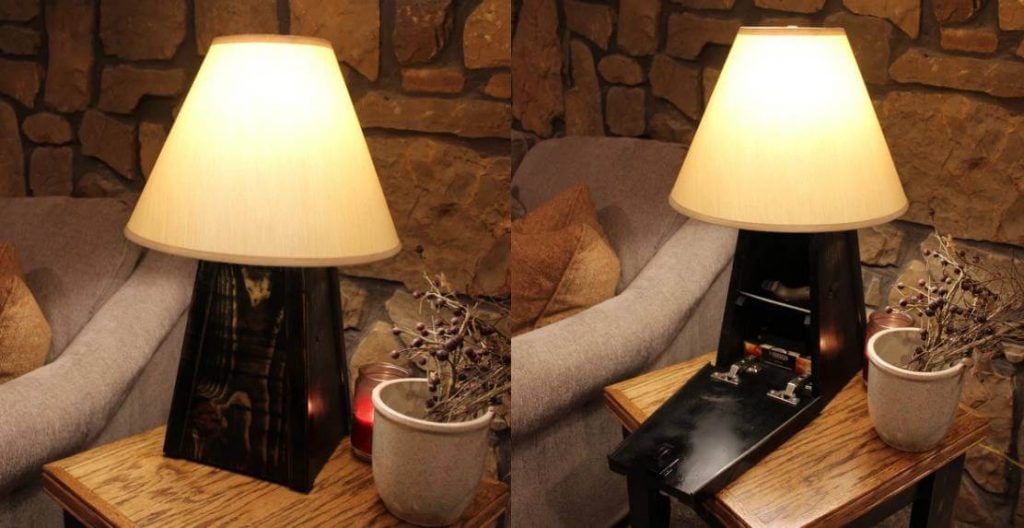
Who can ever think that a normal night lamp could be a place of gun storing? Nobody, right? But when you have this advanced Gun Concealing Lamp, you can sleep peacefully. This amazing furniture will get easily camouflaged with your other bedroom essentials.

9. Romantic Gun Concealer Furniture

Romantic Gun Concealer Furniture

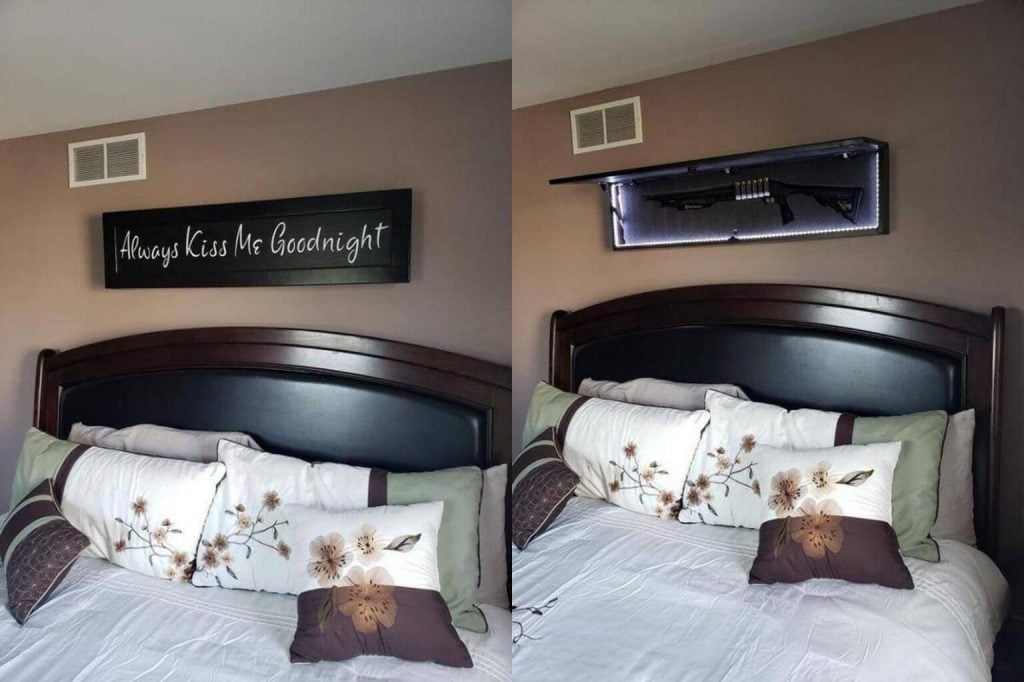
Another interesting place for hiding a gun is the artwork. Look at this quote artwork, it is hanging on the bedroom wall like typical wall decor, but in reality, it is a gun concealment furniture. This furniture looks adorable, and also it is a perfect place to store a big rifle.

10. CouchBunker Gun Safe

Couch Bunker Gun Safe

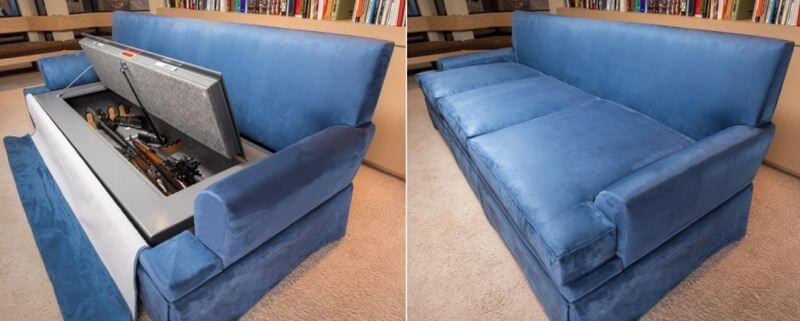
This is a gun concealment furniture that looks like a typical sofa. No one would imagine that the sofa they are sitting on, hides a gun safe. It functions just like a regular couch. With a dimension of 96″H x 39″W x 14″D, it also comes with a two-hour firewall and optional bulletproof cushions. You can easily access the guns by simply removing the seat cushions. Another amazing thing is that it comes in many colors and fabric coverings. So, you can buy the one which looks great in your family room.

11. Secret Compartment Mirror

Secret Compartment Mirror

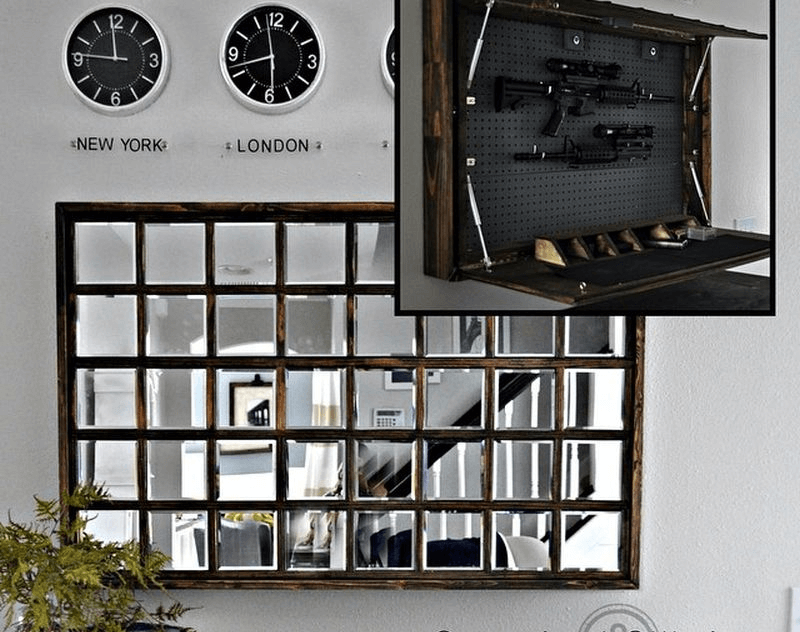
A mirror can be your gun concealment furniture. I know it is hard to believe, but take a look at this mirror. This rectangular mirror has a secret compartment. Which is a safe place to keep weapons out of public sight? To store ammunition, there are also mini shelves. Mirrors are fragile and delicate, so nobody touches them intentionally. You can also place a similar kind of mirror in your home. 

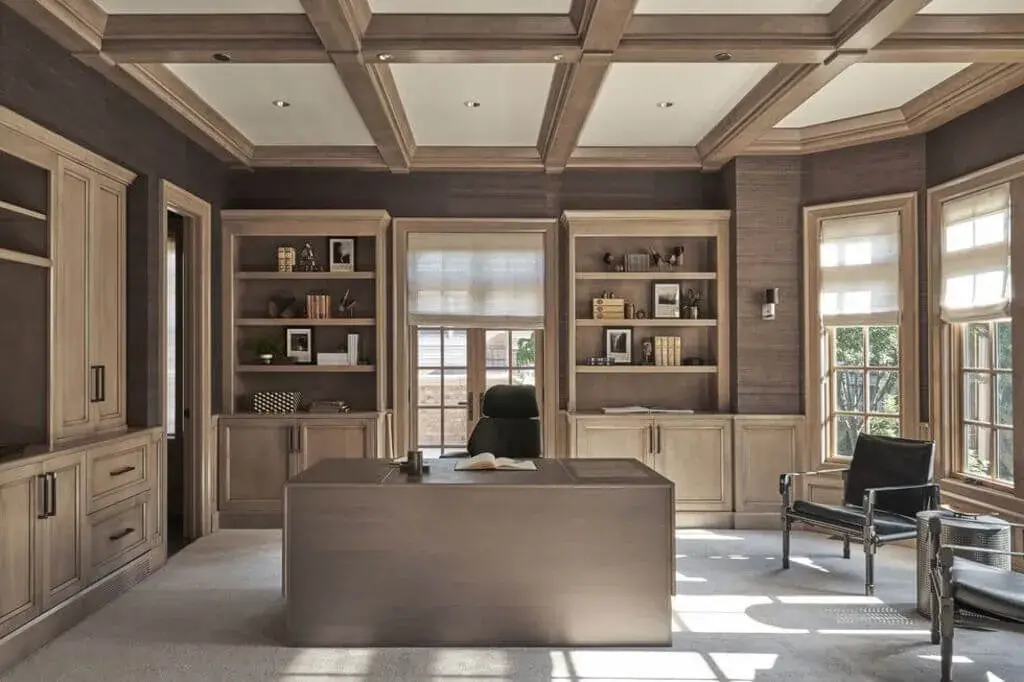
12. Executive Desk Gun Safe

Executive Desk Gun Safe concealment furniture

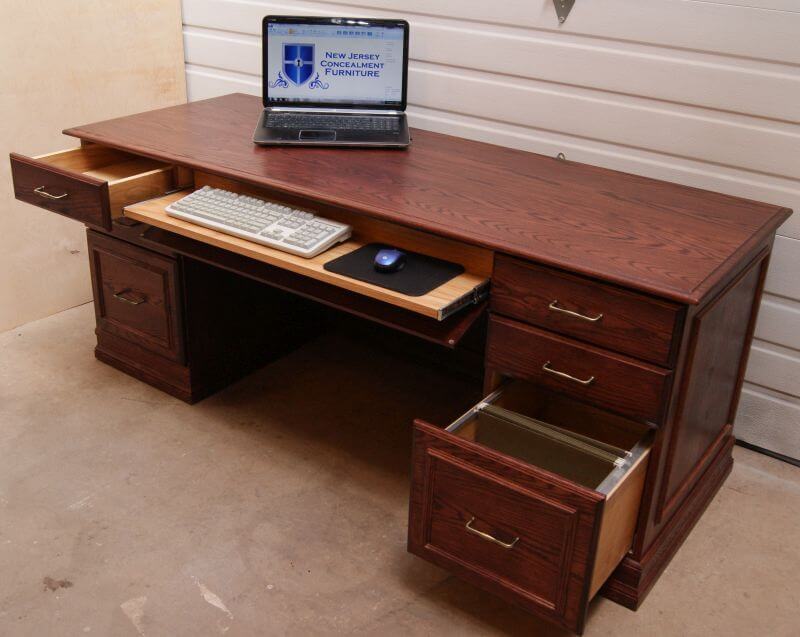
If you’re looking for concealing furniture for your office or workplace, check this out. It is a computer desk with a hidden compartment. Made from solid oak and maple wood, this furniture has four drawers, two file drawers, and much more additional storage space to keep your office essentials. 

Executive Desk Gun Safe concealment furniture ifdea

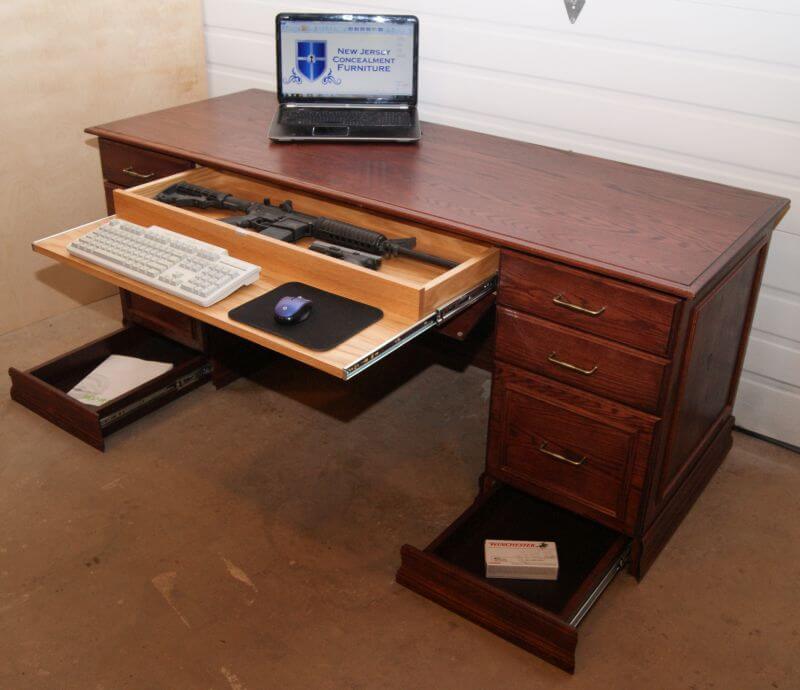
Aside from serving as a desk, it can also hold a gun that is not visible to anybody. In the case of an emergency, you just need to pull out the extended keyboard drawer to access your weapon. 

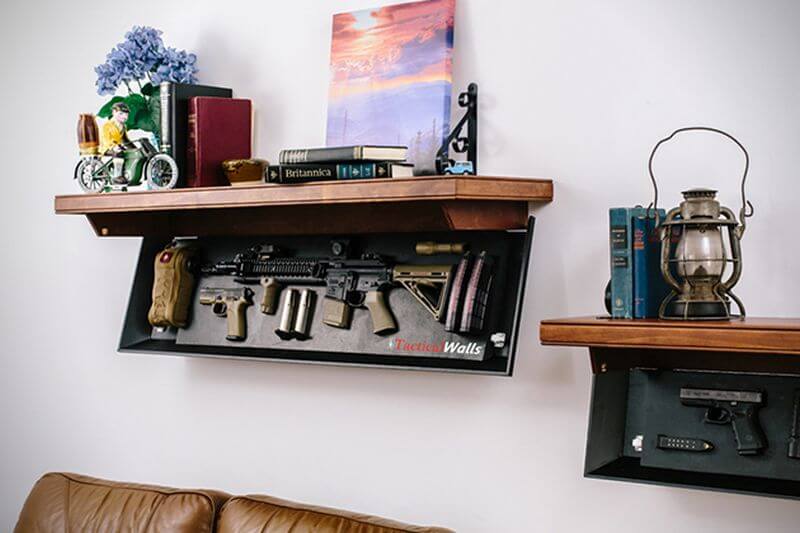
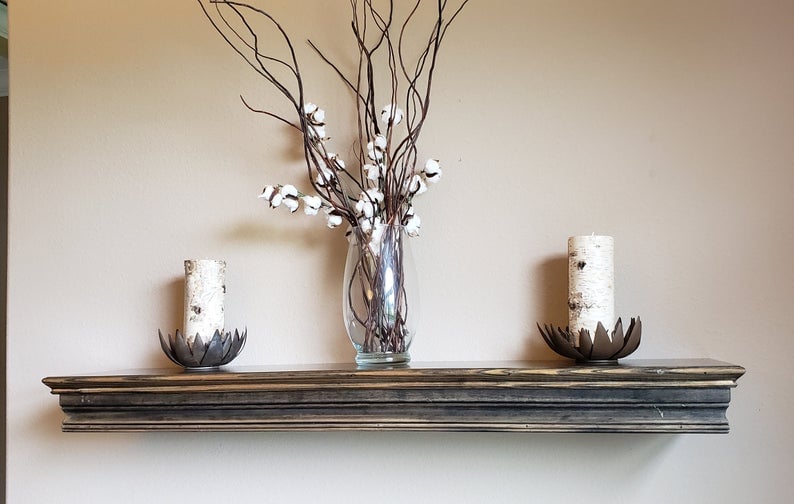
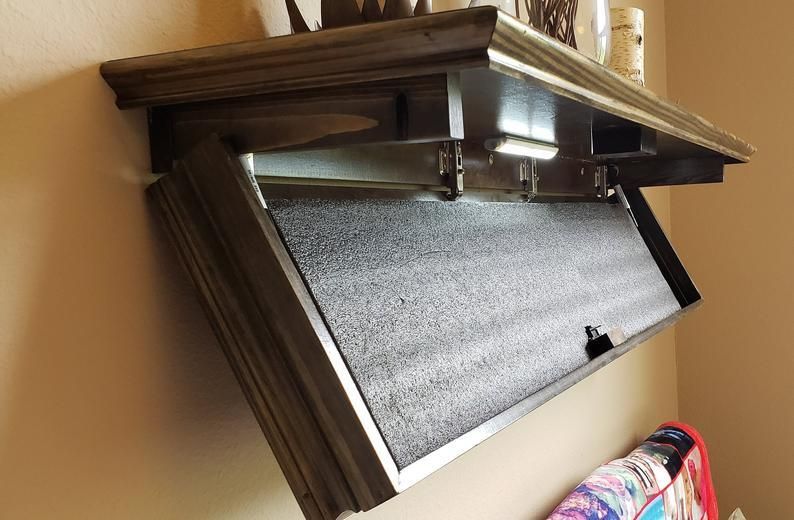
13. Mantle Gun Concealer

Mantle Gun Concealer

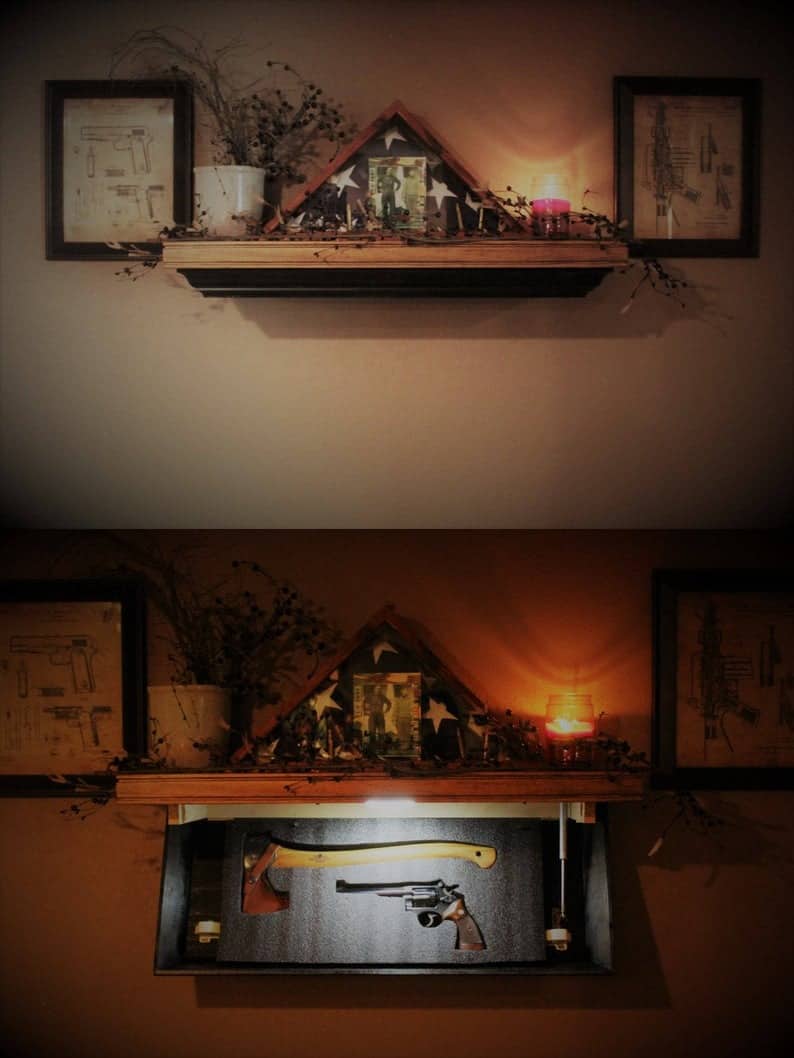
This is a wall mantle which also has a hidden shelf. Here you can store your weapons safe. It is wall mounted so nobody can easily reach out to it. This mantle also has a magnetic lock system, which is easy and convenient to open when in need.

14. Picture Frame Gun Concealer

Picture Frame Gun Concealer

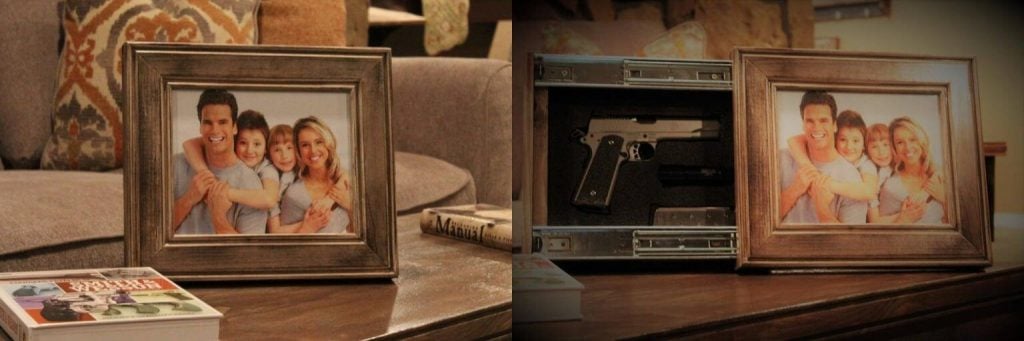
There is absolutely no place better than a family picture frame to hide your safety weapon, right? This is probably is the smallest and safest Gun concealment furniture that can house an entire pistol with ease without giving a hint. 

15. Gun Concealment Storage Bench

Gun Concealment Storage Bench

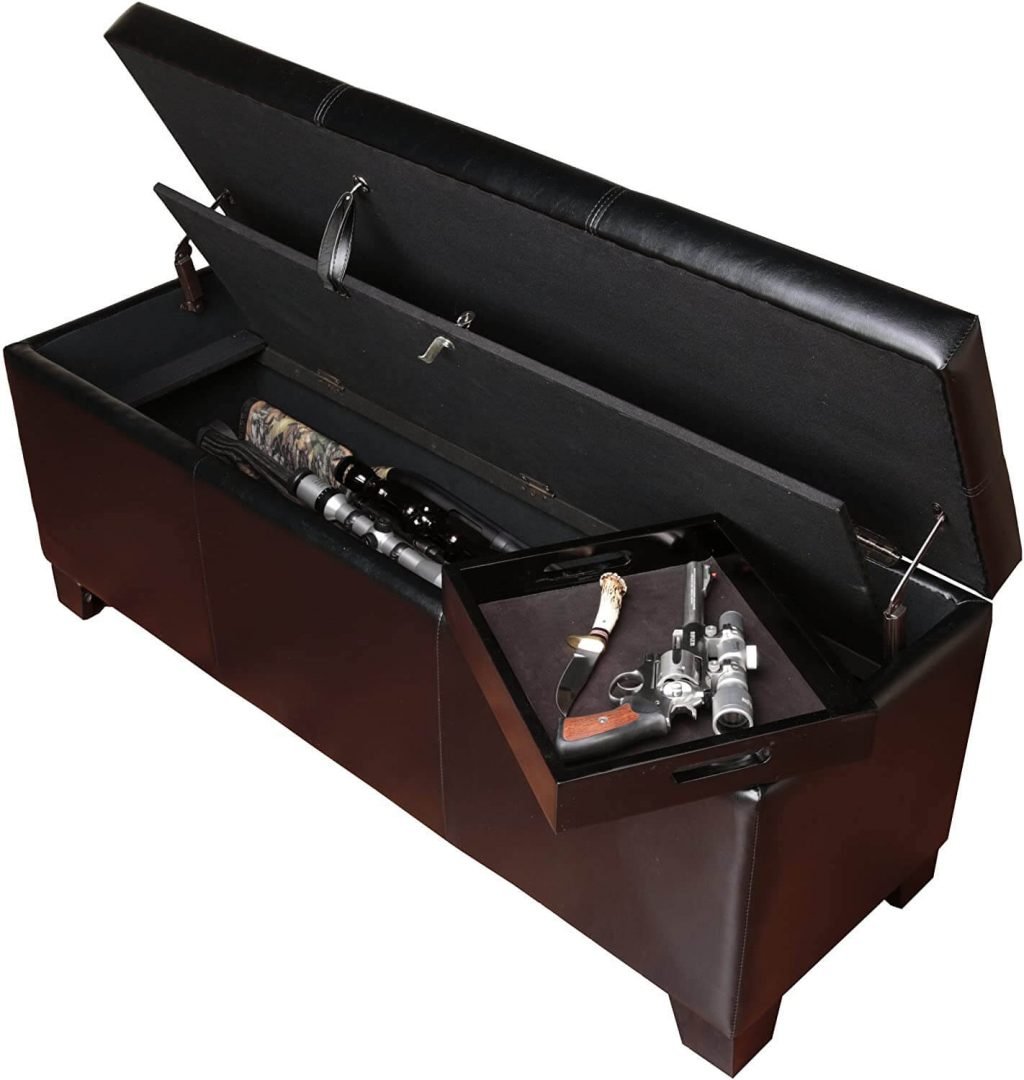
When anyone sees this at first, they think it is just a comfortable bench, but only you know that it is also a place where you are storing your weapons. When you feel any kind of situation, you can just take your gun out by lifting the top part of the bench. It is a huge storage place; it can hold up to five rifles at a time. 

The dimensions of this bench are 51 x 17 x 20 inches. Normally you can use this as a regular sitting bench. It has attractive & durable plastic feet and also comes in various colors. You can place it either in your living area or in the bedroom. 

So, if you own a gun, rifle, or any kind of licensed weapon, these tactical gun furniture is a must for you. people can’t determine whether this gun concealment furniture is a piece of normal furniture or something else. This simply means your guns are safe and hidden from the naked eye and only you know about it. You can place them anywhere in the room and also use them multi purposely.

Keep reading:-

Floor to Ceiling Windows: Top 7 Ideas with Pros and Cons

0
Floor to Ceiling Windows

A home with a spectacular view of a forest, beach, or city skyline, is a dream place for living for many people. Floor to ceiling windows will make this whole living experience more breathtaking and magical. Imagine living in a house without windows; it will be just like living in a boxed home with no air or light. Would you live in these types of homes? For sure, your answer would be a big NO! That’s why it is important to add high-quality UPVC windows to a house.

Do you have large bare walls in your home, and you’re not sure what to do with them? The best solution to this problem is floor-to-ceiling windows! Installing the large windows not only allows you to see the outstanding views of your neighborhood, but also they’ll instantly transform any room. They make the cozy and fresh ambiance from boring and dull.

Today in this blog, we’re going to tell you all about floor-to-ceiling windows. From the benefits of having them to their drawbacks, we’ve also included the latest floor to ceiling windows ideas for you.

You may have windows in your kitchen, bathroom, and other places, but here we’re talking about those windows that are many feet tall. These tall windows will make any house a luxurious and lavishing place of living that is filled with natural light and incredible views. You can also put these tall windows anywhere in your house, such as in the living area, bedroom, kitchen, etc. let’s start with the advantages of having these massive windows in your home.

Floor to Ceiling Windows Pros and Cons

Benefits of Floor to Ceiling Windows

These high ceiling windows not only make the room brighter and airy but also make a connection between outdoor and indoors. When an ample amount of natural light comes into any space, it will make spaces seem bigger than they are. These are only a few advantages of floor-to-ceiling windows; there are a ton of other advantages.

Here are some pros of having the floor to ceiling windows in your home:

More Natural Light:-

A living room with a balcony overlooking the city.

Everyone loves a room that is bright and airy, right. Floor-to-ceiling windows allow plenty of natural light and open up the room. This also helps in reducing the energy bills as the more natural light is available throughout the home; you’ll use fewer light fixtures during the day. This ultimately reduces money on utility bills and also results in valuable savings over time.

Also, natural light is important for our health. It will boost Vitamin D, ward off seasonal depression, improve sleep, and also reduce the health risks of fluorescent lighting.

Create an Indoor-Outdoor Connection

A living room with large windows overlooking a city.

Windows are a way to get into the outer world without actually going. If you live in a neighborhood with amazing views, floor-to-ceiling windows are the best way to enjoy the spectacular sights of the surroundings and the landscape.

Whether your home is built in the countryside or an urban environment, you can enjoy the fantastic views of lakes and rivers, mountain ranges, green fields, or city skylights through the large windows, and that too whenever you want.

Make a Small Room Appear Big

A living room with large windows and a fireplace.

Another benefit of having large or tall windows at home is that it creates the illusion of a bigger space. When the natural light is reflected back on the reflective surfaces like mirrors, it creates an “enlarging effect” and makes the room appear more spacious than it actually is.

Improve Curb Appeal

A living room with a large window overlooking a forest.

A well-designed floor to ceiling windows can easily make any space look more attractive and appealing. If you’re planning to renovate your home or just want to remodel some parts, consider installing floor to ceiling glass wall. It will immediately increase the curb appeal of the place.

Imagine how stunning your space looks when the natural light comes through these glass panels or at night when light fixtures shine through these glass windows or walls. This will also increase the value of the property.

Drawbacks to Ceiling Windows

Floor to ceilings can be show stoppers of your home; still, they have some disadvantages. Let’s see what’s the drawbacks of having the floor to ceiling windows:

Cost of Installation:-

A man installing a sliding glass door in a house.

These amazing large windows look remarkable in the architecture, but they come with a high price tag. Apart from the initial floor to ceiling windows cost, there are many other factors that you have to consider, such as the design and extra cost of engineering and structural components like steel girders and parallel-strand laminated beams.

Lack of Privacy and Security:-

A living room with large windows overlooking the city.

If you live in a private, secluded, fenced property, you won’t face some privacy problems in a home that has floor-to-ceiling windows. No doubt that you can be able to see neighborhood views, but your neighbors and passers-by can also be able to see inside of your property. You have to use blinds or curtains to avoid this issue. In some dense areas, there is also the threat of vandalism and rock-throwing.

Maintenance:-

A woman cleaning a window with a sponge.

Large windows look really pretty and give a perfect background for your Insta perfect pictures; however, you have to be extra careful with them. Small things like your fingerprints and small dust particles can easily stick to the glass surface and make them look dirty.

You have to wash and clean them regularly, which may be challenging for some people.

Too Much Light

A house with a pool and glass doors.

Floor-to-ceiling windows will provide extreme natural light, which can be both beneficial and drawback. Many people don’t like too much light in their living areas. In colder months, this sunlight will be welcomed and good for health; however, this will become an issue on hotter days. Extreme sunlight can also damage furniture, fabrics, and rugs.

7 Stylish and Trendy Floor to Ceiling Windows Ideas in 2023

Whether it is traditional ranch homes or modern villas, floor to ceilings windows will never go out of fashion. After all, they look gorgeous and also provide an energy-saving alternative as green housing options.

Are you looking for some mind-blowing floor to ceiling windows inspirations? Here are seven various types of floor to ceiling window design ideas for you.

1. Glass Window Wall

 Glass Window Wall
Glass Window Wall idea

Want to create a modern minimalistic look? Go with this style in your living space. This wall has large glass panels which look absolutely stunning and also provide access to the garden.

Add a fireplace, a big screen, and several window seating areas to complete the look, and your modern-looking entertainment space is ready! This will be a perfect spot for a social event, hangout, or birthday party.

2. Floor to Ceiling Windows in Kitchen

Floor to Ceiling Windows in Kitchen
Floor to Ceiling Windows in Kitchen ifdea

Create some depth and character in your kitchen by installing some tall windows. It will not only transform the whole look but also provide ample natural light to space. This house has cathedral ceilings which make the overall look of the windows more prominent and lovely.

The exposed beams, sliding barn doors, and other small detailings are providing this space a serious edge. These types of floor to ceiling windows apartments look extremely pleasing and functional.

3. Luxurious Villa with Exotic Views

Luxurious Villa with Exotic Views

Imagine drinking coffee and seeing the ocean dissipating into the sky from behind a glass wall; wouldn’t that be super relaxing and fascinating? Fougeron Architecture has designed the above house.

It features a cantilevered master bedroom with floor-to-ceiling windows exploring views of the Pacific ocean over a 250-foot drop. If your home is located in such a beautiful landscape, you should always consider installing some windows to enjoy the spectacular and wild views.

4. Round Floor to Ceiling Window Design

Round Floor to Ceiling Window Design idea

This St. Andrews Beach project is designed by Austin Maynard Architects. Homeowners wanted to enjoy the ocean views; that’s why designers have created this seaside-facing bedroom.

It is also known because of its unique circular wooden beam structure. The warm timber is used, which provides warmth in the bedroom, while the panoramic views of the sea set the whole cozy ambiance. Furnishings were kept minimum so that it looks simple yet functional.

5. Solid Floor to Ceiling Windows

Solid Floor to Ceiling Windows
Solid Floor to Ceiling Windows idea

Is your home built near a forest or is it surrounded by forest? If yes, it is a must for you to install some high ceiling windows. As not everyone wants to go into the woods to enjoy nature, that’s when these glass windows come to work. You can easily enjoy the sight without even going outside.

Look at the above example, here a simple single glass window is installed so that the residents can enjoy the unobstructed views. Additionally, the wooden floor and stairs pair nicely to the window.

6. French Window “Walls” for Dining Room

French Window “Walls” for Dining Room
French Window “Walls” for Dining Room idea

French windows are one of those styles which never goes out of style. So if your dining area looks a little dull and boring, revamp the look by placing these pretty french windows.

They also allow enough natural light and warmth, perfect for a nice meal or social event. Here the black metal frame is used, which looks absolutely stunning with the other decorations such as the white rug, farmhouse furniture, and open shelves with ceramic collections.

7. Glass Walls in Mountain House

Glass Walls in Mountain House
Glass Walls in Mountain House idea

Look at the above house, would you like to spend your vacations there? The major thing that makes this residence remarkable are the plain glass walls. This looks fabulous and offers lovely water and mountain views.

Here are some more floor to ceiling windows ideas and inspirations for you:

A modern bedroom with wood walls and a bed.
A living room with wood walls and a fireplace.
A living room with a wooden floor and a view of the mountains.
A white living room with large windows and a glass coffee table.
A bedroom with glass walls overlooking a city.
A modern kitchen with large windows and wooden cabinets.
A dining room with a chandelier and chairs.
A living room with large windows overlooking the mountains.
A modern living room with a fireplace and large windows.

The Bottom Line

So, this is all about the Floor to ceiling windows. Everything has its own benefits and drawbacks, and so do these tall glass windows. They’re not easy to install, and also the initial cost is expensive. That’s why it’s vital for you to consider all the factors like price range, sizes, dimensions, and materials before the floor to ceiling windows installation process.

After reading this blog, now you very well know all the advantages, disadvantages, and some of the stylish windows designs. I hope you liked this blog about Floor to ceiling windows ideas. Also, don’t forget to share this blog with your family and friends.

If you want to know more about windows or unique and unusual buildings and constructions, read our previous blogs on Healdsburg House, which has garage size windows and the River Connected Villa Of Queensland: V House

Read more:

7 Things To Consider When Planning An Exhibition

0
Things To Consider When Planning An Exhibition

Trade show exhibitions will continue to be a major player when it comes to reaching target audiences. They can help showcase your brand, products, and services to motivated transactional buyers. To offer a unique level playing field alongside your fiercest competitors. Are you thinking of exhibition planning? 

There are many aspects that contribute towards a successful trade show and this article will outline seven key areas that any business large or small, should put into consideration before investing in an exhibition booth.

Trade show stands builders understandably have a unique insight into what works and what doesn’t at exhibitions because they can see firsthand how their designs and client’s needs must go hand-in-hand. Professionals stand builders can reveal what the most important features of planning a successful show are, and the following seven tips are by far the most common responses that consistently crop up time and again, and are essential to having a trade show that offers the best return on investment.

1) Choose the Best Show

exhibition planning

The first and most important element for successful exhibition marketing is to ensure you are selecting the best possible trade shows to exhibit at. Are they directly geared to your industry? Will attendees be actively seeking your products and services? If the answer is no, you need to look elsewhere.

Researching different trade shows that are happening around the world is critical. So don’t rush into choosing one until you have fully researched every possible option. It’s critical that you find trade shows where your target market is likely to be. You want to maximize brand awareness and gain new leads and customers. It’s not just about choosing a shop window to display your products and services. You want to make sales and generate income.

Picking the correct show can mean the difference between success or failure.

2) Get the Best Location

Get the Best Location

Once you’ve selected the right trade show, the location of your stand is almost just as important. Don’t drag your heels about selecting your stand location and most certainly, do not allow the trade event organisers to choose one for you!

Typically, to gain the best space you will have to book your location at least six months in advance. Ask the organisers for a trade show floor plan and try to identify a high-traffic position that meets both your budget and your goals. Your exhibition stands’ location will have a massive impact on your return on investment.

If you’re unsure about where to position your stand, some examples of great locations include areas with lots of open space, places adjacent to restaurants and coffee shops, and surprisingly even washrooms. Choosing a strategic area can increase your results dramatically, so try to find an area where people will consistently pass by and will make you highly visible.

3) Who Else Will Be There?

A woman standing next to a blue car on display

Knowing about your rivals is critical when it comes to trade show marketing. You should contact the event organisers and get as much information as possible about other confirmed exhibitors.

Find out who your trade show neighbors are, their marketing plans, and any other information to better refine your own exhibition stand to increase your chances of success. Knowing about your competition is critical and taking care of these details beforehand will keep you one step ahead of the competition.

4) Stand Out From the Crowd

A group of people standing around a booth

When asked, trade show stand builders have stated that to really make an impact with exhibition stands, you have to stand out from the crowd. Doing something unique and memorable is a key strategy to gaining buyer’s attention.

Using things like technology, interactive displays, downloadable social media apps, wall screens, bold colors and graphics, and other tactics will draw people to you. Attendees at trade shows have a world of choices available to them, so it’s vital you do something that gets you noticed and attracts the right kind of attention. Create a buzz and people will flock to you.

5) Set Realistic Goals

A group of people standing around a display case

Once you’ve chosen to promote your organisation at a trade show, you ideally need to put a set of realistic goals in place prior to the event.

You will need to decide what’s most important to you. Whether it’s selling products or services, gaining brand recognition, business networking, gaining new leads, or acquiring new customers. Having clearly defined goals will not only help you to focus better, but it will also help you to measure the success of the trade show at its conclusion.

When you set realistic targets, your sales team will become fully focused on achieving those goals. As a result, you should enjoy a much greater experience and get a greater understanding of how attendees perceive your business and whether or not you are catering to their needs.

6) Spread the Word

A group of people standing in a hallway

A great way to generate a buzz and to build anticipation before the event even begins is to let people know. You will be attending the event.

You can do this easily and cost effectively by announcing your attendance on your company website. Distributing bulk email to customers and prospects. Sharing the news via all of your social media channels.

When you get people excited to see what your business has to offer, they will tell others and you will have better odds of claiming a higher return on investment.

7) Make a Great First Impression

Three women standing in front of a display

Trade shows are typically stuffed full of different exhibition stands and attendees. All exhibitors are competing for the time and attention of the people walk through those doors.

Your job is to build a great first impression and to make your exhibition stand memorable. You can do all sorts of things to encourage people to notice you first. Then engage in dialogue about your offerings.

Simple things such as free beverages and refreshments, or cool features. Such as smartphone charging stations, work areas, or even fun photo booths and hangout areas. All help to create a buzz about your stand.

When people have a place to relax, this creates the opportunity. To allow your sales team to discuss your products and services with them in a relaxed, comfortable environment. Where a sale is more likely to occur.

Follow these suggestions and get great results

It’s clear that trade shows will continue to be a powerful marketing option in practically every industry for many years to come. Being creative with your budget and carefully planning your approach will go a long way to bringing you excellent results. Follow the suggestions above and you should have a far more successful experience. That will lead you to exhibit at many more trade shows month-after-month, year after year.

Discover more:

What Is Acacia Wood? Everything You Need to know

0
Acacia Wood

When it comes to selecting the perfect wood for architectural projects, the choices can often be overwhelming. It’s simple to become perplexed with so many alternatives offering various textures, grain patterns, and levels of durability. One wood, nonetheless, stands out among the myriad options thanks to its unrivalled attributes and ageless appeal. Acacia wood has entranced craftsmen and homeowners for generations with its alluring grain patterns and welcoming warm tones.

For those looking for a material that combines both aesthetic appeal and utility, acacia wood has established itself as a go-to option. Acacia trees have a long history that dates back to Africa, Asia, and Australia. As a consequence of their success in a variety of climates, they have produced wood that is very strong and resilient.

You’ll have the information and inspiration you need to appreciate Acacia wood’s classic appeal in your own house once you’ve finished reading this article.

What is Acacia Wood?

A close up view of a  Acacia wooden surface

With its luscious golden tones and alluring textures, acacia wood instantly improves any environment with its atmosphere. But it’s not all about looks. Among other types of wood, acacia wood is a warrior. Its famed durability has withstood the test of time against deterioration, scratches, and dents. 

With assurance, you may put your heaviest items on Acacia wood furniture with the knowledge that it won’t flinch.

How Do We Source Acacia Wood?

A tree that has been cut down in the forest

The Acacia tree, which is a species renowned for its sturdiness, beauty, and adaptability, yields the timber known as acacia wood.  A vast variety of tree species, predominantly found in Africa, Asia, and Australia, are included in the Acacia genus. Due to its outstanding qualities, it has been highly prized throughout history and used for a variety of things, including furniture, flooring, cabinets, and ornamental objects.

Trivia: Since acacia wood is extremely resilient, it was formerly used to build coffins in ancient Egypt; some of these coffins have endured the test of time and are still in tact after thousands of years.

Steps of Sourcing Acacia Wood

1. Selective Harvesting

Only mature trees are chosen for timber harvest; juvenile trees are let to develop, preserving the diversity and vitality of the forest.

2. Sustainable Forest Management

In order to ensure that the rate of harvesting doesn’t surpass natural regeneration, sustainable forest management strategies are put into place.

3. Suppliers

Working with suppliers who follow certifications like FSC or PEFC assures that wood originates from responsibly managed forests and satisfies environmental and social standards.

4. Engagement with Local Communities: 

Supporting sustainable sourcing practises requires respecting the rights of and involving local communities and indigenous people.

5. Transparent Distribution

Traceability and transparent supply chains guarantee the legitimacy and authenticity of acacia wood, avoiding illicit logging.

Species of Acacia Wood

A lone Acacia tree in the middle of a plain
SpeciesDescription
Acacia mangiumNative to Australia, but now widely cultivated in tropical regions for its fast growth and use in paper and pulp industries
Acacia auriculiformisNative to Australia, but now extensively cultivated in tropical regions for its fast growth and use in furniture, flooring, and pulpwood
Acacia koaNative to Hawaii, highly prized for its use in traditional Hawaiian canoe building, and furniture
Acacia senegalNative to Africa, produces gum arabic, which is used in food, cosmetic, and pharmaceutical industries
Acacia melanoxylonNative to Australia, known as blackwood, used for its beautiful, dark wood in furniture, cabinetry, and flooring

5 Key Features of Acacia Wood

A piece of Acacia wood that has been cut in half

Acacia wood has some extremely distinctive qualities that set it apart from other types of wood in addition to being a strong and gorgeous material. Here are some intriguing characteristics of acacia wood that you might not be aware of:

1. Sturdiness

As it is so resistant to fading, scratches, and dents, acacia wood is renowned for its outstanding endurance. It is a great option for furniture and high-traffic areas since it can resist the rigours of daily use.

2. Grain Pattern

Its captivating grain patterns are one of the most distinctive qualities of acacia wood. The wood’s look gains depth through the variety of grain patterns, which might be straight, wavy, or interlaced.

3. Warm Tones

Acacia wood has cosy, welcoming undertones thanks to its warm, golden tones. Stains and treatments can be used to accentuate its natural colour and grain patterns, or it can be allowed to age naturally with time.

4. Low Maintenance

Acacia wood requires extremely minimal upkeep due to its inherent durability. It may be left untreated and continue to be beautiful and durable for many years.

5. Ease of Craftmanship

Craftsmen and artists choose acacia wood because it is reasonably simple to deal with. It is easily sawn, carved, and formed, enabling fine details and imaginative patterns.

5 Top Applications of Acacia Wood

1. Furniture

A long table with chairs around it in a room

Furniture made of acacia wood, such as dining tables and chairs, coffee and side tables, bookcases, and cupboards, combines the best elements of design and use. Acacia wooden furniture enhances the elegance and the visual appeal of any living room with its deep tones, distinctive grain patterns, and durability.

Furniture made of Acacia wood is sure to dazzle and last the test of time whether you’re entertaining guests, unwinding with a cup of coffee, or showcasing your cherished items.

Pro Tip: To avoid fading or warping, keep your Acacia wood furniture out of the sun and excessive temperature changes. 

2. Acacia Wood Flooring

A bedroom with blue walls and wooden floors

Acacia wood flooring is a preferred option because of its durability, natural beauty, and ease of upkeep. It is advised to regularly clean your Acacia wood floors with the right solutions to keep them looking their best. 

Preventative measures, including utilising chair cushions and area rugs, can aid in preventing dents and scratches on the flooring. Regular refinishing and resealing may also help the wood regain its natural lustre and guarantee its endurance over time.

Pro Tip: When cleaning, avoid using wet mops or a lot of water since this might cause the wood to distort.

3. Instruments

A wooden guitar laying on a hard wood floor

Guitars, ukuleles, and percussion instruments made of acacia wood provide performers with a distinctive synthesis of musical brilliance and aesthetic appeal. Acacia wood is used to make musical instruments that have a balanced tone response, a warm resonance, and stunning grain patterns that make them stand out on stage. 

Musicians value the natural attributes and aesthetic attractiveness that Acacia wood lends to their musical endeavours, whether they are strumming a guitar or playing a djembe.

4. Decorative Items

A wooden bowl sitting on top of a white table

Acacia wood contributes its distinctive grain patterns and warm colours to produce eye-catching pieces that enrich any space, from finely made bowls that serve as gorgeous centrepieces to superb cutting boards that seamlessly combine form and function. Each decorative object has a unique narrative to tell, showing the enduring beauty of nature and adding a touch of cosiness and refinement to your surroundings. 

5. Outdoor Furnishings and Floorings

A potted plant sitting on top of a wooden floor

Acacia wood shines in outdoor applications because it is strong and appealing in its natural state. It is ideal for outdoor furniture including tables, chairs, and benches because of its resilience to moisture and deterioration. Due to its strength and longevity, acacia wood decking can provide an outdoor area that is both beautiful and long-lasting. 

Make sure to use the right finishing and sealing procedures to improve weather resistance in order to safeguard and maintain your outdoor Acacia wood items. They will last longer with routine cleaning and reapplication of protective coatings, giving you years of enjoyment in your outdoor retreat.

Pro Tip: Think about applying a UV-protective coating to Acacia wood before using it outside for things like decking or furniture to protect it from the sun’s damaging rays.

5 Steps to Clean Acacia Wood

A close up of a wooden table with chairs in the background

1. Remove Loose Dirt: 

Begin by using a soft brush or cloth to gently remove any loose dirt, dust, or debris from the surface of the wood. This prevents scratching during the cleaning process.

2. Prepare a Mild Cleaning Solution: 

Fill a bucket or container with warm water and add a small amount of mild soap or a wood-specific cleaner. Avoid using strong detergents, ammonia, or bleach, as they can damage the wood.

3. Dampen a Cloth: 

Dip a clean cloth or sponge into the cleaning solution, ensuring it is damp but not dripping with water. Excess water can cause warping or staining of the wood.

4. Wipe the Surface: 

Gently wipe the Acacia wood surface with the damp cloth, working in the direction of the wood grain. This helps remove dirt and grime without damaging the wood fibers.

5. Dry the Wood: 

After cleaning the surface of acacia wood, use a dry, clean cloth to thoroughly dry the surface of the Acacia wood. This step is crucial to prevent moisture absorption and potential damage to the wood.

Embrace the Ingenuity of Acacia Wood!

In conclusion, acacia wood has gained popularity recently since it is a beautiful and adaptable material. It is a preferred option for furniture, flooring, ornamental items, and outdoor uses because to its distinctive grain patterns and warm colours. With appropriate care and maintenance, Acacia wood items may last for years due to its toughness and resistance to wear and tear. 

Therefore, embrace the beauty and adaptability of Acacia wood and allow nature’s creation alter your surroundings whether you’re outfitting your house, remodelling your outdoor area, or looking for distinctive decorative pieces.

FAQs for Acacia Wood

1. Can Acacia Be Used to Make Outdoor Furniture?

Acacia wood is a great choice for outdoor furniture, indeed. It is perfect for withstanding external environments because of its innate resilience to dampness and deterioration. To preserve its longevity, adequate upkeep and preservation, such as sealing and using protective coatings, are advised.

2. How Long-Lasting Is Acacia Wood in Comparison to Other Types of Wood?

Acacia wood is renowned for being extraordinarily durable. It is resistant to wear and tear because to its high Janka hardness grade. In terms of durability, it is equivalent to other hardwoods like oak and teak, although it frequently costs less.

3. Can Acacia Wood Be Used for Flooring?

Yes! Acacia wood flooring is a popular choice due to its hardness and resilience. It is extremely scratch and dent resistant and can sustain considerable foot traffic.

4. Can Cutting Boards Be Made of Acacia Wood?

Yes, the tough and long-lasting, acacia wood cutting boards are a staple in most homeowners. To preserve cleanliness and avoid cross-contamination, the cutting board must be thoroughly cleaned and sanitised after every usage.

5. Is Acacia Wood a Healthy Option for People Who Have Allergies?

Given that other types of wood might cause allergies or sensitivities in certain people, acacia wood is a smart option.

More from The Architecturesideas

13 Cheap Ways to Block Neighbors View from Your Garden

0
Cheap Ways to Block Neighbors View from Your Garden

You might occasionally wish to organize a pool party, meetings, or night-time gatherings with your friends and family, but are unable to do so due to the neighbors’ peek-a-boo behavior. It is when you realize the importance of privacy. Let’s look at some cheap ways to block neighbors’ view from your yard on a budget.

You no longer have to worry about anything while relaxing with friends and family in your yard or garden. Check out how to block out neighbours’ view not wasting too much money.

13 Aesthetics Yet Cheap Ways to Block Neighbors’ View

1. Installing a Fence

A wooden fence with a black trash can next to it

You may put up fences in your backyard or patio to provide more privacy. You have the option of installing a wooden fence or a metal fence. Metal fences, such as corrugated ones, are attractive and easy to obtain at a lower cost.

Additionally, a corrugated metal fence might aid in keeping the wind at bay. A solid corrugated metal fence can also be used as a noise barrier. Fencing made of wood may be a better alternative if you do not wish to have metal installed. The classic wooden fence, which has vertical wooden slats, can be added to a wooden fence.

2. Utilize Screens for the Outdoors

A patio with chairs and a table on it

The following advice is beneficial if you deal with a nosy neighbor. A simple and effective technique to keep strangers from sticking their noses into your patio is to use outside screens. Outdoor screens are fabric hung on metal supports. Furthermore, You may easily transport these outdoor screens.

So you can move them around and put them in whatever area of your yard or patio you choose. Foldable, too, so you can store them when you’re done with them.

Outdoor privacy deck screens, for example, are another option for securing your space from prying eyes. Even though they are constructed of mesh, they keep your neighbors from seeing you. Screening cheap ways to block neighbors’ view. So, if you’re seeking a low-cost privacy solution, this can be a good alternative for you.

3. Privacy From Neighbors Ideas: Build A Slat Wall

A patio with a table and chairs next to a wooden fence

Covering your patio is as simple as putting up a room divider. However, it might end up being pricey. Instead, you may create a garden slat wall that is both visually appealing and functional, it is a cheap way to block neighbors view. You’ll need to dig two holes 22 inches deep in building this wall. Once you’ve explored the holes, it’s time to bury the posts.

After ensuring that the posts are perfectly level, fill the holes with concrete sand for extra stability. First screw in the posts, then insert each board one at a time while ensuring that there is some space between each panel (roughly kept around half-inch apart). Fill the screw holes with wood filler once the boards have been installed. The panels can be sanded, stained, and coated with a protective layer.

4. Plant Hedges

A couple of chairs sitting next to each other on a lush green field

Hedges are an excellent border plant for screening purposes. The vista would be considerably more pleasant if you planted soft trees on buildings to break up the view. These Italian Cypress trees, for example, maybe planted in a straight upright column configuration.

It’s possible for these trees to reach heights of 70 feet or more and to overgrow. Aside from offering seclusion, they will also keep out any light that could get in via the top windows. The width of this plant’s leaves varies from 10 to 20 feet (around 3-6 meters). This plant will do the trick even if you have a very tiny area to work with.

As a bonus, you’ll be able to take advantage of the natural beauty of your surroundings while simultaneously obstructing your neighbor’s view. It’s not only the Italian Cypress that you may cultivate as a border plant; you can also grow Japanese Euonymus, Arborvitae, and a variety of other species. Just be sure that the plants you choose can thrive in your local climate, and then water them regularly to keep them healthy. Trim them if they become out of hand, and don’t forget about it! To make your garden more private, you may use this neighbors privacy screen ideas.

5. Plant Trees and Shrubs

A couple of bushes that are next to each other

Ever wondered how to block out a neighbor’s view?

You may grow a single giant tree or a few groups of shrubs in your patio or backyard garden to obstruct a neighbor’s view, similar to growing hedges. You may create a focal point in your garden by planting a large tree. Try to choose evergreen trees when you’re selecting trees for your patio or backyard to provide seclusion.

Last but not least, who wants privacy all summer to have it ruined by the cold? As a result, evergreen trees are excellent for year-round foliage and seclusion. A less permanent approach is to use a row of large potted plants stacked on top of one another. The fastest-growing plant would provide you seclusion in days by adding plants like bamboo.

6. Use the Long Grass

A wooden bench sitting in the middle of a lush green park

Long grass may also be used as a privacy screen if you grow it long enough. A beautiful, natural-looking living fence is always an excellent choice. In addition to providing seclusion, this will make your backyard appear more upscale. You may make a privacy screen out of a variety of plants.

You may, of course, plant some trees and bushes in your yard. In contrast to shrubs and evergreen trees, ornamental grasses can develop in two seasons and grow to their full size. In other words, if you need seclusion quickly, this is an excellent choice for you. It is possible to create a cheap way to block neighbors view in your landscape using ornamental grasses like Zebra Grass, Pampas, Clumping Bamboo, Feather Reed, Pink Hair, and Fountain Grass.

7. Adding Vines

A house with a lawn and a patio

Using vines to provide seclusion on your deck or patio is like tall grasses. It would be best to place planters with vines under the lattice panels or trellis. The vines would then begin to climb around the objects. Simple, right?

8. Use of Trellis

A garden area with flowers and a pergolated wall

You may also use a trellis to create seclusion on your deck or patio. On the other hand, Frames aren’t as large as fences, making them easier to erect. Trellis may be a stunning addition to your patio garden, mainly if you use attractive plants and vines to dress it up.

9. Screens made of Lattice

A decorative piece of wood sitting on top of a wooden bench

One of the cheap ways to block neighbors view to keep an eye on you is using lattice screens. Wood and other natural materials are commonly used to construct latticework. Plastic is another option. If you can, go with anything made of wood or from a natural substance. A wide selection of designs, colors, and sizes are also available. Some are also adaptable and simple to put in place.

10. Make Use of Overhead Shade

A patio with a couch, chairs and a fire place

An apartment or two-story structure may be an alternative if you have a nearby neighbor who lives in one. You may install a shade structure in your patio or garden. The shade can be fashioned from sailcloth or any other garment material that prevents your neighbors from seeing you from a distance. Take advantage of plants and trees to provide overhead shade.

Alternatively, In addition to providing seclusion, an overhanging shade garden also provides cooling relief from the summer heat.

11. Outdoor Draperies

A white curtain is open in a backyard

One of the most cheap ways to block neighbors view of you is to hang outside curtains. If your patio or backyard has a sitting area where your neighbors constantly stare at you and irritate you.

To get the desired level of seclusion, all you need to do is purchase some readily accessible outdoor curtains and install them. It would be ideal to have some solid poles or wooden bars to hold up the drapes. You can fold them up and store them away when you don’t need the curtains.

12. Suitably Suspend the Greenery

Suitably Suspend the Greenery

You may get several benefits if you beautifully hang your plants. When you hang your plants so that no one can see them from the outside, you’ll be able to experience a sense of seclusion. It can be a great backyard cheap ways to block neighbors view.

In addition, your neighbors would be unable to discern your true motives because you’d be stylishly hanging lovely plants. They could think you’re merely attempting to develop a fresh design. However, you are the only one who knows the genuine reason.

You wouldn’t offend your neighbors, and you’d get to appreciate the beauty of the plants while simultaneously maintaining a sense of seclusion! Aside from saving space, hanging your plants allows you to use that area for other activities like sitting, grilling, and outdoor decor.

13. Be Creative

A small patio with a table and chairs

Tall fences are not permitted in some regions. However, you may erect some towering buildings in your backyard if you so want. As a result, you have some leeway in designing your design for a view blocker.

What about non-transparent plastic bottles in your home? Afterward, you may use it as a privacy barrier. You may sanitize those non-transparent plastic bottles by cutting the bottom and singeing the rough edges.

When you have a bunch of these plastic bottle bottoms that look like flowers, you can thread them together. You may hang the final object on a wooden framework or similar structure. It is only one of many examples. There are various ways to create these stunning buildings on your own.

FAQ’s

1. What to Do If Your Neighbor’s Second Story Window Keeps an Eye on You?

From 25 to 60 feet tall, you may find certain evergreen trees in nature. Planting those deciduous trees will effectively conceal the second-story view of your neighbors. You can also use a canopy over your patio or deck to keep your overlooking neighbors at bay.

2. How Can We Keep Our Neighbors from Seeing Us?

For fast-growing trees like Cypress, we recommend planting evergreens like Emerald Green. Even in the cold, they don’t lose their leaves. Because of this, they are the best way to keep the neighbors at bay. In addition, parasols and screens, shelters, and the like are also options.

3. How to Obstruct the Neighbors View from Their Window to Our Backyard?

Planting tall plants or trees or constructing a fence between your property and your neighbor’s will work to conceal your neighbor’s view of your house from their windows.

4. How Can We Keep Our Garden Private on a Budget?

Trees with ornamental flowers or grasses should be placed in the middle of the tall evergreen trees. You may also create a living wall, hang curtains around your patio or deck, set up a lattice fence, or install a privacy screen are some cheap ways to block neighbors’ view.

5. What Can Be a Fast-Growing Plant That We Can Use for Privacy?

Bamboo is the fastest-growing plant for creating a natural privacy screen. However, because of the invasive nature of most bamboo varieties, you must exercise caution and only choose those that spread slowly.

Always Stay on your Budget with these Ideas

As you can see, there are several cheap ways to block neighbors view available to you when it comes to your privacy. We hope you’ll be able to relax in total solitude on your patio, backyard, or front porch now that you’ve learned how to keep your neighbor at a distance. Every one of us has had to deal with nosy neighbors. What goes on in your backyard doesn’t have to be revealed entirely.

Yet don’t forget to practice what you’ve just learned about some of the fantastic but cheap ways to block neighbors from seeing you.

For additional insights:

Save Money with Sustainable Gardens & Garden Makeovers

0
Sustainable Gardens & Garden Makeovers

When thinking of ways to save money in your household, it’s not just interior changes that you can start making. While updating your outdated kitchen fittings and creating additional bedroom space can help you save money and help increase the value of your home, you might also want to think of how you could utilize your garden space to its full potential too.

In recent years sustainability has been a priority for many, whether through purchasing eco-friendly products from a store, buying fast food with sustainable packaging, or investing in an electric vehicle. Many homeowners have also started to find more sustainable ways to run their households and save money n their groceries and household bills.

The Royal Horticultural Society says that sustainable gardening is important as it helps to protect the environment from flooding, damage, and contamination in the long run. Using a variety of sustainable gardening practices can effectively help to counter climate change. A sustainable garden can involve using natural resources efficiently and reducing waste by composting and recycling. By creating a garden that is self-sustaining and requires minimal input, you can save money in the long run.

Although you might not be selling your home anytime soon, thinking ahead with your garden and home can also help to add value to your property. There are many great garden design ideas that can help you increase the value of your home, such as adding a patio or deck, outdoor lighting, or revamping your old fencing. While costs might be high now for renovating, in the future these garden makeover ideas could get you more money for your property when selling your home. Transform your outdoor space and save money with sustainable gardens and garden makeovers that offer cost-effective solutions and long-term financial benefits.

How to Create a Sustainable Garden for Saving Money

Patio umbrella backyard Sustainable Gardens

Having a sustainable garden can help save you money in the long run as it can help you to reduce costs for maintaining the garden and save on bills. Many homeowners can save money in their household by growing their own fruit and vegetables, collecting rainwater, and being smarter with their garden supplies.

Growing Your Own Produce

If you’re thinking about how to create a sustainable garden on your property, growing your own produce will help you to cut down on grocery costs every month. Growing your own vegetables also eliminates the need for expensive organic produce, and you can ensure that your vegetables are pesticide-free.

Becoming More Mindful of Water Usage

Being more water efficient in your garden can help save money by reducing water bills and conserving water resources. Harvesting rainwater can help reduce costs as the water collected can be used for a variety of tasks, both in and out of your home. In the long run, utilizing rainwater collection can be a sustainable water supply for gardens as homeowners save water when watering their gardens, washing cars, and maintaining lawns.

Investing in Your Outdoor Lighting

As well as saving on food costs and water bills, homeowners can also save money on their electricity in the long run by switching to LED lighting for their outdoor lights. LED lighting can help save money as they use less energy than traditional lighting options, have a longer lifespan, and also reduce the need to frequent bulb replacements.

How to Give Your Garden a Makeover to Increase the Value of Your Home

Small Sustainable Gardens & Garden Makeovers

Even if you’re not thinking of selling your home anytime soon, it can be beneficial to think about ways you can increase your property’s value, both inside and out. From erecting a garden room and upgrading your kitchen appliances to fixing your outdated fencing and converting your loft, there are many projects, big and small, that can help to increase the value of your home. With your garden makeover, creating an attractive outdoor space for potential buyers could help you get more money for your property in the future.

Add a Garden Room to Your Property

To help increase the value of your home, adding a garden room is a good idea as it can help to create additional living space on your property. Garden rooms are a cost-effective way to add square footage to your property without the expense of a traditional home extension. A garden room can also be attractive to potential buyers who work from home and require additional office space.

Improve Your Fencing

Fixing your fencing can also help to improve the security and privacy of your property, which can in turn increase its value. Future buyers may be looking at fencing to see how secure the property is and how private the garden space is. Additionally, a well-maintained fence can enhance the overall appearance of your garden and increase its aesthetic appeal.

Focus on Dressing Up Your Front Garden

When considering how to give your garden a makeover, think about dressing up your front garden. Doing so can help to create a welcoming entrance to your home and can increase a property’s curb appeal and value. Some great garden makeover ideas, which potential buyers will love, include planting colorful flowers, adding decorative lighting, and installing a pathway or driveway.

Conclusion

Transform your yard into a cost-cutting haven! Sustainable gardening boasts delicious homegrown food, lower bills, and even boosts your home’s value. Grow veggies, harvest rainwater, and ditch harsh chemicals. Not selling soon? No worries! Smart garden upgrades, like LED lighting and refreshed fencing, add aesthetic flair and future financial rewards. So, cultivate a flourishing oasis that benefits you and the Earth – one eco-friendly sprout at a time!

Continue reading:

34+ Stunning Shower Tile Ideas That Will Transform Your Bathroom

0
Shower Tile Ideas

A shower is a place for rejuvenation, letting go of all your distress and de-stress after a long day at work. The space thus should be designed to do exactly that. The kind of shower tiles you use can either make or break your experience of the bathroom space. To help you with your shower designs, we’ve curated this list of 35 stunning shower tile ideas.

34+ Shower Tile Ideas

Below in the list of Stunning shower tiles ideas

1. Go for Classic Mosaics

Go for Classic Mosaics

Mosaic tiles create depth and visual interest within the space. The ombre effect of the colors changing from cool to warm give an illusion of added height and elongation. Use it on one wall as a background highlight or on all the surfaces for the effect of a visually interesting volume. 

2. Generate a Rugged Industrial Vibe with Exposed Bricks

Generate a Rugged Industrial Vibe with Exposed Bricks

Exposed brick shower tiles define the rugged industrial theme of this bathroom. These tile shower ideas work well when complemented by other elements like rustic vanity, exposed services, and accents. 

3. A Play of Juxtaposed Patterns

A Play of Juxtaposed Patterns

Cannot choose between the variety of shower tile patterns? Use them all in one! This tiled shower idea is the aptest example that shows how you can juxtapose different tiles to create a stylish and harmonious space.  

4. Bring in the Rich Moroccan Aesthetic

Bring in the Rich Moroccan Aesthetic

Moroccan fishtail shower tile designs feel like a luxurious respite. They bedazzle the bathroom space with grace and an alluring aesthetic. The bright blue hues, the elegant shape, and the scale of the design make for a highly sophisticated shower tile design idea.

5. Let it be Simple and Subtle with Lapping Wooden Planks

Let it be Simple and Subtle with Lapping Wooden Planks

Want to move away from all-whites, but need a subtle sober bathroom aesthetic? Go for these light wooden plank shower tiles. They are perfect for getting a neutral muted look, yet add character and finesse to the space. 

6. Create Interest with Chic and Dramatic Chevron Tiles

Create Interest with Chic and Dramatic Chevron Tiles

Both diagonal and chevron patterned tiles work well for elongating a space. This shower tile design is perfect for small bathrooms where the area if not done right, may feel claustrophobic. Use contrasting colors to create drama and interest within the space. 

7. A Shower That Gives Nautical Nostalgia

A Shower That Gives Nautical Nostalgia

Showers are for relaxation, that’s exactly what this tiled shower ideas represent. A bathroom that feels like an oasis of soothing nautical experience. The deep blue tones calm the nerves while giving a sea-boarding vibe.

8. Bring Nature Inside with Pebble Tiles

Bring Nature Inside with Pebble Tiles

Want to feel at one with nature in the comfort of your bathroom? Use subtly toned pebble tiles in your shower. These modern shower tile ideas are just perfect to bring you close to nature and be reminiscent of a beachy escape. The continuation of the same tile on the floor and walls creates a concentrated space.  

9. Keep it Natural with Stone Shower Tiles

Keep it Natural with Stone Shower Tiles

Natural stone tile showers are a perfect fit for small bathrooms. The natural minimalist aesthetic maximizes the space available and makes it look clutter free and soothing. The contrast created by the floor tiles adds character to the space. 

10. Go Modern with All-Whites

Go Modern with All-Whites

Modern all-white shower designs define elegance. Large white tiles with white grout and sleek faucets and frame details create this alluring minimalist shower design. Be mindful of the lighting, it makes all the difference. 

11. Go for a Rustic Wooden Aesthetic

Create a Personal Spa with Subtle Earthy Tiles

A bathroom shower tile idea that will invigorate a natural in the woods vibe uses dark rustic wooden tiles. The horizontal tiles elongate the space making it appear wider and bigger. The dark natural hues create a raw rustic ambiance for the space. 

12. Create a Personal Spa with Subtle Earthy Tiles

Create a Personal Spa with Subtle Earthy Tiles

If you wish to create a personal spa-like oasis in your bathroom, adopt this bathroom shower tile idea. The subtle earthy tones, large tile size, and minimal grout used in unison on walls, floor, and ceiling create a spacious sauna-like bathroom space.  

13. Go Glam, But Subtly 

Go Glam, But Subtly 

Glamorous bathroom designs that are also subtle make a ravishing space. The marble tiles in conjunction with floor similar toned subdued mosaics are great luxurious walk in shower tile ideas. Complement with statement accessories like chandeliers or rose-gold faucets to match the tiles. 

14. Live the Royal Life, Go for Marvelous Marble

Live the Royal Life, Go for Marvelous Marble

The splendid look of marble is simply unmatchable. A large marble slab adorning the floor and the walls seamlessly creates a royal spectacular shower. The soft pink tone, the elegant pattern, and the brass faucets are the defining features of this royal bathroom design

15. Let the Space Flow, Use Wavy Tiles

Let the Space Flow, Use Wavy Tiles

Add dimension and texture to the bathroom space by using 3D wavy tiles. These small bathroom shower tile ideas make the space look bigger and add to the overall visual, textural, and spatial dimension.

16. Add a Hint of Bold with Byzantine Style Tiles

Add a Hint of Bold with Byzantine Style Tiles

Make a blingy statement with shimmery gold penny tiles. Or, add an ornate highlight to the shower wall to create a bold Byzantine-style-inspired space. This state of art bathroom shower tile idea is anything but basic. If you cannot decide between two bipolar styles, opt for unique blends such as this. It is the perfect synthesis of a subtle and bold design. 

17. Make a Stylish Statement with Art-Deco Aesthetic

Make a Stylish Statement with Art-Deco Aesthetic

A shower tile idea that combines structure and organicness in a remarkably stylish manner. This Art-deco-inspired bathroom design is made up of warm toned pink grid and terrazzo tiles. The structured tiles act as a highlight alongside the flowy terrazzo tiles. The combination creates a seemingly mobile space with a focus. 

18. Adore the Chic Pastels

Adore the Chic Pastels

Create a stunning bathroom with soft-hued pastel tiles such as these. Taking cues from the bygone retro style, this shower tile idea makes a feminine, subtle and chic bathroom aesthetic. 

19. Embrace the Minimal Approach of an Industrial Design

Embrace the Minimal Approach of an Industrial Design

Natural rustic tones of wood and concrete work well for both small and large bathroom spaces. This shower tile idea comprising of exposed concrete textured tiles seamlessly flowing from the floors to the walls hints toward an industrial design approach. Use these tiles alongside natural wooden textures and exposed services for an added industrial character. 

20. Grace Your Space with Parquet Tiles

Grace Your Space with Parquet Tiles

Who says the wood is meant for the non-water zones? Wood-like ceramic tiles allow you to bring the rugged charm of wood to the bathroom. Use elegant wooden parquet tiles to create a graceful and warm bathroom design. Contrast the wooden pattern with marble tiles for a sophisticated look. 

21. Aim for a Timeless look with Marble Tiles

Aim for a Timeless look with Marble Tiles

The classics never go out of style! Take this instance of overall marble tiles in the bathroom. The rich texture of marble with little to no grout creates a holistic volume. The timeless feel of the space is complemented by classic elegant fixtures and faucets. 

22. Achieve a Structured Look with Honeycomb Tiles

Achieve a Structured Look with Honeycomb Tiles

A modern shower tile idea that is equal parts sophisticated and playful defines this bathroom space. The honeycomb-like pattern of the tiles has a structured yet playful vine whereas the contrast of black and white creates a sophisticated feel. Furthermore, the scale and pattern change on the floor thus adding to the character of the space.  

23. Hop on the Terrific Terrazzo Trend

Hop on the Terrific Terrazzo Trend

This elegant, chic and supple shower tile idea is made using terrazzo and graphical line tiles. The terrazzo trend has taken the industry by storm. The flowy pattern of the terrazzo balanced by the stark solid lines creates a visually interesting and alluring bathroom.   

24. Bring in the Vintage Vibe with Distressed Tiles

Bring in the Vintage Vibe with Distressed Tiles

Bring in a vintage charm in your bathroom space with this unique shower tile idea. Use country-style-inspired distressed textured tiles in your space for an elegant charming shower space. Additionally, you can complement the vintage vibe with rustic and natural tiles.    

25. Play Around a Little with Feature Tiles

Play Around a Little with Feature Tiles

Another unique bathroom shower tile idea consists of this vibrant combination of tiles. The charming herringbone tiles are used creatively to make a playful composition. The cool tones of turquoise contrasting the warm browns add to the dramatic visual scene. 

26. Be Nature-Inspired, Use Natural Graphics

 Be Nature-Inspired, Use Natural Graphics

A bathroom that’s an extension of your bedroom should bring in the same elaborate designs. Nature-inspired motifs on shower tiles sculpt a bathroom that is in line with the rest of the house. This bathroom shower tile idea has limitless options and flexibility in terms of what you can achieve. 

27. Opt for a Seamless Look

Opt for a Seamless Look

Seamless natural stone tiles that bind the whole space in a unified natural aesthetic are what make this shower tile idea special. The space flows as a monolith. Sleek details of the fixtures and faucets retain the sanctity of this spa-like bathroom space.

28. Use the Classics with a Twist, Go for Mini-Subway Tiles

Use the Classics with a Twist, Go for Mini-Subway Tiles

Tired of the same subway tiles, but don’t want to move away from its sleek appearance? Use them with the twist, go for mini subway shower tile ideas for a refreshing take on the classic form. Furthermore, you can go for cool and soothing hues to create a stunning bathroom design. 

29. Go Bold with All-Black

Go Bold with All-Black

If you love a clean minimalist aesthetic but want to move away from the typical white slate, go for an all-black design. This bold yet minimal shower tile idea exemplifies the sharpness and sleekness of a modern design with a twist. The matte tiles cut to make a directional focal point define the space.  

30. Go Big or Go Home with Dramatic Tiles

Go Big or Go Home with Dramatic Tiles

A bathroom tile design that oozes glamour and epitomizes over-the-top designs, has to be made using shiny golden mosaics. This style shower tile design idea is for the fearless, glamorous, bold souls out there. 

31. Create a Jovial Pattern

Create a Jovial Pattern

If you’re looking for a shower tile design that will speak for your friendly and jolly personality, this shower tile idea is for you. Subtle graphical wall tiles that when pieced together like puzzles of a jigsaw create an interesting pattern and are just the perfect expression of a quirk in design. 

32. Up Your Design Quotient with Artsy Tiles

Up Your Design Quotient with Artsy Tiles

Need your bathroom space to be an expression of art? Opt for artsy decor tiles like these. This shower tile design idea works perfectly when paired with monochromatic mosaics. You can go wild with your designs, sizes, and types of murals in the shower.  

33. Please the Eye with Ornate Organics

Please the Eye with Ornate Organics

If you are looking for royal shower tile designs without having to splurge on marble, consider shower tiles with ornate patterns. The organic and ornate pattern adorned in gold lining complemented by brass faucets defines this remarkable bathroom. 

34. Give a Touch of Vibrance

Give a Touch of Vibrance

A colorful shower for a colorful personality! Make your bathroom space a place for energizing and cheering by using vibrant tiles like these. They add a very fun and playful touch to the otherwise boring space. 

35. Opt for Tiles as Good as a Wallpaper

Opt for Tiles as Good as a Wallpaper

An out-of-the-box shower tile design idea uses small tiles to create a full-length mural. To dramatize the look, go for vibrant abstract patterns with contrasting hues and ornate patterns. You can even go for striking glam or retro design aesthetics. 

A walk in shower sitting next to a tiled wall
A black and white tiled bathroom with a free standing tub
A bathroom with a glass shower door and a wooden sink
A large bathroom with a walk in shower next to a sink
A bathroom with a walk in shower next to a sink
A bathroom with a claw foot tub and a walk in shower
A white bath tub sitting next to a window
A bathroom with two sinks and a bathtub
A bathroom with a walk in shower next to a bath tub
A bath tub sitting next to a window in a bathroom

Final Verdict

In the end, it all boils down to your style! Let your personality find expression in the design of your bathroom. Choose the ideal shower tile for your creating your at-home spa-oasis. 

FAQs

1. What Color of Tiles Will Enhance the Size and Spaciousness of   My Small Bathroom?

For small bathrooms, lighter colors and neutral tones work well in making the appearance of the space bigger. Whites specifically add volume and depth to the space making it appear larger. 

2. What Is the Best Tile for Shower Walls?

Ceramic tiles and porcelain tiles are the best tiles for shower spaces.

3. What Size Tile Is Best for Smaller Bathroom Spaces?

Ideally, smaller tiles are better for smaller bathroom spaces. They make the space look proportionate, larger tiles on the other hand make the space look smaller. 

4. What Bathroom Tiles Are on Trend?

Recently, matte tiles and earth shower tiles were becoming quite popular. However, that has changed, now terrazzo tiles and glazed pastel tiles are trending. 

5. Should a Bathroom Floor Be Darker Than the Walls?

It is recommended for the bathroom floor be darker than the walls so that the spaces stand out. However, the rule can be tweaked as per convenience and there can be exceptions. 

Read more:-

Waterproofing: Types, Advantages & Disadvantages

0
Waterproofing

Waterproofing applies an impermeable layer to the surface of a building’s foundations, walls, roofs, and other components, such as concrete, leather, or fabric, to prevent water from penetrating the surface. Here, we’ll learn about waterproofing, the many forms of waterproofing, and the pros and cons of using waterproofing.

Waterproofing protects your home from building structures like toilets, pools, tanks, walls, and ceilings. As a result, it helps to keep our homes dry and protects them from the damaging effects of water and moisture. Damp proofing is a word used to describe a foundation’s ability to resist water penetration even under submerged situations, which is all waterproofing.

Here we will be discussing types of waterproofing with its advantages and Disadvantages

Waterproofing: the Science of Keeping Water Out

Making anything watertight or water-resistant is what we mean by “waterproofing.” This procedure allows insulating materials and structures to withstand and resist water penetration under the appropriate conditions. It is possible to utilize these items in wet conditions or at specific depths. On balconies and warehouses that are supposed to be in direct touch with water, it is employed to enhance the comfort of buildings. What kind of waterproofing material should be used depends on where the product will be used.

A building’s waterproofing creates an impenetrable barrier on the surfaces of the building’s structures, such as its foundation, roof, walls, and other structural parts. Waterproof and water-resistant building surfaces are available.

Waterproofing protects a surface against water penetration or other external pressures, such as hydrostatic pressure and capillary, making it water-resistant. It’s a method for attaching flexible and long-lasting membranes to a continuous system. In the building and design sectors, this method is utilized to limit the impact of liquid penetration on systems.

Concrete Waterproofing

Concrete Waterproofing

Concrete surfaces in a structure become more resistant to wear and tear when insulating.

Using cement as a waterproofing material is the most straightforward approach accessible because the elements needed are readily available and specific to mix and apply together.

This waterproofing is typically seen in inside spaces like bathrooms and other locations that aren’t exposed to direct sunlight or weather.

Liquid Waterproofing

Liquid Waterproofing

Liquid membranes, which may be applied by spray, roller, or trowel, are more flexible than cementitious waterproofing because they incorporate a priming layer and a final finish.

Depending on the manufacturer, the waterproofing coating’s endurance can exceed 280 percent surface elongation after curing a rubber coating on a wall. The polymer-modified asphalt liquid layer, available from several manufacturers in varying grades for trowels, rollers, or sprays, can be sprayed.

Bituminous Coating Waterproofing 

Bituminous Coating Waterproofing 

Coating made of asphalt Polymer grades and fiber reinforcing, commonly known as asphalt coating, can impact waterproofing’s flexibility and water resistance. Bituminous coatings are most commonly used beneath wet bolts on concrete foundations. Using flexible materials like polyurethane or acrylic-based polymers, bitumen manufactured material is used in these waterproofings since it becomes exceedingly brittle when exposed to sunshine.

Bituminous Membrane Waterproofing

Bituminous Membrane Waterproofing

Since bituminous waterproofing is inefficient, it is commonly employed on low-slope roofs. It consists of a flashlight and an adhesive membrane applied to the layer. Asphalt, polymers, and filler are the building blocks of self-adhesive compounds, while resins and oils are added to enhance adherence. Membrane life has a stronger binding than adhesive. Thus, the adhesive has a longer shelf life since the flashlight is protected from moisture and air.

In this approach, the flexible asphalt layer is coated with a torch seal and a self-adhesive waterproofing membrane. Self-adhesive membrane waterproofing is a common approach used for on-site waterproofings. However, torch seals are a more permanent and cost-efficient alternative.

Membrane Made of Polyurethane 

This polyurethane liquid membrane is ideal for flat roofs because of its excellent flexibility and weather resistance. Polyurethane is extremely sensitive to moisture levels. Hence moisture content should be evaluated before application to avoid membrane peeling or debonding.

Why Is It Essential to Protect Your Home or Office from Water?

Many people believe that water damage in their homes is not a huge concern, but this could not be further from reality. According to statistics, water damage is seven times more common than fire damage and six times more often than burglary. It doesn’t matter how big or small the water leak is; the consequences may be severe. To prevent water damage to your house, here is a list of things you can do.

  • A yearly inspection for cracks or leaks in the hoses leading to your washing machine, dishwasher, and refrigerator is recommended. You should also replace hoses every five to seven years.
  • Your showers and tubs should be waterproof, so check the caulking around them. Replace the caulk if you see any gaps in the surface. Cheap caulk can keep water from leaking through your floor.
  • Your water supply should be switched off if a pipe bursts in your home. Shutting off the water main in most cases will cease water flow.
  • Make sure your appliances are safe by placing floor pans under them. Even though they can’t protect you from a catastrophic leak, they can prevent harm from minor, sluggish leaks that go unnoticed for a long time.
  • An alarm will sound if water is found in a particular region, alerting you to the danger. It may be installed in basements, bathrooms, kitchens, laundry rooms, and near sump pumps to monitor water levels.
  • When at work, it’s important to safeguard your products from water, especially if you’re selling industrial products like machinery, there are various ways to protect your products from water. A perfect example is coating your products, coating your products will help it protect from water, contact a Wisconsin industrial coatings expert and set an appointment to coat your products.

The Steps in Waterproofing Brisbane Contracts & Processes

Steps in Waterproofing Brisbane Contracts & Processes

Here are some of the common and easy steps that you should know in waterproofing your house.

Step 1: First, sweep and mop the floor well to remove loose debris, dirt, or grease. All membrane-based waterproofing coating schemes require regular floor cleaning.

Step 2: Before applying a primary coat to the structure’s floor, bitumen membranes should be primed using a solvent- or water-based primer.

Step 3: Unroll the sheets on the structure’s floor after ensuring they are appropriately aligned.

Step 4: The layer on the underside of the membrane can be burned off using a torch. The membrane is now ready to be bonded to the concrete surface beneath it.

Step 5: Resolutely press the membrane into the concrete to ensure perfect adhesion. More attention should be paid to the overlaps, edges, and angles to ensure appropriate bonding.

After we have a clear understanding of waterproofing, it is also essential to know some of its merits and demerits: 

5 Pros of Waterproofing: 

  • Prevents the occurrence of fractures in the concrete floor by utilizing this method.
  • A robust construction’s lifespan will be lengthened as a result.
  • It protects the reinforcement against corrosion.
  • In addition, it helps to keep the structure dry.
  • You can keep the ceiling and walls free of leaks using this product.

4 Cons of Waterproofing: 

  • Due to solvent evaporation, the black hue of bitumen-based goods softens in the summer heat.
  • The application of polyurethane coating inhibits concrete’s inherent capacity to breathe.
  • The polyurethane protective covering allows water to develop underneath the impermeable floor coating with a limited pot life.
  • Further leakage is caused by improper crack maintenance during cementation waterproofing.

Waterproofing: a Mandate Need of the Hour

Regular property upkeep is essential for homeowners who want to reduce their responsibility in an accident. When it comes to protecting our homes and our lives, waterproofing is a must-have. It’s usually best to consult with waterproofing brisbane, which has a specialization in waterproofing, to ensure that you receive a guarantee-proof home.

To get more information:-

30+ Spectacular Retaining Wall Ideas for Your Landscape

0
Retaining Wall Ideas

Ideas for functional retaining walls consider several advantages, making them typically a wise investment. They can reduce erosion, stabilize sloped terrain, provide better water management, reduce landslides, and increase the overall worth of your home besides adding useful space to your yard.

Top 5 Reasons You Need a Retaining Wall:

retaining wall idea

Other perks of having a retaining wall in your backyard are:

1. Preventing Soil Erosion

Andinas, or agricultural terraces, are still used by farmers in Peru’s Sacred Valley to cultivate bountiful produce. Imagine the incredible terraces of ancient South American civilizations. For your home, a retaining wall can be used for similar purposes; landscaping is much simpler when your yard is level.

2. Better Water Management

To make your gardening and lawn care more practical, retaining walls also aid in slowing the flow of rainwater. Installing a water-hungry retaining wall system, potentially with a rain garden built into its design, will help Portland residents keep polluting street water out of the city’s rivers.

3. Aesthetic Appeal

Your yard is a fantastic area to invest in, and cheap retaining wall ideas can enable you to make the most of it. Retaining walls can boost the value of your property by up to 15%, whether you’re wanting to create a little dining area or want something that also serves as an additional structural component outside the home.

4. Revamping Drainage

Retaining walls can be utilized to control where water flows. When a slope is close to water, this is extremely useful. However, remember constructing a wall for this reason is subject to several state and local laws. So, it’s crucial to conduct research before creating.

5. Usable Slope

Sloped lands are useful because of retaining walls. The walls level the slope to prevent soil and water from flowing downward. A sloped area can benefit from having retaining walls to help with pedestrian access. A retaining wall flattens the area, making it simpler to stroll there rather than up and down the incline.

If you’re confused about how to build a retaining wall that is both functional and aesthetic, you’re at the right place. Here is a list of inexpensive retaining wall ideas that stand out from the crowd.

1. Natural Stone Retaining Wall Ideas

Natural Stone Retaining Wall Idea

An excellent way to decorate your backyard and make it functional is to build raised garden beds using retaining walls. A raised garden bed looks gorgeous to everyone. Consider adding a gorgeous stone, brick, timber, or concrete retaining wall to a bed to improve its appearance.

Fun Fact: You can create a cave and an interesting feature to the retaining wall. If preferred include a mini statue or a garden with appropriate lighting.

2. Piled-Up Retaining Wall

Piled-Up Retaining Wall idea

A rustic yard might benefit greatly from piled-up retaining walls ideas. All stone walls are stacked ‌regularly but in this case, we’re talking about walls made of smaller, flat stones that fit together well.

3. Stepped Garden Retaining Wall

Stepped Garden Retaining Wall idea

You can add a raised garden bed to your retaining wall installation in a few different ways. One method is to create a raised garden bed behind a strong retaining wall that will hold back the soil, pebbles, and grass. The other way is to use a garden bed to hold the earth while making it appear like a multiple-tiered garden.

Pro Tip: This design can be applied to any material irrespective of its nature, it will still add a unique look to your garden area.

4. Uniform Block Retaining Wall Ideas

Uniform Block Retaining Wall Idea

Block walls are incredibly adaptable. They can be quite tall, holding back mountains of earth created by clearing land for a road, house, or a variety of other constructions, or very simple with only a few courses of blocks.

5. Multi-Layered Retaining Wall

Multi-Layered Retaining Wall idea

Most wall materials can be used to construct multi-layered retaining walls. They’ll probably need big stones or blocks because a wall made of smaller ones might not be sturdy enough. It will be crucial to have good drainage, especially when you descend to the lower tiers. When water flows downwards, if there is insufficient drainage, it will pool at the lowest tier.

6. Experimenting With Materials

Experimenting With Materials idea

To build a retaining wall, you don’t always have to use stone, concrete, or landscaping timbers. The level of structural integrity that these materials provide might not be necessary for your purposes. Consider other materials if you only want to create a few small garden beds, divide up an area in your yard, or level out your patio.

Fun Fact: Based on the texture and shade of the metal used, you can decorate it with a pop art or an interesting art piece. This is an amazing DIY project if you plan it for your garden space.

7. Rustic Wooden Retaining Wall Ideas 

Rustic Wooden Retaining Wall Idea

For a backyard or garden, a landscaping timber retaining wall is perfect. Lighter-tinted wood walls create a trendy, contemporary impression, while weathered wood walls give the landscape a rustic character. We can use many sorts of wood for this design. For optimum aesthetic impact, install wood lengths either horizontally or vertically.

8. Retaining Wall Ideas for Sloped Backyard

Retaining Wall Ideas for Sloped Backyard

The wood log crib is built by interlocking logs with notched logs at the joints to prevent dirt and debris from pouring onto this alpine route. Each tier is spaced far enough apart from one another to prevent creep pressure.

9. The Wood & Stone Combo

 The Wood & Stone Combo retaining wall ideas

By cleverly integrating stones and tree logs, this wall was constructed in the style of nature. The wood wall might just as readily serve as the defining backdrop of a rear patio or a visual barrier separating the front yard from a public sidewalk as it is here next to a stone path. But remember that rotting, aged wood frequently draws mice.

Pro Tip: For the wooden part of the design, if there are adequate branches you can use slices of the bark. This way the elevation can be maintained as the same as using the whole bark.

10. Static Concrete Retaining Wall Ideas

Static Concrete Retaining Wall Ideas

A plain gray concrete planter box forms a part of the static retaining wall. But, the addition of colorful flower beds and metal fencing can distinguish the plain wall. To enhance the texture of the concrete wall add mood lighting and other elevating decorations.

11. Illusional Retaining Wall

 Illusional Retaining Wall idea

The cement retaining wall is constructed from separate “containers” that are connected. This element offers the garden strength and style, making it the ideal solution for yards with little room for a lawn. While concrete barriers often overpower the landscape, this illusional concept is a vertical garden that is both functional and appealing.

Pro Tip: Explore other style of decor to add a pop of color to the monotonous pattern. With full flexibility, this design allows you to explore multiple container and ornamenting options.

12. Cinder Block Retaining Wall Ideas

Cinder Block Retaining Wall Idea

Cinder blocks are excellent building materials and may be used to build various pieces of outdoor furniture, a garden privacy fence, and other things in addition to garden walls. Cinder blocks, which are made of cement, different materials, and water, have many benefits.

13. Bohemian Retaining Wall

Bohemian Retaining Wall ideas

A concrete retaining wall in this steeply sloping backyard gives the boho-inspired patio a sense of seclusion. For more privacy and natural decoration, the wall is overhung by a planted yard. Pairing it up with similar themed furniture and cushions can make the space more cozy and uplifting. 

Pro Tip: Add a complementing pattern of carpet to complete the look. Include a porous rooftop above or next to the seating area.

14. ‘Less is More’ Retaining Wall Ideas

‘Less is More’ Retaining Wall Ideas

The boundary wall of this modern lakeside penthouse exhibits a symmetrical, minimal design with concrete style retaining walls that add a sculptural design element to draw your eye to the home’s striking architectural elements.

15. Antique Brick Style Retaining Walls

Antique Brick Style Retaining Wall idea

This classic home’s front yard has a neat, yet fascinating appearance thanks to the towering brick privacy walls that flank the sidewalk and serve as retaining walls. To add visual appeal to the front of your home, think about installing walls in a range of heights.

16. Cascade Retaining Wall Ideas

Cascade Retaining Wall Idea

Do you want to take full advantage of a site’s natural slope? Build a waterfall that cascades directly into a koi pond in a stone retaining wall. Such an organic appearance helps stabilize a slope without detracting from the unadulterated beauty of your yard. This is one of the best and most refreshing retaining wall ideas for a sloped backyard.

17. Retaining Wall With a Hot-Tub

Retaining Wall With a Hot-Tub

Retaining walls help keep dirt and rock in place on a hillside and uneven yards to create level surfaces and stop erosion. In this house, the yard’s retaining walls assist make level areas for playing and entertaining guests.

18. Infinity Pool Retaining Wall Ideas

Infinity Pool Retaining Wall Ideas

If building a pool on a hillside appeals to you, this is a suitable idea for your retaining wall. The design provides the luxury of an infinity-edge pool and access to the stunning panorama by removing the middle section of this retaining wall.

19. Retaining Wall With Seating

Retaining Wall With Seating

Providing a seating space in the design of retaining wall is a significant way of maximizing functionality. This design with seating is a thoughtful addition to a backyard with a dining area. Complementing the lush effect of a garden, you can introduce a planter box in between the seating area.

20. Retaining Wall With Steps

Retaining Wall With Steps

Running bond construction is used to create a sturdy concrete retaining wall that resembles a classic brick wall. Each brick course is offset by 3/4″ so that even though the wall is level, it effectively curves back into a hillside. As a result, the wall is supported by the backfill rather than being pushed against it.

21. Meandering Cheap Retaining Wall Ideas

Meandering Cheap Retaining Wall Ideas

Examples of how to landscape steep slopes include this softly curved concrete block retaining wall on a golf course. They have placed the little tree further back to allow for root development without perhaps damaging the wall, as seen.

22. Gabion Retaining Wall

Gabion Retaining Wall

For expressive and artistic purposes, they construct gabion walls from a wire cage, basket, or mesh frame that is filled with rocks, concrete, or even slag glass pebbles. The structural differences between gabion designs and other retaining wall designs are significant. Because they are more porous, runoff can pass through them rather than around them, protecting the building.

Fun Fact: In industrial environments, such as bridges, embankments, and seawalls, gabion walls are most frequently utilized as retaining walls or as towering, vertical barriers. 

23. Sandstone Retaining Wall Ideas

Sandstone Retaining Wall Ideas

The front yard has a modest, angular retaining wall made of natural stone. By using the same stone for the steps and the capstones on the natural rock wall, they have created a visual connection between the stairs and the wall.

24. Inexpensive Retaining Wall Ideas With Fieldstone 

 Inexpensive Retaining Wall Ideas With Fieldstone 

Aside from a few larger stones for visual interest, the natural fieldstone retaining wall shown here consists primarily of flat stones. The stones are arranged on the wall in a way that draws attention to the split face and exposed edges. The wall is gently curved to match the natural terrain.

25. Reused Materials for Retaining Wall

Reused Materials for Retaining Wall

Tire retaining walls are a good choice for soil erosion management because they are sturdy, long-lasting, and constructed of recyclable materials. A tire design is very do-it-yourself and cost-effective.

On level, cleared land, stack old tires one on top of the other to create a wall. A further filler material is added as it is being crushed, and they then filled the bottom row of tires with pebbles, soil, sand, or a combination of these.

26. Terrace Style Retaining Wall Ideas

Terrace Style Retaining Wall Ideas

A residence with a steep grade can be transformed into a beautiful and practical front yard by adding a terraced wall. Installing a terrace gives homeowners a tonne of alternatives, like a spot to display plants, a grassy area for a lawn chair, and landscaping with both garden beds and lawns.

Pro Tip:  If you are looking ideas to spice up repetitive auditorium seating, this terrace themed retaining wall is your go-to solution. To avoid hindrance go for low-level bushes or shrubs.

27. Retaining Wall With a Fireplace

Retaining Wall With a Fireplace idea

Adding a fireplace to a retaining wall is one of the best ways to make your garden even better. Your backyard will become a favorite gathering place for friends and family if you make it inviting. Barbecues, swimming pools, hot tubs, pergolas, decks, and outdoor kitchens are crucial social connectors in the backyard.

28. Pitch Black Retaining Wall

Pitch Black Retaining Wall idea

Painting your retaining wall in pitch black will create a focal point and highlights even a simple brick wall. It is effortless to emphasize a particular architectural feature. It can be stairs, seating, or a planter box.

29. Tiled Retaining Wall Ideas

Tiled Retaining Wall Ideas

By introducing tiles, it is possible to break the stereotypes of retaining walls. This will instantly improve the character of an outdoor dining area or a seating space. The addition of suitable furniture and plants is a significant way to amp up your outdoor patio.

Pro Tip: The usage of tiles can be explored in multiple areas other than an island counter, it can applied to a water fountain or a water pond adding character to the retaining wall.

30. Cheap Retaining Wall Ideas With Earth Bag 

Cheap Retaining Wall Ideas With Earth Bag

The construction of earthbags is one of the best-retaining wall ideas for a sloped backyard. It is an economical and sustainable way of providing security and strength to the walls.

It doesn’t require any binding materials and just involves placing the earthbags in an interlocking pattern. Usually, the earthbags are made of ecological materials such as jute, and polymer and are filled with soil

31. Interlocking Stone Retaining Wall

Interlocking Stone Retaining Wall idea

When it comes to stylish retaining walls, this design is just brilliant. To construct the wall, the design asks for interconnecting blocks. These cylindrical bricks provide so much depth to the whole concept and depart from the typical brick or planter box concepts.

32. Natural Landscape Retaining Wall

Natural Landscape Retaining Wall idea

Grass, wood, and stone combined intriguing ideas for these retaining wall landscaping ideas! By fusing all these components to make a modest design that will enclose nature, you can construct your artistic masterpiece. It would be ideal for a little courtyard or outdoor garden area where visitors can relax and take in the view.

A fire pit with wooden chairs around it with retaining wall
A fire pit with wooden chairs around it
with retaining wall ideas
A patio with a fire pit and seating area
with retaining wall idea
A garden with a hot tub surrounded by flowers and a retaining wall
A white house with a green lawn and a retaining wall
A patio with a grill and a retaining wall
A brick wall with a black iron fence and a retaining wall
A garden with a stone wall and a retaining wall
A backyard with a swimming pool and
 a retaining wall
A hot tub sitting on top of a stone patio
with a retaining wall

On a General Note

Your needs and preferences both have a role in the style of retaining wall you select. If you need to rebuild a retaining wall that is in danger of crumbling or if a slope is dangerously encroaching on your property, you must build practical, solid retaining wall ideas. Cheap retaining wall ideas are accessible to even novice builders.

FAQs

1. How Are Retaining Walls Tied Up with Each Other?

There are various retaining walls kinds, each with a unique construction technique. You could discover that mortar is your best option for holding the stones in place for retaining walls made of stacked stone or natural stone. The wall blocks for a retaining wall have lips that fit into the course below, securing them in place.

2. Does a Retaining Wall Construction Require Drainage?

There is just one correct response to this question: yes. A retaining wall’s stability could be destroyed if water collects nearby. You should focus most of your attention on the chilly weather. Several issues can be avoided if there is enough drainage behind the wall.


3. What Retaining Wall Is the Simplest to Construct?

The simplest form of a wall for DIY people to construct is a short wall that is under three feet high and made of concrete blocks or masonry blocks. They are excellent landscaping options for raised flower beds or the front yard.

4. What Is the Lifespan of a Typical Retaining Wall?

Retaining walls’ durability is influenced by several elements, such as the soil, soil quality, and the microclimate of the outdoor area. A natural stone wall can last for 100 years or longer when it is built and designed properly.

5. What Material Is Used to Fill the Space Behind a Retaining Wall?

Crushed stone or gravel works well as a retaining wall’s backfill. On the first foot of the wall, start with stone or gravel; for the next two feet, use compacted earth.

To get more information:-

Coffered Ceiling Ideas: Everything You Need to Know About

0
Coffered Ceiling Ideas

Want to have drama and depth to your ceiling? Then choose coffered ceilings. The coffered ceiling is an effective option for adding aesthetics and value to your space. They help absorb noise and prove to be an excellent camouflage on your imperfect ceiling. 

The coffered ceiling also aids in hiding the peculiarities of a ceiling’s structural components from view. Interested enough? Read along to learn more about coffered ceilings and how to stylize your space!

How Do You Define a Coffered Ceiling?

Define a Coffered Ceiling

Before understanding, what is a coffered ceiling? Let’s know what is a coffer. Architecturally, a coffer means a decorative recessed sunken panel in the ceiling. The termcoffercomes from an ancient Greek banker who invented them to hide his money. They are usually polygonal in shape. Traditionally, wooden beams were used to make the coffers. 

Coffers, when arranged in a series, form a coffered ceiling. The coffered ceilings are designed in grid patterns in the form of 3- dimensional sunken panels. They are initially used to conceal structural imperfections in the ceiling and to provide acoustical benefits. Its patterns can range from simple square patterns to complex octagonal patterns. 

Top 5 Considerations to Be Made for Coffered Ceiling Ideas

Considerations to Be Made for Coffered Ceiling Ideas

1. Ceiling Height 

Even though coffered ceilings lead the eye upward, the beams extend into a room from the bottom, taking up some overhead space. The coffered ceilings can work best in 9’ or higher rooms. Lower-ceiling rooms may develop a claustrophobic feeling. 

2. Functional Beams or Faux 

The coffered ceilings are generally non-load bearing, except for two-story ranch homes. They can be installed to conceal the overhead beams of the ceiling. The coffered ceilings are designed mainly for aesthetic purposes. Their structure is made of hollow faux beams.

3. Cost of Installation 

Before installing your coffered ceiling, you should be aware that it is a labor-intensive job. It requires highly skilled laborers with advanced carpentry skills. On average, $25 per sq. ft. is charged for its installation. 

4. Grid Size 

Grid size determines the complexity of the coffered ceiling. The more complex the ceiling design, the larger the grid. It’s better to start simple and then move towards more complex designs as per the requirements. Your preference will determine the shape and complexity of the grid.

5. Material for Panel 

The sky is the limit for material choice. Several materials are available for coffered ceiling panels. Usually, wood is the preferred material in Western countries. Wood can be painted or stained to match your wall color scheme.

5 Best Benefits: Coffered Ceilings Can Offer 

Best Benefits: Coffered Ceilings Can Offer 

1. Elegant Designs 

The coffered ceiling provides you with several options. They have multi-dimensional effects, intricate finishing, a royal design, and a range of panel colors.  

2. Easy Installation 

Usually, coffered ceilings are made of PVC these days, making them lightweight and easy to install and maintain. 

3. Value Addition 

The coffered ceilings are made to add aesthetic appeal and value to your space. They even have a high resale value for your property. 

4. Sound Absorption 

Coffered ceilings are highly used for sound absorption, noise reduction, and echo resistance. They help to provide a calmer and more tranquil space. 

5. Mold Resistance 

Mildew, sagging, and mold can also be concealed with a coffered ceiling. Their light structure helps with easy cleaning and maintenance. 

These 15 Steps Will Help You Install Your Coffered Ceiling

Steps Will Help You Install Your Coffered Ceiling

Let’s understand how to build a coffered ceiling – 

  1. Analyze the plan and find the grid for your room.
  2. Prepare a detailed drawing of the coffered ceiling installation area. Use square grids for measurement and better understanding.  
  3. Determine the best location for beams to support the load.
  4. According to the space requirement cut box frames and use a 1” spacer in between for easy placement. 
  5. Arrange two side panels parallel to the ground and screw them. The third board is then used to connect perpendicularly. Make sure it is square and in proportion. 
  6. After adding the fourth board, screw it in 90 degrees to the first. 
  7. Repeat the process for the rest of the frames but this time perpendicular to the ground, so that it becomes the top of the coffered ceiling. 
  8. Fix plywood sheets to the frames. Cut ½” plywood pieces, the same as that of your frame, and screw them edge to edge. 
  9. Using a saw cut the coffers into square grids. 
  10. At ceiling height, around the perimeter of the room, install the furring strips. 
  11. After the grid is made, install the framing for the ceiling.  
  12. To the furring strips, add paneling or drywall. 
  13. After preparing the ceiling frame, attach the paneling directly to the furring strips with the help of screws or nails. Make sure to have a smooth and even surface. 
  14. Now you can even have your crown molding if needed. 
  15. At last, make sure, you get a level and correctly spaced paneling before nailing and fixing them. 

The 3 Types of Coffered Ceilings You Should Know About

 Types of Coffered Ceilings You Should Know About

1. Recessed Coffered Ceiling

The recessed coffered ceilings have deeper coffers to hide the beams, thus they appear raised. These are best suited for low-ceiling rooms to create an illusion of height. Recessed coffered ceilings are the most used ceiling these days.

2. Dropped Coffered Ceiling

They are only a few inches deep from the ceiling. To hide AC and ventilation ducts, the dropped coffered ceilings are the best. They work best in small spaces like kitchens and bathrooms.

3. Raised Coffered Ceiling

The raised coffered ceiling extends from the surface of the ceiling to hide any beam underneath it. They get a lot of height because they start from the ceiling surface, making the room look massive. 

Top 15 Coffered Ceiling Ideas to Incorporate into Your Space

1. Wood-Coffered Ceiling Ideas for Kitchen

Wood-Coffered Ceiling Ideas for Kitchen

A kitchen can be made elegant with a wood-coffered ceiling. You can add warmth and character to your kitchen with wood tones. Add a pendant light over the island to create a focal point. To get a modern coffered ceiling look, experiment with luxury paint choices, countertops, and other decor elements.

2. Vaulted Coffered Ceiling Ideas for Living Room

Vaulted Coffered Ceiling Ideas for Living Room

If you want to give a warm look to your living room, try a vaulted coffered ceiling. The wainscoting echoes the design on the simple coffered ceiling, giving the room depth. This coffered ceiling idea is one of the best ways to stylize your room. You can also try painting the ceiling a light color to create a more spacious look.

3. Traditional Color Palette for Coffered Ceiling Ideas

Traditional Color Palette for Coffered Ceiling Ideas

Be it any decor style or any color palette, a coffered ceiling can go with any decor style or color palette. But if it’s a classic and chic color palette with soft, neutral, and warm colors like navy, purple, or mauve, then it’s like a cherry on the cake. Because a muted and toned-down ceiling color can create a statement in your room.

4. Open Concept for Coffered Ceiling Ideas

Open Concept for Coffered Ceiling Ideas

With open-concept homes, coffered ceiling ideas find their way. They are an excellent option to visually divide an open-concept space. You can have a living room, kitchen, and dining area under the open plan and still have a coffered ceiling.

5. Space Utilization for Coffered Ceiling Ideas

Space Utilization for Coffered Ceiling Ideas

While coffered ceiling ideas can add value to your space, you should also consider other details in your room. Utilize the space well with clean and simple decor, neutral colors, and smooth lines. You can have a coffered ceiling and still have an accent wall in your room. 

6. Add Elegant White to Your Coffered Ceiling Ideas

Add Elegant White to Your Coffered Ceiling Ideas

If you want to have a simple yet classic feel in your room, then try to add elegant white to your coffered ceiling ideas. This will give enough depth and gap for enhanced ventilation and lighting. The right seating, TV cabinet, fireplace, and minimal decor will complement your coffered ceiling.

7. Simple Tray Coffered Ceilings Ideas for Living Room

 Simple Tray Coffered Ceilings Ideas for Living Room

You can experiment with tray-coffered ceiling ideas if you have a wide room with a high ceiling. A lighter shade of tray coffered ceiling with a chandelier or a pendant light will add grandeur to your room. The tray coffered ceiling is highly recommended to add visual depth and warmth to the space. Your ceiling beams will gleam when paired with this coffered ceiling.

8. Minimalist Black and White Coffered Ceiling Ideas for the Bathroom

 Minimalist Black and White Coffered Ceiling Ideas for the Bathroom

Nothing can beat black and white. When this classic color combination is paired with coffered ceiling ideas, they create a dramatic result, especially when they are installed in bathrooms. This coffered ceiling color will make the space appear larger without making it feel claustrophobic. Adding perfect lighting will make the space even more charming.

9. Shaded Coffered Ceiling Ideas for Living Room

Shaded Coffered Ceiling Ideas for Living Room

To get an organic feel in your living room, try having double-toned bars with bright cherry colors. Having lighting spots in columns will help add more depth to your living room. This coffered ceiling with well-spaced beams and shaded colors will add elegance to the space. 

10. Barn Wood Coffered Ceiling Ideas

 Barn Wood Coffered Ceiling Ideas

The barn wood coffered ceiling will offer warmth to your room. To create a modern living area, use a vaulted barn wood coffered ceiling style. Proper lighting and fan arrangements will add charm, refinement, and a fetish look to your room. The vaulted coffered ceiling is a magnificent combination of natural wood and barn wood, resulting in an elaborate design that adds interest and generates material contrasts.

11. Coffered Ceiling Ideas for Decoration 

 Coffered Ceiling Ideas for Decoration 

Give your coffered ceiling more flair with decorations. Experiment with curvy and deep coffers with modern pendant lighting fixtures. Try complementing the framework of your room with unique patterns of coffered ceiling ideas. Consider how much lighting you will require to complete your tasks.

12. Bedroom Coffered Ceiling Ideas

Bedroom Coffered Ceiling Ideas

Reclaimed wood can be used to create a coffered ceiling in a farmhouse or cabin bedroom. This coffered ceiling idea will make your bedroom more intimate. Matching furniture will complement the design of the ceiling. The wood coffered ceiling will ease the placement of lighting fixtures in key areas.  

13. Modern Drop Coffered Ceiling Ideas for Home Office

Modern Drop Coffered Ceiling Ideas for Home Office

Your home office should be separate from the rest of your home to enhance work focus. So, if you have a modern drop-coffered ceiling in your office, then the intimacy and productivity of your space will increase. Beams can be painted white with a wooden texture on the coffered ceiling to make the space more formal. 

14. Natural Wood-Coffered Ceiling Ideas

Natural Wood-Coffered Ceiling Ideas

For a more natural look, experiment with a wooden coffered ceiling. This could entail installing wooden panels that have been treated to maintain the wood’s natural color and texture or using unpainted beams. Have the right combination of light and dark shades to balance the color scheme. 

15. Cool Coffered Ceiling Ideas for a Rustic Home

Cool Coffered Ceiling Ideas for a Rustic Home

As it can work with almost any sort of decor and budget, the rustic style is one of the most popular interior design trends. Having a coffered ceiling will make the rustic home more rough and elegant. To give a cabin-like feel to your rustic home, add wooden beams to your coffered ceiling

Let’s Choose Among These Coffered Ceiling Ideas! 

Previously, the coffered ceilings were made out of stone and cut from a solid mass. Their main purpose is to brighten the ceiling and the space. 

So, are you prepared to select coffered ceilings for your home and office? What are you waiting for? Go consult a professional and prepare your ceiling for a coffered design. When installed correctly, your coffered ceiling will add aesthetics and value to your space. A coffered ceiling will bring style, elegance, royalty, charm, and character into your room. 

Coffered Ceiling Idea
A living room filled with furniture and a chandelier
A living room filled with furniture and a fire place
Coffered Ceiling design idea
A bedroom with a large bed and a couch
A bedroom with a bed, dresser, and mirror
A living room filled with furniture and a fire place
A office filled with furniture and a fire place

FAQs

1. How Would You Build a Coffered Ceiling?

The installation of a coffered ceiling requires a special skill set and expertise. A professional designer should do this job. Several steps are involved in the installation, from making coffers to framing and applying paneling.

2. What Is the Cost of a Coffered Ceiling?

There are several factors influencing the price of the coffered ceiling, like the size of your room, the materials to be used, the design, the labor involved, etc. The installation of a coffered ceiling required expertise and specialization. A coffered ceiling typically costs around $25 per square foot, depending on the design.  

3. What Purpose Does a Coffered Ceiling Serve?

Coffered ceilings can add value to your modern home. They can create depth and even conceal your ugly ceiling. These coffered ceilings have been used in several traditional houses to provide the benefit of sound absorption. They are considered elegant and formal for your home.

4. How Can You Distinguish Between a Recessed and Drop-Coffered Ceiling?

The basic difference between a recessed and a drop-coffered ceiling is the depth of the coffer. Recessed ceilings are deeper than drop-coffered ceilings. They can conceal the beams, but drop-coffers can’t. You can create an illusion in your room by combining these ceilings.

5. What Are the Disadvantages of Installing a Coffered Ceiling?

A coffered ceiling provides less flexibility in design and size when compared with prefab panels. Its installation requires a higher level of precision, expertise, and planning, thus having a higher risk of error. Installing a wooden coffered ceiling necessitates the use of specialized tools and skills.

Continue reading: