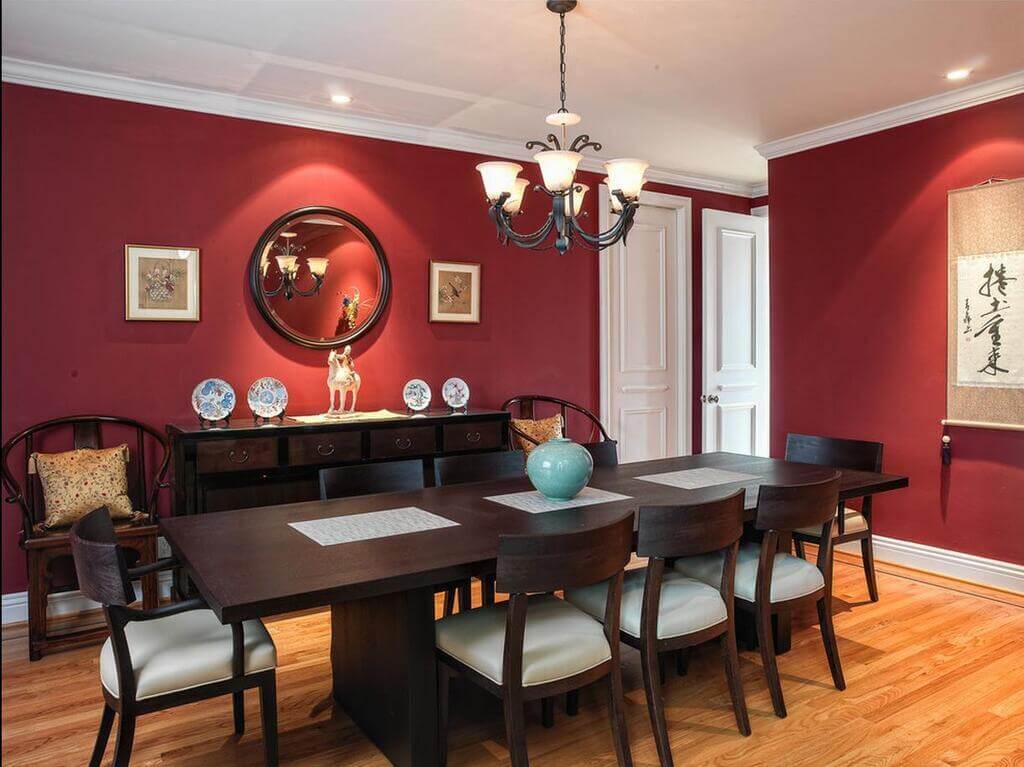
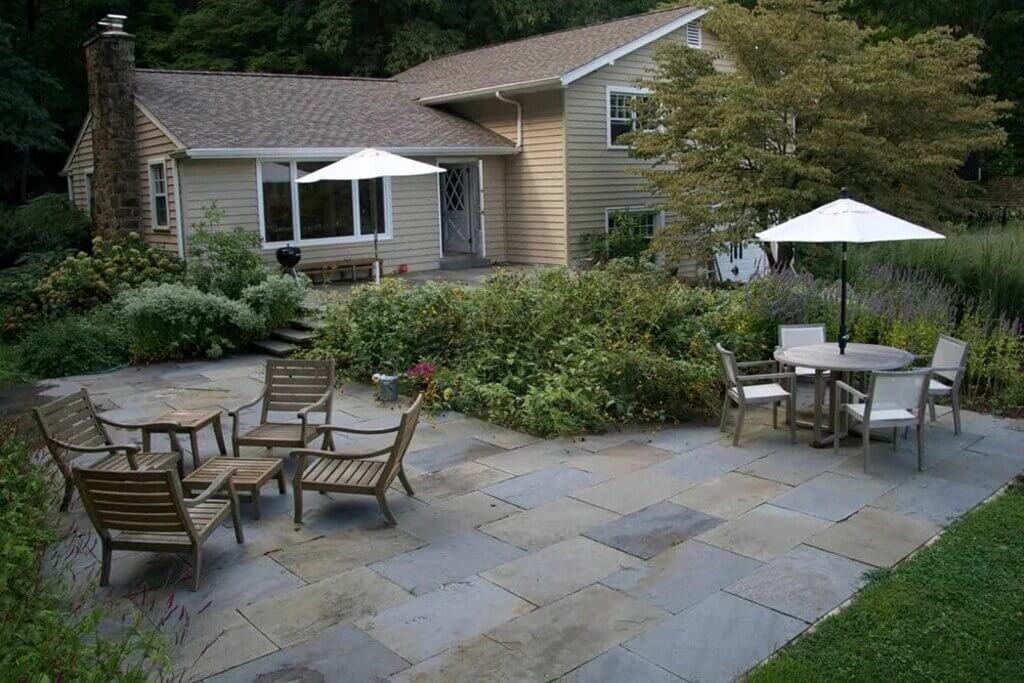
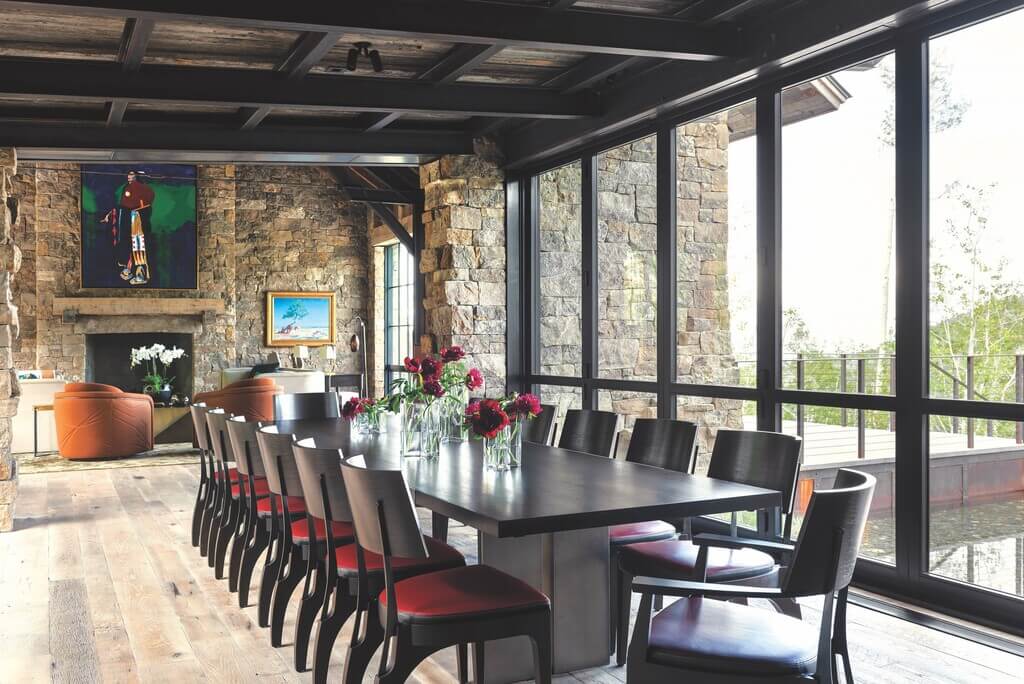
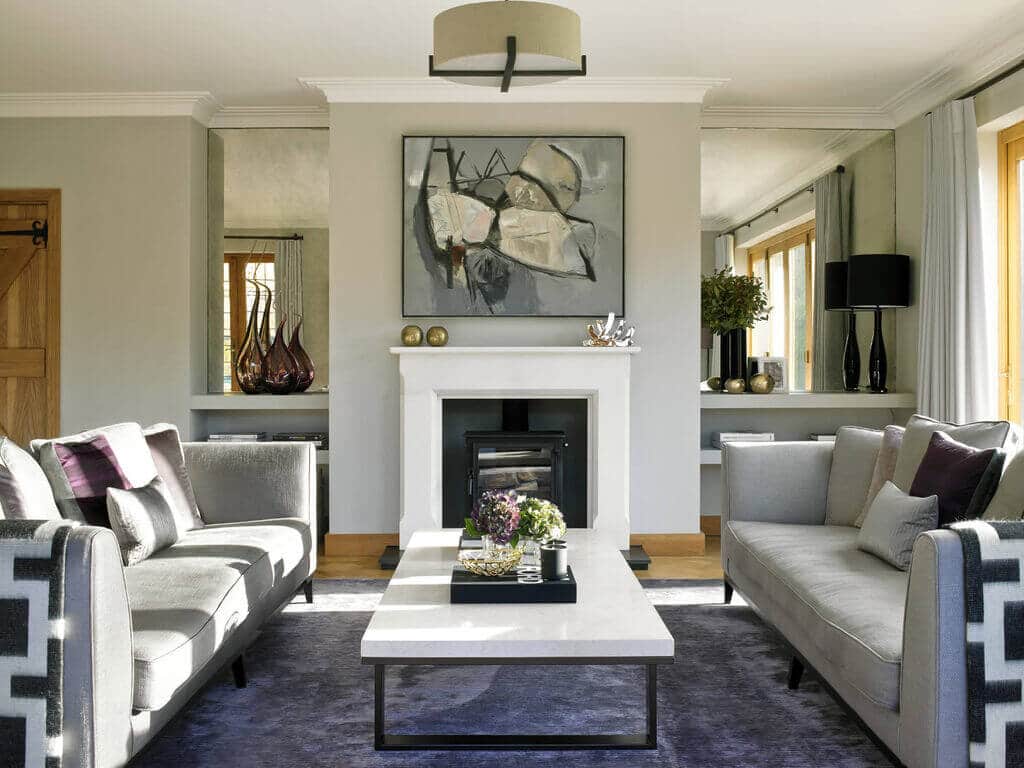
This new year has completely changed our lifestyle. Suddenly our home becomes everything, and now we all are doing everything from home, whether be it work or virtually meeting people. When it comes to the trends, they change all the time, but next year will really have some mind-blowing trends. Today, here we are discussing dining room trends.
Like every year, we’re here to give you some information about various trends and styles you can expect in the upcoming year. This time we’re talking about the dining rooms. Why? Because nowadays, it is not only an eating place, but also it can be used as a home office, and the walls provide a backdrop for remote meetings. Therefore, when a space does many things, its interior should be both comfortable and functional.
Whether you have a small breakfast corner or a substantial formal space dedicated for dinner parties, it should be functional and trendy. Nowadays, people are wisely investing in their property to give a personal touch, and this also increases the home’s overall value.
To ensure your dining room looks absolutely perfect, we’re going to tell you the top trend predictions for the upcoming year. From double-duty design to small personal touches, these trends are not only about aesthetic appeal. They’re more focused on creating a unique and totally liveable environment.
Top 7 Stylish Dining Room Trends
Get ready to know our next year’s top predictions for your dining room. So below are our top seven design trends for the year ahead:
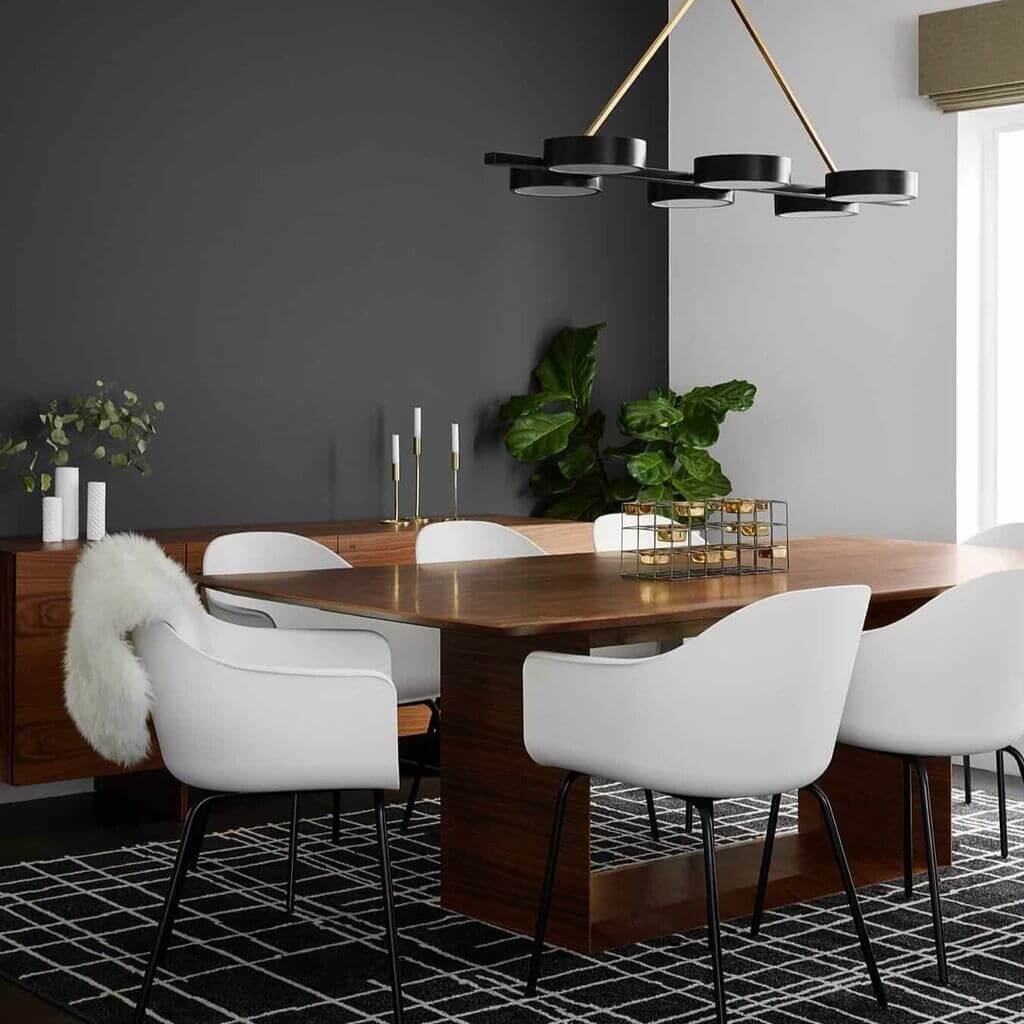
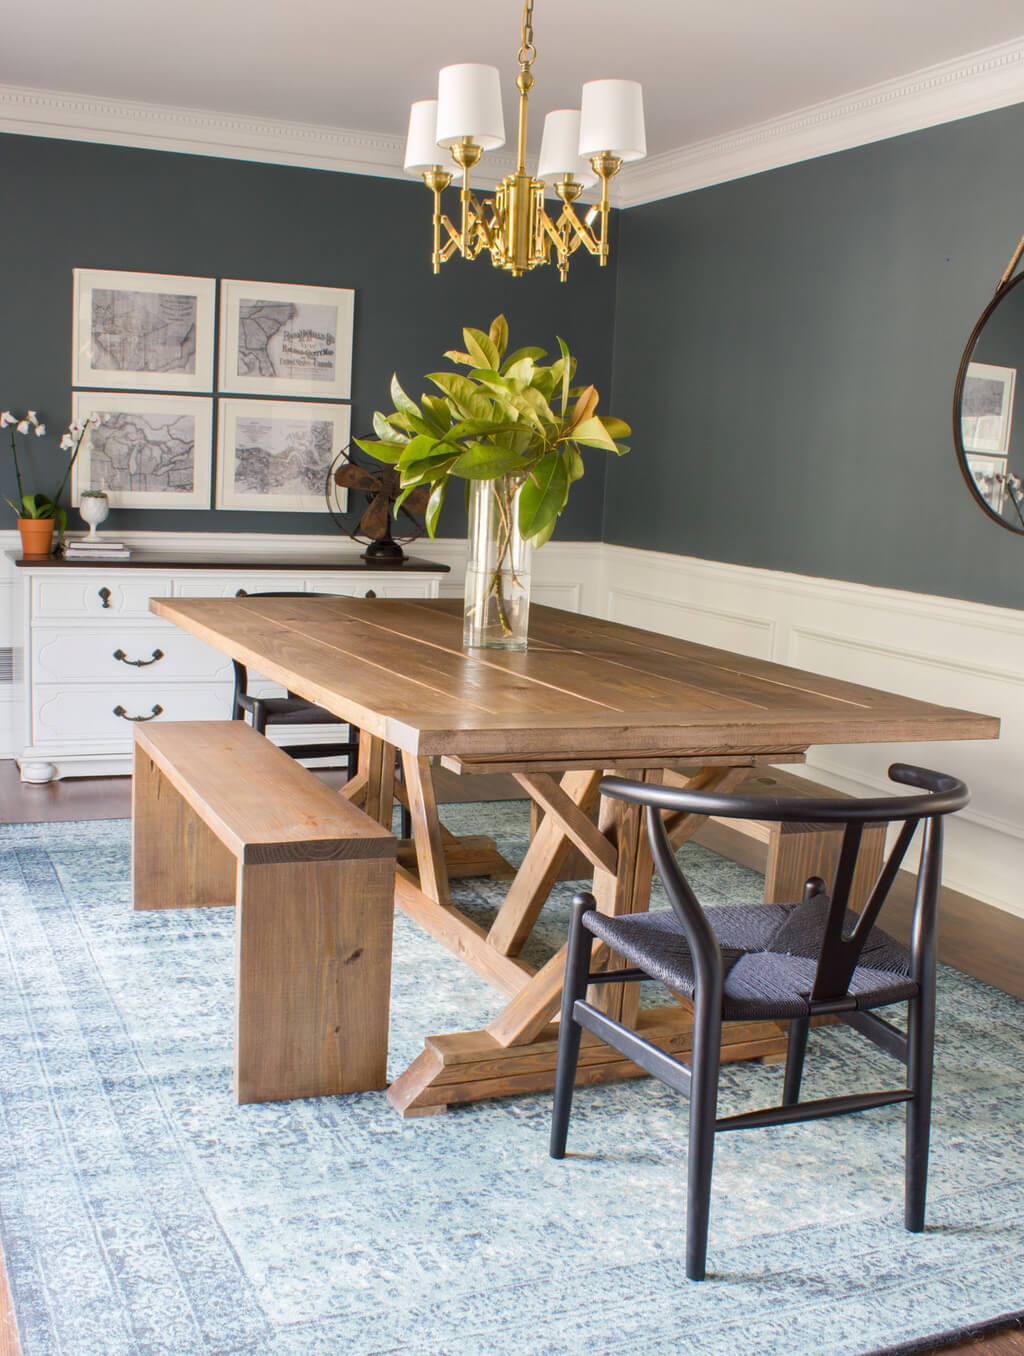
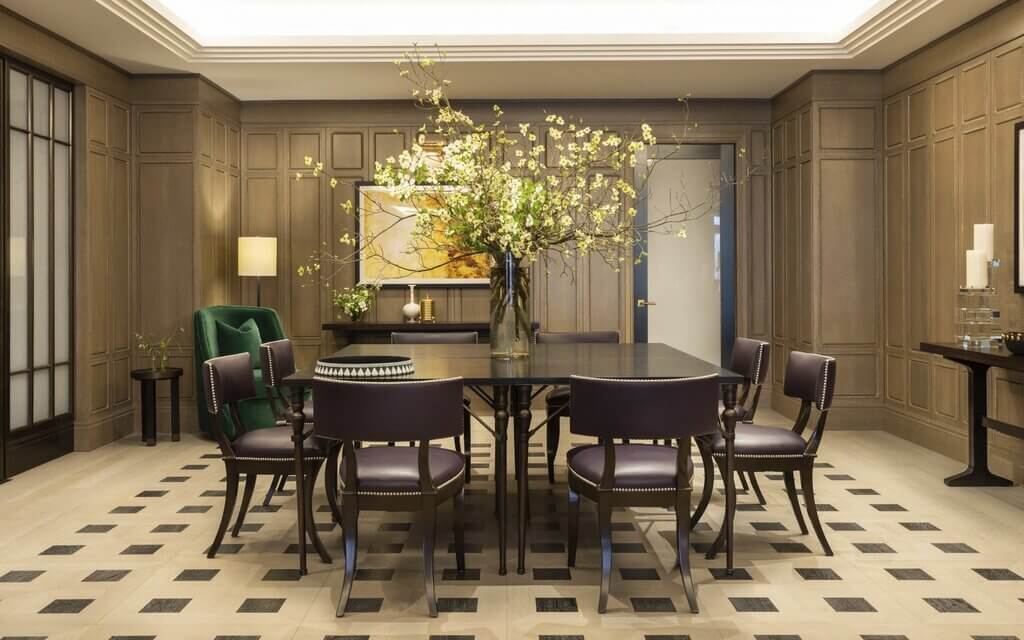
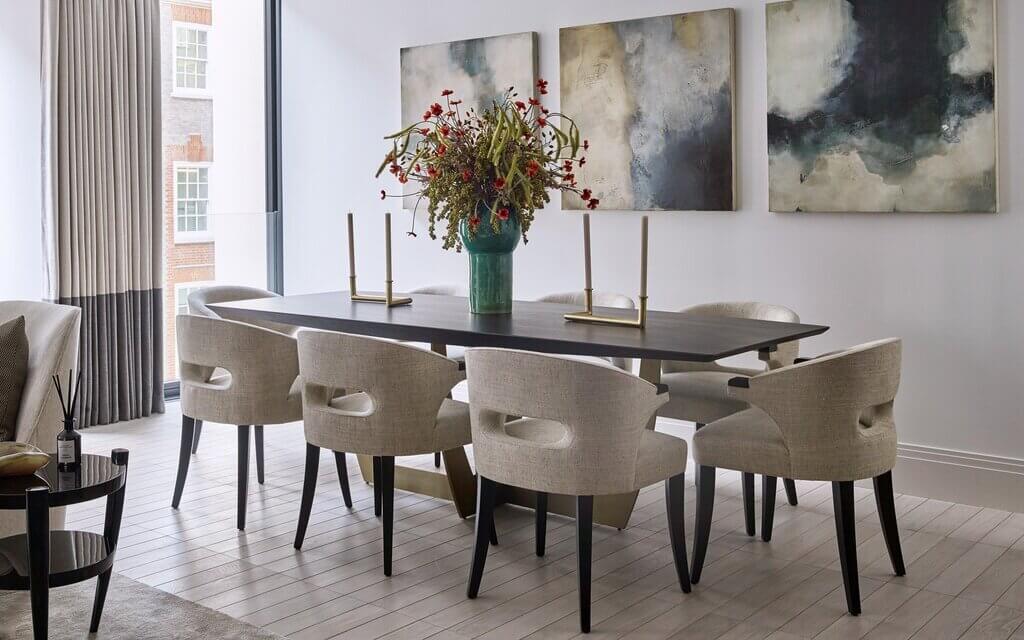
1. Informality & Less Traditional
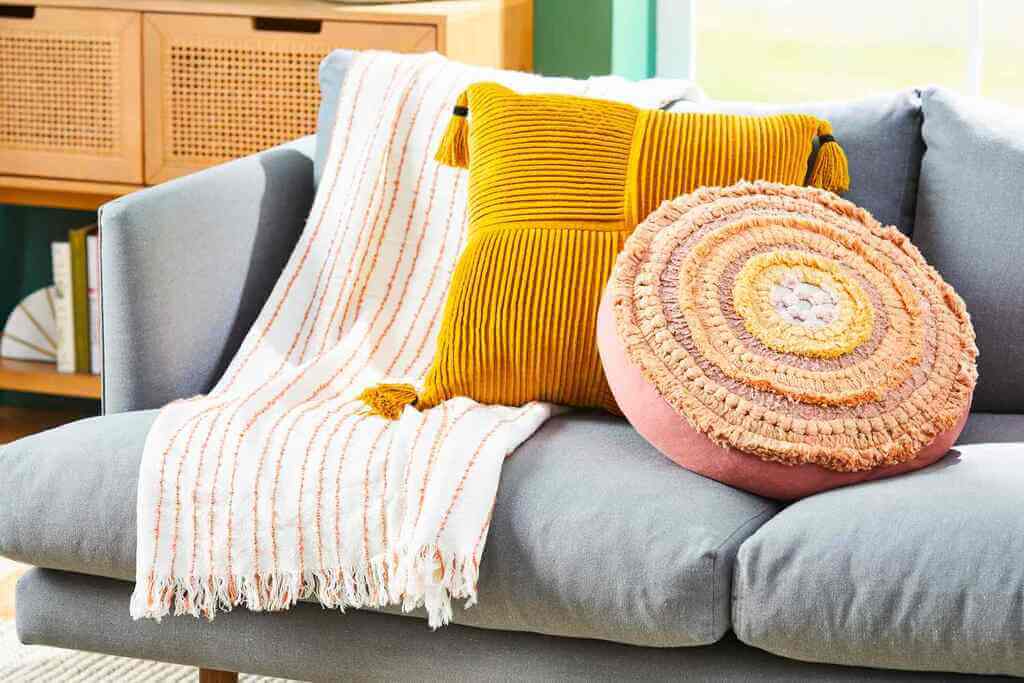
In the upcoming year, the whole energy of the dining room has changed. We didn’t usually use it much before, but the quarantine routine of next year has turned it into a day-use by the entire family. Now, it is no longer a formal, well-defined subject. In the upcoming year, it will be all about: relaxation, comfort, and versatility.
No matter what style, color, or decors you select, just focus on creating a space that’s warm and welcoming. Add a few quirky ornaments, some photos, rugs, warm throws pillows to create a cozy ambiance.
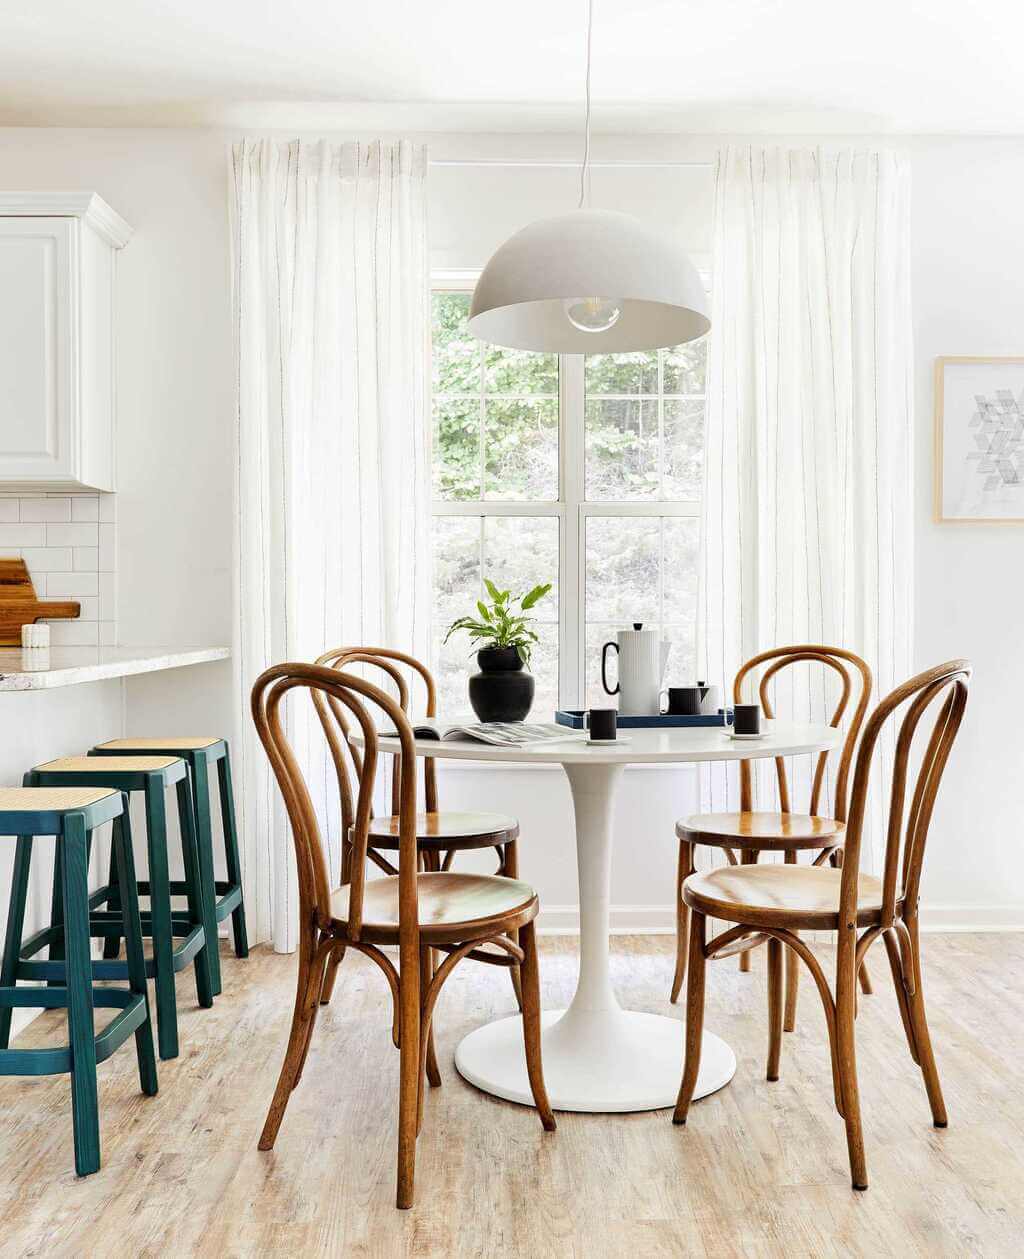
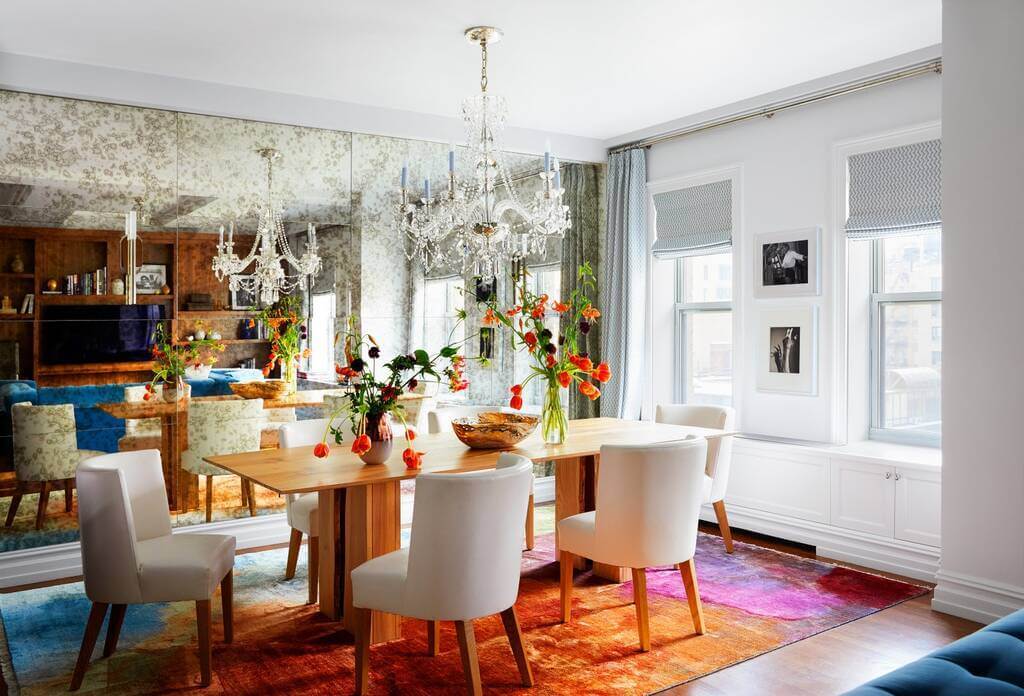
2. Round Tables
Are you thinking of buying some new dining furniture? Consider a round table instead of a square or rectangle one. No matter what material you choose, replace all the sharp angles with soft curves. This will create a more informal and intimate atmosphere.
Round tables are usually smaller and won’t take much space. You can also get an oval-shaped table instead of completely round. These sleek tables will surely be on-trend for the whole year long.
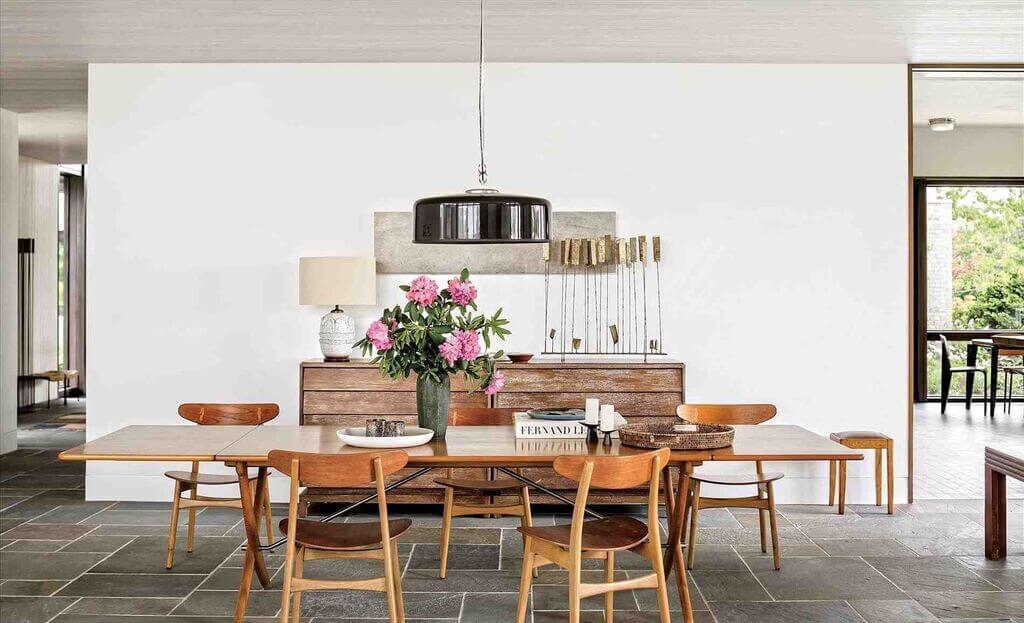
3. Multifunctional Furniture in Modern Style
The dining room was a gathering space to eat and converse back in the upcoming year, but now it has become a multipurpose spot. This simply means it can be used for more than just eating together, and you probably already are using it in multiple ways such as study area, entertaining zone, or both!
So how to achieve this? Just by bringing some unique pieces of decor that can be used in many different ways. Add some statement or colorful chairs to your dining space. Don’t go for the structured furniture; try to mix and match them. You can also include a bench as seating (a huge trend in next year). It will create a more relaxed and welcoming atmosphere.
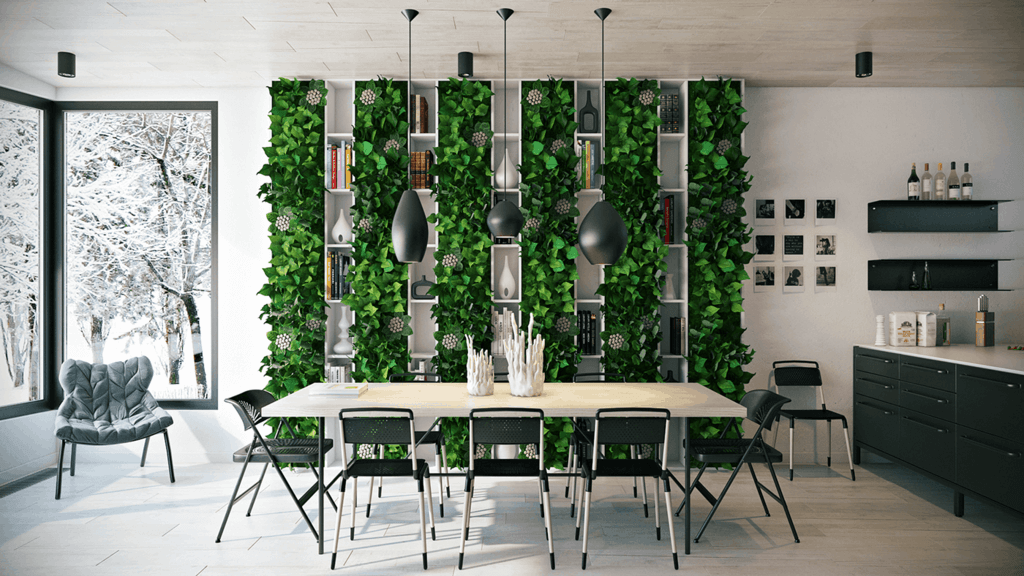
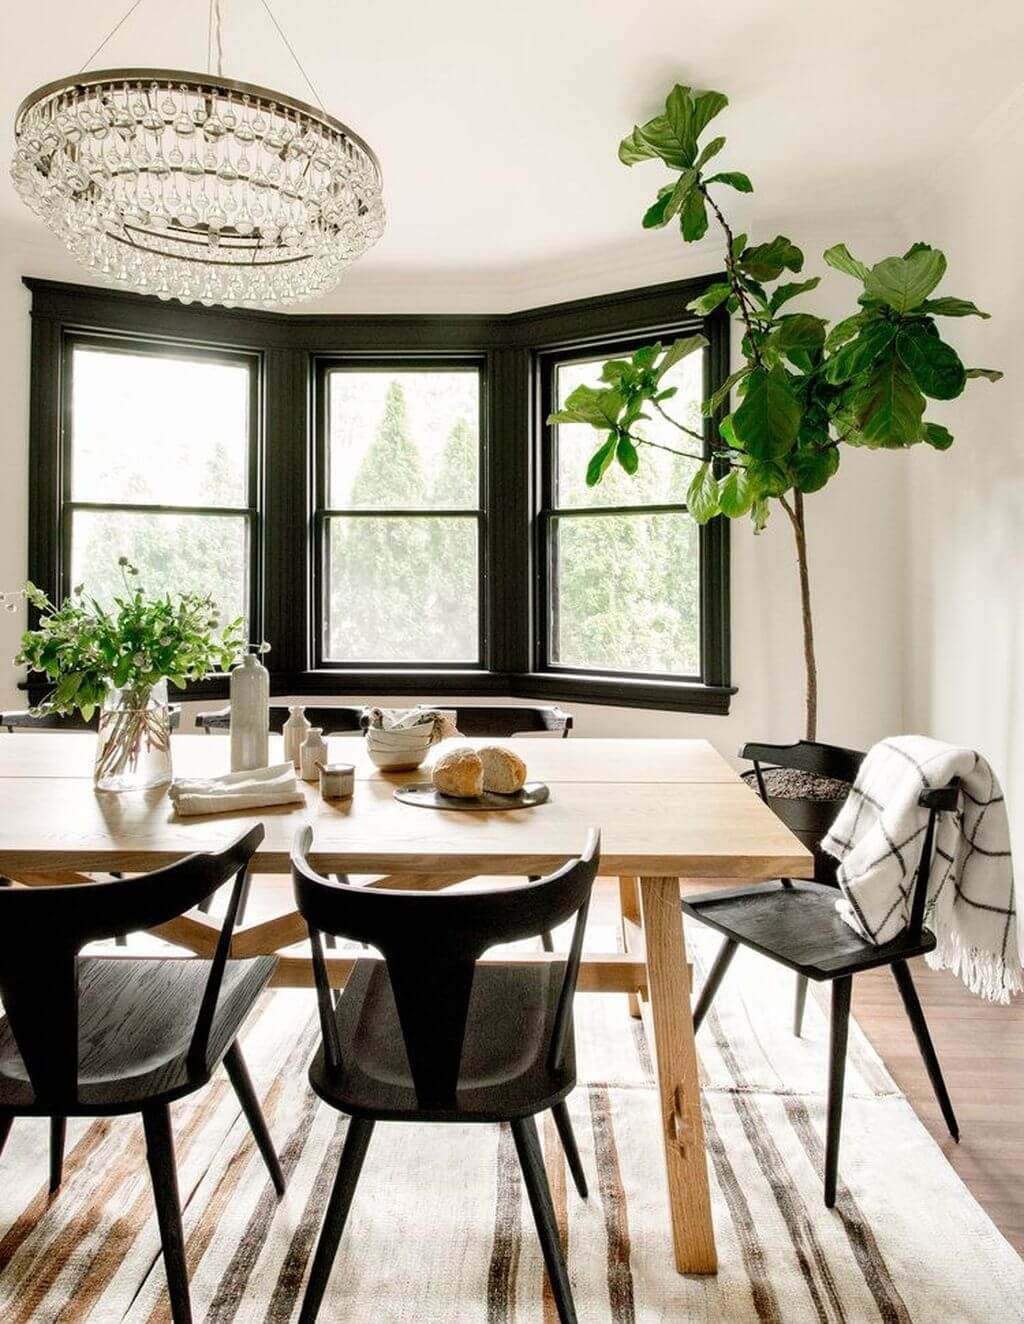
4. Bring Nature Inside
One of the latest interior trends that can be seen everywhere is the Inclusion of plants. They always have a special place in the home because they not only provide filtered air, but they also bring freshness, distinctiveness, and an irreplaceable vibe into the whole space.
We’re sure that houseplants will still be one of the most likable trends in the upcoming year. Don’t limit yourself to one lonely pot plant on the side; place as many plants as possible. You can put Cacti or small succulents to make fascinating dining table decorations or go with plants with variegated and multicolored leaves, such as begonias, sansevierias, or striking dragon plants. They’ll add thick & rich texture while creating an interesting eating area.
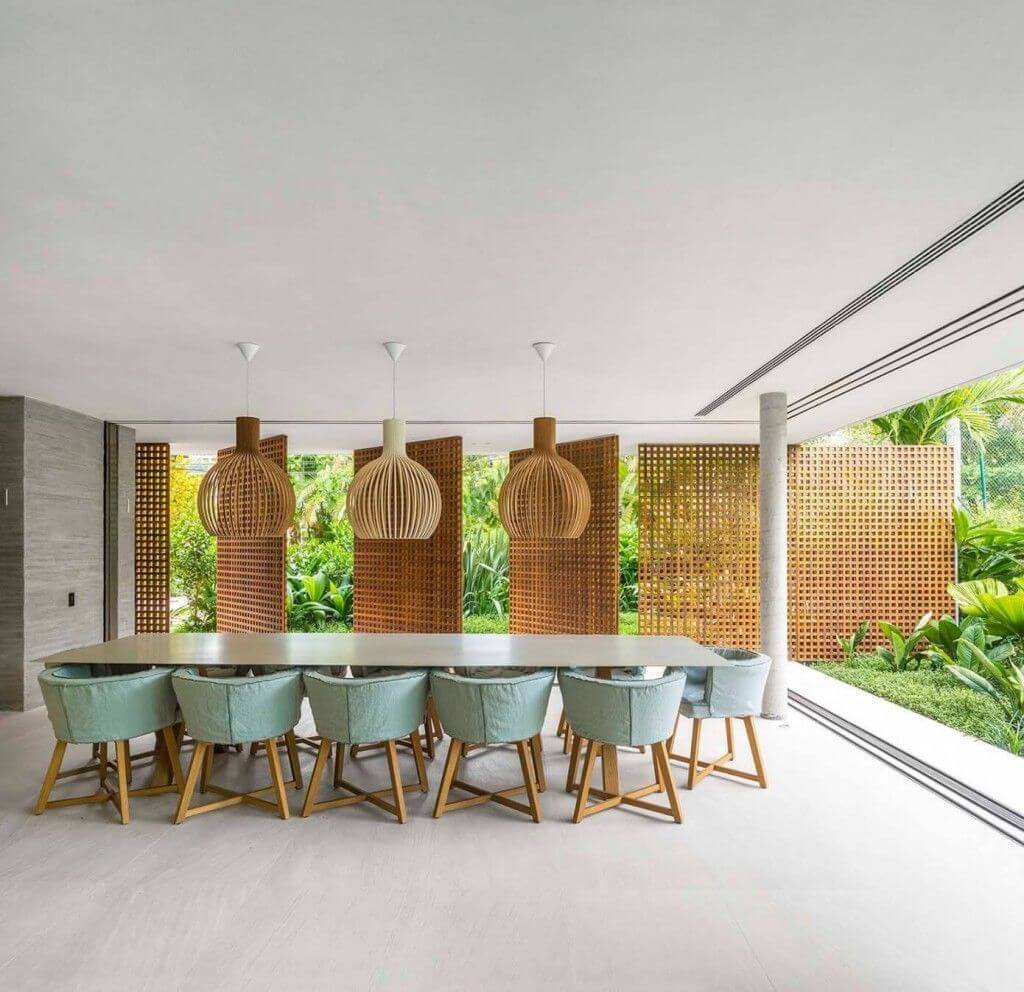
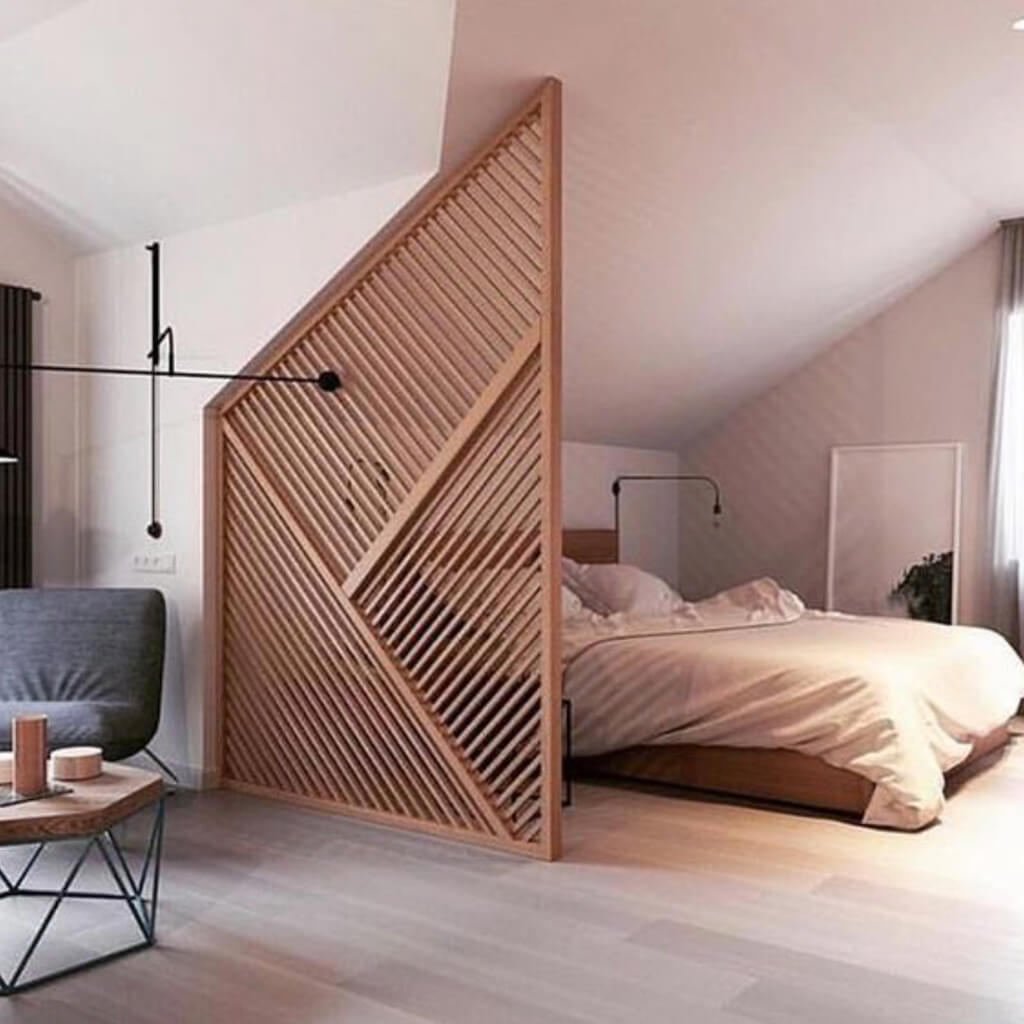
5. Add Partitions & Dividers
Spaces with open concepts are so in the coming year. The new year is all about having privacy and private spaces, and for that, what will be better than dividers! Separating large areas with partitions is a common technique used by many designers and architects.
These structures play a double role: they create spaces and can also be used as decorative elements. You can use them in many ways, such as to allocate spaces, organize an open space, create a welcoming corner in a large environment, or just to hide the disordered objects in your home.
Partitions are quite useful in the dining areas as they’re often constructed next to the kitchen or the living room. So to separate spaces, you can place a divider made of stone, wood, or metal. Many options are available in the market; you can select the best one according to your home size, style, and level of privacy you want.
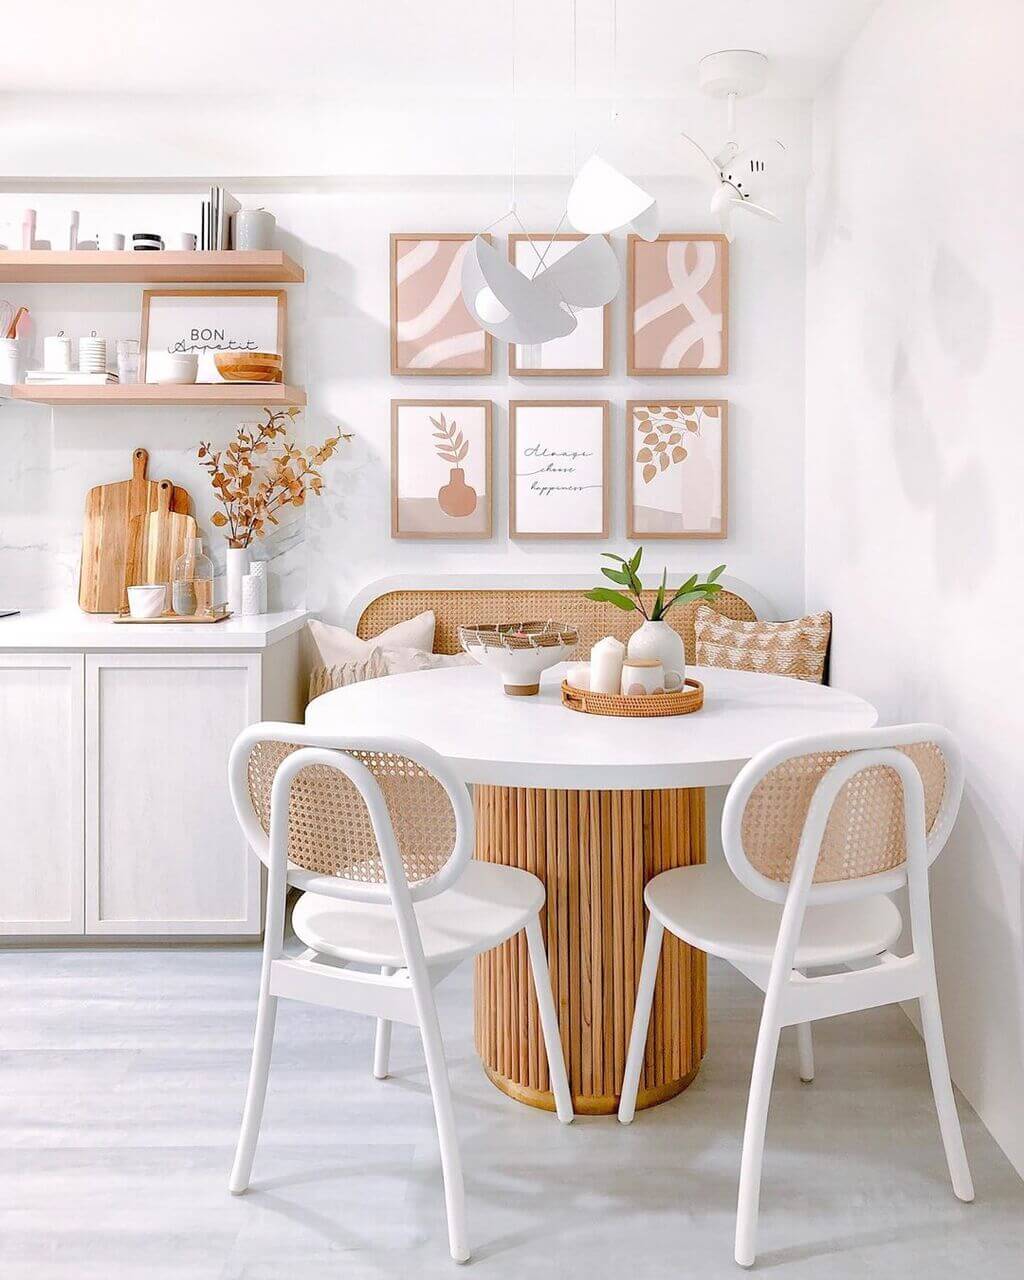
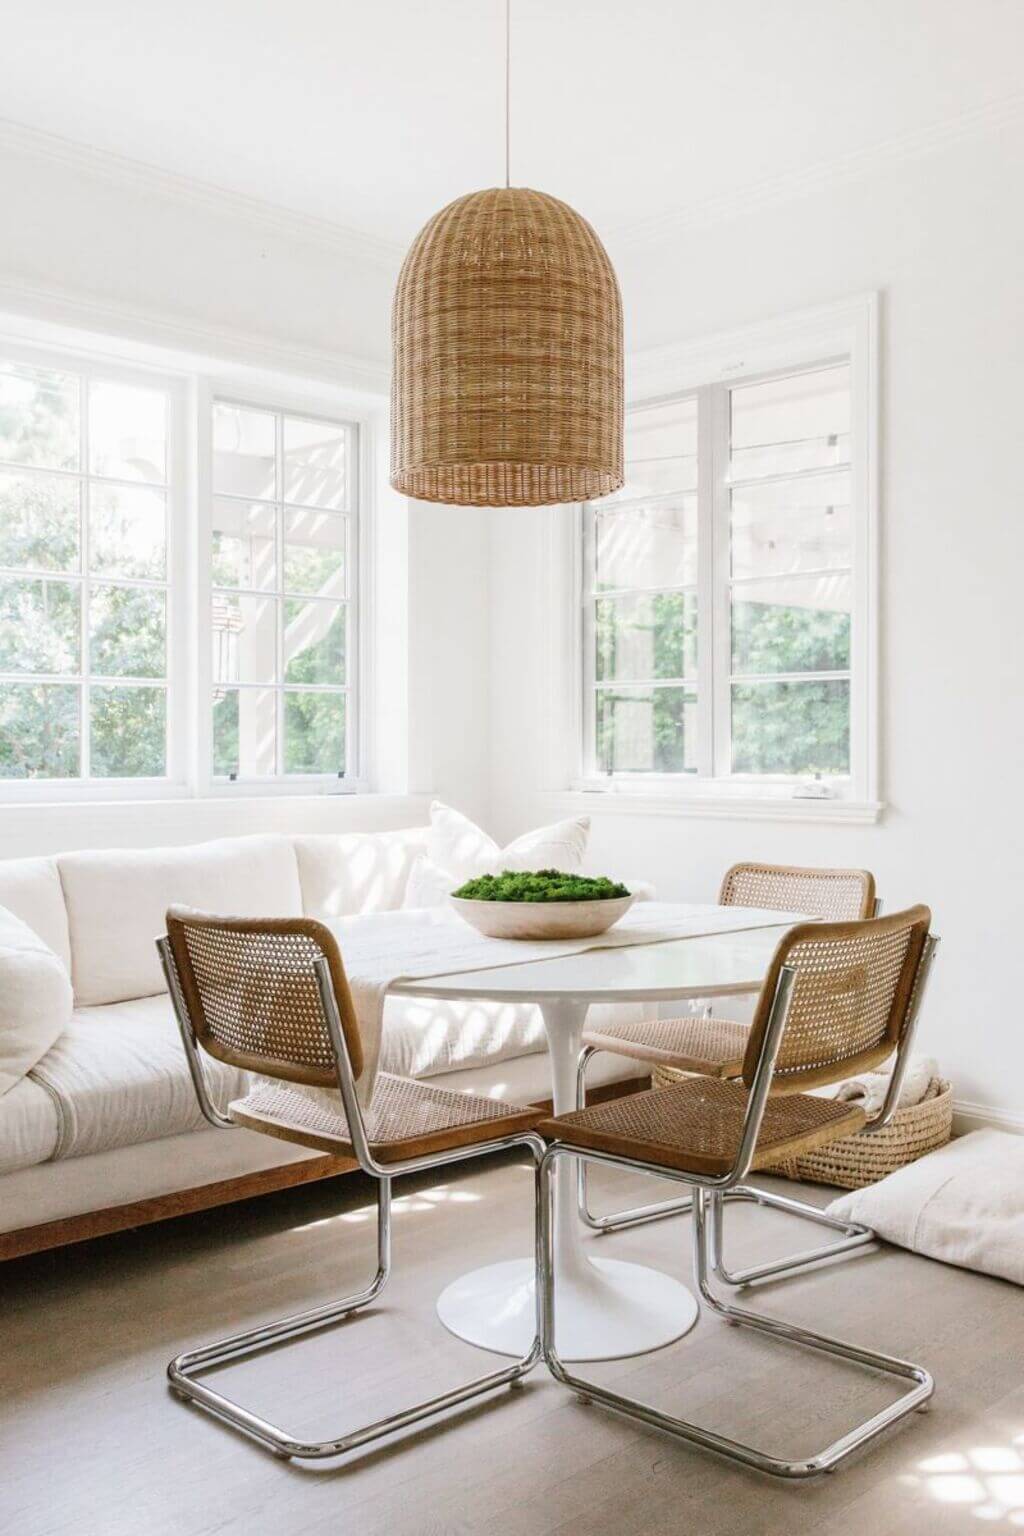
6. Natural Serene Look
Another key trend for the next year is to create a bohemian nature-inspired look. Not just by bringing some decors but also placing some furniture made from various organic materials. Caning, woven seagrass, rattan, and wicker — include these materials in your home furnishings.
You can use them for furniture and lighting accessories and window treatments to create a soft natural look. They’ll blend gracefully with any color palette or decorating theme. So follow this trend and give your place a homely and timeless touch.
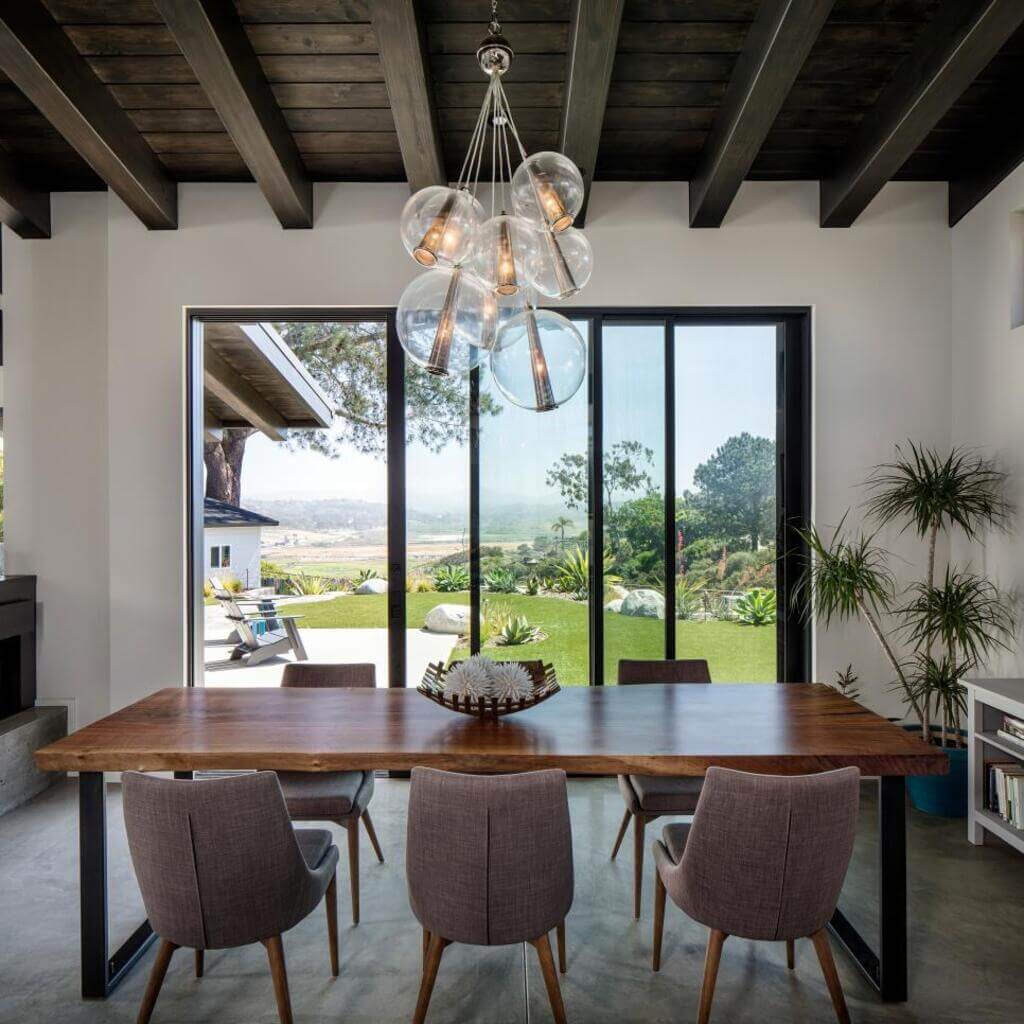
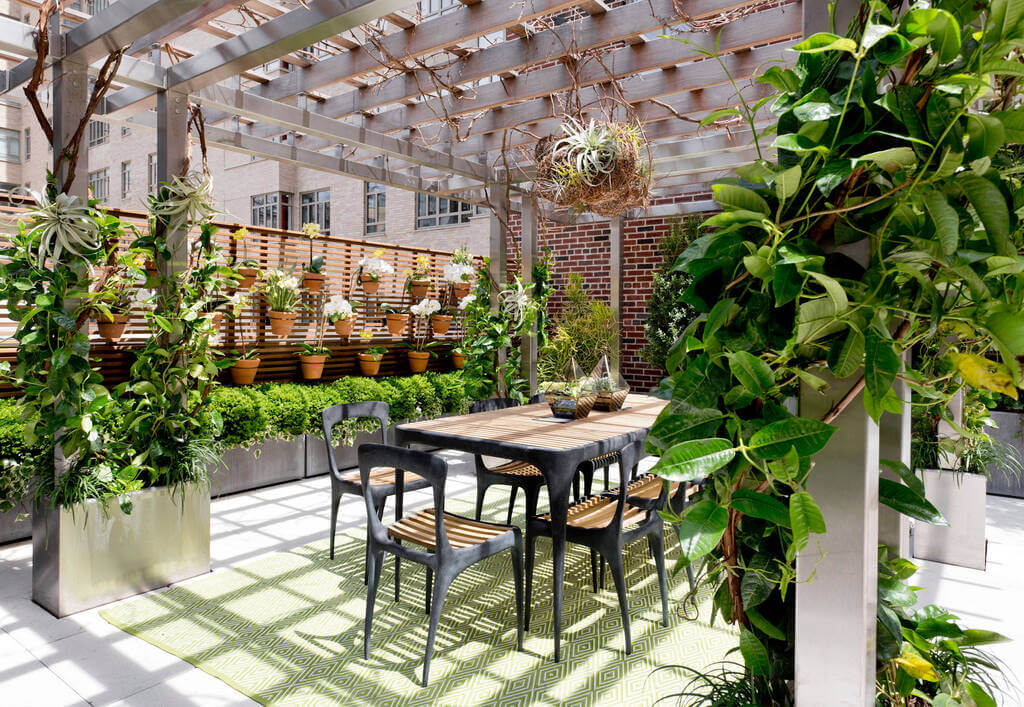
7. Open Dining Areas
According to many designers, there will be a major shift in the upcoming year, especially in our living circumstances. Considering the pandemic, now you are no longer able to host large dinner parties, but still, you can do one thing. Take your dining area outside!
Yes, if you’re lucky enough to have a spacious outdoor space, why not just use it as outdoor dining activities and repurpose your indoor dining rooms for other activities, such as workspaces and exercise areas. Eating with your family in a fresh and tranquil atmosphere will be a soothing and relaxing experience for you.
Final Thoughts
So, which of the dining room trends are you excited about? The next year will be full of surprises, joy, and happiness, so start decorating your place for a new spirit. When it comes to the dining room’s interior, I can talk endlessly because there are so many new things, styles, and thousands of options out there. So don’t be afraid to experiment, try new things, and get amazed by the results.
Make your dining room truly the center of family life and a source of tradition for everyone! So, folks, these are all the unmistakable dining room trends for the next year. With these ideas and predictions, create that warm and cozy feeling, and you’ll automatically be right on-trend.
When you’re getting started on interior design for a Spring home sale, take a deep breath and always repeat the mantra – less is more. Many people want their home to give off the exact same air and style that they themselves employed in decorating it, and while that might woo one particular buyer, your goal is to create a home where a lot of buyers could see themselves.
For this reason, you want your home’s style to be classic, pared down, and decorations to be timeless and simple. This is good news – most people can decorate their homes for the Spring selling season with just what they already have.
Start by Removing Most Sentimental Items
While many people balk when first told that they need to remove their cherished family photos, diplomas, and family memorabilia before the sale, you benefit from this choice. Yes, you’ll spend a few days or weeks without those cherished memories decorating side tables, mantles, and walls, but in exchange, you get to prepare them for the move and get them safely packed away.
Moreover, the home will instantly take on a cleaner, simpler look that offers fewer distractions. Think about your buyers as people who need to stay on task, evaluate the rooms, feeling the space out for their own needs. If they’re reviewing your family photos, they’re off task and may not connect with the house the way they need to. It’s worth it, and your next home will quickly regain that personalized touch!
Go with Classic Warm or Neutral Color Tones
Even if bright and wild hues are your standard go-to for decorating, aim to tone it down a bit for wider appeal. Whether you move a few statement furniture pieces into a storage unit, repaint a bold accent wall or remove wallpaper, focus on getting the space to look as neutral as possible. Color is okay, but use your real estate agent’s expertise to figure out if your gold-painted ceiling or bright pink kitchen accents are going to distract or draw in buyers.
Use Minimal and Simple Wall Art
Once your personal favorite items are off the walls, you’ll want to keep wall art simple and timeless – landscapes, abstract art, and still lifes all let the viewer glaze over the art and focus on the room, while still adding warmth and visual interest to the space. If none of the art in your home looks like this, talk with your real estate agent about the value of leaving walls a little barer or investing in a few inexpensive prints (you can often get creative with this, buying from thrift stores or borrowing from friends for the length of your home showings.)
Decluttering Surfaces Create the Look of a Magazine Spread
You may assume that home decorating is all about what you add to a space – after all, picking the perfect curtain or throw pillow has probably been part of how you’ve made rooms look great before. Now, though, you’re probably seeing that with a “less is more” approach, it can be all about removing things from the room.
If you typically have highly decorated surfaces like coffee tables and bookshelves, experiment with including half as much stuff and see if the result is cleaner: a coffee table that features flowers, a candle, a pile of coasters, and a pile of magazines may look beautiful when you’re hosting friends but reducing it to just the candle might be a better fit for your home showing.
Particularly for built-in shelves and other bookcases, what might be a lovely collection of travel memorabilia might look less busy and more move-in ready with just a couple of books and no other decor – your real estate agent can help you fully achieve the decluttered look without making a space look empty.
The Best Decoration Is a Magnificently Cleaned Home
Beyond the surfaces, keep in mind that a home showing is a sensory experience: when every window is meticulously cleaned, the air smell is mostly neutral with maybe the slightest hint of a pleasant-smelling cleaner, and every carpet and wooden floor is clean enough to eat off of, the buyer just gets a different impression.
Even very old homes show to their best advantage when every smidgen of dust has been removed, showing that the age of a well-built house matters less when it has been lovingly maintained. If you have only a few hours to spend, rather than picking the perfect shade of blankets or deciding on whether to place a fruit basket in the kitchen, focus on deep cleaning such that the buyers can look anywhere they want but will find no signs of disrepair or disarray.
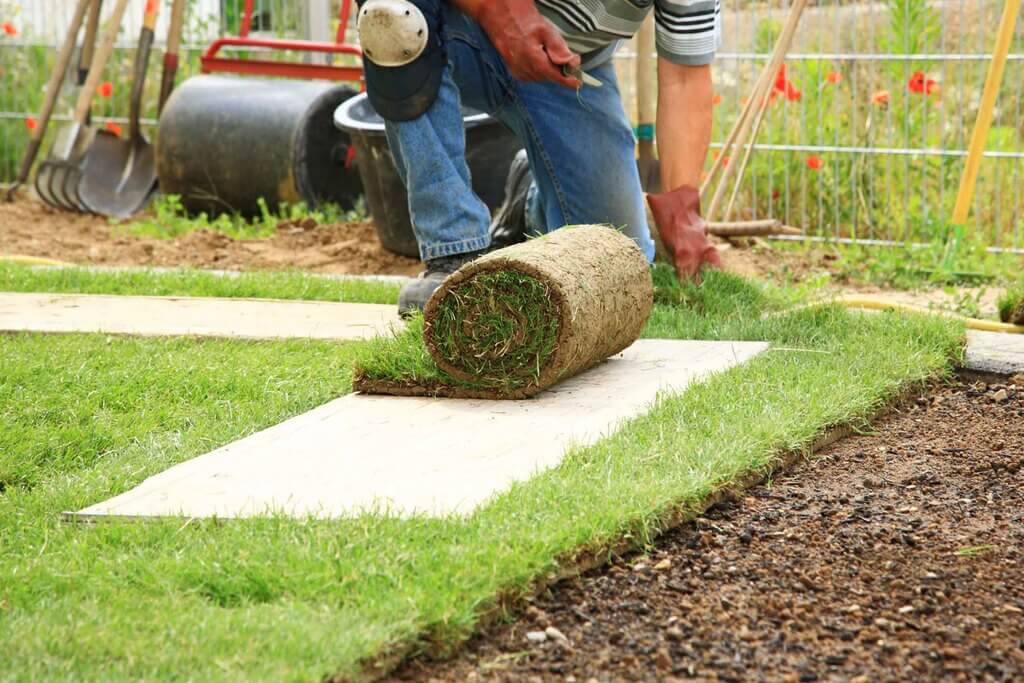
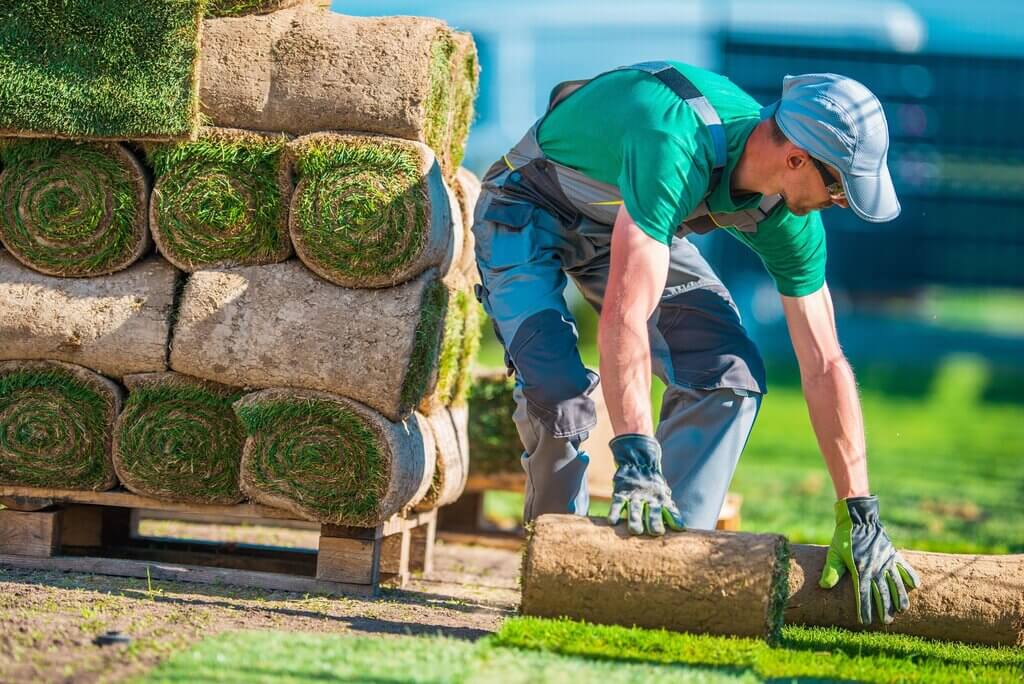
Getting sod installed in your yard is a pretty big deal – it takes research, planning, and usually a good amount of cash too. However, the work isn’t over once you’ve decided on the perfect type of grass for your new lawn; you should also find sod installers who will do a top-notch job of putting in all that grass. For some sod installation jobs, you could technically do it yourself if you’re feeling ambitious. However, this would only work if you had squares of sod; if it came in rolls, you’d need heavy machinery with a specialized attachment to spread it out properly. Hiring the best sod installers will undoubtedly leave you delighted as you admire the sight of your vibrant and verdant lawn.
In some cases, you could get your sod installed by the same company that you bought it from. For example, The Grass Store offers grass for sale in many different varieties, and can also help lay down the sod that’s purchased by customers in certain areas. Assuming you haven’t decided which sod installers to hire, just keep reading for a step-by-step guide.
Step #1: Put Together a List of Options
There are several ways to discover sod installers; one of the easiest is to look online. A single Google search will turn up the most popular options, and from there you can narrow down the list. Another great way is to ask your friends or acquaintances if they can recommend someone. Most landscaping companies have experience installing sod, so if you can find one that comes personally recommended, maybe they’ll be the one you end up hiring.
Your initial online search doesn’t have to be that in-depth – after all, you’re just looking for names to put on your list at this point – but you should still spend a bit of time checking each company out. Look at their online reviews, which can generally be found on Yelp, Angi, or Google My Business.
Step #2: Decide on the Budget and Project Scope
Once you’ve spent some time looking at various sod installers online, you’ve probably gotten a ballpark idea of how much the service would cost. Depending on how much you have in the budget, you may have some room for potential upgrades. Upselling is common in every industry, and the sod installers could suggest other changes to your yard that could be added to your contract.
Why should you be thinking about this at such an early stage? Because some people feel pressured to pay for services that they didn’t initially plan for. Maybe the flowerbeds do need to be weeded, or a couple of trees do need to be trimmed…but do you really want that to be done now? If so, you might as well talk to the sod installers about the possibility of doing more work. If not, you’ve already made up your mind, so you won’t be put on the spot if that situation arises.
Step #3: Check the Company’s Qualifications and References
Some people get their sod installed by landscapers, while others have it done by the same company that sold them the product. These can be equally good options, provided the team comes with the right training, experience, and licensing. You should definitely check that the sod installers have done this type of job before, and they should also be bonded and insured. They may also need specific licensing, such as if they’ll be applying certain fertilizers to help your new grass grow. References are also an important part of discerning the quality of their service; make sure you get multiple references, and ask that they be recent as well.
Step #4: Check for Red Flags
It’s hard to find sod installers who are absolutely perfect, but there are certain red flags that should make you turn around and walk away.
No online presence
Reviews saying they repeatedly missed deadlines
Suspiciously low rates (you get what you pay for)
The suggestion is that you skip the contract
A high proportion of bad online reviews
Poor communication
Asks for a large upfront payment
Lacks licensing or insurance
Step #5: Get to Know Each Candidate
This isn’t really the kind of contract that requires winning and dining before you sign on the dotted line, but you should still talk to someone at each company before committing to anything. This is a great opportunity to ask whatever questions you have, plus you’ll get a better sense of how each sod installing team works. Did you get rushed through the conversation, or were you treated like a valued client? Did it feel like they were saying whatever you wanted to hear, or did you get the sense that they were being honest with you? Sure, there could still be some unpleasant surprises later on, but this can help you identify some bad apples. While you’re talking with each company, it wouldn’t hurt to ask the following questions:
Are you bonded and insured?
Do you use sub-contractors, or will the job be completed by your team?
Could you provide some references from recent clients?
Do you have experience in sod installation?
What kind of guarantee do you offer?
For projects that will cost thousands of dollars, a standard background check would be prudent. Some landscaping companies are really just scammers who hope to land a few big projects, get some tidy upfront payments, and disappear with the money.
Step #6: Sign the Contract
It’s absolutely essential that the sod installers you hire can provide a contract. This will legally require them to meet agreed-upon deadlines and finish the job properly. It’ll also prevent the appearance of surprise charges on the final bill, a trick that some landscapers try to get away with.
The Takeaway
Finding the right sod installer can seem like a complicated process, but it really isn’t that hard if you know what you’re looking for, and which questions to ask. Once that’s out of the way, you’ll be gazing at your picture-perfect new lawn before you know it.
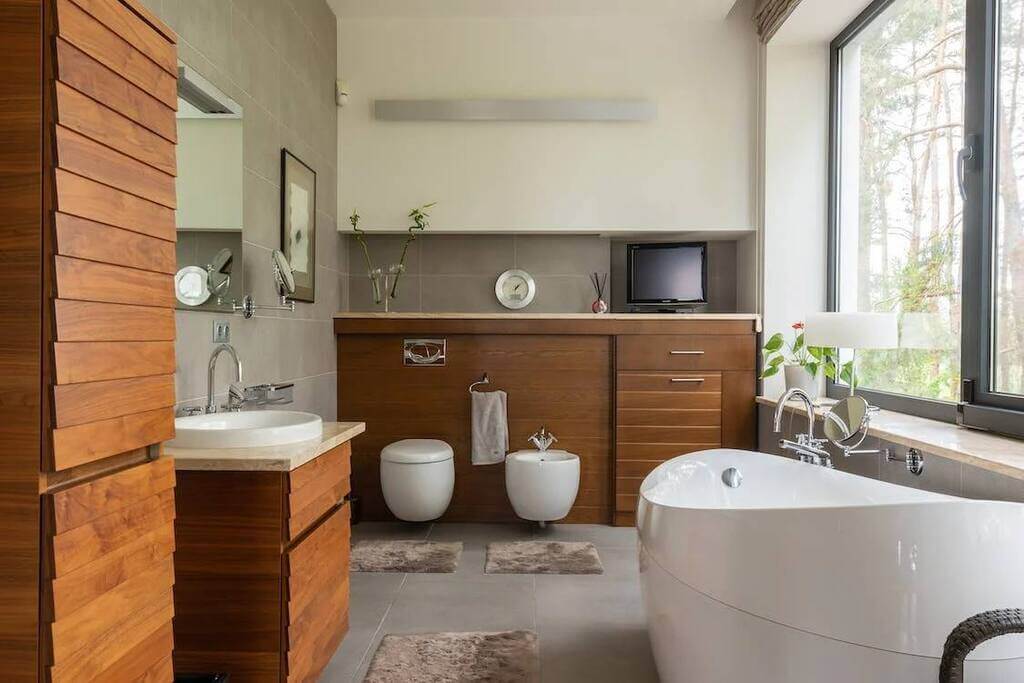
A bathroom vanity is an essential fixture in any bathroom. It serves as a functional space for grooming and storage. However, regular use and exposure to moisture can cause damage to the vanity’s appearance and function. This is why it’s crucial to clean and maintain your bathroom vanity regularly. In this article, we’ll provide you with a comprehensive guide on how to clean a bathroom sink.
Cleaning Your Vanity:
Regular cleaning is necessary to maintain the appearance and function of your 48 inch bathroom vanity. We recommend cleaning bathroom sinks once a week to prevent dirt and grime buildup. Here are the steps to follow when cleaning basins:
Step 1: Clear the Surface
If you’re looking for the best way to clean your bathroom sink, start by clearing the surface of your vanity. Take out any bathroom accessories like soap dispensers and toothbrush holders. This will make it easier for you to give the surface a thorough cleaning.
Step 2: Dust and Wipe Down
Using a soft cloth, dust the surface of your vanity to remove any loose dirt or debris. Then, use a damp cloth or sponge to clean the surface. Be sure to use a mild cleaning solution to avoid damaging the vanity. Avoid using abrasive cleaners or scrubbing pads as they can scratch the surface of the vanity.
Step 3: Clean the Sink and Faucet
The sink and faucet are prone to soap scum buildup and water spots. To clean them, apply a small amount of cleaning solution to a soft cloth or sponge and wipe down the sink and faucet. Rinse with water and dry with a clean cloth.
Step 4: Clean the Mirror
The mirror is an essential part of your bathroom vanity. To clean it, spray a glass cleaner onto a soft cloth and wipe down the mirror. Avoid spraying the cleaner directly onto the mirror to prevent damage to the vanity.
Maintaining Your Vanity:
In addition to regular cleaning, maintaining your bathroom vanity is essential to ensure its longevity. Here are some tips on how to maintain different components of your bathroom vanity:
Sink:
To prevent soap scum buildup in the sink, rinse it thoroughly after each use. You can also use a mild cleaning solution to remove any buildup. Avoid using abrasive cleaners or scrubbing pads as they can damage the sink’s finish.
Faucet:
Clean your faucet regularly to prevent water spots and soap scum buildup. Use a mild cleaning solution and a soft cloth or sponge to clean the faucet. Be sure to dry the faucet after each use to prevent water spots.
Hardware:
Hardware such as knobs and handles can become loose over time. Check them regularly and tighten any loose screws or bolts.
Special Considerations:
Different types of vanities require different cleaning and maintenance techniques. Here are some special considerations for different vanity materials:
Marble:
Marble is a porous material and can stain easily. Avoid using acidic cleaners or anything that contains vinegar. Instead, use a mild cleaning solution and a soft cloth or sponge to clean the surface.
Wood:
Wood vanities should be cleaned with a mild cleaning solution and a soft cloth or sponge. Avoid using excessive water as it can cause warping or splitting of the wood.
Laminate:
Laminate vanities are easy to clean and maintain. Use a mild cleaning solution and a soft cloth or sponge to clean the surface.
Troubleshooting and Repair
Even with regular cleaning bathroom sinks may experience some issues. Here are some common problems and how to troubleshoot and repair them:
Squeaky Drawers:
Over time, the drawer slides may become worn or dirty, causing them to squeak. Apply a small amount of silicone lubricant to the slides to reduce friction and eliminate the noise
Loose Hardware:
If the knobs or handles on your vanity are loose, tighten them with a screwdriver. If the screws are stripped or missing, replace them with new ones.
Stains or Discoloration:
If you’re looking for tips on removing stains from bathroom sinks, it’s important to be aware of potential issues like staining or discoloration. Depending on the material your vanity is made of, it may be more susceptible to staining. For instance, a wood vanity can develop water stains if water is left sitting on it for too long. To tackle stains, you can use a specialized bathroom sink cleaner that’s designed for your vanity’s material or try a DIY solution like baking soda and water. With the right bathroom sink cleaner and stain removal methods, you can keep your sink looking spotless and in top condition.
Water Damage:
If your vanity is located in a bathroom with high humidity or poor ventilation, it may be at risk of water damage. If you’re wondering how to keep the bathroom sink clean and in good condition, it’s important to be mindful of potential water damage. If your vanity is situated in a bathroom with high humidity or inadequate ventilation, it may be vulnerable to water damage. To avoid this, be sure to check for signs of water damage such as warping, bubbling, or peeling. If you notice any damage, it’s best to address it promptly to prevent further issues and keep your bathroom sink looking clean and pristine.
If you are not comfortable troubleshooting or repairing your bathroom vanity, it’s best to hire a professional to handle the job. This is particularly important if you are dealing with issues that involve plumbing or electrical work.
Conclusion
Cleaning basins, as well as maintaining them, may not be the most exciting task, but it’s essential to keep them looking and functioning at their best. If you’re looking for the best way to clean the bathroom sink and keep it in excellent condition, it’s important to establish a regular cleaning and maintenance routine.
By doing so, you can extend the lifespan of your vanity and prevent common issues from arising. In case you do experience any problems, it’s recommended to troubleshoot and repair them promptly to avoid costly repairs later on. By following these helpful tips, you can guarantee that your bathroom sink stays beautiful and functional for many years to come.
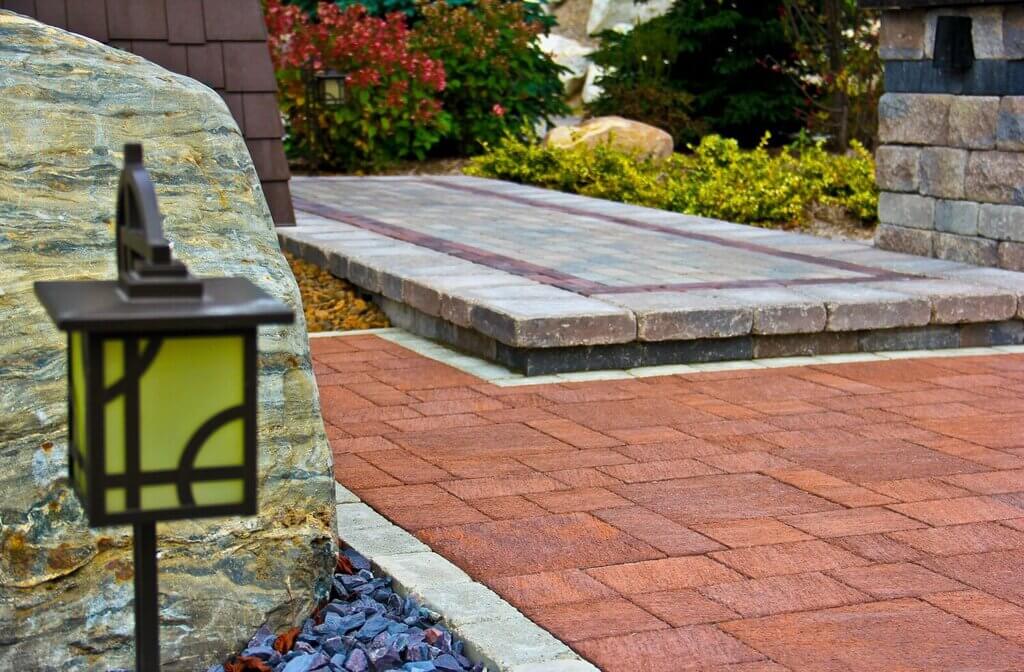
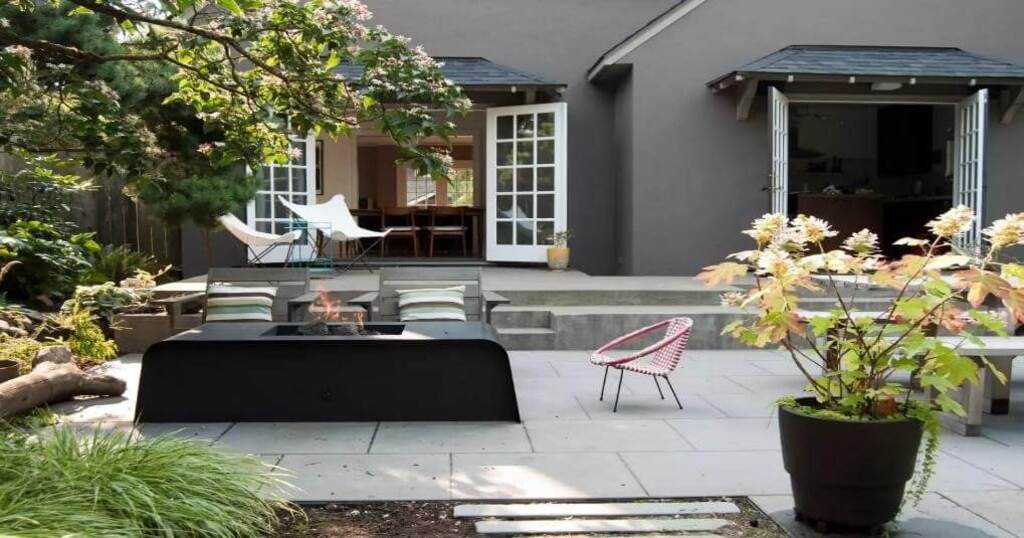
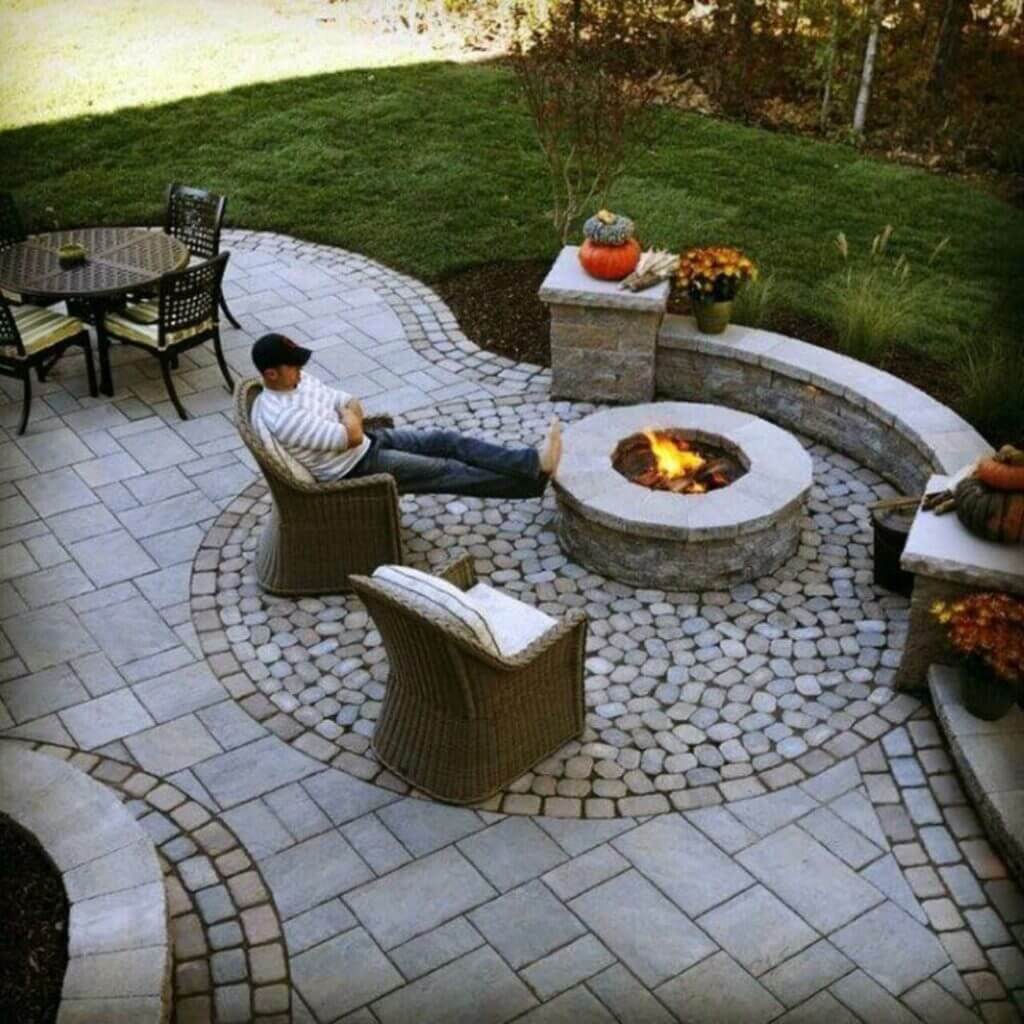
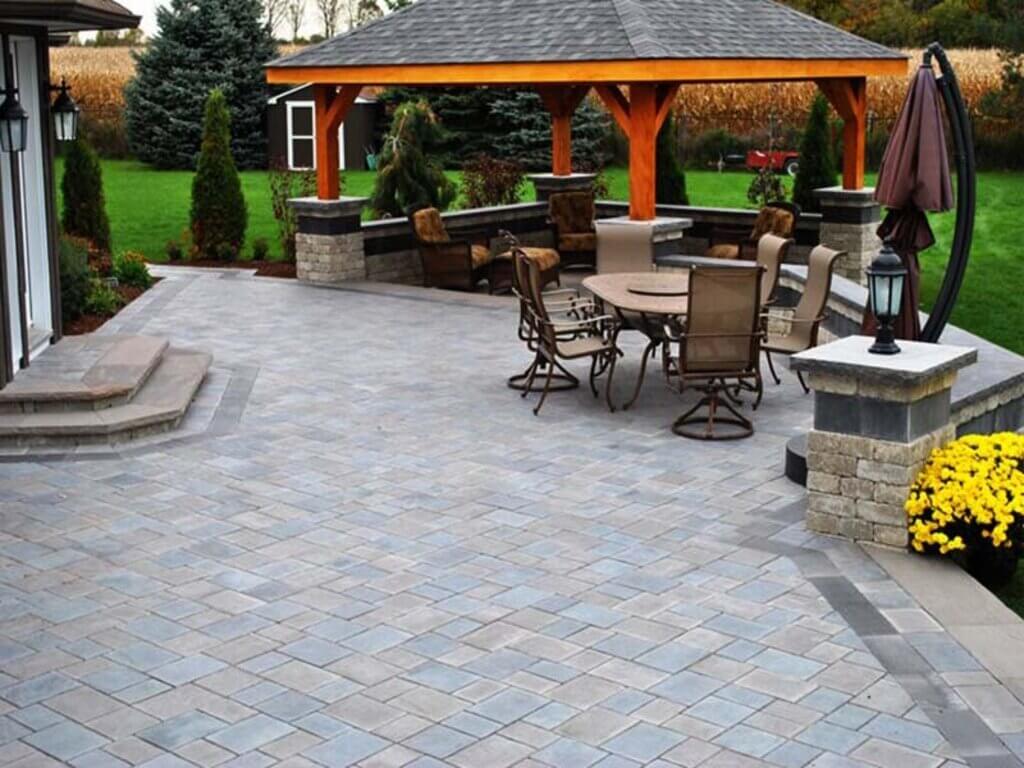
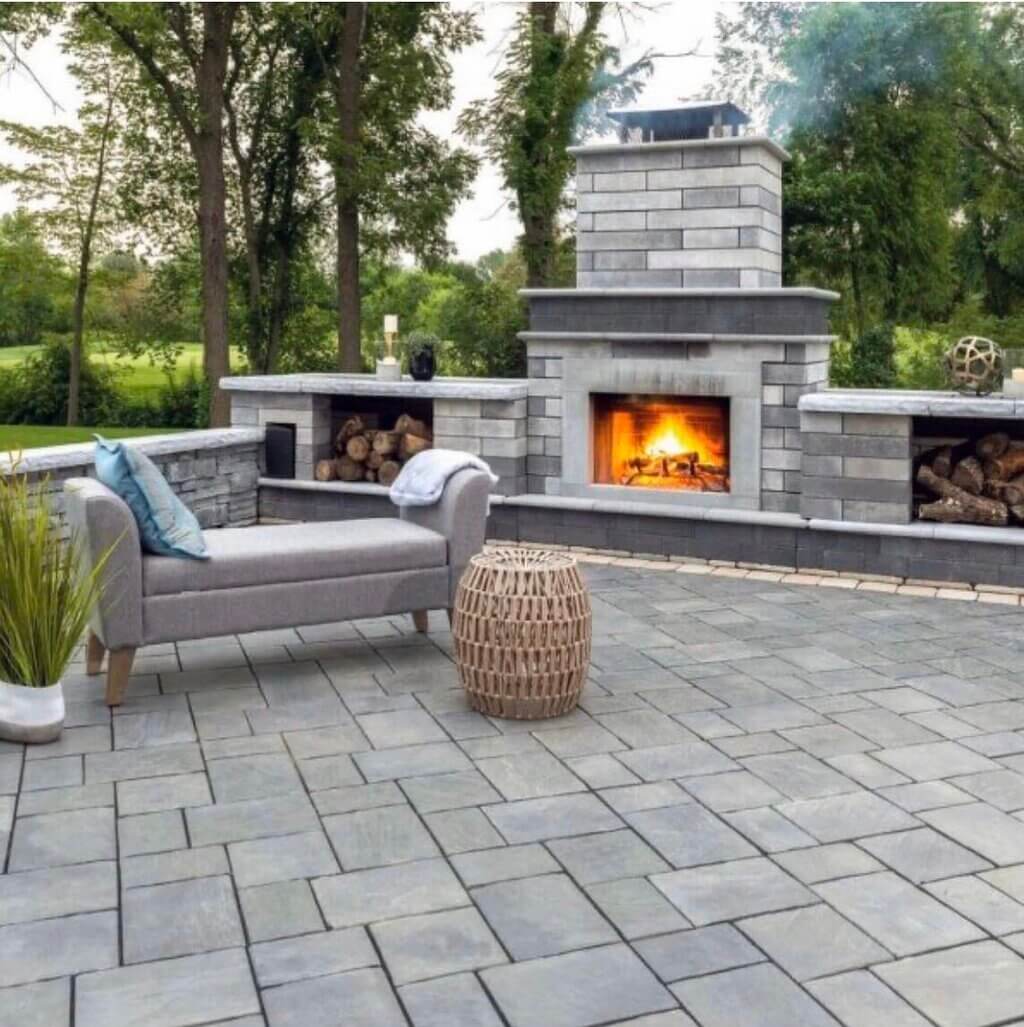
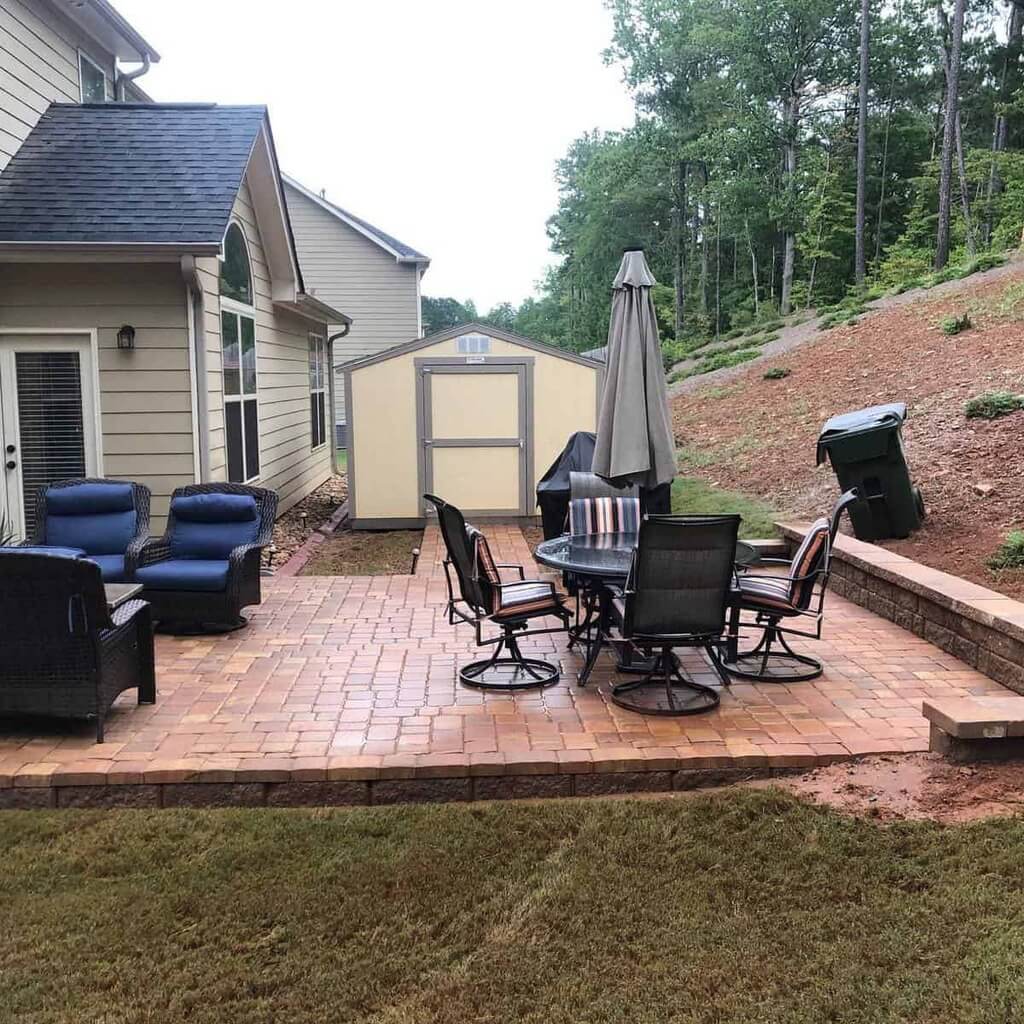
We are always particular about choosing the right back door exteriors of our house. It is a challenge to find exemplary exteriors for your backyard. Usually, our backyards are our favorite spots in our home. We spend most of our free time and weekends in our backyards. When it comes to the outdoors, one of the significant challenges is the patio makeover. Discovering and exploring the cheap patio paver ideas is a fundamental challenge.
Finding the right paver patio ideas for homes is a really tough job. There are many things that we have to consider while looking for ideas. One of the essential factors is budget. We limit ourselves as we all have a limited budget. However, backyards are an exciting place in our home. Thus, when it comes to patio or backyard decoration, instead of spending more money, use your creativity. In this blog, we share some of the best backyard cheap patio paver ideas for your home. So, limit your limitations, not your dreams and ideas. Without getting diverted from the topic, let us start with the blog.
What are Patio Pavers?
A patio cover is a shade structure that covers a patio or deck area. It typically consists of a solid or open roof supported by structural elements. Patio covers can be attached to or detached from the main dwelling. They are specifically designed for outdoor recreational purposes and should not be used as carports, garages, storage rooms, or habitable living spaces.
What is the Significance of a Cheap Patio Paver Ideas?
Patio paver ideas are trending in today’s world. Pavers add a style and class to your backyard patios. Pavers are something that will always create a stunning result. The concept was initially designed to create a natural stone with good looks and great hold while walking.
Ever since people started finding the benefits of pavers, they started using them. From various styles, designs to patterns and colors, you can easily find a variety of choices in the market. However, cheap patio paver ideas are one of the most recommended choices you can explore. You can look through all the different choices and select the one in a reasonable price range.
Outdoor or exterior design planning is usually a one-time investment. Cheap patio ideas work like an angel in disguise. They are highly perfect for your patios in your backyards.
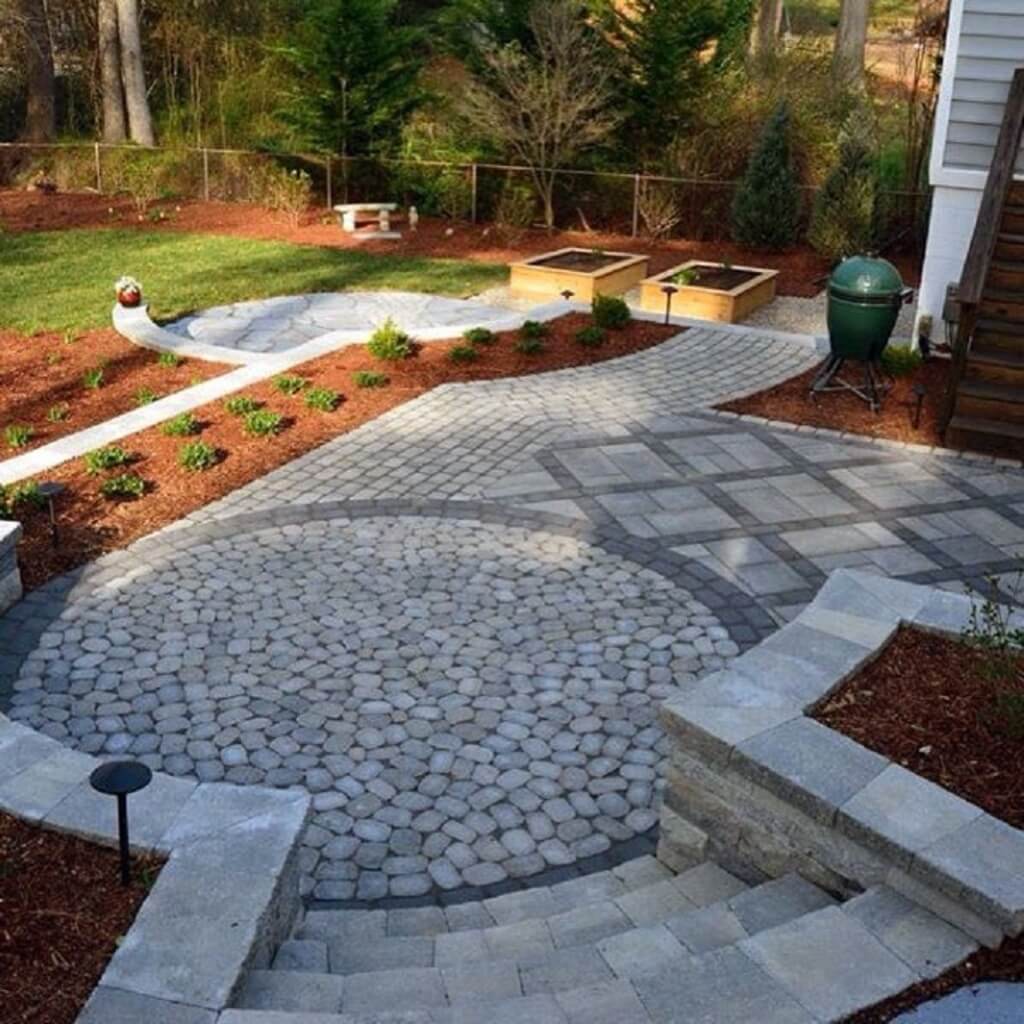
Top 10 Cheap Patio Paver Ideas
Here we’ve listed the best ten patio paver ideas of 2021. There are various options out there in the market. So, it becomes a bit challenging to find the perfect match for your patio. Without wasting any time, let us start with the ideas.
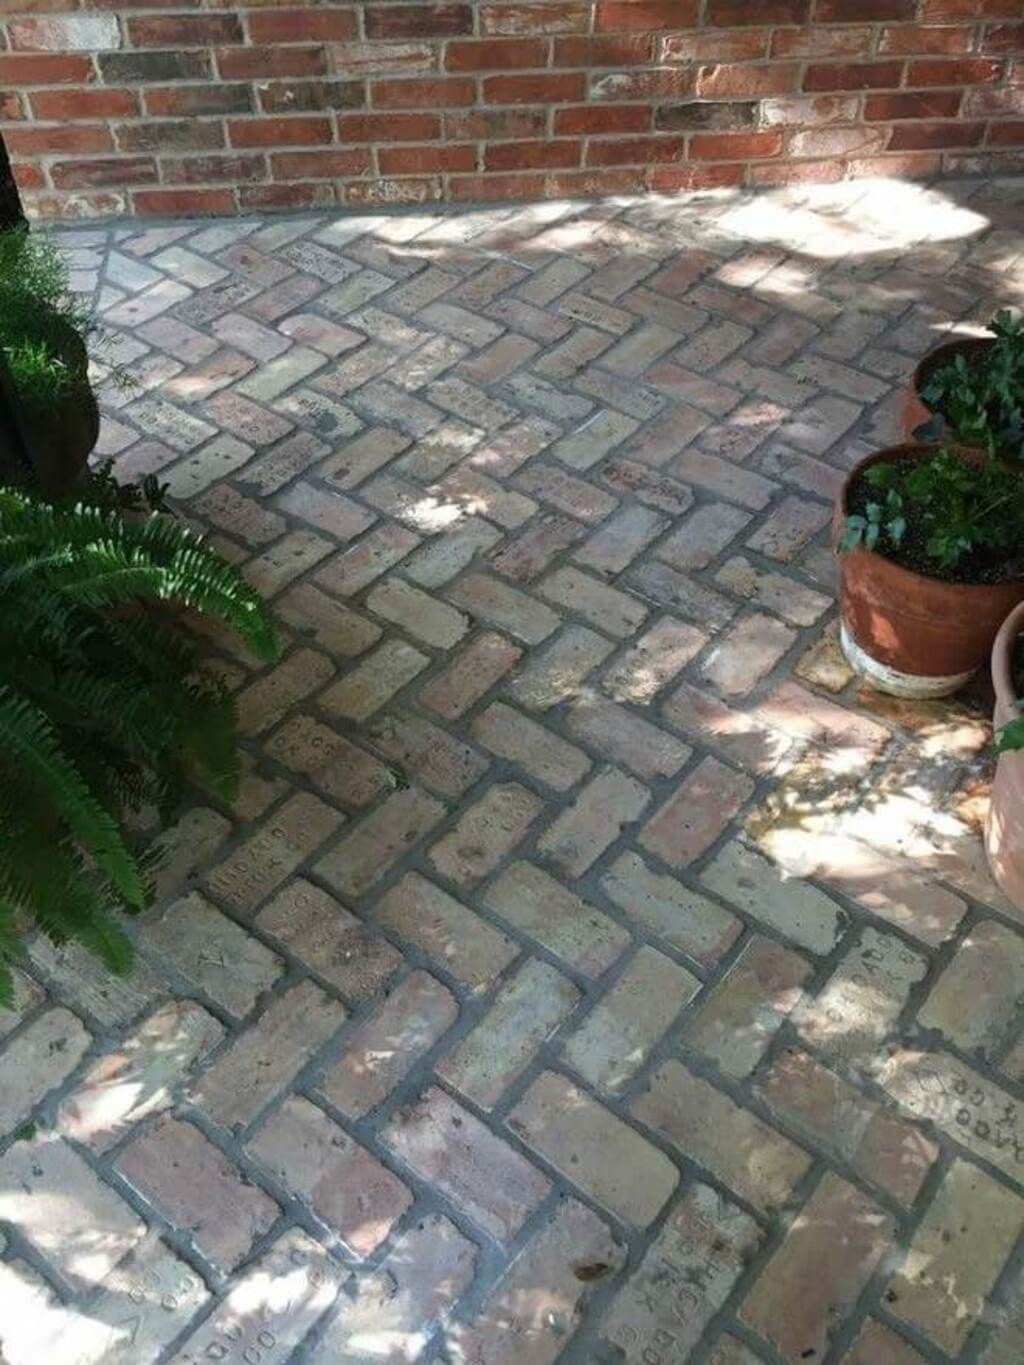
Reclaimed Brick
Bricks are known as one of the most alluring designs for a patio. They are one of the oldest designs. You can go for a polished finish or a raw finish, as per your liking. Reclaimed brick is an excellent source as a repurposed brick. They make the best results for your patio. You can set this brick in whichever pattern you want.
Usually, this red brick looks absolutely stunning on every theme. These bricks are available at a very nominal cost. One of the fascinating features of this brick style is its design pattern. You can actually create any design of your choice according to your patio size and shape. You can also experiment with the bricks to create some unique designs and patterns before installing the pavers on the patios.
Material: Natural Sand Brick
Designs & Patterns: Zig-Zag, Triangular, Circular, and Geometric
Pathway Design
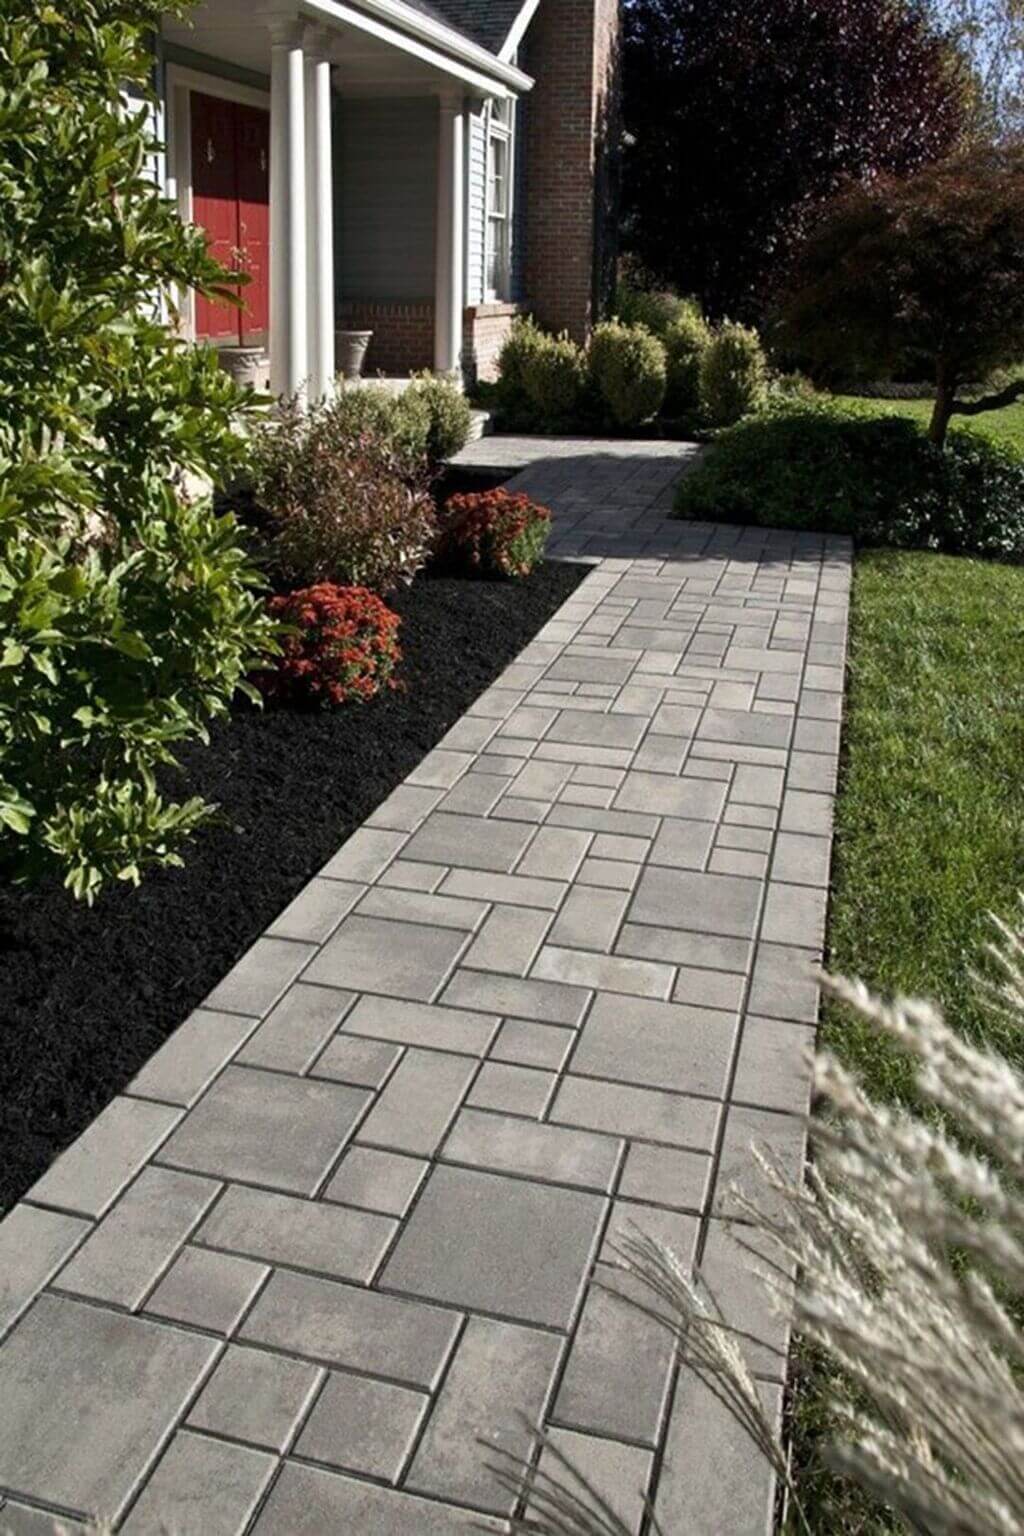
Pathway design is an excellent option if you are looking for something symmetric and an organized-looking result. The pathway design is made of concrete stones. These stones are symmetrically organized in a pathway style. The concrete blocks need to maintain a particular distance. Concrete blocks or stones are available at a reasonable cost. If you want to enjoy a flawless pathway or a patio paver, you can add marble stones to close the gap.
Usually, Concrete Blocks in pathway designs are kept raw as it is. If you want a simple paver patio idea, you can keep it like that. You can even color the stone blocks to add some fun flavor to your patio paver idea.
Material: Concrete
Designs & Patterns: Square block and Rectangular block
Uneven-Wide Blocks
In today’s world, uneven comprehensive blocks are reaching heights. People love the concepts of the uneven blocks that are placed on their patio. This uneven concept was specially designed for outdoor chilling corners and lawn space. It’s just like creating an exciting corner in your patio at a cheaper rate. In that case, nothing is compatible, as the unevenly wide blocks.
These blocks are made from natural stone, which is considered one of the best ways to create a perfect outdoor ambiance. If you are looking for something absolutely natural and raw, you can definitely consider uneven blocks. They are available in different shades and effects. You can explore the shades based on your likings. They are readily available in the market at a reasonable cost.
Material: Natural Stone and Concrete Stone
Designs & Patterns: Uneven wide blocks
Sandston With Patterns
Ever since sandstone entered the market, people have always admired this product. The material is a perfect option for royalty with cost management. It gives you a perfectly luxurious feel when correctly installed on your patio. As per experts, this turns out to be one of the most appreciated backyard cheap patio paver ideas in 2021.
Sandstone allows you to create designs of your own. Right from creating artistic designs to creating an animal print, you can design anything of your liking. When you have choices available to you, why stick to one particular choice. You will get color shade options, too. So, if you want something different than expected, go with the colored sandstone patio idea. You can choose the cheap patio paver ideas in varieties if you go with sandstone.
Material: Natural Sandstone.
Design & Pattern: Various Range of designs and patterns are available.
Concrete Blocks
To date, there is nothing that can compete with traditional concrete blocks. There are various cheap garden paving ideas available in the market. However, this is one of the most preferable and reasonable. Concrete blocks are highly recommended for a raw finish that will provide you the perfect luxurious feel.
If you plan to install your patio around the greenery, this will turn out to be your wisest thought. When you are planning to install concrete bricks on your patio, things become easier to manage.
Material: Natural Concrete Stones
Design & Pattern: Uneven design or Square and Rectangular pattern
No-Space Red Bricks
If you are looking for something aesthetic and traditional, red bricks are the ideal ones. Redbricks are one of the excellent patio paver ideas. They look amazingly alluring when placed correctly on your patio. As per experts, they create a captivating ground piece for your dream backyard patios.
The bricks are placed symmetrically without leaving any space in between them. Usually, there are no spaces left in between. However, if you want, you can also install pebbles, stones, or greenery in between the spaces. There are various styles and patterns you can try in this material as per your requirement. Explore the various styles and pick the right one for your backyard.
Material: Natural Red- Sand Bricks
Design & Pattern: Horizontally Zig-Zag, Vertically Zig-Zag, Circular Spiral, and simply Horizontal or Vertical.
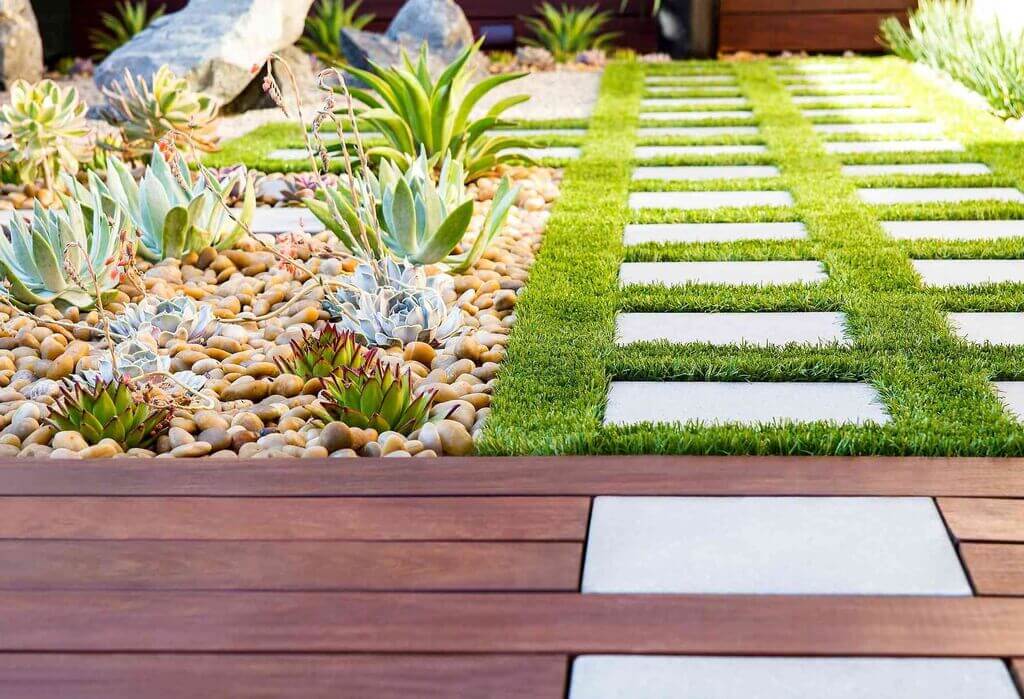
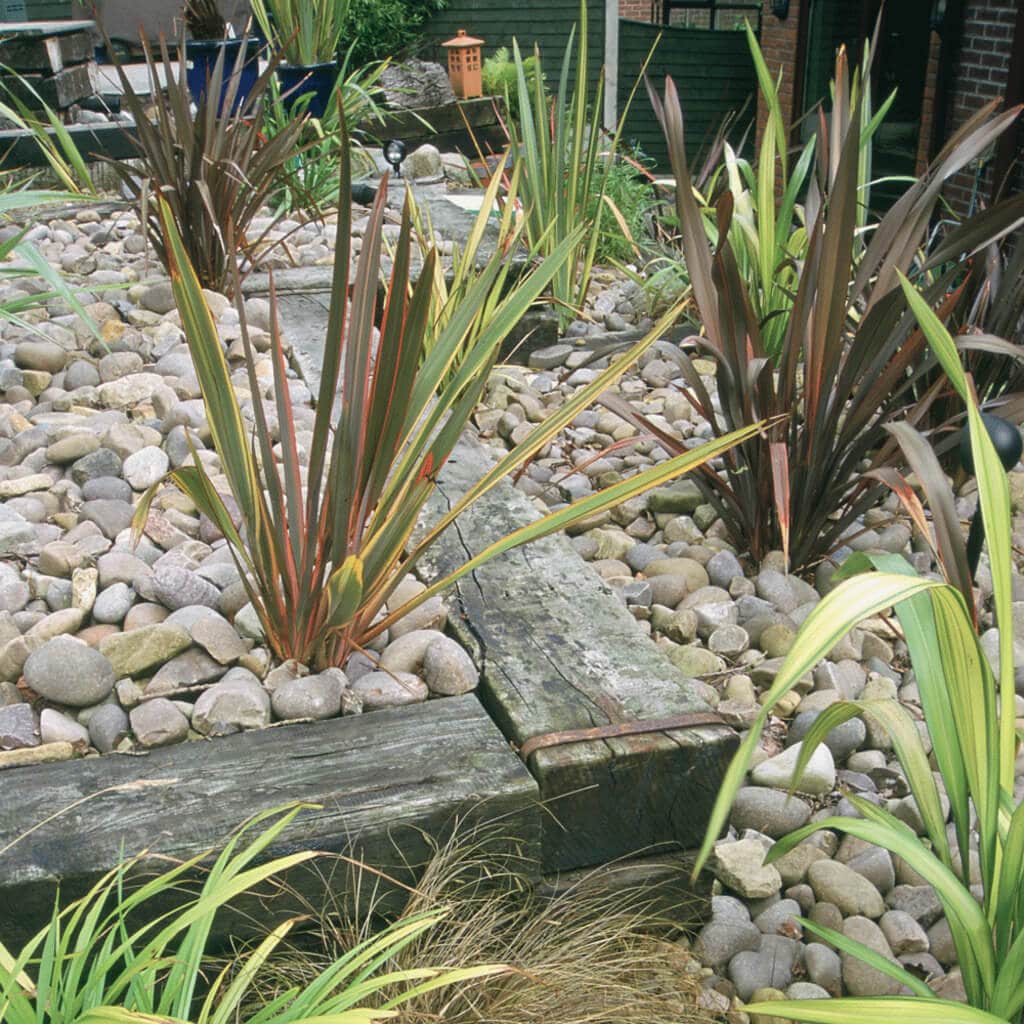
Natural Stone Between The Greenery
Natural Stones are said to be a fantastic option for people who are looking for cheap patio pavers. You will definitely get many ideas and designs in natural stone. However, when you have nature as an option to add flair, why choose something different. The best way to utilize a natural stone as a cheap patio paver is to set them with the greenery.
You can create a beautiful patio paver with natural stone and greenery between the spaces. For this, you have to install the natural stone while maintaining some space between them. Later, you can either grow greenery or place grass slabs in between the spaces. This will give you complete natural and luxurious results at a very nominal price investment.
Material: Natural Sandstone or Concrete Stone.
Design & Pattern: Vertically or Horizontally installed OR Zig-Zag Pattern
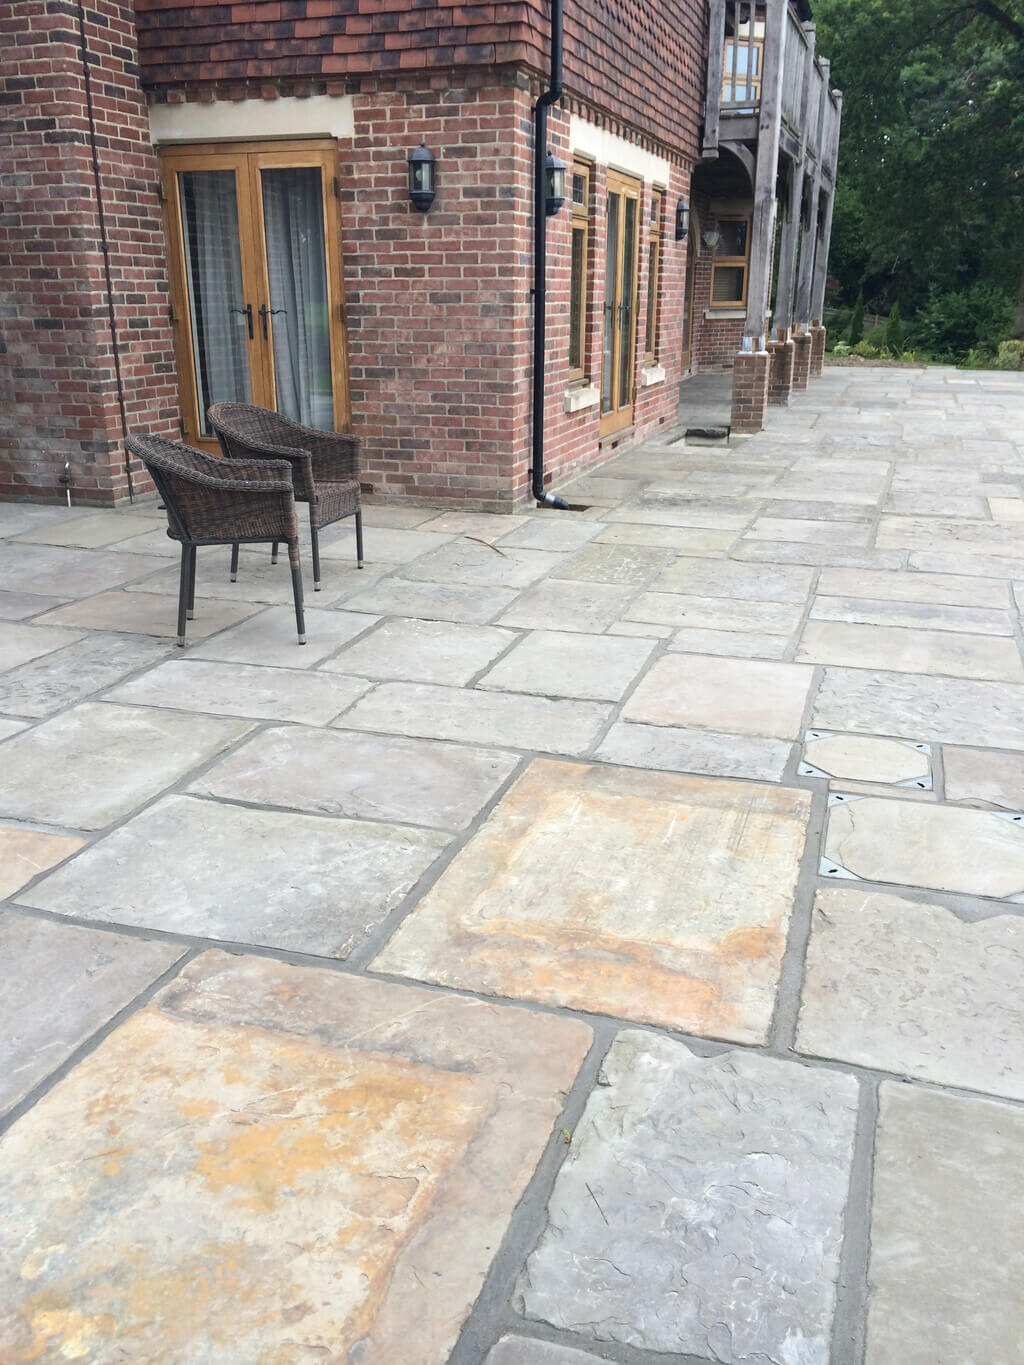
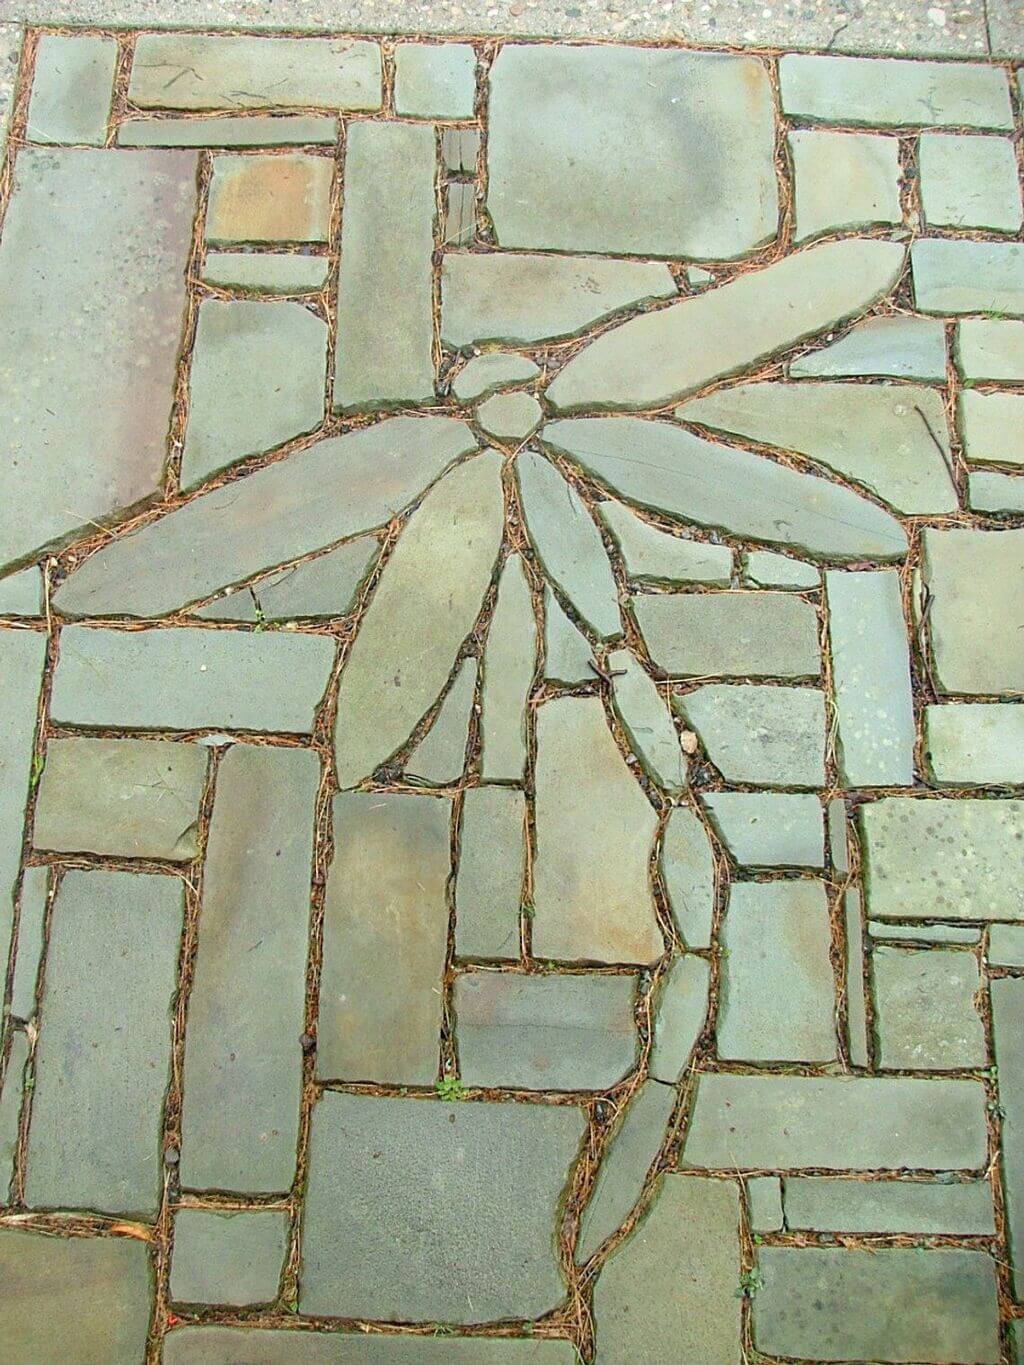
Flagstone Patio Paver
You will get many cheap patio paver ideas, but a perfect result is a must. Flagstones are one of the most admired simple paver patio ideas. They are nothing extra-filtered or loud. Even though they are effortless and casual, they make a perfect tile piece for your patios.
If you are looking for something simple yet exciting, you can definitely go for flagstone as your option. They have different prints imprinted on them. You can explore the various range of prints and make a move as your final selection. Ask your architect or experts which print is perfect for your space to create the desired ambiance. The print on the flagstone will make a clear impact on the ambiance.
Material: Natural Flagstone.
Design & Pattern: Different pieces are placed together to create a unique design and pattern.
Warm Bricks
Do you have limited space in your backyard or patio? Warm brick is the perfect solution for you! These bricks will completely fit in the space and the ambiance. Warm bricks have different shades and tones that give you many options to choose from. They are also available at a very nominal rate and readily available in the market. Bricks are a great deal if you want to install a cheap and easily manageable patio ground option.
Warm bricks are usually placed in different angles to create unique and captivating designs and patterns. There are different shapes and sizes available in the market to make a perfect match for your small backyard. So, if you are looking for something minimal for your small space, consider warm bricks.
Material: Natural Bricks in different warm tones.
Design & Pattern: aligned together to create various captivating patterns.
Tucson Saltillo
We always keep the showstopper in the end, right? So is this Saltillo! Tucson Saltillo is the best cheap patio paver idea. They make the ultimate match for your backyard patios. The shine on the tiles creates a smooth impact on the viewers. The tiles come in different shape patterns that will work perfectly with different types of outdoor spaces.
The tiles are smooth and shiny in nature; that’s why it becomes elementary to maintain and clean them. Unlike other natural stones and tiles, you need not brush these tiles regularly to maintain the shine of the flooring. Thus, if you are looking for easy-to-maintain pavers at a cheap cost, consider the Saltillos.
Material: Tucson Saltillo
Design & Pattern: square, rectangular, hexagon, and circular shaped in patterns.
The Bottom Line
If you know about the cheap patio paver ideasavailable in the market, the whole installation process won’t be that challenging for you. There are various options you can explore. We have listed the top ten that are highly admired and recommended by experts and professionals. We invest our emotions and money in creating our dream backyard patio space. So, why compromise with the ideas that we can explore before selecting our perfect match? Look for your nearest stores or websites before making a decision for your backyard.
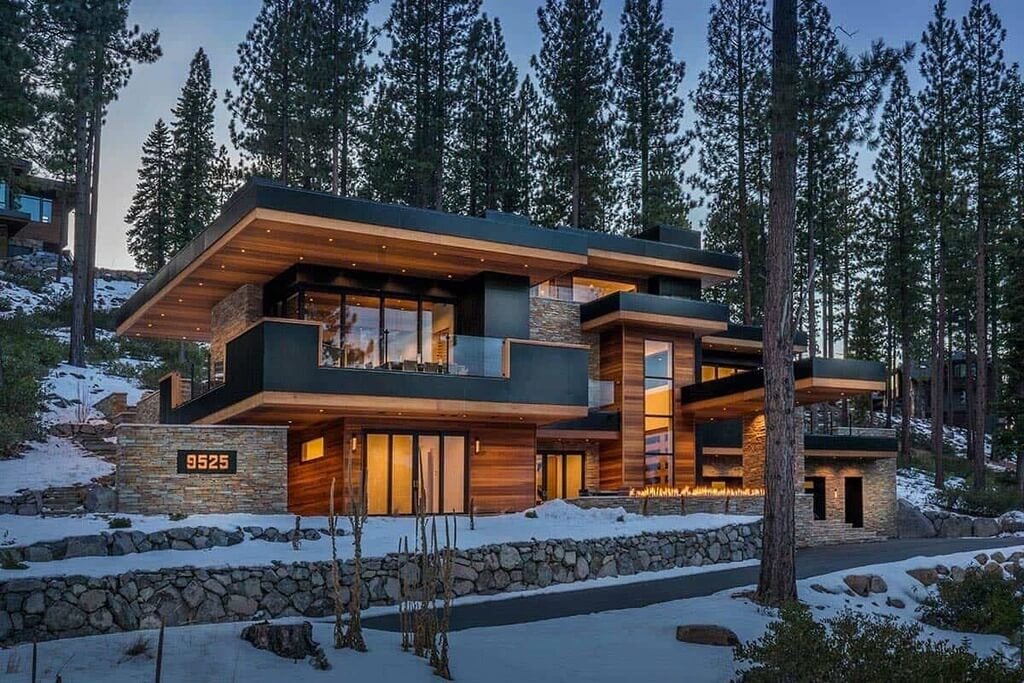
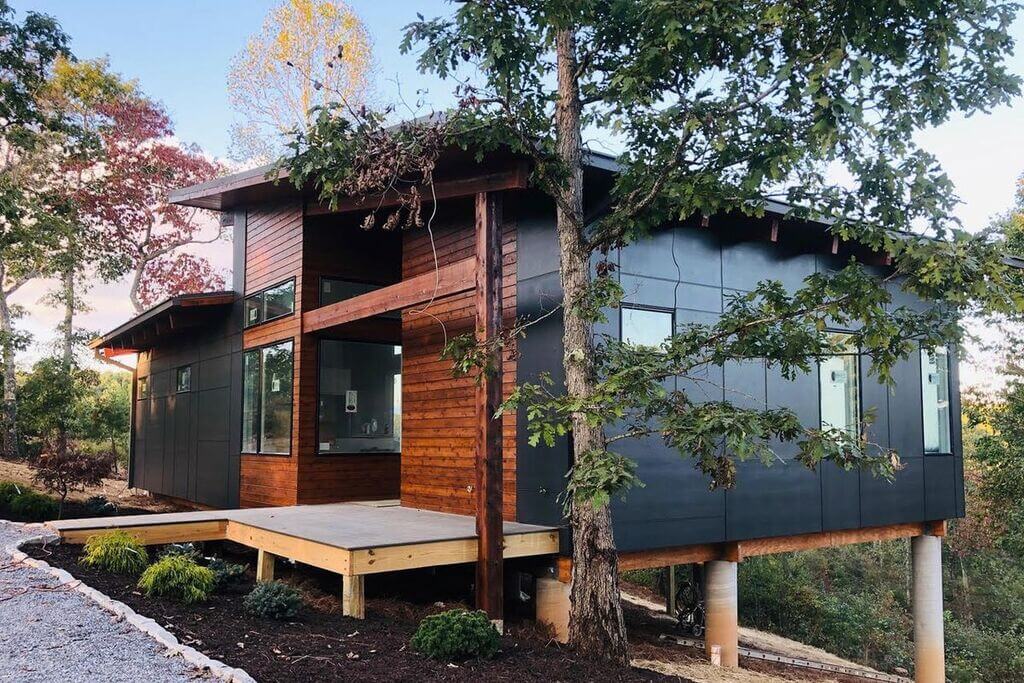
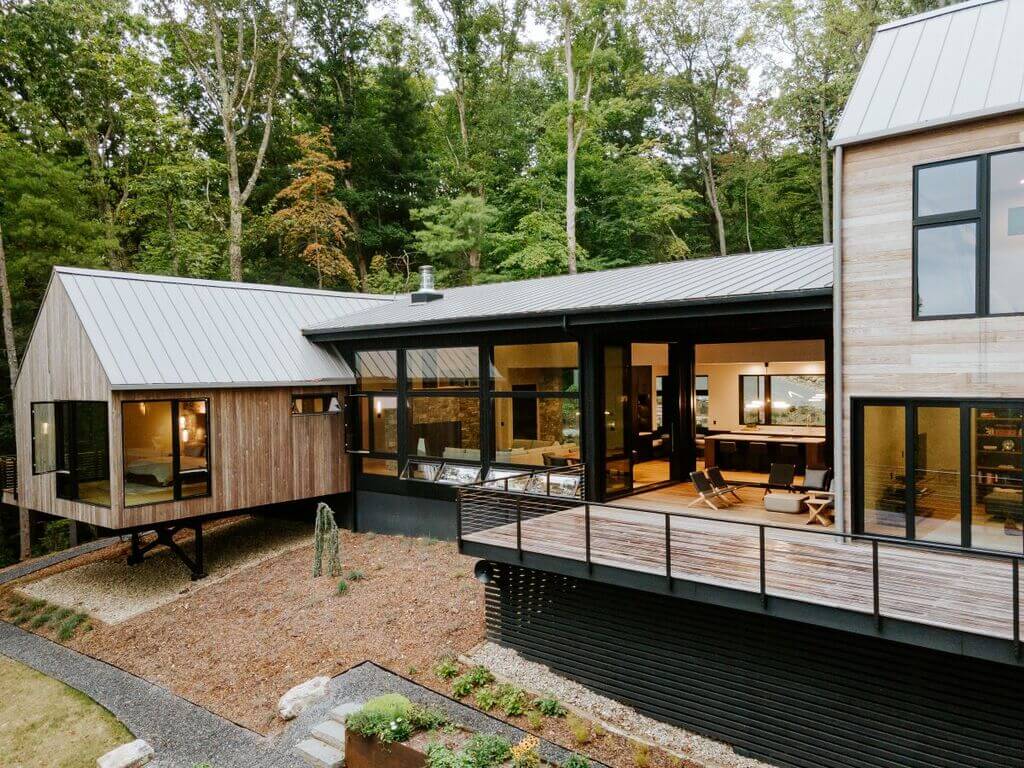
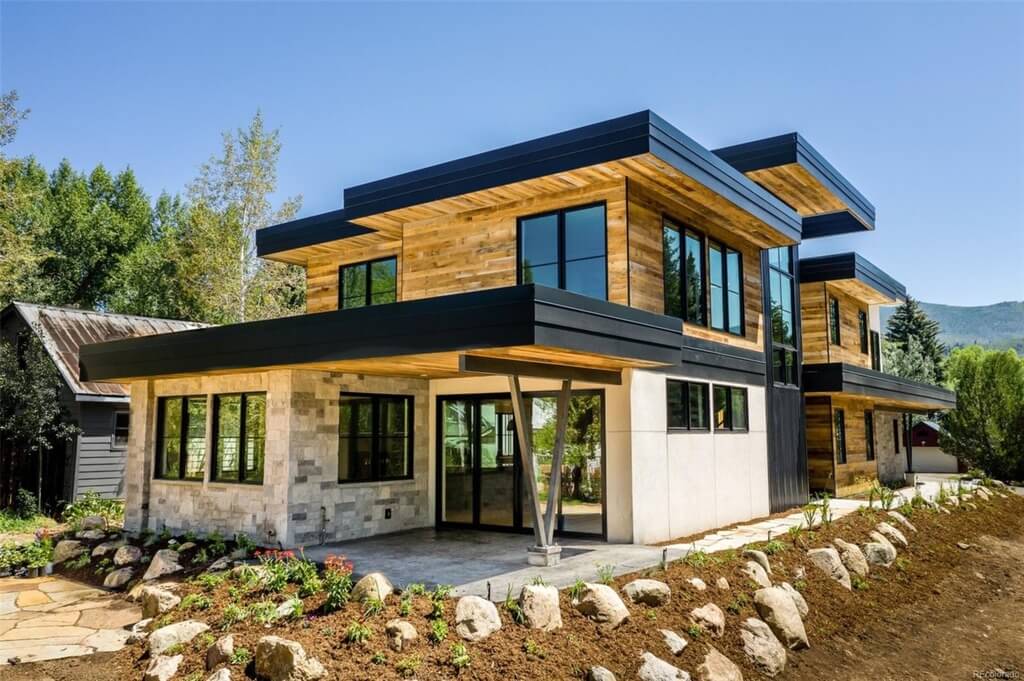
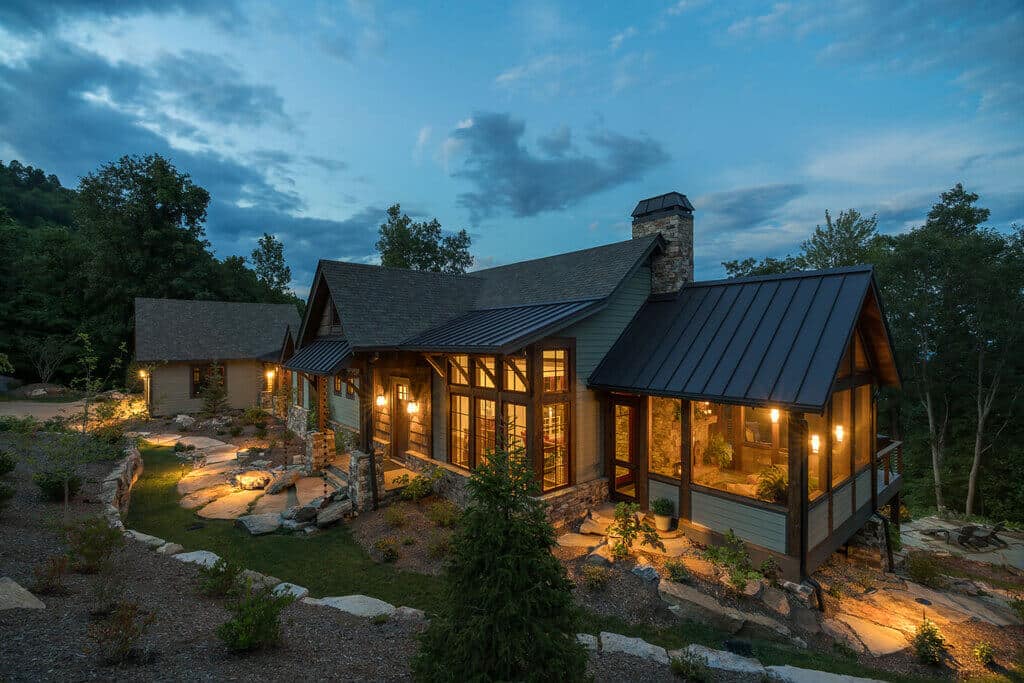
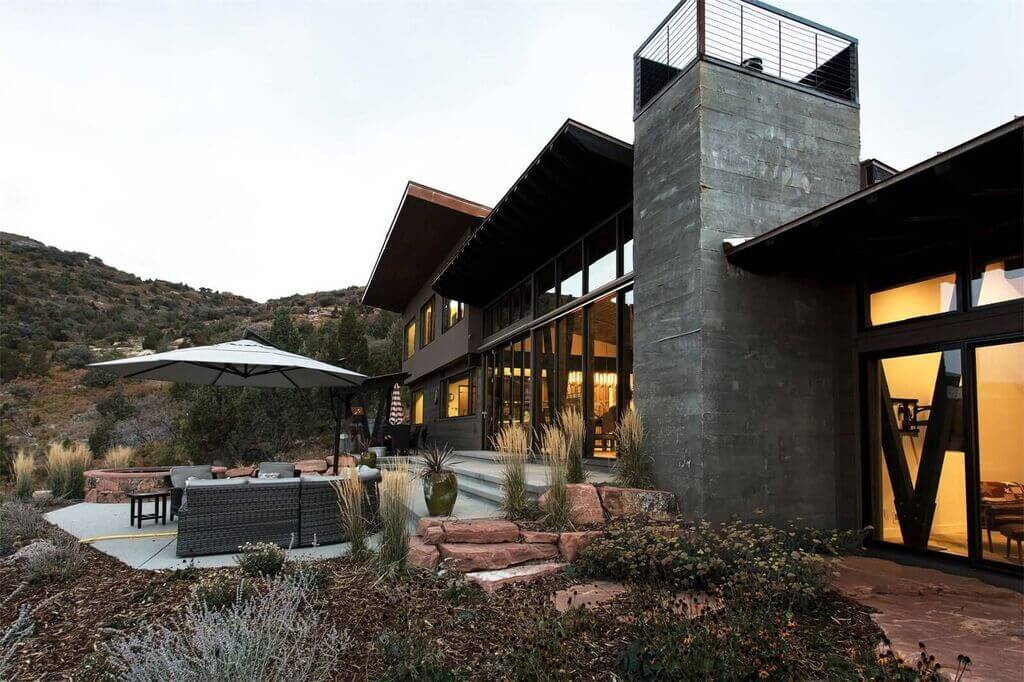
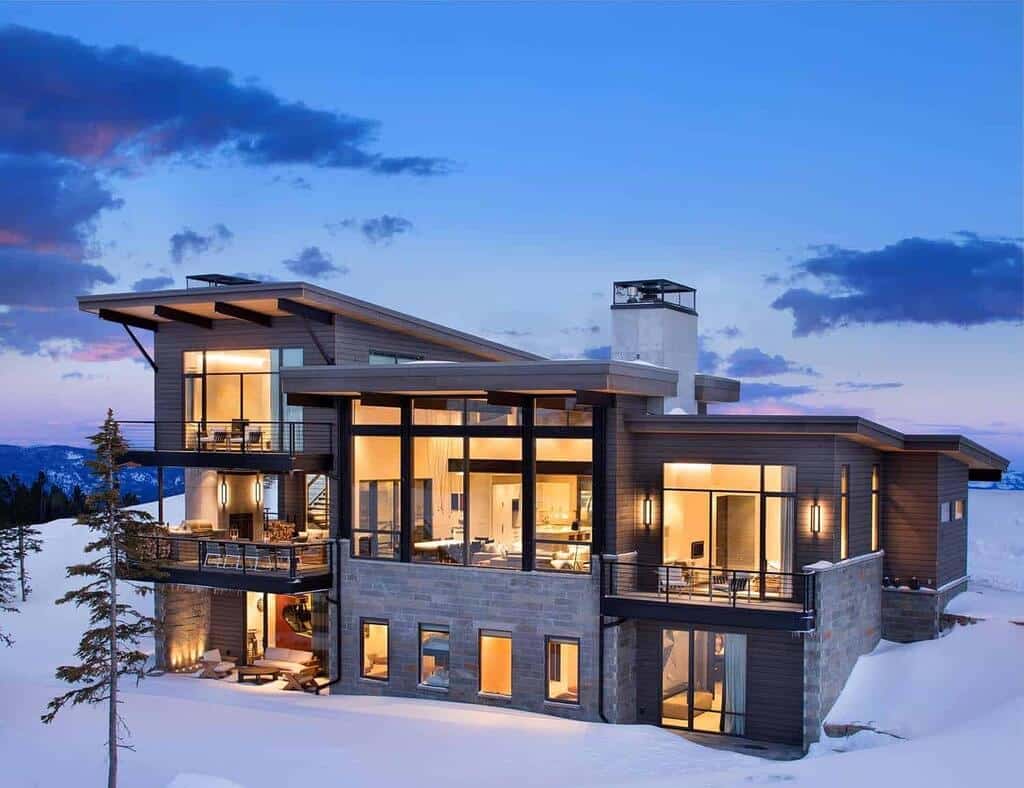
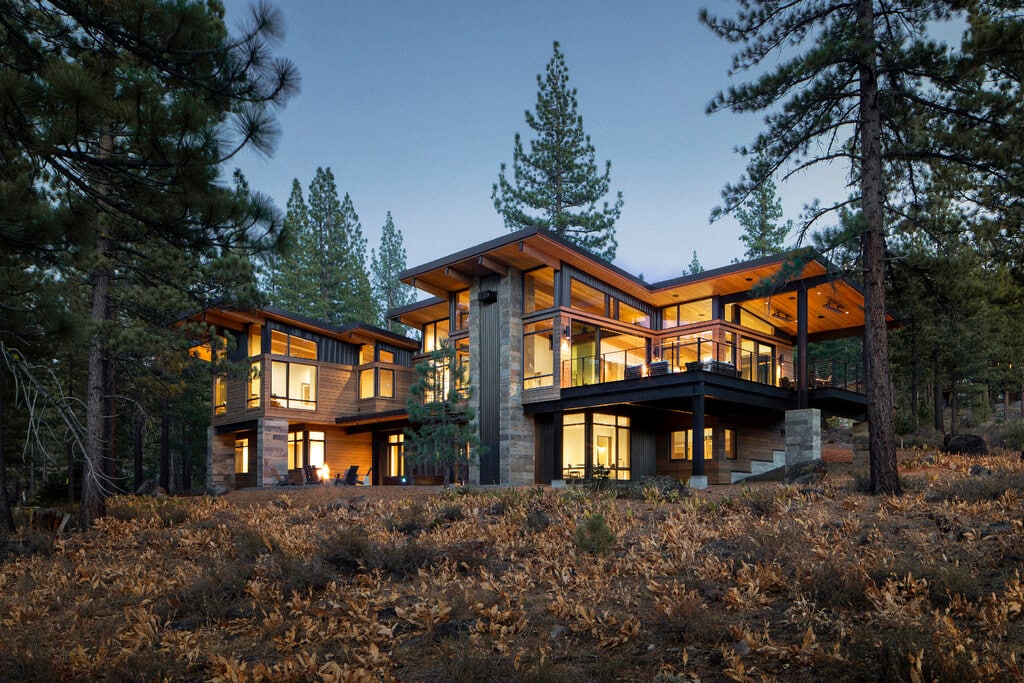
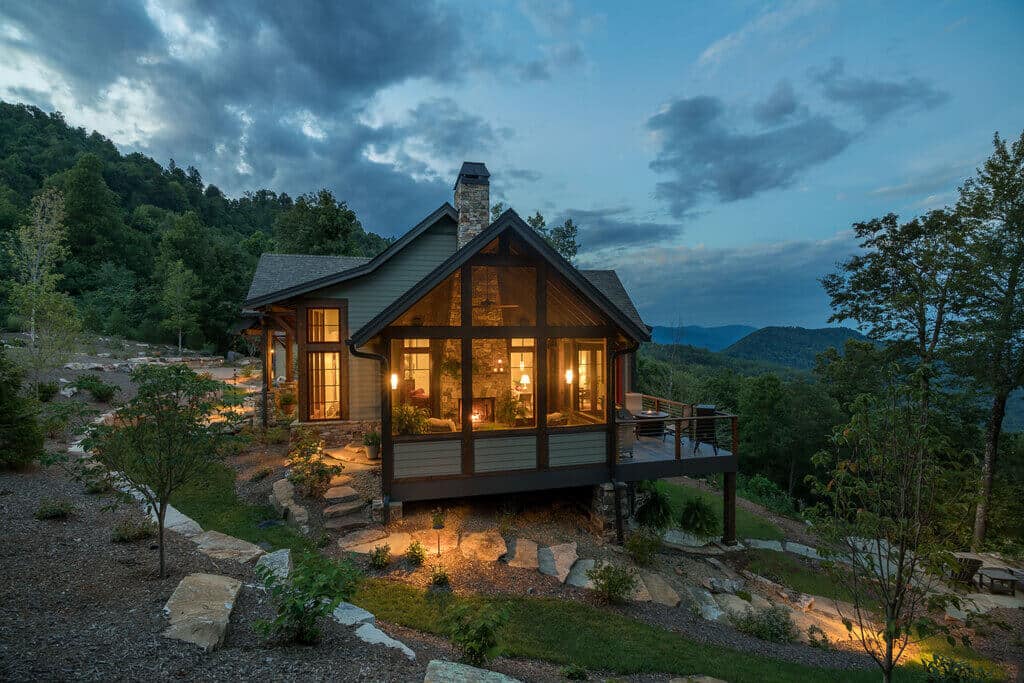
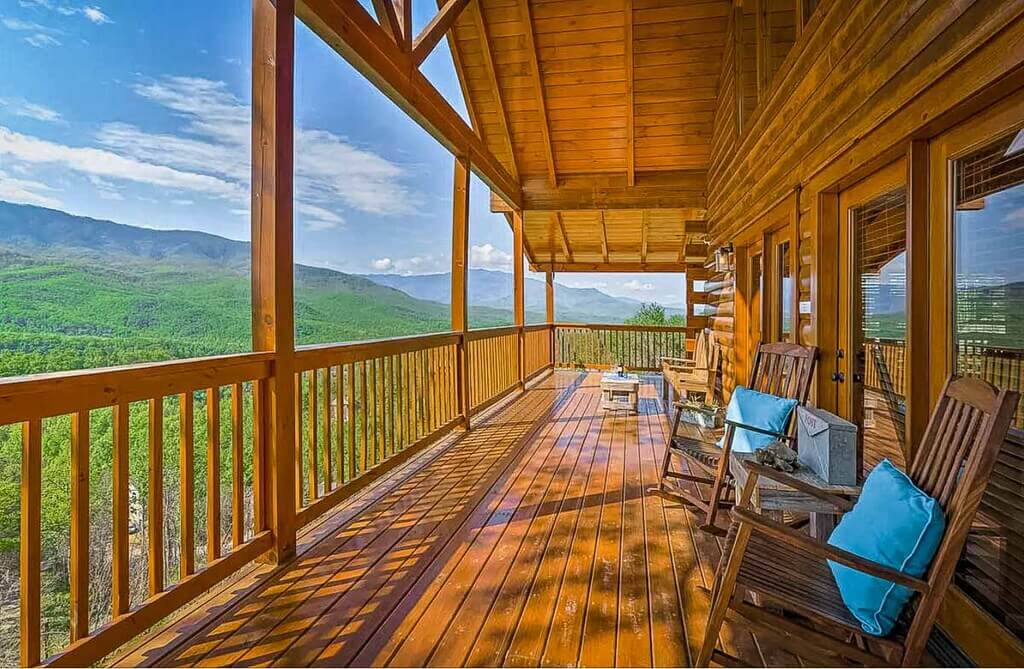
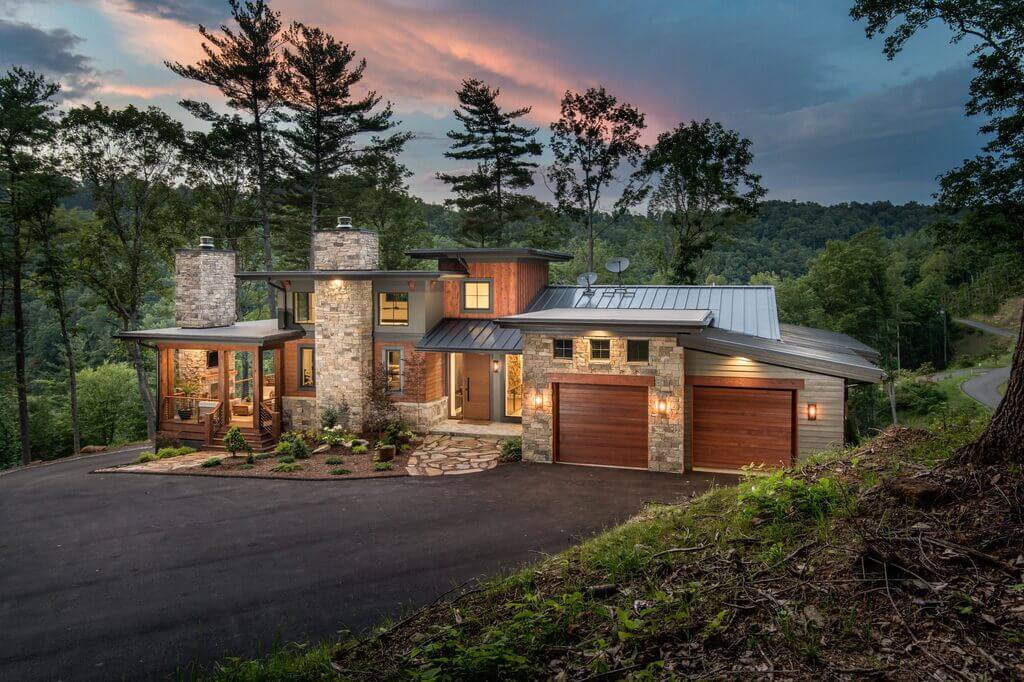
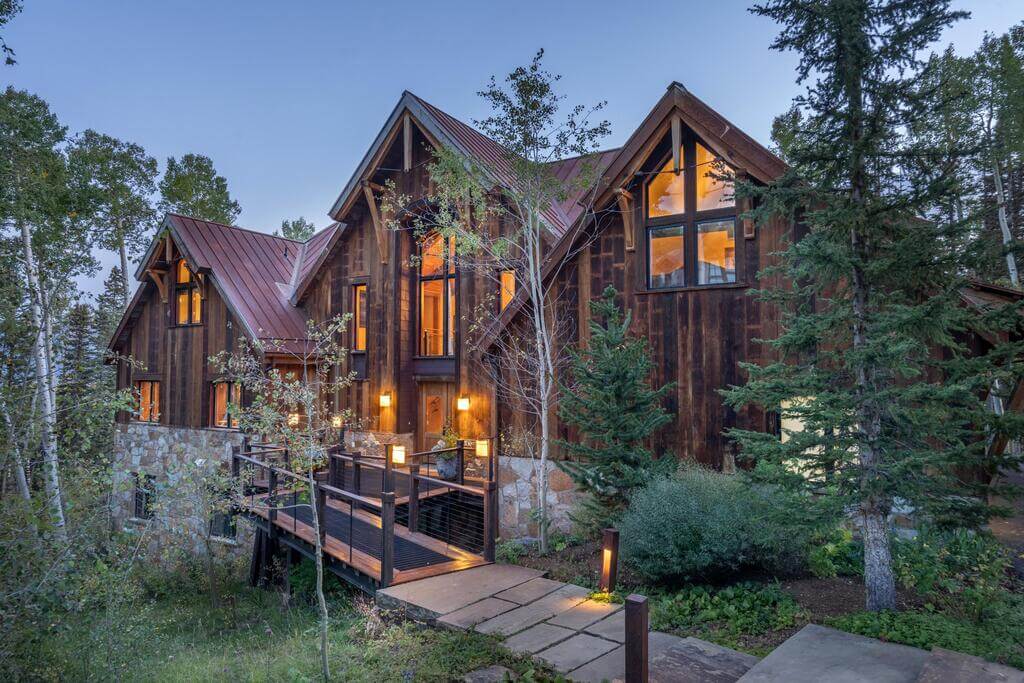
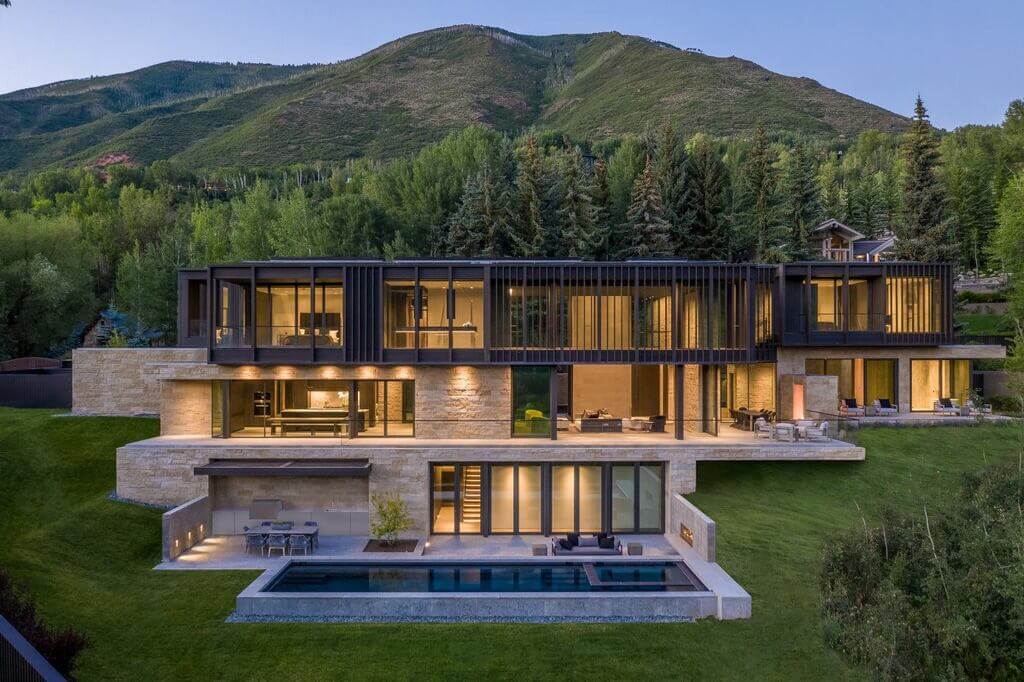
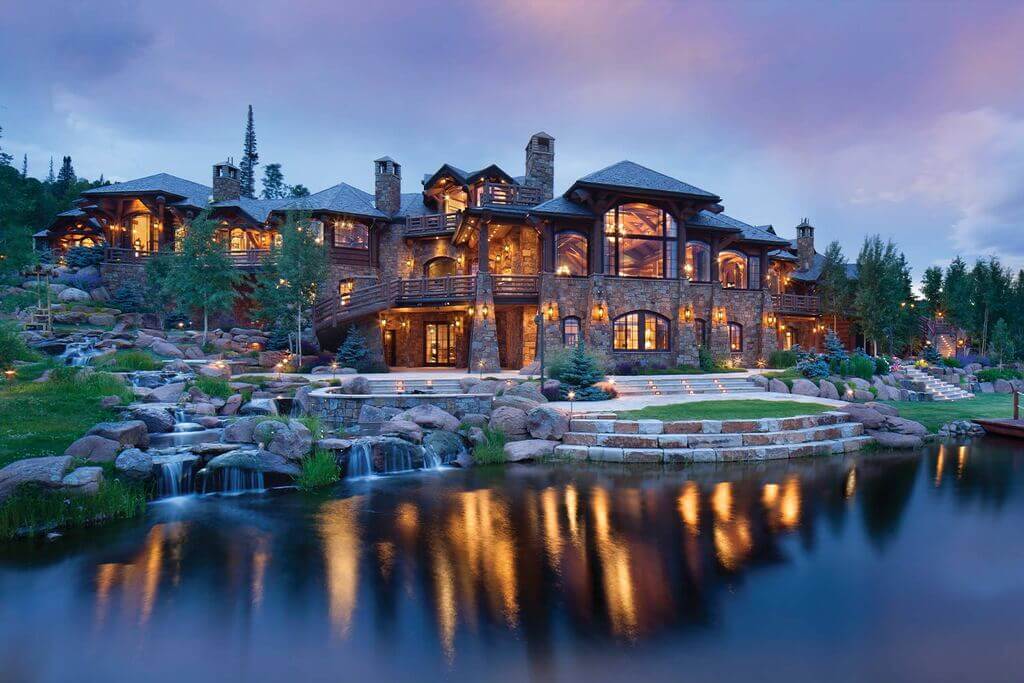
A peaceful and enchanted existence is possible in the mountains. Some of the world’s most beautiful scenery and ecologically rich regions can be found in the mountains. There is a lot of vegetation and wildlife, clean water, and a relaxed, uncomplicated way of life. To avoid the rush and bustle of the city, more and more individuals are purchasing properties in the mountains. Modern mountain homes have the best structures and designs, and many are always interested in staying in these mountain areas.
These homes are typically built on steep, mountainous terrain and feature large windows to enjoy the stunning views. They are also energy-efficient and blend in with their natural surroundings.
This article will help you with detailed information on the ideas you need to know about modern mountain homes.
What are Modern Mountain Homes?
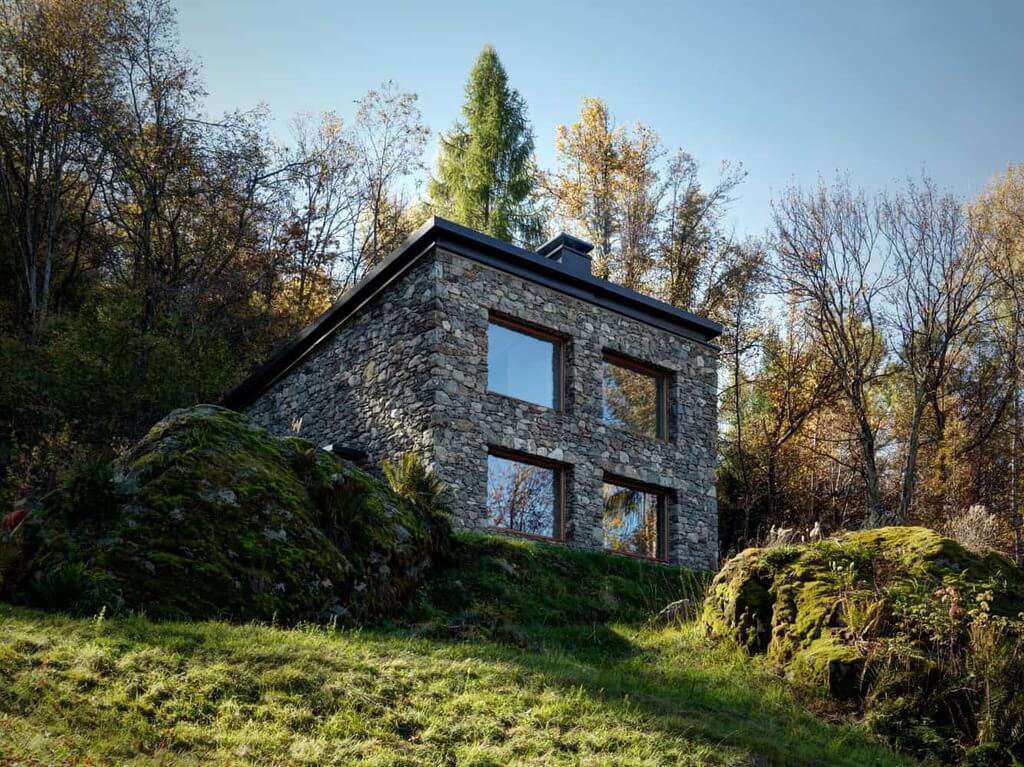
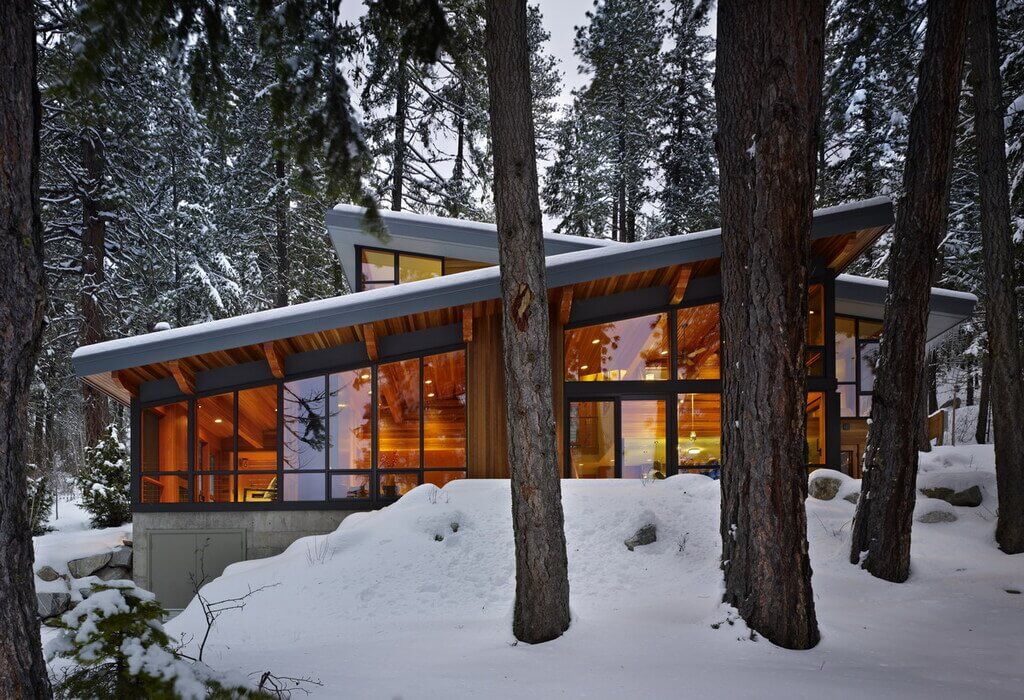
A Mountain home is a house or cottage built on mountainous terrain. Modern mountain house are typically made with a sleek and simple design. They are typically built-in locations where the scenery is a central selling point, such as the Rocky Mountains, the Alps, or the Andes. Mountain homes come in all shapes and sizes but often incorporate features that take advantage of stunning views and provide a comfortable living space.
Mountain homes may be built of traditional materials like wood and stone, or they may use more modern materials like concrete and glass.
What Are the Main Features of Modern Mountain Homes?
Unique Shape of the Structure
The unique shape of the structure of modern mountain homes means that the houses are designed to fit the landscape and provide stunning views. The homes are built with various materials, including stone, wood, and glass, to create a stylish modern look. The houses are made to take advantage of the area’s natural resources and are energy efficient.
Local Materials
Like its more traditional ancestors, modern mountain architecture usually uses local materials like natively cut wood and stone from the area, which are left in their natural states. Some of these materials are natively cut wood and rock found nearby.
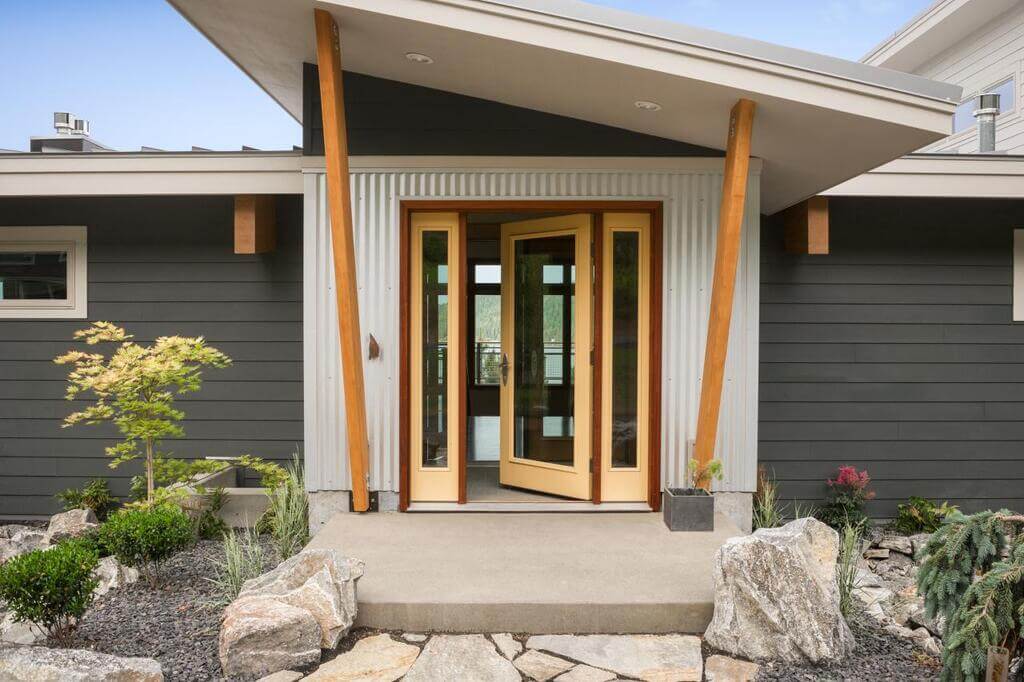
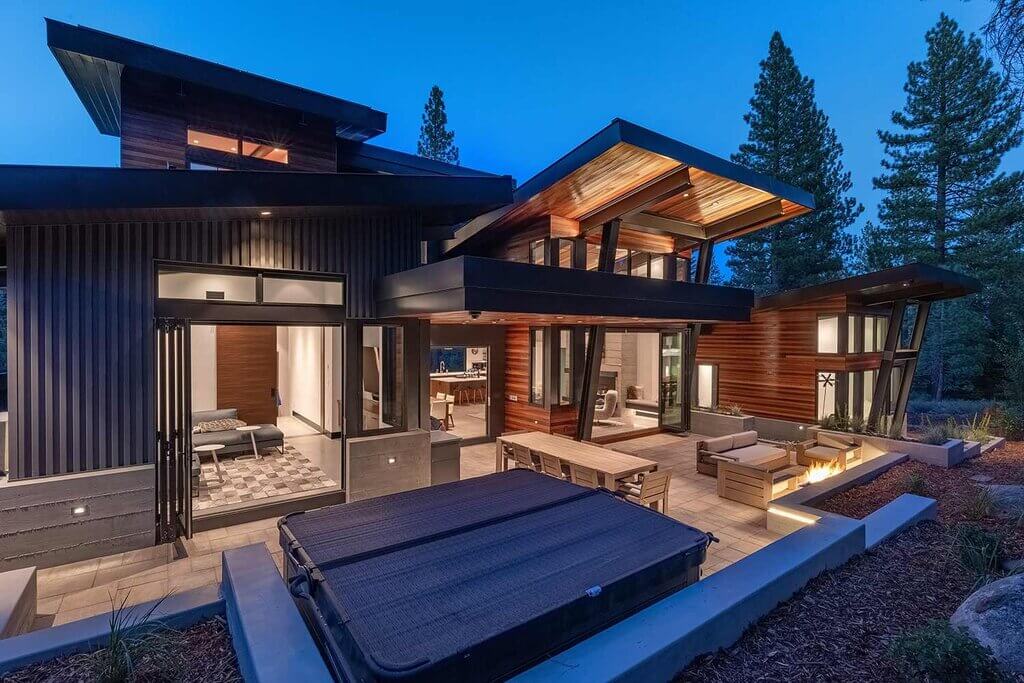
Oversized Windows and Doors
Ample glass windows are strategically placed throughout the room so that residents can enjoy the breathtaking views of the surrounding lake and mountains. To maintain the building’s contemporary vibe, the inside bedroom and bathroom doors are flat slabs of wood, with no panels to break up the smooth lines.
A multi-paned garage door with a mill finishes aluminum frame provides convenient indoor/outdoor access from the lower level’s game area to the patio’s lakeside setting.
Neutral Color Choices
White, gray, and blue are standard colors in contemporary mountain interiors. These colors go well with the natural wood and stone features and the other contemporary steel details.
When it comes to walls that are coated in wood cladding, you want to strike a balance between the domestic atmosphere and the clean lines. Because the light changes drastically from summer to winter in this location, neutral colors are the best choice.
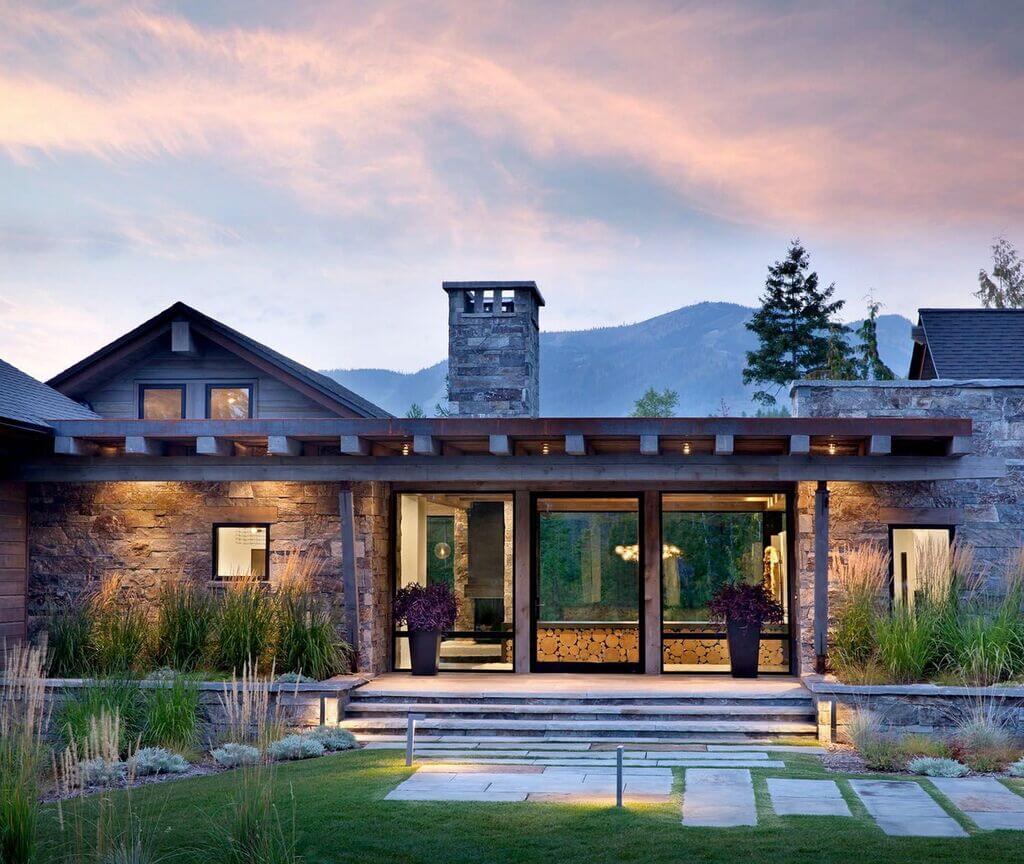
Low Maintenance Landscaping
Along with the flagstone patio, the natural appearance of the environment can be enhanced by using wild grasses, boulders, and pebbles sourced from the surrounding area. It will be challenging to determine what is natural and the result of human activity.
The upkeep of a garden is simplified when it has drought-resistant plants. These plants will develop on their own in the state of Idaho.
Programs Offered by the House
The breathtaking scenery is a major draw for many people who want to settle in mountainous areas. It will be essential to get imaginative with the home’s architecture and the arrangement of spaces to make the most of these views.
A spectacular view up or down the mountain from a principal living space, for example, can be created by simply turning the spaces of the residence.
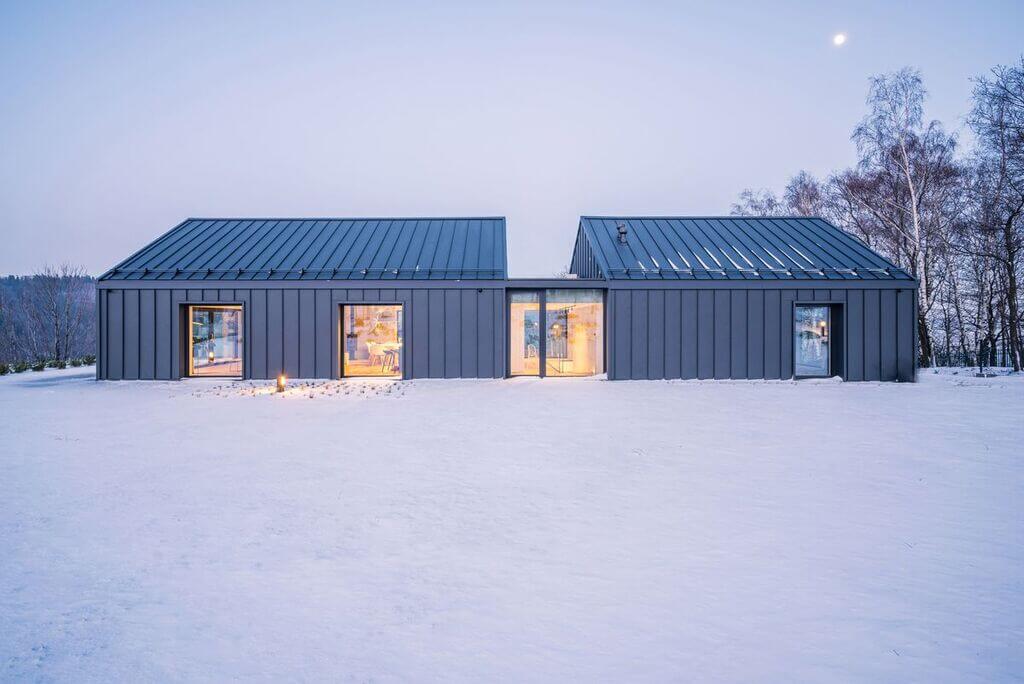
Sloped Roofs
Snowfall is always possible in the mountains and must be planned accordingly. While flat roofs are more typical of contemporary architecture, slanted roofs are often necessary for mountainous regions.
Slanted roofs prevent collapse by directing snow away from the building and, preferably, off the main routes in and out.
Connection to Site
In the past, mountain homes were difficult to connect to essential services like water, electricity, and sewerage. This made them expensive and impractical to build. However, modern mountain house plans are designed to connect to the site.
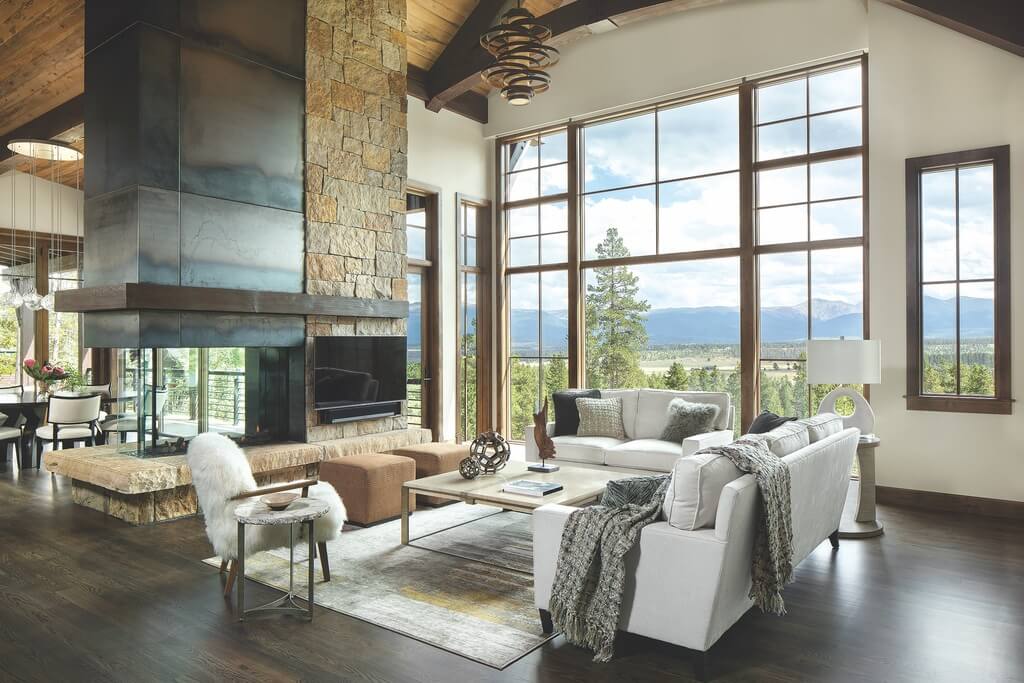
7 Best Interior Designs You Would Love for the Modern Mountain Homes
Sophisticated Open-Plan Living Room
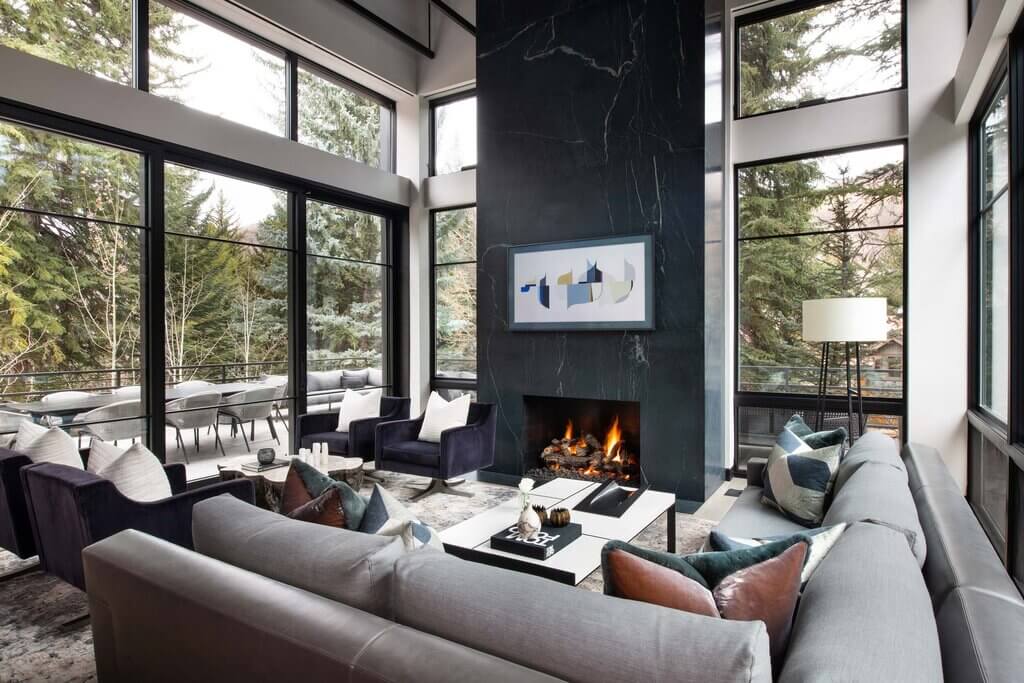
Most of the living rooms in modern mountain homes are designed with a wood-like texture of the ashen gray accent wall, which stands out in the airy and light space. There is plenty of natural light interior design, but if you want to curl up on the sofa with a book after dark, a modern metallic floor lamp is all you need. It could also have a fireplace which helps bring warmth to the room.
Elegant Dining Room & Bar Area
As part of a mountain home’s ideas, the kitchen and living room are separated by an eating area. The abstract monochrome wall painting brings together the living and eating areas.
Dining chairs in black with braided seats look great around the sturdy hardwood table contributing to nuanced texture. Finally, the dining room is anchored with a contemporary pendant light.
Near the kitchen is a cozy nook with a bar and music. This modern area can house your record collection, wine glasses, and other audio equipment. All the shelves are backlit with a warm golden light.
Sleek Kitchen with Breakfast Bar
The usage of matte black is highlighted as one of the best modern mountain kitchen design ideas. The sleek, modern look of these appliances in the kitchen complements the building’s industrial style. Walls are lined with cabinets, many constructed from contrasting natural wood.
Arched Lamp
This is a very classic lamp that easily fits mountain modern homes. Its contemporary pose draws the attention of many, and it’s a beautiful and excellent way to supply light to your house.
Pathfinder Art
You’ll be able to give this set of eye-catching wall art any look you like. Each of this cardboard and whitewashed wood frame creations exudes a natural radiance. Various configurations are possible because each piece can be hung horizontally or vertically in a bedroom or living area.
Accent Chair
With mountain homes, the chairs are designed such that you enjoy and have comfort in your house. This chair is covered with beautiful, top-grain leather, and the overstuffed cushion makes it comfortable. With this chair, you can relax in your home well.
Side Table
This kind of table is common in mountain homes and displays an industrial-antique appearance in many spaces. Moreover, it is durable and lights so you can move and is easily placed near the sofa or bed.
7 Best Exterior Designs You Would Love for the Modern Mountain Homes
Go Gray to Match the Mountains
Make your mountain homes beautiful by making them match the mountains. Mountain beauty can inspire a house’s color scheme and gray blends well with nature. White trim around windows and doors is another suitable method to break up the gray and keep the house from merging.
Invest in Synthetic Shingle Roofing
Cedar shingles are the ideal choice for a rustic cabin in the mountains. Synthetic cedar shake shingles, such as those made by CeDUR, are a better choice for a contemporary mountain house. These shingles seem like cedar but are polyurethane cast from an accurate cedar mold.
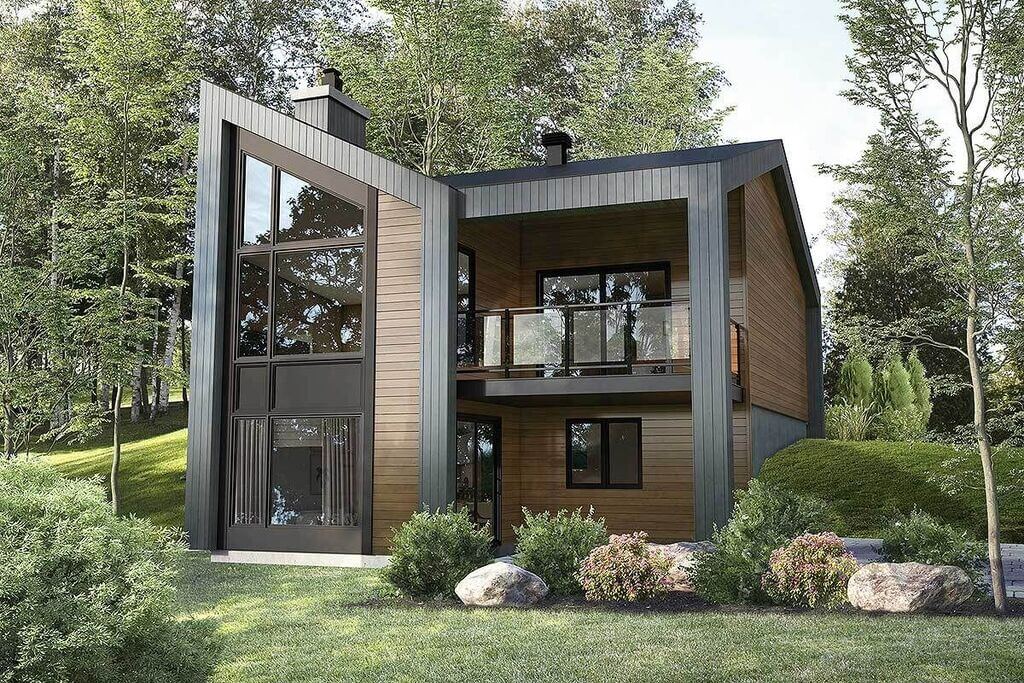
Use Lots of Windows
Having many windows is a must for any contemporary mountain home design. You can take advantage of the mountain scenery from any room in your home if you install plenty of glass windows.
Go Cottage-Style
Try a more rustic, cottage-like style for a nod to some traditional interior decoration. A shaky roof and white stone siding may make a house look warmer. A mountain house can benefit significantly from this additional essential design suggestion.
Decorate with Stone Accents
Incorporating stone siding elements into your mountain house design is another option. In addition to using natural materials like wood and stone, this can assist blend your house in with the surrounding landscape, especially the mountains.
Utilize Slanted Roofing
For a better mountain home, consider having this slanted roofing. Have one that is skewed and current in its creative presentation instead. It also has the potential to inspire more imaginative house design.
Upper-Level Sitting Area
Having a balcony in your mountain house helps people who prefer mountain homes to enjoy the breathtaking mountain scenery from the comfort of their homes. Because of this, you may enjoy the most excellent natural view.
Conclusion
Are you interested in the beauty of modern mountain homes? It is time you make the step and find the most beautiful scene you could enjoy living. Mountain homes are designed to help you enjoy the comfort of the mountain scenery.
They have intended attractiveness, and everyone else would love to stay in the mountain homes. You only need to find the best interior and exterior design that best fits you, and we have helped you identify some of the best designs preferable in mountain homes. Get started by looking at the various modern mountain homes ideas and choose the best for yourself and your family.
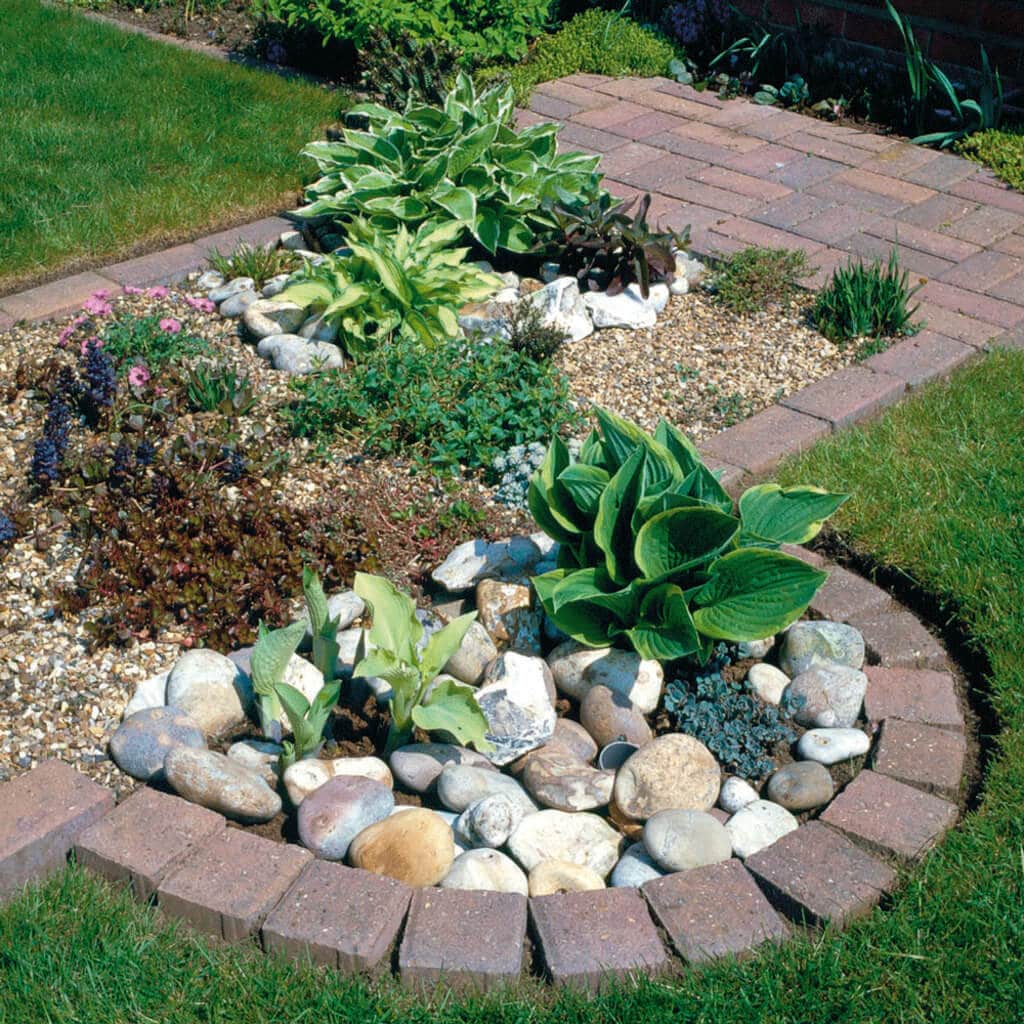
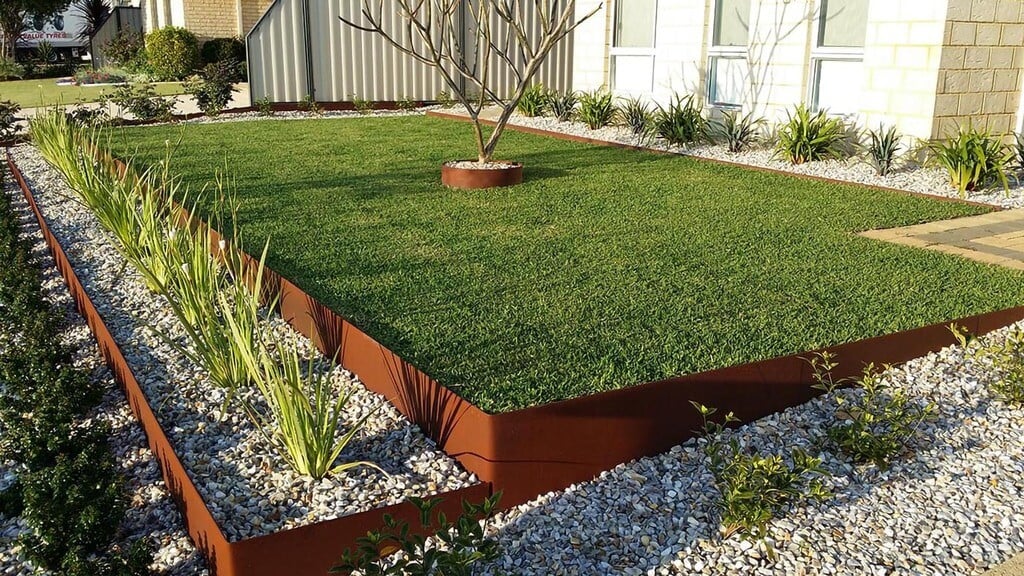
You built a house, had a great interior, the exterior is also magnificent, and equipped with all the modern technology. Oh, and yes. How can we forget about the garden space that you fabricated at the entrance or in the backyard? Let’s check out some garden edging ideas.
But you have a complaint that there is no dimensional factor to your garden, and it doesn’t look organized the way you wanted. We know why it is that way! Because you definitely have overlooked the garden edging. It may look unnoticeable, but the role it plays is unbelievable. It will add a dimension to your garden, that is for sure, but along with that, it will also add texture and quirk to it.
The purpose of garden border edging is to separate two distinct areas and to give an outline to the landscape. The main aim is to prevent animals from entering the veggi e garden. Your garden will look prettier than before after applying our below-mentioned modern garden edging ideas. We have covered all the ideas that will give your garden a modern lookoutor a traditional outlook, some are DIYs, and some are readymade.
The thing about garden edging is that you can go creative with it or just stay simple, still dressing up your garden elegantly.
So if you’re looking for landscape edging ideas and flowerbed edging ideas, keep reading the blog and explore various types of ideas and designs. Finally, pick one that is suitable for your yard or landscape.
Let’s begin.
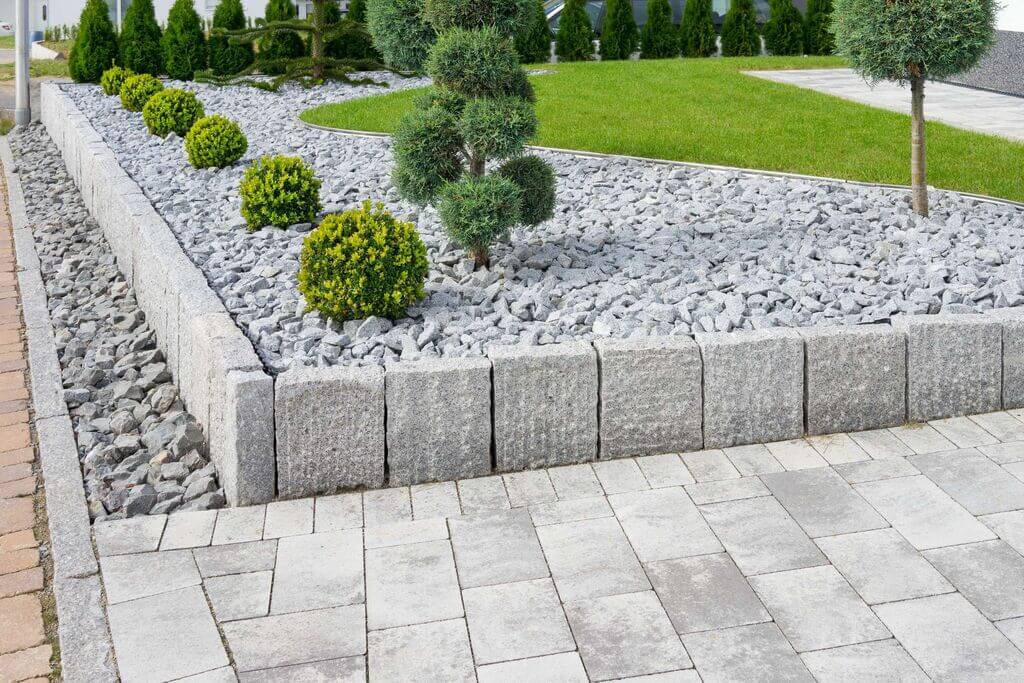
25+ Cheap Landscape Edging Ideas & Designs For Your Yard
Whether you pick a stone, wood or brick, or whatever material or design, the most important thing is to get a beautiful landscape. With the help of these ideas, you’ll get a clearly defined edge that gives a professional finish and a clean division between your various garden areas.
Below is the list of some of the best lawn edging ideas. So go through these garden border ideas before deciding on the edging thing for your place.
Let’s take a look.
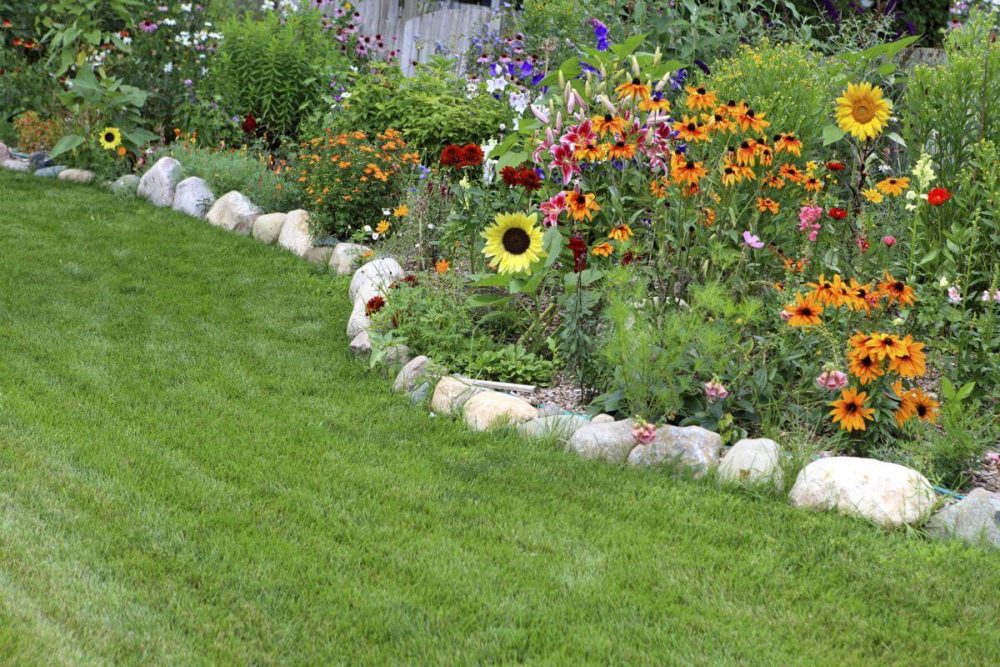
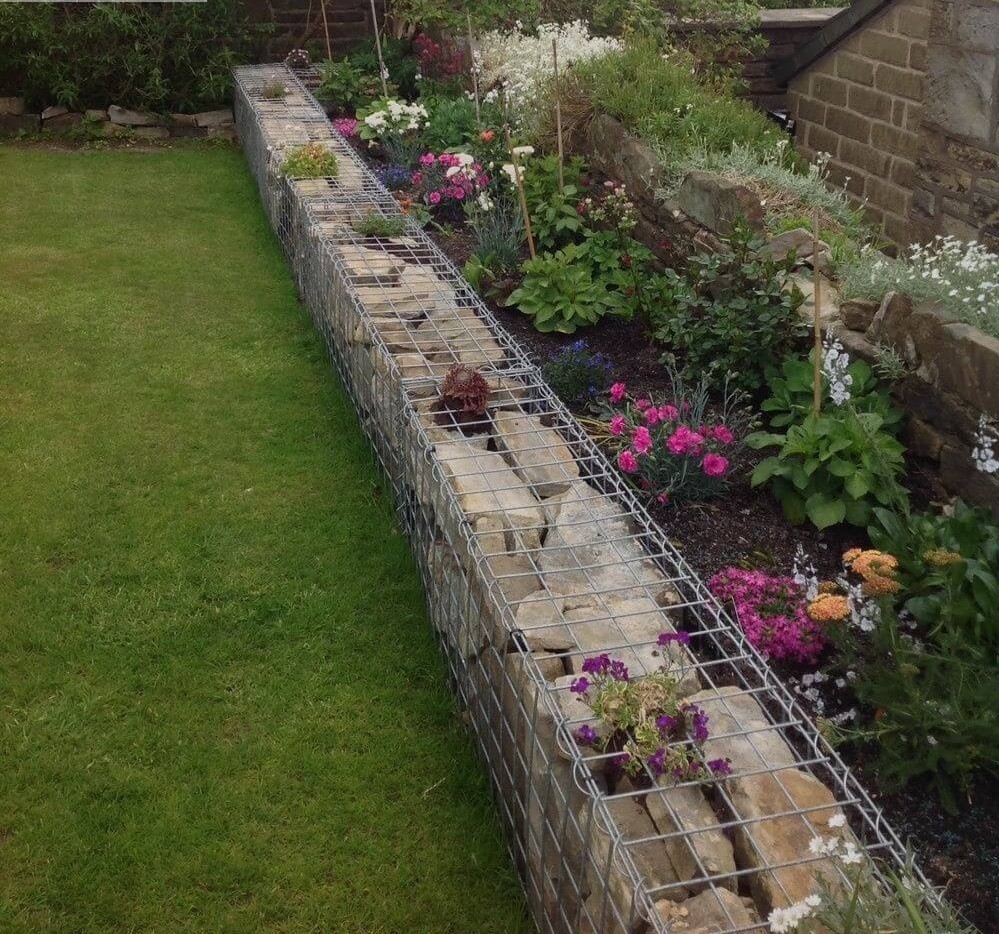
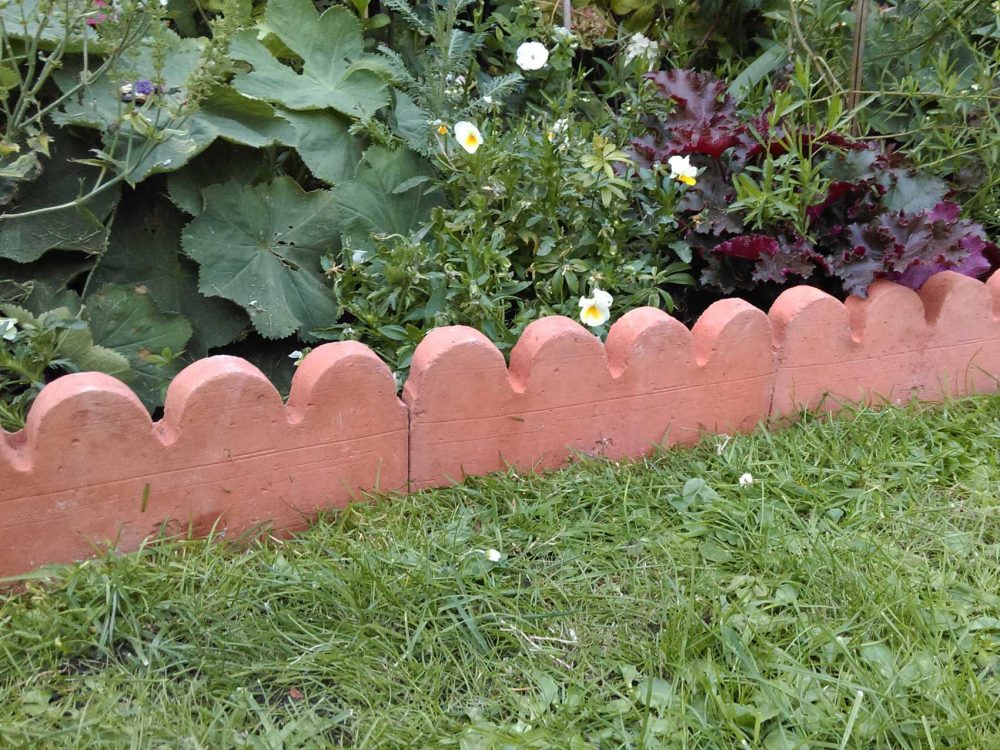
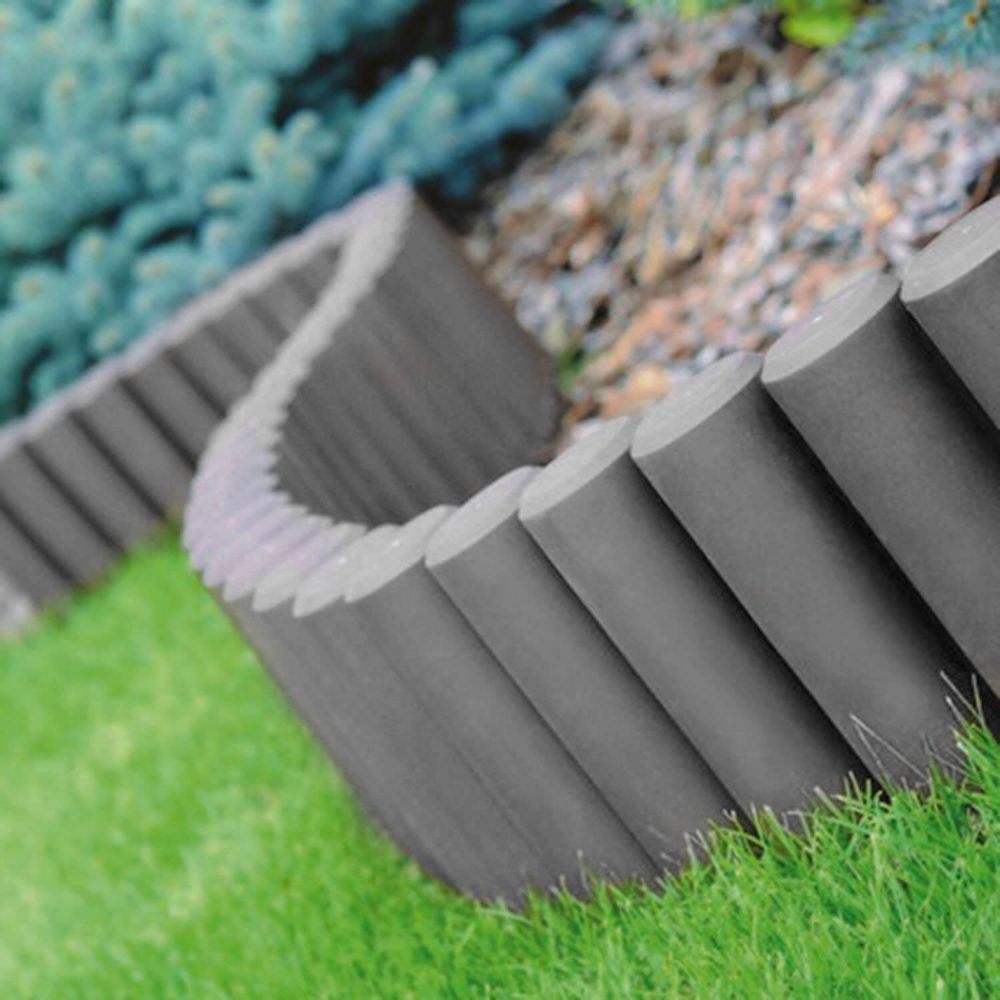
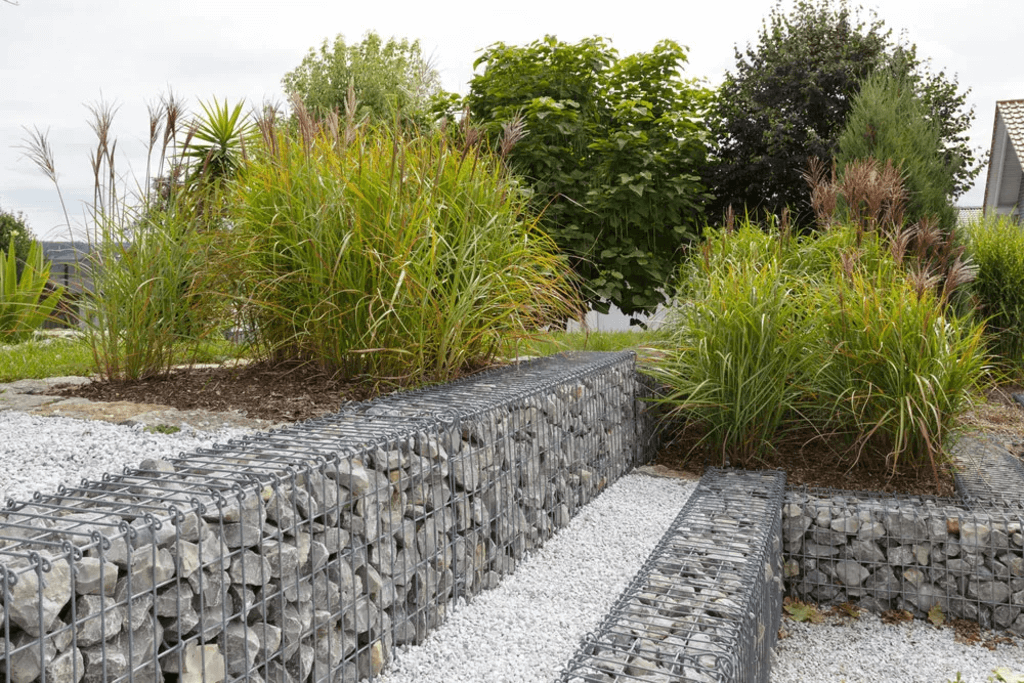
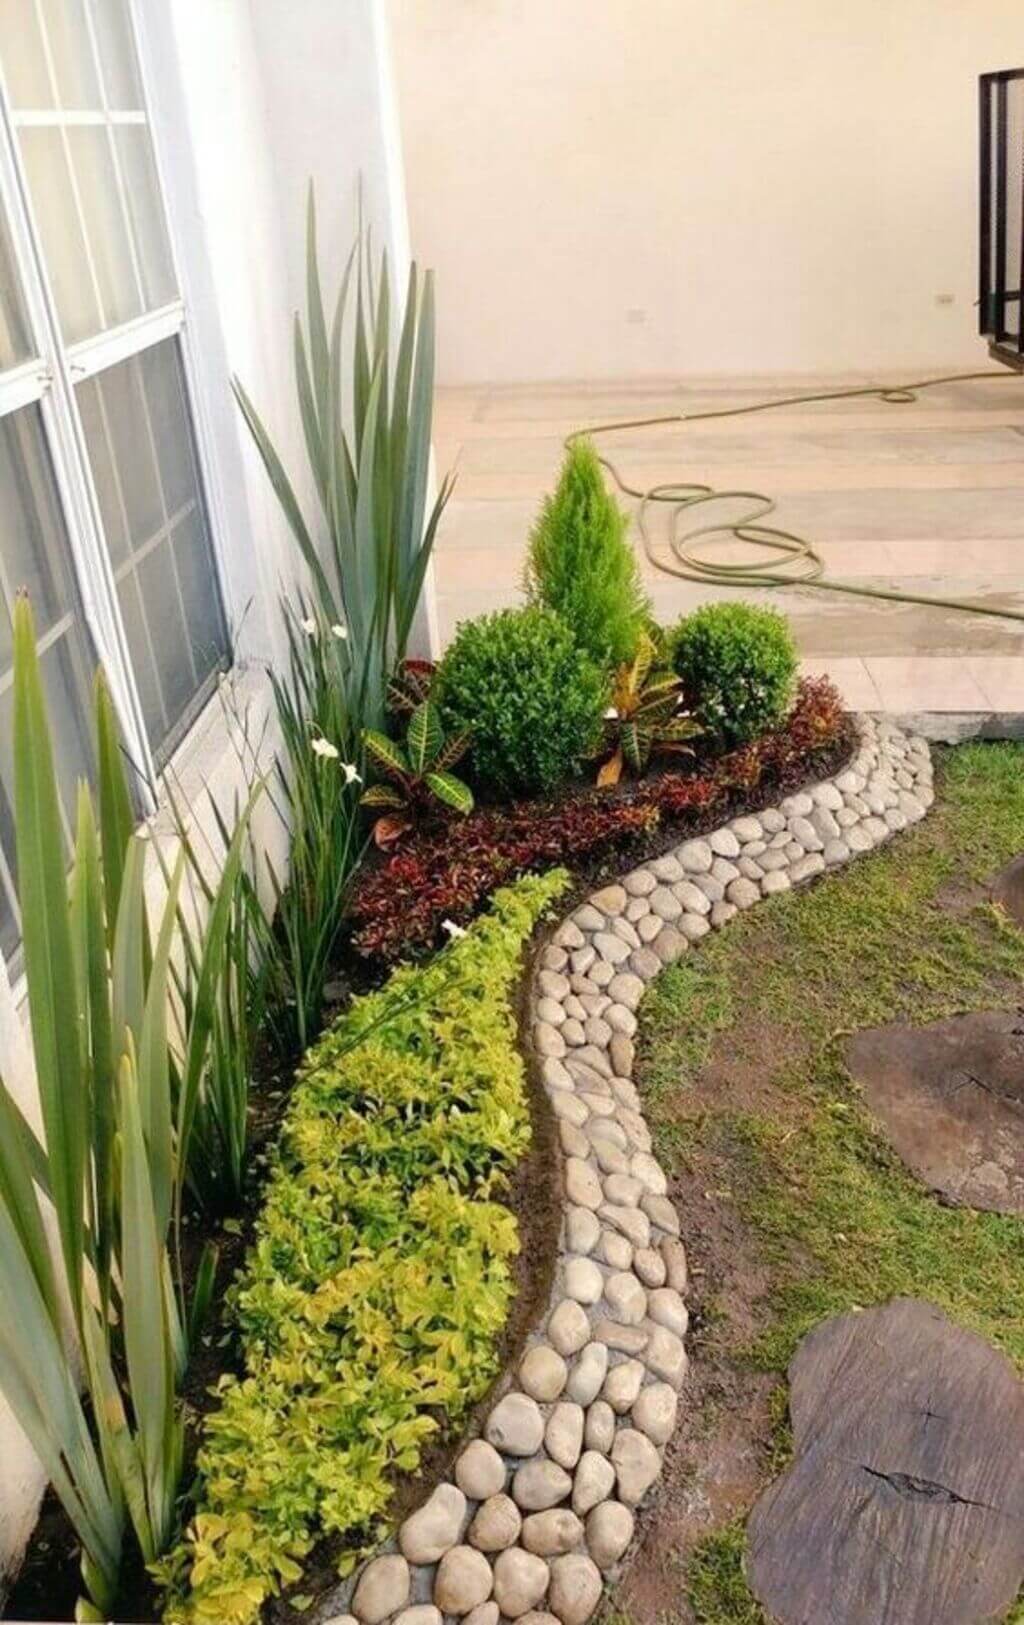
1. Gabion Wall Edging
Want to give a new outlook to your garden?
Try a gabion wall edging!
This kind of garden edging looks natural yet structured. It will seamlessly blend in well with your garden. It’s also quite sturdy and will keep the different garden zones divided.
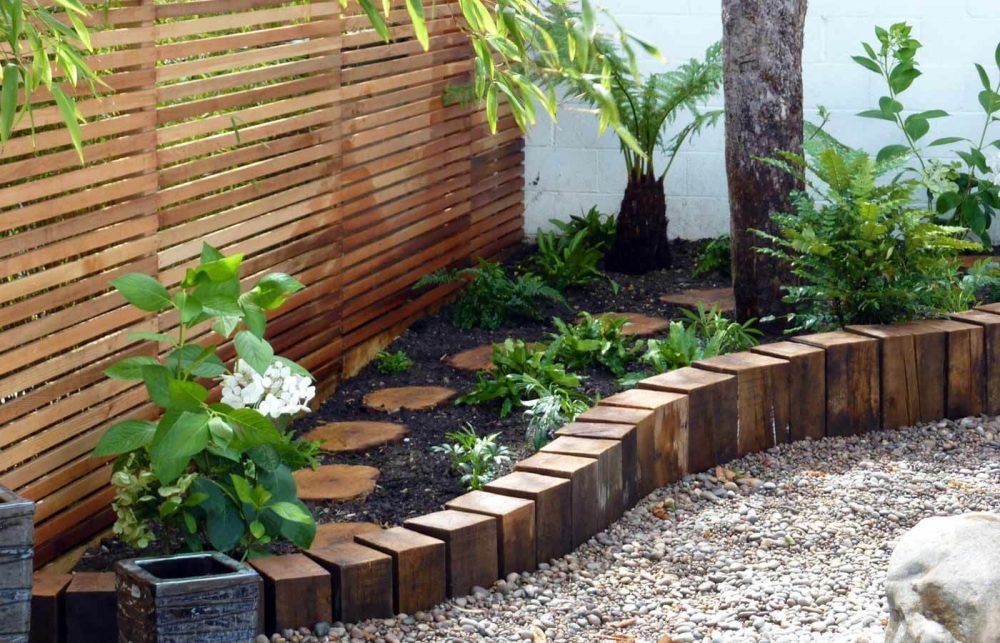
2. Wood-Cut Edging
Want to try DIY cheap garden edging ideas? This will be the perfect idea for you.
To create an edging like this, you need some wood planks and a wood cutting machine. Now, cut the wood pieces into different sizes or the same sizes and start placing them along the edge. You can even paint them with color sprays to add a unique touch to them.
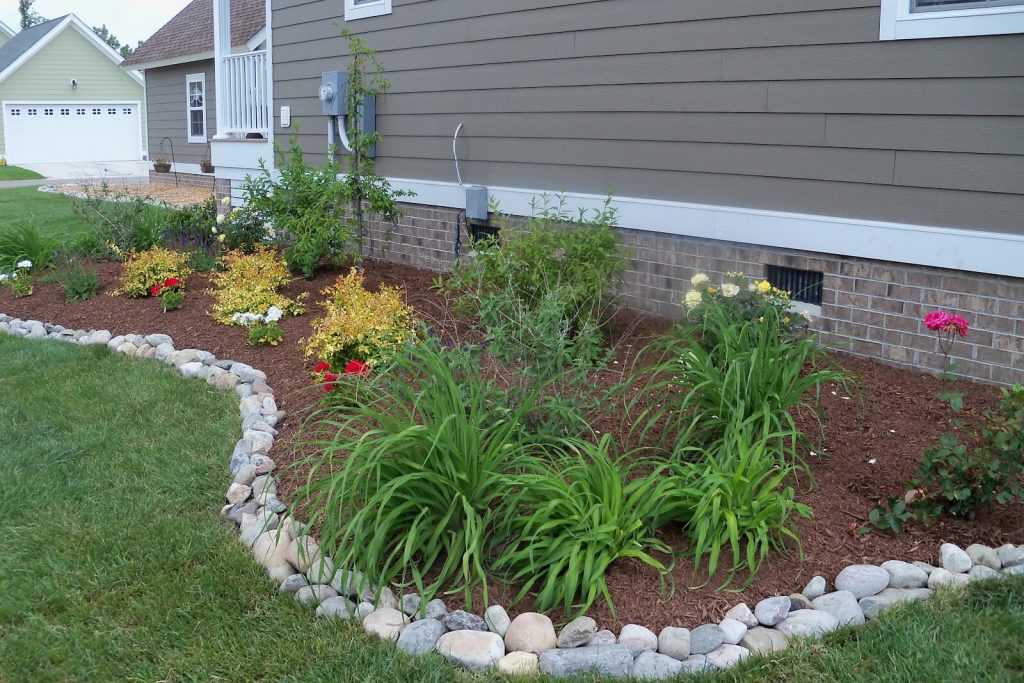
3. Stone Edging
It is really fun to add some stones around the edging of your lawn and garden. You can either create a wide stone path or just keep it narrow. Plus, you can arrange the stones in a particular manner to give a clean look or in a random way for an eye-catchy look.
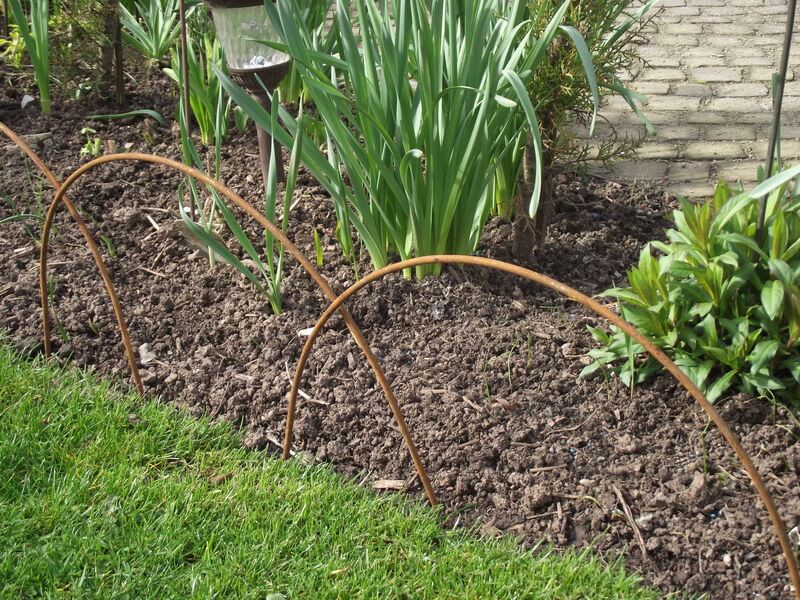
4. Log Edging
Log edging is another cool version of wood-cut edging!
Just buy some logs from the market or from the forest area and then cut them into small pieces and place them where you want to edge. You can also make a small seating table by putting 4 to 5 logs together in a circular pattern.
5. Terracotta Tile Edging
Tiles are always fun and cool, whether you’re using them indoors or outdoors! These terracotta tiles are available in any home depot or earthenware store. All you need to do is to arrange these tiles in a unique way, using either symmetrical or asymmetrical shapes.
6. Tree Branches Edging
We’re pretty sure that this type of edging is surely new for you. Here the woven wood has been used to create a fence-like structure around the garden area. You can make a semi-circle, square, or rectangle shape in the specific area and plant your flowers in that.
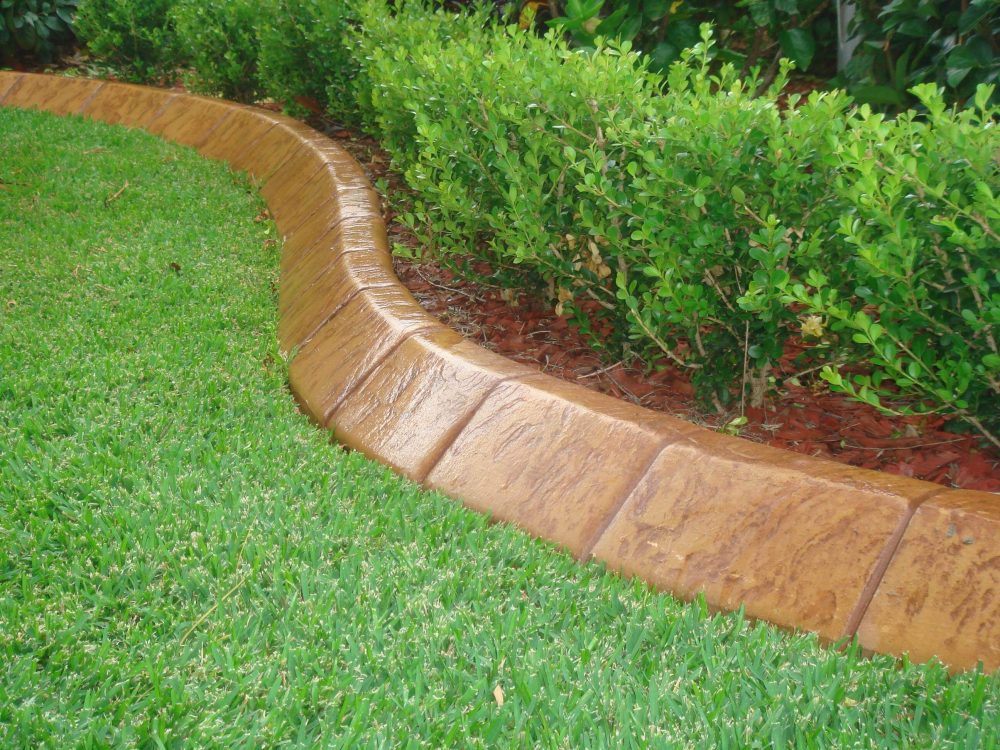
7. Concrete Edging
One of the most common and inexpensive garden edging ideas is concrete edging. Perfect for those people who want an edging solution for their garden that can last long or for a lifetime. You can give a simple step-up step or a complex designer shape or whatever shape you like.
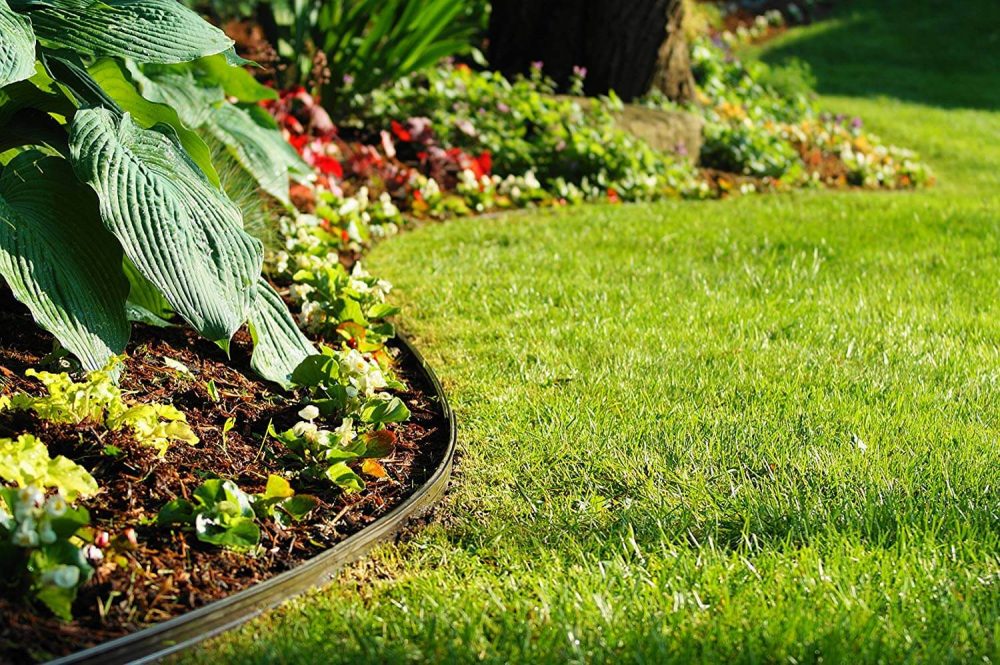
8. Steel Strip Edging
Another of the great flower bed edging ideas is the steel one. These steel strips will give your garden a rough and modern look. Steel strips are available in various sizes. So select the steel strip size according to your garden space.
9. Palisade Edging
Go with Palisade edging if you’re looking for a more sustainable option for your garden edging! This type of edging is made from recycled plastic and is also sturdy. You can use them to border your plants or any specific area on your lawn.
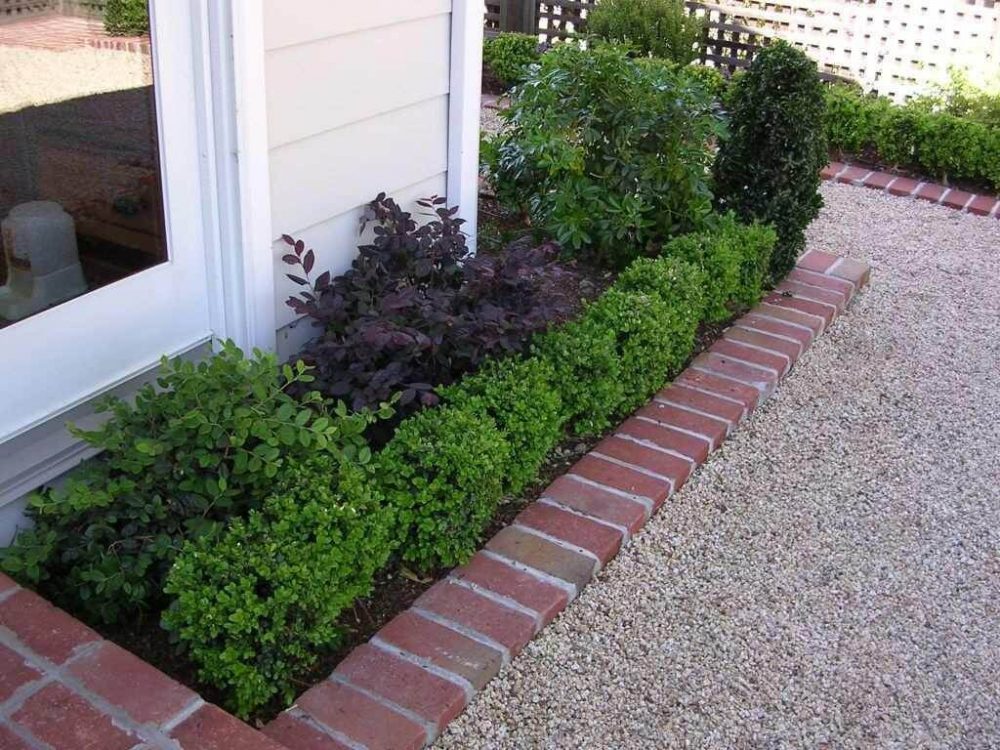
10. Brick Edging
The classic and timeless edging of all time is brick edging. The best thing about bricks is that you can create both traditional and modern looks from them. You can use creativity and lay them in different patterns like in single strips, horizontally, vertically, diagonally, or slantingly.
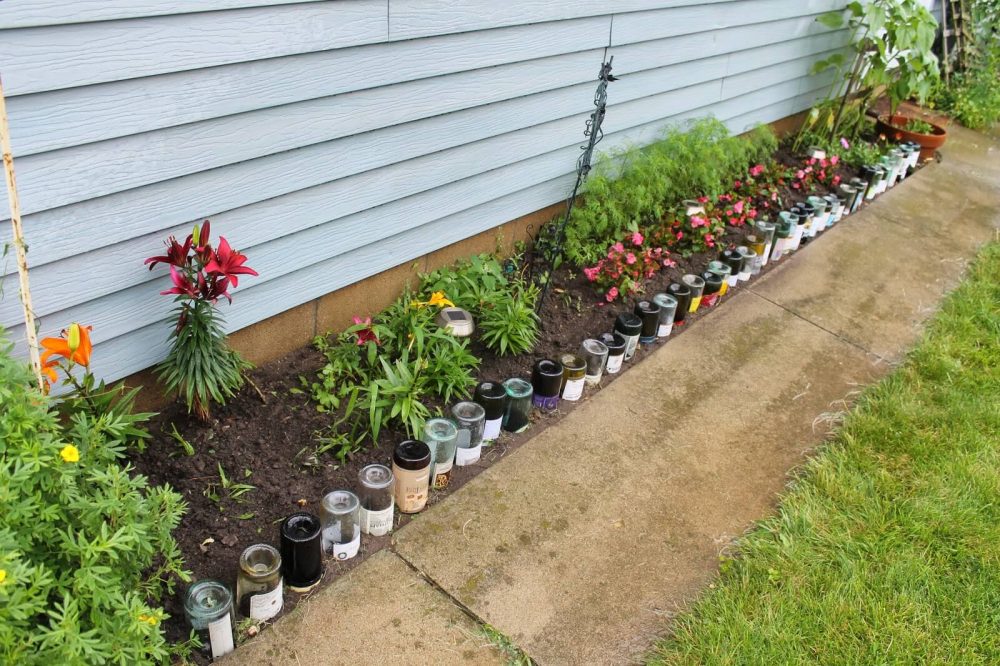
11. Glass Bottle Edging
Do you like to drink so much that you’ve many glass bottles at your place? If yes, this will be a perfect idea for you! Others who don’t have these bottles can buy or thrift them from the local stores. You can use glass bottles, transparent or opaque, colorful ones.
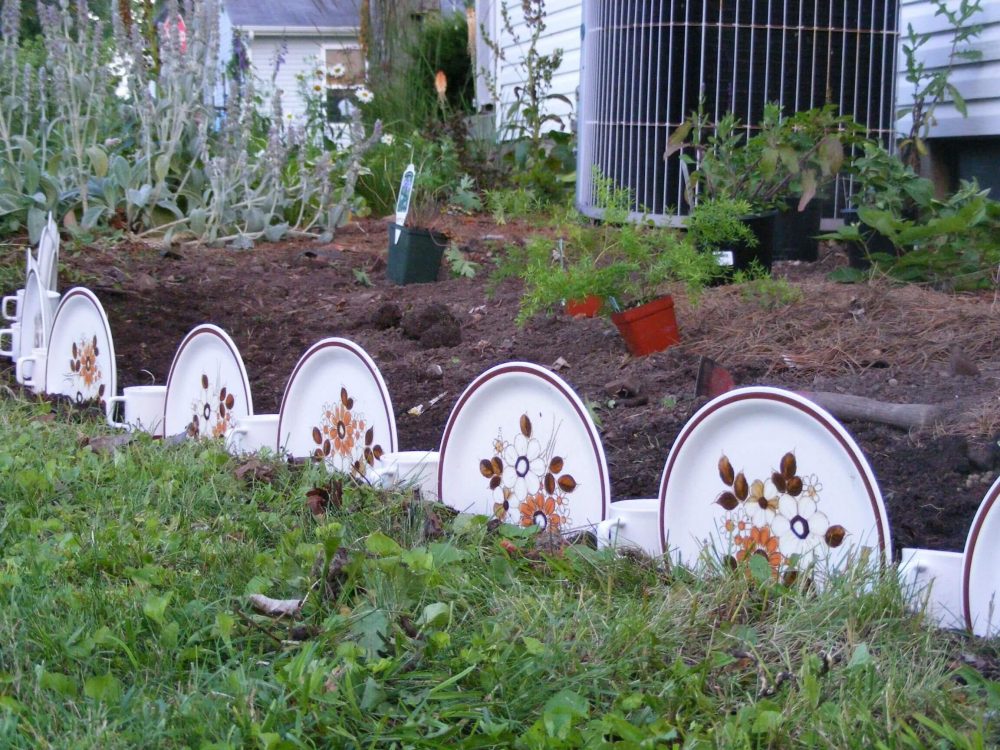
12. Plate Edging
Do you have plates in your kitchen that you don’t use anymore? If yes, bring them out not for dinner but for your garden! Look at the above picture, aren’t using these plates as garden edging a creative idea?
13. Sea-Shell Edging
Do you like to collect seashells?
Bring out your seashell collection and use them in your garden, edging in your yard. These shells will bring the beachy vibes to your place even if you’re living miles away from the water.
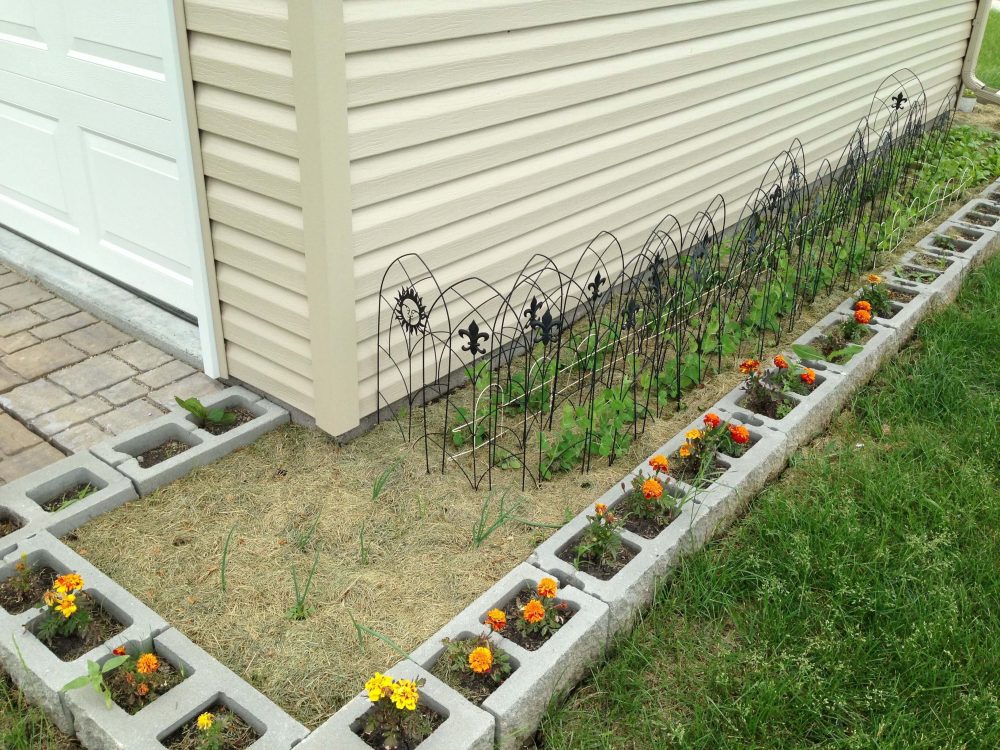
14. Cinder Block Edging
Cinder blocks can be used for two things: for edging and as well as a planting pot! Just put them near the raised bed or tree and place some plants in it. You can create an asymmetrical pattern or whatever you like. Use the plain cinder blocks for a raw effect or while colored ones for a playful effect.
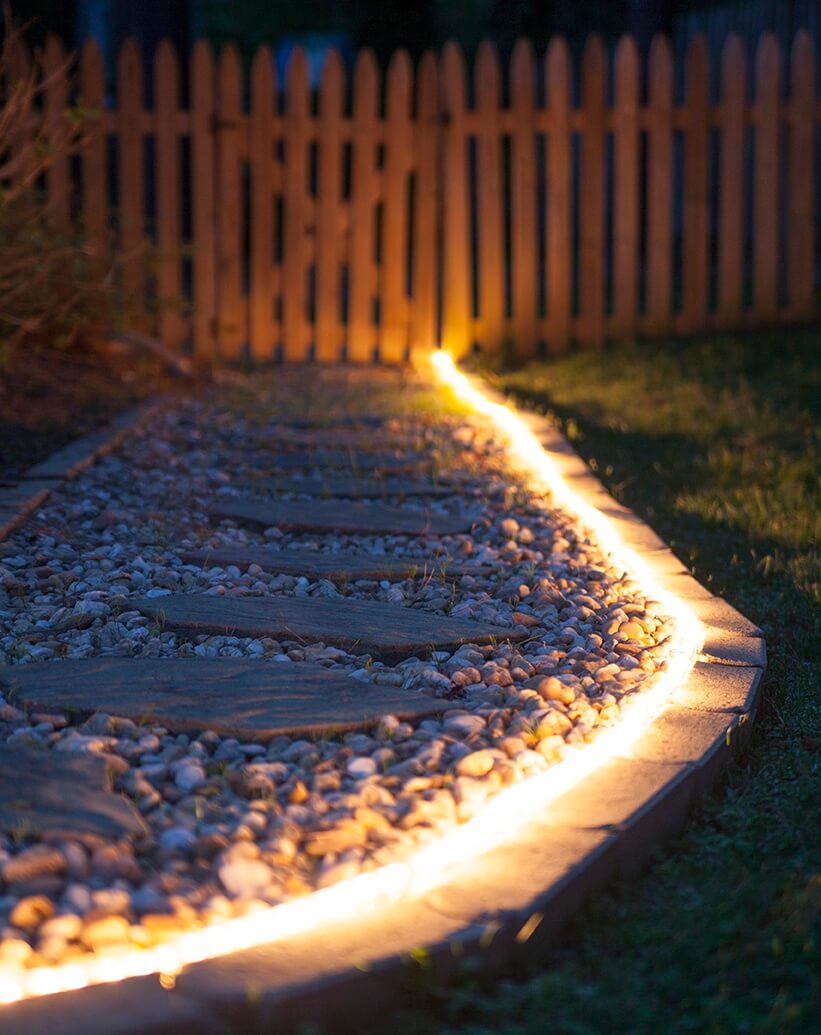
15. Rope Lighting with Brick or Rock Edging
Lighting is the best option if you want to create a perfect ambiance on your lawn or garden. Whether you’re going with rock or brick edging, you can use rope lighting.
Imagine seating in this perfect garden setting with a glass of wine. This romantic and breezy atmosphere will make your yard a perfect spot for parties and gatherings.
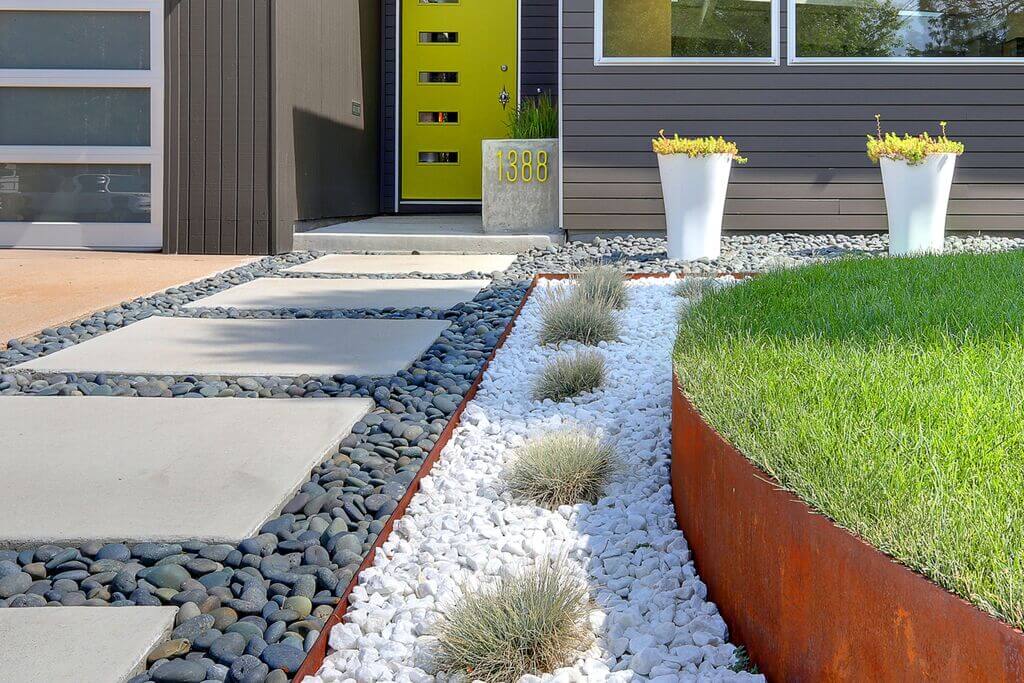
16. Gray Gravel Border
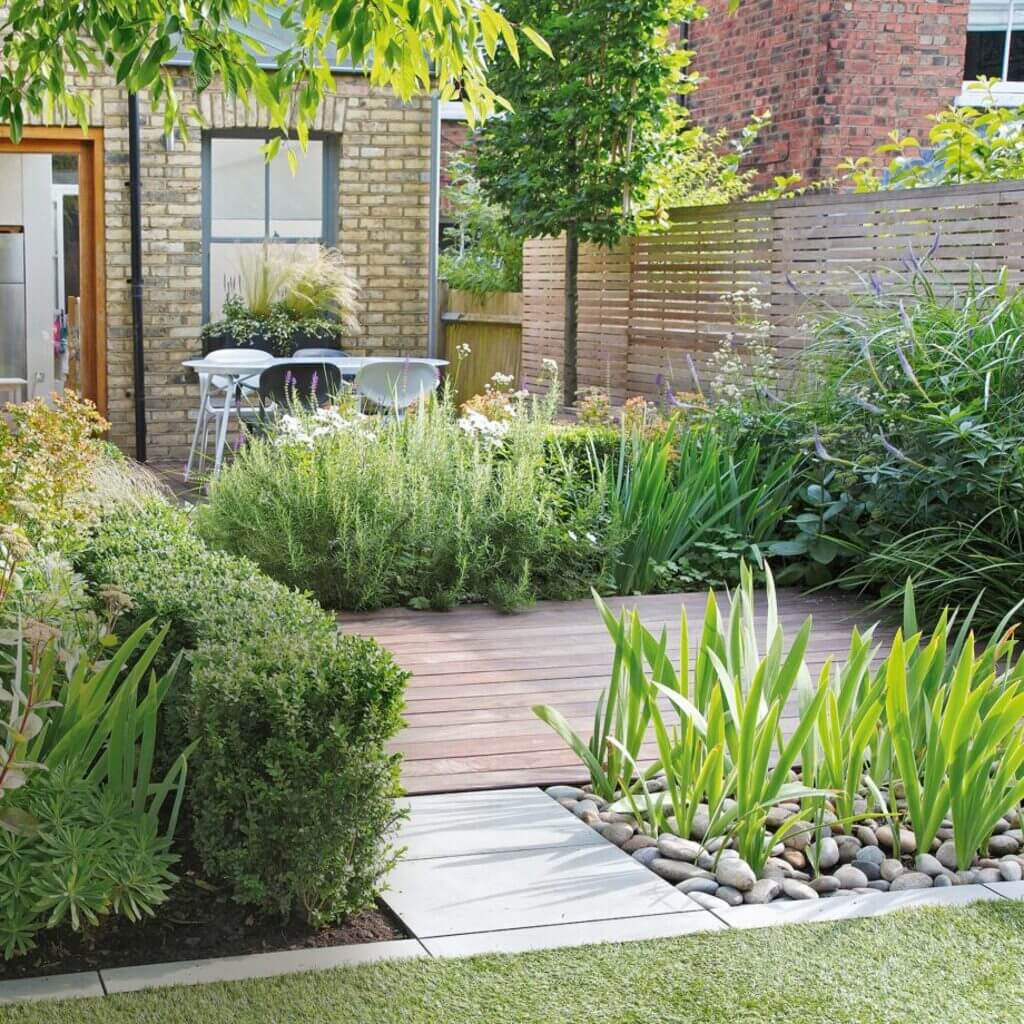
If you’re looking for decorative edging ideas, grey gravel pebbles are the best ones for you! You can use them to separate the walkway and the lawn. To make this design easy, first, you’ve to dig a shallow trench between your lawn and path, then put some protective sheeting and finally fill the top with pebbles of your choice, and your beautiful lawn edging ideas are ready!
17. Pebble Moat
To make your yard look attractive and eye-catching, you can use a technique that many designers use. The technique is to use different levels. Look at the above picture; here, the deck rising out from the surrounding pebbles gives the whole space a sleek but attractive look.
You can use pebble moat as edging and create levels at different heights. This will look contemporary and almost artistic at the same time!
18. Wood Edged Raised Beds
Look at these cheap creative garden edging ideas; doesn’t it look good? The edges around these raised garden beds look simple yet stylish. Instead of wide lengths of wood, use the thin ones as they will provide a neat border. This is also a perfect DIY edging idea for all those people who want to do edging in their garden all by themselves.
19. Caged Rocks
Placing rocks in a wire cage or mesh is nowadays one of the popular edging garden ideas. Look at these gray stones; they’re perfect for achieving a modern, sleek ambiance.
People looking for a contemporary way to add curb appeal and value to your property should definitely try these types of inexpensive landscape border ideas. They’re a good investment for your home or property.
20. Contemporary Block Edge
These large blocks don’t only look good, but they’re also used to avoid any messy overspill. The clean and simple lines of these blocks will give your garden a contemporary modern look. However, this isn’t a budget-friendly option, but you can go with this idea if your pocket allows.
21. Cobblestones Garden Edging Ideas
Cobblestones look pretty similar to brick, but they’re more in a square shape. If you want to add some character and texture to your landscape edging, there is nothing better than cobblestone. You can either use the real ones or the fake ones (available on Amazon) that look exactly like the real cobblestones.
22. Boulder Border
Boulder border edging is super easy to create, and anyone can do this no matter what type of landscape you have. First, create an edge made of large rocks and then pile other rocks on the first one and do this all along the perimeter of your garden.
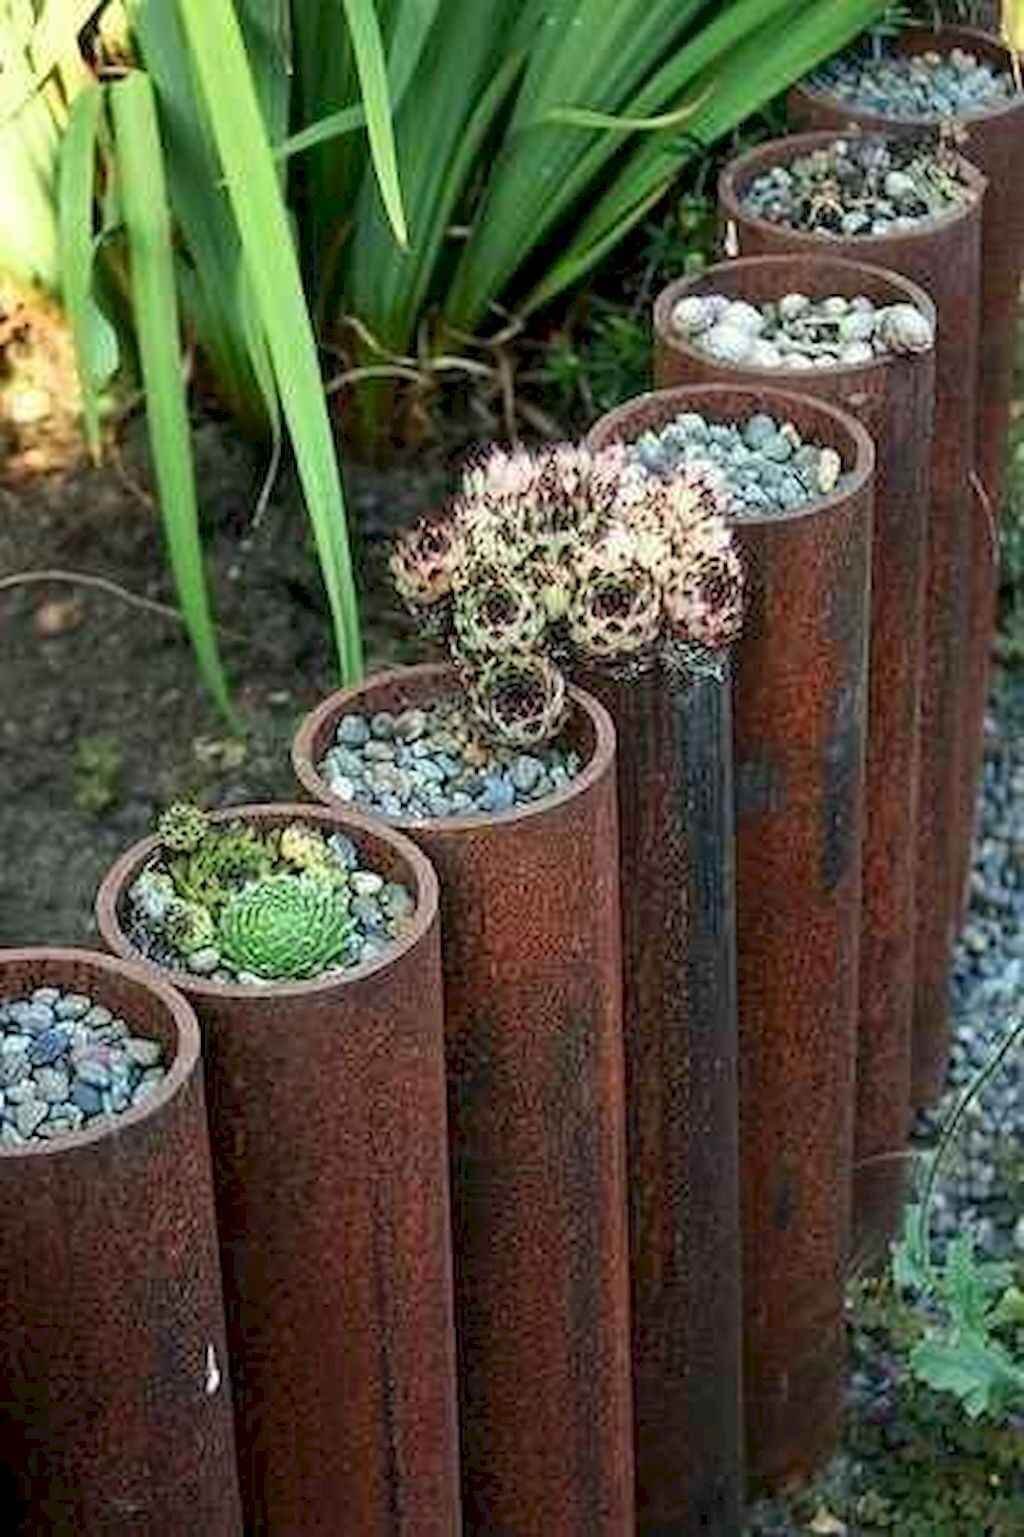
23. Steel Cylinders with Plants
Another inexpensive landscape border ideas for you is this steel cylinder one. Many of you might be wondering what if these cylinders got rusty. Yes, these cylinders do corrode in time, but still, they’ll look cool because of their worn-out look.
You can fill these cylinders with soil and other material to grow succulents. These cylinders will act as both a border and a container.
24. Hedge Edge
A small and well-trimmed hedge can be an excellent garden edging ideas for your lawn. This petite hedge looks really impressive and quite luxurious. Look at the above landscape; here, the owner has opted for these edging ideas for their garden. However, this type of edging can be costly and time-consuming.
25. Cut Stone Edging
Do you want to achieve a formal look? And if you also don’t mind lifting some huge stones and blocks, you can try these landscape edging ideas. For this, you have to use large rectangular cut stones. These huge blocks will act as edging and as well as benches. You can place smaller square stones or large potted plants in between each stone to make this setup more interesting.
Do you want to see more garden edging ideas? Scroll down!
The Bottom Line
So these are all the latest garden edging ideas.
Pick any of the above garden edging ideas and make your garden look extra-attractive and impressive. It will add the desired contour and dimension to your landscape, making it look outstanding. Add quirk to the elements without any hesitation; quirky is the new trend!
I hope this guide on the inexpensive landscape border ideas has helped you pick the best edging for your garden, lawn, or yard. If you find this guide on modern edging ideas helpful and informative, share it with your family and friends and help them create warm and welcoming outdoors.
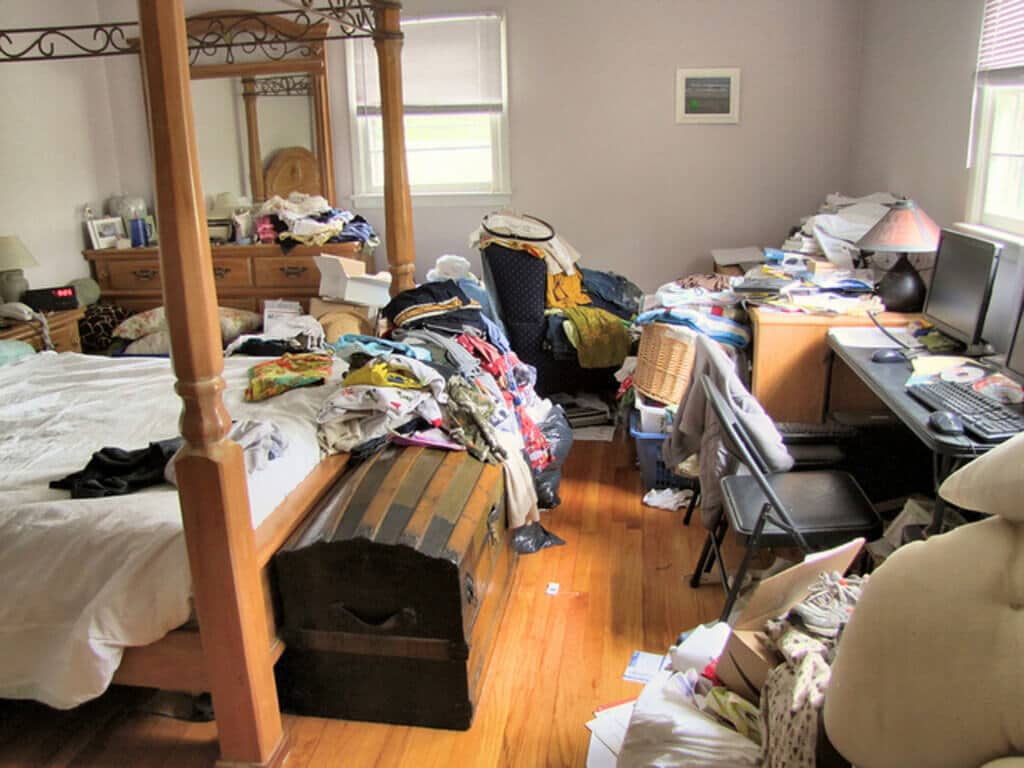
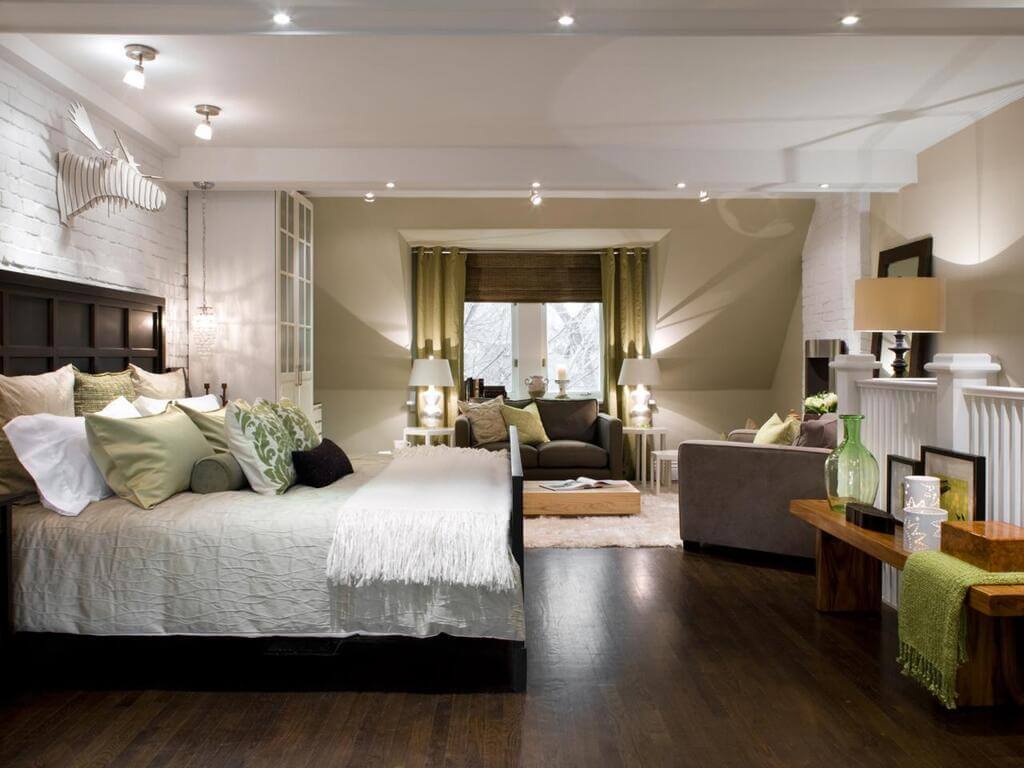
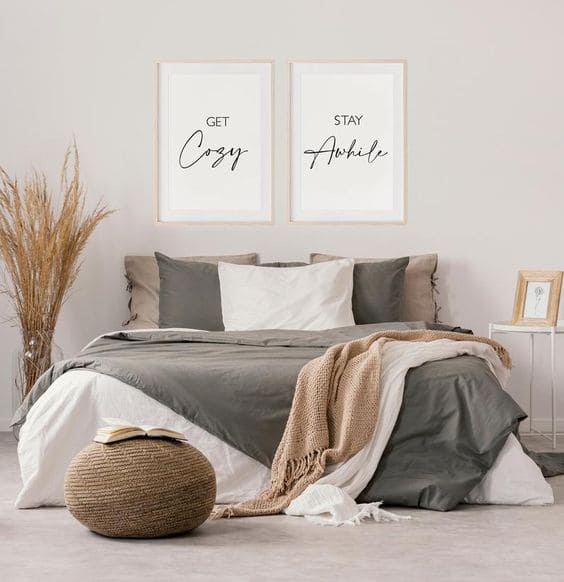
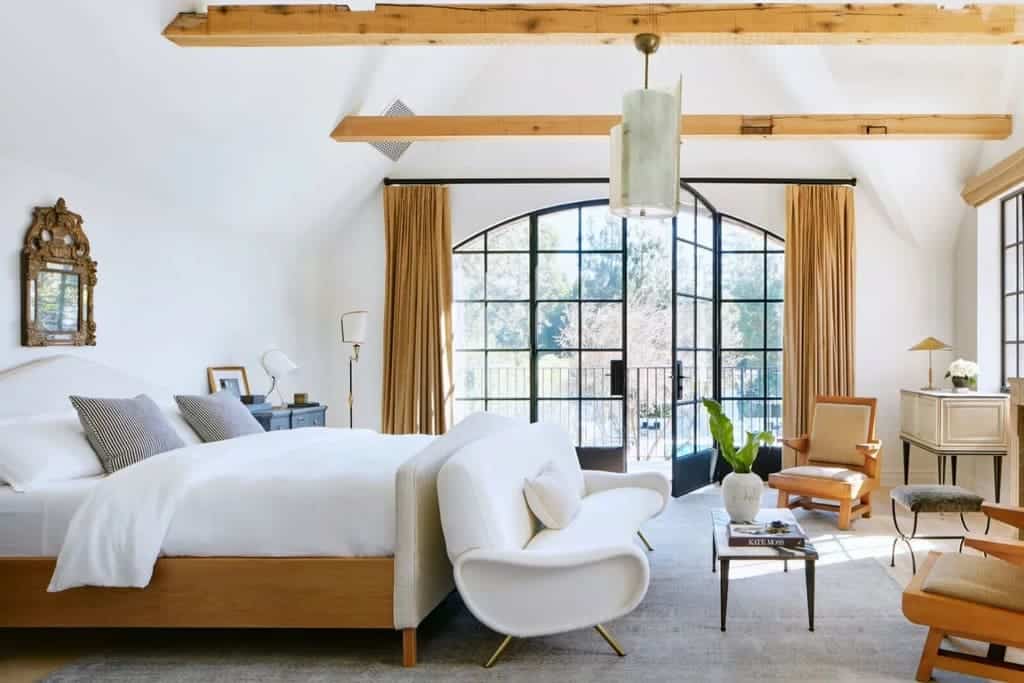
After a long and busy day, there’s nothing quite like coming home to a bedroom that feels like a sanctuary. A place where you can unwind, relax, and recharge for the next day. But how do you create a space that truly promotes relaxation? With our busy lives, it’s easy to let our bedrooms become cluttered and chaotic, leading to a less-than-ideal sleep environment.
Luckily, there are simple and effective ways to transform your bedroom into a relaxation haven. From decluttering and simplifying your space to investing in comfortable bedding, incorporating natural elements, and utilizing lighting, there are many ways to create a calming atmosphere in your bedroom.
1. Declutter and Simplify Your Space for a Calming Atmosphere
If you want to turn your bedroom into a relaxation haven, the first step is to declutter and simplify your space. Start by creating a clear vision for your room and deciding what items are necessary for achieving it. Remove any surface clutter, like stacks of books or folders, to create more open space on surfaces such as the nightstand.
One effective way of decluttering your bedroom is by sorting items into zones, such as clothes or books. This makes it easier to organize and find things when you need them while avoiding any unnecessary confusion or clutter.
Next, consider having a plan for all of your clutter, whether you want to donate or sell items that no longer serve a purpose in your life. When organizing your room’s contents, take advantage of any storage space available within the room like under-bed storage containers.
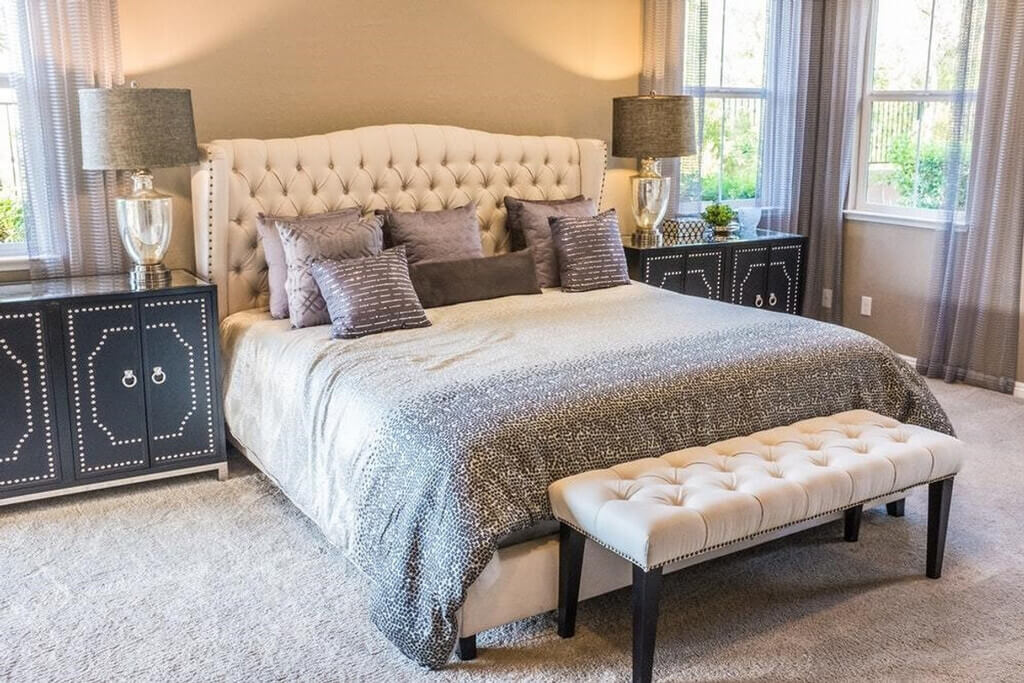
2. Invest in Comfortable and High-Quality Bedding for a Better Sleep Experience
Investing in comfortable and high-quality bedding is an essential step toward creating a relaxing bedroom retreat. Choosing natural fibers like cotton, linen, or silk provides breathability and comfort year-round Or & Zon substainable bed sheets are very popular. These fibers have been used for centuries due to their tendency to wick away moisture, regulate temperature and provide a smooth sleeping surface. For instance, cotton is hypoallergenic, lightweight yet durable – making it ideal for both warm summer nights and chilly winter months.
Regularly washing bedding is essential; not only does it keep it feeling fresh but also helps reduce the potential buildup of dust mites or allergens from sweat and skin cells which can trigger allergies or asthma attacks at night-time. As an added bonus always use fabric softener or natural laundry additives like lavender oil scents for example – they are believed by some people who find these odors soothing before bedtime!
Investing in high-quality bedding materials of excellent thread count (350-800) with vibrant colors patterns carefully chosen to fit the ambiance requirements of each bedroom owner will deliver maximum relaxation benefits for years down the road if cared for well throughout every season every year.
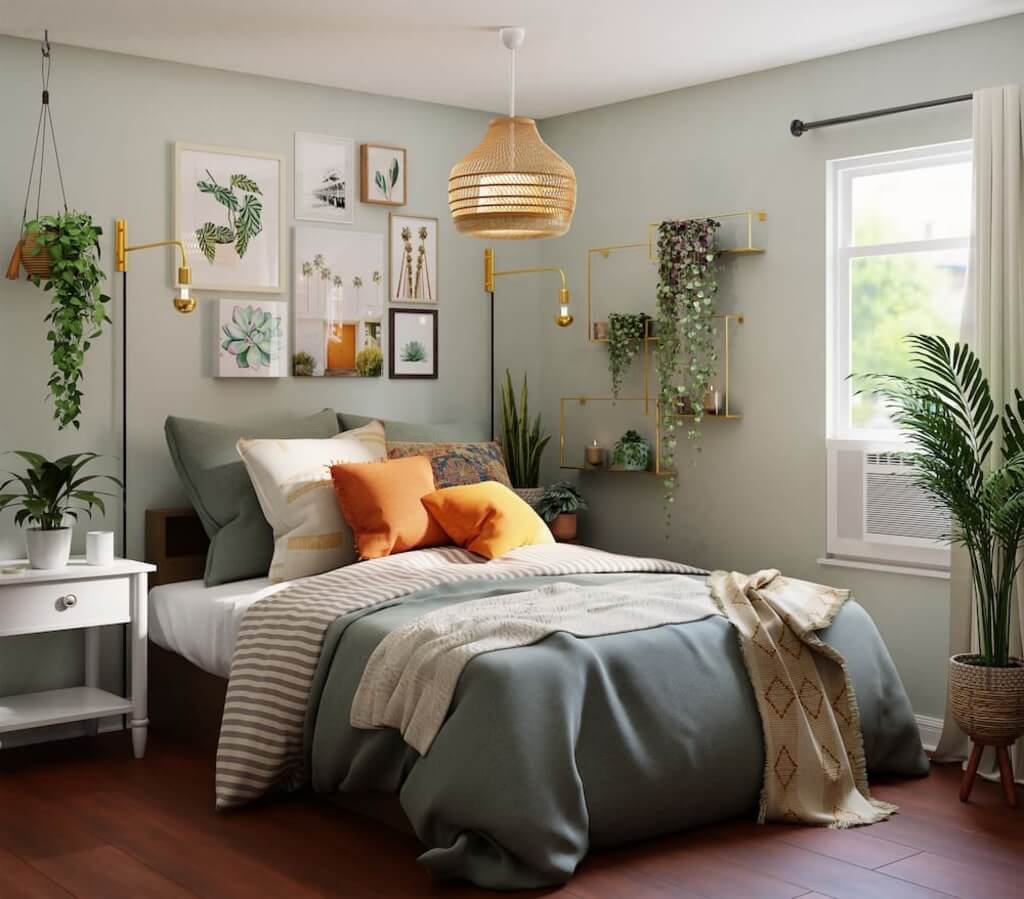
3. Incorporate Plants and Natural Elements for a Peaceful Ambiance
To create a peaceful ambiance in your bedroom, it’s important to incorporate plants and natural elements. Not only do plants bring life to a room, but they also have numerous benefits for your health and well-being.
Use breathing bedroom plants and flowers like lavender or jasmine. These plants are known for their calming effects and can help promote relaxation. Incorporating natural materials such as wood, stone, and greenery in the form of terrariums, potted plants, flowers or hanging plants can give your room an organic feel which promotes relaxation as well.
Plants not only have aesthetic value but are also essential for clean indoor air quality. They act as natural air purifiers by removing pollutants from the air in our homes. This is especially important when you consider that we spend a good portion of our time indoors.
4. Utilize Lighting to Create a Cozy and Relaxing Atmosphere
One of the most important aspects of creating a relaxing bedroom is lighting. Good lighting can make a small bedroom feel bigger or add intimacy to a larger room. To achieve this, it’s essential to consider using various types of lighting and flexibility.
When lighting your bedroom, you should think about natural light during the day, soft light in the evening, and darkness while you sleep. You could add bedside task lamps and clip-on lights on your headboard for low-level light ideal for reading or relaxing. Table lamps and floor lamps are great for adding ambient light throughout the space if you’re looking to achieve a cozy atmosphere.
You can also incorporate angled lights or wall-mounted fixtures into your bedside table decor to create added drama. Warm white bulbs with dimmer switches can emphasize relaxation too while making the space more inviting.
It’s worthwhile manipulating different types of lighting such as table/floor lamps with wall or ceiling lighting to achieve versatility in ambiance. This allows you to change up the mood in your room easily because there are made options available once they work together impeccably.
5. Create a Designated Relaxation Area with Comfortable Seating and Calming Decor
Creating a designated relaxation area in your bedroom is a great way to turn your space into a haven for unwinding after a long day. Begin by choosing comfortable seating like an armchair or chaise lounge. Look for pieces that are soft and cushioned, allowing you to sink in and feel relaxed.
Next, consider adding calming decor to the area. Incorporate soothing colors like sage grey, blush pink, sky blue, and pale yellow into the decor scheme. These colors have been shown to promote relaxation and calmness in the bedroom. Aromatherapy with essential oils such as lavender can also amplify this effect.
Keep the essentials within reach and within view so you don’t need to leave the area when it’s time to unwind. Consider placing books, magazines, or even scented candles on a nearby table or shelf.
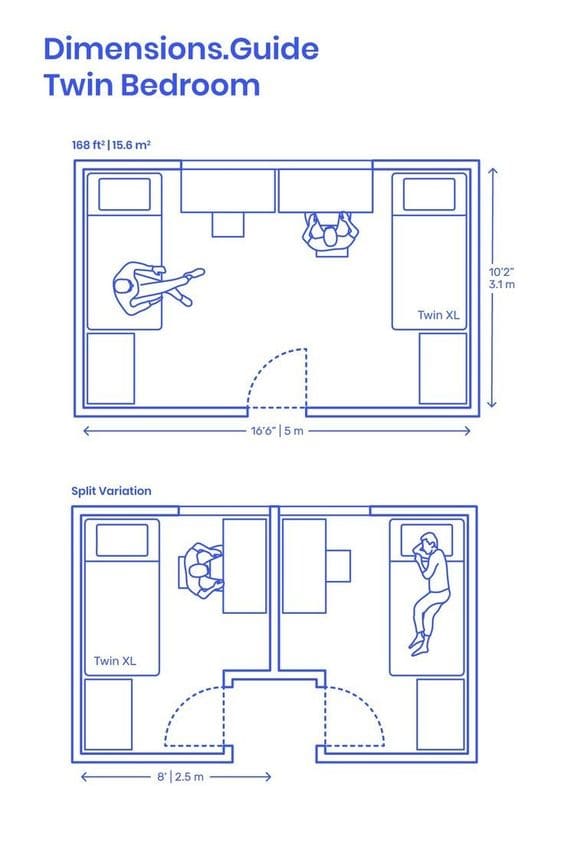
As per the studies, an average adult spends roughly 30% of their time in bed. So, make sure your bedroom is the proper size and that it is cozy for you. One of the first things to think about is the size of the bedrooms, whether you’re planning a makeover or looking for a new home.
So, what is the average bedroom size?
And what are some tips for maximizing your home’s bedrooms, no matter how big or small they are?
In this article, we’ll look at some average size bedroom and expert design suggestions.
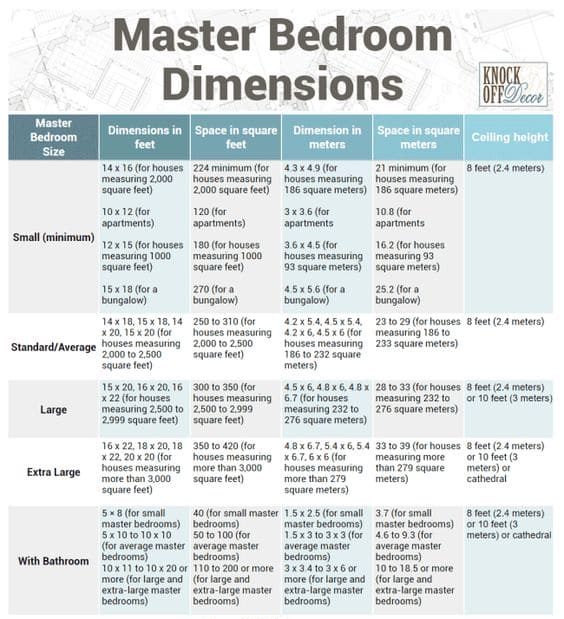
Standard vs. Average Bedroom Size
Before we begin discussing what is the average size bedroom, let‘s have a quick look at some major differences between standard and average bedroom sizes:
Type of Room
Average Bedroom Size (sq. ft.)
Standard Bedroom Size (sq. ft.)
Master Bedroom
132
224
Kid’s Bedroom
100
120
Guest Room
110
120
What is the Average Bedroom Size?
The type of room determines the average size of a bedroom. A child’s bedroom is usually smaller than an ordinary master bedroom. Because of this, we are unable to calculate or estimate average bedroom sizes. But we can assume an average bedroom size.
The average master bedroom size of American homes measures 11ft. x 12ft. (132 sq. ft.). When you account for the usual variances in master bedrooms, secondary bedrooms, and guest bedroom sizes, it is the average size.
Bedroom sizes range from 50 sq ft in small homes to 500 sq ft in large houses. The size of bedrooms is getting smaller on average as tiny homes gain popularity.
To calculate the average bedroom size in a country, use the one-tenth rule. To find the average, multiply the home measurements by 10. Following is a list of average bedroom sizes in different countries:
Country
Average House Size (sq. ft.)
United Kingdom
818
Italy
871
Sweden
893
Japan
1022
Spain
1044
Germany
1173
France
1205
Greece
1356
Denmark
1474
Canada
1948
United States
2163
Australia
2303
Russia
613
China
645
Standard Bedroom Size
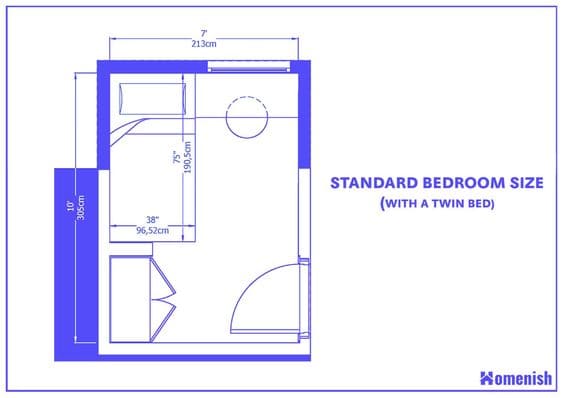
Although standard-sized bedrooms can be much smaller, measuring anywhere from 10 x 10 to 12 x 12 feet. The square feet of these rooms determine whether you’ll turn the living area into a bedroom for an individual child, a pair of twin siblings, etc., or just a guest room.
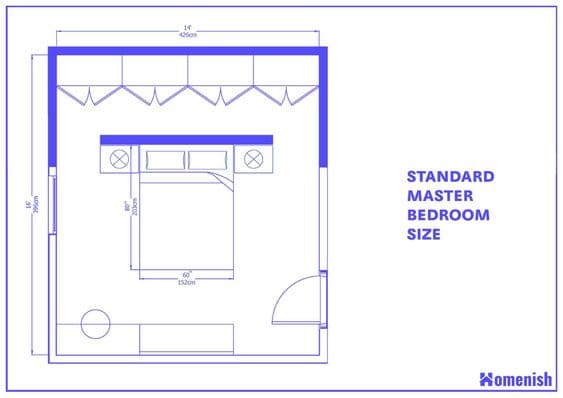
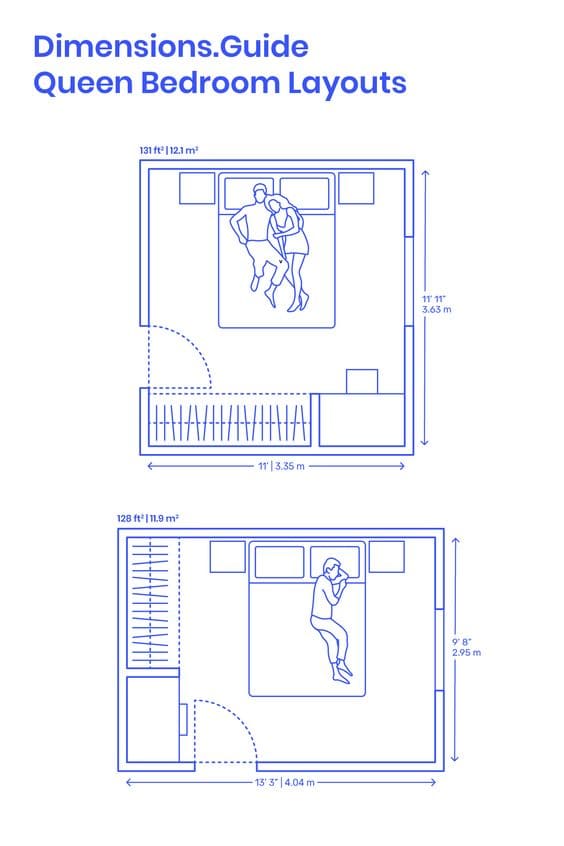
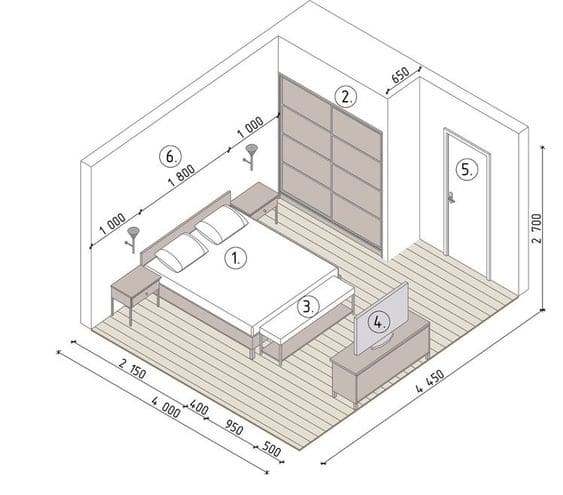
A master bedroom should be 14′ x 16′, or 224 sq. ft. in size. This leaves room for a king-sized bed as well as other bedroom furniture, including nightstands, chests of drawers, a TV cabinet, and a chair for an area to relax.
A secondary bedroom should be 10′ x 12′, or 120 sq. ft. in size. You will have enough room for a queen-size or full bed, along with a few additional minor bedroom furnishings.
A guest bedroom typically measures 10′ x 12′ or 120 sq. ft., which is similar to the size of a secondary bedroom.
What’s The Average Master Bedroom Size?
You may think, “What is the average size of a master bedroom?”. The master bedroom is the biggest bedroom of all. It typically has a king-sized bed, which requires a larger room than if you only had a full-size bed.
When the house ranges from 2,000 to 3,000 sq. ft. in size, the average size of master bedroom is within 200 to 300 sq ft. The average master bedroom is 14′ x 16′ in size. This size of the bedroom has space for a king-size bed and other furniture.
The average living room measures 16′ x 22′ and has square feet of about 300.
What’s The Average Guest Room Size?
Most people don’t give their guest room’s size much thought. They utilize the available room. However, a guest bedroom is smaller than a kid’s room and larger compared to a master bedroom.
A full-sized bed or a queen-sized bed is usually used in a guest room. The room is roughly 100 to 200 sq. ft. in size. However, a guest bedroom’s size varies significantly from other bedrooms’ sizes. In some homes, there isn’t even a guest room.
What Should Your Bed Size Be?
You can use the size of the bed in your bedroom—which has yet to have an owner—to determine how big it should be. The Golden Ratio, or 3:1, is another formula.
Fact: A queen bed takes up 33 sq. ft., making a 100 sq. ft. room standard. The average bedroom is 8′ x 12′ or 10′ x 10′. Remember 3:1, and you’ll be good to go.
Pro Tip: The formula can be used as a general guideline to maximize space. Bigger rooms tend to be favored. As long as it doesn’t detract from other rooms, the bigger the bedroom, the better.
How Small Can You Go While Determining the Average Bedroom Size?
Create each room as compact as you can if there isn’t extra space. Choose the smallest bed in which you feel most at ease, and make sure it barely occupies half the space.
Fact: A full-size bed that occupies less than 30 sq. ft, wouldn’t work well in a space that is less than 60 sq. ft. A room 8′ x 8′ in size would be too small for a bed like that, but it could fit in a small home.
Pro Tip: Other alternatives include sleeper sofas or futons that may be converted into beds. In that way, there is additional floor space throughout the day and more bed space at night.
Bedroom Designs Based on Your Floor Plan
For varied bedroom types, there are certain standard sizes. However, the floor plan of the house will determine the final size and plan. Here are a few examples of average bedroom size in different styles.
1. Traditional Ranch Floor Plan House
Traditional ranch homes, which were very common in the mid-to-late 20th century, have practical floor plans that enable effective use of available space. One to three bedrooms, ranging in size from standard to a little smaller than standard, are typically found in traditional ranch homes. Some bedrooms in ranch homes might be as small as 8′ x 10′, which is common.
2. Modern Craftsman House
As they possess a relaxed and modern vibe, this is an appealing dwelling design that can be found all over the United States. Each sort of bedroom in modern craftsman homes often has one to three rooms, and they all tend to be the same size. The space for bigger bedrooms will be available in floor plans that are greater than 2,500 square feet. Even some master bedrooms that are 16′ x 19′ in size are observable.
3. Apartment House
Condos and apartments must cram a lot of things into a tiny space. Because of this, bedrooms typically don’t surpass standards.
Design Ideas for Smaller Homes
Consider creating the illusion of a bigger floor plan if you don’t have full-size rooms set aside for a variety of uses by using tall furniture pieces rather than wide ones. Always calculate the available average bedroom size and make the most of every inch.
To make the most of your small bedrooms’ available floor space, use long drapes, canopies, or wooden screens to divide large spaces. Here are some suggestions for maximizing those small rooms.
1. Bed
In a bedroom, the bed occupies a good amount of space. So why not make the most of that room by getting a bed featuring storage beneath?
2. Layout
Place most of the furnishings against one wall. Also, put the bed in the corner of the small room that only fits one person.
3. Mirage
Use mirrors to instantly enlarge a small bedroom by featuring furniture with mirrors, accent mirrors, and wardrobe mirrors.
4. Vertical Spaces
Install a tall wardrobe rather than a wide dresser. You might even want to consider a loft bed with an office or storage area underneath if the ceiling is high enough.
Pro Tip: Choose furniture with built-in cubbies and storage areas rather than large pieces of furniture or walk-in closets, which may not be practical. You could consider thinking about furniture that serves multiple purposes or that can be put on the wall because your average bedroom size may be smaller than normal, or the entire room may serve as both a bedroom and a living area.
Standard Bedroom Size Design Ideas
You should first figure out which room is meant for what use. Certainly, homeowners will select bigger rooms for their children’s bedrooms as well as their bedrooms. Then, the smaller rooms are converted into guest rooms. These might not always require a walk-in closet, but they do need some sort of cabinetry or closet space.
Standard Bedroom Size
A standard bedroom size has a configuration that properly fits the needs of the living area. It might not be large enough to accommodate a king-size bed or might already be occupied when you decide to put one in, though it does offer much character.
Pro Tip: Standard-sized beds fit in these rooms, which also have room for a wardrobe or built-in storage. Usually, you have enough room on the floor to add a small vanity, side tables, extra shelving, and an area rug.
Kids Bedroom
The first question to ask while designing your kids’ bedroom is how many kids you have and of what age.
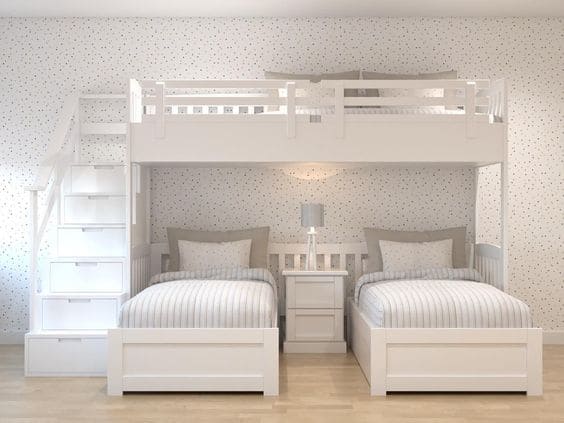
Simple, reasonably priced bedroom options are available if you only have one child. However, if you have two or more kids living with you, you can create a kids’ room with space for twin and bunk beds. But keep in mind that as they get older, they might need their bedrooms.
The average bedroom size for kids is often smaller than other bedrooms. They usually only take up half or even a third of the master bedroom’s space. In most cases, a twin-size bed can be placed in a kid’s bedroom.
Fact: The average bedroom size for a child will be around 50 to 150 sq. ft. due to smaller bed sizes. Now the question is, is there room for two twin beds? Otherwise, you might also put in a single bed that is a standard size.
Pro Tip: Since a kid’s room usually doesn’t require an attached bathroom, you may use some of the small rooms’ space for study areas, bookcases, an artistic corner, etc. Think about bunk beds to make use of the available vertical space if the space is smaller than the average bedroom size.
Guest Bedroom
Guest rooms don’t need to be extremely large or have walk-in closets. However, it is polite to provide them with an attached powder toilet to make them more comfortable.
Fact: Queen-size beds can be installed here for families, or standard-size single beds for friends and family who are single. You could wish to install a wardrobe or single-door closet given the smaller bedroom size to maximize space.
Pro Tip: Most of the time, as there isn’t enough space, you can use innovative decor to put a focal point near the cabinetry or next to the side table to deflect attention from how little space there is. To dazzle and astound your guests, think about using brighter colors and reflecting wall art to give the appearance of a bigger room.
Master Bedroom Design Ideas
Consider the Bathroom
Firstly, a master bedroom usually comes with a master bathroom, or at least, a basic bathroom featuring a shower cubicle, sink, toilet, and, if space permits, a tub. The master bedroom has indeed gotten larger than the average bedroom in terms of total area. Better functionality, as well as form, are thus required for the design and décor.
Don’t Forget The Bed
In this larger room, it would be simple to set up a California king bed, possibly with a designer headboard and elegantly constructed bedside tables. For some extra flair, you can even select platform beds or beds with canopies.
What About Color?
As the average bedroom size is much bigger, you can select energizing color schemes. Red is a good option but use it carefully because it also makes people furious and aggressive. Apart from that, you can use white, brown, yellow, and orange splashes. When you first get up in the morning, these colors lift your spirits, and at the end of a long day, they help you relax.
Bonus Tips
For bonus ideas, consider the following for an average bedroom size:
1. Additional Space
Consider incorporating a chair or two, side tables, and a light. They’re useful not only for seating but also for an additional area to store things (such as coats, baggage, etc.) so that they aren’t always piled up on the bed.
2. Nightstands
Every master bedroom must have a nightstand. They ought to always be somewhat shorter and roughly the same length as your mattress.
3. Divide the Space
A sleeping area and a sitting area are usually separated into two different areas in large master bedrooms. Set up some armchairs or a small couch so that the backs are facing the bed.
Don’t Miss Out On The Space Requirements
Let’s explore the essential furniture and space considerations to keep in mind when remodeling a bedroom.
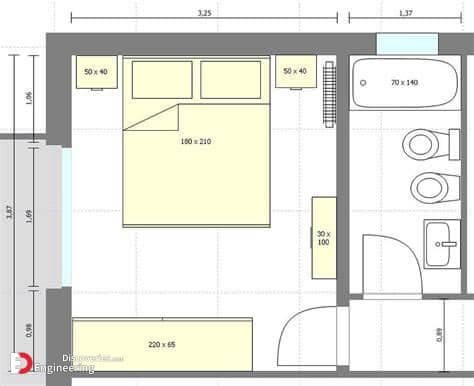
Average Bedroom Size
As per the guidelines of the International Residential Building Code, the average bedroom size must be at least 70 sq. ft. in size, with no dimension being shorter than 7 feet. It’s ideal for a room that will only have one occupant. You need to increase the minimum by 50 sq ft to create a double bedroom (a minimum of 120 sq ft overall).
Ceiling Height
The ceiling has to be no less than 7 feet tall, or at least half the average bedroom size. The minimum area requirement can therefore take into account the floorspace below dormers and sloped ceilings, but at least half of the room needs to have a full-height ceiling.
Electrical and Heating
A bedroom must have a heating system capable of keeping it at 68°F or warmer, as well as a minimum of two electrical outlets.
Window
A minimum of 8% of your floor area should be included in the window glass of your bedroom, and at least half of it should be open.
Access
The bedroom must be accessible from a public space, such as a corridor, without going through another bedroom.
Egress
You must install a window that can be used as a rescue exit if your bedroom doesn’t have an exterior door. Your egress window’s bottom must be between 24 and 44″ from the floor.
So What’s Your Average Bedroom Size?
The bedroom is the place to start and end your day. Instead of making you feel packed and pressured, it should serve as a space where you can unwind and relax.
It’s the only place in your house where you can shut the door while letting your thoughts take over. You must have gained knowledge about the average bedroom size after reading this article. We hope that you can create your ideal home by keeping average bedroom sizes in mind.
Subscribe to our page for more such informative pieces.
FAQs
1. What Is the Average Size of a Bedroom?
The average bedroom size in a house is approximately 219 sq. ft. This covers the master bedroom, whereas an average home has 3.38 bedrooms.
2. What Should Be the Average Bedroom Size in an Apartment?
The average bedroom size in an apartment is 11′ x 12′. Of course, it depends on where you are. Smaller bedrooms are available in densely populated cities like NYC, whereas larger bedrooms may be available in rural apartment complexes.
3. Is a Closet Included in an Average Bedroom Size?
Your bedroom’s overall square footage excludes your closet space. However, when determining bedroom size, closet space is not taken into account; only the total square footage of a home is.
4. What Is the Cost of Adding a Bedroom?
The size of the bedroom will determine how much it will cost to add to your home. Between $50 and $300 per sq. ft. is the price range. The final cost falls somewhere in the range of $10,000 and more.
5. How Much Should the Average Living Space Be Per Person?
It’s quite small, like 971 sq. ft. of living area per person. The increase is brought on by both expanding housing sizes and decreasing average household sizes.
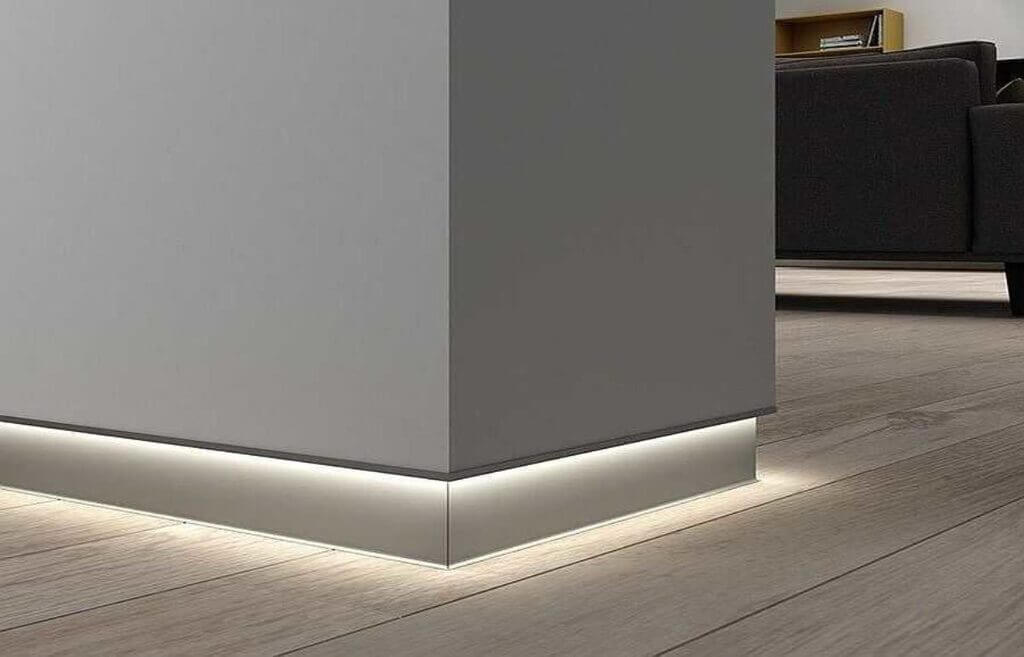
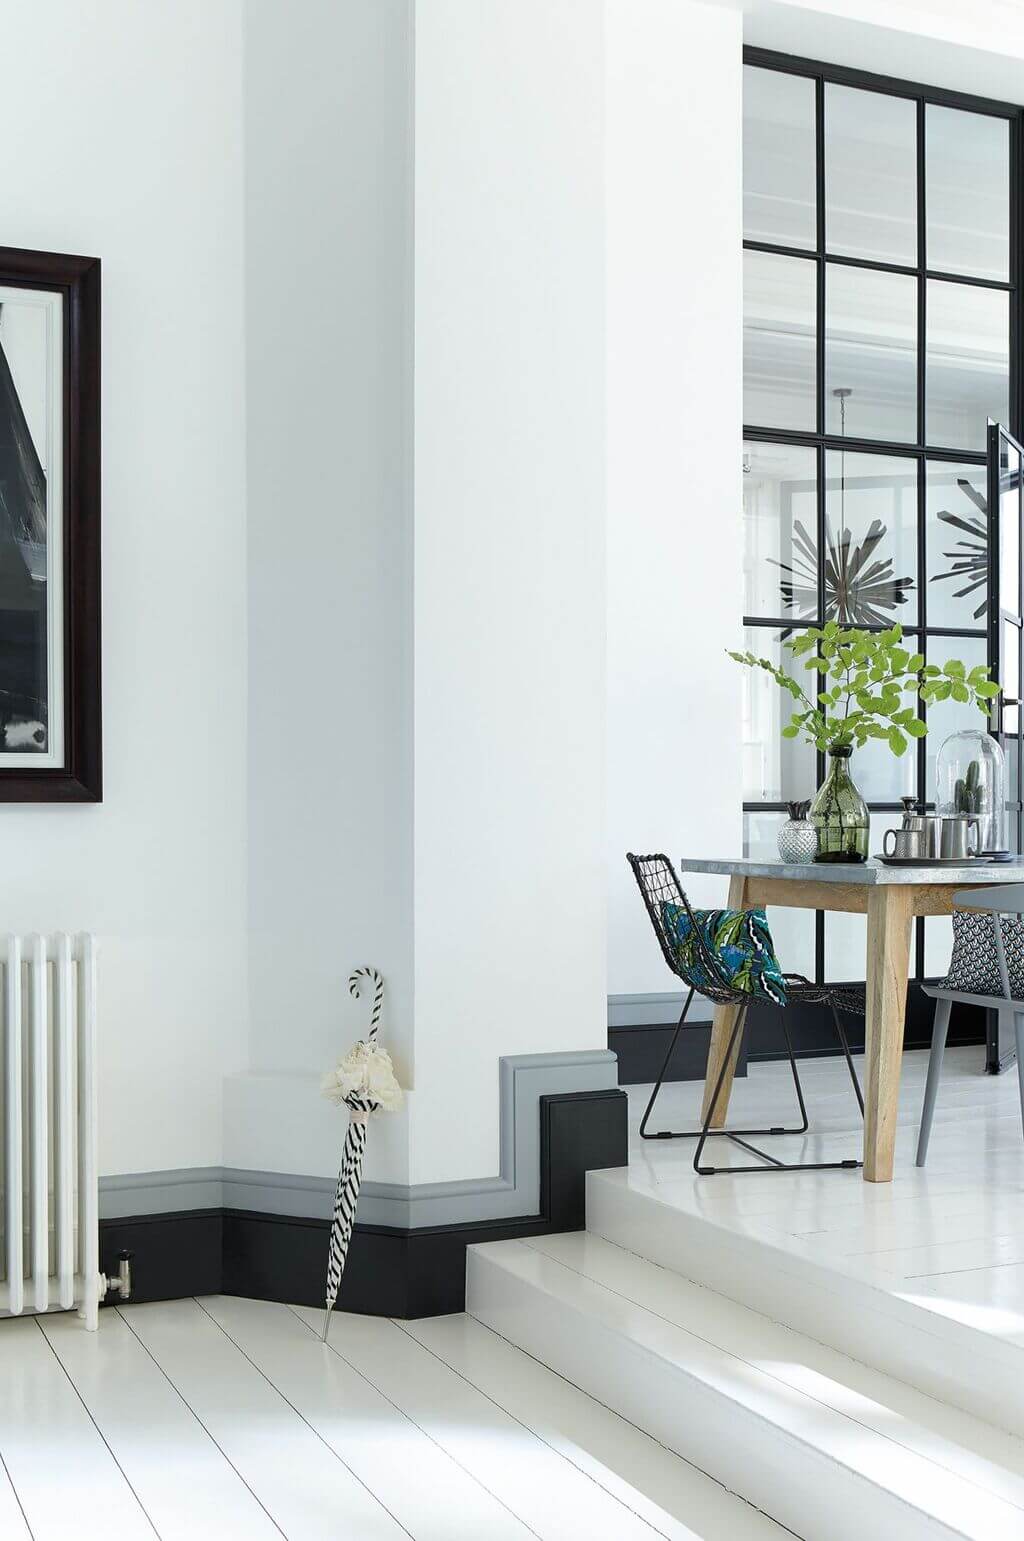
Having a beautiful home with stylish interiors is the dream of many homeowners! However, constructing a perfect house and its exteriors and interiors requires the right planning with the right materials. From coloring to layout and wall paneling, there are many things to consider before finalizing the interiors. Let’s see types of skirting.
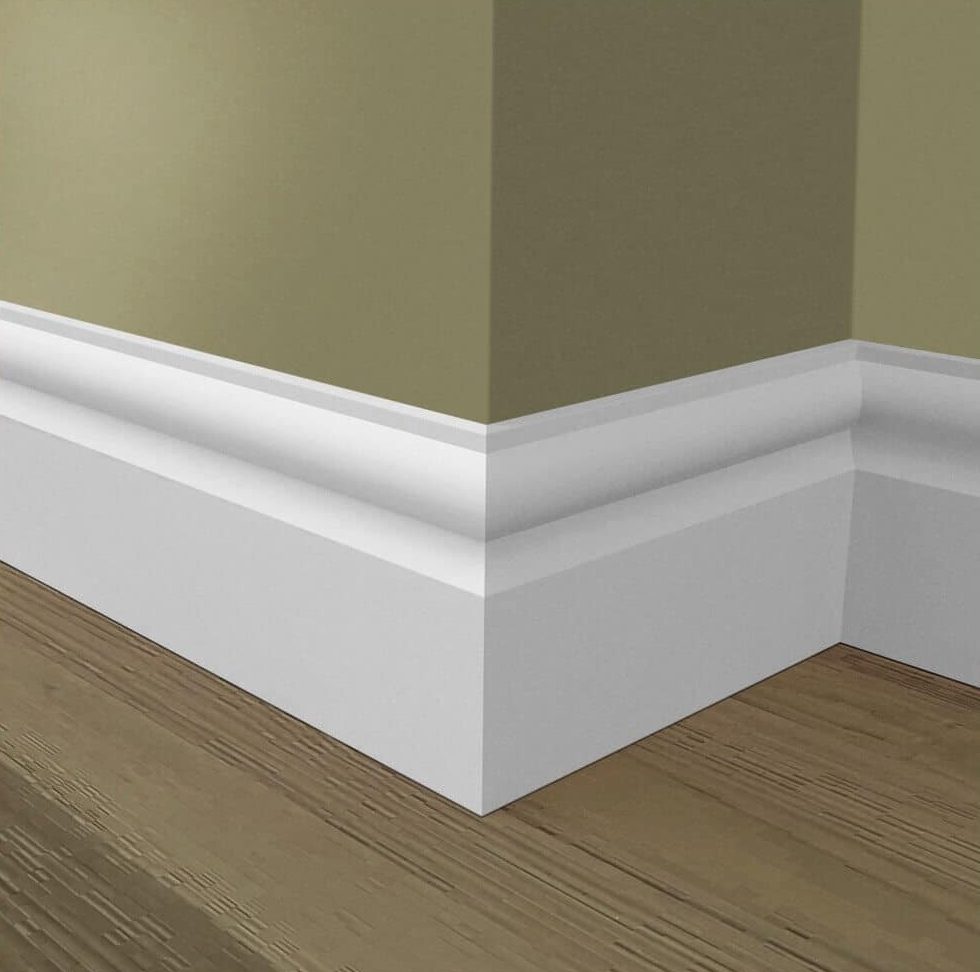
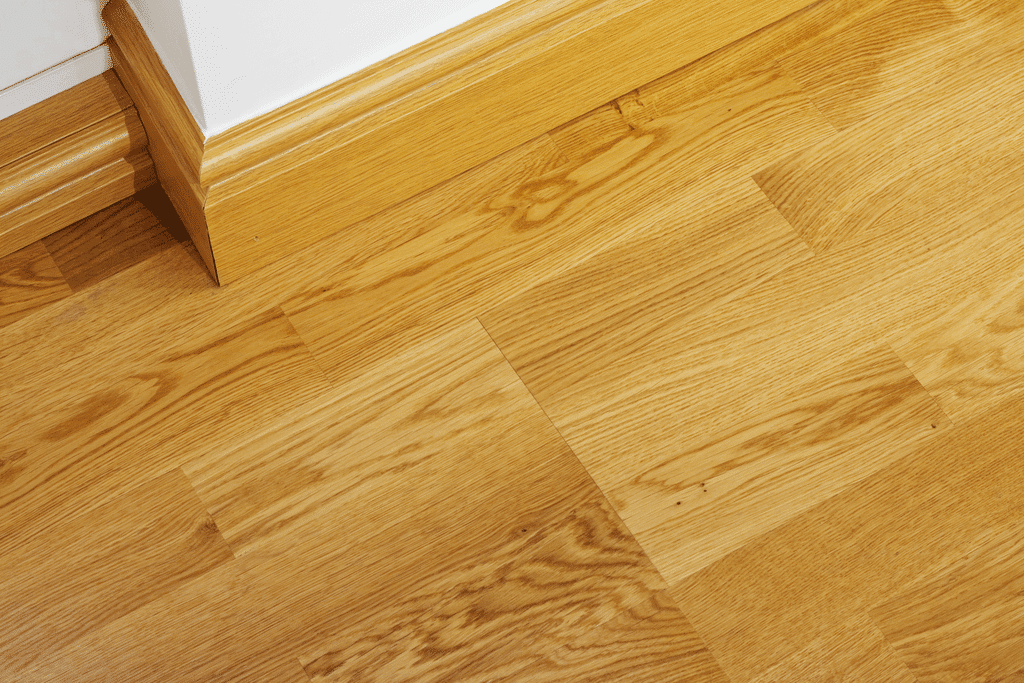
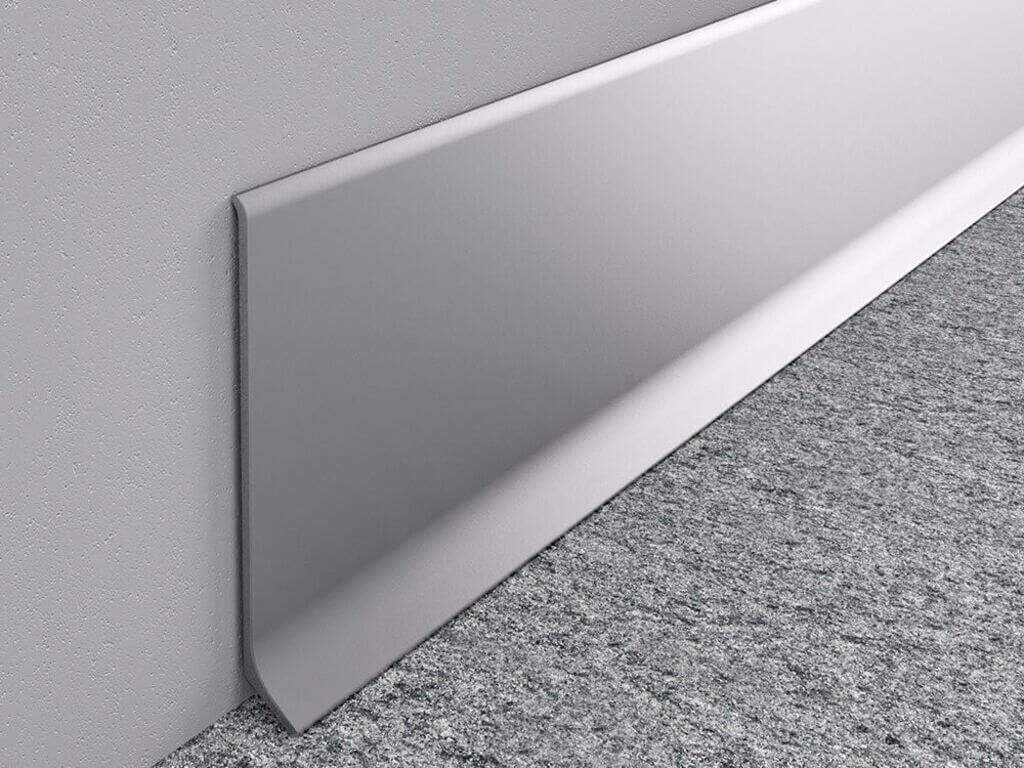
Experts always give advice to people to use only materials that are durable, practical, and aesthetically pleasing. One important thing that you don’t want to miss is the installation of the skirting boards or baseboards for your walls. There are many types of skirting boards available in the market.
If you ask any interior designer or expert, they’ll surely recommend adding skirting boards to your walls. They can easily elevate the design of any room and add a finishing aesthetic touch.
Skirting boards are usually connected to the lower part of the walls that join the wall. They are not only used to cover the imperfections but also add flair and character to your interior.
Today in this blog, we’re going to tell you everything about skirting boards. From types of skirting, styles to their purpose and benefits, we’ve covered everything. So keep on reading this post and find out the best skirting boards for your home.
What is Skirting?
Skirting is generally used to cover any cables, connections, and unwanted features in the wall interiors. They’re also used to make walls look beautiful and attractive. Skirting is permanent and can’t be removed from the walls easily.
What is a Skirting Board?
Skirting boards are also known as mop boards that are installed along the border between the interior wall and the floor. They protect the walls from water when the floor is mopped. These boards also cover improper edges, avoid scratches from furniture, and give any room a finishing touch.
These skirting boards are installed by first cutting the flooring material to a size that is typically ranging from 3 to 5 inches in height. Later they are fixed onto the wall surface along with the room’s flooring. However, these days skirting is not just about hiding the cables and connections; they’ve become an interesting design feature of a house. You can add many features such as LED lighting and designs to elevate your overall home decor.
Are you planning to renovate your house? Do you need to purchase a skirting board? If yes, you need to know the various skirting boards available in the market. Numerous options are available for residential and commercial properties, from MDF, softwood, and hardwood skirting boards. But before that, let’s know more about standard sizes and the purpose of skirting boards.
Standard Size of Skirting
The skirting boards or tiles’ standard height is usually around 120mm and 230mm, with 145mm standing out, or sometimes it also ranges between 10 to 20 cm. However, skirting boards are available in many different sizes, and you can pick skirting height anywhere between 70mm to 400mm.
Purpose of Skirting Boards
Skirting is one of the most important elements for some homes, and for some sites, it’s a way of adding a beauty factor into the space’s interiors. There are many more benefits of skirting boards apart from providing aesthetics, hiding unwanted items in the wall, or protecting the wall from water.
Here are some common purposes of skirting boards in the building:
Skirting boards avoid damage to the wall and floor junction by protecting them from water.
They can be used to hide exposed electrical wiring, cables, and connections.
These boards can be used to cover up the gap between walls and floors, which generally occurs during the construction process.
Skirting boards provide some space between the wall and furniture. This gap avoids the marks, stains, and scratches from the furniture on the wall.
They’re the economical and practical way to prevent painting surfaces from any kind of stains.
It also protects the walls from the dirt marks on the wall when you’re cleaning and mopping the house.
Colored skirting is widely used to improve the interiors and to add a finished and cleaner look.
Now let’s talk about the different types of skirting boards.
7 Types of Skirting For Homes & Offices
Skirting boards are multi-functional, and now you have known all the various purposes and benefits of skirting. These remarkable skirting boards come in various styles, so you can easily select the one for your home. Whether you’re looking for grand Victorian designs to minimalistic contemporary homes or loft apartments, you can easily find the right one for your dream home.
The skirting boards can be different based on the design and the material used. Here are seven common different types of skirting styles:
Pencil Skirting
Wooden Skirting
Metal Skirting
Continued Skirting
Flush Skirting
Geogerian skirting
Double Layered Skirting
1. Pencil Skirting
If you want a clear finished loo, go with pencil skirting boards. It is an accurate design that can easily be installed on plain or patterned walls. Whether you want to hide the expansion gap or a neatly finished surface, pencil skirting is the best option.
You can easily use this type of skirting board to hide all the unsightly wires and connections. These boards usually come with round upper edges which look modern and beautiful.
2. Wooden Skirting
Do you want to add warmth and coziness to your home? If yes, wooden skirting will be an excellent choice for you. These skirting boards impart an element of richness and a sophisticated look to any space.
Wooden skirting looks absolutely stunning, especially with marble or terrazzo floors. It goes with tiled flooring as well. You can even use this skirting on your light floors, walls, and ceilings. It will give your home a traditional aesthetic touch.
These wooden skirting boards are available in the market in various designs, finishes, and sizes. You can select the one according to your home interiors. So, install these decorative wooden skirting to add more detailed decorations to your room.
3. Metal Skirting Types
As the name suggests, the material used in metal skirting is stainless steel. Are you wondering whether it will give an industrial look or it will look good only in commercial spaces? However, that’s not completely true. Though the material is shiny, it can still be used in residential properties. It will give your home a rich and modern look.
So, if you want a modern look or add lightness to your home interiors, metal skirting will be the right choice. It will not only look aesthetically pleasing but also shields your divider from furniture scratches.
Metal skirting boards are durable and sturdy. That’s why it is a bit difficult to install and needs skilled manpower. Other benefits of it are it is flexible, useful, and exquisite. You can even customize them according to a particular room. One disadvantage of metal skirting boards is that they are prone to scratching. Other than this, these versatile boards are functional and elegant-looking.
4. Continued Skirting
Continued skirting or Kept skirting are boards that are installed continuously against walls or staircases. For reference, take a look at the above picture. You can use this type of skirting to feature any structure or element in the interior area.
These modern boards will completely change your space and elevate your house interiors elegantly. It is an innovative interior design idea that many homeowners use to make a color balance within their interior space.
You can see in the above home; here, dark brown skirting boards have been used. They are installed as a part of a similar colored staircase. This takes the interiors to a whole new level. You can also use the skirting boards in the continuous form onwards and upwards and form the stair skirting and stair risers. This will give an elegant finishing touch to the space and elevates the overall appearance.
5. Flush Skirting
Flushing skirting is a bit different from the other types of skirting. Here the skirting and the plastering are placed on the same level. In simple words, the skirting tile is fixed to the wall in such a way that the tile and plaster are flush with each other. Flush skirting provides a charming and seamless look to your interiors.
However, this type of skirting requires proper planning and designing in advance. This is because before installing the skirting, the walls need to be chipped to remove the plaster. The best thing about flush skirting is that as it is flush with the wall, it does not catch dust, especially those tiles at the outer level of the wall. As compared to others, they stay projected out of the walls.
The best part about this type of skirting is that since it is flush with the wall, it does not catch dust, unlike skirting tiles that are projected outwards from the wall. However, this can be expensive in terms of material and labor. Look how the above house has a dark-colored floor that continues further to form the flush skirting.
6. Georgian Skirting
These skirting boards ideas were popularly used in the Georgian period (1714-1830). These boards were highly inspired by the interior molding designs that were used in this period. The Georgian skirting board is uniquely cut with high-quality cutting knives and tools, which look very interesting. This also gives them a smooth, finished look.
This Georgian style of skirting is particularly well suited to a thicker material. That’s why it is advised to use 25mm thick MDF material. You can experiment with wall skirting designs and patterns to give a decent and unique look to your space.
7. Double Layered Skirting Ideas
Double layered skirting or two-toned skirting is used to add depth to a room’s appearance. So if you’re looking for skirting board ideas that can give some detailed design to your interiors, two-tone skirting is the best option to pick.
This skirting involves double skirting, which is made in two parts and joined together when installed. These two layers can be the same level or different levels that completely depends on you.
Look how the homeowners of the above residence have selected the double-layered skirting. The double layer of grey and black skirting looks contrasts with the white floor and walls. So if you also want to add a striking factor to your living room, go with two-tone skirting. However, this skirting may be expensive as it requires skilled workers to install it properly.
Types of Skirting: Which One to Select?
So which type of skirting boards did you like the most for your space? Skirting boards are functional, shield your divider from scratches and water and add an aesthetic look to your overall interiors. You can also hide any type of wiring and connections that makes your room unattractive and messy.
Skirting boards come in different types of skirting material, including UPVC, aluminum, wood, compressed wood. You can pick the skirting materials according to the specific location, interiors, and your budget.
So, this is all about types of skirting for homes. I hope this blog has helped you to upgrade your house interiors with these impressive skirting ideas. Share this blog with your family and friends and help them to create warm, cozy and welcoming house interiors.